asalvo ACTIVITY User manual

www.asalvo.com
ACTIVITY
TRONA
MANUAL DE INSTRUCCIONES
REF: 13989 -15969 - 15976

MANUAL DE INSTRUCCIONES TRONA ACTIVITY
ES
ADVERTENCIAs
CUIDADO!
ADVERTENCIAS IMPORTANTE, CONSERVAR PARA FUTURAS CONSULTAS
• Leaestasinstruccionesdetenidamenteantesdeusaresteproducto
• Serecomiendaelusodelatronaparaniñosde6mesesa3añosdeedad
(pesomáximohastalos18kg)queseancapacesdesentarseporsímismos.
Comomesaysillapuedenserusadosseparadamenteparadibujar,escribir
yjugarhastalos6años.
• ADVERTENCIA:Nodejealniñosinvigilancia.
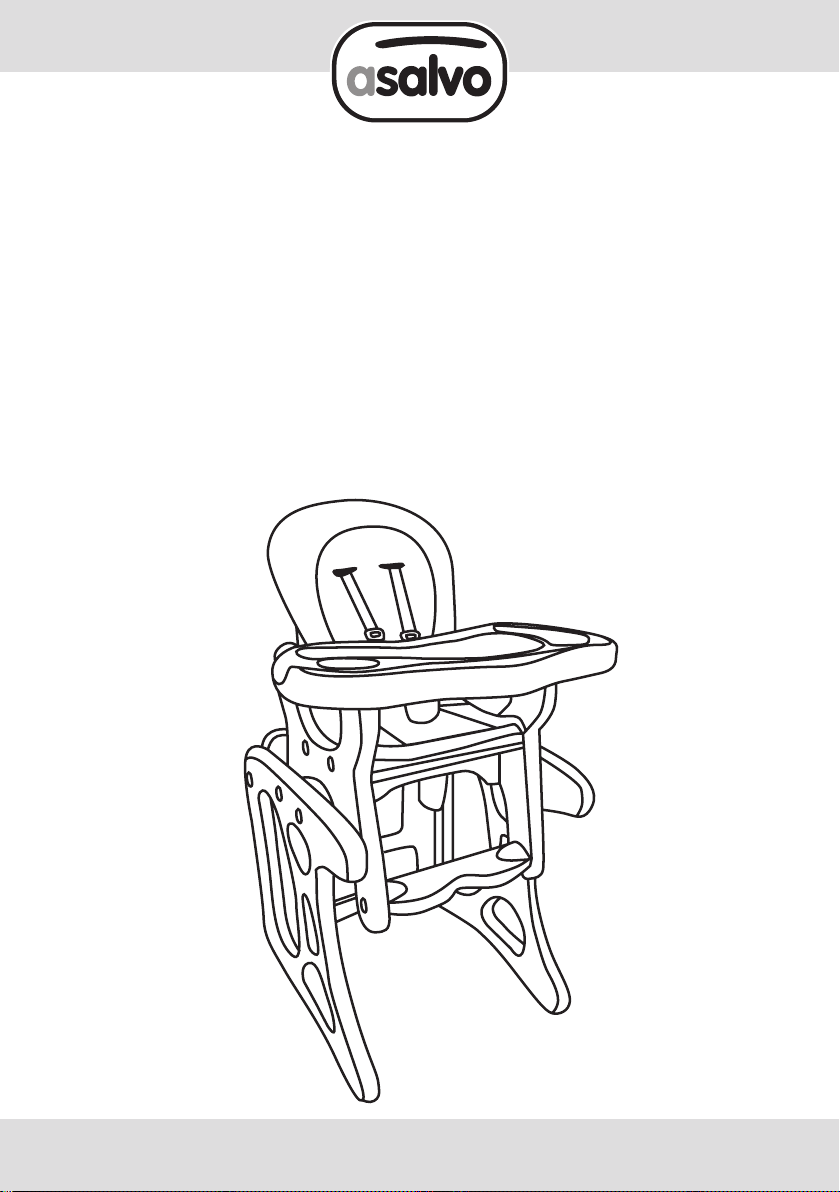
• Vericar siempre la seguridad y la estabilidad de la trona antes de la
utilización
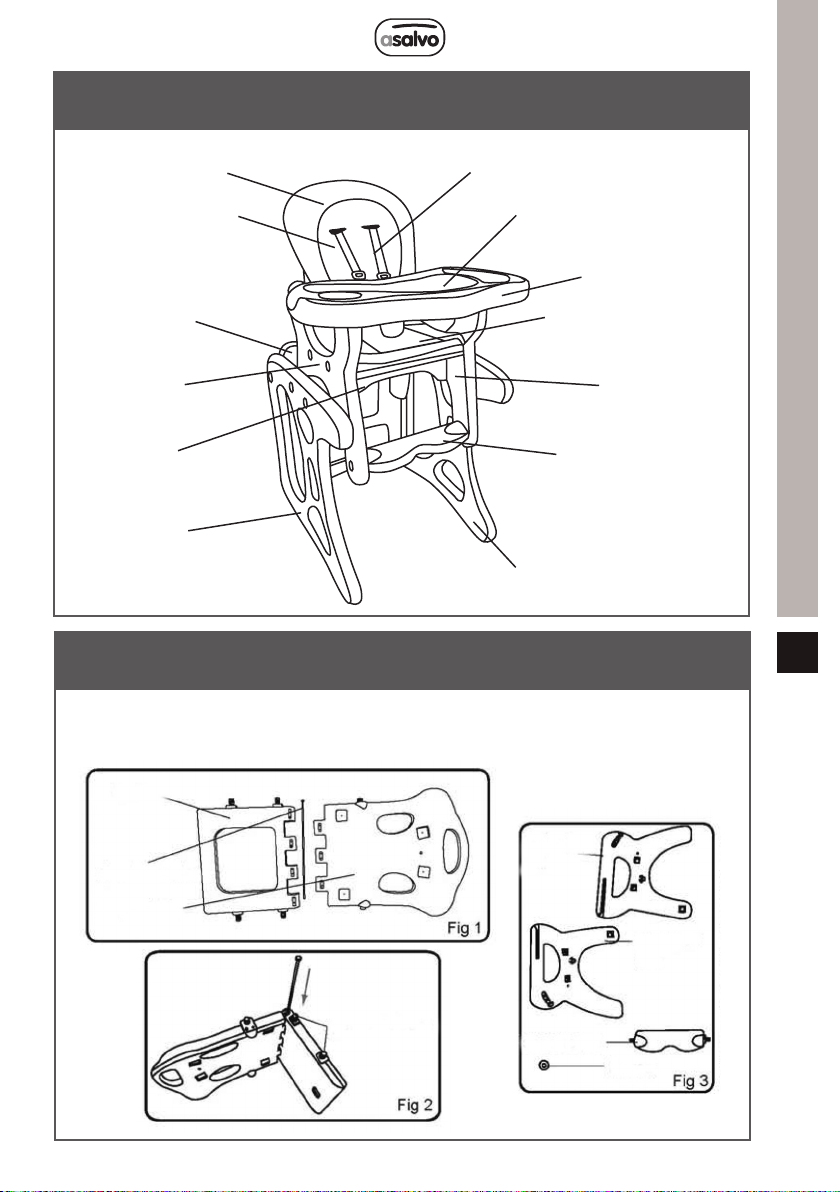
• Colocarsiemprelos5arnesesdeseguridadalniñovericandosucorrecto
anclajeenlahebillacentral.
• Comprobarqueesténcorrectamentejadosyajustadosalamedidadel
niño.
• Noutilicelatronaamenosquetodossuscomponentesesténcorrectamente
jadosyajustados.
• Manténgase alejada del fuego u otras fuentes de calor, tales como
calefactoreseléctricos,cocinas,estufasdegas,etc.
• Latronanoesapropiadaparaniñosquenopuedansentarseporsímismos.
• Noutilizarlatronasialgunadesuspiezasestárotaofalta.
INsTRUCCIONEs DE LAVADO
LIMPIEZA DE LA TRONA
Limpiarlaspartesplásticasconunpañohúmedoconaguayjabónneutro.
LIMPIEZA DEL TEXTIL
Extraereltextil,lavarloamanoydejarlosecaratemperaturaambiente.

MANUAL DE INSTRUCCIONES TRONA ACTIVITY
ESES
COMPONENTEs
MONTAJE DE LA sILLA
Textil
Respaldo
Mesa
Reposabrazos
izq.delasilla
Reposabrazos
derch.delasilla
Baseizquierda
delamesa
Travesaño
Basederecha
delamesa
Bandejaauxiliar
Bandejaajustable
Asiento
Asiento
Pernodel
asiento
Ejedeacople
Resplado
Arnésdeprotección
Reposapiés
1.Unaelrespaldoyelasiento,insertandoelejedeacopleporeloricohasta
elnal(verg.1y2)
Reposabrazos
izq.de
lasilla
Reposabrazos
derch.de
lasilla
Reposapiés
Tuerca

MANUAL DE INSTRUCCIONES TRONA ACTIVITY
ES
MONTAJE DE LA sILLA
MONTAJE DE LA MEsA
2.Inserteambospernosdelasiento
enloshuecoscorrespondientesdel
reposabrazos izquierdo de la silla
y luego del reposabrazos derecho
de la misma (ver g. 4) Ajuste el
reposabrazos de la silla con un
destornillador apretando la tuerca
de plástico, de la misma forma,
aprietelatuercadeplásticodelotro
lado(verg.5)
3. Inserte los pernos de la mesa y del travesaño en el hueco de la base
izquierdadelamesa(verg.7),yluegolabasederechadelamesa(verg.8).
Useeldestornilladorparaapretarlatuercadeplástico,hagalosmismocon
lastuercasdeplásticodelotrolado(verg.9)
Basederch.de
lamesa
Base
izq.de
lamesa
Mesa
Travesaño

MANUAL DE INSTRUCCIONES TRONA ACTIVITY
ES
INsTALACIÓN Y AJUsTE DE LAs bANDEJAs
5.Alineelabandejaauxiliarsobrelabandejaajustable(verg.12)Insertela
cajadeprotecciónenelfondodelabandejaajustableporlaranura(verg.13)
INsTALACIÓN MEsA Y sILLA
4.Alineelasillaconlaguía
ybájelasuavemente(verg.
10)hastaqueseescucheun
“click”(verg.11)
Bandeja
auxiliar
Bandeja
ajustable
Soporte
central
Manillarde
ajustedela
bandeja

MANUAL DE INSTRUCCIONES TRONA ACTIVITY
ES
Después de montar las
bandejas,presione lamanilla
deajustedebajodelamisma
con los dedos e insértelo
suavemente por las ranuras
laterales del asiento hasta
que ajuste perfectamente
(ver g. 14) La bandeja
ajustablepuedecolocarseen
3posiciones(verg.15).
El respaldo es ajustable en 3
posiciones,presionandohaciaarriba
elbotóndeajuste(verg.16)
Presioneelbotónyabraelpestillodeseguridad
(verg.17)
Presioneelbotónlateralparasacarelarnésde
seguridaddesusranuras(verg.18)
Saqueelarnésdeseguridaddelhuecodeltextil
paraextraerelmismodelasilla(verg.19)
INsTALACIÓN Y AJUsTE DE LAs bANDEJAs
AJUsTE DEL REsPALDO
DEsENfUNDADO DEL REsPALDO
Botóndeajustedelrespaldo

MANUAL DE INSTRUCCIONES TRONA ACTIVITY
ES
Para separar la silla de la
trona y convertirla en mesa y
silla independientes, presione
el botón de separación hacia
adentro. La silla podrá salir.
Gire la mesa 90 grados para
bajarla.(verg.20)
1. Coloqueal niñoen la trona cuandola
sillaylamesaesténarmadas.(verg.21)
2. Asegure al niño con el arnés de
seguridad y posteriormente cierre con la
hebilla
3. Ajusteellargodelcinturóndeseguridad
altamañodelniño
4. Instalelabandejaprincipal.
UsO COMO MEsA DE JUEgO Y DIbUJO
COLOCACIÓN DEL NIñO EN LA TRONA
Síguenos
www.asalvo.com
Gracia
POR ADQUIRIR UN
PRODUCTO ASALVO.

www.asalvo.com
Importado por: Estar Asalvo S.L.
CIF B91234286
C/1, PI Fridex · 41500
Alcalá de Guadaíra · Sevilla
Tfno. 902 360 516
Fax: 955 631 205
email: [email protected]

www.asalvo.com
ACTIVITY
HIgH CHAIR
USER GUIDE
REF: 13989 -15969 - 15976

USER GUIDE HIGH CHAIR
EN
CAUTION
CAUTION!
CAUTION IMPORTANT, KEEP FOR FUTURE REFERENCE
• Readtheinstructionscarefullybeforeusingthisproduct.
• The high chair is recommended for use with children from 6 months
to3yearsold(maximumweightupto 18kg)whoareable tositupby
themselves.Asatableandchaircanbeusedseparatelytodraw,writeand
playuntil6years.
• WARNING:Neverleaveyourchildunattended.
• Alwayscheckthesafetyandstabilityofthehighchairbeforeuse.
• Alwayspositionthe5safetyharnessesoveryourchild,checkingthatthey
arefastenedcorrectlyinthecentralclasp.
• Ensurethat theyarecorrectlyfastenedandadjustedtothesizeof your
child.
• Donotusethehighchairifanycomponentisbrokenorhasbeenlost.
• Keep away from re or other sources of heat, such as electric heaters,
stoves,gasstoves,etc.
• TheBabyhighchairisnotsuitableforchildrenthatcannotsitunaided.
• Donotusethehighchairifanyofthepartsarebrokenormissing.
MAINTAININg THE HIgHCHAIR
CLEANING THE HIGHCHAIR
Cleantheplasticpartswithadampcloth,soapandwater.
WASHINGTHECOVER
Removethecover,washitbyhandandleaveittodryatroomtemperature.
Toinstallthecoveragain,dothesameasbefore,butinreverseorder.

USER GUIDE HIGH CHAIR
ESEN
COMPONENTs
INsTALLATION Of THE CHAIR
Cover
Backrest
Table
Leftarmrestof
thechair
Armrestright
armrest
Lefttable
base
Crossbar
Righttable
stand
Auxiliarytray
Adjustabletray
Seat
Seat
Basestud
bolt
couplingshaft
Backrest
ProtectiveHarness
Footrest
1.Putthebackrestandbaseofthechairtogether,andinsertthecoupling
shaftintotheholetilltheend.(seeg.1&2)
Left
armrest
ofthe
chair
Armrest
right
armrest
Footrest
Screwdriver

USER GUIDE HIGH CHAIR
EN
INsTALLATION Of THE CHAIR
INsTALLATION Of THE TAbLE
2. Insert the two stud bolt of
the base into the hole of the
right chair feet, then insert the
studboltofthefootrestintothe
holeoftherightchairfeet(see
g.4)Bucklethechairfeet,use
the screwdriver to tighten the
plasticscrewup,usethesame
waytotightentheplasticscrew
atthereverseside(seeg.5)
3. Insert the plastic screw bar of table and crossbar into the hole of left
tablebase(seeg.7),andbuckletherighttablestand(seeg.8).Usethe
screwdriver to tighten the plastic screw bar up, and use the same way to
tightentheplasticscrewatthereverseside(seeg.9)
Righttable
stand
Lefttable
base
Table
Crossbar

USER GUIDE HIGH CHAIR
EN
INsTALLATION AND ADJUsTMENT Of TRAY
5.Put the auxiliary trayaling to the adjustable tray(see g. 12)Insertthe
protectionboxintothebottomoftheadjustabletrayalongtheslot(seeg.13)
INsTALLATION Of TAbLE AND CHAIR
4. Align the chair with the
bucklepositionandpressit
downsmoothly(seeg.10)
until you hear an instinct
click(seeg.11)
Auxiliary
tray
Adjustable
tray
Protection
box
Adjusting
handleoftray

USER GUIDE HIGH CHAIR
EN
After assemblng all the spare
parts of the adjustable tray, press
the adjusting handle under the
adjustabletraywithfingerandinsert
it smoothly till the bottom along
thesloton thesidesof the seat
untilbuckledup (seefig.14)With
3 buckle positions, the adjustable
traycanbeadjustedwith3different
positions(seefig.15).
3 positions for the backrest press
upwardtheadjustingbutton(seeg.16)
Presstheellipsebuttontoopenthebuckle(seeg.17)
Pressthesidebuttontotakethesafetybeltout
fromchips(seeg.18)
Takethesafetybeltoutfromtheholeofthecover
toremovethecoverfromthechair(seeg.19)
INsTALLATION AND ADJUsTMENT Of TRAY
ADJUsTMENT Of THE bACKREsT
DEsENfUNDADO DEL REsPALDO
Backrestadjustingbutton

USER GUIDE HIGH CHAIR
EN
Whenseparatingthehighchair
intotableandchair,pressthe
release button toward inside
directionthenthechaircanbe
takenoutandcircumrotatethe
table 90 degree to put down.
(seeg.20)
1. Put your children into the high chair
when the table and chair are assembled
together.(seeg.21)
2. Buckleyourchildrenupbyputtingboth
beltclaspstogetherandthenpushthemin
thebeltlock.
3. Adjustthe length ofthe safetybelt to
thechildren’sheight.
4. Installtheadjustabletray
UsE As TAbLE fOR PLAYINg AND WRITINg
PUT YOUR CHILD INTO THE HIgH CHAIR
Follow us
www.asalvo.com
Thak you
FOR PURCHASING
ASALVO PRODUCT.

www.asalvo.com
Imported by: Estar Asalvo S.L.
CIF B91234286
C/1, PI Fridex · 41500
Alcalá de Guadaíra · Sevilla
Tfno. 902 360 516
Fax: 955 631 205
email: [email protected]

www.asalvo.com
ACTIVITY
CADEIRA DE REFEIÇÃO
MANUAL DE INSTRUÇÕES
REF: 13989 -15969 - 15976

ADVERTêNCIAs
ATENÇÃO!
ADVERTÊNCIA IMPORTANTE, GUARDAR PARA FUTURAS CONSULTAS
• Leiaasinstruçõesatentamenteantesdeutilizaresteproducto.
• Recomenda-se a utilização da cadeira de refeição para crianças dos 6
mesesaos3anosdeidade(pesomáximoaté18kg)quesejamcapazesde
sesentarsozinhas.Comomesaecadeira,podeserutilizadaseparadamente
paradesenhar,escreverebrincaratéaos6anos.
• ATENÇÃO:Nãodeixenuncaacriançasemvigilância.
• Vericar sempre a segurança e a estabilidade da cadeira antes da sua
utilização.
• Coloque sempre os 5 arneses de seguraça na criança, vericando a
correctaxaçãoàvelacentral.Veriqueseestãocorrectamentexadose
ajustadosaotamanhodacriança.
• Nãoutilizeacadeiraaltasealgumdoscomponentesestiverdanicadoou
forextraviado.
• Deve manter-se afastada do fogo e de outras fontes de calor, como
calefatoreselétricos,fogões,aquecedoresagás,etc.
• A cadeira de xar nao é aconselhável para crianças que nao consigam
sentar-sesozinhas.
• Nãoutilizaracadeirasealgumadaspeçasestiverrotaoufaltar.
MANUTENÇÃO DA CADEIRA DE REfEIÇÃO
LIMPEZADACADEIRADEREFEIÇÃO
Limparaspartesplásticascomumpanohumedecidocomáguaesabãoneutro.
LIMPEZA DO TECIDO
Retirarotecido,lavaràmãoedeixarsecaràtemperaturaambiente.
MANUAL DE INSTRUÇÕES CADEIRA DE REFEIÇÃO ACTIVITY
PT

PT
COMPONENTEs
MONTAgEM DA CADEIRA
Tecido
Encosto
Mesa
Apoiodebraço
esquerdoda
cadeira
Apoiodebraço
direitodacadeira
Baseesquerda
damesa
Travessão
Basedireita
damesa
Bandejaauxiliar
Bandejaajustável
Assento
Assento
Pernodo
assento
Eixodejunta
Encosto
Arnêsdeproteção
Apoiodepés
1.Unaoencostoeoassento,introduzindooeixodajuntapeloorifícioatéao
m(verg.1e2)
Apoio
debraço
esquerdo
dacadeira
Apoiode
braçodireito
dacadeira
Apoiodepés
Porcas
MANUAL DE INSTRUÇÕES CADEIRA DE REFEIÇÃO ACTIVITY

MONTAgEM DA CADEIRA
MONTAgEM DA MEsA
2. Introduza ambos os pernos
do assento nos buracos
correspondentes do apoio de
braço esquerdo da cadeira
e, depois, do apoio de braço
direito.(verg.4)Ajusteoapoio
debraçosdacadeiracomuma
chavedeparafusos, apertando
a porca de plástico. Repita
o processo com a porca de
plásticodooutrolado.(verg.5)
3.Introduzaospernosdamesaedotravessãonoburacodabaseesquerda
damesa(verg.7)e,depois,dabasedireitadamesa(verg.8).Utilizea
chavedeparafusosparaapertaraporcadeplásticoerepitaoprocessocom
asporcasdeplásticodooutrolado(verg.9)
Basedireita
damesa
Baseesquerda
damesa
Mesa
Travessão
MANUAL DE INSTRUÇÕES CADEIRA DE REFEIÇÃO ACTIVITY
PT
This manual suits for next models
3
Table of contents
Languages:
Other asalvo High Chair manuals
Popular High Chair manuals by other brands

KIKKA BOO
KIKKA BOO SKY HIGH Instructions for use

Baby Trend
Baby Trend HC81618 instruction manual

Foppapedretti
Foppapedretti MEETING instruction manual

Phil & Teds
Phil & Teds lobster manual

Foppapedretti
Foppapedretti LU-LU Instructions for assembly and use

Mothers choice
Mothers choice Happy pears instruction manual