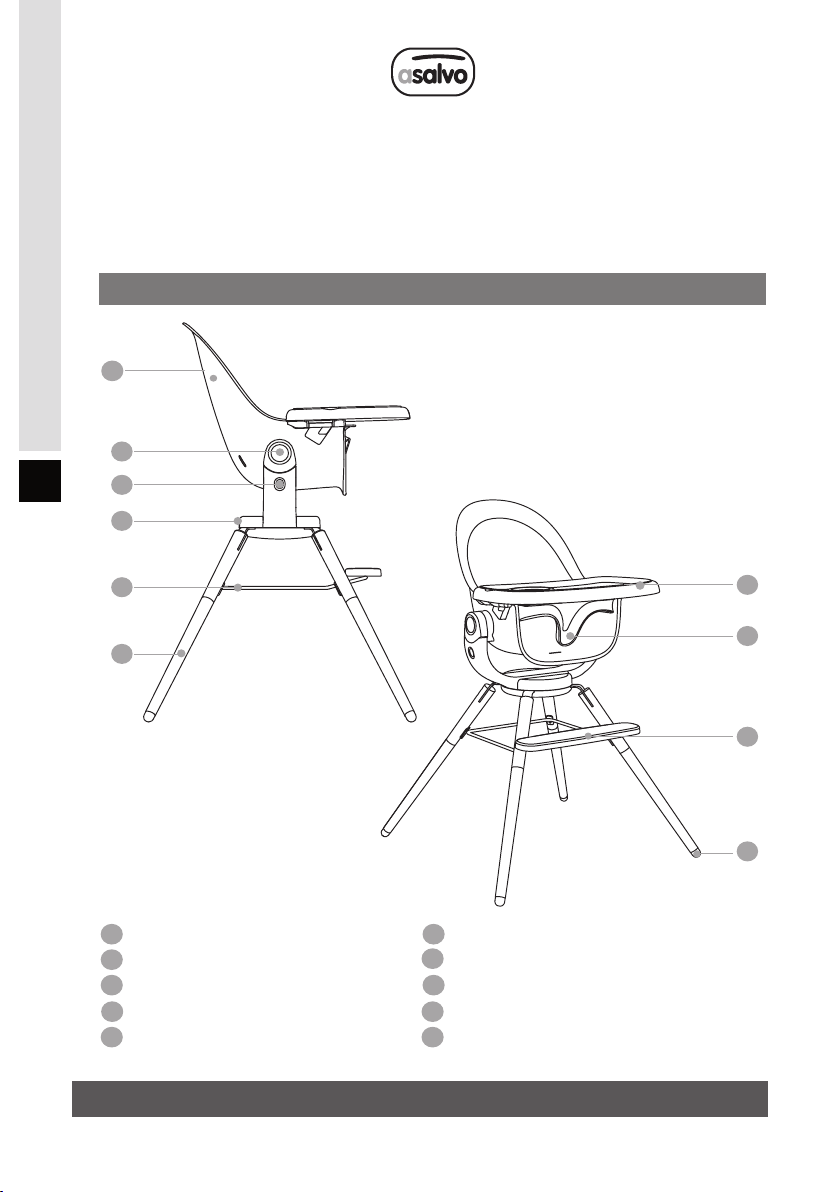
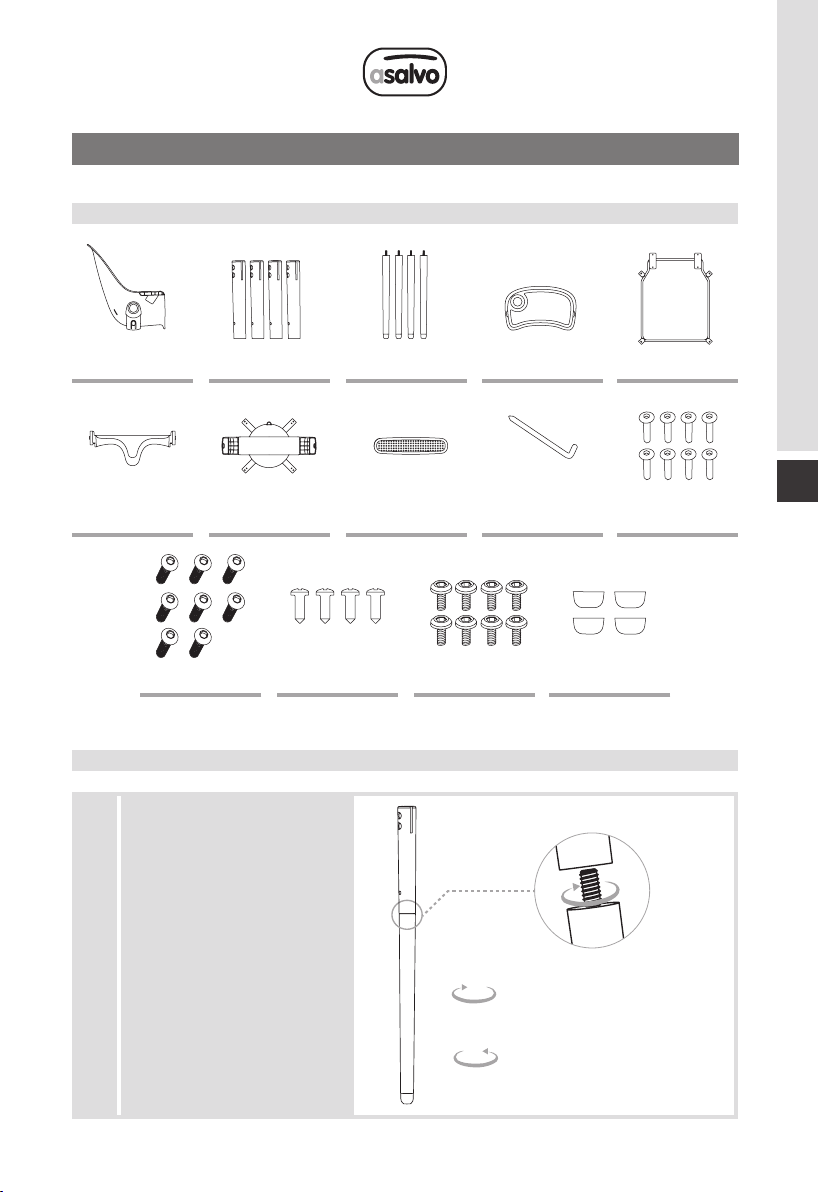
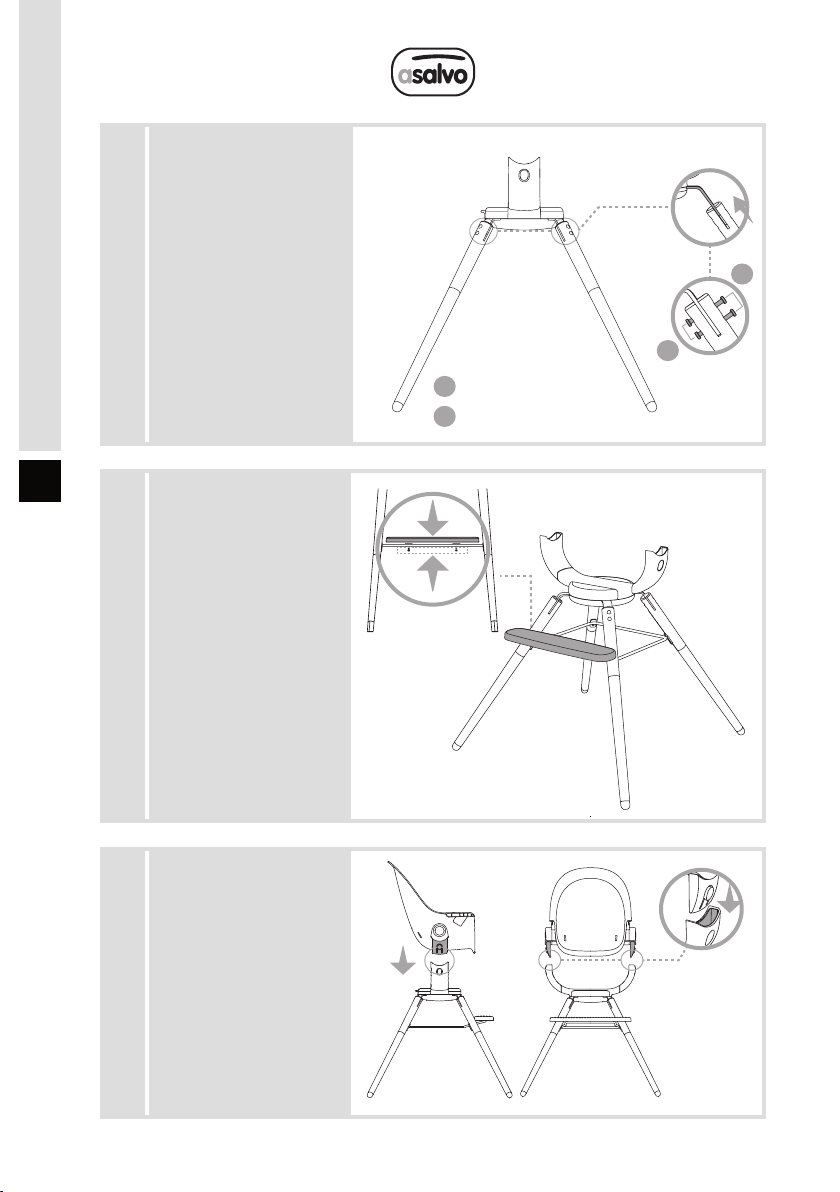
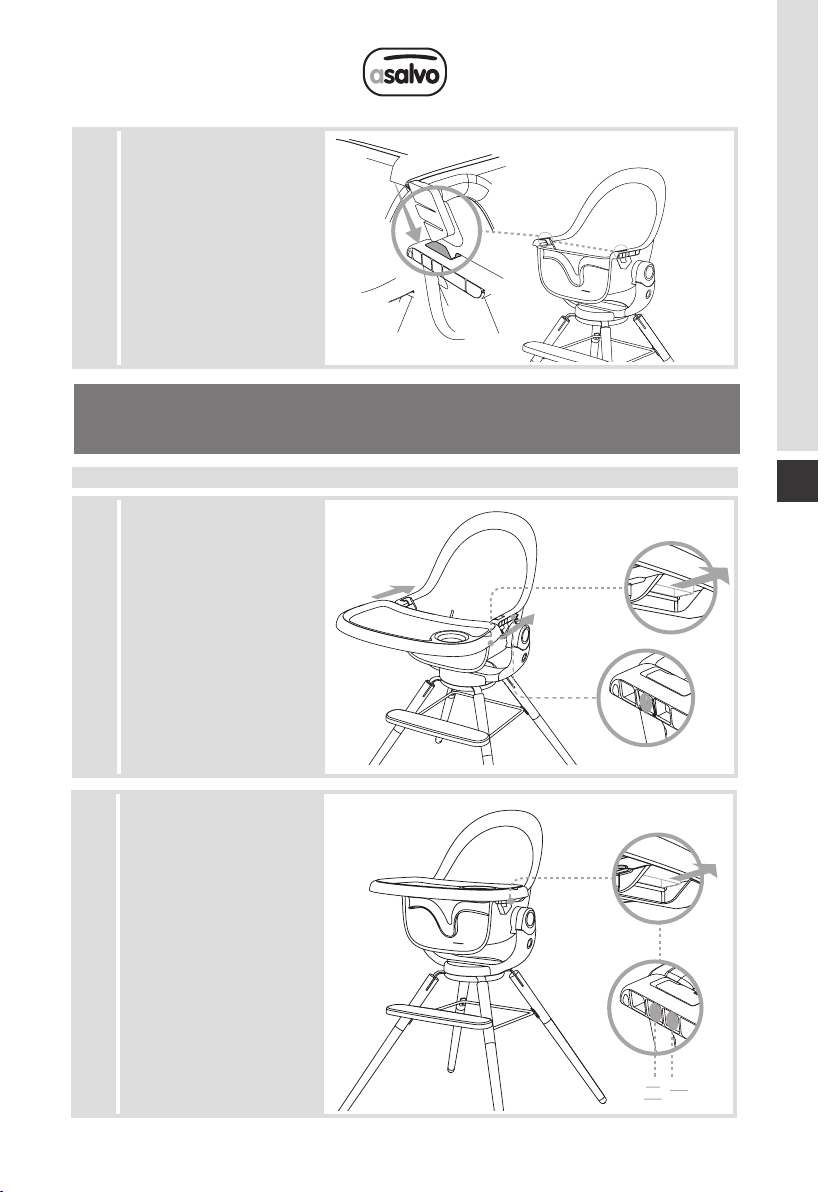
asalvo ADRIA User manual

TRONA ADRIÁ
ADRIÁ HIGHCHAIR - CADEIRA MESA ADRIÁ - CHAISE HAUTE ADRIÁ
SEDIA ADRIÁ - ADRIÁ-SESSEL
MANUAL DE INSTRUCCIONES - INSTRUCTION MANUAL - MANUAL DE INSTRUÇÕES
GUIDE D’USAGE - MANUALE D’ISTRUZIONI - GEBRAUCHSANWEISUNG
REF: 20451
www.asalvo.com
Conforme a la normativa - Under the standard - De acordo com a norma
En conformité avec la norme - Sotto lo standard - Unter dem Standard:
EN 14988:2017+A1:2020

INSTRUCCIONES
ES
ASIENTO
AJUSTE DE RECLINACIÓN
BOTÓN DESMONTAJE DEL ASIENTO
BOTÓN GIRATORIO
ESTRUCTURA DE APOYO
PIE DE MADERA
BANDEJA
T-BAR
REPOSAPIES
ALMOHADILLA PARA LOS PIES DE MADERA
1
4
7
2
5
83
6
9
10
7
8
9
10
1
2
3
4
5
6
Gracias por elegir nuestro producto.
Es importante conservar estas instrucciones para futuras consultas, leer
cuidadosamente. Adecuado a partir de 6 meses hasta 36, y para un peso
menor de 15 kgs cuando el niño pueda sentarse por sí mismo.
Podría ser utilizado como silla después de 3 años de edad y hasta los 6 años.
PARTES PRINCIPALES
¡IMPORTANTE! LEER DETENIDAMENTE Y MANTENERLAS PARA FUTURAS CONSULTAS

INSTRUCCIONES
ES
Insertar las patas superiores
(marcadas A/B/C/D) en las
patas inferiores (marcadas
A/B/C/D).
Atención: las patas superiores
y las inferiores deben coincidir.
Girar en el sentido de las
agujas del reloj
Giro de antibloqueo para soltar
CONTENIDO DE LA CAJA PARA EL MONTAJE
MONTAJE
INSTALACIÓN
ASIENTO
TORNILLOS M6 x
20 (x8)
T-BAR
PIES SUPERIORES x4
TORNILLOS ST4 x
16 (x4) ALMOHADILLAS* 4
PARTE GIRATORIA
PIES INFERIORES x4
TORNILLOS NUT M4*
x16 (x4)
REPOSAPIÉS
BANDEJA
LLAVE TORNILLOS x2
ESTRUCTURA DE APOYO
TORNILLOS
M6 x 30 (x8)
1

INSTRUCCIONES
ES
Insertar los pies de
madera en la parte
giratoria y apretar con la
tuerca y el tornillo M6*30.
(Nota: La tuerca está
dentro, el tornillo está
fuera)
Montar el reposapiés
en la parte delantera del
soporte y apretar con el
tornillo ST4*16
Inserte el asiento en
ambos lados de la
parte giratoria hasta
que escuche un clic.
Insertar eslabón giratorio
tornillo M6 x 30
Lateral Frontal
tornillo NUT M4*10 x (8)
2
3
4
1
1
2
2

INSTRUCCIONES
ES
Insertar el T-BAR en el
mango del asiento hasta
que escuche un clic
Sujetar los botones
de ambos lados de la
bandeja y tire hacia
afuera al mismo tiempo.
Introduzca la bandeja por
el asa del asiento hasta
que oiga un clic.
La bandeja tiene 2
posiciones.
5
1
AJUSTE DE LA BANDEJA
Para ajustar las 2
posiciones de la bandeja,
tire delbotón hacia afuera
hasta que escuche un
clic que asegura que
las posiciones son las
deseadas.
2
ADVERTENCIA:
Siempre asegúrese de que la bandeja está ajustada correctamente a los apoyabrazos
antes de su uso.

INSTRUCCIONES
ES
Sólo hay una posición de
reclinación
Tirar del botón de giro
hacia arriba para ajustar
una posición diferente.
En total, hay 4 posiciones,
90 grados/posición.
aCuando abroche el
arnés de seguridad
debe introducir las 2
hebillas de cierre en
la hebilla central hasta
oír un clic así sabrá
que esta bien atado,
g.1.
bPara desabrochar el
cinturón de seguridad,
pulsar el botón de la
hebilla central. Siga la
g. 2.
1
1
1
AJUSTE DE LA INCLINACIÓN
AJUSTE DEL ASIENTO GIRATORIO
AJUSTE DEL ARNÉS DE SEGURIDAD
Botón
Fig.1
Fig.2

INSTRUCCIONES
ES
Desmonte las pies de
madera inferiores e
inserte los tornillos M6*
20 en las almohadillas,
luego colocar en los pies
superiores y asegurar
que encajen bien.
1
CAMBIO DE TRONA A TABURETE
Almohadilla
Tornillo M6*20
ADVERTENCIA: IMPORTANTE PARA LA SEGURIDAD DE SU HIJO
Siempre ajuste la correa rígida de la entrepierna a la bandeja antes de colocar la bandeja
de la trona. Una vez que la correa de la entrepierna ha sido cerrada sobre el pequeño,
nunca debe ser quitada.
ADVERTENCIA:
Siempre coloque la silla sobre una supercie horizontal y estable.
Nunca coloque la silla cerca de escaleras o escalones.
MANTENIMIENTO
1. Lubricar sólo cuando sea necesario el uso de lubricante basado en silicona.
2. Limpie todas las piezas de plástico periódicamente con un paño suave y húmedo y un
detergente suave. No utilizar lejía.
3. La bandeja de servir se puede lavar en el lavavajillas. La bandeja principal se puede
limpiar con un paño húmedo y detergente suave.
4. No utilizar lejía.
5. Es importante para la seguridad de su hijo que no quite la barra de la entrepierna de la
bandeja.
6. IMPORTANTE! MANTENGA ESTAS INSTRUCCIONES COMO FUTURA REFERENCIA

INSTRUCCIONES
ES ¡ADVERTENCIAS!
• Mantener el niño alejado cuando se pliega y despliega el producto para evitar lesiones.
• Este producto está destinado a niños que puedan sentarse sin ayuda y hasta 3 años o un peso
máximo de 15 kg.
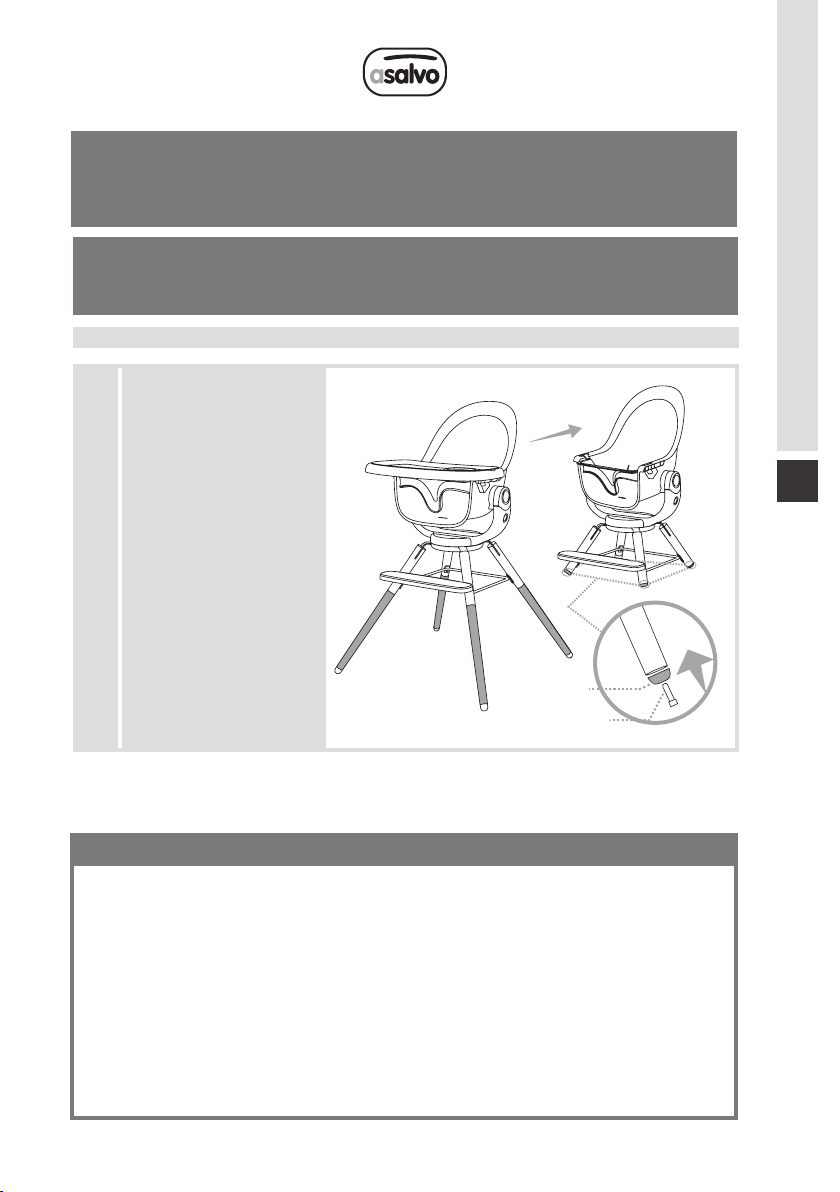
El asiento es una característica de seguridad. No utilice nunca la trona sin el, no ponga la seguridad
del niño en situación de riesgo mediante el uso de otro que no sea original. Es lavable a 30 Cº. Sólo
limpieza en seco. Los cinturones de seguridad de base y componentes de plástico se pueden limpiar
con un estropajo suave y agua tíbia.
• No utilice blanqueadores químicos y corrosivos
• Lavar en frío (30º)
• Lavado en seco, con cualquier solvente excepto el tricloroetileno
• No utilizar lejía
• No usar la secadora
• No planchar
IMPORTANTE
ACERCA DE LA LIMPIEZA Y MANTENIMIENTO DEL ASIENTO
Síguenos
www.asalvo.com
POR ADQUIRIR UN
PRODUCTO ASALVO.
• No deje al niño sin vigilancia.
• Asegúrese que el arnés se ja correctamente.
• No utilice la trona a menos que todos sus componentes estén correctamente jados y
ajustados.
• No coloque la trona cerca del fuego u otras fuentes de calor como calefactores eléctricos
o estufas de gas.
• Lea detenidamente este manual de instrucciones. No hacerlo pondrá en peligro la
seguridad del bebé.
• No use la trona hasta que el niño pueda mantenerse sentado sin ayuda.
• La edad tope de uso es 15 kg y 36 meses.
• No use la trona si alguna de sus piezas falta o está rota.
• Lave el producto con agua y jabón.

INSTRUCTION MANUAL
EN
SEAT
RECLINE ADJUSTMENT
SEAT REMOVAL BUTTON
ROTARY KNOB
SUPPORT STRUCTURE
WOODEN FOOT
TRAY
T-BAR
FOOTREST
PAD FOR WOODEN FEET
7
8
9
10
1
2
3
4
5
6
MAIN PARTS
Thank you for choosing our product.
It is important to keep these instructions for future reference, please read
carefully. Suitable from 6 months to 36 months, and for a weight of less than
15 kgs when the child can sit up on its own.
Could be used as a chair after 3 years of age and up to 6 years.
IMPORTANT! READ CAREFULLY AND KEEP FOR FUTURE REFERENCE
1
4
7
2
5
83
6
9
10

INSTRUCTION MANUAL
EN
Insert the upper legs (marked
A/B/C/D) into the lower legs
(marked A/B/C/D).
Caution: the upper and lower
feet must match.
Rotate clockwise
Anti-lock release twist
CONTENIDO DE LA CAJA PARA EL MONTAJE
ASSEMBLY
INSTALLATION
SEAT
SCREWS M6 x 20 (x8)
T-BAR
UPPER FEET x4
SCREWS ST4 x 16 (x4)
PILLOWS* 4
ROTATING PART
BOTTOM FEET x4
SCREWS NUT M4*
x16 (x4)
FOOTREST
TRAY
SPANNER SCREWS x2
SUPPORT STRUCTURE
TORNILLOS
M6 x 30 (x8)
1

INSTRUCTION MANUAL
EN
Insert the wooden feet
into the rotating part and
tighten with the nut and
the M6*30 bolt.
(Note: Nut is inside,
screw is outside).
Mount the footrest on the
front of the bracket and
tighten with the ST4*16
screw.
Insert the seat into
both sides of the
rotating part until you
hear a click.
Insert swivel
screw M6 x 30
Lateral Front
screw NUT M4*10 x (8)
2
3
4
1
1
2
2

INSTRUCTION MANUAL
EN
Insert the T-BAR into
the seat handle until you
hear a click.
Hold the buttons on both
sides of the tray and pull
it out at the same time.
Insert the tray by the seat
handle until you hear a
click.
The tray has 2 positions.
5
1
TRAY ADJUSTMENT
To adjust the 2 tray
positions, pull the knob
outwards until you hear
a click to ensure that the
positions are as desired.
2
WARNING:
Always ensure that the tray is correctly tted to the armrests before use.

INSTRUCTION MANUAL
EN
There is only one recli-
ning position
Pull the turn knob
upwards to adjust to a
different position.
In total, there are 4
positions, 90 degrees/
position.
aWhen fastening the
safety harness, push
the 2 locking buckles
into the centre buckle
until you hear a click
so that you know that
it is securely fastened,
g.1.
bTo unbuckle the seat
belt, press the button
on the centre buckle.
Follow g. 2.
1
1
1
TILT ADJUSTMENT
SWIVEL SEAT ADJUSTMENT
ADJUSTMENT OF THE SAFETY HARNESS
Bottóm
Fig.1
Fig.2

INSTRUCTION MANUAL
EN
Remove the lower
wooden feet and insert
the M6* 20 screws into
the pads, then fit them
into the upper feet
and make sure they fit
tightly.
1
CHANGE FROM HIGHCHAIR TO STOOL
Pillow
Screw M6*20
WARNING: IMPORTANT FOR YOUR CHILD’S SAFETY
Always fasten the rigid crotch strap to the tray before attaching the highchair tray. Once
the crotch strap has been closed over the child, it should never be removed.
WARNING:
Always place the chair on a horizontal and stable surface.
Never place the chair near stairs or steps.
MAINTENANCE
1. Lubricate only when the use of silicone based lubricant is necessary.
2. Clean all plastic parts periodically with a soft, damp cloth and mild detergent. Do not use
bleach.
3. The serving tray is dishwasher safe. The main tray can be cleaned with a damp cloth and
mild detergent.
4. Do not use bleach.
5. It is important for your child’s safety that you do not remove the crotch bar from the tray.
6. IMPORTANT! KEEP THESE INSTRUCTIONS FOR FUTURE REFERENCE

INSTRUCTION MANUAL
EN
• Keep the child away when folding and unfolding the product to avoid injury.
• This product is intended for children who can sit unaided and up to 3 years of age or a maximum
weight of 15 kg.
The seat is a safety feature. Never use the highchair without it, do not put your child’s safety at risk
by using anything other than the original one. It is washable at 30°C. Dry clean only. The base safety
belts and plastic components can be cleaned with a soft scouring pad and warm water.
• Do not use chemical and corrosive bleaches.
• Cold wash (30°)
• Dry clean with any solvent except trichloroethylene.
• Do not bleach
• Do not tumble dry
• Do not iron
IMPORTANT
ABOUT CLEANING AND MAINTENANCE OF THE SEAT
WARNING!
• Do not leave the child unattended.
• Ensure that the harness is correctly secured.
• Do not use the highchair unless all components are properly attached and adjusted.
• Do not place the highchair near re or other heat sources such as electric heaters or gas cookers.
• Read this instruction manual carefully. Failure to do so will endanger the safety of the baby.
• Do not use the highchair until the child is able to sit up unaided.
• The maximum age for use is 15 kg and 36 months.
• Do not use the highchair if any parts are missing or broken.
• Wash the product with soap and water.
Follow us
www.asalvo.com
Thak you
FOR PURCHASING
ASALVO PRODUCT.

INSTRUCTION MANUAL
PT
SEDE
AJUSTE RECLINÁVEL
BOTÃO DE REMOÇÃO DO ASSENTO
KNOB ROTÁRIO
ESTRUTURA DE APOIO
PÉ DE MADEIRA
CAMINHO
T-BAR
BASE
ALMOFADA PARA PÉS DE MADEIRA
7
8
9
10
1
2
3
4
5
6
Obrigado por ter escolhido o nosso produto.
É importante manter estas instruções para referência futura, por favor leia
atentamente. Adequado de 6 meses a 36 meses, e para um peso inferior a 15
kgs quando a criança é capaz de se sentar sozinha.
Pode ser usada como cadeira depois dos 3 anos de idade e até aos 6 anos
de idade.
PRINCIPAIS PARTES
1
4
7
2
5
83
6
9
10
IMPORTANTE! LER ATENTAMENTE E GUARDAR PARA REFERÊNCIA FUTURA

INSTRUCTION MANUAL
PT
Inserir as pernas superiores
(marcadas A/B/C/D) nas
pernas inferiores (marcadas
A/B/C/D).
Cuidado: os pés superiores e
inferiores devem corresponder.
Rodar no sentido dos ponteiros
do relógio para corresponder.
Rotação anti-bloqueio para
libertar
CONTEÚDO DA CAIXA PARA MONTAGEM
MONTAJE
INSTALAÇÃO
SEDE
PARAFUSO M6 x
20 (x8)
T-BAR
PÉ-DE-CONTROLO x4
PARAFUSO ST4 x
16 (x4) ALMOFADA * 4
PARTE ROTATIVA
PÉU BAIXO x4
PARAFUSO NUT M4*
x16 (x4)
BASE
BANDEJA
TELA DE PASSAGEIROS x2
ESTRUTURA DE APOIO
PARAFUSO
M6 x 30 (x8)
1

INSTRUCTION MANUAL
PT
Inserir os pés de madeira
na parte rotativa e
apertar com a porca e o
parafuso M6*30.
(Nota: A porca está
dentro, o parafuso está
fora).
Montar o apoio para os
pés na parte frontal do
suporte e apertar com o
parafuso ST4*16.
Inserir o assento em
ambos os lados da
parte rotativa até ouvir
um clique.
Inserir giratório
parafuso M6 x 30
Lateral Frente
parafuso NUT M4*10 x (8)
2
3
4
1
1
2
2

INSTRUCTION MANUAL
PT
Inserir o T-BAR na pega
do assento até ouvir um
clique.
Segurar os botões de
ambos os lados do
tabuleiro e puxá-lo para
fora ao mesmo tempo.
Insira a bandeja pela
pega do assento até
ouvir um clique.
O tabuleiro tem 2
posições.
5
1
AJUSTE DA BANDEJA
Para ajustar as 2
posições da bandeja,
puxar o botão para fora
até ouvir um clique para
garantir que as posições
são as desejadas.
2
ADVERTÊNCIA:
Assegurar-se sempre de que o tabuleiro está correctamente montado nos apoios de
braços antes da sua utilização.

INSTRUCTION MANUAL
PT
Existe apenas uma
posição reclinada
Puxar o botão de
rotação para cima para
ajustar a uma posição
diferente.
No total, existem 4
posições, 90 graus/
posição.
aAo apertar o arnês de
segurança, empurre
as 2 velas de fecho
para a vela central
até ouvir um clique
para que saiba que
está bem apertado,
g.1.
b Para desapertar o
cinto de segurança,
premir o botão na
vela central. Siga a
g. 2.
1
1
1
AJUSTE DA INCLINAÇÃO
AJUSTE DE ASSENTO GIRATÓRIO
AJUSTE DO ARNÊS DE SEGURANÇA
Botão
Fig.1
Fig.2
This manual suits for next models
1
Table of contents
Languages:
Other asalvo High Chair manuals