Asko CBB761SC User manual

INSTRUCTIONS FOR USE
Cooker hood
EN
CBB761SC
CBB861SC

3Pictograms used ........................................
4Safety ..........................................................
4.....................................................................
7Your cooker hood ......................................
7Dear customer! ............................................
8Description hood .........................................
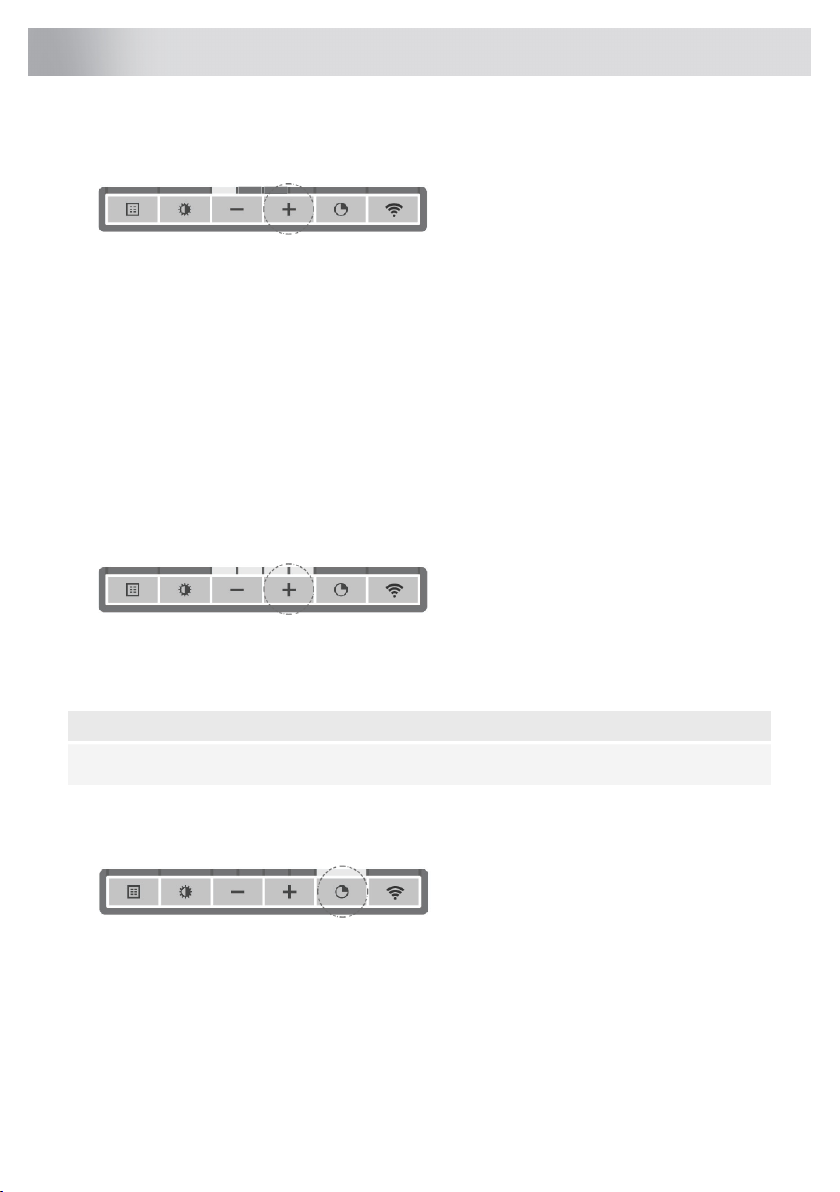
8Description button control ...........................
9Operation ....................................................
9Switching extraction on and off ...................
9Switch on the boost setting ..........................
9Switching on the timer .................................
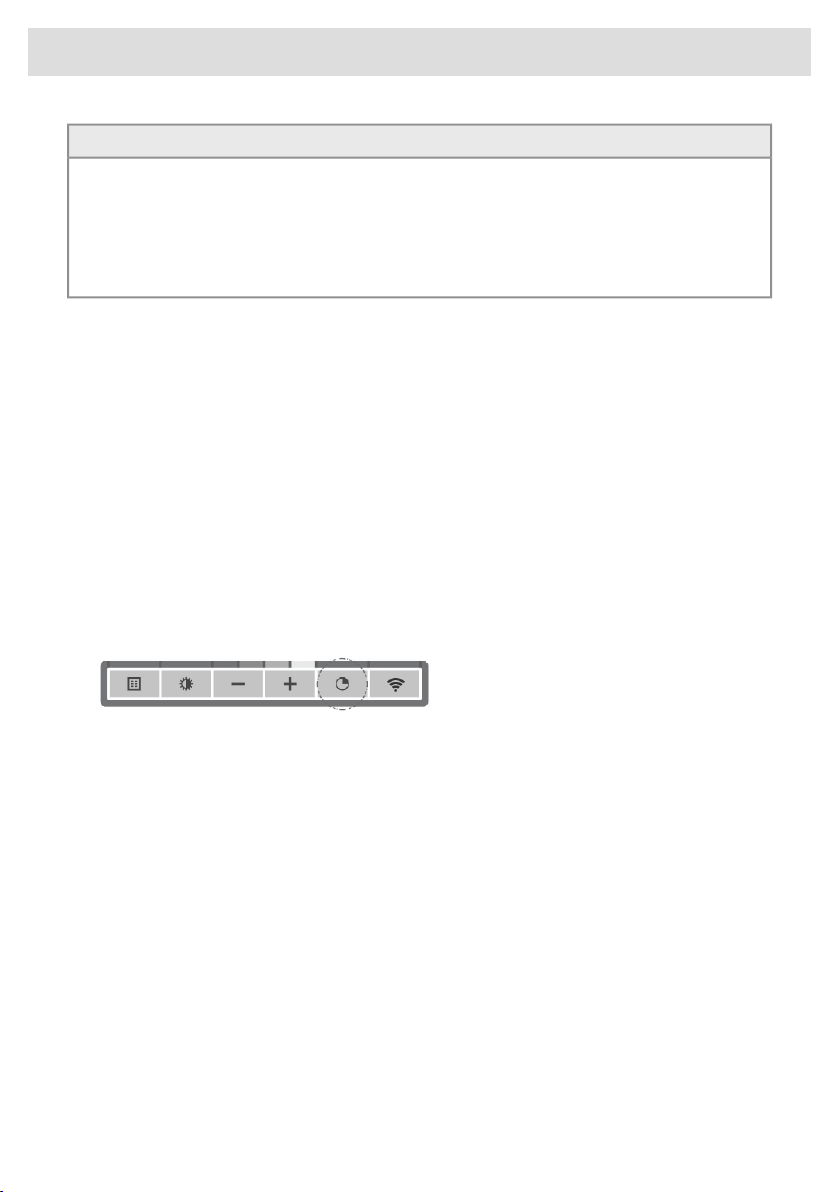
10Switching on recirculation mode .................
10Switching off recirculation mode .................
10Clean Air function ........................................
11Switching the light on and off ......................
11Changing the colour temperature ................
11
Making the connection between cooker hood
and hob ........................................................
12Remote control ...........................................
12Description remote control ..........................
12Pairing the remote ........................................
13Switching extraction on and off ...................
13Switch on the boost setting ..........................
13Switching on the timer .................................
14Switching on recirculation mode .................
14Switching off recirculation mode .................
14Clean Air function ........................................
15Switching the light on and off ......................
15Changing the colour lighting temperature ....
16Wi-Fi connectivity ......................................
16Wi-Fi/ConnectLife-app .................................
21Maintenance ...............................................
21Cleaning .......................................................
23Filter indication .............................................
23Lighting ........................................................
24Battery of the remote ...................................
25Technical data ............................................
25EU Product Sheet ........................................
26EU Product Fiche .........................................
26Compliance information ...............................
27Installation ..................................................
27.....................................................................
29Preparations for installation .........................
30Appliance dimensions .................................
30Built-in ..........................................................
33Environmental aspects ..............................
33
Tips for energy-efficient cooking with
hoods ...........................................................
33Disposal of the appliance and packaging ....
34Your notes ..................................................
Contents

The following symbols are used throughout the manual, and they have the following meanings:
INFORMATION!
Information, advice, tip, or recommendation
WARNING!
Warning –general danger
ELECTRIC SHOCK!
Warning –danger of electric shock
HOT SURFACE!
Warning –danger of hot surface
DANGER OF FIRE!
Warning –danger of fire
It is important that you carefully read the instructions.
3
Pictograms used

WARNING!
READ CAREFULLY AND KEEP IT FOR FUTURE REFERENCE!
Safe use
•This appliance is only designed for household use.
•CAUTION: Accessible parts may become hot when used with
cooking appliances.
•This appliance can be used by children aged from 8 years and
above and persons with reduced physical, sensory or mental
capabilities or lack of experience and knowledge if they have
been given supervision or instruction concerning use of the
appliance in a safe way and understand the hazards involved.
•Do not allow children to play with the appliance.
•Do not allow children to clean or maintain the appliance unless
supervised.
•Always provide adequate ventilation!
•There shall be adequate ventilation of the room when the range
hood is used at the same time as appliances burning gas or other
fuels.
•When the range hood and appliances supplied with energy other
than electricity are simultaneously in operation, the negative
pressure in the room must not exceed 4 Pa (4 × 10⁻⁵ bar).
•Local regulations concerning the discharge of air have to be
fulfilled.
•Never use a pressure cleaner or steam cleaner to clean the
appliance.
ELECTRIC SHOCK!
Avoid the risk of electric shock; make sure the appliance is
switched off before cleaning the appliance.
•Only use the appliance inside the home.
4
Safety

•Do not use the cooker hood if the grease filter has not been fitted
properly!
•Do not lean against the cooker hood.
•Never use the cooker hood as a working surface unless this is
indicated explicitly.
•Grease and oil are inflammable when overheated. Remain in the
cooking area when preparing meals.
•To prevent hot fat from catching fire, you should only deep-fry
under continuous supervision.
•The cooker hood should be cleaned regularly both on the outside
as well as the inside (at least 1 x per month). Insufficient cleaning
or a delay in the replacement of filters can cause a fire hazard.
•Clean the filters on time.
•The grease filters can become hot during use. After cooking wait
at least 30 minutes before cleaning.
•Please note! Intensive use can lead to condensation on the
cooker hood. Condensation is simple to remove with a dry cloth.
•Follow the instructions in the manual for cleaning or replacing the
grease filters and/or carbon filters!
DANGER OF FIRE!
There is a risk of fire if the instructions for cleaning or replacing
grease filters and/or carbon filters are not followed.
Through grease deposits in the metal grease filter. Never work
with open flame under the appliance (eg. flambéing). Always use
the appliance with the metal grease filter. Clean the grease filter
regularly.
Through overheated fat or oil. Never extinguish a fire with water;
always use a fire blanket, lid or plate.
•The appliance may have sharp edges; please be careful during
cleaning.
5
Safety

•The light emitted by LED lights is very dazzling and can damage
the eyes. Do not look directly into the switched on LED lights for
longer than 100 seconds.
•When washing grease filters in the dishwasher it is recommended
to use a short, non-intensive programme. Check the grease filter
after washing in the dishwasher for wear (loose material). Wear
can occur as a result of frequent washing. If loose material is
visible, replace the filters in order to prevent this loose material
from ending up in the food that is cooked.
•Do not use the appliance in temperatures below 5 °C.
•Keep a 20 cm separation distance to the appliance.
6
Safety

Dear customer!
Welcome to our growing ASKO family!
We are proud of our appliances. We hope that this appliance will be an appreciated and dependable
aid for many years to come.
Please read the operating instructions before use. They include general tips, information about the
settings and adjustments you can make, and the best way to take care of your appliance.
TIP!
You can find the most recent version of the instructions for use on our website.
Enjoy your cooking!
7
Your cooker hood

Description hood
1. Button Control
2. LED spot
3. Edge extraction
panel
4. Grease filter
5. Magnet
Description button control
1. Filter reset button
2. Filter indicator, signals when filters require cleaning
3. Lighting button, switches on/off and dims the lighting
4. Lighting indicator
5. –(minus) push-button, reduces air extraction capacity and switches off
6. + (plus) push-button, switches on and increases air extraction capacity
7. Speed level 1 indicator
8. Speed level 2 indicator
9. Speed level 3 indicator
10. Speed level 4/boost indicator
11. Push-button timer function, turns off the hood after time
12. Timer indicator light
13. Wi-Fi push-button
14. Wi-Fi indicator light
8
Your cooker hood

Switching extraction on and off
1. Press the + (plus) button.
The cooker hood will switch on at the lowest setting.
2. Press the + (plus) button again for a higher fan setting. Press and hold the + (plus) button for 1
second to select the highest setting (boost).
3. Press the –(minus) button to select a lower setting.
The extraction setting is indicated in the speed level indicators.
Each light area represents a speed level. Speed level indicator 4 also serves as a boost indicator
when it blinks.
4. If the extraction setting is set at 1, you can switch off the cooker hood by quickly pressing and
releasing the –(minus) button.
5. To switch off the cooker hood from, press and hold the –(minus) button for at least 1 second.
Switch on the boost setting
1. Press and hold the + (plus) button for at least 1 second.
The boost setting is switched on for 10 minutes. The speed level 4 indicator will flash during this
period. The original extraction setting will be reactivated after this period.
2. Press and release the –(minus) button to switch off the boost setting.
NOTE!
If the boost setting has been selected, the timer function cannot be activated.
Switching on the timer
1. Press the timer button.
The timer indicator will start to blink.
The cooker hood will switch off automatically after 10 minutes.
2. Switch off the timer function by pressing a random button (except the one for lighting).
9
Operation

TIP!
On delivery, this cooker hood is set for exhaust air to the outside. The hood can also be set to
recirculation use (the air is blown back into the room after filtration through grease filters and a
combi-filter).
With an RMS kit (recirculation modification set), the air will first be cleaned by the grease filters,
and then odours will be filtered by the combi-filter. The cleaned air is recirculated back into the
kitchen.
Switching on recirculation mode
Simultaneously press and hold the timer button and the light button until the filter indicator flashes
3 times.
The carbon filter indicator is activated.
Switching off recirculation mode
Simultaneously press and hold the timer button and the light button until the filter indicator lights up
for 3 seconds and then turns off.
Clean Air function
The Clean Air function allows you to freshen the air in your kitchen for a maximum of 24 hours at
level 1.
1. Switch off the cooker hood.
2. Press and hold the timer button for approximately 3 seconds.
The cooker hood will switch on automatically for 10 minutes every hour at the lowest speed
setting. During extraction, the indicator lights show a fast-running light. When the hood switches
off after 10 minutes, the indicator lights show a slow running light until the hood switches on
again after 50 minutes.
3. Switch off the Clean Air function in the meantime by pressing a random button (any button other
than the light button).
10
Operation

Switching the light on and off
1. Shortly press and release the light button.
The light switches on at maximum strength.
2. Press and hold the lighting button to set the lighting strength.
3. To turn off the light, shortly press the light button while the light is on.
The lighting changes from maximum to minimum strength and vice versa.
Changing the colour temperature
You can adjust the lighting temperature.
1. Press and hold the light button. Press the –(minus) button to make the light ‘colder’or press the
+ (plus) button to make the light ‘warmer’.
Making the connection between cooker hood and hob
To operate the cooker hood with the hob, you must make a connection between the hob and the
hood.
To make the connection, the Connection setup mode of the cooker hood and the hob must be
activated.
See also the manual for the hob. Check our website for the full range of hobs that can be connected
to your cooker hood.
1. The hood and lights must be switched off.
2. Press and hold simultaneously the –(minus) and the + (plus) button for 3 seconds. All the
indicators will blink simultaneously for a maximum of 3 minutes.
3. On your hob, activate the pairing mode in the user menu (see the hob manual). The connection
to the hob is established.
4. If the connection is successful, the cooker hood will return to standby.
NOTE!
When manually operating the hood in connection mode, the pairing will be lost and must be
paired again.
11
Operation

Description remote control
NOTE!
The remote control is available as an accessory for this cooker hood and is not included with this
appliance.
1. Timer function
2. Increase light intensity
3. Colder light temperature
4. Decrease light intensity
5. Decrease air extraction capacity
6. Clean Air function
7. Warmer light temperature
8. Switch on/off lighting
9. Increase air extraction capacity
10. Fan on/off
Pairing the remote
This remote control must be paired to the cooker hood before first use.
1. Switch on the appliance. Press and hold the –(minus) button and + (plus) button for 3 seconds.
The hood will start ‘pairing mode’for 5 minutes
2.
3. Activate the ’Remote pairing mode’by holding ‘c’and ‘w’for 3 sec.
4. During pairing all the indicators on the hood and remote will blink. All indicators will turn off when
the connection is established.
If the connection is not established repeat the entire pairing process.
NOTE!
Remote control will go into standby after 30 seconds. The remote will wake up when it is picked
up or detects movement.
12
Remote control

Switching extraction on and off
1. Press and hold the ‘Fan’key on the remote for 1 second.
The cooker hood will switch on at the lowest setting.
2. Press the ‘+’key again for a higher fan setting. Press and hold the ‘+’key for 1 second to select
the highest setting (boost).
3. Press the ‘-’key to select a lower setting.
The extraction setting is indicated by the speed level indicators on the hood.
4. To switch off the cooker hood, press and hold the ‘Fan’key for 1 second.
NOTE!
Lighting and motor key must be pressed for at least 1 second. This is to prevent the functions
from being accidentally switched on or off.
Switch on the boost setting
1. Press and hold the ‘+’button for at least 1 second.
The boost setting is switched on for 10 minutes. The speed level 4 indicator will flash during this
period. The original extraction setting will be reactivated after this period.
2. Press and release the ‘-’key to switch off the boost setting.
NOTE!
If the boost setting has been selected, the timer function cannot be activated.
Switching on the timer
1. Press the timer key.
The timer indicator will start to blink.
The cooker hood will switch off automatically after 10 minutes.
2. Switch off the timer function by pressing a random button (except the one for lighting).
13
Remote control

TIP!
The cooker hood can be used in extraction mode or recirculation mode. The air extraction capacity
is adapted to the selected mode. The hood will start-up in the default extraction mode. It has to
be reset for recirculation mode.
With an RMS kit (Recirculation modification set) the air will first be cleaned by the grease filters
and then odours will be filtered by the charcoal filter. The cleaned air is recirculated back into the
kitchen.
Switching on recirculation mode
When the light and fan are off, simultaneously hold the timer key and
the light key until the filter indicator flashes 3 times.
The carbon filter indicator is activated.
Switching off recirculation mode
When the light and fan are off, simultaneously hold the timer key and the light key until the filter
indicator lights up for 3 seconds and then turns off.
Clean Air function
The Clean Air function allows you to freshen the air in your kitchen for a maximum of 24 hours at
level 1.
1. Switch off the cooker hood.
2. Press and hold the ‘Clean Air’key for approximately 3 seconds.
The cooker hood will switch on automatically for 10 minutes every hour at the lowest speed
setting. During extraction, the display will show a fast-moving ‘snake’. When the hood switches
off after 10 minutes, the display will show a slow-moving ‘snake’until the hood switches on again
after 50 minutes.
3. Switch off the Clean Air function by pressing the timer, clean air, ‘-’or ‘+’keys (any key other
than the light key).
14
Remote control

Switching the light on and off
1. Press and hold the light key for 1 second.
The light switches on at maximum strength.
2. Press and hold the ‘increase light’or ‘decrease light’key to set the lighting intensity.
3. To turn off the light, press and hold the light key for 1 second.
NOTE!
Lighting and motor key must be pressed for at least 1 second. This is to prevent the functions
from being accidentally switched on or off.
Changing the colour lighting temperature
You can adjust the lighting temperature.
1. Press and hold the light key for 1 second.
The light switches on at maximum strength.
2. Press the ‘C’key to make the light ‘colder’or press the ‘W’key to
make the light ‘warmer’.
15
Remote control

Wi-Fi/ConnectLife-app
The appliance is fitted with a Wi-Fi module that allows the appliance to connect to a mobile device
such as a smartphone or tablet. It offers to monitor the appliance status via the mobile device.
NOTE!
The monitoring function via mobile device shall not be used to replace the personal supervision
of the cooking process directly on the appliance.
Requirements:
•To use the Wi-Fi connectivity of the cooking hob, the range of your Wi-Fi router must extend to
the hob. The cooking hob only supports 2.4 GHz networks. If, during the connection setup, your
home network is not shown, check the router settings for 2.4 GHz, that the network is not hidden
and the signal is strong enough.
•Additionally, a mobile device with an installed ConnectLife-app and a registered user account
is required (see chapter 'ConnectLife-app').
ConnectLife-app
The ConnectLife app is available on the Apple App Store and Google Play Store. After being paired
with the hood, you can use the app to monitor the status of the hood.
Go to www.connectlife.io/getstarted to download the ConnectLife-app, information about the system,
support and available features. Find additional options under www.connectlife.io.
Getting started with the ConnectLife-app
Get started with your ConnectLife-app in 3 easy steps. Please check as addition chapter “First steps
to set up the Wi-Fi connectivity”. More help under www.connectlife.io/getstarted.
1. Registration:
•Install the ConnectLife-app.
•Start the app.
•Choose “Get Started”and follow the process.
•If you are already registered, use the “Sign In”option.
2. Add the hood:
•In the app: Go to “Appliances”.
•Choose “Add Appliances”or touch the + (plus) key.
•Make sure Wi-Fi on the hood is turned ON, and the hood is in connection setup mode (see
as addition 'First steps to set up the Wi-Fi connectivity').
•Follow the instructions of the ConnectLife-app.
3. Start cooking:
Congratulation, you can now start using ConnectLife together with your appliance.
16
Wi-Fi connectivity

First steps to set up the Wi-Fi connectivity:
1. Check the “Requirements”as described above.
2. The hood and lights must be switched off.
3. Press the Wi-Fi button for three seconds. The Wi-Fi indicator will blink 3 times.
4. Press the Wi-Fi button for 3 seconds to turn on Wi-Fi. Speed level 2 and 3 indicators will blink 3
times. The Wi-Fi indicator flashes.
5. After 3 seconds it will return to the Wi-Fi-menu.
6. Simultaneously press the + (plus) and timer button for 3 seconds to access 'Connection settings'.
Speed level 2 indicator and the Wi-Fi indicator flash while connecting. This mode will turn off
automatically after 5 minutes.
7. Start the ConnectLife-app and follow the instructions in the app.
8. If the ConnectLife-app does not connect to the device, wait 10 minutes and repeat the steps
described or press the '-' (minus) button for 3 seconds to leave the Wi-Fi menu.
INFORMATION!
Troubleshoot quickly by turning the Wi-Fi module off and on again. You can find more help in the
"Wi-Fi troubleshooting" section.
Depending on the Wi-Fi state, there are 1 to 3 options available in the menu:
•The Connection Setup Mode
•The Pairing Mode
•Remote control mode
If more than 1 option is available then use the + (plus) and - (minus) buttons to toggle between the
options.
17
Wi-Fi connectivity

Connection Setup Mode
•The appliance must be connected to the Cloud for the application to monitor and control the
appliance remotely.
•Speed level 2 indicator and Wi-Fi indicator will light up.
•Touch the timer key to enable 'Connection Setup Mode'. Speed level 2 indicator will flash.
•This mode will be disabled automatically after 5 minutes.
•Follow the instructions of the ConnectLife-app.
Pairing Mode
When the process was successful and you want to pair another user, you can use the “Pairing mode”
of the Wi-Fi menu and the “Pairing”or “Discovery”option of the ConnectLife-app. In the
ConnectLife-app, select option 'Add Appliance' and follow the instructions.
•Touch the timer key to enable 'Pairing mode'. The speed level 3 indicator will flash.
•This mode will be disabled automatically after 3 minutes.
•On the ConnectLife-app, use the 'Pairing' or 'Discovery' option of the ConnectLife app to pair
another user.
18
Wi-Fi connectivity

Remote control mode switch on and off
To be able to change function settings remotely, the appliance must be switched on and the
ConnectLife-app must be enabled. Speed level 4 indicator and Wi-Fi indicator will lit static.
Remote control mode is only available if the Wi-Fi connectivity setup has been performed. Touch
the timer key to enable 'Remote control'.
•Speed level 4 indicator is blinking: Remote control is enabled.
•Speed level 4 indicator lit static: Remote control is disabled.
Wi-Fi menu
To access the Wi-Fi menu the hood must be on standby (the hood and lights must be switched off).
Press the Wi-Fi button for 3 seconds. The Wi-Fi indicator will flash.
Switching on Wi-Fi:
•The hood and lights must be switched off.
•Press the Wi-Fi button for three seconds. The Wi-Fi indicator will blink 3 times.
•Press the Wi-Fi button to turn on Wi-Fi. Speed levels 2 and 3 indicators will blink 3 times. The
Wi-Fi indicator will flash. After 3 seconds it will return to the Wi-Fi menu.
Switching off Wi-Fi:
•The hood and lights must be switched off.
19
Wi-Fi connectivity

•Press the Wi-Fi button for 3 seconds. The Wi-Fi indicator is on.
•Press the Wi-Fi button to turn off Wi-Fi. The Wi-Fi indicator will turn off. After 3 seconds it will
return to the Wi-Fi menu.
•Press the '-' (minus) button for 3 seconds to exit the Wi-Fi menu.
Displaying the Wi-Fi status:
•Wi-Fi module disabled: Wi-Fi indicator is off.
•Configuration in progress: Wi-Fi indicator flashes.
•Connected to home network router: Wi-Fi indicator flashes.
•Connected to home network router and cloud: Wi-Fi indicator continuously lit.
Wi-Fi troubleshooting
SolutionPossible causeSymptom
Switch on Wi-Fi (see 'Switching on
Wi-Fi').
Wi-Fi turned off.Wi-Fi icon not shown.
Check that your home network signal
is strong and internet connection is
working.
Home network issues.Wi-Fi setup failed.
Please check the network settings.
Ensure a 2.4 GHz and visible network.
If the signal is too weak, try to move the
network router closer to the appliance.
The home network is not on
2.4 GHz, the network is
hidden, or the signal strength
is too weak.
Home network is not
displayed during connection
setup.
Ensure that Wi-Fi is enabled, and the
internet connection of your home
network is working. Repeat the
connection setup if necessary.
Wi-Fi is disabled or home
network issues.
Appliance is shown
disconnected on the mobile
app.
First disable the Wi-Fi and enable it
again. Check that the internet
connection in your home network is
working. Repeat the connection setup
if necessary.
Further troubleshooting available on
www.connectlife.io or contact the
service department.
Different causes.Other Wi-Fi problem.
NOTE!
Unpair: When the appliance needs to be connected to another network, use the setting ‘unpair’
in the app. The appliance will be deleted from the app and will not be linked to the current user
account.
20
Wi-Fi connectivity
This manual suits for next models
1
Table of contents
Other Asko Ventilation Hood manuals

Asko
Asko CD4634B/4000 User manual

Asko
Asko CW 4985 User manual

Asko
Asko CH060-60 User manual

Asko
Asko CW4930G User manual

Asko
Asko CW4936S User manual

Asko
Asko CC4520 User manual

Asko
Asko WS90 BAM Series User manual

Asko
Asko ES1011QAM User manual

Asko
Asko CW4611 User manual

Asko
Asko A4402TRVS/E01 User manual
Popular Ventilation Hood manuals by other brands

Stirling
Stirling STR-BRH instruction manual

Amica
Amica SIO 61 AX operating instructions

Smeg
Smeg SAH490SS instruction manual

Blanco
Blanco BRSR60X Instructions for the use and care and installation

KOBE
KOBE CH2230SQ-1 Installation instructions and operation manual

AIRFORCE
AIRFORCE F37 90X60 S4 Instruction on mounting and use