ASL INTERCOM V2000 User manual

Installation Guide
ASL Document Ref.: U-0456-0199.docx
Issue: 03 complete, approved - Date: 23/09/15
Part Number: M0623_38
V2000 Battery Backup System
BDIST-V2000 and Batteries
FRONT OF RACK
REAR OF RACK
(Illustration shows
two battery sets and
two BDIST-V2000 as
example only.)
2 x BDIST-V2000
and rack-
mounting kit
Battery Tray

V2000 Battery Backup System – Installation Guide
Copyright © 2015 Application Solutions (Safety and Security) Limited
Application Solutions (Safety and Security) Limited
Unit 17 Cliffe Industrial Estate
Lewes - East Sussex
BN8 6JL - UK
Tel: +44(0)1273 405411 Fax: +44(0)1273 405415
www.asl-control.co.uk
All rights reserved.
Information contained in this document is believed to be accurate, however no representation or warranty is given and Application
Solutions (Safety and Security) Limited assumes no liability with respect to the accuracy of such information.
U-0456-0199.docx – Issue: 03 complete, approved
Page 2 of 20
This equipment is designed and manufactured for installation with the V2000.
Refer to the V2000 Installation guide for EC standards complied with.
Failure to use the equipment in the manner described in the product literature will invalidate the warranty.
This product must be disposed of in accordance with the WEEE directive.
Contents
1Introduction ................................................................................................................................................................. 3
2Safety and Precautions............................................................................................................................................... 4
3Preparation ................................................................................................................................................................. 6
4Unpacking and Handling............................................................................................................................................. 7
5Battery Tray Installation .............................................................................................................................................. 9
6BDIST-V2000 Installation ......................................................................................................................................... 10
7Battery Installation .................................................................................................................................................... 13
8Technical Specification ............................................................................................................................................. 17
9Mechanical Dimensions ............................................................................................................................................ 18
10 Storage and Preservation ......................................................................................................................................... 19
11 Packing for Return .................................................................................................................................................... 19
Additional User Documentation:
1) V2000 Installation Guide (U-0623-0291)
2) V2000 Quick Start Guide (U-0623-0383)
3) ASL System Design Guide (ASL T-0667-0185)
4) Additional reference information is available from the ASL’s website: www.asl-control.co.uk

V2000 Battery Backup System – Installation Guide
U-0456-0199.docx – Issue: 03 complete, approved
Page 3 of 20
1 Introduction
This document describes how to install the V2000 Battery Backup System into an equipment rack.
The V2000 Battery Backup System is comprised of the following main components:
•BDIST-V2000: circuit breaker, feed through terminal and cables
•Rack-mount kit: DIN rail bracket for the BDIST-V2000 and strain relief bracket
The complete list is provided in ‘4 Unpacking and Handling’ section (page 7).
The diagram below provides an overview of the installation sequence.
Summary of Task Section Step(s) Page
Safety and Precautions Read the safety and precautions instructions and guidelines. 2 All 4
Preparation Gather documentation, tools, equipment and rack. 3 All 6
Unpacking and Handling Unpack equipment. 4 All 7
Battery Tray Installation
(if not already installed)
1. Install the battery tray supports. 5 1 9
2. Install the battery tray. 2 9
BDIST-V2000 Installation 1. Install the BDIST-V2000 DIN rail bracket. 6 1 10
2. Install the strain relief bracket. 2 10
3. Install the BDIST-V2000. 3 10
4. Prepare the battery terminal leads. 4 11
5. Connect the battery terminal leads. 5 11
6. Connect the V2000 battery supply cable. 6 12
7. Secure the terminal leads to the strain relief bracket. 7 12
Battery Installation 1. Switch the battery supply circuit breaker off. 7 1 13
2. Install and connect the batteries. 2 to 11 13 to 15
3. Install and connect the second set of batteries (if used). 12 16
4. Install the thermistor cable assembly. 13 16
5. Secure the batteries to the battery tray (if required). 14 16
6. Commission the battery backup system as part of the V2000 system. 15 16
No commissioning instructions are provided in this document.
Refer to V2000 User’s Manual (U-0623-0383).

V2000 Battery Backup System – Installation Guide
U-0456-0199.docx – Issue: 03 complete, approved
Page 4 of 20
2 Safety and Precautions
Observe all safety information both on the equipment and in this section.
Environmental
The temperature and humidity ranges shown in the specifications for this equipment must not be
exceeded.
This equipment must not be installed in an area that is subject to a corrosive atmosphere,
excessive moisture or may allow water or other liquids to come into contact with the unit or its
external connections.
Batteries shall not be exposed to excessive heat such as sunshine, fire etc.
Objects containing liquids should not be placed upon the equipment.
Batteries can produce hydrogen gas under certain conditions.
Ensure that adequate ventilation is provided by the use of front vent panels and/or appropriate
cabinet ventilation.
Do not use open flame or create spark near batteries at any time.
Installation
The battery backup system must be installed in a restricted access location such that there is no
operator access to the wiring or battery.
To prevent injuries and electrical hazard, the battery backup system must be securely attached
to the rack in accordance with the installation instruction.
Weight Safety
Batteries are heavy (23 kg each). Please move and handle with care to avoid personal injuries
and/or damage to the batteries.
Battery Handling
Work on the batteries should be carried out by qualified personnel only.
Always use insulated tools.
Do not use open flame or create spark near batteries at any time.
Fire / Burn Safety
Batteries contained within the rack can deliver very high currents that could cause fire or burns.
Take care to avoid short-circuits of the battery terminals by tools or jewellery.
Do not allow tools or unconnected cables to rest on top of batteries.

V2000 Battery Backup System – Installation Guide
U-0456-0199.docx – Issue: 03 complete, approved
Page 5 of 20
Electrical Safety
The battery backup system must be installed in a restricted access location such that there is no
operator access to the wiring or battery.
Ensure power supply cabling is adequately rated for the unit’s operating current and
temperature, and is protected against short-circuit by a correctly rated fuse or circuit breaker.
This is particularly important for supply feeds from the 24 V backup batteries which can deliver
short circuit currents of several hundred amps.
Using too thin a cable can cause a safety hazard and will give excessive voltage drop and
operational failure.
Always ensure that the equipment is correctly earthed by connection to an AC mains supply with
a protective earthing connection.
Always replace blown fuses with the correct type and rating.
Always ensure that all 24 V circuit breakers are set to OFF before installing or removing batteries
to/from the unit.
Do not switch any of the 24 V circuit breakers on until all batteries have been fully installed.
External 24 V DC batteries contained within these units can deliver very high currents that could
cause fire or burns.
Take care to avoid short circuits of the battery supply by tools or jewellery.
Do not allow tools or unconnected cables to rest on top of batteries.
Battery Replacement
Danger of explosion if battery is incorrectly replaced.
Replace only with type Yuasa NPL65-12IFR.
Battery Disposal
Lead-acid batteries contain substances harmful to the environment.
Never bury in the ground or incinerate at end-of-life.
Return all batteries to your supplier, a licensed ‘spent’ battery dealer or otherwise responsibly
disposed of by following WEEE protocols.

V2000 Battery Backup System – Installation Guide
U-0456-0199.docx – Issue: 03 complete, approved
Page 6 of 20
3 Preparation
1.
Read and observe the safety instructions and guidelines in Section ‘2 Safety and Precautions’
(page 4).
Failure to follow these instructions and guidelines may cause personal injury and/or damage to
the
equipment.
2.
Gather the following documentation and tools:
•The system design documentation of the specific location
•Flat-bladed screwdriver (small and medium)
•Pozidriv screwdrivers (No 1, 2 and 3)
•Fixings for the battery tray (if not already fitted to the equipment rack):
- 2 x M6 earthing cage nuts
- 10 x M6 plain cage nuts
- 2 x M6 Pozipan screws (16 mm, stainless steel)
- 10 x M6 Pozipan screws (20 mm)
- 4 x M6 plain nuts
- 3 x M6 plain washers
- 3 x M6 earthing washers
- 14 x M6 shake-proof washers
•A pair of wire cutters/strippers (suitable for 16 mm2and 35 mm2cables)
•AF spanner with insulated handle for 10 mm nuts
•A heat gun
3.
Gather the equipment (in their original packing):
•V2000_BTRAY-X800-CUST battery tray (if not already fitted to the equipment rack)
•M0456_56 (left-hand) and M0456_57 (right-hand) 800mm battery tray supports (if not already
fitted to the equipment rack)
•V2000_BAT_SET_WITH STRAP battery set
•BDIST-V2000 and BDIST-V2000-MOUNTING-KIT as required by the system design
•MDIST-V2000 as required by the system design
4.
A standard 19-inch rack is required for the installation.
The rack should be fitted with supporting rails for the V2000 mainframe, fan trays (if required), air
exhauster trays (if required), ventilation panels (if required) and wired with power supply, signal, and
control wiring to suit the requirements of the specific system design and should meet the rules and
guidelines provided in the ASL System Design Guide (ASL T-0667-0185).

V2000 Battery Backup System – Installation Guide
U-0456-0199.docx – Issue: 03 complete, approved
Page 7 of 20
4 Unpacking and Handling
1. Observe any markings or warnings on the package prior to handling and opening.
Batteries are heavy (23
kg each).
Please move and handle with care to avoid personal injuries
and/or damages to the batteries.
2.
Check the equipment package for signs of damage during transport. Report problems to the carrier or
supplier.
3. Unpack the equipment in a dry area handling the equipment with care.
4.
Check the equipment package contents for completeness against the delivery note supplied. Report
any missing items immediately.
V2000_BTRAY-X800-CUST package contents:
•1 x generic 800 mm tray
M0456_56 Left-Hand Tray Support package contents:
•1 x left-hand 800 mm battery tray support
M0456_57 Right-Hand Tray Support package contents:
•1 x right-hand 800 mm battery tray support
V2000_BAT-SET-WITH STRAP package contents:
•2 x 12 V batteries (Yuasa NPL65-12IFR)
•Strap
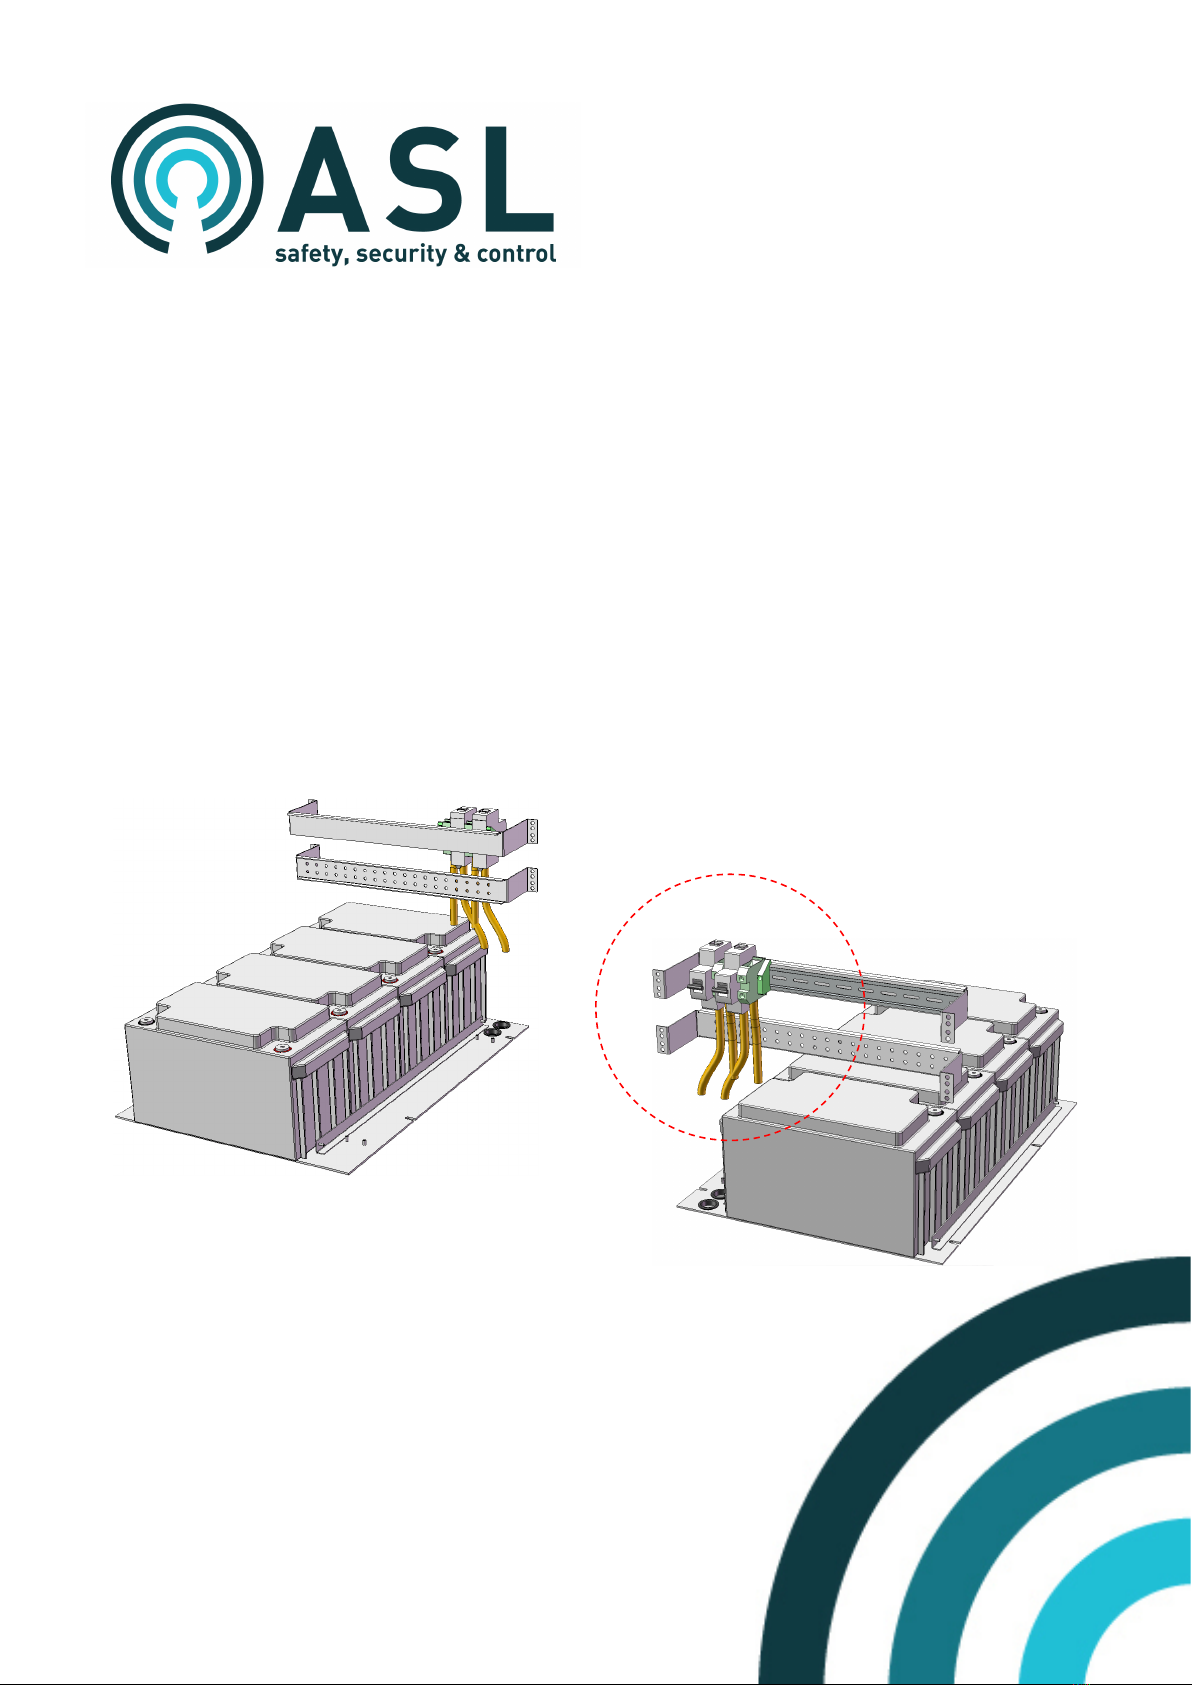
BDIST-V2000 package contents:
•1 x DIN rail-mount circuit breaker (80 A)
•1 x feed through terminal block (WDU35)
•1 x interlink cable: welding cable, single core flexible copper with orange butyl sheath, 35 mm2
size, 570 mm length, heat and oil resistant/flame retardant/halogen free sheath, both ends
terminated with uninsulated terminal lug (M6 stud size, copper with tin plated finish)
•1 x black-band terminal lead: welding cable, single core flexible copper with orange butyl sheath,
35 mm2size, 1100 mm length, heat and oil resistant/flame retardant/halogen free sheath,
one end
terminated with uninsulated terminal lug (M6 stud size, copper with tin plated finish) and one
unterminated end
•1 x red-band terminal lead: welding cable, single core flexible copper with orange butyl sheath,
35 mm2size, 900 mm length, heat and oil resistant/flame retardant/halogen free sheath, one end
terminated with uninsulated terminal lug (M6 stud size, copper with tin plated finish) and one
unterminated end
•1 x black cable: single core LSZH cable, 16 mm2size, unterminated ends
•1 x red cable: single core LSZH cable, 16 mm2size, unterminated ends
•1 x thermistor cable assembly
•4 x LSZH cable ties
•1 x black 18 mm to 6 mm polyolefin heatshrink tubing (60 mm length)
•1 x red 18 mm to 6 mm polyolefin heatshrink tubing (60 mm length)
•1 x Installation Guide

V2000 Battery Backup System – Installation Guide
U-0456-0199.docx – Issue: 03 complete, approved
Page 8 of 20
BDIST-V2000-MOUNTING-KIT packing contents:
•1 x DIN rail recess bracket
•1 x cable strain relief bracket
•2 x end-stop terminals
•2 x M6 earthing cage nuts
•6 x M6 plain cage nuts
•2 x M6 Pozipan screws (16 mm, stainless steel)
•6 x M6 Pozipan screws (20 mm)
•2 x M6 earthing washers
•6 x M6 shake-proof washers
5.
It is advisable to retain the original equipment packing (containers and materials) in the event that the
equipment ever needs returning for service.
6.
If the packing is not to be retained, the packing materials should be either re-cycled or disposed of
according to local regulations.
7.
Ensure that the name and address of the Authorised Distributor from whom you purchased the
product
is recorded on the ‘Service and Warranty’ page of this document for future reference.
8. Repacking instructions are provided in Section ‘11 Packing for Return’ (page 19).

V2000 Battery Backup System – Installation Guide
U-0456-0199.docx – Issue: 03 complete, approved
Page 9 of 20
5 Battery Tray Installation
1. Install the battery tray supports.
Ensure 6U (minimum) is
available for the battery
system.
The battery tray
supporting rails are
handed and should be
fitted so that the battery
tray is positioned as
shown in step 2 below.
Ensure that three M6
cage nuts and screws
are used at each end.
One (minimum) earthing
cage nut and washer
must be used on each
support to ensure that
the support is bonded to
the rack.
2. Install the battery tray onto the
tray supports and secure the tray
with four M6 nuts and washers.
One (minimum) earthing
washer must be used to
ensure that the tray
support is bonded to the
rack.
BATTERY TRAY
(TOP VIEW)
FRONT OF RACK
Cable feed holes on
the right-hand side
(The battery tray model
varies to suit the rack type.
The illustration shows a
battery tray for a rack with
800 mm depth.)

V2000 Battery Backup System – Installation Guide
U-0456-0199.docx – Issue: 03 complete, approved
Page 10 of 20
6 BDIST-V2000 Installation
1. Mount the DIN rail recess bracket
into the equipment rack using the
M6 cage nuts and screws
provided.
One (minimum) earthing
cage nut and washer
must be used to ensure
that the tray support is
bonded to the rack. Use
the supplied stainless
steel M6 screw for
earthing.
2. Mount the cable strain relief
bracket to the rack using the M6
cage nuts and screws provided.
The strain relief bracket
should be mounted 1U
below the DIN rail
bracket in order to
provide adequate strain
relief to the terminal
leads.
One (minimum) earthing
cage nut and washer
must be used to ensure
that the tray support is
bonded to the rack. Use
the supplied stainless
steel M6 screw for
earthing.
3. Mount the BDIST-V2000 onto the
DIN rail bracket and secure the
BDIST-V2000 using 2 x standard
end-stop terminal blocks.
Ensure that the circuit
breaker is in the OFF
position.
BDIST-V2000 DIN rail bracket
Cable strain relief bracket
Strain relief bracket 1U
below the DIN rail bracket.
BDIST-V2000 DIN rail bracket
End-stop terminal blocks
Feed-through terminal block
DC rated circuit breaker (80 A)
Circuit breaker: OFF

V2000 Battery Backup System – Installation Guide
U-0456-0199.docx – Issue: 03 complete, approved
Page 11 of 20
4. Prepare the battery terminal
leads (orange).
Note that the terminal lead has
one end terminated with terminal
lug and one unterminated end.
a. Cut the unterminated end
of the terminal lead to the
minimum length that still
allows the cable to be
routed between the battery
and circuit breaker without
undue strain.
b. Fit the heatshrink tubing to
the unterminated end of
the terminal lead noting the
correct colour.
•Red-band lead: red
heatshrink tubing
•Black-band lead: black
heatshrink tubing
c. Strip the cable end to suit
the termination.
d. Position the heatshrink
tubing 5 - 8 cm from the
unterminated end so and
apply the heat gun.
e. Allow the heatshrink tubing
to cool.
5. Connect the terminal leads to the
BDIST-V2000.
Note the correct polarity
when connecting the
terminal leads.
•Red-band terminal
lead (positive):
connect the lead to
the circuit breaker.
•Black-band terminal
lead (negative):
connect the lead to
the feed through
terminal block.
High current: Ferrules
MUST NOT be used as
they can restrict the
available contact area.
Red-band terminal lead
Black-band terminal lead
35 mm2welding cable (3)
Note correct colour.
5 - 8 cm
Terminal lug (2)
(factory fit)
Unterminated end
RED
RED
BLACK
BLACK
Heatshrink tubing (1)
(approx. 60 mm length)
(factory fit)
Heatshrink tubing (1)
(approx. 60 mm length)
(1) Polyolefin heatshrink tubing: 18 mm to 6 mm, red/black
(2) Battery terminal lug (Eland PN FT35-6): tubular crimp terminal, uninsulated, copper with tin
plated finish, M6 stud size, 35 mm2wire
Terminal lug: not actual shape. For illustrative purposes only.
(3) Cable (Eland PN A1E035): welding cable, single core flexible copper with orange butyl
sheath, 35 mm2size, heat and oil resistant/flame retardant/halogen free sheath
The sum of the lengths of the 35 mm2cables (battery terminal leads + interlink cable)
should not exceed 2 metres.
ASL battery cable maximum length:
•Terminal leads: 1100 mm (black-band) and 900 mm (red-band)
•Interlink cable: 570 mm
Length of cable sheath to be stripped (recommended):
•Red-band cable connects to the circuit breaker: approx. 19 mm
•Black-band cable connects to the feed through terminal: approx. 18 mm
Red-band terminal lead
Black-band terminal lead
Ferrules MUST NOT be used.
Note correct polarity.

V2000 Battery Backup System – Installation Guide
U-0456-0199.docx – Issue: 03 complete, approved
Page 12 of 20
6. Connect the V2000 battery
supply cable (black and red pair)
to the BDIST-V2000.
7. Cut the cable to length ensuring it
does not exceed 1 metre and
terminate it with a Phoenix PC16
plug.
Note the correct polarity
when connecting the
cables.
•Red cable (positive):
connect the lead to
the circuit breaker
(top).
•Black cable
(negative): connect
the lead to the feed
through terminal
block (top).
High current: Ferrules
MUST NOT be used as
they can restrict the
available contact area.
8. Secure each terminal lead to the
strain relief bracket using a LSZH
cable tie.
The terminal leads must
be secured to the strain
relief bracket to prevent
the cables being pulled
from the BDIST-V2000
connections due to their
weight.
Alternate the cable tie
position (top and bottom)
to allow for easier cable
routing.
Red-band terminal lead
Black-band terminal lead
Single core LSZH cable:
•Cable size: 16 mm2
•Max. length: 1 m
1) Ferrules MUST NOT be used.
2) Ensure correct polarity.
To V2000
PHOENIX
2-WAY
PC16 PLUG
(ASL PN 210399)
(PHOENIX PN 1967456)
1) Use LSZH cable ties.
2) Alternate cable tie position.

V2000 Battery Backup System – Installation Guide
U-0456-0199.docx – Issue: 03 complete, approved
Page 13 of 20
7 Battery Installation
1. Ensure the circuit breaker on the battery
power distribution is off.
In racks fitted with ASL BDIST-V2000
(Battery Power Distribution Assembly),
switch off the circuit breaker on the
BDIST-V2000; see example on the right.
2. Slide one battery into the tray.
3. Connect the red-band terminal lead from
the BDIST-V2000 to the positive terminal.
Note that the terminal lead has one end
terminated with terminal lug and one
unterminated end. The unterminated end is
connected to the BIST-V2000.
4. Connect the black-band terminal of the
interlink cable to the negative terminal.
Note that the interlink cable has both ends
terminated with terminal lug.
Batteries are heavy (23 kg each).
Move and handle with care to avoid
personal injuries or damages to the
batteries.
Always use insulated tools.
Note the correct polarity when
connecting the leads:
•Red-band terminal lead: connect
to lead to the positive terminal
•Interlink cable: connect the
black-band terminal to the
negative terminal
Circuit breaker: OFF
Terminal leads
Ensure correct polarity.
(Terminal lug: not actual shape. For illustrative purposes only.)

V2000 Battery Backup System – Installation Guide
U-0456-0199.docx – Issue: 03 complete, approved
Page 14 of 20
5. Fit protective caps to the battery terminals.
6. Slide the battery further to make room for
the second battery.
7. Slide the second battery into the tray.
8. Connect the red-band terminal of the
interlink cable to the positive terminal.
Battery terminal fitted with protective cap.
(Protective cap model may vary.)

V2000 Battery Backup System – Installation Guide
U-0456-0199.docx – Issue: 03 complete, approved
Page 15 of 20
9. Fit protective cap to the positive battery
terminal.
10. Connect the black-band terminal lead from
the BDIST-V2000 to the negative terminal.
11. Fit protective cap to the negative battery
terminal.

V2000 Battery Backup System – Installation Guide
U-0456-0199.docx – Issue: 03 complete, approved
Page 16 of 20
12. If a second battery set is to be fitted into the
tray, slide the batteries further to make
room for one battery and repeat the above
procedure.
In installations with two battery
trays, feed the terminal leads from
the BDIST-V2000 through the holes
on the top battery tray down to the
bottom battery tray.
13. Position the thermistor close to the
batteries.
a. Take the cable tie base and tie wrap
the thermistor cable near the
thermistor probe.
b. Stick the cable tie base to the right-
hand side of the battery tray so that
the thermistor probe is positioned
next to centre of the battery set.
c. Adjust the cable length as required
by looping the cable and securing the
loop portion with LSZH cable ties.
The thermistor cable assembly will
be connected to the appropriate
V2000 as described in the V2000
Installation Guide.
A thermistor probe is required for
each set of batteries.
14. If required, secure the batteries in place using the strap provided.
15. Commission the battery backup system as part of the V2000 system; refer to V2000 User’s Manual
(ASL U-0623-0383).
(Protective caps not shown to show the cable connections)
(Battery cables not shown for clarity. Illustration not to scale)
Thermistor
probe
To V2000
REAR OF RACK
Centre of
battery set
(TOP VIEW)

V2000 Battery Backup System – Installation Guide
U-0456-0199.docx – Issue: 03 complete, approved
Page 17 of 20
8 Technical Specification
8.1 Batteries and Battery Tray
Battery Type .......................................................................................................... Yuasa NPL65-12IFR (VRLA)
Required Temperature Compensation ................................................................................................-36 mV/°C
Float charge voltage at 20°C ...........................................................................................................27.3 V +/-1%
Temperature Range (operating) .................................................................................................... -5°C to +40°C
Humidity Range ....................................................................................................... 0% to 93% non-condensing
Ingress Protection....................................................IP0 (the battery backup system must be installed in a rack
that provides the required ingress protection)
Overall Dimensions (H x W x D) / Weight:
Battery Tray and Supports (for 800 mm deep rack)..........................176 mm x 476 mm x 660 mm / 10.5 kg
Battery (Yuasa NPL65-12IFR) .............................................................174 mm x 350 mm x 166 mm / 23 kg
8.2 BDIST-V2000
Circuit Breaker .........................................................................1 x 80 A DC rated DIN rail-mount circuit breaker
Terminal Block ...................................................... 1 x WDU35 feed through terminal block (50 mm cable max)
Leads
2 x terminal leads .................................welding cable, single core flexible copper with orange butyl sheath,
35 mm2size, 900 mm and 1100 mm length,
heat and oil resistant/flame retardant/halogen free sheath,
one end terminated with uninsulated terminal lug
(M6 stud size, copper with tin plated finish) and one unterminated end
1 x interlink cable..................................welding cable, single core flexible copper with orange butyl sheath,
35 mm2size, 570 mm length,
heat and oil resistant/flame retardant/halogen free sheath,
both ends terminated with uninsulated terminal lug
(M6 stud size, copper with tin plated finish)
2 x single core cables .........................................................black and red, 16 mm2size, unterminated ends)
1 x thermistor cable assembly...............................................................................................2000 mm length
Temperature Range (operating) .................................................................................................... -5°C to +40°C
Humidity Range ....................................................................................................... 0% to 93% non-condensing
Ingress Protection....................................................IP0 (the battery backup system must be installed in a rack
that provides the required ingress protection)

V2000 Battery Backup System – Installation Guide
U-0456-0199.docx – Issue: 03 complete, approved
Page 19 of 20
10 Storage and Preservation
This product should be packed for storage in the original packing as described in the Section ‘11 Packing for
Return’ (page 19) and stored in the following environmental conditions:
•Away from harsh environmental conditions, such as areas that are subject to corrosive atmosphere,
excessive moisture or may allow water or other liquids to come into contact with the unit or its external
connections.
•In a heated and humidity controlled storage areas where the temperature and humidity are within the
equipment specification.
11 Packing for Return
If a product is being returned for servicing, try to use the containers and materials of the original packaging.
Attach a tag indicating the type of service required, return address, equipment type and full serial number.
If the original packing can no longer be used, the following general instructions should be used for repacking
with commercially available materials:
•All electronics assemblies must be properly packed in ESD protective packing for transport, to prevent
physical and ESD damage.
•The filler material used for packing must be antistatic or static dissipative, as this may come into contact
with exposed connectors, wiring, or PCB assemblies. The use of non-conductive filler material may
cause damage to the electronic assemblies reducing their operational life, or even destroying them.
•Use a sturdy cardboard box that will support the weight and size of the equipment.
•Attach a tag indicating the type of service required, return address, equipment type and full serial
number.
•Completely wrap the equipment in bubble wrap (all sides must be protected) and secure the wrap in
place with tape.
•Place the wrapped equipment inside the box surrounded by filler material, ensuring that there is no room
for movement.
•Seal the box securely with packing tape.

Service and Warranty
Name and Address of Authorised Distributor:
This product carries a full warranty. For full details of warranty
and service agreements, please contact the Authorised
Distributor who supplied the product to you.
Exclusions
The warranty does NOT cover:
1. Customer misuse, including incorrect installation.
2. Damage other than manufacturing defects.
3. Transit / Courier damage.
4. Incorrect voltage or power supply used.
5. Incorrect input signal.
6. Abnormal environmental operating conditions.
7. Damage incurred by accident, fire, lightning or other hazard.
8. Modification to the unit or inexpert / attempted repair.
9. No fault found – where no fault can be found after extensive
testing, indicating user error or failure in ancillary equipment.
10. Electronic assemblies which are improperly packed when
returned for repair or service. All electronics assemblies
must be properly packed in ESD protective packing for
transport to prevent physical and ESD damage.
Should any of the above apply, Application Solutions (Safety and Security) Limited reserves the right to raise any relevant charges to
the customer.
Application Solutions (Safety and Security) Limited shall not be liable for any indirect, special or consequential loss or damage (including
without limitation any loss of profits) arising from the use of this product or for any breach of this warranty.
In the interest of continual product development, Application Solutions (Safety and Security) Limited reserves the right to make changes
to product specification without notice or liability.
Other manuals for V2000
2
This manual suits for next models
1
Table of contents
Other ASL INTERCOM Batteries Pack manuals
Popular Batteries Pack manuals by other brands

BYD
BYD Battery-Box Premium LVL 15.4 operating manual

Panasonic
Panasonic CF-VZSU30BU operating instructions

IntelliQuip
IntelliQuip TOUGHPOWER TP-600 User instruction manual

Growatt
Growatt APX 5.0P-B1 user manual

TBB power
TBB power M12-100 user manual

Crestron
Crestron Internal Battery Pack TPMC-4XG-BTP installation guide