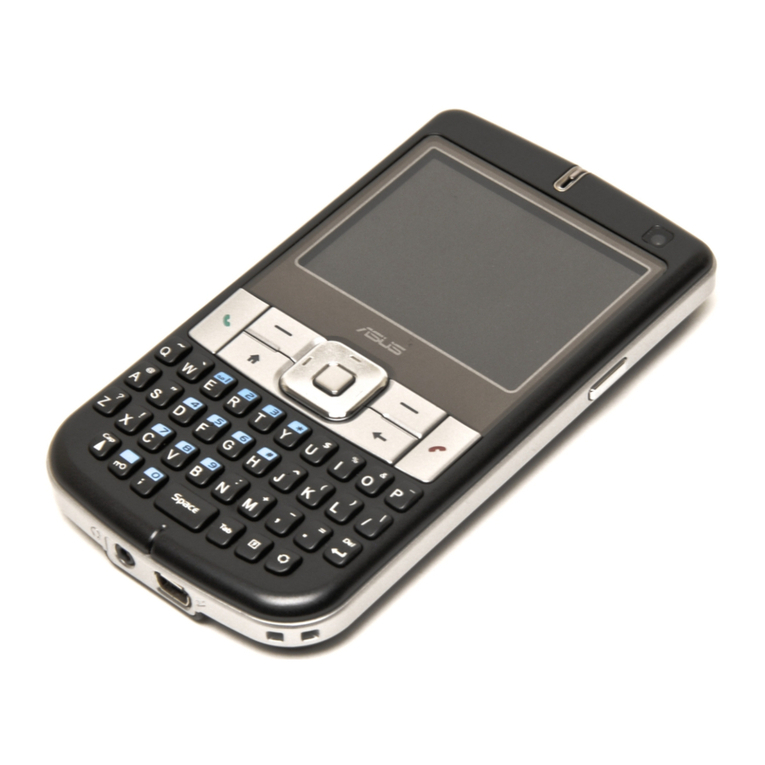
Asus M530w User manual

Index
1 English ............................................................................................. 1
2 Dansk............................................................................................... 18
3 Suomi .............................................................................................. 35
4 Norsk ............................................................................................... 52
5 Svenska........................................................................................... 69

1
English
Quick Start Guide
M530w
SMARTPHONE
QWERTYUIOP
ASDF G HJKL
zXCVB N M,.
/
=
+
!
?
@
Space
Cap

2
English
Getting to know your Smartphone
QWERTYUIOP
ASDF G HJKL
zXCVB N M,.
/
=
+
!
?
@
Space
Cap
Layout
Top feature
Components:
Power/Quick List button
Power LED
I Sub camera lens
Call key
Left soft key
Home Button
Navigation buttons
Action button
Right soft key
Back button
End key
The QWERTY keypad
Select button
Volume controller
1
2
3
4
5
6
7
8
9
10
11
12
13
14
1
23
4
5
11
7
8
10
9
6
12
13
14
Left side features Front features

3
English
Components:
Earphone slot
Mini-USB connector
I Camera lens
Cameraashlight
Speaker
Battery compartment
Camera button / Function
Side key
15
16
17
18
19
20
21
AM
15 16
17
18
19
20
21
Right side featureRear features
Bottom features

4
English
Device components description
No. Item Description
1Power/Quick List button Press and hold to turn the phone ON/OFF.
Press and quickly release to open the Quick List, which gives
you quick access to Wireless Manager (for enabling and
disabling wireless capabilities), Key lock, Device lock, and preset
proles.
2Notication LED This multi-color LED noties the following:
• Green - Phone fully charged.
• Flashing green - Network detected.
• Red - Phone is charging.
• Flashing red - Event notication.
• Flashing blue - Bluetooth® or WLAN(IEEE 802.11b/g) ON.
3Sub Camera Lens This sub camera is for the video conference.
4Call key Press to answer a call or dial a number.
Press twice to redial last number.
Press and hold during an active call to switch to speakerphone
mode.
5Left Soft key Use to select the command right above it on the main display.
When the keypad is locked, press this key followed quickly by
the Asterisk key to unlock.
6Home Button Press to return to the Home screen.
7Navigation buttons Use this to move up, down, right, and left through selections on
the display.
The primary use of the Up and Down navigation keys is for
movement within menus and navigation through contacts.
The primary use of the Left and Right keys is change settings
and edit text.

5
English
No. Item Description
8Action button The Action key acts much like the Enter key on a keyboard. In
general, press to conrm an action.
When you scroll to a check box, pressing the Action key selects
or clears the check box.
9Right Soft key Performs the task indicated above the button.
10 Back button Press to go back to the previous screen.
Press to delete in a text eld.
11 End key Press to end a call.
Press and hold to lock the keypad.
12 QWERTY keypad Press to enter text, numbers, and symbols.
13 Select button The Select button acts much like the Action key. Press this button to
conrm an action. When you scroll to a check box, press this button
to clear the check box.
14 Volume controller Press the arrow buttons to adjust the volume.
15 Earphone port Plug headset accessory to this port.
16 Mini-USB connector Use this connector to synchronize your data or to charge the
battery.
17 Camera lens This 2-megapixel camera comes with Auto-Focus (AF) lens and
ash light features.
18 Camera ashlight Allows you to capture images in a dim environment.
Press and hold the mode switcher button to turn this ashlight
on/off.
19 Speaker Allows you to listen audio media and phone calls.
20 Battery compartment Contains the battery that supplies power to the device.

6
English
Setting up your Smartphone
1. Remove the battery compartment cover.
2. Insert the SIM card into the slot with its nicked corner and its contacts face down.
3. Replace battery compartment cover.
To install a SIM card
123
No. Item Description
21 Camera button / Function
Side key By default, this button is assigned to activate the Camera
application:
Press to launch the camera viewnder.
Press to take a picture if already in camera mode.
To change the key assignment and activate other applications
using this button, press Start > More > Settings > More > Key
Assignment. From the dropdown list, select the application you
want to activate using this button.

7
English
To install a microSD card
1. Remove the battery compartment cover.
2. With the label side (usually the side with the card
manufacturer’s name) face up, and the barcode/serial
number side face down, insert the card into the
microSD card slot located on the right side of the
phone.
3. Push the card all the way into the slot until it ts
completely.
To charge the battery
1. Connect the AC adapter to a power source.
2. Connect the power cable plug to the mini USB sync and power connector.

8
English
To turn ON your phone
1. Press and hold Power ( ) for approximately three seconds until the display turns on.
3. If you are asked for a Personal Identication Number (PIN) code, key in the code using the
keypad, then press Action (
QWERTYUIOP
ASDF G HJKL
zXCVB N M,.
/
=
+
!
?
@
Space
Cap
). The main display shows the idle screen.
4. Enter your PIN and press Done. Wait for your operator and Microsoft screens to load.
Home screen
The Home screen automatically displays when you turn on your Smartphone or leave it idle.
Status indicators
Time/Date
Your next appointment
Select and press Action to
open Calendar
Your service provider
Select and press Action to
open Wireless Manager
Most recently-used programs
Left soft key command
Press the Left soft key to
launch the Start menu, which
displays all the installed
programs
Right soft key command
Press the Right soft key to open
Contacts, Messages, or Call History.
Network signal strength
Power status

9
English
Start Menu
Press More to display the
next screen of programs
QWERTY keypad
QWERTYUIOP
ASDF G HJKL
zXCVB N M,.
/
=
+
!
?
@
Space
Cap
Caps lock
Press to enter
uppercase
texts.
Input key
Press to change the input
mode.
Symbols key
Press and hold, then
short press the key
containing the symbol
you want to enter.
Symbols Table key
Press to display
the list of available
symbols.

10
English
Choosing a service provider
You can change your service provider using the Auto Conguration tool. The Auto Conguration tool
allows you to conveniently select and connect your 3G or GPRS service provider when using SIM
cards from different operators.
To choose a service provider:
1. From the Home screen, press Start then select Internet > AutoConguration.
2. Select service provider from the list.
3. Press Done when nished.
Changing regional and language settings
To change region and language settings:
1. From the Home screen, press Start then select Internet > More > Settings > More > More >
Regional Settings.
2. In Language, select your preferred language for phone interface and menus.
3. In Locale, select location. After selection, the format of the remaining elds for date, time,
number, and currency are automatically set to the standards used in the selected location.
You can also opt to change the remaining elds individually to your desired settings.
4. Press Done when nished.
NOTE Turn off the device to apply new region and language settings.

11
English
Makingyourrstcall
1. On the Home screen, start entering the phone number you want to call using the QWERTY
keypad.If you entered the wrong number, press Back
QWERTYUIOP
ASDF G HJKL
zXCVB N M,.
/
=
+
!
?
@
Space
Cap
to delete the last digit; press and
hold to delete all digits.
2. Once you have entered the number, press Call
QWERTYUIOP
ASDF G HJKL
zXCVB N M,.
/
=
+
!
?
@
Space
Cap
to make the call.
3. Press End
QWERTYUIOP
ASDF G HJKL
zXCVB N M,.
/
=
+
!
?
@
Space
Cap
to end the call.
Setting up an e-mail account
1. On the Home screen, press Start > Messaging > New E-mail Account....
3. In E-mail address, enter the e-mail address for this account.
4. Select Try to get e-mail settings automatically from the Internet. Automatic setup attempts to
download necessary e-mail server settings so that you do not need to enter them manually.
5. Follow the instructions to complete the setup.
NOTE If Automatic setup is unsuccessful, you will have to contact your ISP (Internet
Service Provider) to obtain information for entering settings manually.
Editing MMS settings
On the Home screen, press Start > Messaging > MMS. press Menu > Options > Account
Options > MMS to open the Preferences screen and edit MMS settings. Select or clear check boxes
according to your needs. Press Menu > MMS Settings > MMSC Settings, and select your Internet
Service Provider from the list.

12
English
Sendingyourrstmessage(text/MMS/e-mail)
1. On the Home screen, press Start > Messaging.
2. Select Text Messages, MMS, or an e-mail account, and press Action
QWERTYUIOP
ASDF G HJKL
zXCVB N M,.
/
=
+
!
?
@
Space
Cap
or Select .
3. Press New .
4. In To, enter the mobile phone number (for text and MMS messages) or e-mail address (for MMS
and e-mail messages) of the person to which you want to send the message or press Action
QWERTYUIOP
ASDF G HJKL
zXCVB N M,.
/
=
+
!
?
@
Space
Cap
to select the person from your contacts.
5. Press the Down navigation key, and enter your message.
6. When nished, press Send.
NOTE If you are working ofine, MMS and e-mail messages are saved to the Outbox
folder and sent the next time you connect.
Changing ring tone volume
1. On the Home screen, press Start >Settings>Prole.
2. Scroll to the prole you want to change, press Menu , and select Edit.
3. Select Ring Volume and use the Left/Right navigation keys to adjust the volume.
4. Press Done .
Using your Bluetooth headset
1. On the Home screen, press Start > Settings > More > Connections > Bluetooth > Menu and
select Turn On Bluetooth and Turn On Visibility.
2. Turn on your Bluetooth headset and bring it to within 10 meters of your Smartphone.

13
English
3. Put your Bluetooth headset into pairing mode. Refer to your Bluetooth headset’s user manual for
instructions.
4. On your phone, press Add new device....
5. Select the Bluetooth headset on the Add Devices list and press Next.
6. Enter the passkey provided in the headset user manual. The phone will now pair with the
headset.
7. Set the Bluetooth mode on your phone to On and you are ready to talk hands free.
NOTE Refer to 6-4 Using Bluetooth of the user guide for more information on setting
up Bluetooth partnerships.
Synchronizing information with ActiveSync
IMPORTANT Do not connect your phone to your PC until you have nished installing
ActiveSync.
1. Place the Getting Started CD into the optical
drive of your PC and follow the on-screen
instructions to install ActiveSync.
2. After installation is complete, connect the
appropriate end of the USB sync cable to the
mini USB and power connector at the bottom
of your Smartphone and the other end to a
USB port on your PC (see illustration).
3. ActiveSync will autostart when it detects your
phone, and the connection wizard will open.
Work through each screen of the wizard, and
select the information you want to synchronize.

14
English
Entering text, numbers, and symbols
Use the QWERTY keypad to enter text, numbers, and symbols.
Your Smartphone supports two input modes for entering text and numbers: Multipress, and
Numeric. Multipress is used for entering text, and Numeric mode is used for entering numbers.
When you select a eld that requires text or numbers, the phone automatically selects the
appropriate input mode. The status indicator on the top right side of the display screen shows the
input mode that is currently active.
You may enter symbols from the QWERTY keypad or from the list of available symbols.
QWERTYUIOP
ASDF G HJKL
zXCVB N M,.
/
=
+
!
?
@
Space
Cap
Caps lock
Press to enter
uppercase
texts.
Input key
Press to change the input
mode.
Symbols key
Press and hold, then
short press the key
containing the symbol
that you want to enter.
Symbols Table key
Press to display
the list of available
symbols.

15
English
To change the input mode
1. Press key on the keypad to change
the input mode.
The status indicator for the selected input
mode appears at the top right corner of the
screen.
INDICATOR INPUT MODE
Multipress text input mode,
lowercase
Numeric input mode
QWERTYUIOP
ASDF G HJKL
zXCVB N M,.
/
=
+
!
?
@
Space
Cap
Using Multipress mode
Multipress mode allows you to key in text by pressing keys on the keypad.
To enter uppercase texts
To enter uppercase texts, make sure that the input mode is in Multipress mode ( ), then press
the key.
To change the Multipress time out
On the Home screen, press Start > More > Settings > More > More > Accessibility. In Multipress
time out, select the length of the pause between key presses.
QWERTYUIOP
ASDF G HJKL
zXCVB N M,.
/
=
+
!
?
@
Space
Cap

16
English
Using Numeric mode
To enter numbers, use Numeric mode. If you need to enter a number within a line of text, change to
Numeric mode to enter the number, and then change back to Multipress mode to nish entering the
text.
1. If necessary, change to Numeric mode by pressing .
2. To enter a number, press once. To enter numbers, press twice.
3. Change back to Multipress input mode by pressing once.
QWERTYUIOP
ASDF G HJKL
zXCVB N M,.
/
=
+
!
?
@
Space
Cap
QWERTYUIOP
ASDF G HJKL
zXCVB N M,.
/
=
+
!
?
@
Space
Cap
NOTE If a eld permits a numeric entry only, such as a phone number, the input mode
automatically defaults to Numeric mode.
Entering symbols
You may enter symbols either from the QWERTY keypad or from the list of available symbols.
To enter symbols
• To enter symbols from your QWERTY keypad, press and hold the key, and short press the
key containing the symbol that you want to enter.
For example, if you want to enter a “+” symbol: Press and hold the key, and short press
the key.
• If the symbol you want to use is not on the QWERTY keypad, press the key to display the listIf the symbol you want to use is not on the QWERTY keypad, press the key to display the list
of available symbols, then select the symbol you want to enter.
QWERTYUIOP
ASDF G HJKL
zXCVB N M,.
/
=
+
!
?
@
Space
Cap
QWERTYUIOP
ASDF G HJKL
zXCVB N M,.
/
=
+
!
?
@
Space
Cap
QWERTYUIOP
ASDF G HJKL
zXCVB N M,.
/
=
+
!
?
@
Space
Cap
QWERTYUIOP
ASDF G HJKL
zXCVB N M,.
/
=
+
!
?
@
Space
Cap
QWERTYUIOP
ASDF G HJKL
zXCVB N M,.
/
=
+
!
?
@
Space
Cap
QWERTYUIOP
ASDF G HJKL
zXCVB N M,.
/
=
+
!
?
@
Space
Cap

17
English
For more information
Refer to the following sources for additional information on the ASUS M530w Smartphone.
• ASUS M530w Smartphone User Manual
• ActiveSync®Help (on your PC)
Web sites and technical support
Technical support: +886-2-2894-3447
Support Fax: +886-2-2890-7698
Web site: www.asus.com.tw
Software download: support.asus.com.tw*
Smartphone web site: www.microsoft.com/windowsmobile/smartphone
* Available on this site is an online Technical Inquiry Form that you can ll out to contact technical support.
15G06A302000
Basic care and maintenance
Cleaning your phone
Do not use solvents or abrasives to clean your phone. Use only a slightly damp cloth to clean the
outer surface. To remove dust from the screen, use a soft lint-free cloth.
Battery use and care
Use your phone only with batteries, chargers, and accessories recommended by the manufacturer.
Do not leave your phone connected to the charger for more than one week as overcharging may
result in shorter battery life. All batteries have limited lives, and the battery life will decrease after
repeated charges. When the operating time is noticeably shorter than usual, replace the battery with
a new one.

18
Dansk
Hurtigstarts-guide
M530w
SMARTPHONE
QWERTYUIOP
ASDF G HJKL
zXCVB N M,.
/
=
+
!
?
@
Space
Cap

19
Dansk
M530w
Lær din smart-telefon at kende
QWERTYUIOP
ASDF G HJKL
zXCVB N M,.
/
=
+
!
?
@
Space
Cap
Udseende
Set oppefra
Dele:
1. Strøm/Hurtiglisteknap
2. Strøm LED
3. I underkameralinse
4. Kaldeknap
5. Venstre programmerbare knap
6. Hjemknap
7. Navigationsknapper
8. Handlingsknap
9. Højre programmerbare knap
10. Tilbageknap
11. Slutknap
12. QWERTY tastatur
13. Vælgeknap
14. Lydstyrke
1
2
3
4
5
6
7
8
9
10
11
12
13
14
1
23
4
5
11
7
8
10
9
6
12
13
14
Set fra siden Set forfra
Other manuals for M530w
2
Table of contents
Languages:
Other Asus Cell Phone manuals

Asus
Asus ZenFone 4 User manual

Asus
Asus 6z User manual

Asus
Asus ZenFone V Live User manual
Asus
Asus ZenFone 3 Laser ZC551KL User manual

Asus
Asus ZENFONE T500 User manual

Asus
Asus V66 Handset Manager User manual

Asus
Asus J501 User manual

Asus
Asus I01WD User manual

Asus
Asus J208 User manual

Asus
Asus Zenfone 8 Flip User manual