Asus CMAX6000 User manual

User Guide
CMAX6000
Wireless AX DOCSIS 3.1 Cable Modem Router

CMAX6000
First Edition
March 2020
Copyright © 2020 ASUSTeK Computer Inc. All Rights Reserved.
No part of this manual, including the products and soware described in it, may
be reproduced, transmitted, transcribed, stored in a retrieval
system, or translated into any language in any form or by any means, except
documentation kept by the purchaser for backup purposes, without the express
written permission of ASUSTeK Computer Inc. (“ASUS”).
Product warranty or service will not be extended if: (1) the product is repaired,
modied or altered, unless such repair, modication of alteration is authorized in
writing by ASUS; or (2) the serial number of the product is defaced or missing.
ASUS PROVIDES THIS MANUAL “AS IS” WITHOUT WARRANTY OF ANY
KIND, EITHER EXPRESS OR IMPLIED, INCLUDING BUT NOT LIMITED TO
THE IMPLIED WARRANTIES OR CONDITIONS OF MERCHANTABILITY
OR FITNESS FOR A PARTICULAR PURPOSE. IN NO EVENT SHALL ASUS,
ITS DIRECTORS, OFFICERS, EMPLOYEES OR AGENTS BE LIABLE FOR
ANY INDIRECT, SPECIAL, INCIDENTAL, OR CONSEQUENTIAL DAMAGES
(INCLUDING DAMAGES FOR LOSS OF PROFITS, LOSS OF BUSINESS, LOSS
OF USE OR DATA, INTERRUPTION OF BUSINESS
AND THE LIKE), EVEN IF ASUS HAS BEEN ADVISED OF THE
POSSIBILITY OF SUCH DAMAGES ARISING FROM ANY DEFECT OR
ERROR IN THIS MANUAL OR PRODUCT.
SPECIFICATIONS AND INFORMATION CONTAINED IN THIS MANUAL
ARE FURNISHED FOR INFORMATIONAL USE ONLY, AND ARE SUBJECT
TO CHANGE AT ANY TIME WITHOUT NOTICE, AND SHOULD NOT
BE CONSTRUED AS A COMMITMENT BY ASUS. ASUS ASSUMES NO
RESPONSIBILITY OR LIABILITY FOR ANY ERRORS OR INACCURACIES
THAT MAY APPEAR IN THIS MANUAL, INCLUDING THE PRODUCTS
AND SOFTWARE DESCRIBED IN IT.
Products and corporate names appearing in this manual may or may not be
registered trademarks or copyrights of their respective companies, and are used
only for identication or explanation and to the owners’ benet, without intent to
infringe.

3
Contents
1 Getting to know your cable modem router ............................... 5
1.1 Package contents.................................................................................................... 5
1.2 Your cable modem router.................................................................................... 5
1.3 Positioning your router......................................................................................... 5
1.4 Product label ............................................................................................................ 5
1.5 Hardware Setup....................................................................................................... 5
2 Conguring the General Settings ............................................... 6
2.1 Internet service........................................................................................................ 6
2.2 Basic Network Setup.............................................................................................. 7
3 Setting up Your Gateway ............................................................. 8
3.1 At a Glance ................................................................................................................ 8
3.2 Connection................................................................................................................ 8
3.2.1 Status .............................................................................................................................9
3.2.2 Cable Network............................................................................................................9
3.2.3 Local IP Conguration...........................................................................................11
3.2.4 Wi-Fi............................................................................................................................. 12
3.3 Firewall......................................................................................................................21
3.3.1 IPv4 Firewall / IPv6 Firewall.................................................................................21
3.4 Software ...................................................................................................................22
3.5 Hardware..................................................................................................................22
3.5.1 Hardware System....................................................................................................22
3.5.2 LAN ..............................................................................................................................23
3.5.3 Wireless ......................................................................................................................24
3.6 Wizard .......................................................................................................................24
4 Managing Network Clients........................................................ 26
4.1 Connected Devices ..............................................................................................26
4.1.1 Reserved IP ............................................................................................................... 27

4
4.2 Setting up Parental Control...............................................................................28
4.2.1 Managed Sites ........................................................................................................29
4.2.2 Managed Services .................................................................................................30
4.2.3 Managed Devices ..................................................................................................32
4.2.4 Reports ......................................................................................................................33
5 Conguring the Advanced Settings ......................................... 34
5.1 Port Forwarding.....................................................................................................34
5.2 Port Triggering .......................................................................................................36
5.3 Remote Management .........................................................................................38
5.4 DMZ ...........................................................................................................................39
5.5 Device Discovery...................................................................................................40
6 Troubleshooting......................................................................... 42
6.1 Logs............................................................................................................................42
6.2 Diagnostic Tools ....................................................................................................43
6.3 Wi-Fi Spectrum Analyzer ....................................................................................44
6.4 Reset/Restore Gateway.......................................................................................45
6.5 Change Password..................................................................................................46
6.6 Feedback..................................................................................................................47

5
11 Getting to know your cableGetting to know your cable
modem routermodem router
1.1 Package contents
1.2 Your cable modem router
1.3 Positioning your router
1.4 Product label
The product label at the bottom of your cable modem router
contains the default Wi-Fi network name (SSID), Wi-Fi password,
login information for the web graphical user interface (web GUI),
serial number, MAC address, and other information.
1.5 Hardware Setup

6
22 Conguring the GeneralConguring the General
SettingsSettings
2.1 Internet service
Visit your ISP’s website and follow the on-screen instructions to
activate your Internet service. If you subscribed to automatic IP
(DHCP) service, the Internet is accessible now.
NOTES:
• Your ISP’s contact information may change. Visit your ISP’s
website or check your Internet service billing statement for
the latest contact information.
• If your router still does not connect to the Internet, contact
your ISP and do the following:
1. Provide your router’s serial number and MAC address
located on the product label, and conrm with your ISP if
it is already active.
2. If your router is visible to your ISP but there is still no
Internet connection, reboot your router and check the
online status again.
3. If your router is still not visible to your ISP or your ISP can
not provide technical support, do the following:
1) Go to router.asus.com or http://10.0.0.1.
2) Enter login username and password on the screen
and you will be directed to the At a Glance page.
3) On the left-side menu, click Troubleshooting and
select Feedback tab.
4) Click the Generate log and Download File buttons
to save the log les and send the log les to
cm_feedback@asus.com. We will reply to you as soon
as possible.

7
2.2 Basic Network Setup
To set up your CMAX6000 settings:
1. Launch your web browser and go to Enter the default IP
address, router.asus.com or http://10.0.0.1.
2. Enter default login name“admin” and password “password”
on the login screen.
3. Click Sign In to log into the software conguration interface.
4. Set up a new password when prompted.
5. Click Save and log into the software conguration interface
with your new password.

8
33 Setting up Your GatewaySetting up Your Gateway
3.1 At a Glance
This is the rst screen displayed when you successfully log into
the web management interface. The At a Glance of the Gateway
section allows you to view the network connectivity and Wi-Fi
connection status, to congure your device operation mode
as router or bridge, and to save/upload cable modem router
settings.
3.2 Connection
The Connection section allows you to view network connection
status, manage your network clients and congure your
network’s security settings.

9
3.2.1 Status
The Status page displays device information and Cable Network
Internet/Wireless/LAN connection status connected to your
network.
To view your network connection status:
1. From the navigation panel, go to Gateway > Connection tab.
2. Select Status from the dropdown menu of the Connection
section.
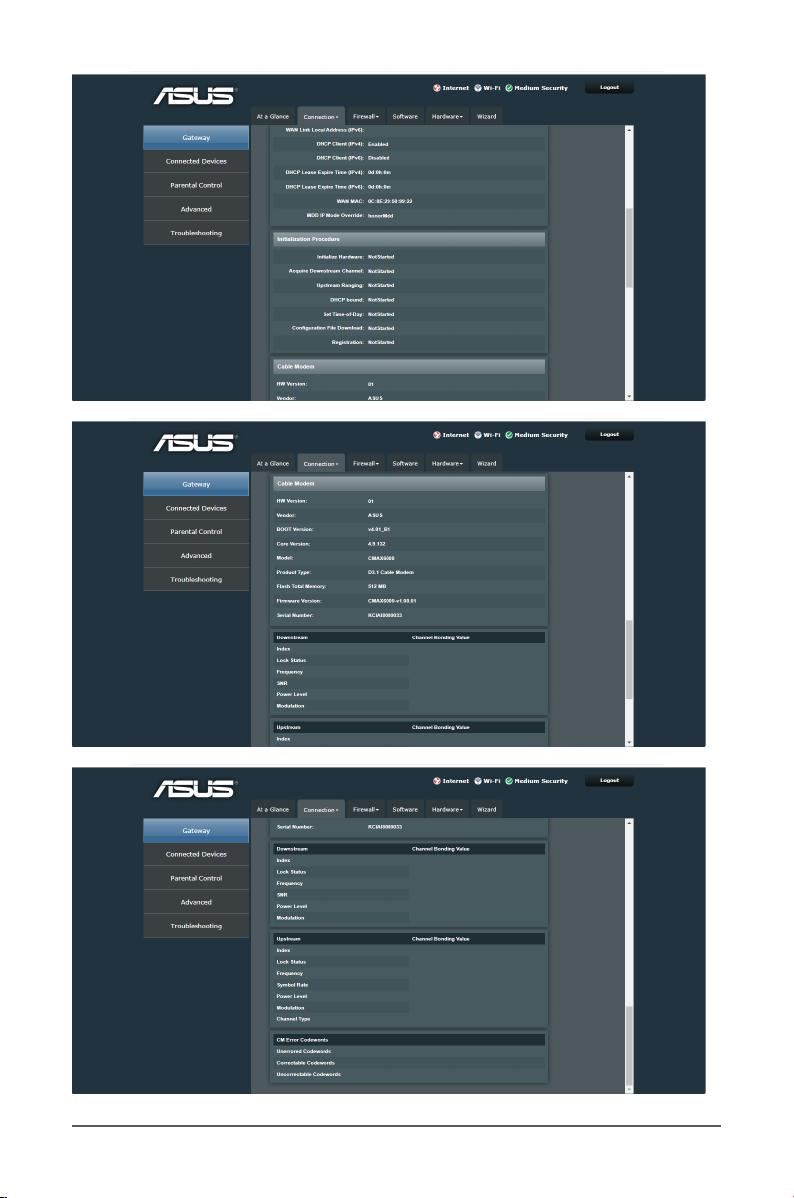
3.2.2 Cable Network
The Cable Network screen displays the settings of WAN
connection status.
10
Table of contents
Other Asus Modem manuals

Asus
Asus 4G-AC68U User manual

Asus
Asus AAM6000EV User manual

Asus
Asus ZENFONE T500 User manual

Asus
Asus PCE-AX58BT User manual

Asus
Asus DSL-N17U Instruction manual

Asus
Asus DSL-N10E User manual

Asus
Asus SpaceLink WL-110 User manual

Asus
Asus WL-600g User manual

Asus
Asus DSL-AC68U User manual

Asus
Asus 4G-AC53U User manual

Asus
Asus AAM6000UG-ALC Operating instructions

Asus
Asus PCE-AC88 User manual

Asus
Asus US2-400 User manual

Asus
Asus eMTA User manual

Asus
Asus WL-140 User manual

Asus
Asus USB-AX56 User manual

Asus
Asus RT-N300 B1 User manual

Asus
Asus AAM6000UG User manual

Asus
Asus 4G-N16 User manual

Asus
Asus U3100mini User manual


