AT&T SB8740 User manual

User’s manual
SB8740
Accessory cordless handset for use
with AT&T model SB8735
BC

Congratulations
on your purchase of this AT&T product. Before using this AT&T
product, please read the Important safety information on
pages 12-14 of this manual. Please thoroughly read this user’s
manual for all the feature operations and troubleshooting
information necessary to install and operate your new AT&T
product. You can also visit our website at
www.telephones.att.com or call 1 (800) 222-3111. In
Canada, dial 1 (866) 288-4268.
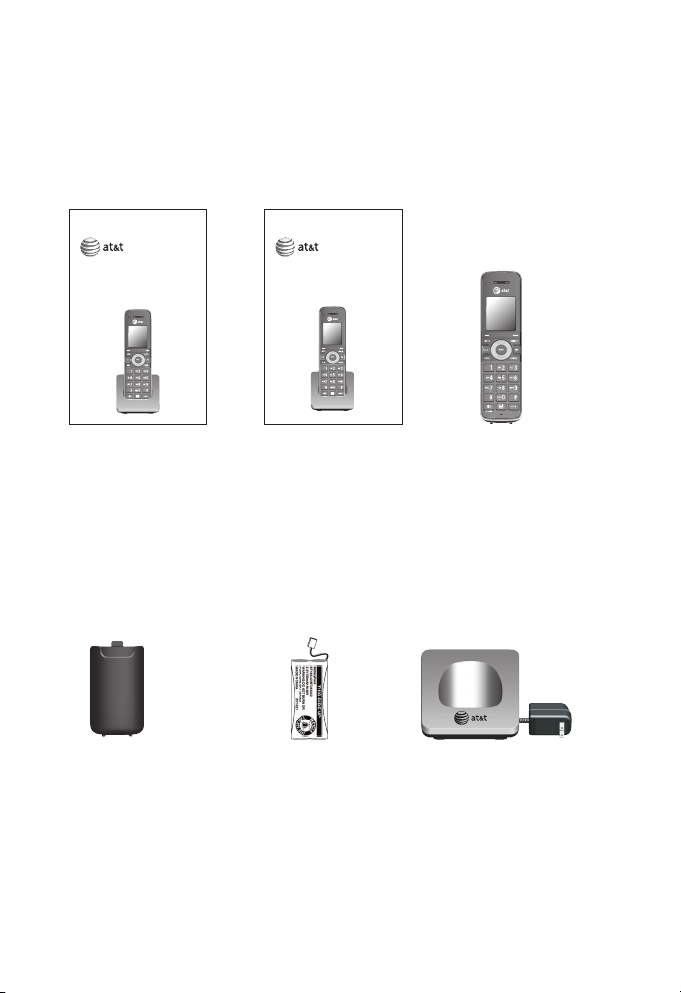
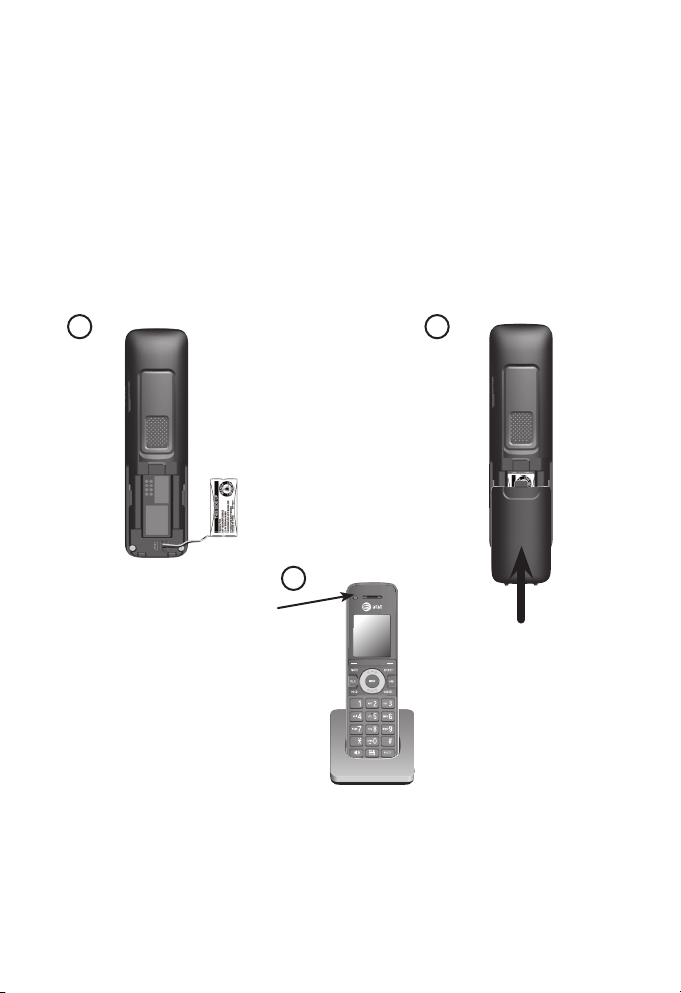
Model number: SB8740
Type: Accessory cordless handset for use with AT&T model SB8735Accessory cordless handset for use with AT&T model SB8735
Serial number:
Purchase date:
Place of purchase:
Both the model and serial numbers of your AT&T product can be
found on the bottom of the telephone base.
Save your sales receipt and original packaging in case it is
necessary to return your telephone for warranty service.
© 2013 Advanced American Telephones. All Rights Reserved. AT&T and
the AT&T logo are trademarks of AT&T Intellectual Property licensed to
Advanced American Telephones, San Antonio, TX 78219. Printed in China.
T
Compatible with
Hearing Aid T-Coil
TIA-1083
Telephones identified with this logo have reduced noise and
interference when used with most T-coil equipped hearing aids and
cochlear implants. The TIA-1083 Compliant Logo is a trademark of
the Telecommunications Industry Association. Used under license.

Parts checklist
Your telephone package contains the following items. Save
your sales receipt and original packaging in the event warranty
service is necessary.
Cordless handset
SB8740
User's manual
SB8740
Quick start guide
Charger for cordless
handset with power
adapter installed
Battery for cordless
handset
Battery compartment
cover
User’s manual
SB8740
Accessory Cordless Handset
for SB8735
Quick start guide
SB8740
Accessory Cordless Handset
for SB8735

1
Your product may be shipped with a protective sticker covering
the handset display - remove it before use.
For customer service or product information, visit our website at
www.telephones.att.com or call 1 (800) 222-3111. In
Canada, dial 1 (866) 288-4268.
Avoid placing the telephone base too close to:
Communication devices such as television sets, VCRs, or other
cordless telephones.
Excessive heat sources.
Noise sources such as a window with traffic outside, motors,
microwave ovens, refrigerators, or fluorescent lighting.
Excessive dust sources such as a workshop or garage.
Excessive moisture.
Extremely low temperature.
Mechanical vibration or shock such as on top of a washing
machine or work bench.
•
•
•
•
•
•
•
You must install and
charge the handset
battery before using the
cordless handset.
See pages 5-7 for easy
instructions.
Getting started
Installation

2
Charge light
On when the handset is charging in the
charger.
Softkeys (2)
Press to select a menu item displayed above
the key.
MUTE
During a call, press to mute the microphone.
TALK
Press to make or answer a call.
HOLD
Press to hold a call.
REDIAL/PAUSE
Press to view the last 10 numbers dialed.
/SPEAKER
Press to turn on the handset speakerphone.
Press again to resume normal handset use.
•
•
•
•
•
•
•
Getting started
Quick reference guide

3
Getting started
Quick reference guide
VOL/ DIR
Press to scroll up while in menus.
During a call, press to increase the listening
volume.
Press to show directory entries when the telephone
is not in use.
MENU
Press to enter the menu.
SELECT
While in a menu, press to select an item or save an
entry or setting.
OFF
During a call, press to hang up.
CANCEL
While using menus, press to return to idle mode.
VOL/ CID
Press to scroll down while in menus.
During a call, press to decrease the listening
volume.
Press to show the caller ID history when the
telephone is not in use.
MUTE/DELETE
While predialing, press to delete digits.
While reviewing the directory entry, press to delete
an individual entry.
While entering or editing a directory entry, press to
erase a digit or character.
•
•
•
•
•
•
•
•
•
•
•
•
•

4
Getting started
Quick reference guide
Belt clip

5
Plug the power adapter into an
electrical outlet not controlled
by a wall switch.
Getting started
Charger installation
Install the charger as shown below.
IMPORTANT INFORMATION
Use only the power adapter supplied with this product. To order a replacement
power adapter, visit our website at www.telephones.att.com, or call
1 (800) 222-3111. In Canada, dial 1 (866) 288-4268.
The power adapter is intended to be correctly oriented in a vertical or floor mount
position. The prongs are not designed to hold the plug in place if it is plugged into
a ceiling, under-the-table or cabinet outlet.
1.
2.

6
Install the battery as shown on the following page. Once you
have installed the battery, the screen indicates the battery
status (see the table below). If necessary, place the handset in
the charger to charge the battery. For best performance, keep
the handset in the charger when not in use. The battery is fully
charged after 11 hours of continuous charging. See the table on
page 22 for battery operating times.
If the screen is blank, you need to charge the handset without
interruption for at least 30 minutes to give the handset enough
charge to use the telephone for a short time. When the battery
is low, the handset shows Low battery and a flashing .
Battery indicators Battery status Action
The screen is blank or
shows Place in charger
and flashes.
The battery has no or
very little charge. The
handset cannot be used.
Charge without
interruption (at least
30 minutes).
The screen shows
Low battery and
flashes.
Battery has enough
charge to be used for a
short time.
Charge without
interruption (at least
30 minutes).
The screen shows
EXT XX. (XX represents
the extension number of
the device the handset
is registered to).
Battery is charged. To keep the battery
charged, place it in the or
charger when not in use.
Getting started
Battery installation and charging

7
Getting started
Battery installation and charging
Plug the battery connector securely into the socket inside the
handset battery compartment. Insert the supplied battery with
the label THIS SIDE UP facing up as indicated.
Align the cover flat against the battery compartment, then
slide it upwards until it clicks into place.
Charge the handset by placing it face forward in the charger.
The charge light is on when charging.
1.
2.
3.
Install the battery as shown below.
The charge light
IMPORTANT INFORMATION
Use only the supplied rechargeable battery or replacement battery (model
BT166342). To order a replacement battery, visit our website at
www.telephones.att.com, or call 1 (800) 222-3111. In
Canada, dial 1 (866) 288-4268.
If you do not use the handset for a long time, disconnect and remove the
battery to prevent possible leakage.
•
•
1 2
3

8
The charger is ready for tabletop use. If you want to mount
the charger on a wall, use two 10mm screws and wall anchors
(not provided) to hold the charger in place. The screws and
wall anchors are available for purchase in many hardware or
consumer electronics retailers. You might need a professional to
install the charger.
To mount the charger on the wall
Use a pencil to mark the desired positions of the two holes
on the wall, make sure the space between the two holes is
30mm. Drill two holes in the wall according to the marks. Cut
out the wall mount installation card at the back of this user’s
manual for measurement.
1.
Screw spacing 30mm
(1.18 inches)
If you drill the holes into a stud, go to step 3.
-OR-
If you drill the holes into an object other than a stud, insert
the wall anchors (not provided) into the holes and tap gently
on the ends with a hammer until the wall anchors are flush
with the wall.
2.
Getting started
Wall mount installation

9
Getting started
Wall mount installation
Insert the screws (not provided) into the holes and tighten
them until only 1/4 inch of the screws are exposed.
3.
Align the holes at the back of the charger with the screws on
the wall and slide the charger down until it locks into place.
4.

10
You can use this handset handsfree when you install any
industry-standard 2.5mm corded telephone headset (purchased
separately). For best results, use an AT&T 2.5mm corded headset.
To purchase a corded headset, visit our website at
www.telephones.att.com, or call 1 (800) 222-3111. In
Canada, dial 1 (866) 288-4268.
Getting started
Adding a corded headset
Plug a 2.5 mm
headset into the
HEADSET jack on the
side of the handset.
Side view of the handset

11
Taking care of your telephone
Your cordless telephone contains sophisticated electronic parts, so you must
treat it with care.
Avoid rough treatment.
Place the corded handset down gently.
Save the original packing materials to protect your cordless telephone if you
ever need to ship it.
Avoid water
You can damage your cordless telephone if it gets wet. Do not use the corded
handset in the rain, or handle it with wet hands. Do not install the cordless
telephone near a sink, bathtub or shower.
Electrical storms
Electrical storms can sometimes cause power surges harmful to electronic
equipment. For your own safety, take caution when using electric appliances
during storms.
Cleaning your telephone
Your cordless telephone has a durable plastic casing that should retain its
luster for many years. Clean it only with a soft cloth slightly dampened with
water or a mild soap.
Do not use excess water or cleaning solvents of any kind.
•
•
•
•
•
•
•
•
Remember that electrical appliances can cause serious injury if used when
you are wet or standing in water. If the telephone base should fall into
water, DO NOT RETRIEVE IT UNTIL YOU UNPLUG THE POWER CORD AND
TELEPHONE LINE CORDS FROM THE WALL, then pull the unit out by the
unplugged cords.
Appendix
Maintenance

12
This symbol is to alert you to important operating or servicing
instructions that may appear in this user’s manual. Always follow basic
safety precautions when using this product to reduce the risk of injury,
fire, or electric shock.
Safety information
Read and understand all instructions in the user’s manual. Observe all
markings on the product.
Avoid using a telephone during a thunderstorm. There may be a slight chance
of electric shock from lightning.
Do not use the telephone to report a gas leak in the vicinity of the leak. Under
certain circumstances, a spark may be created when the adapter is plugged
into the power outlet, or when the handset is replaced in its cradle. This is a
common event associated with the closing of any electrical circuit. The user
should not plug the phone into a power outlet, and should not put a charged
handset into the cradle, if the phone is located in an environment containing
concentrations of flammable or flame-supporting gases, unless there is
adequate ventilation. A spark in such an environment could create a fire or
explosion. Such environments might include: medical use of oxygen without
adequate ventilation; industrial gases (cleaning solvents; gasoline vapors; etc.);
a leak of natural gas; etc.
Do not use this product near water, or when you are wet. For example, do
not use it in a wet basement or shower, or next to a swimming pool, bathtub,
kitchen sink, or laundry tub. Do not use liquids or aerosol sprays for cleaning.
If the product comes in contact with any liquid, unplug any line or power cord
immediately. Do not plug the product back in until it has dried thoroughly.
Install this product in a protected location where no one can trip over any line
or power cords. Protect cords from damage or abrasion.
f you cannot solve the problem, or if the product is damaged, refer to the
Limited warranty section on pages 19-21. Do not open this product except
as directed in your user’s manual. Opening the product or reassembling it
incorrectly may expose you to hazardous voltages or other risks.
Replace backup battery only as described in your user’s manual (see pages 6-7).
Do not burn or puncture batteries — they contain caustic chemicals.
This power adapter is intended to be correctly oriented in a vertical or floor
mount position. The prongs are not designed to hold the plug in place if it is
plugged into a ceiling, an under-the-table or cabinet outlet.
Caution: Use only the power adapter provided with this product. To obtain a
replacement, visit our website at
www.telephones.att.com or call
1 (800) 222-3111. In Canada, dial 1 (866) 288-4268.
•
•
•
•
•
•
•
•
Appendix
Important safety information

13
Especially about cordless telephones
Privacy: The same features that make a cordless telephone convenient
create some limitations. Telephone calls are transmitted between the
telephone base and the handset by radio waves, so there is a possibility that
your cordless telephone conversations could be intercepted by radio receiving
equipment within range of the cordless handset. For this reason, you should
not think of cordless telephone conversations as being as private as those on
corded telephones.
Electrical power: The telephone base of this cordless telephone must be
connected to a working electrical outlet which is not controlled by a wall
switch. Calls cannot be made from the handset if the telephone base is
unplugged, switched off or if the electrical power is interrupted.
Potential TV interference: Some cordless telephones operate at frequencies
that may cause interference to TVs and VCRs. To minimize or prevent
such interference, do not place the telephone base of the cordless telephone
near or on top of a TV or VCR. If interference is experienced, moving the
cordless telephone farther away from the TV or VCR will often reduce or
eliminate the interference.
Rechargeable batteries: This product contains nickel-metal hydride
rechargeable batteries. Exercise care in handling batteries in order not to
create a short circuit with conductive material such as rings, bracelets, and
keys. The battery or conductor may overheat and cause harm. Observe proper
polarity between the battery and the battery charger.
Nickel-metal hydride rechargeable batteries: Dispose of these batteries in
a safe manner. Do not burn or puncture. Like other batteries of this type, if
burned or punctured, they could release caustic material which could
cause injury.
The RBRC™ Seal means that the manufacturer is voluntarily
participating in an industry program to collect and recycle
nickel-metal hydride rechargeable batteries when taken out
of service within the United States. These batteries may be
taken to a participating local retailer of replacement batteries
or recycling center. Or you may call 1 (800) 8-BATTERY for
locations accepting spent Ni-MH batteries.
•
•
•
•
•
Appendix
Important safety information

14
Precautions for users of implanted cardiac pacemakers
Cardiac pacemakers (applies only to digital cordless telephones):
Wireless Technology Research, LLC (WTR), an independent research entity, led
a multidisciplinary evaluation of the interference between portable wireless
telephones and implanted cardiac pacemakers. Supported by the U.S. Food and
Drug Administration, WTR recommends to physicians that:
Pacemaker patients
Should keep wireless telephones at least six inches from the pacemaker.
Should NOT place wireless telephones directly over the pacemaker, such as in
a breast pocket, when it is turned ON.
Should use the wireless telephone at the ear opposite the pacemaker.
WTR’s evaluation did not identify any risk to bystanders with pacemakers from
other persons using wireless telephones.
Especially about telephone answering systems
Two-way recording: This unit does not sound warning beeps to inform the other
party that the call is being recorded. To ensure that you are in compliance with
any federal or state regulations regarding recording a telephone call, you should
start the recording process and then inform the other party that you are recording
the conversation.
SAVE THESE INSTRUCTIONS
•
•
•
Appendix
Important safety information

15
Appendix
Energy-saving charging mode
When this mode is activated, all cordless telephone functions,
except handset battery charging, will be disabled.
To activate the energy-saving charging mode:
Make sure the handset is plugged with a charged battery
before proceeding. Make sure the telephone base is
connected to power.
Press MENU on the handset.
Press or to scroll to User Settings and press SELECT.
Press or to scroll to Registration and press SELECT.
Press or to scroll to Deregister and press SELECT.
The screen shows Please wait... The process takes up to
10 seconds to complete. The handset displays Handset is
deregistered.
If the phone fails to enter this mode, repeat Step 1 to Step 6 above.
When the handset successfully enters the energy-saving
charging mode, the CHARGE light turns off and its screen
displays At the base, starts handset registration. Then
put HS on cradle to register.
To deactivate the energy-saving charging mode:
Make sure the handset is plugged with a charged battery
before proceeding. Make sure the handset charger and the
telephone base are connected to power.
Press MENU on the telephone base.
Press or to scroll to User Settings and press SELECT.
Press or to scroll to DECT handset and press SELECT.
The screen displays Dect handset: register. Press select on
the telephone base. The base displays Registering...
Place the handset in the charger.
-OR-
If the handset is already in the charger, lift it from the
charger then place it back again.
Wait until the registration process is successful. The handset
displays Success and the base displays Registration succeed.
1.
2.
3.
4.
5.
6.
1.
2.
3.
4.
5.
6.

16
This equipment complies with Part 68 of the FCC rules and with technical
requirements adopted by the Administrative Council for Terminal Attachments
(ACTA). The label on the back or bottom of this equipment contains, among other
things, a product identifier in the format US:AAAEQ##TXXXX. This identifier must
be provided to your telephone service provider upon request.
The plug and jack used to connect this equipment to premises wiring and the
telephone network must comply with the applicable Part 68 rules and technical
requirements adopted by ACTA. A compliant telephone cord and modular plug
is provided with this product. It is designed to be connected to a compatible
modular jack that is also compliant. An RJ11 jack should normally be used
for connecting to a single line and an RJ14 jack for two lines. See Installation
Instructions in the user’s manual.
The Ringer Equivalence Number (REN) is used to determine how many devices you
may connect to your telephone line and still have them ring when you are called.
The REN for this product is encoded as the 6th and 7th characters following the
US: in the product identifier (e.g., if ## is 03, the REN is 0.3). In most, but not
all areas, the sum of all RENs should be five (5.0) or less. For more information,
please contact your telephone service provider.
This equipment may not be used with Party Lines. If you have specially wired
alarm dialing equipment connected to telephone line, ensure the connection of
this equipment does not disable your alarm equipment. If you have questions
about what will disable the alarm equipment, consult your telephone service
provider or a qualified installer.
If this equipment is malfunctioning, it must be unplugged from the modular jack
until the problem has been corrected. Repairs to this telephone equipment can
only be made by the manufacturer or its authorized agents. For repair procedures,
follow the instructions outlined under the Limited Warranty.
If this equipment is causing harm to the telephone network, the telephone
service provider may temporarily discontinue your telephone service. The
telephone service provider is required to notify you before interrupting service.
If advance notice is not practical, you will be notified as soon as possible. You
will be given the opportunity to correct the problem and the telephone service
provider is required to inform you of your right to file a complaint with the FCC.
Your telephone service provider may make changes in its facilities, equipment,
operation, or procedures that could affect the proper functioning of this
product. The telephone service provider is required to notify you if such changes
are planned.
Appendix
FCC part 68 and ACTA

17
If this product is equipped with a corded or cordless handset, it is hearing aid
compatible.
If this product has memory dialing locations, you may choose to store emergency
telephone numbers (e.g., police, fire, medical) in these locations. If you do store or
test emergency numbers, please:
Remain on the line and briefly explain the reason for the call before hanging up.
Perform such activities in off-peak hours, such as early morning or late evening.
Industry Canada
Operation is subject to the following two conditions: (1) this device may not cause
harmful interference, and (2) this device must accept any interference, including
interference that may cause undesired operation.
The term ‘’IC:‘’ before the certification/registration number only signifies that the
Industry Canada technical specifications were met.
The Ringer Equivalence Number (REN) for this terminal equipment is 0.1. The
REN is an indication of the maximum number of devices allowed to be connected
to a telephone interface. The termination on an interface may consist of any
combination of devices subject only to the requirement that the sum of the RENs
of all the devices does not exceed five.
This product meets the applicable Industry Canada technical specifications.
Appendix
FCC part 68 and ACTA
Table of contents
Other AT&T Handset manuals

AT&T
AT&T TL90071 User manual

AT&T
AT&T SB67108 - AT&T User manual

AT&T
AT&T CL80101 User manual

AT&T
AT&T CL80100 User manual

AT&T
AT&T TL90073 User manual

AT&T
AT&T BL103-0K User manual

AT&T
AT&T GL2113-0 User manual

AT&T
AT&T EP590-2 - AT&T 5.8 GHz Expansion Handset User manual

AT&T
AT&T TL76008 User manual

AT&T
AT&T E5901 User manual