AT&T 992 User manual

© 2005 Advanced AmericanTelephones.
All Rights Reserved.
AT&T and the Globe Design are
trademarks of AT&TCorp.,licensed to
Advanced AmericanTelephones.
Printed in China. Issue
Visit us at www.telephones.att.com.
Please also read
Part 1 — Important
Product Information
USER’S MANUAL
Part 2
© 2005 Advanced American Telephones. All Rights Reserved.
AT&T and the Globe Design are trademarks of AT&T Corp., licensed to Advanced American Telephones.
Two-Line Speakerphone with
Caller ID/Call Waiting 992
0992_CIB_1ATT_FINAL_022105 2/22/04 4:46 PM Page II
AT&T
8/05
4

0992_CIB_1ATT_FINAL_022105 2/22/04 4:47 PM Page

PRODUCT OVERVIEW ..............1
BEFORE YOU BEGIN ...................2
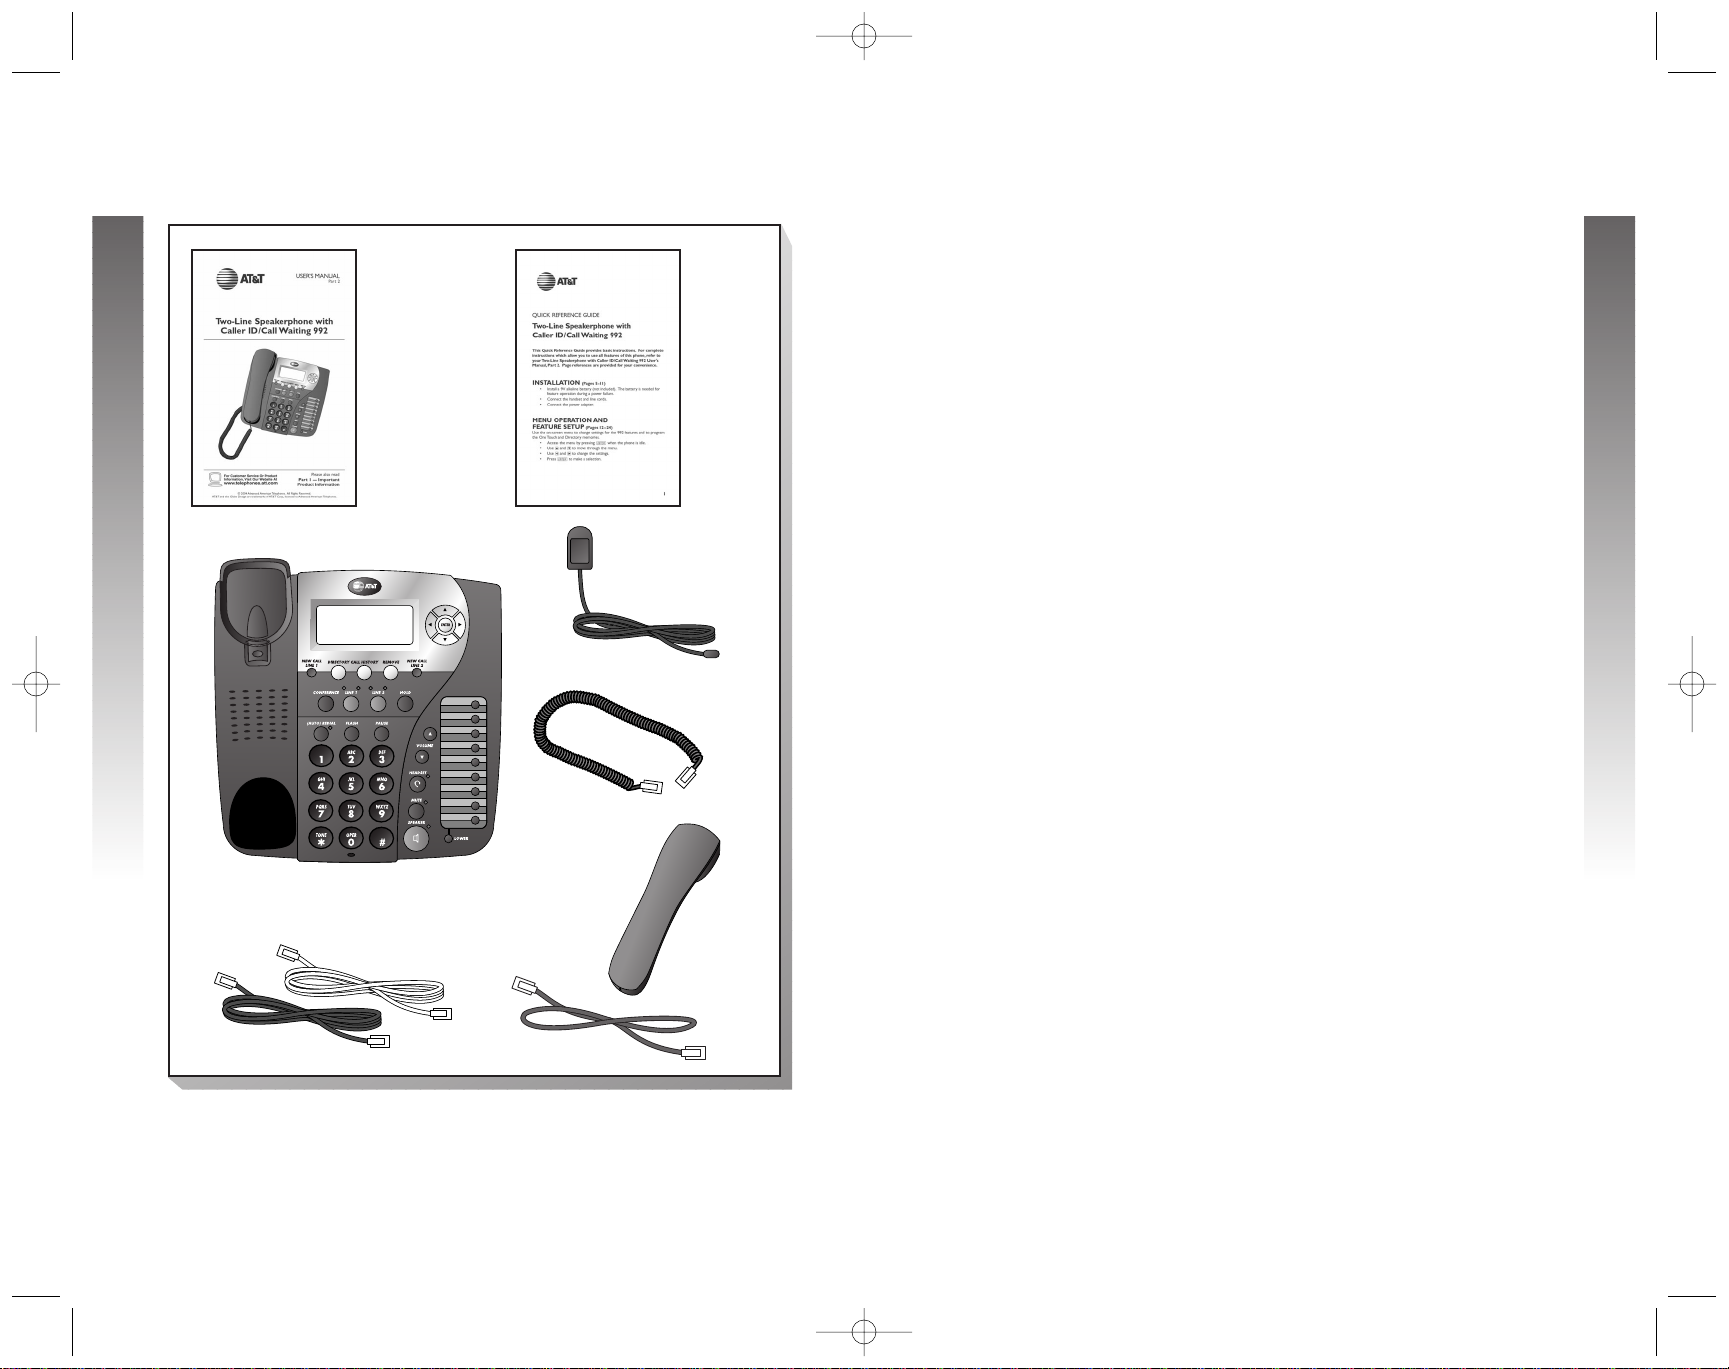
Parts List..................................................2
Tools Needed.........................................2
Glossary...................................................3
Audible Signals .......................................4
INSTALLATION...............................5
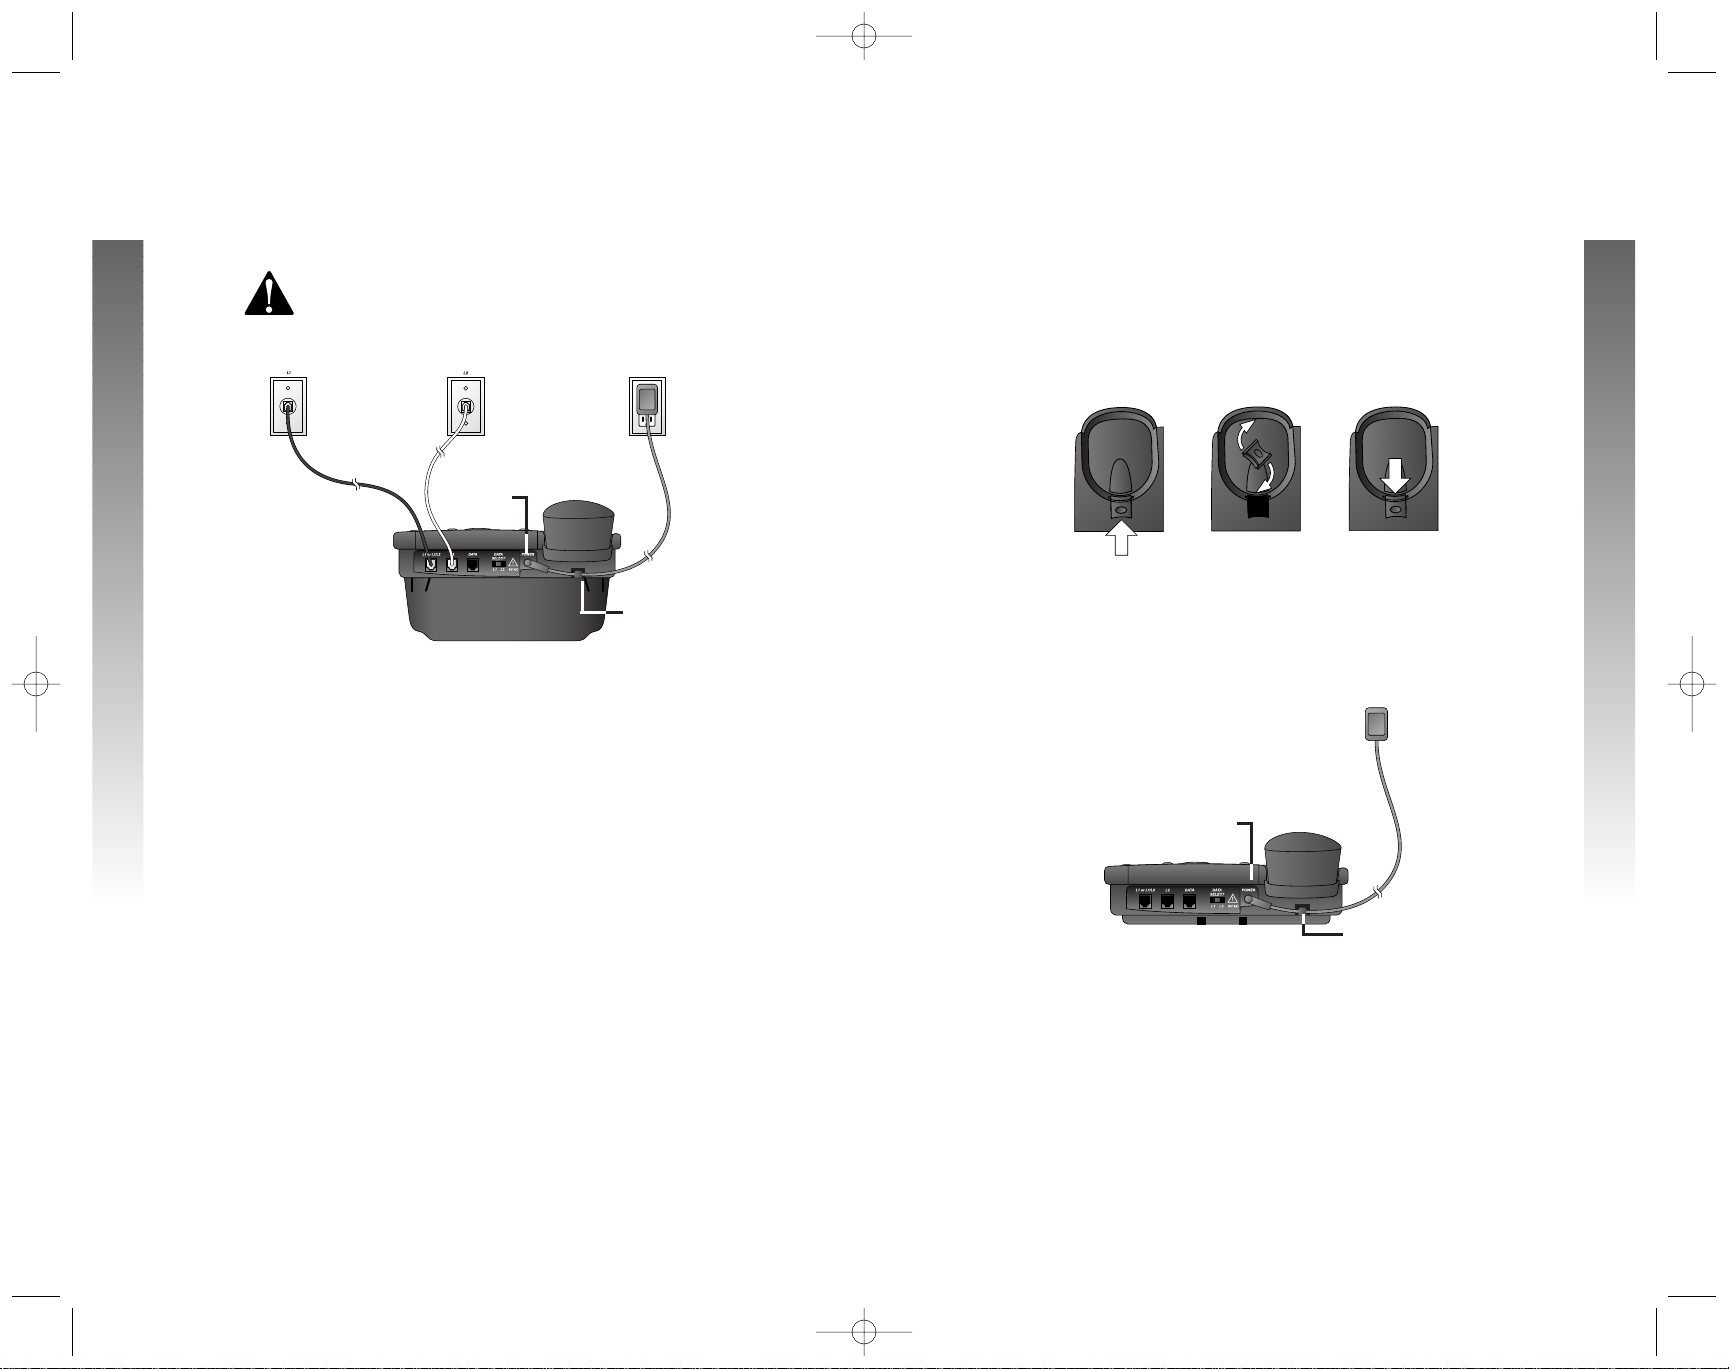
Battery Installation................................5
Table/Desk Installation.........................6
Wall Installation.....................................9
Switchable Data Port.........................11
Headset Jack.........................................11
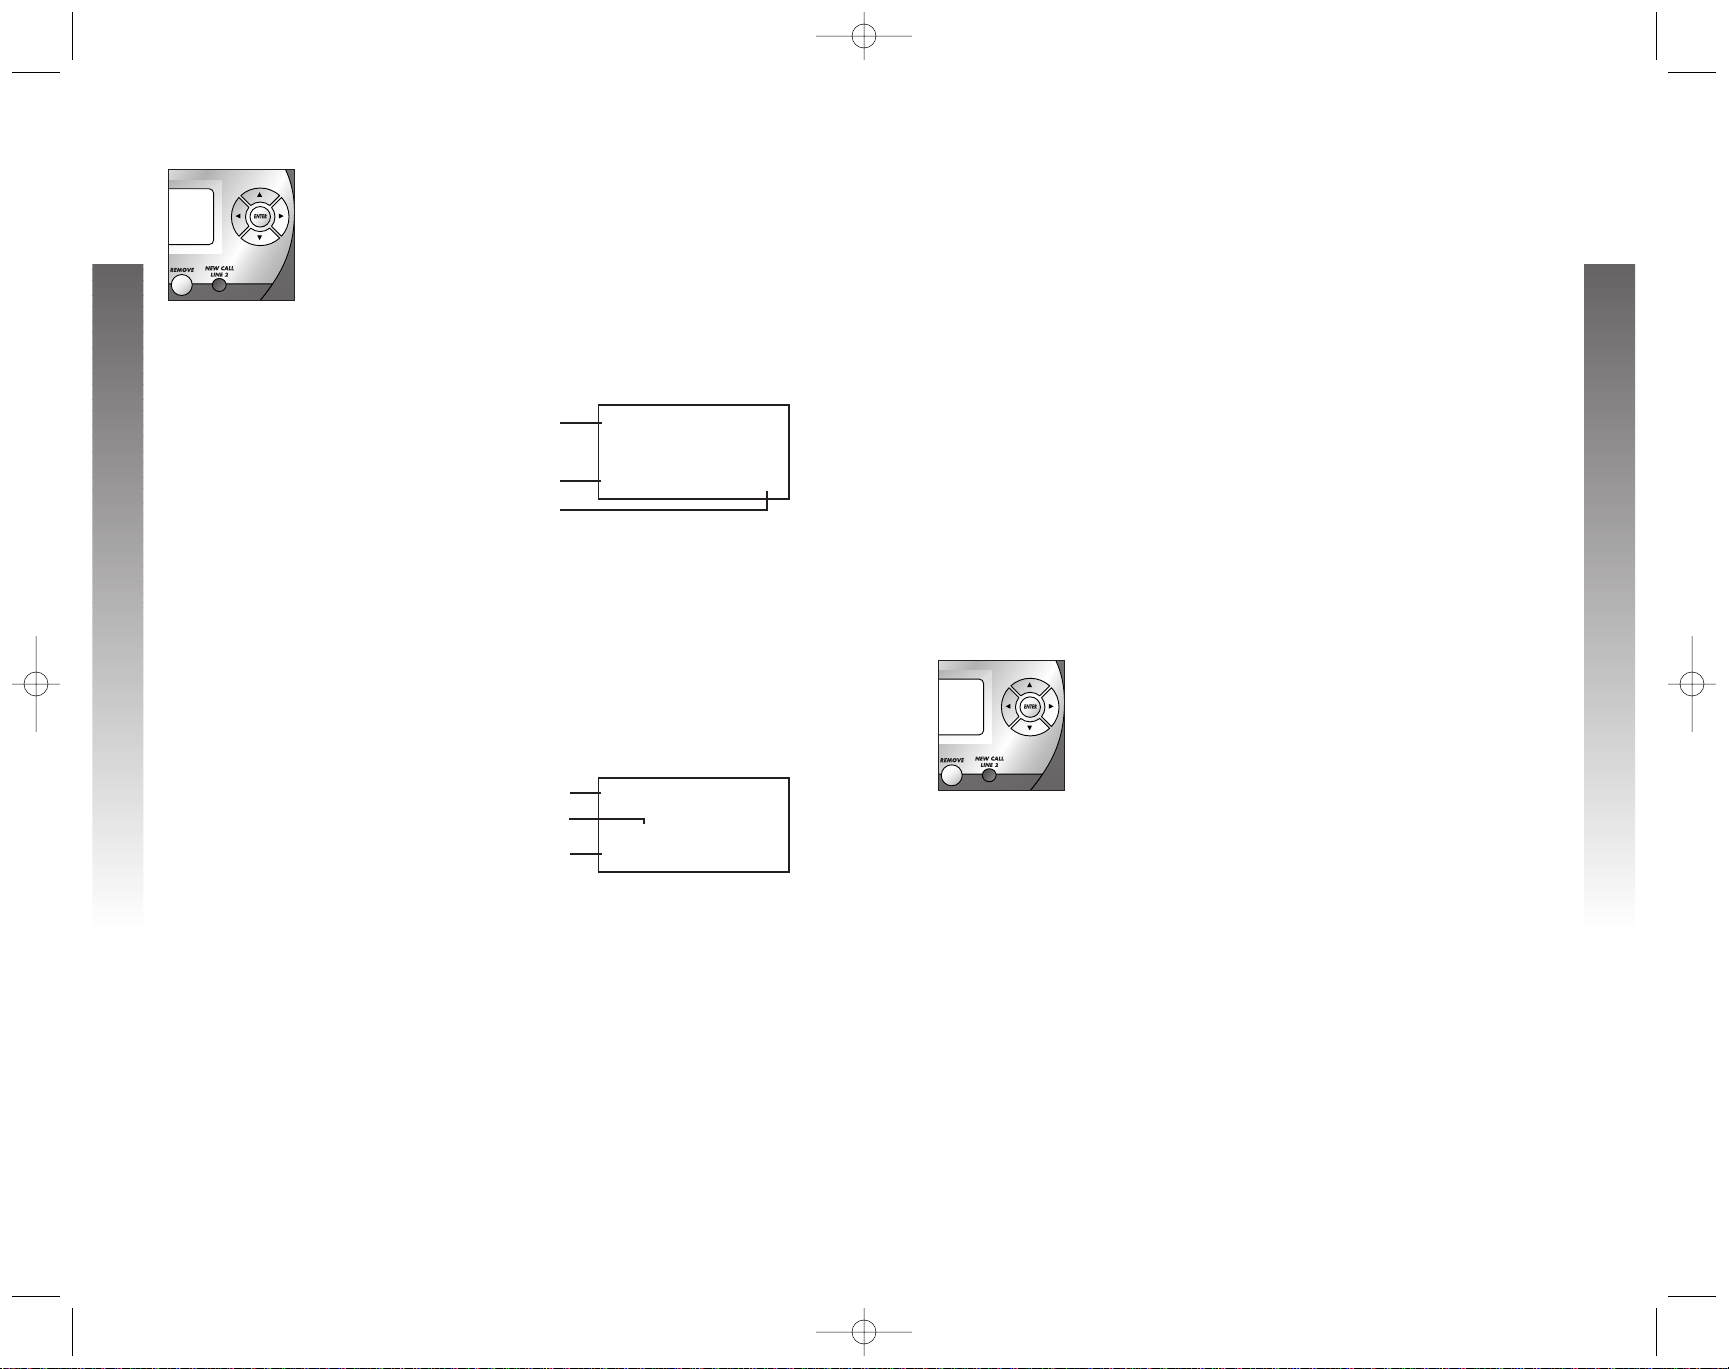
MENU OPERATION ...................12
Menu Structure ...................................13
Rapid Scroll...........................................13
FEATURE SETUP.........................14
Turn Auto Speaker On or Off ........14
Set a Primary Line ..............................14
Turn Automatic Line Selection
On or Off.........................................15
Set Preferred Mode ...........................16
Set the Time and Date ......................17
Turn Screen Backlight On or Off ....18
Set the Scroll Rate..............................18
Turn COVM Indicator On or Off
for Each Line....................................19
Turn NEW CALL Light Off..............20
Program Home and Local
Area Codes......................................21
Set Call History...................................22
Choose How to Store Repeat Calls
in Call History.................................23
Turn Caller ID with Call Waiting
On or Off.........................................24
Set the Display Language..................24
TELEPHONE OPERATION....25
Make, Answer or End a Call............25
Switch Between Handset, Headset
and Speakerphone..........................26
Timer .....................................................27
Volume...................................................27
i
CONTENTS
CONTENTS
CONTENTS
0992_CIB_1ATT_FINAL_022105 2/22/04 4:46 PM Page IV
Redial......................................................28
Display Dial...........................................28
Auto Redial...........................................29
Hold........................................................30
Switch Between Lines
During a Call....................................30
Mute .......................................................31
Flash........................................................31
Conference Calls ................................31
Low Battery Indicator .......................32
Lights and What They Mean ............32
ONETOUCH OPERATION....33
Store a Number in a One Touch
Location ............................................34
View a One Touch Entry ..................35
Dial a One Touch Number ..............36
Erase a One Touch Number............36
DIRECTORY OPERATION......37
Menu Structure ...................................37
Store a Name and Number
in the Directory..............................38
Review Directory Entries.................40
Edit a Directory Entry.......................40
Dial a Number from the
Directory..........................................42
Remove a Name and Number
from the Directory........................42
CALLER ID.......................................43
Caller ID Display.................................44
Call Waiting ..........................................45
Display Screen Messages ..................45
Message Waiting and
NEW CALL Light...........................46
Call History..........................................46
Remove Calls from Call History....48
Dial a Number from Call History...49
Save a Name and Number from
Call History to the Directory ....50

This AT&T Two-Line Speakerphone with Caller ID/Call Waiting 992 can be used
with one or two incoming telephone lines and features a speakerphone for
hands-free use. It is hearing-aid compatible and can also be used hands-free
with a two-band 2.5 mm headset (purchased separately). This phone can be
used on a desk or mounted on a wall and does not require AC power for basic
operation when a fresh 9V alkaline battery is installed.
The 992 has a switchable data port for connecting the phone to another
device such as a fax machine or modem. This phone has a Caller ID feature
which supports Caller ID with Call Waiting service. (Caller ID services are
subscriber services available from many local telephone companies for a fee.)
The backlit screen display allows you to view information on the screen even
in low light conditions. The 992 also features a 24-number memory for faster
dialing and has a directory which can store up to 100 additional numbers
with names.
This User’s Manual contains detailed instructions for installing, programming
and operating your AT&T Two-Line Speakerphone with Caller ID/Call
Waiting 992. Please be sure to follow the directions carefully.
1
PRODUCT OVERVIEW
PRODUCT OVERVIEW
PRODUCT OVERVIEW
ii
CONTENTS
CONTENTS
0992_CIB_1ATT_FINAL_022105 2/22/04 4:46 PM Page ii
DEFAULT SETTINGS................52
GENERAL PRODUCT
CARE....................................................53
TECHNICAL
SPECIFICATIONS........................54
IN CASE OF DIFFICULTY......55
INDEX.................................................58
Save a Number from Call History
in a One Touch Location ..............51

3
BEFORE YOU BEGIN
BEFORE YOU BEGIN
Parts List
Your box should include:
Tools Needed
You will also need the following to install your phone:
•9V alkaline battery
2
BEFORE YOU BEGIN
BEFORE YOU BEGIN
BEFORE YOU BEGIN
Power
adapter
Handset
Base unit with desk wedge attached
This User’s
Manual Quick
Reference
Guide
Coiled
handset cord
Seven-foot black line cord (4-connector)
Seven-foot clear line cord (2-connector)
Eight-inch line cord
Glossary
Caller ID: Caller Identification is a subscriber service available from most
local telephone companies for a fee. When you subscribe to Caller
Identification, you can see who’s calling before you answer the phone if you
and the caller are both in areas offering Caller ID service with compatible
equipment.
Caller ID with Call Waiting: This is a single, combined subscriber service
which may be available from your local telephone company. If you subscribe
to this service, you can use your 992 telephone to see who’s calling even
while you are on another call (as long as your caller is in an area with Caller
ID service and both telephone companies use compatible equipment).
COVM: Central Office Voice Mail is a subscriber voice message service
which may be available from your local telephone company. This service may
be called by another name in your area (e.g., Call Answering).
Home Area Code: This is the area code for your telephone number. Most
users simply dial the seven digits of a phone number to make a call within
their own area code and 11 digits outside of their area code. If this applies
to you, enter your own area code into the unit as the Home Area Code.
After programming, if you receive a call from within your Home Area Code,
the screen will display the seven digits of the phone number.
You may, however, live in a region where for calls within your own area code,
you must dial 10 digits (that is, the area code and phone number). If this
applies to you, enter “000”for the Home Area Code and enter your area
code as a Local Area Code. After programming, if you receive a call from
within your area code, the screen displays the 10 digits of the phone number.
Be sure to follow the directions under “Program Home and Local Area
Codes”on page 21 during Feature Setup.
Local Area Code: Most users dial 11 digits to make calls outside their
own area codes. If this applies to you, you do not need to program any Local
Area Codes.
However, if you dial only 10 digits to make calls to some areas outside your
own area code (without dialing “1”), then program these Local Area Codes
into the phone. Up to four Local Area Codes can be programmed. After
programming, if you receive a call from one of these Local Area Codes, the
screen displays the 10 digits of the phone number. See “Program Home and
Local Area Codes”on page 21 for instructions.
Navigation buttons: These are the buttons used when programming
your 992 phone and for scrolling through feature options (E,+,
-,>,<).
Primary Line: This is the line on your phone you designate to be selected
automatically when you lift the handset, press K, or press h.
0992_CIB_1ATT_FINAL_022105 2/22/04 4:46 PM Page 2

Battery Installation
Before using the telephone, install a 9V alkaline battery (not included). In case
of a power failure, you will be able to use the phone normally if a fresh 9V
alkaline battery is installed, but Caller ID, headset and speakerphone may not
work properly. If AC power fails and there is no battery power, your volume
control will remain at the last setting until AC power is restored. The LCD
screen, ringer and lights will not work until AC power is restored. You will be
able to make and receive calls using only the handset only on Line 1. This
phone has a Memory Loss Protection feature and will store your Caller ID
information, memory and programmed settings until power is restored.
When battery power is low,shows on the display to alert you. Replace
the battery promptly.
CAUTION: Always disconnect all cords before installing a
new battery.
1Remove the label covering the display screen.
2Turn the telephone upside down.
3You may want to remove the desk wedge for easier access to the
battery cover. Push down on the tabs, and lift the wedge up and
away from the phone.
4Press on the tab and pull to remove the battery cover. Insert one
new 9V alkaline battery (not included) following the polarity
markings in the battery compartment.
5Replace the battery compartment cover.
6If you are wall mounting the phone turn to “Wall Installation”
beginning on page 9.
—OR —
If you are using your phone on a table or desk, turn to “Table/Desk
Installation”beginning on page 6.
9V ALKALINE
BATTERY
9V ALKALINE
BATTERY
5
INSTALLATION
INSTALLATION
Audible Signals
WHEN YOU HEAR: IT MEANS:
A long, low frequency buzz, An error has occurred. Try the
repeating (error tone) operation again.
Three, ascending tones The operation was successful.
(confirmation tone)
Three beeps You have reached the minimum
or maximum volume setting.
4
BEFORE YOU BEGIN
BEFORE YOU BEGIN
INSTALLATION
Polarity
markings
0992_CIB_1ATT_FINAL_022105 2/22/04 4:46 PM Page 4
a
B
t
t

•If you have two one-line wall jacks, use both long line cords.
For this installation option it does not matter which line cord
you use for each line. Insert one end of the first cord into the
jack labeled L1 OR L1/L2 on the back of the phone. Then,
plug the other end into the wall jack for Line 1. Insert one end
of the other cord into the jack on the back of the phone labeled
L2. Then, plug the other end into the wall jack for Line 2. Make
sure the cords snap firmly into place at both ends.
3 Connect the handset to the telephone.
Plug the coiled handset cord into the handset jack on the left side of
the phone. Plug the other end of the coiled cord into the handset,
then hang up.
continued on page 8
Table/Desk Installation
1 Attach the desk wedge.
If the desk wedge is not already attached, slide the tabs into the
holes as shown. Snap the wedge onto the base.
2 Connect the line cord(s) to the telephone and your modular
wall jack(s).
•If you have a single two-line wall jack, use only the black
(4-connector) line cord. Plug one end into the jack labeled
L1 OR L1/L2 on the back of the telephone. Plug the other
end into the wall jack. Make sure the cord snaps firmly into
place at both ends.
76
INSTALLATION
INSTALLATION
INSTALLATION
INSTALLATION
Telephone
line cord
Telephone line cord
Modular
wall jack
for Line 2
Modular
wall jack
for Line 1
Black telephone
line cord
Two-line modular
wall jack
0992_CIB_1ATT_FINAL_022105 2/22/04 4:46 PM Page 6

Table/Desk Installation
continued from page 7
4 Connect the power cord.
CAUTION: Use only the power cord supplied
with this phone. If you need a replacement cord, call
1 800 222-3111.
Fit the power cord behind the strain relief tab. Then plug the smaller
end of the power cord into the jack labeled POWER on the back
of the phone. Plug the power adapter into a standard electrical
outlet not controlled by a wall switch.
5 Check for dial tone.
Press L, then lift the handset or press Sand listen for a
dial tone. Then press land listen for a dial tone. If you do not
hear a dial tone, see IN CASE OF DIFFICULTY beginning on page 55.
6 Confirm Lines 1 and 2.
Press Land call one of your phone numbers. If you hear a busy
signal, you called Line 1. If you hear a ringing signal in the receiver,
then you called Line 2.
98
INSTALLATION
INSTALLATION
INSTALLATION
INSTALLATION
Wall Installation
1 Remove the desk wedge.
If the desk wedge is attached, remove it following the directions in
“Battery Installation”beginning on page 5. Store wedge in a safe
place in case you use this phone on a table or desk in the future.
2 Reverse the handset tab.
Hold down the switchhook, and slide the tab up and out of its slot.
Turn the tab so that the end with the “hook”is up, then insert the
tab back into its slot.
3 Connect the power cord to the phone.
Fit the power cord behind the strain relief tab. Then plug the smaller
end of the power cord into the jack labeled POWER on the back
of the phone.
4 Connect the handset to the telephone.
Plug the coiled handset cord into the handset jack on the left side of
the phone. Plug the other end of the coiled cord into the handset,
then hang up.
continued on page 10
POWER
jack
Strain
relief tab
Figure 1 Figure 2 Figure 3
Power
cord
POWER
jack
Strain
relief tab
Power
adapter
0992_CIB_1ATT_FINAL_022105 2/22/04 4:46 PM Page 8

6 Plug the power adapter into an AC outlet not controlled by
a wall switch.
7 Follow Steps 5 and 6 in “Table/Desk Installation”on page 8.
Switchable Data Port
If you want to connect another device (such as a modem or fax machine)
to the wall jack, you can use the jack labeled DATA on the phone. You
can set the data port to use Line 1 or 2. Set the DATA SELECT switch
located on the back of the phone to L1 or L2. A call picked up at another
extension on the line used by the data port may interrupt a fax, modem or
message transmission.
Headset Jack
NOTE: A 9V alkaline battery MUSTbe installed for the headset to work
correctly in all conditions.
You can use this phone hands-free when you install any AT&T two-band
2.5 mm headset, or other compatible, electronically isolated headset.
Headsets must be purchased separately and are available by calling Customer
Service at 1 800 222–3111. For best results use an AT&T two-band
2.5 mm headset.
Make sure the headset is firmly plugged into the headset jack under the
rubber flap on the right side of the phone. You will hear an error tone if
you press hwhen the headset is not plugged in.
1110
INSTALLATION
INSTALLATION
INSTALLATION
INSTALLATION
Data port DATA SELECT
switch
Wall Installation
continued from page 9
5 Connect the line cord(s) to the telephone and your
modular wall jack(s).
•If you have a single two-line wall jack, use only the short
line cord. Plug one end into the jack labeled L1 OR L1/L2
on the back of the telephone. Place the cord in the channel
under the phone as shown. Plug the other end into the wall
jack. Make sure the cord snaps firmly into place. Then, place
the phone on the wall jack mounting studs and pull down until
it is held securely.
•If you have two separate one-line wall jacks, use two
line cords (the short cord and one of the long cords). Plug one
end of the short cord into the jack labeled L1 OR L1/L2 on
the back of the telephone. Plug one end of a long cord into the
jack labeled L2 on the back of the phone. Place the cords in
the channels under the phone as shown. Plug the free end of
the line cord for Line 1 into the Line 1 wall jack. Plug the free
end of the line cord for Line 2 into the Line 2 wall jack. Make
sure the cords snap firmly into place at both ends. Then, place
the phone on the Line 1 wall jack mounting studs and pull until
it is held securely.
Two-line
modular
wall jack
Modular
wall jack
for Line 2
Modular
wall jack
for Line 1
0992_CIB_1ATT_FINAL_022105 2/22/04 4:46 PM Page 10

Menu Structure
Use the menu to set the values for the 992 features.
Access the menu by pressing Ewhen the phone is
idle. The menu for Feature Setup is below.
ONE TOUCH
PROGRAM
VIEW
AUTO SPEAKER
MAIN MENU
PHONE SETTINGS
PRIMARY LINE
ALS ON/OFF
PREFERRED MODE
SET TIME/DATE
LCD BACKLIGHT
SCROLL RATE
MAIN MENU
Rapid Scroll
You can scroll through menu items or setting choices
more quickly using this feature. Press and hold the desired
scroll button (+,-,>or <). The screen will scroll
through your choices at the rate you program during
Feature Setup. See “Set the Scroll Rate”on page 18 for
programming instructions.
Feature setup, memory programming and some individual
feature operations for the 992 use menus shown in the
screen display. Use the navigation buttons (<,>,+,-,
E) to begin, end and move through menu operations
(for example, FEATURE SETUP).
•Press Eto activate a menu operation. The
first menu item for this topic or data will appear
in line four of the screen. For example, the
screen displays:
NOTE: If you do not press a key to continue
menu operations within approximately 30 seconds,
the telephone automatically exits the menu.
•When xis displayed on screen, you can press
-or +repeatedly to move through the menu.
•Press Eto choose the menu item currently
displayed. This may be a lower level menu,
an action, or a feature settings screen. For
example:
•When () is displayed on screen, you can press
>or <to scroll through setting choices.
•Press -or Eto store the setting and show
the next option for the feature currently displayed.
When you successfully change a setting, you will
hear a confirmation tone.
•To return to the main menu, press -or +until
the screen display includes MAIN MENU. Then
press E.
•To exit Feature Setup, press and hold E.
NOTE: If you hear an error tone, repeat the steps to
program the feature.
()H
PRIMARYXLINEHHHx
FEATUREHSETUP
ONE TOUCHXHHHHx
1312
MENU OPERATION
MENU OPERATION
MENU OPERATION
MENU OPERATION
❖
❖
❖❙
❙
❙
◗
◗
◗
VOICE MESSAGE
L1 COVM ON/OFF
L2 COVM ON/OFF
L1 LIGHT OFF
L2 LIGHT OFF
MAIN MENU
CALLER ID
AREA CODES
CALL HISTORY
REPEAT CALLS
CID-CALL WAIT
MAIN MENU
LANGUAGE
MENU OPERATION
❖
❖
❖❙
❙
❙
◗
◗
◗
Menu item
Menu topic or data
Menu indicator
Menu
Current Setting
Feature
0992_CIB_1ATT_FINAL_022105 2/22/04 4:46 PM Page 12
LINE
1
PHONEXSETTINGS

Turn Automatic Line Selection
On or Off
When this feature is turned on and you take the phone off
hook, it automatically connects you to a pre-selected line.
Lines have priority in this order: ringing primary, ringing
non-primary, idle primary, idle non-primary, and busy primary.
Ringing primary: when the Primary Line is set to Line 1
and Line 1 is ringing, Line 1 is automatically connected.
Ringing non-primary: when the Primary Line is set to
Line 1 and Line 1 is idle while Line 2 is ringing, Line 2 is
automatically connected.
Idle primary: when the Primary Line is set to Line 1 and
both lines are idle, Line 1 is automatically connected.
Idle non-primary: when the Primary Line is set to Line 1
and Line 1 is busy while Line 2 is idle, Line 2 is
automatically connected.
Busy primary: when the Primary Line is set to Line 1 and
Line 1 and Line 2 are busy, Line 1 is automatically
connected.
1Press Eto begin feature setup.
2Press -until the screen display includes PHONE
SETTINGS.
3Press E. The screen display includes
PRIMARY LINE.
4Press -until the screen display includes ALS
ON/OFF and the current setting.
5Press <or >to toggle between and.
6When the correct setting is shown, press -or
Eto save the setting. The screen display
includes PREFERRED MODE.
7Proceed to Step 5 on page 16 to set the next
feature (Preferred Mode).
—OR —
Press and hold Eto return to the idle screen.
NOTE: If you press a LINEbutton before pressing
K,that line will be used instead of the Automatic
Line Selection you programmed. Automatic Line
Selection will resume for the next call.
Turn Auto Speaker On or Off
Choose whether pressing a One Touch button while the
phone is on hook automatically initiates a One Touch call
or displays the One Touch number without dialing the call.
If you want to automatically dial the One Touch numbers
by pressing a One Touch button without taking the phone
off hook first, set Auto Speaker to .If you want to view
One Touch numbers on screen by pressing a One Touch
button while the phone is on hook, set Auto Speaker to
.This phone comes with Auto Speaker set to .
See ONE TOUCH OPERATION beginning on page 33 for
details about One Touch calls.
NOTE: Auto Speaker dials the call in your selected
Preferred Mode (see page 16). If the headset is not
connected, the call is dialed using the speakerphone.
1Press Eto begin feature setup.
2Press Eagain. The screen display includes
ONE TOUCH and PROGRAM.
3Press -until the screen display includes AUTO
SPEAKER and the current setting.
4Press <or >to toggle between and .
5When the desired setting is shown, press -or
Eto save your choice. The screen display
includes MAIN MENU.
6Press and hold Eto return to the idle screen.
Set a Primary Line
1Press Eto begin feature setup.
2Press -until the screen display includes PHONE
SETTINGS.
3Press E. The screen display includes
PRIMARY LINE and the current setting.
4Press <or >to toggle between and
2.
5When the line you wish to set as primary is
displayed, press -or Eto save the setting.
The screen display includes ALSXON/OFF.
6Proceed to Step 5 on page 15 to set the next
feature (Automatic Line Selection).
—OR —
Press and hold Eto return to the idle screen.
NOTE: When the phone is off-hook, the primary line
setting is disabled.
1514
FEATURE SETUP
FEATURE SETUP
FEATURE SETUP
FEATURE SETUP
FEATURE SETUP
❖
❖
❖❙
❙
❙
FEATURE SETUP
❖
❖
❖❙
❙
❙
❖
❖
❖❙
❙
❙
0992_CIB_1ATT_FINAL_022105 2/22/04 4:46 PM Page 14
ON
OFF
OFF
OFF
ON
OFF
ON
LINE
1
LINE

Set Preferred Mode
Choose the mode (headset or speakerphone) which will
be used automatically when you dial a number from the
directory, a One Touch location or call history without
lifting the handset. The Preferred Mode will also be used
when Auto Speaker is set to and you dial a One Touch
number without lifting the handset. For information about
the Auto Speaker setting, see “Turn Auto Speaker On or
Off”on page 14.
1Press Eto begin feature setup.
2Press -until the screen display includes PHONE
SETTINGS.
3Press E. The screen display includes
PRIMARY LINE.
4Press -until the screen display includes
PREFERRED MODE and the current setting.
5Press <or >to toggle between Spea erphone
and Headset.
6When the desired mode is displayed, press -or
Eto save the setting. The screen display
includes SET TIME/DATE.
7Proceed to Step 5 on page 17 to set the next
feature (Time and Date).
—OR —
Press and hold Eto return to the idle screen.
1716
FEATURE SETUP
FEATURE SETUP
FEATURE SETUP
FEATURE SETUP
FEATURE SETUP
Set the Time and Date
If you subscribe to Caller ID service, the time and date are
set automatically with each incoming call. You can set the
time and date manually following these instructions.
1Press Eto begin feature setup.
2Press -until the screen display includes PHONE
SETTINGS.
3Press E. The screen display includes
PRIMARY LINE.
4Press -until the screen display includes SET
TIME/DATE.
5Press E. The screen display includes Enter
new time and the current setting.
6Use the dial pad keys to begin entering the
correct time (hh/mm). The digits of the new time
will appear on screen as you enter them.
7If needed, press +or -to toggle between AM
and PM. Press Ewhen your choice is shown.
8When the correct time is shown, press +or -
until the screen display includes DATE. Select
DONE if the date is already correct.
9Press Eto save the time and move on to
change the date. The screen display includes
Enter new date and the current setting.
10 Use the dial pad keys to begin entering the
correct date (mm/dd). The digits of the new
date appear on screen as you enter them.
11 When the correct date is shown, press E
to save the setting. The screen display includes
LCD BACKLIGHT.
12 Proceed to Step 5 in “Turn Screen Backlight
On or Off”on page 18 to set the next feature
(Screen Backlight).
—OR —
Press and hold Eto return to the idle screen.
NOTE: If you try to save an invalid time or date,
you will hear an error tone and the date or time will
not be changed.
❖
❖
❖❙
❙
❙
◗
◗
◗
❖
❖
❖❙
❙
❙
0992_CIB_1ATT_FINAL_022105 2/22/04 4:46 PM Page 16
ON

Turn COVM Indicator On or Off
for Each Line
If you subscribe to Voice Mail service with your local
telephone service provider, turn the COVM indicator on
to have the NEW CALL light for that line flash when there
are messages waiting. If you do not subscribe to Voice Mail
service, turn the COVM indicators off for each line.
1Press Eto begin feature setup.
2Press -until the screen display includes VOICE
MESSAGE.
3Press E. The screen display includes L1
COVM ON/OFF and the current setting.
4Press <or >to toggle between and
for the line shown.
5Press -to save the current setting and display
the next line with its COVM setting.
6Repeat Step 4 to turn the COVM indicator on
or off for the other line.
7When you are finished setting the COVM
indicators, press -or Eto save the setting.
The screen display includes L1 LIGHT OFF.
8Proceed to Step 5 on page 20 to set the next
feature (NEW CALL Light).
—OR —
Press and hold Eto return to the idle screen.
Turn Screen Backlight On or Off
1Press Eto begin feature setup.
2Press -until the screen display includes PHONE
SETTINGS.
3Press E. The screen display includes
PRIMARY LINE.
4Press -until the screen display includes LCD
BACKLIGHT and the current setting.
5Press <or >to toggle between and .
6When the correct setting is shown, press -or
Eto save your choice. The screen display
includes SCROLL RATE.
7Proceed to Step 5 in “Set the Scroll Rate”below
to set the next feature (Scroll Rate).
—OR —
Press and hold Eto return to the idle screen.
Set the Scroll Rate
You can choose the speed (scrolls per second) for the
Rapid Scroll feature. (See “Rapid Scroll”on page 13
for details.)
1Press Eto begin feature setup.
2Press -until the screen display includes PHONE
SETTINGS.
3Press E. The screen display includes
PRIMARY LINE.
4Press -until the screen display includes SCROLL
RATE and the current setting.
5Press <or >to change the setting (Very
Slow,Slow,Medium, Fast, or Very Fast).
6When the correct scroll rate is shown, press -
or Eto save the setting. The screen display
includes MAIN MENU.
7Press Eto return to the main Feature Setup
menu and continue setting up your phone.
—OR —
Press and hold Eto return to the idle screen.
1918
FEATURE SETUP
FEATURE SETUP
FEATURE SETUP
FEATURE SETUP
FEATURE SETUPFEATURE SETUP
❖
❖
❖❙
❙
❙
❖
❖
❖❙
❙
❙
❖
❖
❖❙
❙
❙
0992_CIB_1ATT_FINAL_022105 2/22/04 4:46 PM Page 18
OFF
ON
OFF
ON

Program Home and Local
Area Codes
You can program this phone to recognize one Home and
up to four Local Area Codes. (See “Glossary”on page 3
for definitions.) The Home Area Code must be programmed
in order for you to dial numbers in call history and so that
you can transfer numbers from the call history to the
directory. By programming these specific area codes, the
unit will be able to distinguish a local call from a long
distance call and will dial the appropriate number of digits.
NOTE: If you must dial the area code to place
calls within your own area code, enter “000”for the
Home Area Code and enter your area code as a
Local Area Code.
1Press Eto begin feature setup.
2Press -until the screen display includes
CALLER ID.
3Press E. The screen display includes AREA
CODES.
4Press E. The screen display includes HOME
and the current setting.
5Use the dial pad keys to enter your Home Area
Code, then press -to save the setting. The
screen display includes LOCAL 1 and the current
setting. If you need to enter any Local Area
Codes, use the dial pad keys and then press -
to save your entry and scroll to the next Local
Area Code (LOCAL 2,LOCAL 3, and LOCAL 4).
6When you are finished entering all of the area
codes you need to program, press -until the
screen display includes DONE, then press E.
The screen display includes CALL HISTORY.
7Proceed to Step 5 on page 22 to set the next
feature (Call History).
—OR —
Press and hold Eto return to the idle screen.
Turn NEW CALL Light Off
If a NEW CALL light continues to flash when there are no
messages on that line, you may have received a false signal
from your local telephone service provider. You can turn
off the light manually.
1Press Eto begin feature setup.
2Press -until the screen display includes VOICE
MESSAGE.
3Press E. The screen display includes L1
COVM ON/OFF.
4Press -until the screen display includes LIGHT
OFF and the line number of the light you want to
turn off.
5Press Eto turn the light off for that line.
The screen display includes MAIN MENU.
6Press Eto return to the main Feature Setup
menu and continue setting up your phone.
—OR —
Press and hold Eto return to the idle screen.
2120
FEATURE SETUP
FEATURE SETUP
FEATURE SETUP
FEATURE SETUP
FEATURE SETUPFEATURE SETUPFEATURE SETUPFEATURE SETUP
0992_CIB_1ATT_FINAL_022105 2/22/04 4:46 PM Page 20

Choose How to Store Repeat Calls
in Call History
You can choose how new calls from the same number are
displayed. Choose Combined to show only the most
recent call from the number. Set to Separate for the
phone to display each call individually.
1Press Eto begin feature setup.
2Press -until the screen display includes
CALLER ID.
3Press E. The screen display includes AREA
CODES.
4Press -until the screen display includes REPEAT
CALLS and the current setting.
5Press <or >to toggle between Combined and
Separate.
6When the correct setting is shown, press -or
Eto save your choice. The screen display
includes CID-CALL WAIT.
7Proceed to Step 5 of “Turn Caller ID with Call
Waiting On or Off”on page 24 to set the next
feature (Caller ID with Call Waiting).
—OR —
Press and hold Eto return to the idle screen.
Set Call History
You can choose whether or not the phone stores calls in
call history.
1Press Eto begin feature setup.
2Press -until the screen display includes
CALLER ID.
3Press E. The screen display includes AREA
CODES.
4Press -until the screen display includes CALL
HISTORY and the current setting.
5Press <or >to toggle between All Calls
and No Calls.
6When the correct setting is shown, press -or
Eto save your choice. You will hear a
confirmation tone and the screen display includes
REPEAT CALLS.
7Proceed to Step 5 on page 23 to set the next
feature (Repeat Calls).
—OR —
Press and hold Eto return to the idle screen.
2322
FEATURE SETUP
FEATURE SETUP
FEATURE SETUP
FEATURE SETUP
FEATURE SETUPFEATURE SETUPFEATURE SETUPFEATURE SETUP
❖
❖
❖❙
❙
❙
❖
❖
❖❙
❙
❙
0992_CIB_1ATT_FINAL_022105 2/22/04 4:46 PM Page 22

TELEPHONE OPERATION
TELEPHONE OPERATION
TELEPHONE OPERATION
25
Turn Caller ID with Call Waiting
On or Off
If you subscribe to combined Caller ID with Call Waiting
service from your local phone service provider, you need
to turn this feature on in order to see call information for
Call Waiting calls.
1Press Eto begin feature setup.
2Press -until the screen display includes
CALLER ID.
3Press E. The screen display includes AREA
CODES.
4Press -until the screen display includes
CID-CALL WAIT and the current setting.
5Press <or >to toggle between and .
6When the correct setting is shown, press -or
Eto save your choice. The screen display
includes MAIN MENU.
7Press Eto return to the main Feature Setup
menu and continue setting up your phone.
—OR —
Press and hold Eto return to the idle screen.
Set the Display Language
1Press Eto begin feature setup.
2Press -until the screen display includes
LANGUAGE and the current setting.
3Press <or >to scroll through the language
choices (English,Espanol,or
When the language you want to use is displayed,
press -or Eto save the setting.
4Press and hold Eto return to the idle screen.
24
FEATURE SETUP
FEATURE SETUP
NOTE: When you make a call, the phone selects the
Primary Line you programmed (See “Set a Primary
Line”on page 14). When you answer a call, the phone
automatically selects the ringing line.
Make, Answer or End a Call
NOTE: If the phone is in use on one line,any calls
made or answered on the other line will use the same
mode (handset,speakerphone, or headset) already in use.
NOTE: If you dial a phone number longer than 16
digits, the screen will display only the last 16 digits.
Handset
To make a call, lift the handset and dial the call. The
number appears on screen as you dial.
To answer a call, lift the handset.
To override automatic line selection, lift the handset,
then press and release a LINE button
—OR —
Press the LINE button for the line you wish to select,
then lift the handset.
To end the call, replace the handset.
Speakerphone
To make a call, press K. The SPEAKER light goes
on. Wait for a dial tone, then dial the call. The number
appears on screen as you dial.
To answer a call, press Kor press the LINE
button of the incoming call, then press K.
To override automatic line selection, press K,
then press and release a LINE button. Dial the call within
five seconds.
—OR —
Press the LINE button for the line you wish to select,
then press K. Dial the call within five seconds.
To end a call, press Kagain.
NOTE: If headset is programmed as the default mode
(see“Set Preferred Mode”on page 16), you must press
Kto activate the speakerphone.
continued on page 26
❚
❚
❚
❖
❖
❖❙
❙
❙
❖
❖
❖❙
❙
❙
0992_CIB_1ATT_FINAL_022105 2/22/04 4:46 PM Page 24
OFF
ON
ais).
c
Fran

Timer
When you make or answer a call, the timer automatically
starts. For outgoing calls the timer begins when you start
to dial the number. The screen displays the elapsed time
in minutes and seconds (up to 59:59 ) and then displays
hours and minutes up to 10 hours (09:59 ) before starting
at 00:00 again. The timer stops automatically when you
hang up. When you place a call on hold, the timer remains
in the screen display.
Volume
Handset/Speakerphone/Headset
Volume Control
When you are on a call, press VOLUME +to increase
call volume. Press VOLUME -to decrease volume. The
speakerphone has eight volume levels. The handset and
headset have four levels. You will hear three beeps when
you reach the minimum or maximum level.
Ringer Volume
You can adjust the ringer volume for each line independently.
If a LINE button has been pressed, volume adjustments will
affect the selected line. If no line is pre-selected, volume
adjustments will affect the primary line you programmed
(see “Set a Primary Line”on page 14). If one line is
ringing, volume adjustments will affect the ringing line.
Press VOLUME +or VOLUME -to adjust the ringer
volume. This phone has eight ringer volume levels,
including off. Each time you adjust the ringer, you will
hear a sample ring indicating the volume level.
Make, Answer or End a Call
continued from page 25
Headset
Make sure the headset is plugged into the headset jack.
You will hear an error tone if you press hwhen the
headset is not plugged in.
To make a call, press and release h. The
HEADSET light goes on. Wait for a dial tone, then dial
the call. The number appears on screen as you dial.
To answer a call, press h.
To override automatic line selection, press h,
then press and release a LINE button. Dial the call within
five seconds.
—OR —
Press the LINE button for the line you wish to select,
then press h. Dial the call within five seconds.
To end a call, press Kagain.
To end a call, press hagain.
NOTE: If speakerphone is programmed as the default
mode (See“Set Preferred Mode”on page 16), you
must press hto activate the headset.
Switch Between Handset, Headset
and Speakerphone
To switch from handset to headset or
speakerphone, press hor K, then replace
the handset. (In order to use the headset, it must be
firmly plugged in.)
To switch from speakerphone to handset, lift the
handset. (Do not press Kor the call will be
disconnected.)
To switch from headset to handset when the handset
is in the cradle, lift the handset.
To switch from handset to headset when the handset
is off-hook, press hagain.
To switch from headset to speakerphone, press
K.
To switch from speakerphone to headset, insert the
headset plug into the jack firmly, and press h.
26
TELEPHONE OPERATION
TELEPHONE OPERATION
TELEPHONE OPERATION
TELEPHONE OPERATION
27
❚
❚
❚
0992_CIB_1ATT_FINAL_022105 2/22/04 4:46 PM Page 26

Auto Redial
The phone can automatically redial the last number
you called up to ten times, until the other line rings or
you cancel Auto Redial. Auto Redial calls are made using
the speakerphone.
1While the phone is on hook, press a.
The phone dials the number in redial memory
using the Primary Line you selected or Automatic
Line Selection if it is turned on. (See “Set a
Primary Line”on page 14 or “Turn Automatic
Line Selection On or Off”on page 15.)
—OR —
While the phone is on hook, press a LINE button
to select a line. Then, press a. The
phone dials the number in redial memory.
2When the other line rings or the other party
answers, lift the handset
—OR —
Press K
—OR —
Press Hto speak with the other party.
If the number dialed is busy, the phone will disconnect,
wait 40 seconds and redial the call up to 10 times.
To cancel Auto Redial at any time, press a
again. Lifting the handset or pressing Kor h
while the phone is redialing a call will also cancel the Auto
Redial feature.
Redial
The last number dialed on this phone (up to 24 digits) is
stored in redial memory until you dial another number.
Handset
To dial the same number again, lift the handset, listen for
the dial tone, then press R.
Speakerphone or Headset
To dial the same number again, press Kor h,
then press R. The phone automatically dials the
last number using the Primary Line you selected. (See “Set
a Primary Line”on page 14.)
To dial the same number using a specific line, press
Kor h, press a LINE button, then press
R.
NOTE: You may experience a delay before the call is
dialed when using the Redial feature. This is normal.
28
TELEPHONE OPERATION
TELEPHONE OPERATION
TELEPHONE OPERATION
TELEPHONE OPERATION
29
❚
❚
❚❚
❚
❚
0992_CIB_1ATT_FINAL_022105 2/22/04 4:46 PM Page 28
E
E
K
E
To dial this number on a specific line,press
or h,press a LINE button and then press .
Speakerphone or Headset
To dial the Display Dial number, press Kor h,
then press .
Handset
To dial the Display Dial number, lift the handset, listen for
the dial tone, then press .
Display Dial
The Display Dial memory contains either the last incoming
telephone number received on the phone,the last number
reviewed in Call History,or the last number reviewed in
the Directory, whichever was most recent.it is shown on
line 4 of the display.
-
al
:
l
a
:
6
08
5
5
5
100
0
6
08
5
5
0
100
5
l
Redi
y
ispaDi
D

Mute
Mute allows you to hear the other party, but the other
party can’t hear you.
To activate this feature, press and release M.
The MUTE light goes on.
To return to the conversation, press and release
Magain.
NOTE: Switching from handset to speakerphone
or headset, or from speakerphone or headset to
handset, changing lines, and putting a call on hold also
cancel Mute.
Flash
Use Finstead of the switchhook to activate telephone
company subscriber services such as Call Waiting or
Three-Way Calling.
NOTE: During a conference call,flash works only on
Line 1.
Conference Calls
You can use both lines at the same time to set up a
three-way conference call.
1Make or answer a call and press H.
2Establish a call on the other line.
3Press C. All three parties are connected
to the call.
To end a conference call, hang up.
If one caller hangs up during a conference call, you might
hear a dial tone. Press the LINE button of the remaining
call to disconnect the other line and eliminate the dial tone.
NOTE: Under certain circumstances, the far-end
parties on a conference call may not hear one another
clearly.
Place a Conference Call on Hold
1Press Hto hold both lines.
2Press Cto release Hold and continue
your conference call. continued on page 32
Hold
While on a call, press H. The red LINE light for the call
will flash slowly while the call is on hold. You can replace
the handset in the cradle without disconnecting the call
and the speakerphone or headset is automatically disabled.
To release hold and return to the call:
Press the LINE button for the call
—OR —
When Automatic Line Selection is set to ,you can lift
the handset.
The call will automatically be reconnected in the original
mode (speakerphone or headset), or you can lift the
handset. The red LINE light for the call remains on steadily
when you release Hold.
For information about Automatic Line Selection, see “Turn
Automatic Line Selection On or Off”on page 15.
Switch Between Lines During a Call
During a call on one line, you can make or answer a call
on the other line by pressing H. You can use the H
and LINE buttons to switch back and forth between calls
as often as necessary.
Example: While using Line 1, Line 2 rings:
1Press Hto hold Line 1.
2Press lto answer the other call.
3Press Lto hang up Line 2 and return to your
first call
—OR —
Press Hto hold Line 2, and press Lto
return to your first call.
NOTE: If you switch lines without pressing Hfirst,
you will drop the call.
30
TELEPHONE OPERATION
TELEPHONE OPERATION
TELEPHONE OPERATION
TELEPHONE OPERATION
31
❚
❚
❚
❚
❚
❚
❚
❚
❚
❚
❚
❚
0992_CIB_1ATT_FINAL_022105 2/22/04 4:46 PM Page 30
OFF

33
ONE TOUCH OPERATION
ONE TOUCH OPERATION
32
TELEPHONE OPERATION
TELEPHONE OPERATION
This telephone has 18 One Touch locations where you can store phone
numbers you wish to dial using fewer keys than usual. You can store up to
24 digits in each location.
The first nine locations can be accessed using only the One Touch buttons.
To access the remaining nine locations, press land then the One Touch
button for the desired location.
You may wish to write the names or telephone numbers of One Touch entries
on the directory card, using the light gray spaces for the first nine locations
and the dark gray spaces for the second nine locations.
ONE TOUCH OPERATION
9 lower OneTouch
locations
(all dark gray spaces)
LOWER button
9 OneTouch locations
(all light gray spaces)
OneTouch buttons
Conference Calls
continued from page 31
Talk Privately With One Caller
1Press H.
2Press the LINE button of the person with whom
you want to speak privately.
3Press Cto continue your conference
call.
To disconnect one party from a conference call and keep
the other on the line, press the LINE button of the call
you want to continue.
Low Battery Indicator
The screen displays when the batteryneeds to be
replaced, or when no battery is installed.
❚
❚
❚
Lights and What They Mean
LIGHT: STATUS: MEANS:
LINE, green On steadily This line is selected for use or is
the designated primary line.
LINE, red On steadily This line is in use.
Flashing slowly This line is on hold.
Flashing quickly This line is ringing.
MUTE On This phone is muted.
SPEAKER On You are on a speakerphone call.
Flashing This phone is dialing an Auto Redial
call. The microphone is not active.
HEADSET On You are on a headset call.
NEW CALL On steadily You have unreviewed call
information on this line.
Flashing You have new voice mail messages
waiting on this line.
0992_CIB_1ATT_FINAL_022105 2/22/04 4:46 PM Page 32
a
B
t
t
Other manuals for 992
3
Table of contents
Other AT&T Telephone manuals