ATESS EVD-40D User manual

EVD-40D 40kW
DC charging equipment user manual
+ 86 755 2998 8492
T
Shenzhen Atess Power Technology Co.,Ltd
3rd floor, building 9, Henglong industrial park, the fourth industrial zone of Shuitian community,
Baoan district, Shenzhen, China
E info@atesspower.com
Wwww.atesspower.com

Thank you for choosing ATESS mode
charging equipment
ATESS EVD series intelligent DC charging equipment is a device that provides
high-efficiency, safe and stable DC power supply for electric vehicles, which has a
friendly man-machine interface and integrates corresponding functions of control,
billing, communication and security protection. The charging equipment uses
OCPP 1.6JSON open protocol for communication with back-office server, thus to
realize functions such as reservation and network payment via mobile APP.
Diversified communication options, including wired Ethernet, WIFI, 4G, wireless,
are provided for customers to conveniently connect the device to a charging
network. This product supports CCS. Each connector works independently. Up to
2 EV could be charged at the same time. All the above features make it most
suitable for outdoor charging.
We sincerely hope that this product can meet your needs, and we welcome and
value your feedback and suggestions on the performance and function of the
product. We will continuously improve the quality of our products and services..
Copyright Notice
This user manual is copyrighted by Shenzhen ATESS Power Technology Co., Ltd.
(hereinafter referred to as “ATESS Power Technology”). No unit or individual may
extract or copy part or all of this user manual without the written permission of the
company. Content must not be transmitted in any form, including materials and
publications.
All rights reserved.
ATESS Power Technology has the final interpretation of this user manual. The
product specification may be updated from time to time and is subject to change
without prior notice!

Menu
I. Product description. . . . . . . . . . . . . . . . . . . . .
II. Packaging list.........................
III. Installation and wiring. . . . . . . . . . . . . . . . . .
IV. Parameter configuration
4.1 System Parameters. . . . . . . . . . . . . . . . . . . .
4.2 Network parameters...................
4.3 Protection parameters. . . . . . . . . . . . . . . . .
V. Operation instruction and LCD introduction
5.1 Charging mode and operation. . . . . . . . . .
5.2 LCD interface introduction. . . . . . . . . . . . . .
5.3 Appendix: Fault code .................
VI. Specification ........................
VII. Appendix
7.1 Electric diagram .....................
7.2 Warranty............................
7.3 Cantact............................
1
3
3
7
8
10
11
12
15
16
18
19
19

I. Product description
1. HMI; 6. Air outlet;
2. Charging connector holder; 7. Mounting bracket;
3. RFID reader; 8. Emergency Stop button;
4. LED indicators; 9. Charging connector holder;
5. WIFI/4G antenna
Explanation of LED indicators behaviors:
Blue - Standby(The charging equipment can only be used when the blue light lit);
Red Steady on/Flashing - Fault;
Green Steady on - Charging in process;
Green Flashing - Establishing communication;
Yellow Flashing - System initializing.
Internal view and terminal definition
1. AC input RCBO;
2. SPD
3. AC input terminal block. Terminal definition is (①L1;②L2;③L3;③N) from
right to left;
4.PE terminal;
Fig: AC Surge protection device
Note: The charging equipment will detect the current status of the lightning
arrester module in real time. When the lightning protection module is damaged,
the display will have an alarm indicating that the lightning protection device is
faulty. When repairing and replacing the lightning protection module, the left side
cover must be removed first. Then the maintenance person can operate the
breaker in the surge protection circuit and replace the lightning protection module!
(The red circle in the figure is the lightning protection status indicator. When the
indication window indicates green, the lightning protection module is normal;
when the indication window indicates red, the lightning protection module has
been broken and damaged, and the lightning protection module needs to be
replaced.)
6
5
7
9
8
1
3
4
2
13
2
4

II. Packaging list
No.
1
2
3
4
5
6
Items
Mode charging equipment
User manual
Certificate of quality
Mounting bracket
Cable hooker
Hex head expansion bolt,
M8*80/304 stainless steel
Qty
1
1
1
1
1
9
Remark
Already installed on the rear side of the
charging equipment
III. Installation and wiring
1. Firstly, according to the specific installation height requirement of the user,
determine the installation height of the charging equipment and the installation
height of the cable hooker. According to the dimensions in the following drawings,
drill 4 holes for bracket mounting and 3 holes for cable hooker mounting on the
wall. Take out the expansion bolts in thepacking accessory bag, hammer the
expansion bolts into the holes. Remove the nuts and washers for later use.
2. Loosen the 2 screws at the bottom of the charging equipment that fixes the
mounting bracket, keep them properly for later use. Place the mounting bracket
onto the bolts just installed and screw the nuts and washers. Take out the cable
hooker and fix it using the same procedure.
3. After the mounting bracket and cable hooker is fixed, place the charging
equipment onto the mounting bracket, with the outward bent part inserted to the
slot on the rear side of the charging equipment. Lock the charging equipment onto
the bracket at the bottom using the 2 screws. The installation is done.

4. Now prepare for wiring. Use 4 power cables and 1 PE cable, it is suggested to
use a 5-core cable(with PE included) for the convenience of using the water-proof
cable gland. The live wires shall be at least 16mm², PE shall be greater than
10mm². The PE wire shall be crimped to a M6 size ring terminal. Open the 2 locks
at the left side of the upper front cover and open it. Connect the AC input cables
into the corresponding terminals through the cable gland on the bottom left side
and fasten them(Refer to the Internal view and terminal definition part for wire
connection), put the transparent cover on the terminal block for safety purpose.
Connect the network cable through the hole in front of the AC input cable gland to
the RJ45 socket and fasten the water-proof gland. Turn on the RCBO. Close and
lock the upper cover after checking internal wiring and breaker position. The
wiring is then finished.
Notice
1. Only professional personnel can do the wiring, connect the AC input wires in
correct phase order according to the markings on the terminal block.
2. The PE terminal shall be connected to the Earth firmly and reliably!
3. No live work! Turn off the upstream breaker in the distribution panel and the
breaker inside the charging equipment before repairing or maintaining.
4. Please do no disassemble the unit unless authorized!
IV. Parameter configuration
After installed and connected, the charging equipment must first be configured
according to the actual needs of the user. The parametersare configured through
the LCD touch screen. Save the change and exit then the charging equipment can
be used normally.
After the system enters standby, click thebutton marked by the red rectangle in the
above figure to enter the system management page, as shown below.
System management page
L1 L2 L3 N PE
Terminal
Wire
2
≥16mm
≥AWG5
2
≥16mm
≥AWG5
2
≥16mm
≥AWG5
2
≥16mm
≥AWG5
2
≥10mm
≥AWG7

4.1 System Parameters
System Parameters page
After changing parameters, click the “Set” button to save the setting, then click the
“Back”button for the setting to take effect.
4.2 Network parameters
Network parameters need to be configured when the charging station needs to be
connected to back office server for operation and management. Network
parameters include server parameters and charger parameters. Currently the
charging equipment only support LAN connection, WiFi/4G is yet to develop.
No. Parameters Function description
1
2
3Charge ID
Tariff rate
RFID Card
PIN CODE
Charger ID, suggested touse serial number as
charger ID.
Charging tariff setting, used to set the price per
kWh.
4Charging station ID
Identification number of charging station.
(one charging station may consist of multiple
charging equipment).
5Number of power
modules
Number of power modules inside the mode 4
charging equipment.
6Modules power Rated power setting of power module
7Plug and Charging Charging mode setting. 1 is Plug&charge mode,
payment is not needed; 2 is APP or RFID mode.
PIN code setting of RFID reader, a 6-digit code,
the default setting is 242007.It must be the
same with the PIN code of user card. Users can
also use other PIN code if they have card writer
to change PIN code of user card.
No. Parameters Function description
8
9
10 Time set
Language set
Meter address DC meter ’s modbus address(already preset in
factory, it is not allowed to modify)
System time setting. Format is Y, M, D, H, M, S.
The Year setting can only set the last 2 digits,
e.g. use 19 for 2019.
Language setting. Currently support Thai-English
and Thai-Chinese dual language display.
11 Password set Password of management page. It’s a 4-digit
fixed length password, default is “1234”.

10
9
No. Parameters Function description
1
2
3Charger IP
Server URL2
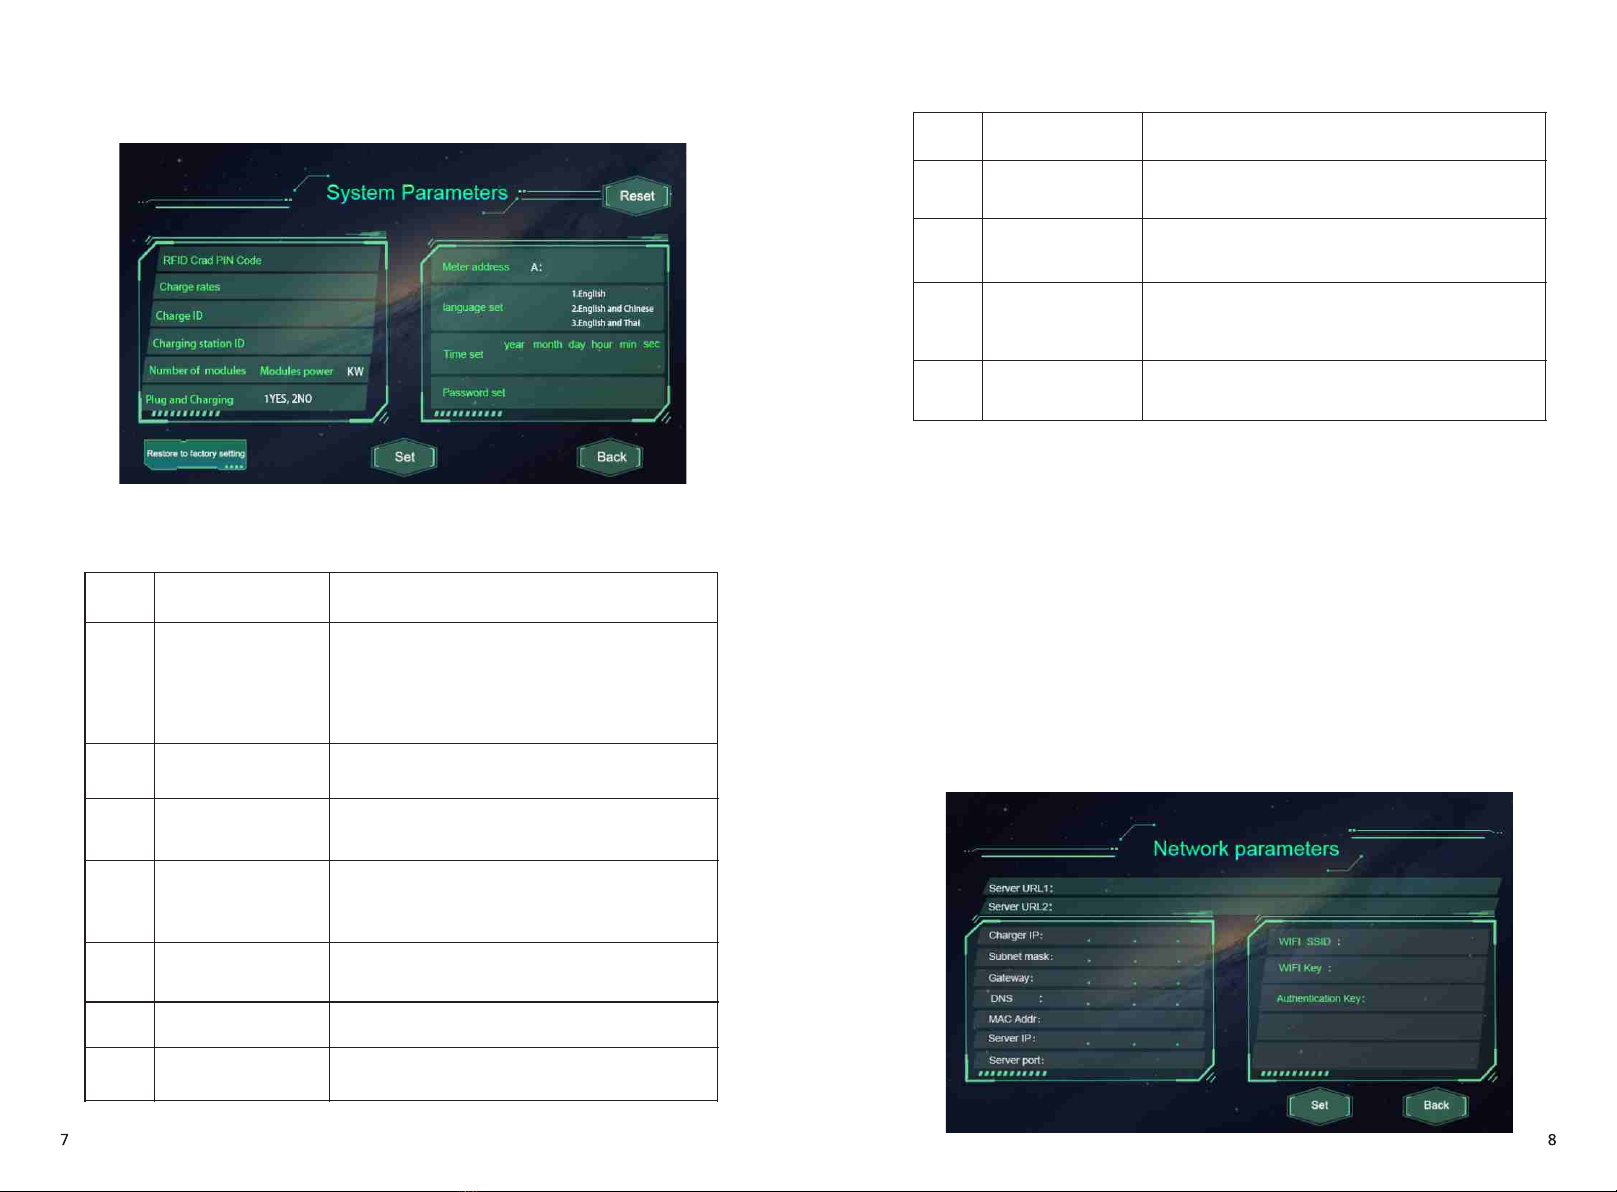
Server URL1 Server address setting, used to set domain or IP
address of back-office server.
IP setting of the charging equipment
Address of backup server. This parameter is not
available now, reserved for future use.
4 Subnet mask Subnet mask setting
5Gateway Gateway setting
6DNS DNS server address
7MAC Addr MAC address
8Server IP Server IP address
9Server port Server port number
10 WIFI SSID
WIFI SSID setting, to set the name of the
wireless network to which the charging
equipment is to be connected. A reserved
function for future use
11 WIFI Key WiFi password setting. A reserved function for
future use
12 Authentication Key OCPP login authentication setting
4.3 Protection parameters
The protection-related parameters, such as voltage, current, temperature, power,
etc.
No. Parameters Function description
1
2
3
4
5
6
7
8
9
DC output overvoltage value
DC output overcurrent value
AC input overvoltage value
AC input undervoltage value
AC input overcurrent value
DC output limit power
Charger over temperature value
Charger derate temperature
value
Insulation Resistance
Over voltage limit setting of DC
output
Over current limit setting of DC
output
Over voltage limit setting of AC
input
Under voltage limit setting of AC
input
Over current limit setting of AC
input
Power limitation setting of DC
output
Over temperature limit setting of
charging connector
Charging connector’s temperature
at which the charging equipment
starts decreasing output power
The min value of insulation
resistance

V. Operation instruction and LCD
introduction
5.1 Charging mode and operation
APP/RFID mode:
Initiate or cease charging by scanning QR code using APP or by swiping RFID
card.
You can also use APP for reservation and payment provided that the back-office
server supports such function;
4
52
3
1
APP/RFID mode operation process flow
Plug&Charge:
Charging will start automatically after EV plugged in. If you want to stop the
charging, just press the stop icon on the screen.
Plug&Charge mode operation process flow
The charging equipment is equipped with a 7 inch industrial-grade resistor type
touch panel. The display content is as below,
When powered up, the charging
equipment will show this display,
Charging information, which will
show the status of the charging
equipment,such as standby,
charging, fault,etc.
5
4
13
2QRSC N
QRSCN
STOP
STOP
12
4
3
Stop
5.2 LCD interface introduction

Management page, user can
set different kinds of parameters
here. Password authentication is
required when entering each
parameter setting page.
Password window. Before entering
numeric, please first press the text
display field to move the cursor
there, then you can type in the 4-
digit password. A wrong password
will cause no response and action.
System parameters page.
Network parameters page, used to
set network related parameters of
back-office server and the
charging equipment.
Protection parameters page of DC
output, used to set limit value of
v o l t a g e , c u r r e n t , p o w e r ,
temperature, etc.
Fault record page, user can check
history fault record here.
Charging record page.
Charging information page, to
c h e c k r e a l - t i m e c h a r g i n g
parameters.

5.3 Appendix: Fault code
No. Fault description
1
2
3
4
5
6
7
8
9
10
11
12
13
14
15
16
17
18
19
20
Emergency stop is pressed!
RFID communication fault!
Lightning protection fault!
Power module communication fault!
Over temperature fault!
DC output overvoltage fault!
Meter communication fault!
DC output overcurrent fault!
Waiting for BMS communication timeout!
Insulation detection timeout!
Insulation detection fault!
DC+ Contactor sticking fault!
DC- Contactor sticking fault!
Battery voltage reverse fault!
Plug head connection over temperature fault!
Plug line disconnection fault!
AC Contactor sticking fault!
AC Input Overvoltage!
AC Input Undervoltage!
BMS communication fault!
VI. Specification
Model EVD-40D
Dimension(mm) 775*556*270(L*W*H)
Weight(kg) 80KG
Display LCD
Casing material
AC input
Grid connection
Current
Voltage
DC output
Stainless steel&acrylic sheet
Voltage
400V, 3 phase 5 wires
AC 260~475V
≤64A
45~65Hz
DC150~750V
Frequency
Current
Voltage-stabilizing accuracy
Current-stabilizing accuracy
Power factor
Efficiency
<±0.5%
≥0.95 @20%~50% of full load output power
≤±1% (at 20% ~100% of rated power)
≥0.98 @50%~100% of full load output power
≥0.99 @100% full load output power, rated
input voltage and frequency
≥95.2%,@750V,50% ~100% of rated
current and rated input voltage
Plug type CCS
0-80A

IP degreel
Working environment
Relative humidity
Altitude
Cooling method
Remote monitoring
Payment
Standby power
Standards
Mounting
Metering accuracy
Certificate
Protection features
Low and high trip limit of AC
input voltage
Over voltage trip limit of DC
output
Over temperature protection
Short circuit protection
Emergency stop protection
Lightning protection
Leakage protection
-25℃~+50℃, derate since 50℃
Ip54
5%-95%
≤2000m, derate for higher than 2000m
Forced air cooling
Ethernet/WIFI/4G/485/232
RFID/APP
25W
IEC-62196-1;IEC-62196-3;
Wall or Pole
CE
0.5
Adjustable within 260~457V AC
Adjustable within 260V~778V DC
Yes
Derate since 50℃; Stop at 75℃
Yes
Type A
Type II
VII. Appendix
7.1 Electric diagram
Fig7-1, Main circuit diagram

7.2 Warranty
For detailed warranty terms, please refer to ATESS warranty card.
7.3 Contact
Company Name:Shenzhen Atess Power Technology Co.,Ltd
Address:3rd floor, building 9, Henglong industrial park, the fourth industrial zone of Shuitian
community, Baoan district, Shenzhen, China
Website:www.atesspower.com
Service line:+8675529988492
E-mail:info@atesspower.com
Table of contents
Other ATESS Batteries Charger manuals