AU AQUOS sense3 plus SHV46 Installation guide

Basic Manual
・Descriptions in this manual are based on AndroidTM 9 Pie.
・The company names and product names appearing in this manual are
trademarks or registered trademarks of their respective holders.
・For exemptions, refer to “Notes on Usage” available on the au homepage.
December 2019, 1st Edition
Sold by: KDDI CORPORATION,
OKINAWA CELLULAR TELEPHONE COMPANY
Manufactured by: SHARP CORPORATION

Preface
Thank you for buying the “AQUOS sense3 plus サウンド SHV46” (simply
called the “SHV46” or the “product” from here on).
Before using the product, be sure to read the “Basic Manual” (this manual)
and “Notes on Usage” to ensure correct use. Store in a safe place for easy
reference.
Instruction Manual
■“Basic Manual” (This Guide)
The “Basic Manual” (this manual) available on the au homepage describe
basic operations of major functions.
(https://www.au.com/english/support/manual/)
■“Online Manual” (Japanese)
You can check “Online Manual” (Japanese) that describes detailed of various
functions by operating the product as follows.
On the home screen, swipe/flick up the screen and display the “App list
screen” →[Support] →[ 取扱説明書] (Online Manual) (Japanese).
Also, you can check “Online Manual” (Japanese) on the au homepage.
(https://www.au.com/online-manual/shv46/)(Japanese)
■“Full Instruction Manual” (Japanese)
You can check “取扱説明書 詳細版” (Full Instruction Manual) (Japanese) that
describes detailed of various functions on the au homepage.
(https://www.au.com/support/service/mobile/guide/manual/)(Japanese)
1
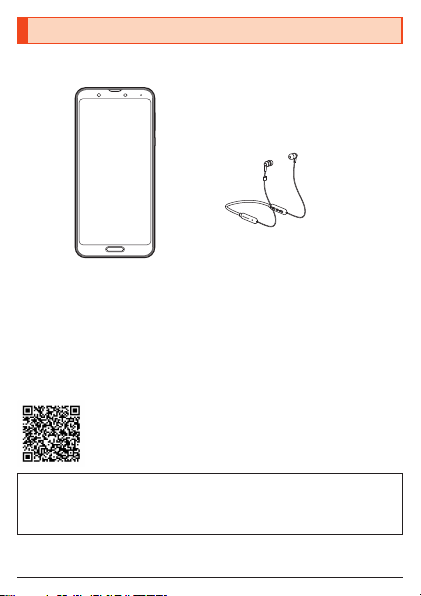
List of Packaged Items
Before you start using the product, make sure that you have all the following
packaged items with the product.
Pioneer-brand headphones
[C7 Wireless Special Edition]
(complimentary sample)*
SHV46
•取扱説明書(Basic Manual) (Japanese)
•ご利用にあたっての注意事項(Notes on Usage) (Japanese)
•コーションシート(Caution sheet) (Japanese)
* For precautions, usage instructions, warranty, etc. regarding the Pioneer-brand
headphones (complimentary sample), see the quick start guide and safety guide
included with the headphones, or an instruction manual at the URL below.
(https://jp.pioneer-audiovisual.com/support/purpose/manual_catalog/manualdl/
product_select_n.php?p_nm=1595)(Japanese)
The following items are not included in the package.
•au Nano IC Card 04
•microSD™ memory card
•AC adapter
•USB Type-C™ cable
•Purchase a specified charger (sold separately).
2
◎The battery is built into the product.
◎Illustrations of cell phones in this manual are only for reference. They may
look different from the actual product.
Illustrations and Descriptions in This
Manual
•In this manual, the key illustrations are simplified as shown below.
u/d:Volume up/down key
f:Power key
•In this manual, operation procedures are described as below.
Description Explanation
On the home screen, swipe/
flick up the screen and display
the “App list screen”
→[Settings] →[About phone].
On the AQUOS Home screen, swipe/flick
up the screen to switch to the App list
screen, and then tap “ Settings”.
Continue by tapping “About phone”.
f (hold down for at least 2
seconds).
Hold fdown for at least 2 seconds.
* Tapping is to select a key or icon displayed on the screen by lightly tapping it with
your finger.
•Screenshots and operations in this manual are based on attaching an au
Nano IC Card 04 to the product.
•Illustrations and screenshots may differ from actual screen. Portions of the
screen are sometimes omitted.
•Explanations of this manual are based on the case when the color of the
main unit is “Classy Blue” as an example.
•Explanations of this manual are based on the case when the product is held
vertically. If you hold it horizontally, menu items/icons/on-screen keys etc.
may be different.
•Descriptions in this manual are based on operation in AQUOS Home.
Operations may be different if home applications have been changed (by
using “Home applications”, etc.).
•Menu items, layers and icons described in this manual may be different
according to functions being used and conditions.
3

•In this manual, “au Nano IC Card 04” are abbreviated as “au IC Card”.
•In this manual, “microSD™ memory card (commercially available)”,
“microSDHC™ memory card (commercially available)” and “microSDXC™
memory card (commercially available)” are abbreviated as “microSD
memory card” or “microSD”.
•In this manual, the “Basic Manual” included with the product (this manual),
“Notes on Usage”, and “取扱説明書(詳細版)(Full Instruction Manual)”
(Japanese) are collectively the “Instruction Manual”.
•All of the indicated amounts exclude tax unless otherwise specified.
•The company names and product names appearing in this manual are
trademarks or registered trademarks of their respective holders. Also, ™ and
® marks are sometimes omitted.
Cell Phone Etiquette
■Use of cell phones is not allowed in the following
places!
•Do not listen to music or watch videos while driving a car or riding a
motorbike or bicycle. Use of a cell phone while driving a car or riding a
motorbike is prohibited by law. (Use of a cell phone while riding a bicycle
may be punishable by some regulations.) Be attentive to traffic around you
while walking. Not being able to hear surroundings or looking only at the
display may cause a traffic accident. Be careful especially at train crossings,
on station platforms, and at crosswalks.
•Since using the product on airplanes is restricted, follow the instructions
given by the respective airlines.
■Be considerate of people around you
•Do not make calls in theaters, museums, libraries, and other similar places.
Turn power off or turn on manner mode so as not to disturb others around
you with your ringtones.
•Do not use the cell phone outside in town where you might hinder other
pedestrians.
•Viewing a cell phone screen while walking is a serious hazard. Do not
suddenly stop to talk on/operate the cell phone or do so while walking.
4

•Move to areas where you will not inconvenience others on bullet trains, in
hotel lobbies, etc.
•Refrain from talking in a loud voice.
•Check whether sound from earphones, etc. is audible when near others on a
train.
•Obtain the permission of other people before you take their photos with the
cell phone's camera.
•Keep general morals when you use the camera function.
•Some people close to you in crowded places such as packed trains may be
using a cardiac pacemaker. Turn on “Airplane mode” or turn the cell phone
off in such places.
•Abide by the rules of hospitals and other medical institutions where it is
forbidden to use or carry cell phones.
5
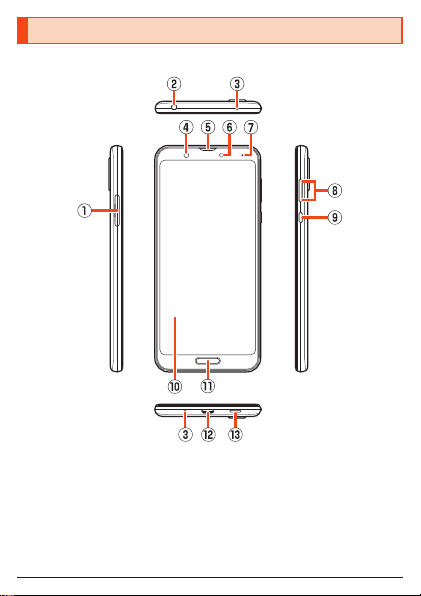
Names and Functions of Parts
■Front/Left Side/Right Side/Top and Bottom
①au IC Card/microSD memory card tray
②Earphone/Microphone jack
③Mouthpiece (Microphone)
④In camera lens
⑤Earpiece (Receiver)/Speaker
6

⑥Proximity sensor/Light sensor
Proximity sensor prevents inadvertent operations of the touch panel during
a call.
Light sensor adjusts the brightness of display to match the ambient
brightness.
⑦Charging/Incoming indicator
While charging, it illuminates in red/green according to the battery level.
Even after charging (battery level 100%), indicator remains lit in green if a
specified charger (sold separately) is connected.
While receiving a mail and new notification, it flashes according to the
setting.
⑧ud Volume up/down key
Adjust the volume.
⑨fPower key
Turn the screen on/off.
(The screen goes out after no operation for a certain period of time.)
Hold it down to turn on/off the power, restart the product, etc.
⑩Display (Touch panel)
The display surface is covered by the protective film. Remove it when you
use the commercially available one.
⑪Fingerprint sensor
Use to unlock the lock screen etc. by fingerprint authentication. Also, set it
to use as the home key.
⑫External connection jack
Use when connecting, TypeC Common AC Adapter 01/02 (sold separately),
USB Type-C cable (commercially available), USB cable for peripherals
(commercially available), etc. to the product.
When you connect, TypeC Common AC Adapter 01/02 (sold separately),
USB Type-C cable (commercially available), etc. to the product, the
geomagnetic sensor of the product is affected by the magnetism of
connected devices and it may not function properly.
When you use functions and applications using the geomagnetic sensor,
remove the cable.
⑬Speaker
7

■Back
⑭Wide-angle out camera lens
The ornamental camera cover serves as an air vent to maintain product
performance.
⑮Standard out camera lens
The ornamental camera cover serves as an air vent to maintain product
performance.
⑯Mobile light
⑰Internal antennas
⑱GPS antenna
⑲Wi-Fi®/Bluetooth®antenna
⑳&mark
Hold it over a reader/writer when using Osaifu-Keitai®/NFC.
8

◎The outer case (back) of the product cannot be removed. Removing it
forcibly may cause damage or a fault.
◎The battery is built into the product, and cannot be removed by the
customer. To force the power off, refer to “Turning the Power Off Forcibly”
(▶P.22)
au IC Card/microSD memory card tray
◎Note that pulling or applying excessive force on an au IC Card/microSD
memory card tray may cause damage.
Proximity sensor/light sensor, earpiece (receiver)/speaker, mouthpiece
(microphone), speaker, air vent (ornamental camera cover)
◎Product earpiece also serves as a speaker. Volume is set to increase
gradually to prevent sound from being emitted loudly near ear when
switching to hands-free talk or ending talk.
◎Placing stickers, etc. over the proximity sensor/light sensor may prevent
the product from operating properly.
◎Covering the earpiece (receiver)/speaker, mouthpiece (microphone),
speaker or air vent (ornamental camera cover) with stickers, fingers, etc.
may hinder product performance.
Internal antennas, Wi-Fi®/Bluetooth®antenna, GPS antenna
◎Antennas are built into the product. Do not cover with hand during calls
or data communication. Doing so may affect call/communication quality.
Earphone/Microphone jack
◎An earphone/microphone with the switch or depending on the type of the
earphone/microphone, it may not be available with the product.
IMEI plate
◎A plate with the sticker which the IMEI number (International Mobile
Equipment Identifier) is printed is stowed near the au IC Card/microSD
memory card tray. Except when the IMEI number is required such as
requesting servicing or repairs, do not pull out the plate or remove the
sticker.
9
When pulling out the IMEI plate
①With the display side upward, pull out the au IC Card/microSD memory
card tray. (For details on pulling out the au IC Card/microSD memory
card tray, refer to step 1“Attaching the au IC Card” (▶P.13).)
②Place your finger (nail) on the hole in the IMEI plate, and pull out the
IMEI plate. (Do not pull the IMEI plate all the way out.)
* If the IMEI plate is difficult to pull out, place the catch on the underside of
the au IC Card/microSD memory card tray (side with no printing) in the
hole in the IMEI plate from above, and pull out the IMEI plate.
(Be sure to remove the au IC Card and microSD memory card from the
tray beforehand.)
IMEI plate
au IC Card/microSD
memory card tray
Catch (tray underside)
Hole in IMEI plate
Catch
Tray underside
◎Note that pulling out the IMEI plate forcibly or adding forces on it may
damage the plate.
◎To return the IMEI plate after pulling it out, slowly push it in while taking
care not to insert it too deep.
10
◎You can also operate the product to confirm the IMEI.
On the home screen, swipe/flick up the screen and display the “App list
screen” →[Settings] →[About phone] →[IMEI].
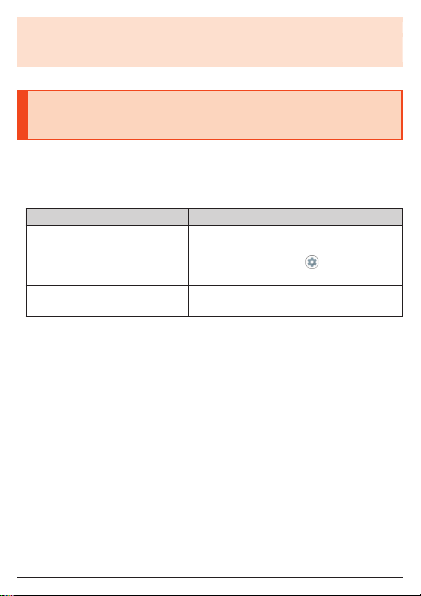
Charging/Incoming indicator
Notify you of the battery level status while charging, and a missed call,
receiving a mail, etc. by illuminating/flashing the charging/incoming indicator.
State of
indicator Color State of indicator
Illuminating Red Charging in progress (Battery level is approx.
94% or less)
Illuminating Green Charging in progress (Battery level is approx.
95% or more)
Flashing Red Charging unavailable
Flashing White New notification such as a missed call
•You can set the charging/incoming indicator depending on apps.
◎When the display is on, the charging/incoming indicator which notifies
you of new notification such as a missed call does not flash. Check
notification icons on the notification/status panel.
◎While connecting a specified charger (sold separately) to the product
even after charging is complete (battery level is 100%), it keeps
illuminating in green.
11
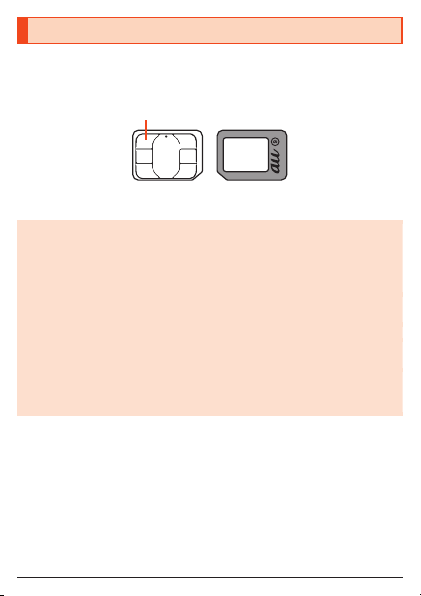
au IC Card (SIM Card)
The au IC Card records your personal information such as phone numbers.
This product supports au Nano IC Card 04.
au Nano IC Card 04
IC (metal) part
Front Back
◎Note the followings since using the au IC Card may cause a fault or
damage easily.
•Do not touch the IC (metal) part of the au IC Card.
•Confirm the orientation for inserting.
•Do not attach or remove it forcibly.
◎When the au IC Card is not attached properly or any trouble is found,
error messages are displayed.
◎Do not misplace the au IC Card once it is removed.
◎Do not insert the au IC Card attached with a conversion adapter. May
cause a fault.
◎Make sure to unplug the USB Type-C plug such as TypeC Common AC
Adapter 01/02 (sold separately) from the product when attaching or
removing the au IC Card.
12
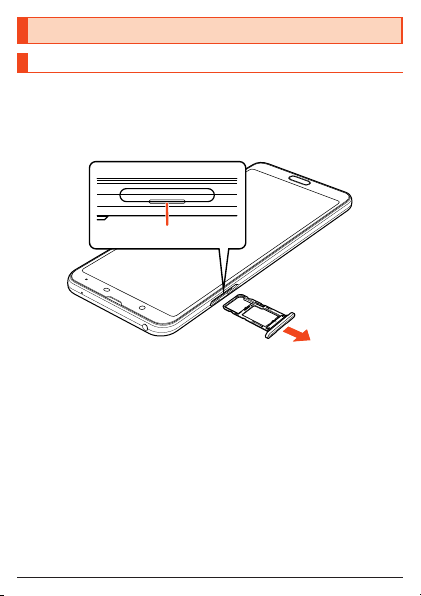
Attaching/Removing the au IC Card
Attaching the au IC Card
Before attaching the au IC Card, turn the product off.
Also, attach it with the display side turned up.
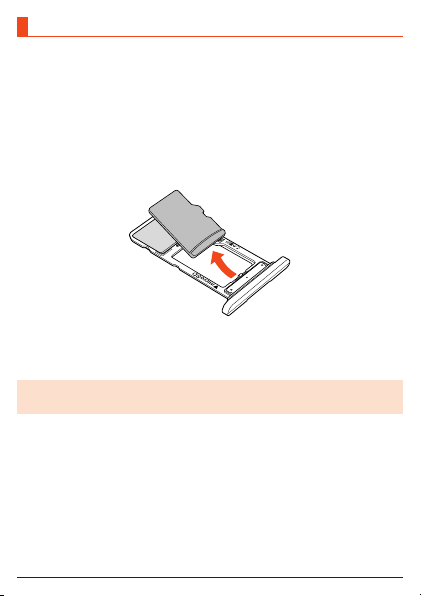
1With your finger on the groove, pull out the au IC Card/
microSD memory card tray.
Groove
13
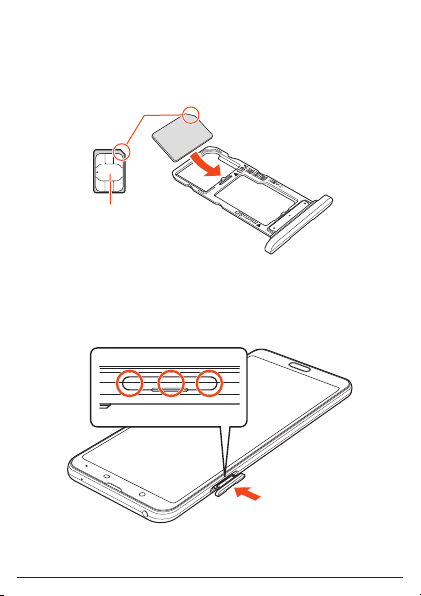
2Put the au IC Card to the au IC Card/microSD memory card
tray with the IC (metal) side turned down.
Check the direction of the au IC Card and put it securely.
Not to let the au IC Card lift up from the card tray.
If the au IC Card does not fit the card tray, may cause a fault.
Notches
IC (metal)
3Insert the au IC Card/microSD memory card tray all the
way to the product horizontally.
Push the ○areas securely and make sure there is no space between the
product and the card tray.
14

Attaching or removing the au IC Card/microSD memory card tray
◎Do not insert the au IC Card/microSD memory card into the product
directly. First place the card on the tray, then push the entire tray into the
product.
◎Take care not to lose or damage the removed au IC Card/microSD
memory card tray.
◎When pulling out the card tray from the product, pull it slowly and
horizontally with the display side turned up.
•Pulling out the card tray forcefully or obliquely may cause damage.
•When pulling out the card tray with the display side turned down or the
product stood upright, the au IC Card or microSD memory card being
attached to the card tray may be off and cause loss.
◎When attaching the card tray, insert it slowly with the display side turned
up and make sure there is no space between the product and the card
tray.
•Do not insert the card tray the other way around. Failure to do so may
cause damage it.
•Inserting the card tray not deeply enough may cause impairment of the
waterproof/dustproof property or prevent the product from functioning
properly.
•For details on closing the card tray, refer to “Closing the au IC Card/
microSD memory card tray” on the “Notes on Usage”.
15

Removing the au IC Card
Before removing the au IC Card, make sure to turn the product off.
Also, remove it with the display side turned up.
•For details on attaching or removing the au IC Card/microSD memory card
tray, refer to “Attaching the au IC Card” (▶P.13).
1With your finger on the groove, pull out the au IC Card/
microSD memory card tray.
Take care not to let the au IC Card come off from the tray and be
misplaced when pulling it out.
2Removing the au IC Card from the au IC Card/microSD
memory card tray.
3Insert the au IC Card/microSD memory card tray all the
way to the product horizontally.
16

Using a microSD Memory Card
Attaching a microSD Memory Card
Before attaching a microSD memory card, make sure to turn the product off.
Also, attach it with the display side turned up.
•For details on attaching or removing the au IC Card/microSD memory card
tray, refer to “Attaching the au IC Card” (▶P.13).
1With your finger on the groove, pull out the au IC Card/
microSD memory card tray.
2Put the microSD memory card to the au IC Card/microSD
memory card tray with the terminal (metal) side of the
memory card turned down.
Check the direction of the au IC Card and put it securely.
Not to let the microSD memory card lift up from the card tray.
If the microSD memory card does not fit the card tray, may cause a fault.
3Insert the au IC Card/microSD memory card tray all the
way to the product horizontally.
◎Make sure that the top/bottom and front/rear of the microSD memory card
are facing correctly.
Attaching it forcibly may cause damage.
◎Do not touch the terminal part of a microSD memory card.
17
Removing the microSD Memory Card
Before removing a microSD memory, make sure to turn the product off.
Also, remove it with the display side turned up.
•For details on attaching or removing the au IC Card/microSD memory card
tray, refer to “Attaching the au IC Card” (▶P.13).
1With your finger on the groove, pull out the au IC Card/
microSD memory card tray.
2Removing the microSD memory card from the au IC Card/
microSD memory card tray.
3Insert the au IC Card/microSD memory card tray all the
way to the product horizontally.
◎The microSD memory card may become warm after a long time use, but
this is not a fault.
18

Charging
Charging
When you purchase the product, the internal battery is not fully charged. Be
sure to charge the internal battery before use.
•If the performance of the battery does not recover (e.g. the usable time after
each charge has become extremely short), the internal battery may be at the
end of service life. On the home screen, swipe/flick up the screen and
display the “App list screen” →[Settings] →[About phone] →[Battery
status] to check the charging performance of the internal battery.
•On the home screen, swipe/flick up the screen and display the “App list
screen” →[Settings] →[Battery] to check battery health.
•While charging, the battery icon is displayed with superimposed.
•For details on the charging/incoming indicator while charging, refer to
“Charging/Incoming indicator” (▶P.11).
◎The product may become warm while charging, but this is normal.
◎Depending on the operation procedure and usage environment, the
temperature inside the product may get high and the product may even
get heated. In such case, charging may stop for security reasons.
◎Charging the internal battery while using the camera function etc. may
lengthen the charging time.
◎If you perform various operations with a specified charger (sold
separately) connected to the product, charging/discharging may take
place repeatedly in a short time. Frequently charging the internal battery
shortens its service life.
◎If you charge the internal battery when the battery has run out, the
charging/incoming indicator may not illuminate soon. However, charging
is in progress.
◎If the charging/incoming indicator flashes in red, force the power off
(▶P.21) and turn the product on again. If the indicator continues to flash,
stop charging the internal battery and contact an au shop or the Repair
and Delivery Support Center.
19
Table of contents
Other AU Cell Phone manuals

AU
AU A1301S Installation guide

AU
AU Digno ISW11K User manual

AU
AU W32T Specification sheet

AU
AU Xperia ZL2 Sol25 Service manual

AU
AU Urbano L01 Installation guide

AU
AU IS03 Installation guide

AU
AU SCV32 Installation guide

AU
AU INFOBAR A03 Installation guide

AU
AU TORQUE X01 Installation guide

AU
AU pt003 Installation guide

AU
AU A5505SA Installation guide

AU
AU Urbano L03 Installation guide

AU
AU K011 User manual

AU
AU AQUOS SHV31 Installation guide

AU
AU AQUOS SHV31 Quick start guide

AU
AU ISAI FL LGL24 Service manual

AU
AU AQUOS PHONE IS12SH Installation guide

AU
AU URBANO V01 Installation guide

AU
AU Qua Phone QX Installation guide

AU
AU KYL21 DIGNO S Installation guide


