AU ISAI FL LGL24 Service manual
MFL68506703
All company names and product names in this guide are trademarks or registered
trademarks of the respective companies.
The TM and ® marks may be omitted in this guide.
Sold by: KDDI CORPORATION, OKINAWA CELLULAR
TELEPHONE COMPANY
Imported by: LG Electronics Japan, Inc.
Manufactured by: LG Electronics Inc.
June 2014, 1st Edition
Please read this manual rst
LGL24 Setting Guide
Thank you for purchasing the "isai FL (LGL24)" (simply called the "product" from
here on).
This "Setting Guide" describes the basic operations and initial settings for using
the product.
For descriptions on various functions, refer to the "Basic Manual" or the "取扱説明書
詳細版 (Full Instruction Manual)" (Japanese) on the au website.
Before using the product, be sure to read the "Notes on Usage" to ensure correct
and safe use.
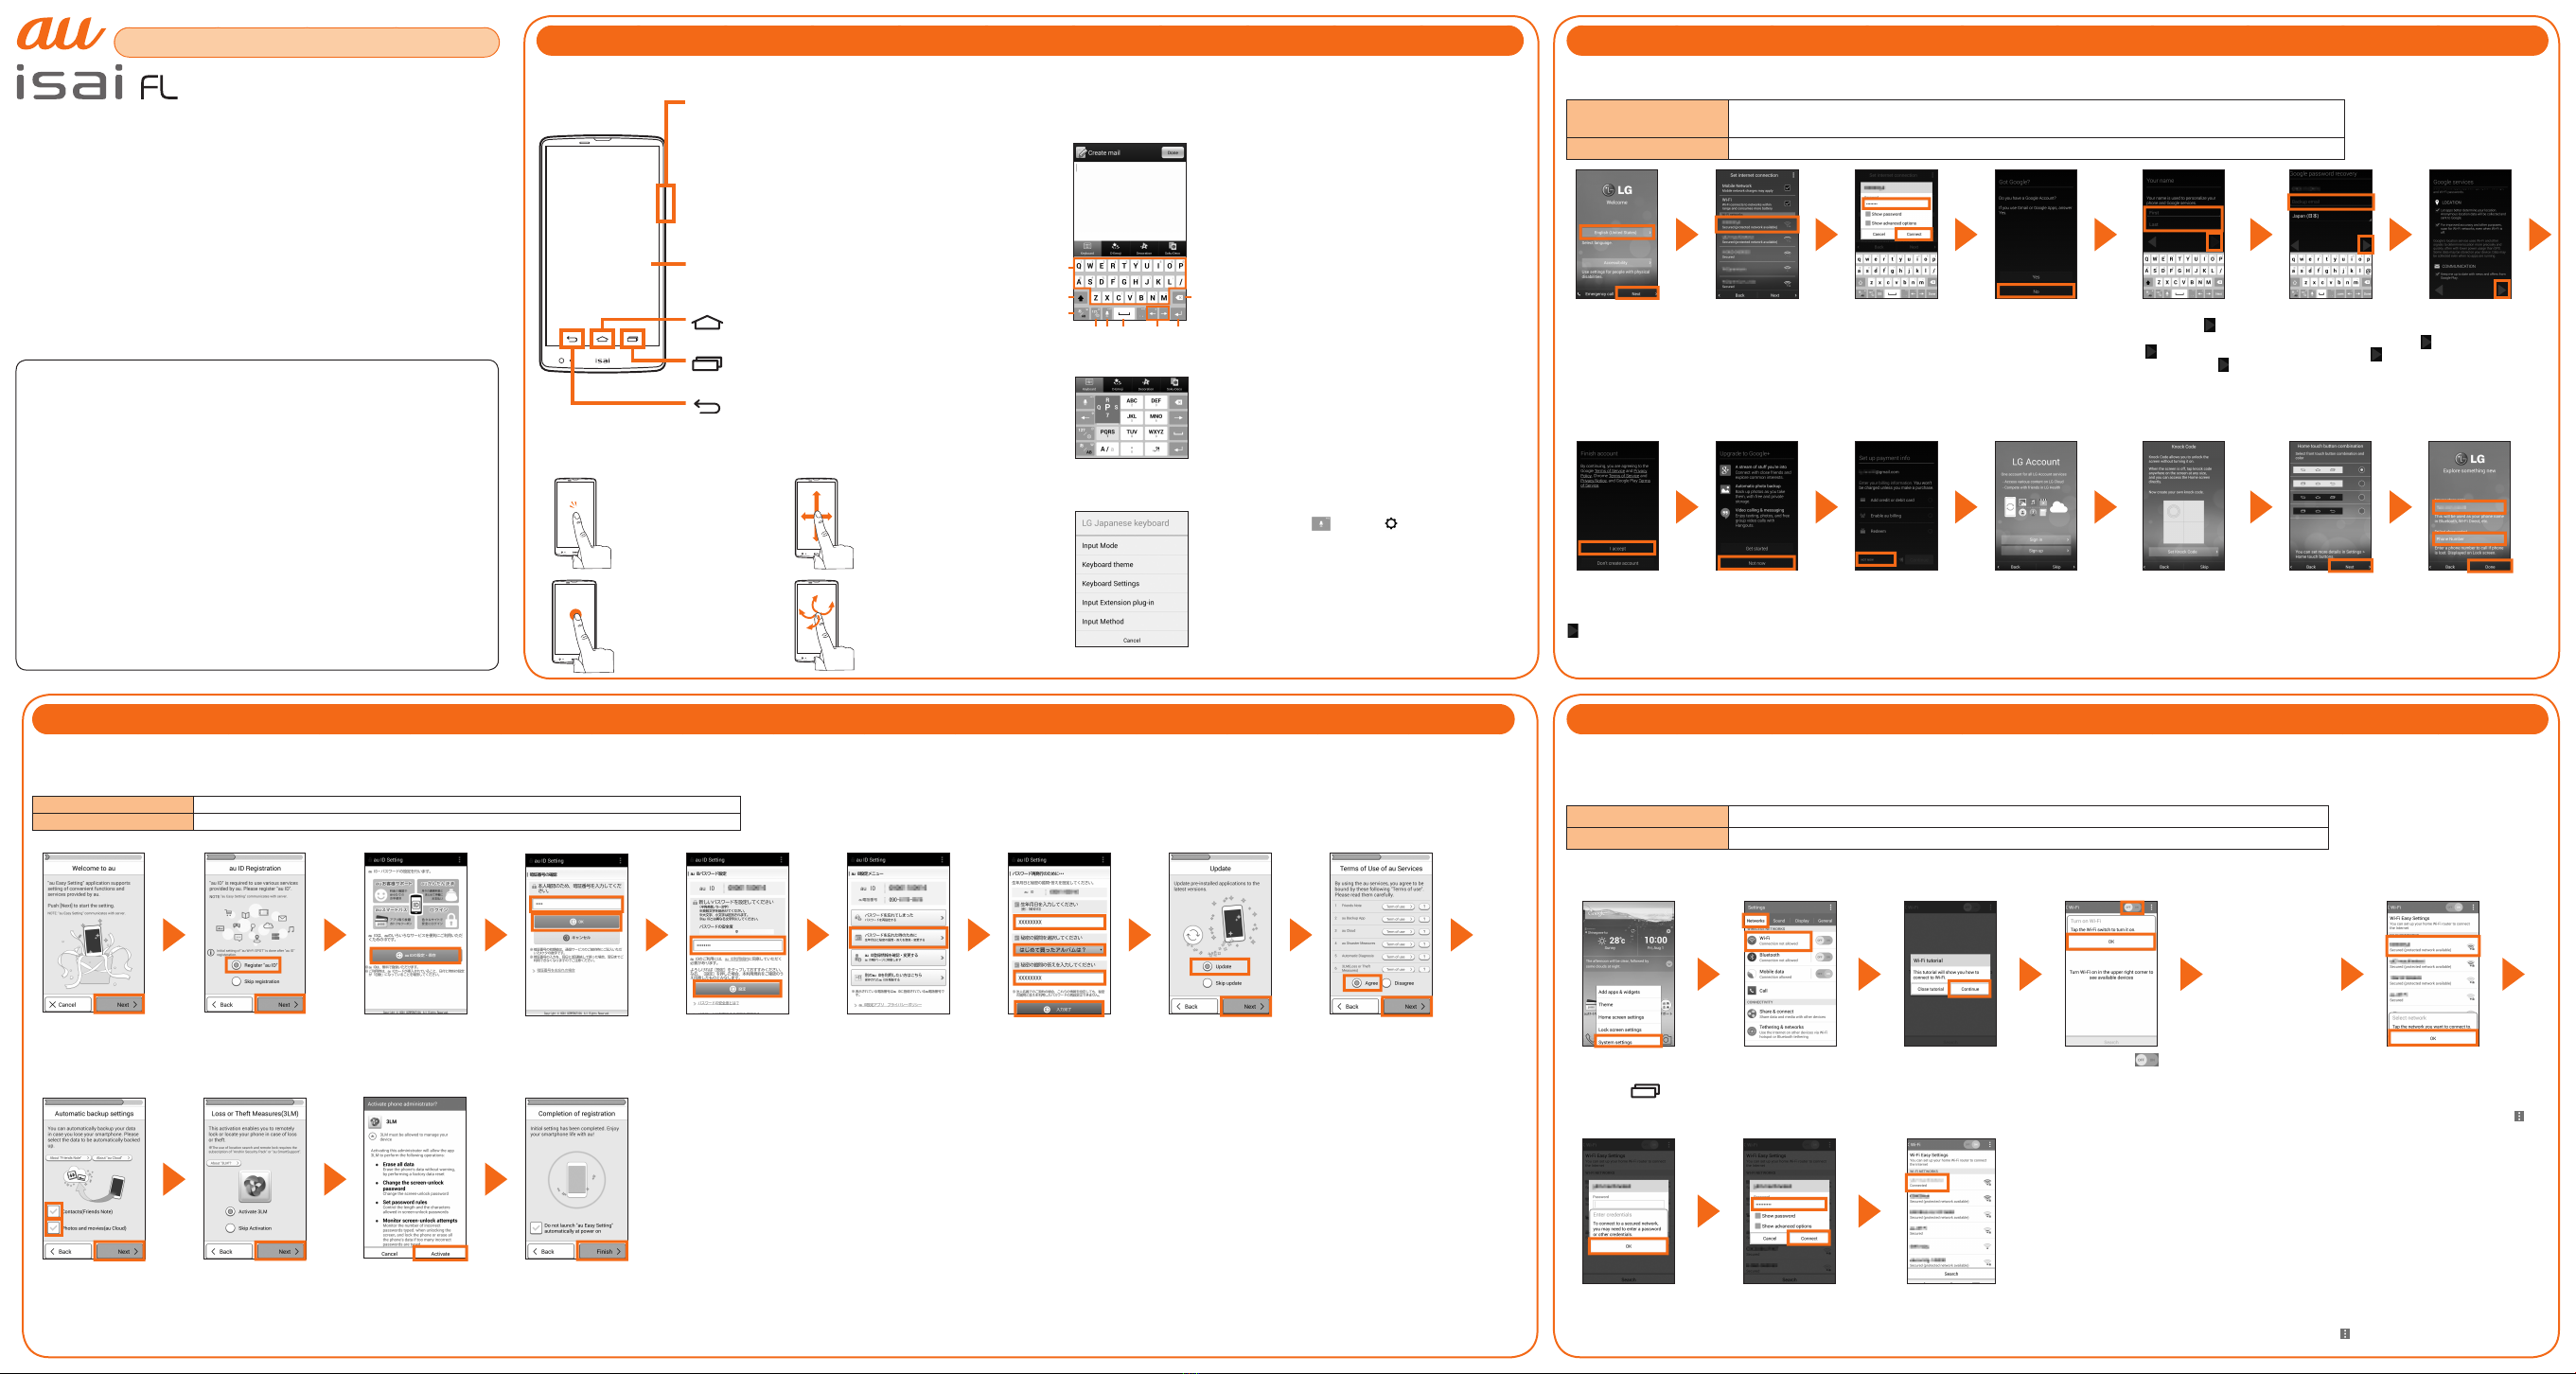
■Basic operations to input characters
This product uses the software keyboard displayed at the bottom of the screen to
enter characters.
Tap the keys on the screen to enter characters.
a
b
c
i
def gh
a Inputs the characters of each key.
b Switches upper case/lower case of entering
character.
c Switches the Input Mode.
d Enter numbers/pictograms/symbols/emoticons.
e Switches to voice typing.
f Inputs a space and converts characters in
Hiragana-Kanji input mode.
g Moves the cursor to the right/left and changes the
range of characters when converting characters.
h Start a new line/conrm the characters input.
i Deletes the character to the left of the cursor.
Flick input
You can enter a desired character by icking the
key up, down, right, or left without tapping the key
repeatedly on 10key keyboard. Touch and hold the
key to display the candidates that can be entered
by icking (ick guide). Flick the key in the direction
of a desired character to enter that character.
Flick guide
LG Japanese Keyboard
Touch and hold and tap " " to display LG
Japanese Keyboard screen.
Input Mode (Hiragana-Kanji, half-width alphabet,
etc.), Keyboard Settings (QWERTY Keyboard, 10key
keyboard) and Input Method can be switched.
LG Japanese Keyboard settings can also be made.
■Basic operations of the keys
Power key
●Power ON
Press and hold the power key.
●Power OFF
Press and hold the power key→ Select "Power o" → "OK".
●Sleep mode
Press the power key in operation to switch to sleep
mode.
●Cancel sleep mode
Press the power key
in sleep mode to display the
unlock screen.
Swipe on the unlock screen to unlock.
Display (Touch panel)
Directly touch an item or key displayed on the screen
to operate.
Home key
Use it to display the home screen, etc.
Task key
Check running applications.
Back key
Goes back to the previous screen.
■Basic operations of the touch panel
Tap
Lightly touch a
menu or item and
immediately release
your nger.
Slide
While your nger is
lightly touching the
screen, move it in the
desired direction.
Touch and hold
Keep touching an
item with your nger.
Flick (Swipe)
Quickly move (ick)
your nger up, down,
right, or left.
●
Learning the Basic Operations
Describes the names of parts and
operation.
●
Setting a Google Account
Sets up to use services such as
Gmail and Google Play.
●au Easy Settings
Sets the au ID.
●Setting Wireless LAN
(Wi-Fi®)
Sets the wireless LAN (Wi-Fi®)
function.
●
E-mail Settings and Backup
Sets up to use e-mail (@ezweb.
ne.jp).
●Making Calls
You can also make a call using
call logs or contacts.
●Receiving Calls
You can also receive a call in
sleep mode.
●Transferring Contacts
You can transfer your contacts
data from your old au phone.
●
Backup from Main Unit
to microSD Memory Card
Describes how to back up data
from the main unit to a micro SD
memory card.
●
Send/Receive via Infrared
Describes how to send/receive
contacts data via infrared
communication.
●Reducing Battery
You can reduce the battery
consumption by setting up
Battery saver.
Learning the Basic Operations
Setting Wireless LAN (Wi-Fi®)
By using the wireless LAN (Wi-Fi®) function, you can access to the Internet using a wireless LAN environment built in your home or a public wireless LAN environment away from home.
When setting the wireless LAN (Wi-Fi®) as described in this guide, you need to be in an environment where the radio waves can be received from the wireless LAN device or public
wireless LAN that you want to access to.
Check the following information before setting the wireless LAN (Wi-Fi®) function.
SSID The name set for the wireless LAN device or public wireless LAN service that you are connecting to
Password The password for connecting to the wireless LAN device or public wireless LAN service
* Connection to all public wireless LAN services is not guaranteed.
* You may need a separate contract with a service provider to use some public wireless LAN services.
* Enabling the wireless LAN (Wi-Fi®) function uses a lot of battery power. We recommend turning o the wireless LAN (Wi-Fi®) function when not using it.
The wireless LAN (Wi-Fi®)
function is enabled, and the
available wireless LAN (Wi-
Fi®) networks are detected.
On the home
screen, touch
and hold " " →
"System settings"
"Networks" tab →
Tap "Wi-Fi"
When "Wi-Fi tutorial"*1
appears, tap
"Continue"
Tap "OK"*1→" "
"OK"
*1
→ Tap the SSID of the
wireless LAN (Wi-Fi
®
) network
that you are connecting to
* If the wireless LAN (Wi-Fi
®
) network that you
want to connect to is not displayed, tap " "
→ "Add network" and register it manually.
*1 "Wi-Fi tutorial" will not be displayed when setting up for the second time or later. The contents
displayed in initial setting may vary depending on Wi-Fi® connection setting. If you want to
display Wi-Fi tutorial again, in Wi-Fi setting screen, tap " " → "Interactive tutorial".
Tap "OK"*1
Enter Password → Tap "Connect"
* This step is not required if you
select a wireless LAN (Wi-Fi
®
)
network without security settings.
When "Connected"
appears under SSID,
connection is complete.
au Easy Settings
■Setting au ID
This section describes how to set up an au ID on the initial settings screen, which appears when you rst turn on the power after purchasing the product.
The settings can be changed with the "au ID Setting" application.
au ID* Register your au phone number or any other character string as an au ID.
au ID password Register the password for the au ID.
* The same au ID as another user's cannot be registered.
Tap "Next"
Tap "Register "au
ID"" → "Next"
Tap "au IDの設定・
保存 (Set/Save au
ID)"
Enter the security
code → Tap "OK"
Set the
password→"設定
(Set)"→Tap "au ID
設定メニューへ (To au
ID settings menu)"
Tap "パスワードを忘れた
時のために (When you
forget your password)"
* Register information required
to retrieve the password.
Enter 生年月日 (Date of birth),
秘密の質問 (Secret question)
and 答え (Answer)→ "入力完了
(Done)" → "変更 (Change)" →
Tap "終了 (Done)"
"Update" → Tap
"Next"
Check the terms
and conditions→
"Agree" → "Next" →
Tap "Agree"
Place check marks
next to data you want
to backup → tap "Next".
* When a dierent screen
from the above appears,
follow the displayed screen.
Select whether to
use a service → Tap
"Next"
Conrm the
contents → Tap
"Activate"
* Appears only when
using "Loss or Theft
Measures (3LM)".
Tap "Finish"
* When a dierent
screen from the above
appears, follow the
displayed screen.
Setting a Google Account
You can use online services provided by Google, such as Gmail and Google Play, by setting up a Google account.
This section describes how to set up an account on the initial settings screen, which appears when you rst switch on the power after purchasing the product.
User name Register your Google account (user ID) and the characters that you want to use as your mail address.
You can register any user name, but you cannot set the same user name as another user's.
Password Register password for the Google account.
Select "English
(United States)"
and tap "Next"
Tap a network
that you will
connect to
* Tap "Next" if you
do not need to set
internet connection.
Enter your
password →
"Connect" → Conrm
the connection →
Tap "Next"
* This step is not
required if you select a
Wi-Fi® network without
security settings.
"No" → Tap "Get
an account"
* If you already have a
Google account, tap
"Yes".
Enter your rst and
last names and " " →
Enter your email address
and " " → Enter your
password and tap " "
* Email addresses already
being used by another
user cannot be used.
* Enter the password twice
for conrmation.
"Set up recovery
options" → Enter
a mail address for
back up → tap " "
*
Recovery email
address will be used in
case you forget your
password. Input can be
omitted.
Conrm the
contents → Tap
" "
"I accept" →
Enter the text
displayed → tap
" "
Tap "Not now"
* If you are joining
Google+, tap "Get
started".
Tap "NOT NOW"
* If you are purchasing
applications from
Google Play,
enter payment
information.
Setting LG
Accounts as
required
* Tap "Skip" if you
do not need to set
internet connection.
Check if you agree
software update and log
information → "Next" → Set
Knock Code as required
* Tap "Skip" if you do not
need to set Knock Code.
Select a
home touch
combination and
a theme → Tap
"Next"
Enter your
phone name
and contact in
case of loss →
Tap "Done"
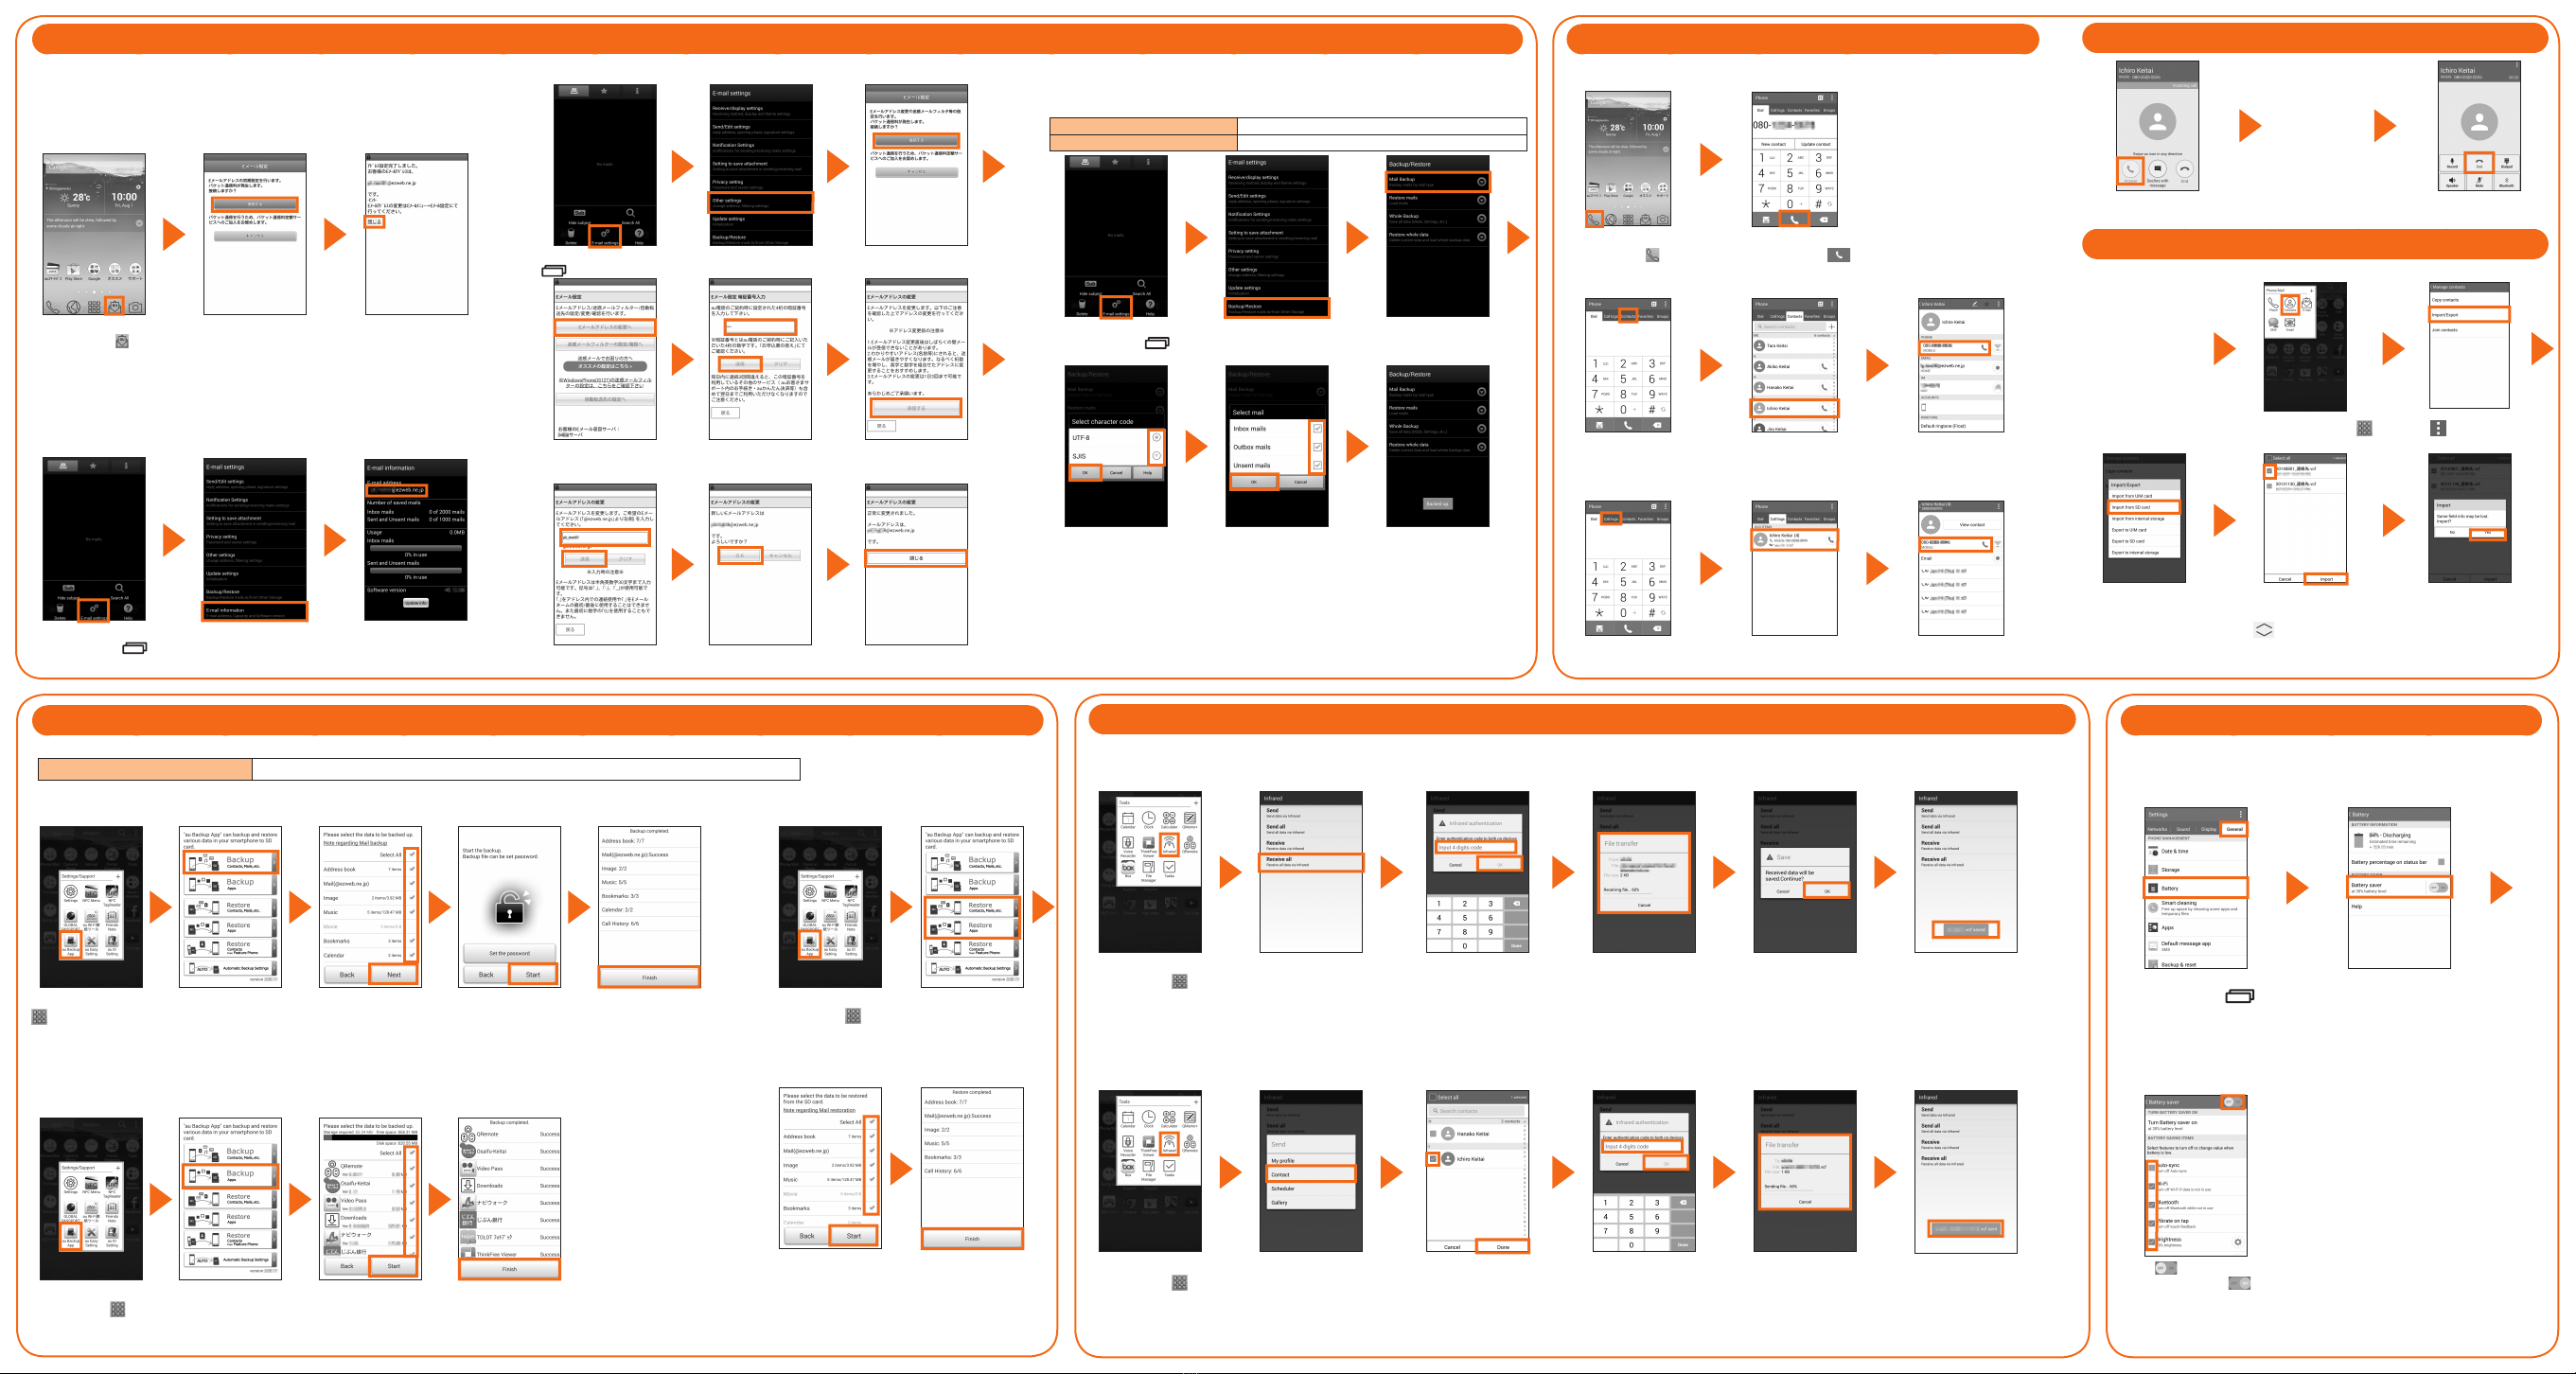
Reducing Battery
■Using Battery Saver
Set up to switch to Battery Saver Mode automatically when the battery is
running low.
On the home screen,
touch and hold " "
→ "System settings"→
"General" tab→
"Battery"
Tap "Battery saver"
* Conrm the status such
battery etc. on "Battery
information".
Tap " " to make it to
the position to. " "
→ Check the item you
want to enable.
Send/Receive via Infrared
You can send/receive data (My prole, Contact, Scheduler, Gallery) using infrared communication.
■Receive contact data via infrared communication
On the home
screen, tap " "
→ "Tools" →
"Infrared"
Tap "Receive all"
Input 4 digits code
(authentication
code) → Tap "OK"
"File transfer" is
displayed once the
infrared reception starts.
When "Received
data will be
saved. Continue?"
appears, tap "OK"
Reception is
complete when "○
○○ saved" appears
The infrared
communication ends
automatically.
■Send contact data via infrared communication
On the home
screen, tap " "
→ "Tools" →
"Infrared"
Tap "Send" →
"Contact"
Select the contact
data that you want
to send → Tap
"Done"
If "Infrared
authentication"
appears, input
4 digits code
(authentication
code) → Tap "OK"
"File transfer" is
displayed once the
infrared transmission
starts.
Transmission is
complete when "○○
sent"
appears
The infrared
communication ends
automatically.
E-mail Settings and Backup
E-mail (@ezweb.ne.jp) is a service that enables you to exchange e-mails with
other cell phones, which support e-mail, and with PCs. Your e-mail address is
decided automatically after the initial settings.
The e-mail address in the initial settings can be changed.
■Initial Settings
On the home
screen, tap " "
Conrm the
contents
→
Tap "接続
する (Connect)"
Once the initial settings for
e-mail are completed, your
e-mail address appears.
Check E-mail address
→
Tap "閉じる(Close)".
*
When the description
screen for E-mail function
appears, conrm the
content and tap "閉じる
(Close)".
■Conrming your e-mail address
On the E-mail screen,
touch and hold
" "
→ Tap "
E-mail settings"
Tap "E-mail
information"
Your e-mail address appears
in the e-mail address eld.
■Changing your e-mail address
On the E-mail screen, touch and hold
" " → Tap "E-mail settings"
Tap "Other settings" Tap "接続する
(Connect)"
Tap "Eメールアドレス
の 変更へ (To Change
E-mail address)"
Enter the security
code → Tap "送信
(Send)"
Conrm the contents
→Tap "承諾する
(Accept)"
Enter e-mail address
→ Tap "送信 (Send)"
Tap "OK" Tap "閉じる (Close)"
■E-mail backup
You can back up your e-mails to the product or a microSD memory card. The product can
also retrieve the backup data that has been saved. The save destination is as follows.
Internal storage in the product /storage/emulated/0/private/au/email/BU
microSD memory card /storage/external_SD/private/au/email/BU
On the E-mail screen,
touch and hold
" "
→ Tap "
E-mail settings"
Tap "Backup/
Restore"
Tap "Mail Backup" →
"OK"
Select character
code to make backup
data → Tap "OK"
Place check marks
on a mail type to
back up → Tap "OK"
"Backed up." appears when
the backup is complete.
PC mail
PC mail can be used to send/receive E-mail from this product by setting a mail
account that you normally use on your PC.
Gmail
Gmail is a mail service provided by Google.You can send/receive Gmail from this product.
You can also use Gmail from the PC or the browser on this product and share mail information.
Backup from Main Unit to microSD Memory Card
This section describes how to back up and restore data from the main unit to a microSD memory card.
Backup data storage destination /storage/external_SD/Android/data/com.kddi.android.ausdbackup
* Depending on the data, it may be stored to other folder.
■Back up contacts, mails, etc. ■ Restore
On the home screen, tap
" " → "Settings/Support"
→ "au Backup App"
* For the rst activation, an
access conrmation screen to
this product appears. Check
the content and tap "agree".
Tap
Backup
Contacts, Mails,
etc.
Check items you
want to back up
→
Tap "Next"
Tap "Start"
* If setting up the
password, tap "Set the
password" → Enter a
password → Reenter
the password → Tap
"OK".
Tap "Finish"
■Back up apps
On the home
screen, tap " " →
"Settings/Support"
→ "au Backup App"
"Backup Apps"
* If a note about backup
appears, check the
contents and tap "OK".
Check items you
want to back up →
Tap "Start"
Tap "Finish"
On the home
screen, tap " " →
"Settings/Support"
→ "au Backup App"
Tap "Restore
Contacts, Mails,
etc."/"Restore
Apps"
Check items you
want to restore →
Tap "Start"
* Tap "Restore address book" → "OK" → "Finish" to
restore only contacts.
* When a settings screen of au ID appears, follow the
onscreen instructions.
Tap "Finish"
Receiving Calls
The call starts.
Swipe "Answer" during an
incoming call
Tap "End" to end the call
Transferring Contacts
You can transfer data from your old phone to this product using a microSD memory card.
Save the contacts
(address book) from
your old phone to
a microSD memory
card, and insert the
card into the product
Refer to the instruction
manual of your old phone, etc.
on how to save the contacts.
On the home screen, Tap " "
→ "Phone/Mail" → "Contacts"
Tap " " *1 → "Manage
contacts" → "Import/Export"
Tap "Import from SD
card"*2
Check the item that you want
to import → Tap "Import"
Tap "Yes"
*1 If it is not displayed, tap " " to display.
*2 Select the account or location that you want to import data to select if a saving
location screen does appear.
Making Calls
■Entering a phone number to make a call
On the home
screen, tap " "
Enter a phone
number → Tap " "
■Calling from Contacts
On the phone screen,
tap "Contacts" tab
Tap the other party
that you want to call
Tap a phone
number
■Calling from Call logs
On the phone screen,
tap "Call logs" tab
Tap the other party
that you want to call
Tap a phone
number
Other AU Cell Phone manuals

AU
AU K002 User manual

AU
AU Isai LGL22 Service manual

AU
AU Basio 2 Installation guide

AU
AU Samsung Galaxy S III Progre SCL21 Installation guide

AU
AU Aquos Series Installation guide

AU
AU FJL22 Installation guide

AU
AU A5505SA Installation guide

AU
AU Torque G03 Installation guide

AU
AU Miraie Installation guide

AU
AU Urbano L03 Installation guide

AU
AU E10K Installation guide

AU
AU AQUOS PHONE CL IS17SH Installation guide

AU
AU Digno M Installation guide

AU
AU AQUOS K Installation guide

AU
AU TORQUE G04 Service manual

AU
AU Mirach IS11PT Installation guide

AU
AU Xperia Z3 SOL26 Installation guide

AU
AU E08T Installation guide

AU
AU SHL21 Installation guide

AU
AU Digno ISW11K User manual


