AU IS03 Installation guide
November2010Edition

ii
ue00as319e.fm
[ii/ii]
~~~~<MFZ>
Thank you for purchasing the IS03.
Before using your IS03, be sure to read the IS03 Basic Manual (this
PDF manual) to ensure correct usage. After you have finished reading
this manual, store this PDF manual and the printed manuals in safe
places so you can retrieve them whenever you need them.
Be sure to read the Safety Precautions “安全上のご注意” in the full
Instruction Manual (Japanese) to ensure proper usage of the IS03.
For troubleshooting, check the symptom of your IS03 in
(au Customer Support) on the au homepage.
http://www.kddi.com/customer/service/au/trouble/kosho/
index.html
•You cannot receive or make calls in a location where the signal
cannot be received, even within the service area. Calling may not be
available in a location where the signal is weak. If you move to a
location where the signal is weak during a call, the call may be
interrupted.
•The au phone is a digital cell phone and can maintain a high call
quality until the signal weakness reaches its limit. Therefore, once
the limit has been reached, the call may be disconnected suddenly.
•Note that the au phone uses signals which may be intercepted by a
third party. (However, the CDMA system enables highly confidential
call communications.)
•The au phone is a wireless station which is compliant with the Radio
Act, and may be subject to inspections regulated by the Radio Act.
•When you insert the au IC-Card, the product number information of
your au phone is sent to the au server for the security and operation
status notification of the au phone.
•Always be considerate of others around you when using your au
phone in public places.
•For a child’s use, read the IS03 Basic Manual and give your child
instructions on proper use.
•The IS03 is a cell phone compatible with the international roaming
service. Each network service which is described in the IS03 Basic
Manual varies depending on the area or service.
Preface
Basic Manual (this PDF manual) describes basic operations of major functions
of the IS03.
For detailed descriptions on various functions, refer to the IS03 full Instruction
Manual (Japanese), which is available on the au homepage.
Downloading Manuals
The Basic Manual (this PDF manual) and the full Instruction Manual
(Japanese) are posted on the au homepage.
http://www.au.kddi.com/torisetsu/index.html
Online Manual
Online manuals are also provided on the au homepage, which contents are
from the full Instruction Manual (Japanese) and are reorganized in a
searchable format.
http://www.au.kddi.com/manual/index.html
Safety Precautions
auお客さまサポート
Before Using an au Phone
as31_ue.book ii ページ 2010年12月27日 月曜日 午前10時41分

1
Contents
ue01as319e.fm
[1/2]
~~~~<MFZ>
Preface............................................................ ii
Safety Precautions.......................................... ii
Before Using an au Phone.............................. ii
Checking the Contents of the Box .......................... 3
Illustrations and Descriptions in This Manual ......... 3
Cell Phone Etiquette ............................................... 3
Names and Functions of Parts ............................... 5
Charging the Battery Pack...................................... 6
Turning the Power On/Off....................................... 7
Turning the Power On ............................................. 7
Turning the Power Off ............................................. 8
Sleep Mode ............................................................ 8
Switching the Display Language to English............ 8
Initial Setup ............................................................. 8
Adjusting the Touch Panel...................................... 9
Removing the Battery Pack .................................... 9
Attaching the Battery Pack ................................... 10
Inserting microSD Memory Card .......................... 10
Removing microSD Memory Card ........................ 11
Security Code and PIN Code................................ 11
Security Code and Passwords ............................. 11
PIN Code .............................................................. 11
Removing au IC-Card ........................................... 12
Inserting au IC-Card ............................................. 12
Operating the Touch Panel................................... 13
Operating the Touch Keys .................................... 13
Operation While Using Functions ......................... 14
Selecting an Item ..................................................14
Displaying the Menu .............................................14
Viewing the Desktop..............................................15
Using Status Bar ...................................................15
Using Notification/Status Panel .............................17
Using the Desktop .................................................17
Switching the Desktop ..........................................17
Moving Icons on the Desktop ...............................18
Using Shortcuts/Widgets/Folders..........................18
Viewing the Display (Sub Area).............................19
Using Main Menu ..................................................19
Switching Orientation ............................................21
Character Input......................................................22
Switching Character Entry Modes.........................23
Switching Software Keyboards .............................23
Entering Hiragana/Kanji/Katakana/Alphanumerics
..............................................................................23
Correcting Characters...........................................24
Entering Emoji/D-Emoji/Symbol/Facemark............24
Switching Input Software.......................................25
Making a Call.........................................................26
Making an International Call..................................26
Answering a Call ...................................................27
Putting the Call on Hold ........................................27
Sending a Mail Message to the Saved Mail Address
..............................................................................27
Returning a Call (Outgoing History/Incoming
History) ..................................................................27
Turning On Manner Mode .....................................28
Turning On the Answering Memo..........................28
Setting the Answering Memo ................................28
Playing a Message in Answering Memo ...............29
Saving an Address Book Entry..............................30
Using an Address Book.........................................30
Using Saved Phone Number.................................30
Sending a Mail Message to the Saved Mail Address
.............................................................................. 31
Using E-mail/C-mail .............................................. 32
Sending E-mail Messages .................................... 32
Sending C-mail Messages .................................... 32
Receiving E-mail/C-mail Messages ...................... 33
Reading Received E-mail/C-mail Messages......... 33
Setting Mail Filters ................................................ 34
Rejecting Spam C-mail Messages ........................ 35
Using PC-mail ....................................................... 36
Registering another PC-mail account ................... 36
Sending PC-mail Messages.................................. 37
Receiving PC-mail Messages ............................... 37
Using Gmail .......................................................... 37
Sending Gmail ...................................................... 37
Receiving Gmail.................................................... 38
Replying/Forwarding Gmail .................................. 38
Viewing Sites with Browser...................................39
Using Bookmarks/History...................................... 39
Bookmarking a Web Page .................................... 39
Using the Camera ................................................. 40
Cautions for Using the Camera.............................40
IS03 Position for Taking a Photo ..........................40
Taking a Photo...................................................... 41
Recording Movies ................................................. 41
Using Gallery ........................................................ 42
Cautions for Using 1Seg ....................................... 43
Initial Setup of TV (1Seg)......................................43
Watching TV (1Seg).............................................. 43
Contents
Introduction
Getting Ready
Learning the Basics
Phone
Address Book
Mail
Internet
Multimedia
TV (1Seg)
ue01_as31_9e.fm 1 ページ 2010年12月28日 火曜日 午前9時33分

2
Contents
ue01as319e.fm
[2/2]
~~~~<MFZ>
Operations on the 1Seg screen ............................44
Playing TV (1Seg) Sounds as BGM ......................44
Using microSD Memory Card ...............................45
Handling Precautions............................................45
Initializing microSD Memory Card ........................45
Using Contents Manager ......................................46
Playing/Displaying Data........................................46
Using Menu in the Contents Screen .....................46
Using au one Market .............................................47
Using Android Market............................................47
Managing Applications ..........................................48
Checking Your Profile ...........................................49
Changing the Incoming Ring Tone........................49
Changing the Wallpaper........................................49
Restarting with the Reset Button...........................49
Using Global Passport CDMA...............................50
For overseas use without anxiety..........................50
Configuring the Overseas Settings .......................50
Making a Call at Your Travel Destination ..............51
Receiving a Call at Your Travel Destination..........51
Inquiry methods ....................................................52
Setting Conditions for Activating the Remote Lock
..............................................................................53
Troubleshooting ....................................................54
Index............................................................. 56
File Management
Applications
Settings of IS03
Global Function
In Case of Loss of Your IS03
Appendix/Index
as31_ue.book 2 ページ 2010年12月8日 水曜日 午前11時17分

3
Introduction
ue02as319e.fm
[3/4]
~~~~<MFZ>
Check all the contents are included.
•Purchase a specified charger (sold separately).
•The illustrations in this manual may look different from the actual
product.
■Note on Key Illustrations
In this manual, the key illustrations are simplified as shown below.
■Note on Screenshots
The screenshots in this manual are simplified and may look different
from the actual screens.
■Use of cell phones is not allowed in some places.
•Using a cell phone while driving is dangerous and prohibited by law.
•Using a cell phone in an aircraft is prohibited by law.
■Be considerate of people around you.
•Some people close to you in crowded places such as packed trains
may be using a cardiac pacemaker. Turn the cell phone off in such
places.
•Abide by the rules of hospitals and other medical institutions where
it is forbidden to use or carry cell phones.
Checking the Contents of the Box
The following items are not included.
•AC adapter
•Stereo earphone, earphone microphone
Introduction
IS03
Warranty
(Japanese)
Battery pack
microUSB-18 pin (charger)
conversion cable
microUSB-USB conversion cable
(Sample)
●Instruction Manual (Japanese)
●Safety Precautions (Japanese)
●Notice Sheet (Japanese)
●Setting Guide (Japanese)
microSD memory card
(2 GB) (Sample)
Illustrations and Descriptions in This
Manual
Cell Phone Etiquette
•Cell phones always emit weak radio waves when power is on. Use cell
phones in an enjoyable and safe manner without forgetting to be
considerate of others around you.
as31_ue.book 3 ページ 2010年12月8日 水曜日 午前11時17分

4
Introduction
ue02as319e.fm
[4/4]
~~~~<MFZ>
■Be considerate of where you use the cell phone and
how loudly you talk.
Do not make calls in theaters, museums, libraries, and other similar
places. Turn power off or turn on manner mode so as not to disturb
others around you by ring tones.
•Do not use the cell phone on a street where you might interrupt the
flow of pedestrians.
•Move to areas where you will not inconvenience others on trains or in
hotel lobbies.
•Refrain from talking in a loud voice.
•Obtain the permission of other people before you take their photos
with the cell phone’s camera.
as31_ue.book 4 ページ 2010年12月8日 水曜日 午前11時17分
5
Getting Ready
ue03as319e.fm
[5/12]
~~~~<MFZ>
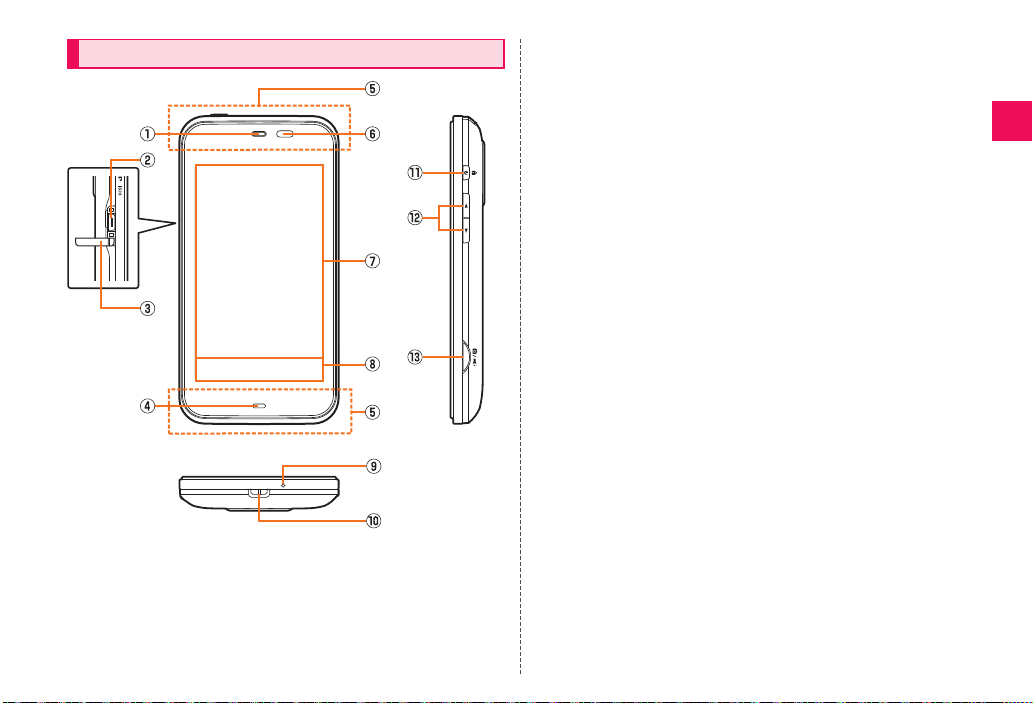
AEarpiece (Receiver)
Emits voice of other party during a call, messages in Answering
memo, etc.
BExternal connection jack
Use it to connect the IS03 to the microUSB-18 pin (charger)
conversion cable or the microUSB-USB conversion cable.
CExternal connection jack cover
DCharging/Incoming indicator
Lights in red while charging.
Blinks according to the settings when receiving a call or mail
message.
EInternal antennas
Do not cover the internal antennas when you call, use the Internet,
Wi-Fi, Bluetooth®, or retrieve GPS information.
FProximity sensor/Light sensor
Proximity sensor prevents operating the touch panel incorrectly
during a call. Light sensor detects the ambient brightness and
adjusts the brightness of display (main area).
GDisplay (main area)
HDisplay (sub area)
When the display (main area) is turned on, touch keys are
displayed. When it is turned off, the battery level or date is
displayed.
IMicrophone
Transmits your voice during a call. It is also used for recording
sounds.
JStrap eyelet
KfPower key
Turns on/off the power, and sets/cancels sleep mode.
Lud Volume up/down key
Adjusts volume.
Use it to change the manner mode settings.
MbShutter key
Use it to take photos or movies.
Hold it down on the desktop to activate Camera.
Hold it down on the unlock screen to turn on the picture light.
Names and Functions of Parts
Getting Ready
as31_ue.book 5 ページ 2010年12月8日 水曜日 午前11時17分
6
Getting Ready
ue03as319e.fm
[6/12]
~~~~<MFZ>
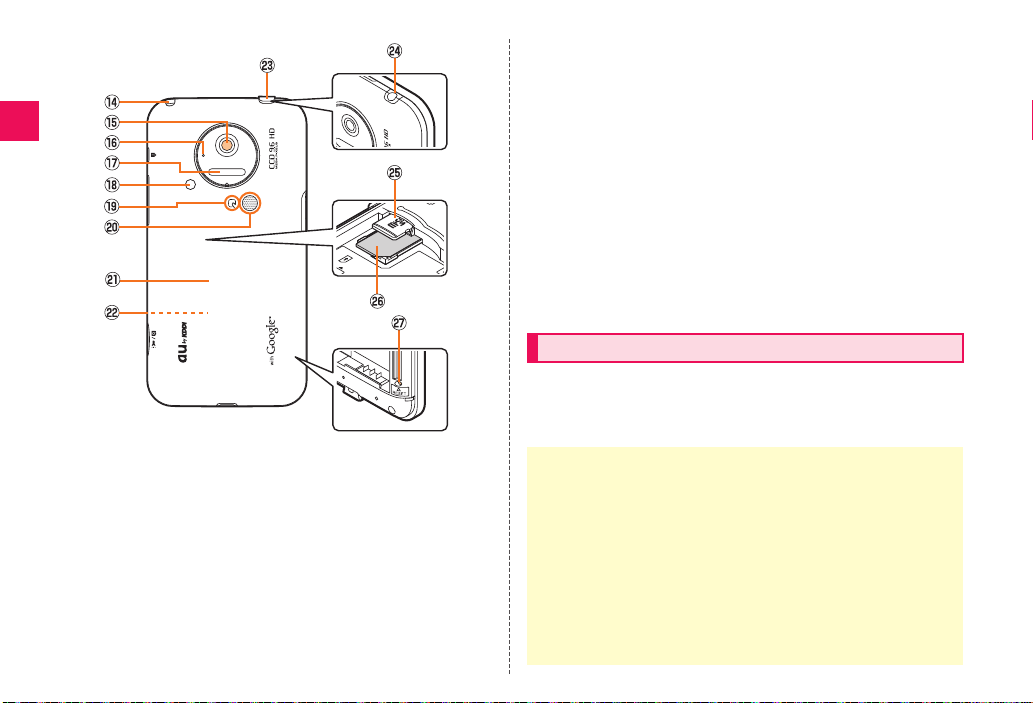
NTV antenna
Use it to watch TV (1Seg) or to use FM transmitter.
It has no influence on calls or data communication if you extend the
TV antenna when calling or using browser.
OCamera lens
PShooting indicator
Blinks when activating camera or video camera.
QInfrared port
Sends and receives data via infrared communication.
RPicture light
SFeliCa mark
Hold it over a reader/writer when using Osaifu-Keitai®.
TSpeaker
Emits ring tones, alarm tones, etc.
UBattery pack cover
VBattery pack
For removing or attaching the battery pack, see “Removing the
Battery Pack” or “Attaching the Battery Pack”.
WEarphone jack cover
XEarphone jack
Use it to connect a stereo earphone or earphone microphone.
YmicroSD memory card slot
Zau IC-Card
Your phone number etc. are recorded.
aReset button
Restarts the IS03.
The battery pack is not fully charged at the time of purchase. Charge
the battery pack when you use the IS03 for the first time or the battery
level becomes low. Charging is finished when the red charging/
incoming indicator goes out.
Charging the Battery Pack
•When the battery pack has less than approximately 10 percent of the
battery level, the message Please connect charger appears on the screen.
Charge the battery back after tapping OK, or exchange it for another one
fully charged.
•The common AC adapter 01 (sold separately) is only for domestic use with
a 100 V AC power outlet.
The common AC adapter 02 (sold separately) supports a voltage of 100 V to
240 V AC. Be sure to use the common AC adapter 02 (sold separately)
when charging overseas.
•Charging is not available when the battery pack is not attached. Attach the
battery pack before charging.
•Be sure to close the external connection jack cover, and do not pull or twist
it forcefully.
as31_ue.book 6 ページ 2010年12月8日 水曜日 午前11時17分

7
Getting Ready
ue03as319e.fm
[7/12]
~~~~<MFZ>
■Charging the Battery Pack with the Specified AC
Adapter (sold separately)
You need the microUSB-18 pin (charger) conversion cable and the
specified AC adapter (sold separately). (The shape of AC adapter
may differ from the illustrations depending on the product.)
AConnect the specified AC adapter (sold separately) to
the microUSB-18 pin (charger) conversion cable.
Connect the specified AC adapter (sold separately) to the
microUSB-18 pin (charger) conversion cable with checking the shape
of tip of the adapter.
BOpen the external connection jack cover.
CConnect the microUSB-18 pin (charger) conversion
cable to the IS03.
DPlug the specified AC adapter (sold separately) into a
100 V AC power outlet.
Be sure to plug it firmly into the power outlet.
Charging/Incoming indicator lights in red, and appears. When
charging is finished, the charging/incoming indicator goes out.
AHold down ffor at least two
seconds.
The unlock screen is displayed.
Drag to to unlock. If Screen lock is
set, the Lock No. entry screen is displayed.
s
•Battery life may be reduced depending on the use of applications or
functions.
Charging time takes approximately 150 minutes.
B
C
D
A
Check the
orientation
External
connection jack
AC adapter
(sold separately)
microUSB-18 pin (charger)
conversion cable
Release buttons
•Charging is available by connecting the IS03 to a PC with the
microUSB-USB conversion cable. From the Main Menu, select Settings
[Select USB connection [Mark USB battery charge to enable the setting.
Turning the Power On/Off
Turning the Power On
•The initial setting of the touch panel is executed while the logo
Android™ au with Google™ is displayed. Do not touch the screen, otherwise
touch panel operations may not be performed properly.
《Unlock screen》
as31_ue.book 7 ページ 2010年12月8日 水曜日 午前11時17分

8
Getting Ready
ue03as319e.fm
[8/12]
~~~~<MFZ>
AHold down ffor at least two
seconds.
The phone options screen is displayed.
If you hold down fon the unlock screen,
the power is turned off before the phone
options screen is displayed.
BSelect Power off [Select OK.
If you press for no operation is made for a while, the screen is
turned off temporarily, and then sleep mode is set.
■Canceling Sleep Mode
AWhile sleep mode is set, press f.
The unlock screen is displayed.
You can switch the display language for function names and other
items to English.
AOn the desktop, select .
BSelect (Settings).
CSelect (Language & keyboard).
DSelect (Select language).
ESelect English.
To set up the following, refer to the supplied Setting Guide (Japanese)
before using the IS03.
■Setting Up Your Account
•Set up your Google account to use Google applications such as
Android Market.
•Set up au one-ID to use au one Market, au one ナビウォーク (Navi
Walk), etc.
■Setting Up E-Mail
•Set up e-mail to use e-mail ([email protected]).
* E-mail setup is unnecessary if you have switched your au phone to the IS03.
■Setting Up Wi-Fi®
•Set up Wi-Fi to use Wi-Fi connection.
•Touch panel operations on the display (sub area) are not available while the
unlock screen is displayed.
Turning the Power Off
Sleep Mode
《Phone options screen》
Switching the Display Language to English
Initial Setup
設定
言語とキーボード
言語(Language)を選択
as31_ue.book 8 ページ 2010年12月8日 水曜日 午前11時17分
9
Getting Ready
ue03as319e.fm
[9/12]
~~~~<MFZ>
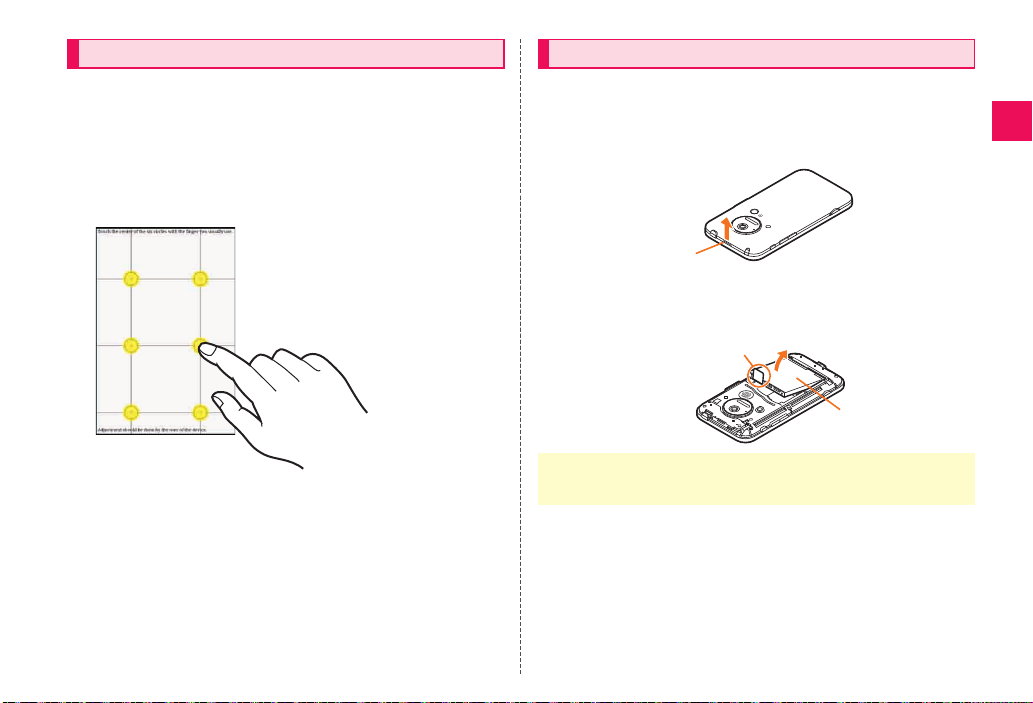
To adjust the touch panel, perform the steps with the finger you
normally use in a position allowing for ease of operation.
AFrom the Main Menu, select Settings
[Select About phone [Select Adjust touch panel.
The touch panel adjustment screen is displayed.
BTap the centers of the six circles.
When removing the battery pack, turn off the IS03.
ARemove the battery pack cover.
Hook a fingertip (nail) on the concave portion, and then remove the
battery pack by pulling up in the direction of the arrow.
BRemove the battery pack.
Remove the battery pack by pulling up on the PULL tab in the direction
of the arrow.
Adjusting the Touch Panel Removing the Battery Pack
•When removing the battery pack, always pull up on the PULL tab.
Or use the protruding edge of the battery pack. Doing otherwise may result
in damage to the main body or the battery contacts.
Concave
portion
Battery pack
PULL tab
as31_ue.book 9 ページ 2010年12月8日 水曜日 午前11時17分

10
Getting Ready
ue03as319e.fm
[10/12]
~~~~<MFZ>
Use the specified battery pack for the IS03 and attach it properly.
AAfter making sure that the PULL tab is closely
attached to the battery pack, align the contacts on the
battery pack with those of the IS03 and then insert the
battery pack securely.
BAfter attaching the battery pack cover, press the
battery pack cover securely, and make sure that it is
closed properly.
ATurn off the IS03 and remove the battery pack cover
and battery pack.
BConfirm the direction of the microSD memory card
and slowly insert it into the slot until it clicks.
Insert a microSD memory card until you hear a click and confirm it is
locked. Releasing the microSD memory card before it is locked may
cause it to pop-out.
CAttach the battery pack, and attach the battery pack
cover.
Attaching the Battery Pack
•Before attaching the battery pack, make sure that the au IC-Card is inserted
properly.
•Failure to follow the correct procedure when attaching the battery pack may
result in damage to the battery pack or the battery pack cover.
PULL tab
Contacts on IS03
Inserting microSD Memory Card
•Insert a microSD memory card with the right side up in the appropriate
direction.
Inserting a microSD memory card forcefully into the slot could result in
failure to remove the microSD memory card, or damage to the microSD
memory card or the IS03.
Insert this card
with the
microSD logo
side up
microSD memory
card slot (upper)
as31_ue.book 10 ページ 2010年12月8日 水曜日 午前11時17分

11
Getting Ready
ue03as319e.fm
[11/12]
~~~~<MFZ>
ATurn off the IS03 and remove the battery pack cover
and battery pack.
BSlowly push the microSD memory card toward the
slot until it clicks.
After it clicks, pull back your finger and keep putting it on the microSD
memory card until it comes out a little. Releasing the microSD memory
card when it is pushed toward the slot may cause ejection of the
microSD memory card.
CSlowly remove the microSD memory card.
Slowly remove the microSD memory card.
Some microSD memory cards cannot be unlocked and do not come
out smoothly. In such case, pull it out with your finger.
DAttach the battery pack, and attach the battery pack
cover.
You have to use each security code for using the IS03. You can use a
security code and other passwords described below. Take care not to
forget your security code and passwords, because they are required
for performing various operations and using subscription services.
●Security Code
If the PIN code is incorrectly entered three times consecutively, the
PIN code will be locked. Use the PUK code to unlock the PIN code.
■PIN Code
You can set the IS03 to require PIN code entry every time the power is
turned on, to prevent unauthorized use of the au IC-Card by a third
party.
•At the time of purchase, the PIN code is not to be required to use
phone. From the Main Menu, select Settings [Select Location &
security [Select Set up UIM card lock [Mark Lock UIM card to set
the PIN code to be required.
It is also required when setting Lock UIM card.
Removing microSD Memory Card
•Some functions may not be available when a microSD memory card is not
inserted.
•Do not remove the microSD memory card forcefully. It may result in damage
to the microSD memory card or the IS03, or data loss.
•The microSD memory card may be warm after a long time use. It is normal.
BC
Security Code and PIN Code
Security Code and Passwords
Usage
Example
AUsing the Answering Service (Voice Mail) and Call Transfer
remotely from a fixed-line phone
BMaking inquiries, applications, and changes while using au
Customer Service Center voice guidance, and au homepage
Initial
Setting
The four-digit number you wrote on your subscription form
●Lock No. ●PIN Code
Usage
Example
Setting/Canceling Screen
lock, Remote lock, Restrict
address book, etc.
Usage
Example
Preventing unauthorized
use of the au IC-Card by a
third party
Initial
Setting
1234 Initial
Setting
1234
PIN Code
as31_ue.book 11 ページ 2010年12月8日 水曜日 午前11時17分

12
Getting Ready
ue03as319e.fm
[12/12]
~~~~<MFZ>
•The initial setting of the PIN code is “1234”. You can change the PIN
code to a four- to eight- digit number by selecting Change UIM PIN.
■PUK Code
Enter the PUK code when the PIN code is locked.
•PUK code is an eight-digit number given at the time of purchase,
and is printed on the back side of the plastic card where your au
IC-Card is attached.
•When you enter the PUK code, set the new PIN code by selecting
Change UIM PIN.
•If the PUK code is incorrectly entered ten times consecutively,
contact an au shop, PiPit or the au Customer Service Center.
Turn off the power and remove the battery pack before removing or
inserting the au IC-Card.
APull out the tab of the tray
and remove the au IC-Card.
APull out the tab of the tray.
BPlace the au IC-Card on the tray with the IC (metal
surface) side down and insert it.
•When the PIN code is locked, the IS03 may be restarted for the security
reasons.
Removing au IC-Card
Tab
Inserting au IC-Card
•Note the following not to cause malfunction or damage when you insert or
remove the au IC-Card.
•Do not touch the IC (metal surface) part of the au IC-Card or the IC card
jack part of the IS03.
•Confirm the correct direction when you insert the au IC-Card.
•Do not insert or remove the au IC-Card forcefully.
•Take care not to lose your au IC-Card when you remove it.
Cutout
as31_ue.book 12 ページ 2010年12月8日 水曜日 午前11時17分

13
Learning the Basics
ue04as319e.fm
[13/25]
~~~~<MFZ>
The display of the IS03 is a touch panel. You can operate the IS03 by
directly touching the screen.
While the display (main area) of the IS03 is displayed, the following
four icons are always displayed in the display (sub area). Those are
used as touch keys. By tapping or long-touching the keys, you can
display the option menu, the desktop, etc.
Operating the Touch Panel
■Tap/Double Tap
Tap: Gently touch a screen and
then immediately release your
finger.
Double tap: Tap the same
position twice.
■Long Touch
Keep touching an item or key.
■Slide
While your finger is gently
touching the display, trace it to
the desired direction.
■Flick
Operate the screen by quickly
moving (flicking) your finger up,
down, right, or left.
Learning the Basics
■Pinch
While two of your fingers are
touching the screen, move the
fingers apart or closer together.
■Drag
While your finger is gently
touching the screen, trace it to
the desired position.
•When performing flick operations, move your finger slowly and then flick it
gently.
Operating the Touch Keys
Icon Operation Description
eTap Displays the option menu.
#Tap Displays the desktop/Main Menu.
Long touch Displays the running applications
list screen.
^Tap Returns to the previous page.
mTap Displays the Quick Search Box.
Long touch Displays the voice search screen.
as31_ue.book 13 ページ 2010年12月8日 水曜日 午前11時17分

14
Learning the Basics
ue04as319e.fm
[14/25]
~~~~<MFZ>
Select a displayed item or icon by tapping the screen directly.
Two methods are available to display the menu of the screen: the
option menu and the context menu.
■Option Menu
The option menu is displayed by tapping e on the display (sub area)
on the screen where the menu is available.
•When the option menu is displayed, you can close it by tapping e
again.
Example: In the address book list screen
■Context Menu
The context menu is displayed by long-touching an item or a display
where the menu is available.
•When the context menu is displayed, you can close it by tapping
^.
Example: In the address book list screen
Operation While Using Functions
Selecting an Item
Displaying the Menu
《Address book list
screen》
Option menu
Tap e
《Address book list
screen》
Context menu
Long-touch
the contact
(“Keitai
Ichiro”)
as31_ue.book 14 ページ 2010年12月8日 水曜日 午前11時17分

15
Learning the Basics
ue04as319e.fm
[15/25]
~~~~<MFZ>
You can check the status or current settings of the IS03 on the
desktop.
* This screen is for the explanation of each function, so it is different
from the default status.
AStatus bar
Displays notification indicators such as missed call or status
indicators to check the status of the IS03.
BFolder
CWidgets
DQuick Search Box
You can search for information within the IS03 or on the web sites.
EMain Menu key
Displays the Main Menu.
FShortcuts
GQuick Menu
You can register icons for frequently used applications from the
Main Menu.
Up to three icons for applications can be registered.
Phone, Mail, and Browser are registered by default.
HRunning application key
Displays the running applications as a list to switch or exit running
applications.
The status bar is on the top of the screen of the IS03. The notification
indicators to notify you of a missed call, a new mail message, or a
running operation are displayed on the left side of the status bar, while
the status indicators to show the status of the IS03 are on the right
side.
■Examples of notification indicator
Viewing the Desktop
《Desktop》
A
G
B
C
D
E
F
H
Using Status Bar
Indicator Description
Missed call
New mail message (E-mail)
New mail message (PC-mail)
New mail message (Gmail)
Alarm terminated
Schedule notification of the calendar
1Seg information
1Seg watching information
1Seg recording information
Playing music
USB debug connecting
Dialing/Calling
Putting a call on hold
Answering memo
microSD memory card not inserted
Few space available in the IS03
Receiving Bluetooth®pair setting request
as31_ue.book 15 ページ 2010年12月8日 水曜日 午前11時17分
16
Learning the Basics
ue04as319e.fm
[16/25]
~~~~<MFZ>
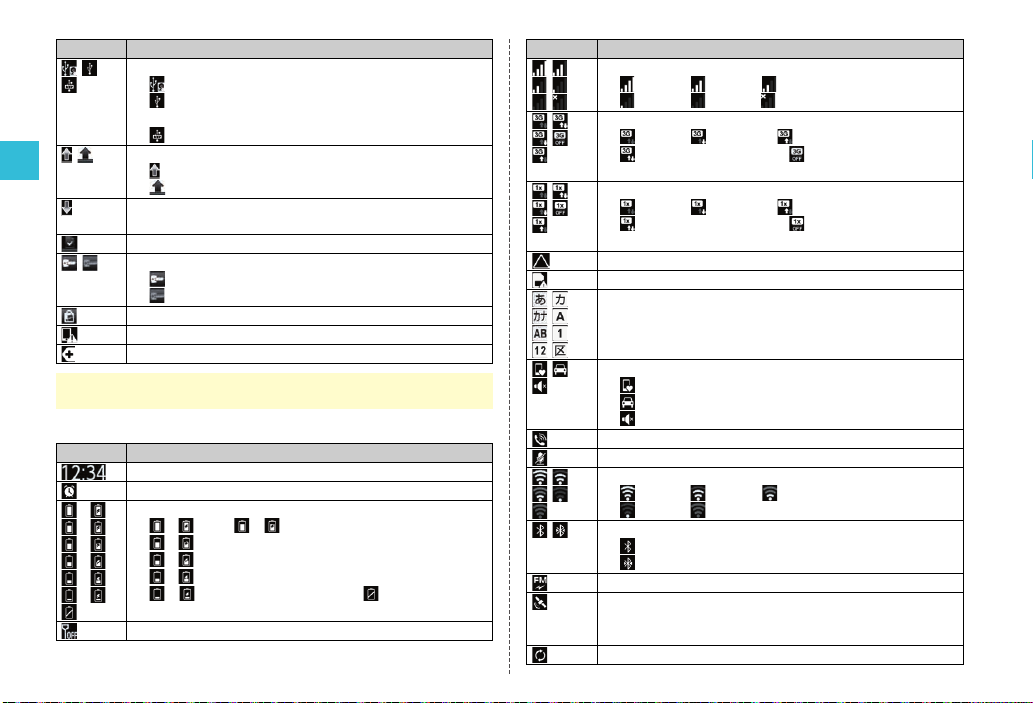
■Examples of status indicator
USB connecting
Card reader mode
Fast transfer mode/USB connecting (in Card
reader mode connecting)
MTP mode
Data upload
Uploading data
Finished uploading data
Downloading data/Finished downloading data
•The download indicator is displayed as an animation.
Finished installing
VPN connection
Connected to VPN
Unconnected to VPN
Update available
Major Update available
Indicators collected
•When the same type of notifications exist, the number of them is displayed
on the lower right of the indicator.
Indicator Description
Time
Alarm set
()
()
()
()
()
()
Battery level (While charging)
( ) Full/ ( ) Approx. 80 % remaining/
( ) Approx. 60 % remaining/
( ) Approx. 40 % remaining/
( ) Approx. 20 % remaining/
( ) Approx. 10 % remaining/ Battery level 0 %
•The charge indicator is displayed as an animation.
Offline mode set
Indicator Description
Signal strength
Level 4/ Level 3/ Level 2/
Level 1/ Level 0/ Out of service area
3G data receiving status
Waiting/ Receiving/ Sending/
Sending and Receiving/ Data communication off
setting
CDMA 1X data communication status
Waiting/ Receiving/ Sending/
Sending and Receiving/ Data communication off
setting
In roaming
au IC-Card not inserted
Character type
Manner mode status
Normal Manner
Drive Manner
Silent Manner
During a call using hands-free
Microphone set to off during a call
Wi-Fi signal strength
Level 4/ Level 3/ Level 2/
Level 1/ Level 0
Bluetooth®in use
Waiting
Connecting
FM transmitter in use
GPS in use
•The GPS positioning indicator is displayed as an
animation.
Data synchronizing
Indicator Description
as31_ue.book 16 ページ 2010年12月8日 水曜日 午前11時17分

17
Learning the Basics
ue04as319e.fm
[17/25]
~~~~<MFZ>
In the notification/status panel, you can check the details on
notification indicators and status indicators or activate an application
corresponding to the indicator.
You can also set manner mode or Veilview.
ATap the status bar.
The notification/status panel is displayed.
ANotification area
You can view the status of the IS03 and contents of
notifications. You can tap to activate a corresponding
application depending on the information.
BManner mode setting
You can display the manner mode setting menu by tapping
the key.
CVeilview setting
Enables/Disables Veilview.
DTime
Displays the current time. You can tap to set the date and
time.
EClear the notifications
You can clear all the notifications by tapping the key.
FRunning applications
Displays the running applications list screen.
GClose tab
You can close the notification/status panel by tapping the tab.
You can switch the desktop by sliding or flicking it to the right and left.
You can register shortcuts, widgets and folders on each desktop
screen.
•When you slide or flick the desktop to the right and left, the indicator
displayed on the top of the screen shows the current display
position.
Answering memo set
No Answering memo
Answering memo (one to nine entries)
Answering memo (ten entries)
Osaifu-Keitai®lock setting in use
Using Notification/Status Panel
Indicator Description
《Notification/Status panel》
A
C
B
D
E
F
G
Using the Desktop
Switching the Desktop
《Switching desktop screens》
as31_ue.book 17 ページ 2010年12月8日 水曜日 午前11時17分
18
Learning the Basics
ue04as319e.fm
[18/25]
~~~~<MFZ>
By long-touching an icon of a shortcut, a widget, or a folder, you can
move or rearrange it.
AOn the desktop, long-touch an
icon to be moved.
The desktop display becomes reduced.
BDrag the icon to the desired
position and release your finger.
You can create a folder or add a shortcut of an application etc. or a
widget on the desktop.
A widget is an application which can be registered on the desktop.
■Adding Shortcuts/Widgets/Folders
AOn the desktop, select e[Select Add
[Select Shortcuts/Widgets/Folders.
BSelect an item.
The selection screen or the setting screen of an application, an
account, or data being added may be displayed. Operate according
to the instructions on the screen.
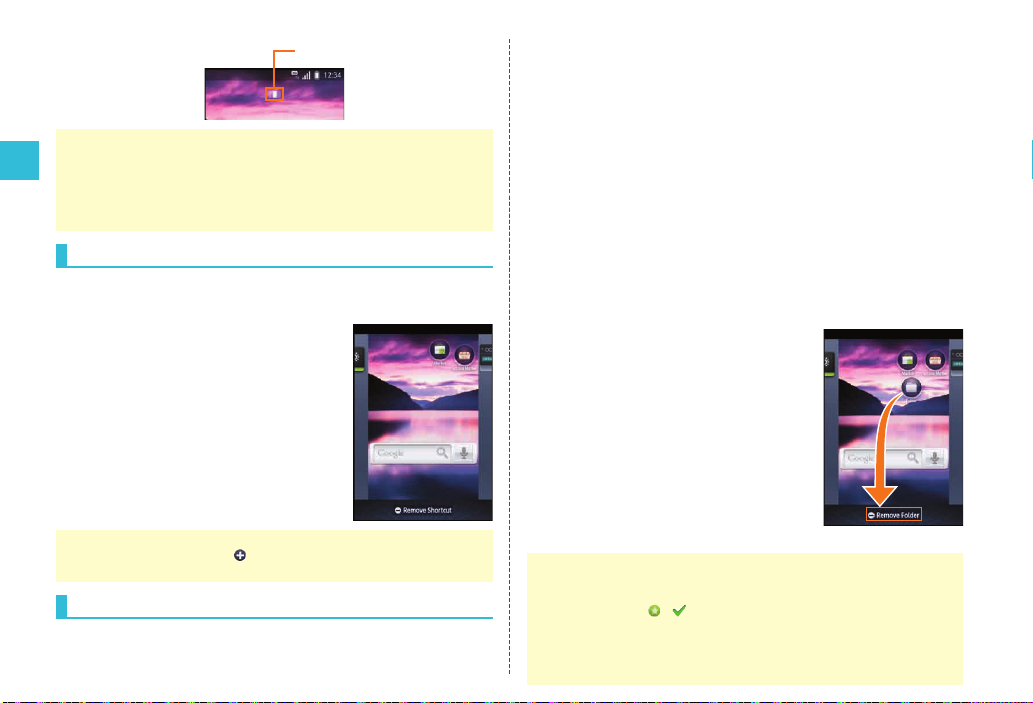
■Removing Shortcuts/Widgets/Folders
ALong-touch the shortcut/widget/folder icon to remove
on the desktop.
The desktop display becomes reduced.
BDrag it to the display area of
Remove Shortcut,
Remove Widget, or
Remove Folder and release
your finger.
•A total of three desktop screens, one for each side, are set by default.
•Power Control widget is displayed by sliding the desktop to the right by
default. By setting each function of Wi-Fi, Bluetooth®, GPS,
auto-synchronization setting, and the brightness of the display setting
frequently with the Power Control widget, you can reduce battery
consumption.
Moving Icons on the Desktop
•You can switch the desktop by dragging an icon to the right or left edge of
the desktop. If you drag it to at the right or left edge of the desktop, a
new desktop is added.
Using Shortcuts/Widgets/Folders
Indicator
•The IS03 is compatible with the Droidget in addition to the Android standard
widget.
* Droidget is a program for widgets.
•Widgets for which ( for widgets added to the desktop) is displayed in
the widget list screen are compatible with the Droidget. When you select the
Droidget in the widget list screen, the confirmation screen is displayed. If
you select Set, the widget is added to the desktop. If you select Delete, it is
deleted from the IS03.
《
Folder removing screen
》
as31_ue.book 18 ページ 2010年12月8日 水曜日 午前11時17分
Table of contents
Other AU Cell Phone manuals

AU
AU Infobar C01 Installation guide

AU
AU KYL21 DIGNO S Installation guide

AU
AU pt003 Installation guide

AU
AU G'zOne IS11CA Installation guide

AU
AU AQUOS PHONE CL IS17SH Installation guide

AU
AU Aquos Phone SL IS15SH Installation guide

AU
AU AQUOS PHONE ISW16SH Installation guide

AU
AU W32T Specification sheet

AU
AU Mirach IS11PT Installation guide

AU
AU HTC J ONE HTL22 Installation guide

AU
AU Xperia ZL2 Sol25 Service manual

AU
AU Qua Phone QX Installation guide

AU
AU Miraie Installation guide

AU
AU FJL22 Installation guide

AU
AU Digno ISW11K User manual

AU
AU INFOBAR A03 Installation guide

AU
AU A1402SII Installation guide

AU
AU Basio 2 Installation guide

AU
AU AQUOS SHV31 Installation guide

AU
AU T006 Installation guide


