AU Aquos SHV33 Installation guide

~~~~
BasicManual
CellphoneandPHSoperatorscollectandrecycleunused
telephones,batteriesandbatterychargersatstoresbearing
thelogoregardlessofbrandandmanufacturertoprotect
theenvironmentandreusevaluableresources.
濡れた状態での充電は、
異常な発熱・焼損などの
原因となり大変危険です。
CustomerServiceCenter
Forinquiries,call:
Forgeneralinformation,charges,andoperationassistance
(tollfree)
Fromfixed-linephones: Fromaucellphones:
areacodenotrequired
areacodenotrequired
Fromfixed-linephones: Fromaucellphones:
Incaseabovenumbersarenotavailable,calltoll-free:
0120-977-033(exceptOkinawa)
0120-977-699(Okinawa)
Forservicecancelationprocedureincaseoflossortheft
(tollfree)
onyouraucellphone.
KeitaiGuaranteeServiceCenter
Forloss,theftordamage(tollfree)
Fromfixed-linephones/aucellphones:
Businesshours:9:00to21:00(7daysaweek)
Businesshours:9:00to20:00(7daysaweek)
Businesshours:24hours(7daysaweek)
0120-925-919
•The company names and product names appearing in this manual are
trademarks or registered trademarks of their respective holders.
•For exemptions, refer to “Notes on Usage” available on the au homepage.
December2015,1stEdition
Soldby:KDDICORPORATION,
OKINAWACELLULARTELEPHONECOMPANY
Manufacturedby:SHARPCORPORATION
shv33e00hyo1.fm
[0/0]
shv33_e.book 0 ページ 2016年1月27日 水曜日 午前9時55分
1
shv33e01.fm
[1/29]
Thank you for buying the “AQUOS SERIE mini SHV33” (simply called the
“SHV33” or the “product” from here on).
Before using the product, be sure to read the “Basic Manual” (this manual) and
“Notes on Usage”/“Setting Guide” available on the au homepage to ensure
correct use. After you have finished reading the manuals, be sure to keep them
accessible and store the printed manuals (“取扱説明書” (Basic Manual), “ご利
用にあたっての注意事項” (Notes on Usage) and “設定ガイド” (Setting Guide))
(Accessories) in safe places so that you can refer to them whenever you need
them. If you lose the printed manuals (Accessories), contact an au shop or
Customer Service Center.
Before you start using the product, make sure that you have all the following
packaged items with the product.
•取扱説明書 (Basic Manual) (Japanese)
•ご利用にあたっての注意事項 (Notes on Usage) (Japanese)
•設定ガイド (Setting Guide) (Japanese)
•Purchase a specified charger (sold separately).
■“Basic Manual” and “Setting Guide”
The “Basic Manual” (this manual) and “Setting Guide” available on the au
homepage describe basic operations of major functions.
For detailed descriptions of various functions, refer to the “Instruction Manual
application” (Japanese version) that can be used on the product or “Full
Instruction Manual” (Japanese) available on the au homepage:
(http://www.au.kddi.com/english/support/manual/)
■“Instruction Manual Application” (Japanese/English
Version)
You can use the “Instruction Manual application” (Japanese version) on the
product to check detailed operational procedures.
Also, you can activate intended functions from an explanation screen
depending on the functions.
On the home screen, “Apps Sheet” [[取扱説明書] (Instruction Manual).
Also, you can use the “Instruction Manual application” (English version) on the
product to check operational procedures.
On the home screen, “Apps Sheet” [[Basic Manual] after switching the
display language to English (zP.14).
•To use the application for the first time, you need to download and install it by
following on-screen instructions.
Preface
List of Packaged Items
The following items are not included in the package.
•microSD memory card
•AC adapter
•Earphone
•microUSB cable
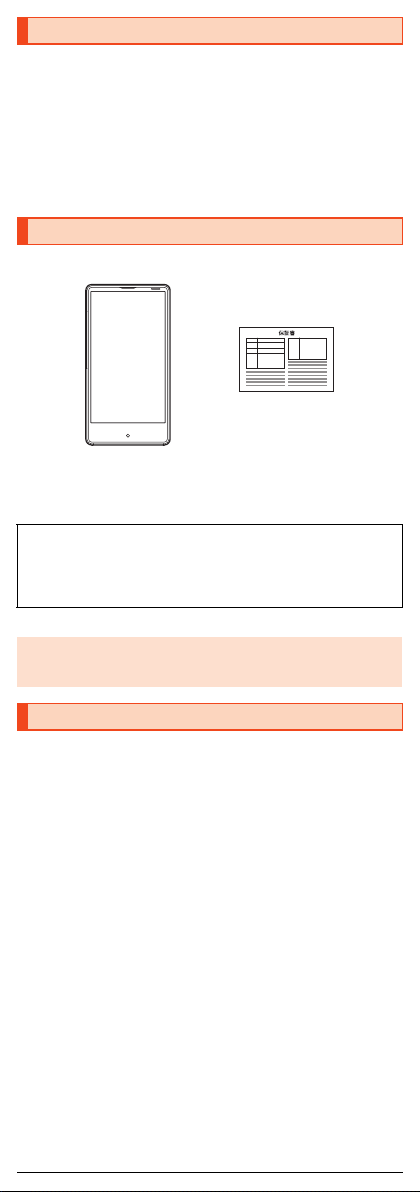
◎The battery is built into the product.
◎Illustrations of cell phones in this manual are only for reference. They may
look different from the actual product.
Operating Instructions
保証書 (Warranty)
(Japanese)
SHV33
shv33_e.book 1 ページ 2016年1月27日 水曜日 午前9時55分

2
shv33e01.fm
[2/29]
■Use of cell phones is not allowed in the following
places!
•Do not listen to music or watch videos/TV while driving a car or riding a
motorbike or bicycle. Use of a cell phone while driving a car or riding a
motorbike is prohibited by law. (Use of a cell phone while riding a bicycle
may be punishable by some regulations.) Be attentive to traffic around you
while walking. Not being able to hear surroundings or looking only at the
display may cause a traffic accident. Be careful especially at train crossings,
on station platforms, and at crosswalks.
•Since using the product on airplanes is restricted, follow the instructions
given by the respective airlines.
■Be considerate of people around you
•Do not make calls in theaters, museums, libraries, and other similar places.
Turn power off or turn on manner mode so as not to disturb others around
you with your ringtones.
•Do not use the cell phone outside in town where you might hinder other
pedestrians.
•Viewing a cell phone screen while walking is a serious hazard. Do not
suddenly stop to talk on/operate the cell phone or do so while walking.
•Move to areas where you will not inconvenience others on bullet trains, in
hotel lobbies, etc.
•Refrain from talking in a loud voice.
•Check whether sound from earphones, etc. is audible when near others on a
train.
•Obtain the permission of other people before you take their photos with the
cell phone's camera.
•Some people close to you in crowded places such as packed trains may be
using a cardiac pacemaker. Turn on “Airplane mode” or turn the cell phone
off in such places.
•Abide by the rules of hospitals and other medical institutions where it is
forbidden to use or carry cell phones.
au Disaster Countermeasure is an application in which you can use Disaster
Message Board, Emergency Rapid Mail (Earthquake Early Warning, Disaster
and Evacuation Information, and Tsunami Warning), Disaster Voice Messaging
Service and Disaster Information.
AOn the home screen, “Apps Sheet” [[au災害対策] (au
Disaster Countermeasure).
The au Disaster Countermeasure menu screen is displayed.
When you activate this for the first time, an agreement screen regarding
the use or an initial setting screen is displayed.
Follow the on-screen instructions.
■Using Disaster Message Board
Disaster Message Board is a service to enable customers in disaster areas to
register their safety information via LTE NET when large-scale disasters, such
as an earthquake whose Japan seismic scale is approximately 6-lower or
more, occur. The registered safety information can be checked by customers
using au phones, and also from other carriers' cell phones, PCs, etc.
For details, refer to “Disaster Message Board Service” on the au homepage.
AOn the au Disaster Countermeasure menu screen, [災害用
伝言板] (Disaster Message Board).
Follow the on-screen instructions for registration/confirmation.
Cell Phone Etiquette
Using au Disaster Countermeasure
Application
◎To register the safety information, an e-mail address (〜ezweb.ne.jp) is
required. Set the e-mail address in advance.
◎Deletion of the safety information and configurations for Safety
Notification Mail are not available during wireless LAN (Wi-Fi®)
connection.
◎The Company does not guarantee the quality of this service. The
Company, regardless of the cause, shall not be liable for any problems
related to registration of safety information due to the concentration of
access to this service or equipment errors, any loss due to the damage,
ruination, etc. of safety information or any loss arising from registered
safety information.
shv33_e.book 2 ページ 2016年1月27日 水曜日 午前9時55分

3
shv33e01.fm
[3/29]
■Using Emergency Rapid Mail
Emergency Rapid Mail is a service to collectively deliver Earthquake Early
Warning and Tsunami Warning provided by the Japan Meteorological Agency,
and Disaster and Evacuation Information provided by the national government
or the local governments to au phones in the specified areas.
•At the time of purchase, receiving setting of Emergency Rapid Mail
(Earthquake Early Warning, and Disaster and Evacuation Information) is set
to “受信する” (Receive). You can receive Tsunami Warning by setting 災害・
避難情報 (Disaster and Evacuation Information).
When receiving Earthquake Early Warning, secure your safety and act
composedly according to the surrounding situations.
When receiving Tsunami Warning, leave sea coasts immediately and
evacuate to safe places such as hills and strongly-built tall buildings.
AOn the au Disaster Countermeasure menu screen, [緊急速
報メール] (Emergency Rapid Mail).
The inbox is displayed.
Select a mail to check to display the details of the mail.
削除 (Delete) Delete received mails.
設定 (Settings) 緊急地震速報 (Earthquake Early Warning), 災害・避難
情報 (Disaster and Evacuation Information)
•受信設定 (Receive setting): Set whether to receive
Earthquake Early Warning, Disaster and
Evacuation Information, and Tsunami Warning.
•Tap [受信する] (Receive)/[受信しない] (Not
receive).
•音量 (Volume): Set the volume of the receiving
sound.
•マナー時の鳴動 (Linkage to the manner mode): Set
whether to make the product ring at the time of
reception while the manner mode is applied.
•バイブ (Vibrator): Set whether to activate the
vibrator at the time of reception.
•受信音/バイブ確認 (Check receiving sound/
vibrator): Play back and check set volume/vibrator.
◎This service is available only in Japan (Not available overseas).
◎Emergency Rapid Mail is free of both information charges and
communication charges.
◎Emergency Rapid Mail cannot be received while the power is turned off.
◎Emergency Rapid Mail may not be received when you are in a place
where the signal cannot be received (e.g. tunnels and basements) or the
signal is weak, even within the service area.
◎Emergency Rapid Mail which failed to be received will not be able to be
received again.
◎When you receive Emergency Rapid Mail, you will be notified by the
dedicated alarm tone and the vibrator. The alarm tone cannot be
changed.
* When you receive Earthquake Early Warning, you will be notified by the alarm
tone, voice (“地震です” (Jishin-desu)) meaning that an earthquake has
occurred and the vibrator.
* When you receive Tsunami Warning, you will be notified by the alarm tone,
voice (“津波です” (Tsunami-desu)) meaning that a tsunami has occurred and
the vibrator.
◎The alarm tone does not ring if Emergency Rapid Mail is received during
a call.
◎Information intended for the areas of other than your present location may
be received.
◎As for this service, the Company shall not be liable for any damage
incurred on the users resulted from failure or delay of information delivery
due to communication disturbance or system failure, contents of the
information or other problems that are not supposed to be blamed on the
Company.
◎For details on Earthquake Early Warning and Tsunami Warning provided
by the Japan Meteorological Agency, refer to the agency's homepage.
(http://www.jma.go.jp/jma/indexe.html)
Earthquake Early Warning
◎Earthquake Early Warning notifies areas where a strong shaking (Japan
seismic scale 4 or more) is expected when an earthquake whose
maximum Japan seismic scale is predicted of 5-lower or more has been
detected.
shv33_e.book 3 ページ 2016年1月27日 水曜日 午前9時55分

4
shv33e01.fm
[4/29]
■Using Disaster Voice Messaging Service
Disaster Voice Messaging Service is a service to record voices with a
smartphone and deliver them as a voice message to people to whom you want
to deliver the information that you are safe when large-scale disasters occur.
AOn the au Disaster Countermeasure menu screen, [災害用
音声お届けサービス] (Disaster Voice Messaging Service).
■Using Disaster Information
You can check histories of Disaster and Evacuation Information delivered by
the local governments, disaster related information portal, etc.
AOn the au Disaster Countermeasure menu screen, [災害関
連情報] (Disaster Information).
BFollow the on-screen instructions.
◎This service detects an earthquake (P-wave, preliminary tremors) near
the seismic center immediately after the earthquake occurs and
automatically calculates its location, scale and predicted strength of the
shaking. After that, you will be notified of the earthquake as soon as
possible within a few seconds to dozens of seconds before a strong
shaking from the earthquake (S-wave, principal shock) occurs.
◎In the vicinity of the seismic center, a strong shaking may reach you
before Earthquake Early Warning.
◎The Earthquake Early Warning distribution system provided by this
service is different from that provided by TV, radio and other
communication media and thus the arriving time of Earthquake Early
Warning may be different among those media.
Tsunami Warning
◎Tsunami Warning notifies areas including target sea coasts of Major
Tsunami Warning and Tsunami Warning provided by the Japan
Meteorological Agency.
Disaster and Evacuation Information
◎Disaster and Evacuation Information notifies information related to the
safety of citizens, such as evacuation advisories, evacuation orders or
various alarms delivered by the national government or the local
governments.
◎To use this service via Wi-Fi®, making initial settings via 4G (LTE/WiMAX
2+) networks is required.
◎Voice messages can be recorded for up to 30 seconds.
◎Voice messages can be exchanged among au phones as well as other
carriers' cell phones and PHS devices.
◎Voices may not be heard when the media sound volume is set to low or
the manner mode is applied.
◎When no free space is left on the internal memory, voice messages may
not be saved or played.
◎Some cell phones cannot receive voice messages. For details, refer to
the au homepage.
shv33_e.book 4 ページ 2016年1月27日 水曜日 午前9時55分

5
shv33e01.fm
[5/29]
■Note on Key Illustrations
In this manual, the key illustrations are simplified as shown below.
■Description of Operations for Selecting Item/Icon/Key
etc.
In this manual, operation procedures are described as below.
* Tapping is to select a key or icon displayed on the screen by lightly tapping it with
your finger.
■Notes on Illustrations/Screenshots
Screenshots and operations in this manual are based on the product with an
au Nano IC Card 04 installed.
Screenshots may differ from actual screen. Portions of the screen are
sometimes omitted.
Illustrations and Descriptions in This
Manual
Description Explanation
On the home screen,
“Apps Sheet” [[Phone]
[Enter “141”
[[CALL].
Slide/flick the Feel Home screen to switch to the
Apps Sheet, and then tap “ Phone”. Continue
by tapping “ ”, “ ”, and “ ”, and
finally “ ”.
f(hold down for at
least 2 seconds).
Hold fdown for at least 2 seconds.
◎Explanations of this manual are based on the case when the color of the
main unit is “Scarlet” as an example.
◎Explanations of this manual are based on the case when the product is
held vertically. If you hold it horizontally, menu items/icons/on-screen
keys etc. may be different.
◎Descriptions in this manual are based on operation in Feel Home.
Operations may be different if home applications have been changed (by
using “Home applications”, etc.).
◎Menu items, layers and icons described in this manual may be different
according to functions being used and conditions.
◎In this manual, “microSD™memory card (commercially available)”,
“microSDHC™memory card (commercially available)” and “microSDXC™
memory card (commercially available)” are abbreviated as “microSD
memory card” or “microSD”.
◎All of the indicated amounts exclude tax unless otherwise specified.
Actual screen
In this manual, part of the
screen such as icons are
omitted.
In this manual
shv33_e.book 5 ページ 2016年1月27日 水曜日 午前9時55分
6
shv33e01.fm
[6/29]
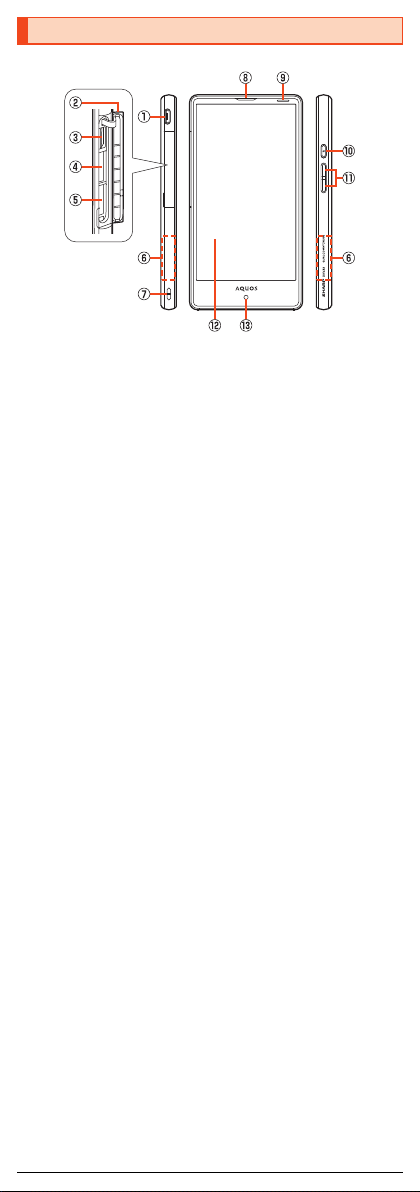
■Front/Left Side/Right Side
AExternal connection jack
Use when connecting the common AC adapter 05 (sold separately), the
microUSB cable 01 (sold separately), USB cable for peripherals
(commercially available), etc. to the product.
When you connect the common AC adapter 05 (sold separately), the
microUSB cable 01 (sold separately), etc. to the product, some applications
may not function properly since the geomagnetic sensor is affected by the
magnetism of connected devices. Use the product after removing the
cable.
Bau Nano IC Card 04/microSD memory card cover
CIMEI tray
Allows you to confirm the product's IMEI.
Dau Nano IC Card 04 tray slot
EmicroSD memory card slot
FGrip sensor
By setting “Grip magic”, holding the product (touch the sensor areas on
both sides at the same time) turns the screen on or minimizes the volume
and makes the product vibrate when a call is arriving or for an incoming call
or notification.
•Even if you release your hand from the sensor areas, the screen is not
turned off immediately.
GStrap eyelet
HEarpiece (Receiver)
IProximity sensor/Light sensor
Proximity sensor prevents inadvertent operations of the touch panel during
a call.
Light sensor detects the ambient brightness and adjusts the brightness of
display.
JfPower key
Turn the screen on/off.
Hold it down to turn on/off the power, set the manner mode, etc.
Kud Volume up/down key
Adjust the volume.
Hold down uon the Welcome Sheet (Lock Screen) to turn on the mobile
light.
Hold down don the Welcome Sheet (Lock Screen) to set/disable the
manner mode.
LDisplay (Touch panel)
MIn camera lens
Names and Functions of Parts
shv33_e.book 6 ページ 2016年1月27日 水曜日 午前9時55分

7
shv33e01.fm
[7/29]
■Back/Top and Bottom
NOut camera lens
O&mark
Hold it over a reader/writer when using Osaifu-Keitai®/NFC.
PInternal antenna
QTV antenna
RWi-Fi®/Bluetooth®/GPS antennas
SMobile light
TSub microphone
UEarphone/Microphone jack
VCharging/Incoming indicator
WMouthpiece (Microphone)
XSpeaker
◎The back cover of the product cannot be removed. Removing it forcibly
may cause damage or a fault.
◎The battery is built into the product, and cannot be removed by the
customer. To force the power off, refer to “Turning the Power Off Forcibly”
(zP.13).
IMEI tray
◎An IMEI (international mobile station equipment identity) is a special
identification code assigned to each phone. You can pull the IMEI tray out
to confirm the IMEI of the product.
◎The IMEI is information required when requesting servicing or repairs.
◎The IMEI tray cannot be removed from the main unit. Take care not to
apply force when handling.
◎You can also operate the product to confirm the IMEI.
On the home screen, “Apps Sheet” [[Settings] [[About phone]
[[Status] [[SIM status] and confirm the IMEI field.
Grip sensor
◎The sensor may not work properly and prevent you from using Grip magic
in the following cases. This may also cause malfunction.
•Operation with gloved hands
•Operation while the product is equipped with a cover etc.*
•Operation while the product is wet
•Operation while a metallic object touches the sensor
•When you put a cover on/off the product with Grip magic set to “ON”.
* Depending on the cover, you may be able to use Grip sensor with the product
equipped with it. Set “Putting cover setting” to “Covered” after equipping the
product with the cover.
Display (Touch panel)
◎If the product is equipped with a commercially available corresponding
flip cover, you can turn the display on/off by opening/closing the flip
cover. If you close the equipped flip cover obliquely, the display may not
be turned off.
Proximity sensor/Light sensor, earpiece (receiver), mouthpiece
(microphone), speaker, sub microphone
◎Placing stickers, etc. over proximity sensor/light sensor may prevent the
product from operating properly.
◎Covering earpiece (receiver), mouthpiece (microphone), speaker or sub
microphone with stickers, fingers, etc. may hinder product performance.
TV antenna, internal antenna, Wi-Fi®/Bluetooth®/GPS antennas
◎Antennas are built into the product. Do not cover with hand during calls or
data communication. Doing so may affect call/communication quality.
shv33_e.book 7 ページ 2016年1月27日 水曜日 午前9時55分

8
shv33e01.fm
[8/29]
The au Nano IC Card 04 records your personal information such as phone
numbers.
Any au IC card other than au Nano IC Card 04 cannot be used with the product.
Before attaching the au Nano IC Card 04, turn the product off.
AOpen the au Nano IC Card 04/microSD memory card cover.
BSlowly pull the au Nano IC Card 04 tray straight out by
hooking a finger on it.
CPut the au Nano IC Card 04 on the au Nano IC Card 04 tray.
Make sure the notches on the au Nano IC Card 04 and au Nano IC Card
04 tray face the proper orientation and put the card slowly on the tray.
DSlowly insert the au Nano IC Card 04 tray into the au Nano
IC Card 04 tray slot, taking care not to let the tray be
caught on the metal parts on both sides of the slot.
Confirm the position of the au Nano IC Card 04 tray slot and the orientation
of the au Nano IC Card 04 tray carefully, and insert the tray all the way into
the slot in the direction of the arrow. Inserting the tray forcibly may
damage the tray.
Using the au Nano IC Card 04
au Nano IC Card 04
◎Make sure to unplug the microUSB plug of the common AC adapter 05
(sold separately) etc. from the product when attaching or removing the au
Nano IC Card 04.
Attaching the au Nano IC Card 04
IC (metal) part
au Nano IC Card 04
Front Back
au Nano IC Card
04 tray
au Nano IC Card 04 tray
au Nano IC Card 04
IC (metal) part up
Notches
au Nano IC Card
04 tray slot
Metal parts
shv33_e.book 8 ページ 2016年1月27日 水曜日 午前9時55分

9
shv33e01.fm
[9/29]
EClose the au Nano IC Card 04/microSD memory card cover.
Before removing the au Nano IC Card 04, turn the product off.
AOpen the au Nano IC Card 04/microSD memory card cover.
BSlowly pull the au Nano IC Card 04 tray straight out by
hooking a finger on it.
CRemove the au Nano IC Card 04 from the au Nano IC Card
04 tray.
DSlowly insert the au Nano IC Card 04 tray into the au Nano
IC Card 04 tray slot, taking care not to let the tray be
caught on the metal parts on both sides of the slot.
Confirm the position of the au Nano IC Card 04 tray slot and the orientation
of the au Nano IC Card 04 tray carefully, and insert the tray all the way into
the slot in the direction of the arrow. Inserting the tray forcibly may
damage the tray.
EClose the au Nano IC Card 04/microSD memory card cover.
◎Inserting the au Nano IC Card 04 tray not deeply enough may prevent the
product from functioning properly.
◎Take care not to lose or damage the removed au Nano IC Card 04 tray.
Removing the au Nano IC Card 04
au Nano IC Card
04 tray
au Nano IC Card
04 tray slot
Metal parts
shv33_e.book 9 ページ 2016年1月27日 水曜日 午前9時55分

10
shv33e01.fm
[10/29]
AOpen the au Nano IC Card 04/microSD memory card cover.
BSlowly insert the microSD memory card into the microSD
memory card slot.
Confirm the orientation for inserting, then insert in the direction of the arrow
until it clicks and is locked.
Releasing the microSD memory card before it is locked may cause it to
pop out.
CClose the au Nano IC Card 04/microSD memory card cover.
Be sure to unmount microSD card before removing. Not doing so may corrupt
data or card may no longer operate properly.
AOpen the au Nano IC Card 04/microSD memory card cover.
BSlowly push the microSD memory card in all the way.
After it clicks, let the microSD memory card come back out a little without
releasing it. Releasing the card when it is pushed deeply into the slot may
cause it to pop out.
CSlowly pull the microSD memory card straight out.
DClose the au Nano IC Card 04/microSD memory card cover.
Using a microSD Memory Card
Attaching a microSD Memory Card
◎Make sure that the top/bottom and front/rear of the microSD memory card
are facing correctly.
Trying to force a wrongly oriented card into the slot could make it
impossible to remove the card or result in damage.
◎Do not touch the terminal part of a microSD memory card.
Removing the microSD Memory Card
◎Do not remove the microSD memory card forcefully. Doing so may result
in damage or data loss.
◎The microSD memory card may become warm after a long time use, but
this is not a fault.
microSD
memory card slot
Metal part down
shv33_e.book 10 ページ 2016年1月27日 水曜日 午前9時55分

11
shv33e01.fm
[11/29]
When you purchase the product, the internal battery is not fully charged. Be
sure to charge the internal battery before use.
•If the performance of the battery does not recover (e.g. the usable time after
each charge has become extremely short), the internal battery may be at the
end of service life. On the home screen, “Apps Sheet” [[Settings]
[[About phone] [[Status] [[Battery status] to check the charging
performance of the internal battery.
•While charging, the charging/incoming indicator illuminates in red, and the
battery icon is displayed with superimposed. When the battery is charged
to approximately 95%, the charging/incoming indicator illuminates in green.
When charging is finished, the charging/incoming indicator goes out.
The followings are the explanation of how to connect the common AC adapter
05 (sold separately)/common DC adapter 03 (sold separately) to charge. For
details on the specified AC adapter (sold separately)/specified DC adapter
(sold separately), refer to “Introduction of Peripheral Devices” (zP.19).
AConfirm the direction of the microUSB plug of the common
AC adapter 05 (sold separately)/common DC adapter 03
(sold separately) and insert it in the direction of the arrow
to the external connection jack of the product.
Charging
Charging
◎The product may become warm while charging, but this is normal.
◎Depending on the operation procedure and usage environment, the
temperature inside the product may get high and the product may even
get heated. In such case, charging may stop for security reasons.
◎Charging the internal battery while using the camera function etc. may
lengthen the charging time.
◎If you perform various operations with a specified charger (sold
separately) connected to the product, charging/discharging may take
place repeatedly in a short time. Frequently charging the internal battery
shortens its service life.
◎If you charge the internal battery when the battery has run out, the
charging/incoming indicator may not illuminate soon. However, charging
is in progress.
◎If the charging/incoming indicator flashes in red, force the power off
(zP.13) and turn the product on again. If the indicator continues to flash,
stop charging the internal battery and contact an au shop or the Keitai
Guarantee Service Center.
◎If you stop charging while the charging/incoming indicator still illuminates
during charging, the cell phone may be left not fully charged even if
is displayed on it. In such case, the usage times shorten.
Charging with the Specified AC Adapter (Sold
Separately)/Specified DC Adapter (Sold
Separately)
External
connection jack
Protruding edges
Common AC adapter 05 (sold separately)/
Common DC adapter 03 (sold separately)
shv33_e.book 11 ページ 2016年1月27日 水曜日 午前9時55分

12
shv33e01.fm
[12/29]
BPlug the common AC adapter 05 (sold separately) power
plug into a 100 V AC power outlet/Plug the common DC
adapter 03 (sold separately) plug into a cigarette lighter
socket.
CWhen charging is finished, pull the microUSB plug of the
common AC adapter 05 (sold separately)/common DC
adapter 03 (sold separately) straight out from the external
connection jack of the product.
DUnplug the common AC adapter 05 (sold separately) power
plug from the power outlet/Unplug the common DC adapter
03 (sold separately) plug from the cigarette lighter socket.
The followings are the explanation of how to charge the internal battery by
connecting the product to a USB port of a PC through which the battery can be
charged.
AConnect the microUSB cable 01 (sold separately) to a USB
port of a PC after the PC is activated completely.
BConnect the microUSB cable 01 (sold separately) to the
product.
◎Although you can charge the internal battery while the power is turned on,
charging time lengthens.
Charging with a PC
◎If you use the microUSB cable to charge the internal battery, it may take
the internal battery longer to be fully charged than if you use the specified
AC adapter (sold separately).
◎Turn the protruding side of the microUSB plug down and insert the
microUSB plug to the external connection jack of the product straightly.
Inserting the microUSB plug in the wrong direction may result in damage
to the external connection jack of the product.
◎If you charge the internal battery when the battery has run out, the
charging/incoming indicator may not illuminate. In such case, use the
specified AC adapter (sold separately) for charging.
Common DC adapter 03
(sold separately)
Common AC adapter 05
(sold separately)
External
connection jack
USB port of a PC
microUSB cable 01
(sold separately)
Protruding edges
shv33_e.book 12 ページ 2016年1月27日 水曜日 午前9時55分

13
shv33e01.fm
[13/29]
■Turning the Power On
Af(hold down for at least 2 seconds) while the product
is turned off.
■Turning the Power Off
Af(hold down for at least 2 seconds).
B[Power off] [[OK].
■Restarting the Product
You can restart the product after turning it off.
Af(hold down for at least 2 seconds).
B[Reboot] [[OK].
■Turning the Power Off Forcibly
You can force the product to turn off if the screen freezes or you are unable to
turn the product off.
Af(hold down for at least 8 seconds).
Release your finger after the product vibrates to turn the power off.
■Booting in Safe Mode
Turn the product off then boot it in a state close to that at time of purchase.
If operation of the product is unstable, it may be due to applications installed
after purchasing the product. If symptoms improve when booted in safe mode,
uninstalling the applications you installed may remedy symptoms.
Af(hold down for at least 2 seconds).
BLong touch “Power off” [[OK].
“Safe mode” is displayed at the bottom of the screen when the product is
booted in safe mode.
To end safe mode, reboot the product.
If you press for no operation is made for a specified time, the screen is
turned off.
■Turning the Screen On
Afwhile the screen is turned off.
Turning the Power On/Off
◎The initial setting of the touch panel will be executed until “AQUOS”
disappears from the screen after the power is turned on. Do not touch the
screen, otherwise touch panel operations may not be performed properly.
◎If the power is turned off forcibly, unsaved data will be deleted. Do not
turn the power off forcibly unless you cannot operate the product.
◎When the product is turned off, you can boot it in safe mode by f
(hold down for at least 2 seconds) to turn it on, and then holding down
duntil the Welcome Sheet (Lock Screen) is displayed after the SHARP
logo appears.
◎It is recommended that you back up your data on the product before
booting in safe mode.
◎Widgets that you yourself created may be deleted.
◎Safe mode is not a normal state for the product to be booted in. End safe
mode before normal use.
Turning the Screen On/Off
◎When you put the product in your pocket, bag, etc., turn the screen off.
Putting the product in while the screen is turned on may cause
inadvertent operations.
shv33_e.book 13 ページ 2016年1月27日 水曜日 午前9時55分

14
shv33e01.fm
[14/29]
The Welcome Sheet (Lock Screen) is displayed if you turn the screen on.
AWallpaper
BAddress Book Plus
Display information registered in the address book. Frequently called
contacts such as favorites can be displayed in the notifications area.
CNotifications area
Notifications for missed calls, new e-mail/SMS, etc. appear as a pop-up.
Double-tap notification for corresponding screen.
Drag notifications area down for list of notifications. Tap notifications for
corresponding screen.
DOwner info
Tap to display texts according to items set for “Owner info” in “Lock &
Security”.
EShortcuts
Slide “ ” to top of screen for shortcuts.
FInfo area
If “エモパー (emopa)” is set to “ON”, a variety of information from emopa is
displayed.
•Flick to the left/right to switch the information.
•Depending on the information, double-tap it to check the related
information or details.
•If initial settings for emopa have not been made, “エモパーを使ってみませ
んか? (Try using emopa?)” is displayed. Double-tap to make emopa
settings.
GScreen lock
Slide “ ” to top of screen to unlock the screen.
•If a password, etc. is set in “Screen lock”, it is displayed as “ ”.
HActivate camera
Slide “ ” to top of screen to activate the SH camera.
You can switch the display language for function names and other items to
English.
AOn the home screen, “Apps Sheet”.
B[設定] (Settings).
C[言語と文字入力] (Language & input).
D[言語(Language)を選択] (Select language).
E[English].
Welcome Sheet (Lock Screen)
Switching the Display Language to
English
《Welcome Sheet (Lock Screen)》
shv33_e.book 14 ページ 2016年1月27日 水曜日 午前9時55分

15
shv33e01.fm
[15/29]
Feel Home is a home screen that consists of the Desktop Sheet, the Apps
Sheet, and the dock.
You can tap widgets/shortcuts on the Desktop Sheet and icons on the Apps
Sheet to use functions. You can also register shortcuts for favorite apps in the
dock.
•Slide/flick the home screen to the left/right to switch between the Desktop
and Apps Sheets.
■Viewing the Feel Home
AStatus bar
BDesktop Sheet/Apps Sheet
CDock
You can register a shortcut for the application in the dock, to start quickly.
DNavigation Bar
EGuide Tab
When you switch the Desktop Sheet/Apps Sheet, the sheet name will be
displayed.
FPage Indicator
The current position of the Desktop Sheet/Apps Sheet will be displayed.
Using the Feel Home
◎Slide/flick the Desktop and Apps Sheets up/down to switch pages.
◎Slide “^”, “#”, or “$” up and drag left or right until “ ” is appears
and release your finger to search the internal memory and websites for
information. Applications can be selected to activate them.
Also, slide “^”, “#”, or “$” up and drag left or right until “ ” or
“ ” appears and release your finger to use screen shrink mode.
《Apps Sheet》《Desktop Sheet》
Switchingsheets
shv33_e.book 15 ページ 2016年1月27日 水曜日 午前9時55分

16
shv33e01.fm
[16/29]
The notification icons to notify you of a missed call, a new mail message, a
running operation, etc. are displayed on the left side of the status bar, while the
status icons to show the status of the product are on the right side.
■Main Notification Icons
■Main Status Icons
* Both “LTE” and “WiMAX 2+” networks are available. “4G” is displayed for either
network. Your cell phone connects to the network deemed to be the least congested
according to the network traffic.
Using the Status Bar
Icons
Icon Description
Missed call
New E-mail message
New SMS message
New PC-mail message
New Gmail™message
Making a call, talking, receiving a call
Talking in high quality sound with a model supporting VoLTE
provided by au.
Call on hold
Answering memo
Available space on the internal memory being run out
Update available
Installation completion of application
Software update available
Icons collected
Icon Description
Time
〜Battery level
〜: Battery level display : No battery
•While charging, the battery icon is displayed with
superimposed.
•Percentage of the remaining battery level appears on the left
side of the battery icon
Airplane mode set
〜Signal strength (Receiving electric field)
〜: Level display : Out of service area
•The icon indicating network is displayed at the upper left.
: LTE/WiMAX 2+ available*
•During a communication, the icon is displayed with
superimposed.
Roaming
Manner mode status
: Standard manner mode : Silent manner mode
During a call using hands-free
Microphone set to “Mute” during a call
Answering memo set
: No Answering memo
: Answering memo (one to nine entries)
: Answering memo (ten entries)
shv33_e.book 16 ページ 2016年1月27日 水曜日 午前9時55分
17
shv33e01.fm
[17/29]
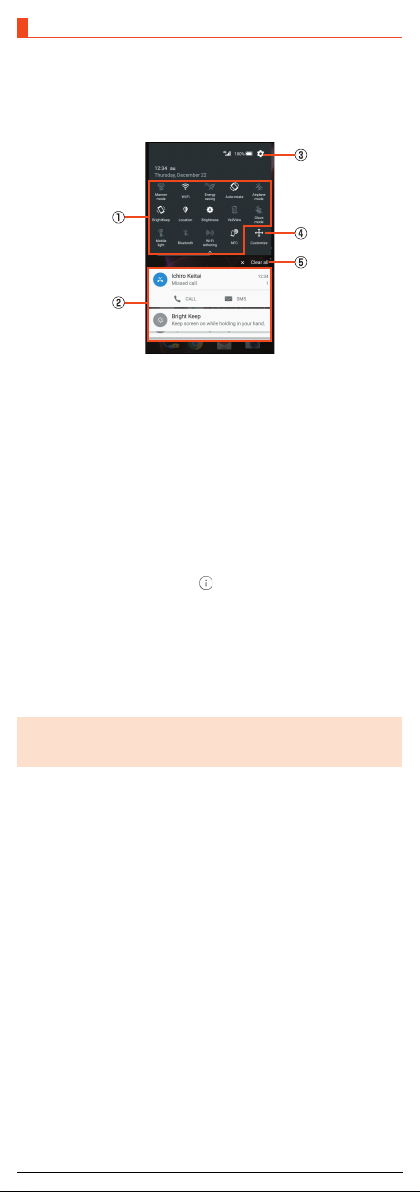
In the notification/status panel, you can check the details on notification icons
and status icons or activate an application corresponding to the icon.
You can also set the manner mode, VeilView, etc.
ASlide the status bar down.
■Viewing the Notification/Status Panel
AFunction buttons
Switch settings of the frequently used function by one touch.
Slide the screen up or down or tap the top of the screen to shrink/enlarge
the function button area.
BNotification
Check the status of the product and notifications as well as make settings
for Address Book Plus. Tap notifications to activate corresponding
application.
•Flick notifications to the left or right to delete them. Some notifications
cannot be deleted.
•Slide the displayed area up to view hidden notifications.
•Slide notifications up or down using two fingers or pinch in/pinch out to
switch between detailed and simple views.
•Long touch notification [Tap [ ] to make notification settings for the
application.
CSettings
Tap it to make various settings for the product.
DCustomize
Change or rearrange the displayed function buttons.
EClear all
Tap it to clear all the notifications. You may not be able to delete a
notification depending on the notification.
Using the Notification/Status Panel
◎Slide the notification/status panel from the bottom to the top to hide it.
◎Slide the status bar down using two fingers to display the notification/
status panel with the function button area expanded.
《Notification/Status panel》
shv33_e.book 17 ページ 2016年1月27日 水曜日 午前9時55分

18
shv33e01.fm
[18/29]
You can switch input methods for character entry.
•Following operation explanations use “Japanese - S-Shoin”.
AOn the home screen, “Apps Sheet” [[Settings]
B[Language & input] [[Current selected keyboard]
C[CHOOSE KEYBOARDS]
D[Google Keyboard]/[S-Shoin]/[Google voice typing]
AOn the character entry screen, [ ] [[Input UI]
[[QWERTY keyboard]/[12 keyboard].
AOn the home screen, “Apps Sheet” [[Settings]
[[Profile].
Set not to disturb others around you in public.
•When you set the manner mode, the ringtone/receiving sound/operation
sound does not ring. Also, if you set “Silent manner mode”, the vibrator is not
activated when receiving a call/mail and the alarm is not activated.
AOn the home screen, “Apps Sheet” [[Settings]
[[Sound/notification] [[Mode settings].
BSelect a mode.
AOn the home screen, “Apps Sheet” [[Settings] [[More]
[[Airplane mode].
Switching Input Methods
Switching Software Keyboards
Checking Your Own Phone Number
Setting the Manner Mode
Setting Airplane mode
shv33_e.book 18 ページ 2016年1月27日 水曜日 午前9時55分

19
shv33e01.fm
[19/29]
■au Carrying Case F Black (0105FCA) (sold separately)
au Carrying Case G Black (0106FCA) (sold separately)
au Carrying Case H Black (0107FCA) (sold separately)
■Common AC Adapter 03 (0301PQA) (sold separately)
Common AC Adapter 05 (0501PWA) (sold separately)
Common AC Adapter 03 Navy (0301PBA) (sold separately)
Common AC Adapter 03 Green (0301PGA) (sold separately)
Common AC Adapter 03 Pink (0301PPA) (sold separately)
Common AC Adapter 03 Blue (0301PLA) (sold separately)
AC Adapter JUPITRIS (White) (L02P001W) (sold separately)
AC Adapter JUPITRIS (Red) (L02P001R) (sold separately)
AC Adapter JUPITRIS (Blue) (L02P001L) (sold separately)
AC Adapter JUPITRIS (Pink) (L02P001P) (sold separately)
AC Adapter JUPITRIS (Champagne) (L02P001N) (sold
separately)
•Illustrations and forms may not match depending on the AC adapter you
use.
■Common DC adapter 03 (0301PEA) (sold separately)
■Portable charger 02 (0301PFA) (sold separately)
■microUSB cable 01 (0301HVA) (sold separately)
microUSB cable 01 Navy (0301HBA) (sold separately)
microUSB cable 01 Green (0301HGA) (sold separately)
microUSB cable 01 Pink (0301HPA) (sold separately)
microUSB cable 01 Blue (0301HLA) (sold separately)
Introduction of Peripheral Devices
◎It may not be possible to adequately charge the product with the portable
charger 02 (sold separately).
◎For the latest information about available peripheral devices, check the
au homepage (http://www.au.kddi.com/english/) or contact Customer
Service Center.
◎The product does not support ASYNC/Fax transmission.
◎The above-mentioned peripheral devices can be purchased from au
Online Shop. You may not be able to purchase one depending on the
stock status.
(http://auonlineshop.kddi.com/)
Earphone/Microphone
◎An earphone/microphone with the switch or depending on the type of the
earphone/microphone, it may not be available with the product.
au Carrying Case F Black
Common AC adapter 05
shv33_e.book 19 ページ 2016年1月27日 水曜日 午前9時55分
Other manuals for Aquos SHV33
1
Table of contents
Other AU Cell Phone manuals

AU
AU W65T Installation guide

AU
AU basio Installation guide

AU
AU Xperia Z3 SOL26 Installation guide

AU
AU INFOBAR A02 Installation guide

AU
AU AQUOS SHV32 Installation guide

AU
AU Xperia XL2 SOL25 Installation guide

AU
AU K002 User manual

AU
AU TORQUE G04 Service manual

AU
AU A1402SII Installation guide

AU
AU Galaxy S6 edge SCV31 Installation guide

AU
AU Aquos Phone SL IS15SH Installation guide

AU
AU ISAI FL LGL24 Service manual

AU
AU GzOne 4G LTE Installation guide

AU
AU AQUOS PHONE IS12SH Installation guide

AU
AU K011 User manual

AU
AU A1303SA Assembly instructions

AU
AU Urbano L01 Installation guide

AU
AU Aquos SHV33 Quick start guide

AU
AU pt003 Installation guide

AU
AU W32H Installation guide


