auna PRO MIC-900 User manual

www.auna-multimedia.com
MIC-900
Kodensator-Mikrofon
Condenser Microphone
Micro à condensateur
10006515 10011711 10028868 10028869 10030363 10031503


3
DE
Sehr geehrter Kunde,
wir gratulieren Ihnen zum Erwerb Ihres Gerätes.
Lesen Sie die folgenden Hinweise sorgfältig durch
und befolgen Sie diese, um möglichen Schäden
vorzubeugen. Für Schäden, die durch Missachtung
der Hinweise und unsachgemäßen Gebrauch
entstehen, übernehmen wir keine Haftung. Scannen
Sie den QR-Code, um Zugri auf die aktuellste
Bedienungsanleitung und weitere Informationen
rund um das Produkt zu erhalten.
TECHNISCHE DATEN
Artikelnummer 10006515, 10011711, 10028868, 10028869,
10030363, 10031503
Mikrofontyp USB-Kondensator-Mikrofon
Charakteristik Niere
Frequenzbereich 30 Hz - 18 KHz
Empndlichkeit -32 dB
Stromversorgung Via USB (Anschluss: Typ B)
Maße / Gewicht Mikrofon: 16,5 x Ø 5 cm (H x Ø)
Mikrofonspinne:9 x 9 x 6 cm (BxHxT)
Kabellänge: ca. 3 Meter
Gewicht Mikrofon: ca. 295g
Gewicht Mikrofonspinne: ca. 180g
Lieferumfang
• Mikrofon
• Spinne
• 3/8“ auf 5/8“ - Adapter,
• Schutztasche
• USB-Kabel

4
DE
SICHERHEITSHINWEISE
• Diese Bedienungsanleitung dient dazu, Sie mit der Funktionsweise
dieses Produktes vertraut zu machen.
• Bewahren Sie diese Anleitung daher stets gut auf, damit Sie jederzeit
darauf zugreifen können.
• Bitte verwenden Sie das Produkt nur in seiner bestimmungsgemäßen
Art und Weise. Eine anderweitige
• Verwendung führt eventuell zu Beschädigungen am Produkt oder in der
Umgebung des Produktes.
• Ein Umbauen oder Verändern des Produktes beeinträchtigt die
Produktsicherheit.
• Önen Sie das Produkt niemals eigenmächtig und führen Sie
Reparaturen nie selber aus!
• Behandeln Sie das Produkt sorgfältig. Es kann durch Stöße, Schläge
oder den Fall aus bereits geringer Höhe beschädigt werden.
• Halten Sie das Produkt fern von Feuchtigkeit und extremer Hitze.
• Lassen Sie keine Gegenstände aus Metall in dieses Gerät fallen.
• Stellen Sie keine schweren Gegenstände auf dieses Gerät.
• Reinigen Sie das Gerät nur mit einem trockenen Tuch.
• Verwenden Sie ausschließlich vom Hersteller oder vom qualizierten
Fachhandel empfohlenes Zubehör.
• Die Gewährleistung verfällt bei Fremdeingrien in das Gerät.
•
Kleine Objekte/Verpackungsteile (Plastikbeutel, Karton, etc.)
Bewahren Sie kleine Objekte (z.B. Schrauben und anderes Montagematerial,
Speicherkarten) und Verpackungsteile außerhalb der Reichweite von
Kindern auf, damit sie nicht von diesen verschluckt werden können. Lassen
Sie kleine Kinder nicht mit Folie spielen. Es besteht Erstickungsgefahr!
Transport des Gerätes
Bitte bewahren Sie die Originalverpackung auf. Um ausreichenden Schutz
beim Transport des Gerätes zu erreichen, verpacken Sie das Gerät in der
Originalverpackung.
Reinigung der äußeren Oberäche
Verwenden Sie keine üchtigen Flüssigkeiten, wie Insektensprays. Durch zu
starken Druck beim Abwischen können die Oberächen beschädigt werden.
Gummi- oder Plastikteile sollten nicht über einen längeren Zeitraum mit
dem Gerät in Kontakt sein. Nutzen Sie ein trockenes Tuch.

5
DE
TECHNISCHE ANFORDERUNGEN
Das Mikrofonsignal wird über einen USB-Anschluss an einen Computer ge-
sendet. Über diesen wird es auf mit Strom versorgt.
Ihr Computer muss folgende Mindestanforderungen erfüllen:
PC Mac
Intel oder AMD CPU, 1 GHz oder
besser
G4/G5, 800 MHz oder besser
Mindestens 512MB RAM Mindestens 512MB RAM
USB 2.0-Anschluss USB 2.0-Anschluss
Windows XP/Vista/7/8/10 Mac OS X 10.3.9 (Panther) oder besser
INSTALLATION
• Starten Sie Ihren Computer.
• Schließen das Mikrofon an einem freien USB-Anschluss an
Hinweis: Das Betriebssystem installiert automatisch die benötigten
Treiben.
• Wählen Sie das Mikrofon als Eingangsquelle für die von Ihnen verwen-
dete Aufnahmesoftware.
Windows:
• Stellen Sie die Aufnahmelautstärke über die Windows-Lautstärkeregler
ein (Lautsprechersystem auf der Taskleiste).
• (Optional:) Wählen Sie Mikrofon unter Systemeinstellungen->Sounds
und Audiogeräte-> Audio-Tab als Soundaufnahmegerät aus.
Mac OS:
• Stellen Sie die Aufnahmelautstärke über das Audio Midi Setup ein. Hin-
weis: Das Mikrofon ist nun betriebsbereit.
• (Optional:) Wählen Sie Mikrofon im Audio Midi Setup im Audio Devices-
Tab als Standard-Soundaufnahmegerät aus.
HINWEISE ZU MONTAGE UND NUTZUNG
Um den gewünschten Klang zu erreichen, testen Sie verschiedene Position
zur Schallquelle. Bewegen Sie das Mikrofon ruhig im Aufnahmeraum und tes-
ten verschiedene Abstände und Winkel. Erst wenn Sie den passenden Grund-
ton erreicht haben, sollten Sie Equalizer und Klangprozessoren verwenden.

6
DE
Wegen dem extrem linearen Frequenzgang und der hohen Klangauösung
des Mikrofons sollte „EQing“ nicht notwendig für Hochfrequenzen sein.
Dieses beeinusst das Eingangssignal nur zu stark und erhöht den Störton
unnötig. Das Mikrofon verfügt über die Klarheit, die zur Aufnahme und Abmi-
schen notwendig ist.
Das Mikrofon verfügt über einen Adapter, der auf europäische und amerika-
nische Mikrofonhalter passt. Lösen Sie den Adapter von Mikrofon, befesti-
gen Sie diesen am Mikrofonhalter und xieren dann das Mikrofon auf dem
Adapter. Das Mikrofon sollte aufrecht befestigt werden und der Schall sollte
in einem rechten Winkel auf dieses eintreen. Testen Sie verschiedene Po-
sitionen bis Sie den gewünschten Klang erzielen. Falls nötig können Sie es
auch mit dem Scharnier vertikal verstellen.
NOTIZ: Behandeln Sie das Mikrofon und den Adapter sorgsam. Setzen Sie
die Gewinde keiner zu großen Gewalt aus.
Sie können das Mikrofon natürlich auch ohne diesen Adapter auf einen pas-
senden, von Ihnen gekauften Mikrofonständer montieren.
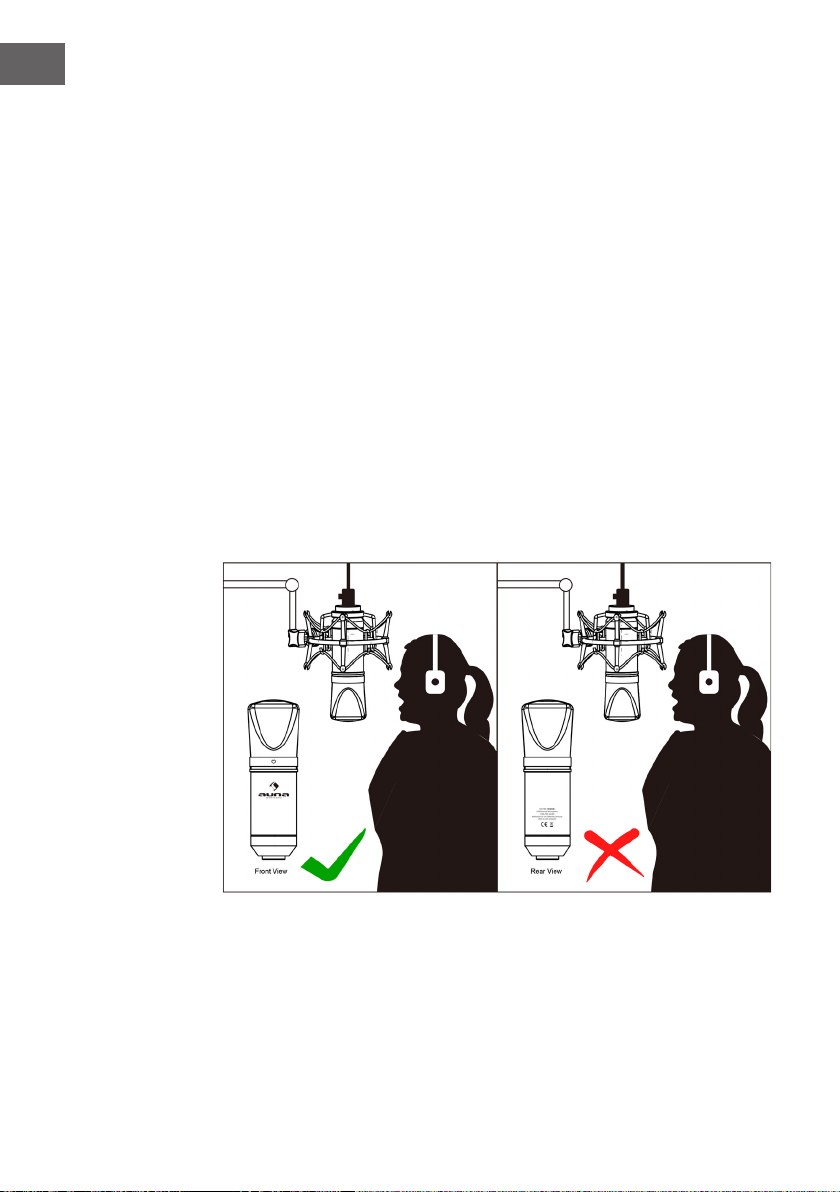
Singen/sprechen Sie in die Vorderseite (mit auna-Logo bedruckt) des Mikro-
fons, um die besten Ergebnisse zu erzielen:

7
DE
HINWEISE ZUR ENTSORGUNG
Bendet sich die linke Abbildung (durchgestrichene
Mülltonne auf Rädern) auf dem Produkt, gilt die
Europäische Richtlinie 2012/19/EU. Diese Produkte dürfen
nicht mit dem normalen Hausmüll entsorgt werden.
Informieren Sie sich über die örtlichen Regelungen zur
getrennten Sammlung elektrischer und elektronischer
Gerätschaften. Richten Sie sich nach den örtlichen
Regelungen und entsorgen Sie Altgeräte nicht über
den Hausmüll. Durch die regelkonforme Entsorgung
der Altgeräte werden Umwelt und die Gesundheit Ihrer
Mitmenschen vor möglichen negativen Konsequenzen
geschützt. Materialrecycling hilft, den Verbrauch von
Rohstoen zu verringern.


9
EN
Dear Customer,
Congratulations on purchasing this device. Please
read the following instructions carefully and follow
them to prevent possible damages. We assume
no liability for damage caused by disregard of the
instructions and improper use. Scan the QR code
to get access to the latest user manual and more
product information.
TECHNICAL DATA
Item number 10006515, 10011711, 10028868, 10028869,
10030363, 10031503
Type USB condenser microphone
Pattern Cardioid
Frequenzbereich 30 Hz - 18 KHz
Connection and power supply Via USB (Connection: type B)
Dimension & weight Microphone: 16,5 x Ø 5 cm (H x Ø)
Shockmount: 9 x 9 x 6 cm (BxHxT)
Cable: ~ 3m
Weight microphone: 295g
Weight shockmount: ca. 180g
Scope of delivery
• Microphone,
• Shockmount
• Adapter (3/8“ to 5/8“),
• Pouch
• USB cable

10
EN
SAFETY INSTRUCTIONS
• These operating instructions are intended to familiarize you with the
operation of this product.
• Please keep this manual in a safe place so that you can access it at any
time.
• Please use the product only in its intended manner. Any other
• Use may result in damage to the product or to the environment of the
product.
• Conversion or modication of the product impairs product safety.
• Never open the product on your own authority and never carry out
repairs yourself!
• Handle the product carefully. It can be damaged by shocks, blows or
falling from an already low height.
• Keep the product away from moisture and extreme heat.
• Do not drop metal objects into this product.
• Do not place heavy objects on this product.
• Clean the product only with a dry cloth.
• Only use accessories recommended by the manufacturer or by qualied
retailers.
• Warranty will be void if the unit is tampered with.
Small objects
Keep small objects (i.e. screws, mounting material, memory cards etc.) and
packaging out of the range of children. Do not let children play with foil.
Choking hazard!
Transporting the device
Please keep the original packaging. To gain suicient protection of the
device while shipment or transportation, make sure to put it back in its
original packaging.
Cleaning the surface
Do not use any volatile liquids, detergents or the like. Use a clean dry cloth.

11
EN
TECHNICAL REQUIREMENTS
Your microphone comes with a USB connector. The audio signal is sent from
the microphone to the computer through this connection. At the same time
the computer uses the USB connection to supply the microphone with the
necessary power. A connection is made by using the included USB cable with
type-B connector.
NOTE: Use only the included cable to ensure an optimal signal quality and a
reliable power supply. To operate the microphone, your computer needs to
meet the following system requirements:
Windows PC Mac
Intel or AMD CPU, 1GHz or higher G4/G5, 800MHz or higher
minimum 512MB RAM minimum 512MB RAM
USB 2.0 interface USB 2.0 interface
Windows XP/Vista/7/8/10 Mac OS X 10.3.9 (Panther) or higher
INITIAL OPERATION
Before you can use your microphone, connect it to a free USB port on your
computer. For initial operation of your microphone, complete the following
steps:
• Power up your computer.
• Connect your microphone to a free USB port on your computer
NOTE: Your operating system automatically installs the required drivers.
• Select the microphone as input source in your preferred audio software
application.
Windows:
• Adjust the recording level as required, using the Windows Volume Con-
trol panel. (Shortcut: Loudspeaker icon found in the taskbar)
• Select the microphone in the pull-down menu of Sound recording by
clicking on Sounds and Audio Devices in the Control Panel and then
clicking the tab Audio
•
Mac OS:
• Adjust the recording level as required, using Audio Midi Setup in Mac
OS.
Your microphone is now ready for use.
• (Optional:) Select your microphone in the Audio Midi Setup in Audio
Devices-Tab as standard recording device.

12
EN
MOUNTING AND OPERATION
To get the sound you want, try changing the mic position relative to the
sound source oreven move the microphone around in the recording room of
your studio. Adjusting the angle at which walls face the sound source can also
be helpful. Only when the desired basic sound has been achieved, should
you start to use equalizers and signal processors,if any at all (remember:
less is often more!). Due to the extremely linear frequency response and the
high sonic resolution of your microphone, there is no need for high-frequency
“EQing” that can heavily inuence the signal and unnecessarily increase the
noise level. The microphone provides that much-desired transparency which
often gets lost during recording and mixing.
There is an adapter on your microphone that lets you mount it on mic stands
with either metric (Europe) or imperial-gauge threads (North America).
First dismantle the microphone from the stand mount adapter by detaching
the ne-thread shoulder screw at the bottom end of the microphone. Fasten
the adapter onto the microphone stand, place the microphone into it and
tighten the screw again. Basically, the microphone in the stand mount adapt-
er should stand upright and face the sound source at a right angle.
The angle of the microphone to the sound source inuences the sound of the
recording; therefore, experiment with dierent positions until you achieve
the desired sound. To this end, you can rotate the mic in the stand mount
adapter by loosening the screw somewhat and tightening it again. If neces-
sary, you can bend the microphone out of its vertical position by using the
hinge on the microphone stand.
NOTE: Please make sure to handle the microphone shaft with attention and
care to avoid damaging the screw thread. In no situation should you ever
apply excessive force.
Of course, you can detach the microphone from the stand mount adapter and
attach it to a commercially available suspension mount.
Make sure to speak/sing into the front side (see logo print) of the micro-
phone for the best sound:

13
EN
DISPOSAL CONSIDERATIONS
According to the European waste regulation 2012/19/EU
this symbol on the product or on its packaging indicates
that this product may not be treated as household waste.
Instead it should be taken to the appropriate collection
point for the recycling of electrical and electronic
equipment. By ensuring this product is disposed of
correctly, you will help prevent potential negative
consequences for the environment and human health,
which could otherwise be caused by inappropriate waste
handling of this product. For more detailed information
about recycling of this product, please contact your local
council or your household waste disposal service.

14
FR
Chère cliente, cher client,
Toutes nos félicitations pour l’acquisition de ce
nouvel appareil. Veuillez lire attentivement et
respecter les instructions de ce mode d’emploi an
d’éviter d’éventuels dommages. Nous ne saurions
être tenus pour responsables des dommages dus
au non-respect des consignes et à la mauvaise
utilisation de l’appareil. Scannez le QR-Code pour
obtenir la dernière version du mode d‘emploi et
des informations supplémentaires concernant le
produit.
FICHE TECHNIQUE
Artikelnummer 10006515, 10011711, 10028868,
10028869, 10030363, 10031503
Type Microphone USB à condensateur
Caractéristique Cardioïde
Réponse en fréquences 30 Hz - 18 KHz
Sensibilité -32 dB
Alimentation électrique Par USB (connecteur : type B)
Contenu de l’emballage
Microphone : 16,5 x Ø 5 cm (H x Ø)
Suspension : 9 x 9 x 6 cm (L x H x P)
Longueur du câble : env. 3 mètres
Poids microphone : env. 295 g
Poids suspension : env. 180 g
Contenu de l’emballage
• Microphone
• Suspension
• Adaptateur 3/8 “ - 5/8 “
• Sacoche de protection
• Câble USB

15
FR
INSTRUCTIONS DE SÉCURITÉ
• Ce mode d’emploi sert à vous familiariser aux fonctions de ce produit.
Conservez-le bien an de pouvoir vous y référer à tout moment.
• L’achat de ce produit donne droit à une garantie de deux ans en cas de
défectuosité de l’appareil sous réserve d’une utilisation appropriée de
celui-ci.
• Veiller à utiliser le produit conformément à l’usage pour lequel il a
été conçu. Une mauvaise utilisation est susceptible d’endommager le
produit ou son environnement.
• Tout démontage ou toute modication de l’appareil porte atteinte à la
sécurité du produit. Attention aux risques de blessure !
• Ne jamais ouvrir le produit de son propre chef et ne jamais le réparer
soi-même !
• Manipuler le produit avec précaution. Les chocs, les coups ou les chutes
- même de faible hauteur -
• peuvent endommager l’appareil.
• Ne pas exposer le produit à l’humidité ou à une chaleur extrême.
• Ne pas introduire d’objets métalliques dans cet appareil.
• Ne pas poser d’objets lourds sur l’appareil.
• Nettoyer l’appareil uniquement avec un chion sec.
• Utiliser uniquement les accessoires recommandés par le fabricant ou
par une entreprise spécialisée et qualiée.
• Toute ouverture non autorisée de l’appareil entraîne l’annulation de la
garantie.
Petits objets / éléments d’emballage (sac plastique, carton, etc.) : Tenir
les petits objets (par exemple les vis et le matériel d’assemblage, les cartes
mémoire) et le matériel d’emballage hors de la portée des enfants pour
éviter qu’ils ne les avalent. Empêcher les enfants de jouer avec les lms de
protection. Il existe un risque d’étouement !
Transport de l’appareil : Conserver l’emballage d’origine. Pour garantir
une protection suisante de l’appareil pendant son transport, emballer
l’appareil dans son emballage d’origine.
Nettoyage en surface de l’appareil : Ne pas utiliser de liquides volatiles
comme ceux contenus dans les bombes insecticides. Une pression trop
importante exercée sur la surface de l’appareil pendant le nettoyage
peut l’endommager. Éviter le contact prolongé du caoutchouc ou du
plastique avec l’appareil. Utiliser un chion sec.

16
FR
CONFIGURATION TECHNIQUE REQUISE
Le signal du microphone est envoyé par la connexion USB d’un ordinateur.
C’est l’ordinateur qui alimente également le micro en électricité. L’ordinateur
doit répondre aux caractéristiques techniques suivantes :
PC Mac
Intel ou AMD CPU, 1 GHz ou plus G4/G5, 800 MHz ou plus
Au moins 512 MB RAM Au moins 512 MB RAM
Connecteur USB 2.0 Connecteur USB 2.0
Windows XP/Vista/7/8/10 Mac OS X 10.3.9 (Panther) ou plus
INSTALLATION
• Démarrer l’ordinateur.
• Brancher le microphone à un connecteur USB libre.
• Remarque : le système d’exploitation installe automatiquement les pi-
lotes nécessaires
• Sélectionner le microphone comme source d’entrée pour le logiciel
d’enregistrement utilisé.
Windows :
• Régler le volume de l’enregistrement avec le volume du haut-parleur
Windows (dans les paramètres du haut-parleur de la barre des tâches).
• (Optionnel :) Sélectionner Microphone en tant qu’appareil d’enregistre-
ment sonore dans Paramètres Système -> Sons et appareils audio ->
onglet Audio.
Mac OS :
• Régler le volume de l’enregistrement avec Audio Mini Setup. Remarque
: le microphone est à présent prêt à l’emploi.
• (Optionnel :) Sélectionner Microphone en tant qu’appareil d’enregistre-
ment sonore standard dans l’onglet Audio Devices de Audio Mini Setup.

17
FR
CONSIGNES D’INSTALLATION ET D’UTILISATION
Pour obtenir le son souhaité, tester plusieurs positions par rapport à la
source sonore. Déplacer lentement le microphone dans la salle d’enregis-
trement et essayer diérentes distances et orientations. Utiliser l’égaliseur
et les processeurs audio uniquement lorsque le un son global convenable a
été atteint.
En raison de la réponse en fréquence extrêmement linéaire et de la haute
dénition sonore du microphone, « EQing » n’est pas nécessaire pour les
fréquences élevées. Celui-ci perturberait trop fortement le signal d’entrée et
augmenterait les bruits parasites. Le microphone ore une clarté nécessaire
à l’enregistrement et au mixage.
Le microphone dispose d’un adaptateur qui convient pour les supports de
microphone européens et américains. Retirer l’adaptateur du microphone,
le xer au support de microphone puis xer le micro à l’adaptateur. Le mi-
crophone doit être monté à la verticale et la source sonore doit l’atteindre
en angle droit. Essayer plusieurs positions jusqu’à obtenir le son souhaité.
Si nécessaire, il est possible d’ajuster le micro verticalement à l’aide de la
charnière.
REMARQUE : manipuler le microphone et l’adaptateur avec précaution. Ne
pas trop serrer les xations.
Bien entendu, il est possible de monter le microphone sans adaptateur sur
tout autre pied de micro adapté.

18
FR
INFORMATION SUR LE RECYCLAGE
Appareils électriques et électroniques usagés
Vous trouverez sur le produit l’image ci-contre (une
poubelle sur roues, barrée d‘une croix), ce qui indique
que le produit se trouve soumis à la directive européenne
2012/19/UE. Renseignez-vous sur les dispositions en
vigueur dans votre région concernant la collecte séparée
des appareils électriques et électroniques. Respectez-les
et ne jetez pas les
appareils usagés avec les ordures ménagères. La mise
au rebut correcte du produit usagé permet de préserver
l’environnement et la santé. Le recyclage des matériaux
contribue à la préservation des ressources naturelles.


Other manuals for MIC-900
2
This manual suits for next models
6
Table of contents
Languages:
Other auna PRO Microphone manuals

auna PRO
auna PRO MIC-900 User manual

auna PRO
auna PRO CM001B User manual

auna PRO
auna PRO Mic 600 User manual

auna PRO
auna PRO UHF200F User manual

auna PRO
auna PRO UHF200C User manual

auna PRO
auna PRO MIC-900 User manual

auna PRO
auna PRO VHF-4 User manual

auna PRO
auna PRO MIC 900 LED User manual

auna PRO
auna PRO 10026457 User manual