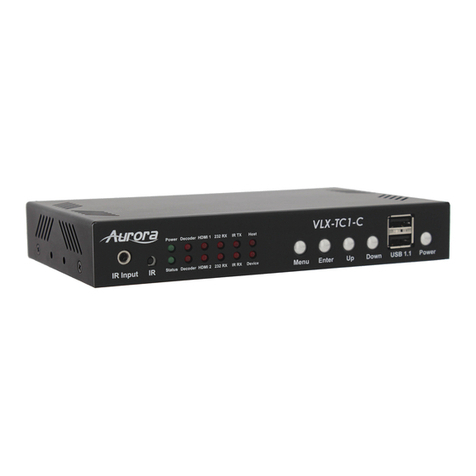
Aurora VLX-TC1-CF User manual

USERS GUIDE
Manual Number: 191122 | Firmware Rev: 3.20.0 or Higher
www.auroramm.com
VLX Series
VLX-TC1-CF ● VLX-TCW2H-C ● VLX-TCW2V-C
1GbE Visual Lossless Low Latency AV over IP
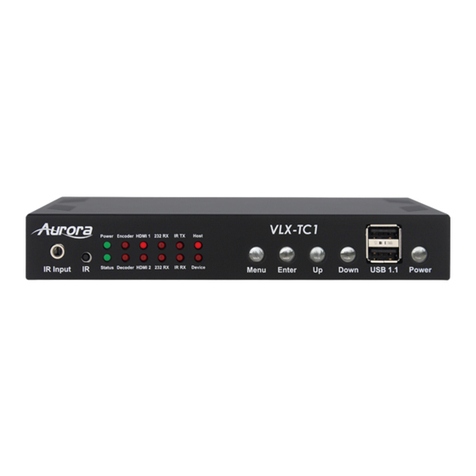
VLX-TC1-CF
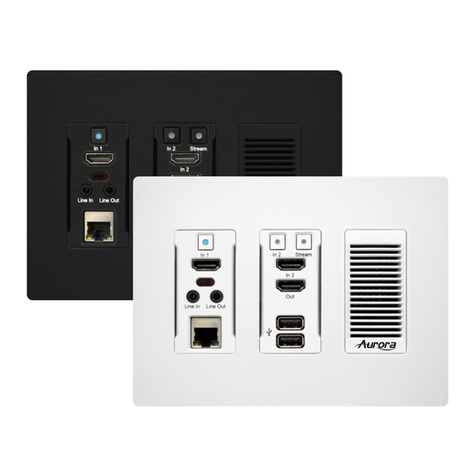
VLX-TCW2V-C
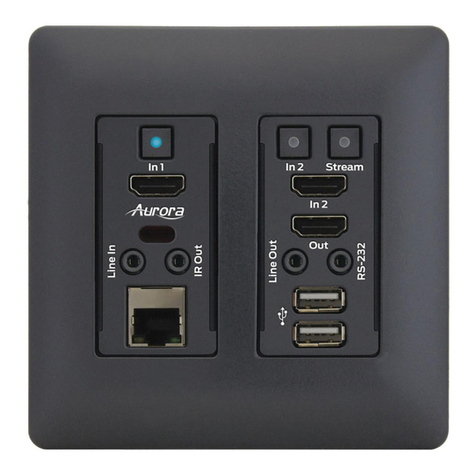
VLX-TCW2H-C

USERS GUIDE
www.auroramm.com
ii
SAFETY INSTRUCTIONS
Please review the following safety precautions. If this is the first time using this model, then read this manual before
installing or using the product. If the product is not functioning properly, please contact your local dealer or Aurora for
further instructions.
The lightning symbol in the triangle is used to alert you to the presence of dangerous voltage inside the product
that may be sufficient to constitute a risk of electric shock to anyone opening the case. It is also used to indicate
improper installation or handling of the product that could damage the electrical system in the product or in other
equipment attached to the product.
The exclamation point in the triangle is used to alert you to important operating and maintenance instructions.
Failure to follow these instructions could result in injury to you or damage to the product.
Be careful with electricity:
Power Outlet:
To prevent electric shock, be sure the electrical plug used on the product power cord
matches the electrical outlet used to supply power to the Aurora product. Use the power adapter and power
connection cables designed for this unit.
Power Cord: Be sure the power cord is routed so that it will not be stepped on or pinched by heavy items.
Lightning: For protection from lightning or when the product is left unattended for a long period, disconnect
it from the power source.
Also follow these precautions:
Ventilation: Do not block ventilation slots, if applicable, on the product, or place any heavy object on top of
it. Blocking airflow could cause damage. Arrange components so that air can flow freely. Ensure that there
is adequate ventilation if the product is placed in a stand or cabinet. Put the product in a properly ventilated
area, away from direct sunlight or any source of heat.
Overheating: Avoid stacking the Aurora product on top of a hot component, such as a power amplifier.
Risk of Fire: Do not place unit on top of any easily combustible material, such as carpet or fabric.
Proper Connections: Be sure all cables and equipment are connected to the unit as described in this
manual.
Object Entry: To avoid electric shock, never stick anything in the slots on the case, or remove the cover.
Water Exposure: To reduce the risk of fire or electric shock, do not expose to rain or moisture.
Cleaning: Do not use liquid or aerosol cleaners to clean this unit. Always unplug the power to the device
before cleaning.
ESD: Handle this unit with proper ESC care. Failure to do so can result in failure.
FCC
This device complies with Part 15 of the FCC Rules. Operation is subject to the following two (2) conditions:
1. This device may not cause harmful interference.
2. This device must accept any interference received, including interference that may cause undesired operation.
Trademarks
All trademarks in this document are the properties of their respective owners.

USERS GUIDE
www.auroramm.com
ii
TABLE OF CONTENTS
PACKAGE CONTENTS .........................................................................................................................................................4
OPTIONAL ACCESSORIES ..................................................................................................................................................5
INTRODUCTION.....................................................................................................................................................................9
About...................................................................................................................................................................................9
Documentation....................................................................................................................................................................9
Features ............................................................................................................................................................................10
VLX-TC1-CF Front............................................................................................................................................................11
VLX-TC1-CF Rear.............................................................................................................................................................13
VLX-TCW2H-C Front ........................................................................................................................................................14
VLX-TCW2V-C Front ........................................................................................................................................................16
VLX-TCW2H-C and VLX-TCW2V-C Rear ........................................................................................................................18
VLX-TC1-CF Dante®Option Slot ......................................................................................................................................19
VLX-TCW2 Wall Plate Additional Button and LED Functions...........................................................................................20
UNDERSTANDING THE BASICS........................................................................................................................................21
Direct Connection with No Ethernet Switch......................................................................................................................21
10GbE Ethernet Switch.....................................................................................................................................................21
Network Infrastructure.......................................................................................................................................................21
Isolated Network or Users Network ..................................................................................................................................21
Controlling the VLX ...........................................................................................................................................................21
Controlling the VLX for Redundancy.................................................................................................................................22
EDID and its Importance...................................................................................................................................................22
Video Wall Capabilities .....................................................................................................................................................22
Ethernet Bandwidth Usage ...............................................................................................................................................22
HARDWARE INSTALLATION .............................................................................................................................................24
Network Setup...................................................................................................................................................................24
Encoder Setup...................................................................................................................................................................24
Decoder Setup ..................................................................................................................................................................24
Control Setup ....................................................................................................................................................................24
Dante®Option Card Setup................................................................................................................................................25
WEB SETUP PAGES ...........................................................................................................................................................26
Encoder Mode Web Pages...............................................................................................................................................26
Decoder Mode Web Pages...............................................................................................................................................36
APPLICATIONS....................................................................................................................................................................48
Example 1: VLX-TCW2 Configured as Transmitter to VLX-TC1 Configured Receiver....................................................48
USERS GUIDE
www.auroramm.com
iii
Example 2: VLX Multi-Room.............................................................................................................................................49
Example 3: Matrix – Multiple VLX to Multiple VLX............................................................................................................50
Example 4: Video Wall......................................................................................................................................................51
Example 5: KVM Utilizing USB 2.0 ...................................................................................................................................52
Example 6: VLX-TC1-CF with Local Ethernet Control......................................................................................................53
Example 7: VLX-TC1-CF Daisy Chain..............................................................................................................................55
Example 8: VLX-TC1-CF Independent Dante®/AES67 Switch.........................................................................................56
SOFTWARE..........................................................................................................................................................................57
IPBaseT Manager PC Control Tool ..................................................................................................................................57
CONNECTOR PIN DEFINITION...........................................................................................................................................59
HDMI.................................................................................................................................................................................59
CAT5e/6/6A.......................................................................................................................................................................60
RS-232..............................................................................................................................................................................61
IR (Infrared).......................................................................................................................................................................62
APPENDIX 1.........................................................................................................................................................................63
Troubleshooting ................................................................................................................................................................63
APPENDIX 2.........................................................................................................................................................................65
Firmware Update...............................................................................................................................................................65
APPENDIX 3.........................................................................................................................................................................66
Protocol.............................................................................................................................................................................66
APPENDIX 4.........................................................................................................................................................................67
Recommended Cabling.....................................................................................................................................................67
APPENDIX 5.........................................................................................................................................................................68
Recommended Network Switches....................................................................................................................................68
APPENDIX 6.........................................................................................................................................................................70
Technical Specifications....................................................................................................................................................70
APPENDIX 7.........................................................................................................................................................................72
Warranty............................................................................................................................................................................72

USERS GUIDE
www.auroramm.com
4
PACKAGE CONTENTS
Please make sure the following items are included within your package. Contact your dealer if any items are missing or
damaged.
Box Versions
VLX-TC1-CF
1 QTY VLX-TC1-CF 1G RJ-45/SFP Copper Transceiver Unit
2 QTY Mounting Ears and screws
Wall Plate 2 Gang Versions
VLX-TCW2V-C
1 QTY VLX-TCW2V-C 1G RJ-45 Copper Transceiver Unit with VGA and HDMI Inputs
VLX-TCW2H-C
1 QTY VLX-TCW2H-C 1G RJ-45 Copper Transceiver Unit with 2 HDMI Inputs
Power supplies are sold separately.
*Note: Go to www.auroramm.com for latest manual and firmware.

USERS GUIDE
www.auroramm.com
5
OPTIONAL ACCESSORIES
RK2-1-K
(1RU Rack Mount Holds 2 Units)
Includes 4 rails and 1 blank
RK2-5-K
(5RU Rack Mount Holds 12 Units)
Includes 24 rails and 4 blanks
RK2-BP-K
(Blank Plate for Rack Mounts)
RK2-RL-K
(For VLX-TC1 Use in Rack Mounts)
IPE-DTE-1
(Dante®Option Card)
IPX-ReAX-1
(IPX-TC3 ReAX Control System Option Card)

USERS GUIDE
www.auroramm.com
6
VLX-LCVR
(VLX Wall Plate LAN Port Cover)
IPX-SFP-RJ45-1
(1G RJ-45 LAN SFP Module)
IPX-SFP-1GMM-1
(1G Multi-Mode Fiber SFP Module)
IPX-SFP-1G20
(1G Single-Mode Duplex Fiber SFP Module)

USERS GUIDE
www.auroramm.com
7
DXB-8
(8 Button Wall Plate)
PS0081-1
(48V 24 Watt PoE Injector)
Available in –US, -AU, -EU, and –UK worldwide models
PS0094-3
(48V 25 Watt Wall Supply)
Comes with US, AU, EU, and UK interchangeable blades
IR Receiver CA0026-1
IR Emitter CA0061-1

USERS GUIDE
www.auroramm.com
8
IR Blaster CA0049-1
RS-232 Adaptor CA0052-F2T3R
(3.5mm TRS to FEMALE DB89 2-TX 3-RX)
RS-232 Adaptor CA0052-F3T2R
(3.5mm TRS to FEMALE DB89 3-TX 2-RX)
RS-232 Adaptor CA0052-M2T3R
(3.5mm TRS to MALE DB9 2-TX 3-RX)
RS-232 Adaptor CA0052-M3T2R
(3.5mm TRS to MALE DB9 3-TX 2-RX)
LVR-2G Gang Electrical Ring

USERS GUIDE
www.auroramm.com
9
INTRODUCTION
About
The VLX Series provides one of the most advanced IP Streaming solutions on the market utilizing Aurora’s IPBaseT®
technology, which synergizes various IP/AV standards to work together as one. It is the industry’s first 4K UHD
transceiver with only 1.5 Frame (25ms) latency and visually losses compression. Using a transmitter (encoder) and
receiver (decoder), respectively, used to be the standard – until now. The VLX Series box or wall plates can be set up as
either one to make installation, inventory, and troubleshooting easier.
Another industry first is the option slot to add other IP capabilities, like Dante®audio, for a more complete, distributed
system. Audio, video, data, and control can be sent securely to one or many units using off-the-shelf 1G RJ-45 Ethernet
switch. When the VLX is set up to be a transmitter, the 2 HDMI inputs (VLX-TC1-CF, VLX-TCW2H-C) or VGA/HDMI
inputs (VLX-TCW2V-2) become a source switch and the HDMI output becomes a potential loop out. When set up as a
receiver, a user can select the local HDMI inputs or an IP source. Fast-switching of the sources further enhances the
presentation (Matching source resolutions and frame-rate required). Regardless of how the VLX is set up, the audio can
be de-embedded at any location, and/or be sent to or received from a Dante® enabled device. The USB is also flexible,
working as a KVM and/or a high-speed data transfer (50Mbps) for memory sticks. Each VLX USB feature can also be set
as a host or a device. To keep the system friendly, an OSD and integrated web server are available for easy navigation
and setup of features.
Digital signage, education, corporate, and residential are just a few markets which benefit from the flexibility and low cost
of the VLX Series.
Documentation
Aurora provides many documents to support the VLX series and accessories. Below is a list of the available documents
that can be found on the download tab of the VLX products or the customer portal.
VLX Series Network Switch Recommendation and Configuration
VLX Series Protocol Guide (Available only on Customer Portal)
IPBaseT®FAQ (Frequently AskedQuestions)
IPBaseT®VLX Series AV Evolution for an Industry Revolution (Features and the benefits over tradition Matrix)
IPBaseT®Brochure
IPBaseT®for BetterEducation

USERS GUIDE
www.auroramm.com
10
Features
Configure as Transmitter (Encoder) or Receiver (Decoder)
4K60 4:2:0/4K30 4:4:4 Over 1G CAT5e/6/6a
HDMI 2.0, HDCP 2.2
Visually Lossless with only 1.5 Frame Latency
1080P to 4K and 4K to 1080P Scaling
128 per source with HDCP, Larger for Non-Encrypted Sources
Video Wall with Image Rotation
1G LAN PoE
2 HDMI Inputs, 1 HDMI Output (VLX-TC1-CF, VLX-TCW2H-C)
1 VGA/1 HDMI Inputs, 1 HDMI Output (VLX-TCW2V-C)
Line In/Out Stereo
RS-232 Serial Port & IR (In/Out)
On Screen Display (OSD)
Integrated Web Server for Configuration and Control
USB 2.0 Host and Device ports
2 USB 1.1 for HID devices (VLX-TC1-CF)
Dante® IP AudioOption
Front Keypad and IR Remote with lockout function
Auto Sense Switching
Rack and Under Table Mounting (VLX-TC1-CF)
2 Gang Mounting for Wall plates (VLX-TCW2V-C, VLX-TCW2H-C)
Available in White or Black (VLX-TCW2V-C, VLX-TCW2H-C)
*Note: Wall plate versions require full 2 gang electrical box space. Some electrical boxes and mud rings do not
accommodate the full size. Read specifications for dimensions.

USERS GUIDE
www.auroramm.com
11
VLX-TC1-CF Front
LEDs
Power/Status: Power will light green when unit is on or in standby. Status will blink at a normal pace during regular
operation and slower pace when in standby.
Encoder/Decoder: Encoder (transmit) or Decoder (receiver) will be lit when set accordingly.
HDMI 1/HDMI 2: Will light accordingly based on input selection. If both are lit, then it is the remote stream when set
as a decoder. If neither is lit, then no source is routed.
232 TX/RX: Will blink when RS-232 data is being sent or received.
IR TX/RX: Will blink when IR signal is being sent or received.
Host/Device: For USB option. Host will be lit if set for PC to be connected to the USB. Device will be lit if set for
peripherals like keyboard or mouse is to be connected.
LAN Connector LED’s (Rear):
Left LED Green = 1G/Good
Left LED Orange = 10/100 or Bad Connection
Right LED is Orange, for general LAN Activity
Buttons
Power Button: Press and hold for 5 seconds for power standby.
Menu Button: Press and hold for 5 seconds switch between encode and decode mode.
Up Button: Select next input source.
Down Button: Select previous input.
Enter Button: Pressing will toggle Link On/Off. This stops streamed Video, IRoIP, SoIP and USBoIP. If the VLX
device is connected in the network the status led will go on/off to indicate that link has gone on/off.
Miscellaneous
IR Window:IR remote and IR pass through.
IR Input: For use with external IR Receiver. If utilized, front IR window will become disabled.

USERS GUIDE
www.auroramm.com
12
*Note: It is important to use 5V only photo receiver which is with carrier and inverted. Use a stereo 3.5mm
TRS connector.
USB HID:Dual Type A USB 1.1 Connectors for keyboard/mouse.
Special Functions
Factory Default: Press Power and Menu for 5 seconds. The USB Host LED will blinkto indicate factory default and
the unit will reboot.
Reboot: Press Power button for 5 seconds. Power LED goes off and the board reboots.
Secondary Firmware Image Mode: Press Power and Down button while powering up for 5 seconds. The Host and
Device LEDs will keep blinking and both Encoder and Decoder LEDs will be on.
IP Information on RS-232: Press and hold UP and DOWN for 5 seconds and the units IP information will reveal on
RS-232 port at 9600 baud 8N1.
Default Settings
Baud Rate: 9600
IP Mode: DHCP
Fallback IP Mode (no DHCP Present): Auto-IP 169.254.xxx.xxx range
Autosense: Off

USERS GUIDE
www.auroramm.com
13
VLX-TC1-CF Rear
Rear
From left to right:
48VDC: 48 Volt isolated power input; 10/100/1000Mbps LAN; can power the unit with PoE from injector or switch.
LAN Connector LED’s (Rear):
Left LED Green = 1G/Good (1G is required for proper operation)
Left LED Orange = 10/100 or Bad Connection
Right LED is Orange, for general LAN Activity
USB 2.0: 50Mbps USB 2.0 Micro to be connected to a host (PC) or device (i.e., mouse, keyboard, etc.)
Control IR Out: Infrared control output 30kHz-60kHz. IR emitter must be mono 3.5mm TS.
HDMI in 1/ In 2: HDMI inputs up to 4K30p/4:4:4 or 4K60p/4:2:0.
HDMI Out: HDMI Output to Display up to 4K30p/4:4:4 or 4K60p/4:2:0. Output can be native or scaled (e.g. from
1080p to 4K30p/4:4:4).
Audio In: Analog stereo audio input.
Audio Out: Analog stereo audio output. De-embedded audio output from HDMI stream. HDMI multichannel audio
(up to 7.1) is down mixed to stereo (2 channel).
Control RS-232: Serial port pass-through and control up to 115Kbps.
SFP: SFP Cage for Multi-mode or Single Mode Fiber and RJ-45 LAN with optional modules available from Aurora.

USERS GUIDE
www.auroramm.com
14
VLX-TCW2H-C Front
Buttons
In 1: Selects HDMI Input 1 (Lights Red, Green, or Blue).
In 2: Selects HDMI Input 2 (Lights Red, Green, or Blue).
Stream: Selects remote stream assigned when set as decoder (Lights Red, Green, or Blue). If held for 5 seconds will
switch between encode and decode modes. Stream button will light blue when in encode mode.
Connectors
HDMI In 1/2: HDMI inputs up to 4K30 4:4:4/4K60 4:2:0.
HDMI Out: HDMI Output to Display.
RS-232: Serial port pass-through and control up to 115Kbps.
IR Output: For InfraRed output of 30kHz-60kHZ. Uses 3.5mm TS emitter.
Audio In: Stereo audio input.
Audio Out: Audio de-embedded output.
Ethernet: 10/100 LAN.
USB: USB 2.0 Type Ato be connected to a host (PC) or device (i.e., Mouse, keyboard, etc.).
Miscellaneous
IR Window: IR remote or IR pass-through.

USERS GUIDE
www.auroramm.com
15
Special Functions
Factory Default: Press [IN2] and [STREAM] button till white LED turns on for a second. Release the switches once
the white led turns on, on both the buttons. The unit will reboot automatically after factory default.
Reboot: Press [In1] button for 5 seconds.All lit LEDs will be off now and the board reboots.
Secondary Firmware Image Mode: Press [In1] and [In2] button while powering up for 5 seconds. The LED in
buttons In1 and In2 will light Red once the board has finished booting to indicate secondary mode. This may be
necessary if for some reason the firmware becomes corrupted during a firmware update.
LED Indications
When power is first applied, all front LEDs will light white for a second.
All LEDs will light white to indicate that the firmware update is in progress.
Selected input source LED will light red.
Encoder mode is indicated by a blue led on stream button.
Both In1 and In2 LEDs will light Red to indicate secondarymode.
Default Settings
Baud Rate: 9600
IP Mode: DHCP
Fallback IP Mode (no DHCP Present): Auto-IP 169.254.xxx.xxx range
Autosense: Off

USERS GUIDE
www.auroramm.com
16
VLX-TCW2V-C Front
Buttons
In 1: Selects VGA (Lights Red, Green, or Blue).
In 2: Selects HDMI Input 2 (Lights Red, Green, or Blue).
Stream: Selects remote stream assigned when set as decoder (Lights Red, Green, or Blue). If held for 5 sec will
switch between encode and decode modes. Stream button will light blue when in encode mode.
Connectors
VGA In: VGA input up to 1900 x 1200 @60Hz.
HDMI In: HDMI inputs up to 4K30/4:4:4 or 4K60/4:2:0.
HDMI Out: HDMI Output to Display.
RS-232: Serial port pass-through and control up to 115Kbps.
IR Output: For InfraRed output of 30kHz-60kHz. Uses 3.5mm TS emitter.
Audio In: Stereo audio input.
Audio Out: Audio de-embedded output.
Ethernet: 10/100 LAN.
USB:USB 2.0 Type Ato be connected to a host (PC) or device (ex. Mouse, keyboard, etc.).
Miscellaneous
IR Window: IR remote or IR pass-through.

USERS GUIDE
www.auroramm.com
17
Special Functions
Factory Default: Press In1 and In2 button till white LED turns on for a second. Release the switches once the white
led turns on, on both the buttons. The unit will reboot automatically after factory default.
Reboot: Press In1 button for 5 seconds.All lit LEDs will be off now and the board reboots.
Secondary Firmware Image Mode: Press In1 and In2 button while powering up for 5 seconds. The LED in buttons
In1 and In2 will light Red once the board has finished booting to indicate secondary mode. This may be necessary if
for some reason the firmware becomes corrupted during a firmware update.
VGA Port Resolutions
800x600, 1024x768, 1280x720, 1280x768, 1280x800, 1280x960, 1280x1024, 1360x768
1440x900, 1600x1200, 1680x1050, 1920x1080
Default Settings
Baud Rate: 9600
IP Mode: DHCP
Fallback IP Mode (no DHCP Present): Auto-IP 169.254.xxx.xxx range
Autosense: Off

USERS GUIDE
www.auroramm.com
18
VLX-TCW2H-C and VLX-TCW2V-C Rear
Rear
48VDC: 48 Volt DC isolated power input
LAN: 10/100/1000Mbps LAN. Can power the unit with PoE from injector or switch.
RS-232: Serial port pass-through and control up to 115Kbps. Also, has 5V for connection to DXB-8 8 button wall
controller.
Expansion Slot for Dante®Option: Cover supplied for card protection.
*Note: Wall plate versions require full 2 gang electrical box space. Some electrical boxes and mud rings do not
accommodate the full size. VLX-TCW2 wall box dimensions are 3.728” x 2.83” x 1.404”. Wall box portion depth is
1.404” without option card and 2.25" with option card.

USERS GUIDE
www.auroramm.com
19
VLX-TC1-CF Dante®Option Slot
Option card slot for Dante®option.
*Note: The MAC address for the Dante® option will be on the card label.
This manual suits for next models
3
Table of contents
Other Aurora Transceiver manuals

Aurora
Aurora IPX series User manual

Aurora
Aurora MLink Ultra User manual

Aurora
Aurora IVLX-TCW2V-C User manual

Aurora
Aurora IPX-TC3 Series User manual

Aurora
Aurora VLX-TC1-C User manual

Aurora
Aurora IPX-TC1-F User manual

Aurora
Aurora IPX-TC3A Series User manual

Aurora
Aurora VLX-TC1-C User manual

Aurora
Aurora VLX-TCW2H-C User manual