Automated Signature Technology Ghostwriter User manual

Important Product Information
The serial number of your new Ghostwriter signature machine is
located on the back panel. For future convenience,
please record the information here.
Model:
Serial Number:____________________________
Date Installed:____________________________
Service Rep: _____________________________
Sales & Technical Support: 800.636.4450


TTaabblleeooffCCoonntteennttss
Introduction . . . . . . . . . . . . . . . . . . . . . . . . . . . . . . . . . . . . . . . . . . . . . . . . .1
Ghostwriter . . . . . . . . . . . . . . . . . . . . . . . . . . . . . . . . . . . . . . . . . . . . . . . . . . . . . . . . . .1
Part 1: Components . . . . . . . . . . . . . . . . . . . . . . . . . . . . . . . . . . . . . . . . . .3
Basic Machine Components . . . . . . . . . . . . . . . . . . . . . . . . . . . . . . . . . . . . . . . . . . . .3
Signature card reader . . . . . . . . . . . . . . . . . . . . . . . . . . . . . . . . . . . . . . . . . . . . . . .3
Keypad . . . . . . . . . . . . . . . . . . . . . . . . . . . . . . . . . . . . . . . . . . . . . . . . . . . . . . . . . .3
Electric lock (optional) . . . . . . . . . . . . . . . . . . . . . . . . . . . . . . . . . . . . . . . . . . . . . . .3
On-Off switch . . . . . . . . . . . . . . . . . . . . . . . . . . . . . . . . . . . . . . . . . . . . . . . . . . . . .3
Writing head . . . . . . . . . . . . . . . . . . . . . . . . . . . . . . . . . . . . . . . . . . . . . . . . . . . . . .3
Light board . . . . . . . . . . . . . . . . . . . . . . . . . . . . . . . . . . . . . . . . . . . . . . . . . . . . . . .3
Illuminated signing plate . . . . . . . . . . . . . . . . . . . . . . . . . . . . . . . . . . . . . . . . . . . . .3
Writing Head . . . . . . . . . . . . . . . . . . . . . . . . . . . . . . . . . . . . . . . . . . . . . . . . . . . . . . . .4
Rocker arms . . . . . . . . . . . . . . . . . . . . . . . . . . . . . . . . . . . . . . . . . . . . . . . . . . . . . .4
Spring clips . . . . . . . . . . . . . . . . . . . . . . . . . . . . . . . . . . . . . . . . . . . . . . . . . . . . . . .4
Pressure adjustment strip . . . . . . . . . . . . . . . . . . . . . . . . . . . . . . . . . . . . . . . . . . . . .4
“T” Bar . . . . . . . . . . . . . . . . . . . . . . . . . . . . . . . . . . . . . . . . . . . . . . . . . . . . . . . . . . .4
Pen holder . . . . . . . . . . . . . . . . . . . . . . . . . . . . . . . . . . . . . . . . . . . . . . . . . . . . . . .4
Plug Panel . . . . . . . . . . . . . . . . . . . . . . . . . . . . . . . . . . . . . . . . . . . . . . . . . . . . . . . . . .5
Plug panel . . . . . . . . . . . . . . . . . . . . . . . . . . . . . . . . . . . . . . . . . . . . . . . . . . . . . . . .5
Power plug . . . . . . . . . . . . . . . . . . . . . . . . . . . . . . . . . . . . . . . . . . . . . . . . . . . . . . .5
Foot pedal plug . . . . . . . . . . . . . . . . . . . . . . . . . . . . . . . . . . . . . . . . . . . . . . . . . . .5
Light board plug . . . . . . . . . . . . . . . . . . . . . . . . . . . . . . . . . . . . . . . . . . . . . . . . . . .5
Signature transfer plug . . . . . . . . . . . . . . . . . . . . . . . . . . . . . . . . . . . . . . . . . . . . . .5
Signature card . . . . . . . . . . . . . . . . . . . . . . . . . . . . . . . . . . . . . . . . . . . . . . . . . . . .4
Part 2: Machine Assembly . . . . . . . . . . . . . . . . . . . . . . . . . . . . . . . . . . . . . .7
Part 3: Operation . . . . . . . . . . . . . . . . . . . . . . . . . . . . . . . . . . . . . . . . . . . . .9
Keypad diagram . . . . . . . . . . . . . . . . . . . . . . . . . . . . . . . . . . . . . . . . . . . . . . . . . .9
Basic operation . . . . . . . . . . . . . . . . . . . . . . . . . . . . . . . . . . . . . . . . . . . . . . . . . . . .10
User menu . . . . . . . . . . . . . . . . . . . . . . . . . . . . . . . . . . . . . . . . . . . . . . . . . . . . . . . .10
System menu . . . . . . . . . . . . . . . . . . . . . . . . . . . . . . . . . . . . . . . . . . . . . . . . . . . . .12
Signing special items . . . . . . . . . . . . . . . . . . . . . . . . . . . . . . . . . . . . . . . . . . . . . . . .12
Part 4: Security Information . . . . . . . . . . . . . . . . . . . . . . . . . . . . . . . . . . . . .13
Part 5:Troubleshooting . . . . . . . . . . . . . . . . . . . . . . . . . . . . . . . . . . . . . . . . .15
Removeable keypad diagram . . . . . . . . . . . . . . . . . . . . . . . . . . . . . . . . . .17
Signature card order form . . . . . . . . . . . . . . . . . . . . . . . . . . . . . . . . . . . . . .19


Introduction
Thank you for purchasing the Ghostwriter, our smallest and most versatile signing machine.
The flexibility of the Ghostwriter allows signature reproduction with any common writing instrument on
almost any material that needs a personal signature.
This manual contains information to achieve the highest quality signature reproduction from your
signature machine.
Ghostwriter
Description
The Ghostwriter is designed to be trouble free and user friendly. The Ghostwriter reproduces a quality
signature on virtually any type of document, photograph or other media that will fit under your writing
instrument.
The signature card contains the desired signature and is interchangeable with other Ghostwriter
signature machines. Any number of signature cards may be ordered to best utilize your signature
machine.
The Ghostwriter can sign the following specialty items.
✒ Books
✒ Special item endorsements (balls, hockey pucks, odd shaped and sized items)
✒ Posters
✒ Banners
www.signaturemachine.com 800.636.4450
Automated Signature Technology 1

2 Automated Signature Technology
800.636.4450 www.signaturemachine.com

Automated Signature Technology 3
www.signaturemachine.com 800.636.4450
Part 1: Components
Signature card reader
The Signature Card Reader is located on the top left side of the Ghostwriter. The status light is located
on the top of the machine. The Signature Card is inserted into the front of the reader. This status light
will blink green when the reader is accessing the signature card.
Keypad
The buttons on the keypad vary in function depending on the menu options that appear on the
screen. See the LCD panel for function key listing.
Electric lock [optional]
The electric lock is located on the right side of the machine. Once locked, it will prevent any operation of the
machine.
On-Off switch
The on-off switch is located on the bottom right front of the machine.
Writing head
The writing head holds the pen and signs the signature. See page 4 for details.
Basic Machine Components

800.636.4450 www.signaturemachine.com
Light board & illuminated signing plate
The Light Table is located under the Ghostwriter. This table contains an illuminated area that is
positioned under the writing arms. The machine signs within this area. The Light Board is not required
for machine operation and may be removed if necessary.
Rocker arms
The rocker arms connect the writing arms to the machine.
Spring clips
Spring Clips are located at the ends of the rocker arms and hold the ends of the writing arms.
Adjustable Writing Arms. (#2 on diagram) The adjustable writing arms are unique to the
SigTech 4000. These writing arms are comprised of a right side (short side) and a left side
(long side). The right side has a pivot bearing on the end and a ball bearing on the other.
Pressure adjustment strip
The pressure adjustment strip is the stainless steel strip that follows the pen during the signing motion
applying pressure to the pen. This strip can be bent to change the pen pressure from light for a felt tip
pen to heavy for a bold signature from a ball point pen.
"T" bar
The "T" Bar picks up the writing arms. The “T” bar is adjusted through the “Set Pen Height” setting.
Pen holder
The pen holder on the writing arms holds the writing instrument during signature reproduction Two thumb
screws on the sides of the pen holder tighten to secure the pen or other instrument in the pen holder. The
4 Automated Signature Technology
Rocker Arm
Spring Clips
Writing Arms
Pressure Adjustment Strip
“T” Bar
Pen Holder
Writing Head

height of the pen is adjusted by the “Set Pen Height” setting option.
Plug panel (above)
The plug panel is located on the back of the machine. The ports are listed below.
Power plug
The power port is a 24 volts.
Foot pedal plug
The Foot Pedal Port is 12 volts.
Light board plug
The light table is 12 volts.
Signature transfer plug
This plug is for the Signature Transfer cable
included with the Signature Transfer Kit
(optional)
www.signaturemachine.com 800.636.4450
Automated Signature Technology 5
power
foot pedal
light board signature transfer kit
Plug Panel
Name: John Doe
Order # 25478
Date: 5/2015
TOP BOTTOM

Signature card
The Signature Card is a smart card storage device for signatures, phrases and drawings. The
Signature Card is inserted into the smart card reader.
Foot Pedal
Use the Foot Pedal to sign the documents. If you change the signature card while using the
foot pedal, reload the signature card from the User
Menu
Other Machine Parts
Paper Control Tray. Controls paper during auto-feed
of documents. Removable for manual operation.
Paper Catch Tray. Placed outward during auto-feed to catch documents.
Sheet Feeder
1. Sheet feeder interface plug
2. Right and left paper holder
3. Paper bail lever
4. Lock lever
800.636.4450 www.signaturemachine.com
6 Automated Signature Technology
2.
4.
1.
3.

www.signaturemachine.com 800.636.4450
Automated Signature Technology 7
Part 2: Machine Assembly
Standard Machine Components
1. Paper Feeder
2. Ghostwriter signature machine
3. Light board with illuminated signing area
4. Paper Control Tray
5. Writing arms
6. Sheaffer fountain pen
7. Foot pedal
8. Power cord
9. Signature Card (purchased separately)
Additional Options
The following options are available for purchase. Please call for pricing.
» Electric lock
» Dust cover
» Writing arms for large pens
» Signature transfer kit
Assembly of the Machine
1. Open the top of the box
2. Remove the machine wrapping in packing materials and
set on a table or desk.
3. Remove the packing material.
4. Plug the foot pedal into the back of the machine.
5. Make sure the light table is plugged into the back of the machine.
6. Plug the small jack of the power cord into the back of the machine and the other end into the
power supply. Then plug the cord from the power supply into the a power outlet.
7. Locate paper control tray. It screws into the light board. This tray is needed for auto-feed
operation.
8, Locate the paper catch tray. It slides into the front of the machine. It catches the paper after it is
5
7
8
9
2
3
6
1
4

signed
9. Locate Signature Card and have ready for machine operation.
8. See next section for machine operation.
9. Keep box and packing for return shipment to factory.
8 Automated Signature Technology
800.636.4450 www.signaturemachine.com
Part 3: Operation
The Ghostwriter is designed to be
user-
friendly.
All the of the instructions needed to
operate the machine are located
on the LCD screen. Below is a
diagram of the different
screens and locations of the
options.
www.signaturemachine.com 800.636.4450
Automated Signature Technology 9
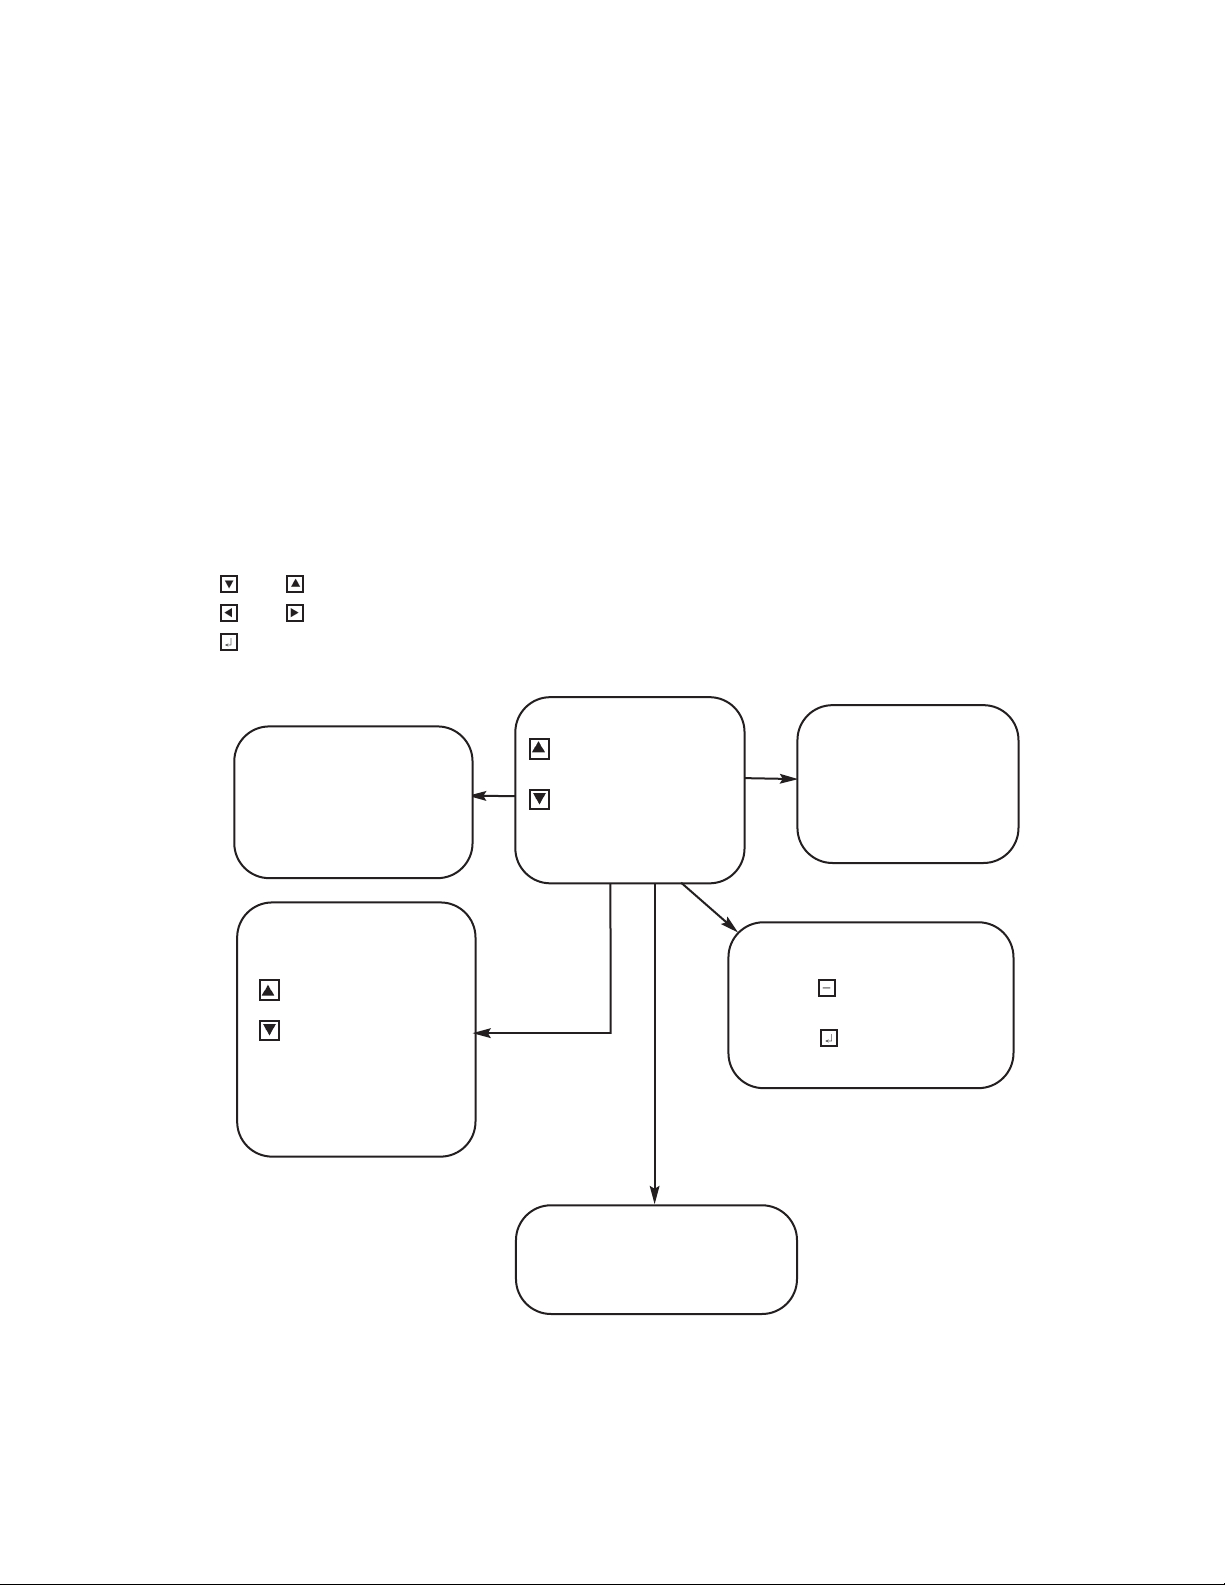
Please see screen for detailed machine operation instructions.
Button Operations
and scroll through menu selections. The highlight text is the selected option.
and move the cursor left or right.
(enter) accepts settings or menu options.
Menu Screens Ghostwriter Basic
Start Print
Press or Foot Pedal to
Sign Once
Press for Auto-rewrite
Main Menu
Auto Cycle Restart
Select Setup Menu
Select User Menu
Set Pen Depth
Setup Carousel
System Menu
Select User Menu
Enter Number/Print
View Page Count
Reset Page Count
Set Skip Amount
Set Document Pages
Total Page Count
Home Machine
Eject Page
Set Passcode
EXIT to Main
Setup Carousel
Add Sig File
Delete Sig File
Reset Carousel
Exit To Main
System Menu
For service personnel only
PASSWORD PROTECTED
Select Setup Menu
Text Mode Setup
Page Mode Setup
Manual Cycle
Exit To Main

.
Basic Operation
1. Press the on-off switch to the on position. The signing
plate illuminates and the LCD displays the following
information.
2. Insert desired signature card into the machine, chip side up and pointing toward
the machine. The Ghostwriter accesses the card (green indicator light blinks) and the
LCD screen changes to the following as the Ghostwriter loads the signature and homes the machine
to the proper setting.
10 Automated Signature Technology
800.636.4450 www.signaturemachine.com
GHOSTWRITER
Automated Signature
Technology
Insert Sig Card
into Card Reader
To Continue
Loading Sig Card
Into Memory
Please Standby
Returning to
Home
FIG. 1
Insert pen into the
holder until it
touches the paper.
Press Any Key
FIG. 2
Main Menu
Auto Cycle Restart
Select Setup Menu
Select User Menu
Set Pen Depth
Setup Carousel
System Menu

Automated Signature Technology 11
www.signaturemachine.com 800.636.4450
3. Once loaded, the machine is ready for operation, Figure 1. Using move the selection bar until
Set Pen Depth is highlighted and press . The “T” Bar lowers,Figure 2. Loosen thumb screws and
Insert the pen of your choice into the pen holder, tighten the thumb screws and press any key to
continue. The LCD returns to the main menu, Figure 1.
4. Press Foot Pedal and machine signs
5. Tape a piece of paper or place a post-it note over the signing area. Press the foot pedal to sign
the paper The machine starts signing the signature. The LCD displays the name of the signature being
signed and the count signed.
Once the signature is signed, the machine returns to the rest position. The signed paper (template) is
the location where the machine signs each and every time. Use this template for manual signing or
to setup the signing position for auto-feed signing.
Congratulations! You have completed the the basic set-up
and operation of the Ghostwriter.
Auto-Feed Setup
From the main menu, select Setup Menu. From this menu, you can setup the machine to sign using
the 2 auto feed modes or manual sign (same as the foot pedal from the Main Menu)
Text Mode Setup This signing mode is used if the signing position on the
document varies from top to bottom. For example, signing form
letters.
Page Mode Setup This signing mode is used if the signing position on
the document does not vary on the pge.
Manual Cycle This signing mode allows documents to be signed using
a button on the keypad or the foot pedal. Operator feeding is
required.
Page Mode
Place documents into the feeder. Select PAGE MODE SETUP to
feed the first sheet, it will move the page edge to the edge of the signing area and stop. Use the
DOWN arrow to move the documents' target signing area to the template area. If you overshoot, use
the UP arrow move the target area up relative to the template on the signing area. Once the
signature block is in the correct position, press to sign that document and press + to start
automatically signing the all documents in the sheet feeder at this setting. If this setting needs to be
moved to better position the signature, press any key to pause and use the arrows to move the target
area and press + to continue.
Text Mode
Place documents into the feeder and select TEST MODE SETUP to feed the first sheet, it will
User Menu
View Job Count
Auto Print Delay
Reset Job Count
Home Machine
Reload Sig Card
View Total Count
Remote Control
Set Password
Software Version
Smart Card Info
EXIT to Main

12 Automated Signature Technology
800.636.4450 www.signaturemachine.com
move the first text found to the edge of the signing area**. Use the down arrow to move the
documents' target area to the template area. If you overshoot the target area, you may use the up
arrow move the target area up to better position the document. Once the signature is in the correct
position, press to sign that document or press + to start automatically signing the all documents
remaining in the sheet feeder using this setting. If the setting needs to be moved to better position the
signature, press ANY KEY TO Pause and use the UP/DOWN arrows to move the signing area and press
+ to continue the signing/feeding cycle.
The Ghostwriter MAX will continue to cycle until the feeder is empty or a misfeed happens. PAPER
ERROR will appear on the display. Rectify the problem and press AUTO to continue.
To use the last signing position, select AUTOCYCLE RESTART from the main menu.
** If your document has printed areas on the bottom of the document (like your organizations'
address) you will need to change the skip amount in the USER SETUP MENU on the main menu.
Changing the skip amount will allow the scanner to skip over an area at the bottom of a document
before "looking" for text on you document. Changing the number will allow 1/10 inch of space to skip
for each number (i.e. 10 scanner will allow 7/10ths inch of your document before "looking" for text)**
USER MENU
The User Menu contains features and functions that help manage the Ghostwriter and offer security.
Each of the selections in the User Menu is discussed in this section. The User Menu, figure 6, is
accessed from the main menu. Use the to scroll down to the User Menu selection and press .
To select these options, use the arrow keys to move the selection bar and press . Press any key exit
from the function. The machine returns to the main menu.
View Job Count displays the number signed since the counter was reset.
Auto Print Delay is the amount of time the machine pauses between signature signing in Auto-rewrite
mode. The factory setting for this function is 2. This setting can be changed by using the left and right
arrows to move the cursor to the appropriate digit and the up and down arrows to increase or
decrease the number.
Reset Job Count resets the job counter to “0”
Home Machine tests the position of the writing arms and other components of the writing mechanism
and returns them to operating position if necessary.
Reload Sig Card is used to load a new signature file into the machine. This may also be done by
turning the machine off and back on.
View Total Count is the total number of signatures signed by the Ghostwriter.
Remote Control is used with the Signature Transfer Kit option. This function allows the operator to
access the machine from a PC to transfer signatures. PC software and accessories sold separately.

contact you sales representative for Signature Transfer Kit pricing.
Set Password is enabled by Sigtech personnel. This function requires a 4 digit password to be entered
into the key pad before operation of the machine. Use Set Password to change the current password
setting. The user must input the old password before entering a new password.
Setup Carousel
The Carousel allows different variations of the same signature to be loaded into the machine. Up to
15 signature files can be loaded. These files are stored in the machine until they are deleted using
the Carousel menu. To add a signature file, select Setup Carousel from the Main Menu and then
select Add Sig File. Insert the signature card into the reacer and press the plus keep to store.
Continue until all the signatures are loaded.
Ghostwriter MAX will use signatures stored in the Caroursel unless there is a card in the card reader.
SYSTEM MENU
The System Menu selection on the main menu is only for use by trained service personnel. This
selection is password protected. Settings in this area should not be changed unless instructed by a
technical representative.
Signing Special Items
The Ghostwriter signs many items, some items may require machine modification.
» Books » CD Cases » Certificates
» Checks » Diplomas » Greeting Cards
» Lithographs » Magazines » Photographs
» Hats » Posters » T-Shirts
Signing items that are opaque
When the signature template is not visible for placement through the item to be signed, it may require
that lines or guides be put on the deck around the piece. This will allow for repetitious placement of
the signature on the item.
Signing large documents or posters
Large documents may require the signature placement to be in the far left or right areas of the
document. This position may require an inverted inverted Signature Matrix from SigTech. An inverted
Signature Card signs the signature upside down on the illuminated signing plate. This allows the
www.signaturemachine.com 800.636.4450
Automated Signature Technology 13

operator to rotate the documents upside-down before signing and place the signature on the
documents correctly. Please consult customer service if you have any questions, concerning the
need for an inverted Signature Card.
Signing thick items
With a standard Ghostwriter signature machine you may sign items up to ½ inch thick. This may range
from a small book or magazine to a plastic CD case.
Pens and other writing instruments
You can use virtually any writing instrument you choose. We recommend that you test several types
prior to beginning your project. The more you use the Ghostwriter, the more familiar you will become
with what pen works best for you. Using different writing instruments enables you to add variation to
the signature. Consideration of paper texture and weight will also vary the signature reproduction.
Special pens Some pens will not fit in the standard pen holder on the writing arms. If you have a pen
or marker that doesn't fit, contact Automated Signature Technology for the solution. We offer custom
pen holders to fit specialty pens.
Part 4: Security Information
Security
All organizations are concerned about security. There are several basic options available for your
machine. An electric lock prevents access to your signature machine by anyone who does not have
a key. You may also remove the writing arms so that they may be placed in a secure cabinet or
drawer. The signature card may also be removed from the machine and placed in a safe place.
In addition to a lock the following options are available for advanced logging and security.
Simple Security
This is included in all Ghostwriter model. It includes one username and password for the machine.
Data Log Security
All operators will need to enter a unique, four digit employee ID number. The system will allow the
Administrator to keep track of the date, time, signature and number of signatures that were cycled.
The data log is accessible only by the Administrator's unique password.
Advanced Data Log Security Option With Printing Capabilities
In addition to the Data Log Security, the Administrator attaches a standard printer to the Ghostwriter.
This feature will allow the administrator to print the reports and store them in printed form for reference.
Warranty Information
SigTech signature machines are shipped to your office by SigTech factory personnel. They are
guaranteed against defects of materials and workmanship for a period of 90 days. This contract may
be extended. If you have any problems, call our service department. Please contact your SigTech
Representative regarding annual maintenance contracts.
14 Automated Signature Technology
800.636.4450 www.signaturemachine.com

www.signaturemachine.com 800.636.4450
Automated Signature Technology 15
Gold Service Plan (available in most metropolitan areas)
Factory repair with on-site preventive maintenance and unlimited telephone and e mail support
Covers all parts, labor and shipping costs. Machines will be repaired in our factory within two business
days or a replacement machine will be shipped to you in its place. Annual, scheduled preventive
maintenance will be performed in your office by one of our technicians. During the servicing of the
signature equipment, we will clean, lubricate, make all necessary adjustments, and replace any parts
needed for the proper operation of the machine, and repair or replace any worn components.
Silver Service Plan
Factory repair and unlimited telephone and e mail support
Covers all parts, labor and shipping costs. Machines will be repaired in our factory within five business
days or a replacement machine will be shipped to you in its place.
Part 5: Troubleshooting
LCD displays “Sensor out of range” error
Turn the machine off and back on. Machine should recalibrate and return to normal. If problem is not
resolved. Contact technical support.
The writing arms stick to the "T" bar
The bottom of the arm can become worn and may need to be smoothed and lubricated. Any
common light oil helps.
The writing arms pop out of the clips on the rocker arms
Remove the ball from the clip and squeeze the clip together with the rocker arm. This will tighten the
clip and hold the arm in the holder.
The pen makes scratchy noises while signing
Check the pen for any damage to the tip. Rolling ball, fountain and felt tip pens can become
damaged and it will effect the quality of reproduction. You can also decrease the pressure on the
pen by removing the pressure strip or bending it up.
Signing area is not illuminated
Check to make sure that the machine has power and is on.
No power
Check to make sure that the power cord is plugged securely into the module on the
back of the machine and into a live wall outlet. If the machine has power to the LCD and foot pedal,
contact technical support.

Foot pedal does not start the machine
Check to make sure that the machine is turned on and the foot pedal is plugged into the appropriate
plug in the back of the machine.
Signature does not load into the machine
Check the signature card to ensure that the chip is facing up and that the card is pushed into the
reader. If problem persists, contact technical support
Technical Support
If problem is not resolved, please call technical support toll free 800-636-4450 and a representative
will help assess the problem. Please have your model and serial number available.
Notes
Table of contents
Popular Postal Equipment manuals by other brands


Gibraltar Industries
Gibraltar Industries AF FLORENCE ExpressLocker Maintenance & Troubleshooting guide

FP
FP optimail Quick reference guide

Frama
Frama EcoMail operating instructions

SSS Siedle
SSS Siedle CLASSIC Product information

Neopost
Neopost IS-200 Series Quick installation guide

FP
FP optimail installation guide


