FP Postbase Mini User manual

Franking machine
Operator Manual
First steps

PostBase Mini
2
About this Manual
Please read this manual before installing and using the PostBase Mini franking
machine. Please keep this manual near PostBase Mini for quick reference.
This Operator Manual is directed at the users of the PostBase Mini.
This manual describes installation and comissioning of the PostBase Mini franking
machine and gives basic information on operating the PostBase Mini. Functions that
are described here but are not available for each PostBase Mini (among other things
because of postal requirements in the individual countries) are identified as (not avail-
able in all countries).
Further documents For complete specifications of the PostBase Mini, refer to the
Operator Manual PostBase Mini (Reference Guide) – availa-
ble as a download from Francotyp-Postalia.
The Installation instructions (flyer) shows an overview of the
steps during installation.
Information on country-specific features and particularities can
be found in the Addendum to the Operator Manual (if available
in your country).
Safety tips The following keywords and signs identify the safety tips in this
manual:
Warning! indicates a potential hazard that may result in injury.
Caution! indicates a potential hazard that may result in dam-
age to the machine or impair the franking process.
In this manual, the product name appears in its plain form
‘PostBase Mini’.
Text features
and symbols
The following symbols and text features are used in this
manual:
• Bullets precede instructions.
– Dashes precede list items.
Menu names and options from the operating menu are written
in small capitals, e.g. MENU.
A tip offers advice or additional suggestions for improving the
operation.
Illustrations The display figures in this manual are generic examples that
may differ from the actual display on your PostBase Mini.
As currency, Euro is used exemplarily.

Contents 3
About this Manual _____________________________________________2
1 Safety tips ____________________________________________________4
2 A short description of the PostBase Mini __________________________6
3 Installation and commissioning __________________________________9
Step 1: Unpacking and checking the contents of the package ____________9
Step 2: Assembling PostBase Mini _______________________________10
Step 3: Removing the transport fixture _____________________________11
Step 4: Connecting PostBase Mini ________________________________12
Step 5: Turning the PostBase Mini on _____________________________13
Step 6: Installing PostBase Mini __________________________________13
4 The basics of operation ________________________________________19
4.1 Turning the PostBase Mini on / off __________________________19
4.2 Standby ______________________________________________20
4.3 Screen elements and operation philosophy ___________________21
4.3.1 The touch screen _______________________________________21
4.3.2 The Home screen ______________________________________23
4.3.3 The Product calculation menu _____________________________24
4.3.4 The Menu _____________________________________________26
4.3.5 Lists _________________________________________________26
4.3.6 Adjustment menus ______________________________________27
4.3.7 Pop-up windows ________________________________________28
4.3.8 Procedures (wizards) ____________________________________29
5 Franking ____________________________________________________30
5.1 Setting the franking imprint _______________________________30
5.2 Positioning and franking a letter ____________________________31
Appendix
Connection settings (Overview) ___________________________________33
Technical Data ________________________________________________36
Declaration of conformity ________________________________________38
License ______________________________________________________39
Security Declaration for data usage ________________________________41
United States Patents ___________________________________________41
Customer Support / Warranty _____________________________________43

PostBase Mini
4
1 Safety tips
PostBase Mini is a digital franking machine with ink-jet print technology for franking
mail. PostBase Mini complies with the pertinent safety regulations for office informa-
tion equipment.
Please observe the following tips for your own safety:
Prevention of electrical hazards
• Operate the PostBase Mini only on a grounded single-phase power socket. Make
sure your office power supply conforms to the power requirements indicated on the
power supply unit’s serial number plate.
• Use only with specified power supply unit: XP POWER LTD. - VEH40US24.
• Make sure the socket for connecting the PostBase Mini is close by and easily
accessible at all times.
• Unplug the mains plug in case of an emergency. Call the Customer Support.
• Take special care that no foreign objects or liquids penetrate the interior of the
PostBase Mini.
• Unplug the mains plug prior to cleaning the PostBase Mini.
Prevention of mechanical hazards
• Do not remove any equipment related to safety or protection. Do not make them
inoperative or unable to function.
• Do not remove any parts of the housing.
Accessories and consumables
• We recommend to use only approved FP equipment and FP original parts. The
manufacturer FP has established reliability, safety and applicability. The manufac-
turer cannot assess the reliability, safety and applicability for products not approved
by FP, and therefore not vouch for such products. The full functioning of the
PostBase Mini franking machine at the time of delivery can only be guaranteed
when using original Francotyp-Postalia ink cartridges.
• Use only the power supply unit provided with the PostBase Mini or approved by
Francotyp-Postalia. Make sure that the power supply unit is not damaged.

Safety tips 5
• Use the supplied cables or cables that have been approved by Francotyp-Postalia.
Make sure that cables are not damaged.
• Ingestion of the ink can be hazardous to health. Avoid contact with the eyes. Keep
the ink cartridges away from children. Further instructions for use are enclosed with
the ink cartridge.
• We recommend to use only the batteries provided by Francotyp-Postalia.
The manufacturer FP has established reliability, safety and applicability.
Observe the instructions enclosed with the battery for correct use and disposal.
General safety tips
• Install the PostBase Mini according to the instructions.
• When you move the PostBase Mini from a cold environment (i.e. below 10 °C /
50 °F): Unpack the PostBase Mini and wait at least two hours before connecting
the PostBase Mini. The PostBase Mini requires this period to adapt to the ambient
conditions. Any condensation evaporates.
• Have maintenance and repair work done only by qualified personnel authorised by
Francotyp-Postalia. Otherwise, your warranty may become void.

PostBase Mini
6
2 A short description of the PostBase Mini
Connections (view from the right)
Scale with
weighing platform
Button
ON / OFF
Battery compartment
(at the bottom)
Letter slot
Display / touch screen
Operating panel
ink cartridge below it
Stylus for touch screen operation:
pull out to the right
Serial number plate
(at the bottom)
Connection for the external
power supply unit
LAN port / Network interface
PC connection
USB
Connection for an optional external device
USB
Use only with specified power supply unit:
XP POWER LTD. - VEH40US24

A short description of the PostBase Mini 7
Things worth knowing about PostBase Mini
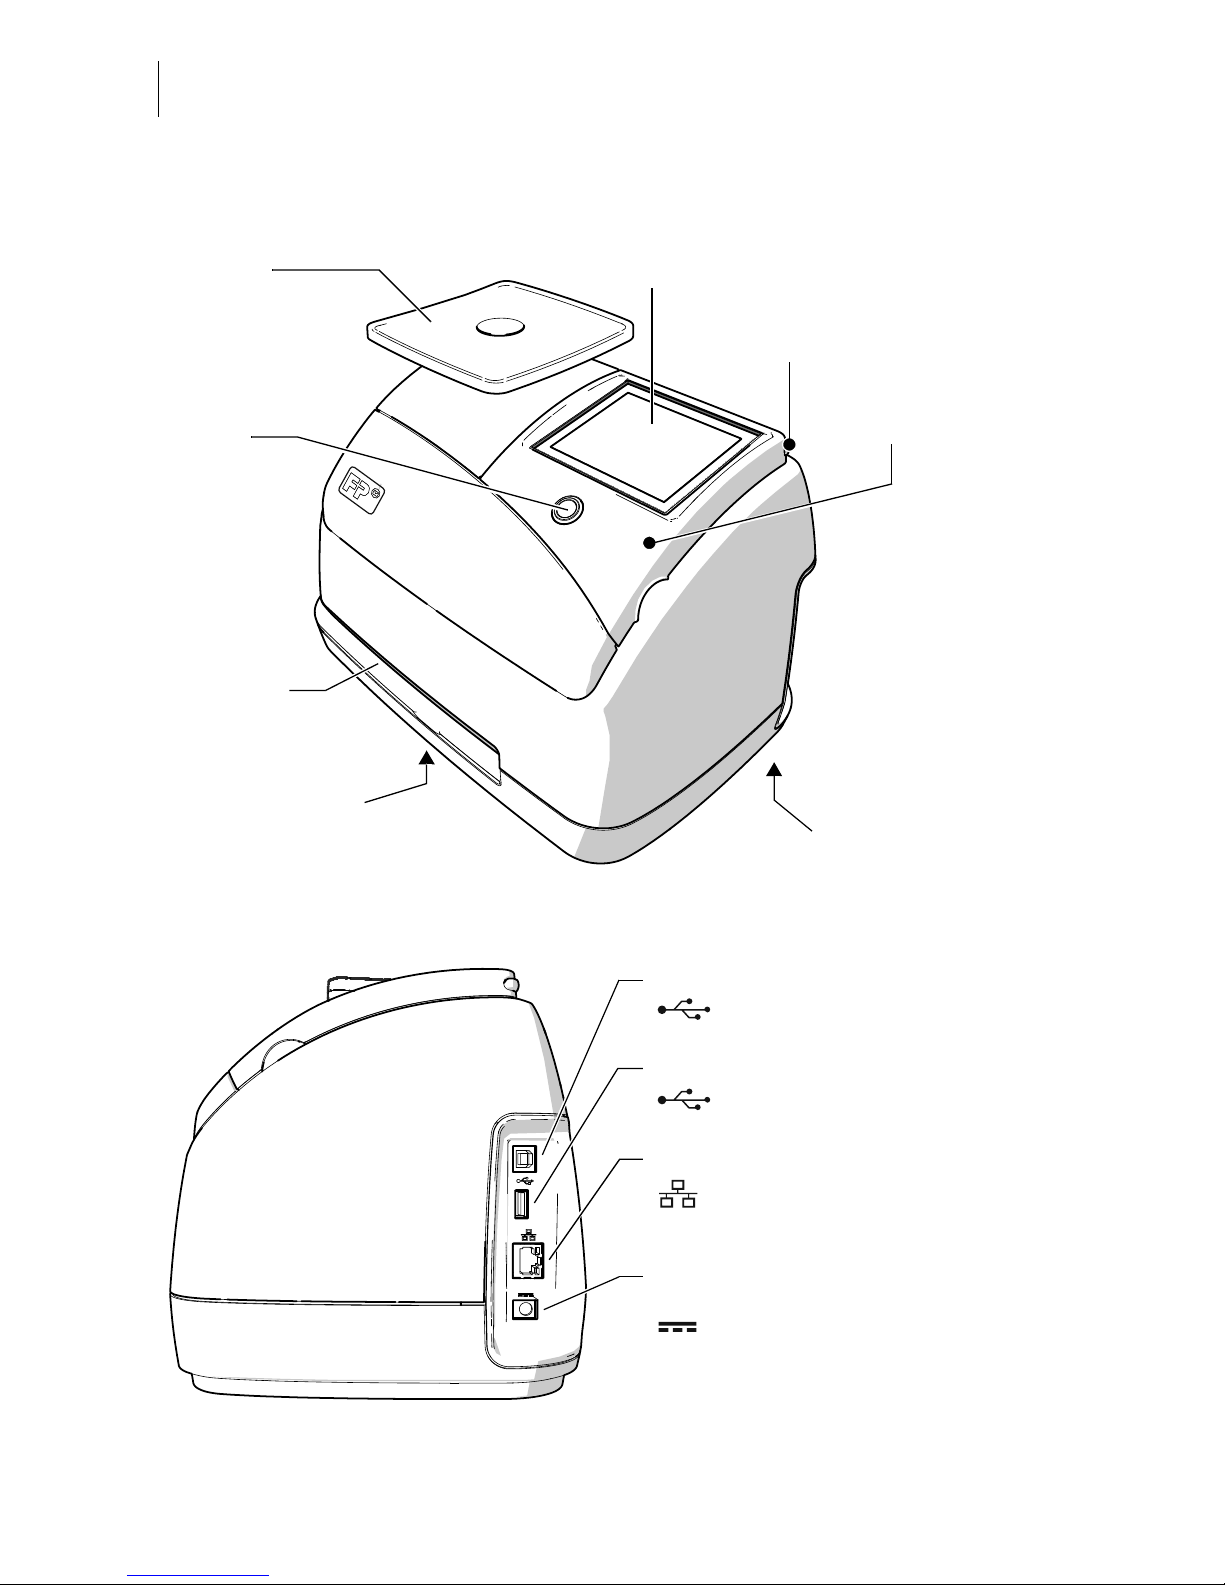
PostBase Mini is a digital franking machine for small
mail volumes featuring a touch screen. It stands out due
to its compact design and intuitive handling. The reliable
ink-jet technology delivers clean franking imprints.
Intuitive handling PostBase Mini makes do with only a single button,
arranged in the centre: for switching on and off. For all
other operations, the clearly designed user interface in
the 3.5 inch colour display guides you fast and easy to
the desired destination.
Franking Simply switch on the PostBase Mini, select a postal
product, position a letter – done!
Franking is possible on mail pieces made of ink-absorb-
ing material – postcards to 6 mm (0.23") thick letters in
ISO B4 format – and special self-adhesive labels.
Letters as advertising medium In addition to printing postage, you can print an adver-
tisement of your choice on every mail piece you send.
When using the optional PC control software, this can
also be a text message (if available in your country).
Download postage You conveniently download the postage for franking
online from the data centre into your franking machine.
If desired, PostBase Mini can also, by itself, make sure
there is always sufficient postage available and prompt
you automatically to download postage.
(Availability and handling of features relating to postage accounting
depend on the respective countries.)
Remote Services:
flexible and up to date
The PostBase Mini ensures you are always using the
current postal rates. Whether new postage rates, new
adverts or a software update – the franking machine
downloads current data from the data centre.

PostBase Mini
8
Additional functions Weighing – the space saving, integrated scale quickly
and reliably determines the weight of letters and par-
cels. The determined weight directly affects the product
settings.
Account function – PostBase Mini allows for registra-
tion and billing of postage costs to accounts.
Access control – PostBase Mini can be protected
against unauthorised use via a PIN (Personal Identifica-
tion Number).
Controlling PostBase Mini via PC software (optional).
Francotyp-Postalia offers software for controlling and
administration of the PostBase Mini franking machine
via PC, e.g. NavigatorBasic, NavigatorPlus,
RemoteOne, ReportOne (not available in all countries).

Installation and commissioning 9
3 Installation and commissioning
Step 1: Unpacking and checking the contents of the package
Warning! Do not start operating PostBase Mini if parts are damaged or miss-
ing. Please contact the Customer Support.
Caution! Carry out the steps exactly in the given order. Also, consult the
installation instructions (fold-out).
1
2
3456
7
9
8
1 PostBase Mini franking machine
2 Ink cartridge
3 Power cable
4 Power supply unit
5 USB cable
6 Ethernet cable
7 ‘First steps’ manual
8 Installation instructions (flyer)
9 Weighing platform (version as ordered)

PostBase Mini
10
• Unpack the packages.
• Check that the contents of the packages
are complete and free from any damage.
Keep the packing and the transport fixture for
the print system. Use it again when you need
to transport PostBase Mini or send it in to
service.
Step 2: Assembling PostBase Mini
Caution! When you move PostBase Mini from a cold environment (i.e. below
10 °C / 50 °F): Unpack the PostBase Mini and wait at least 2 hours before
connecting PostBase Mini. PostBase Mini requires this period to adapt to the
ambient conditions.
• Choose an installation site with the follow-
ing ambient conditions:
– room temperature: 15 °C to 35 °C (59 °F
to 95 °F)
– no direct sunlight
– power socket in the immediate vicinity
– network connection with internet access.
• Place PostBase Mini on a firm, level, low
vibration and horizontal base.
• Remove the protective foil from the display.
Mounting the weighing platform
• Hold the weighing platform such that the
slot in the weighing platform foot points to
the back.
• Place the weighing platform onto the scale
receptacle from above. The slot of the
weighing platform must slide in the coun-
terpart on the scale receptacle.
• Press down slightly on the weighing plat-
form with your flat hand.
Slot

Installation and commissioning 11
Step 3: Removing the transport fixture
A transport fixture (cardboard) is inserted in
the ink cartridge holder as a transport protec-
tion for the print system.
Remove the transport fixture:
• Lift up the operating panel as far as it goes.
It snaps in this position.
• Pull the cardboard (transport fixture) up out
of the cartridge holder.
Note: Do not insert the ink cartridge until later
in the installation process (step 6)!
• Lower the operating panel back into
position.
Keep the transport fixture (cardboard). use it
again whenever you need to transport your
PostBase Mini, or when sending it to the cus-
tomer support.
Transport fixture

PostBase Mini
12
Step 4: Connecting PostBase Mini
Warning! Use only the power supply unit provided with the PostBase Mini or
approved by Francotyp-Postalia. Make sure that the power supply unit is not
damaged.
Use the cables provided with the PostBase Mini or approved by Francotyp-
Postalia. Make sure that cables are not damaged.
Connect PostBase Mini only to a grounded single-phase power socket. Make
sure your office power supply conforms to the power requirements indicated
on the power supply unit’s serial number plate.
Make sure the socket for connecting PostBase Mini is close by and easily
accessible at all times.
• Connect the franking machine to a local
area network (LAN).
• Connect the franking machine to a PC
(optional).
• Plug the mains plug of the power supply
unit into the power connection of the frank-
ing machine. Connect the power cable to
the power connection of the power supply
unit. Only then, plug the power cable into
the power socket.
Optional

Installation and commissioning 13
Step 5: Turning the PostBase Mini on
• Press the button on the operating panel.
The display lighting and button illumination
switch on. PostBase Mini performs a self test
and then starts the installation procedure.
Step 6: Installing PostBase Mini
PostBase Mini will guide you step by step
through the installation procedure. This
chapter covers a selection of the most impor-
tant steps. Follow the instructions on the
display.
For information on handling the touch screen
and an overview of screen elements, please
read chapter 4.3.
• Have the R-PIN ready (received seper-
ately).
• Touch the button with the desired
language.
• Confirm with the button and continue
the installation procedure.

PostBase Mini
14
PostBase Mini comes with pre-set connec-
tion settings that should work in most cases.
• Press the button to use these settings.
PostBase Mini tests the connection to the FP
Infrastructure.
If no connection can be established, the wiz-
ard for entering connection parameters is
opened.
• If necessary: Enter the connection para-
meters. If need be, ask your network
administrator for details.
For details on possible settings, please read
the appendix “Connection settings (Over-
view)” in the “First steps” Operator Manual.
Caution! PostBase Mini may reboot several
times during installation. Do not unplug the
machine!
• Enter the Repository-PIN (R-PIN).
• Confirm with the button.
PostBase Mini now downloads the software
and data, then reboots.
• Follow the instructions on the display.

Installation and commissioning 15
PostBase Mini then asks you to insert the
ink cartridge.
• Lift up the operating panel as far as it goes.
You can feel it engage.
• Remove the ink cartridge from the packing.
• Remove the nozzle protection.
For details, please refer to the instruction
leaflet that comes with every cartridge.
• Hold the ink cartridge so the contacts are
facing to the front of the franking machine.
• Insert the ink cartridge into the socket.
• Push the ink cartridge all the way down
until the little green latch locks it into place
with an audible click. While doing so, you
will have to overcome a slight spring pres-
sure.
The illustration on the left shows the
correct position of the latch.

PostBase Mini
16
• Lower the operating panel back into posi-
tion.
PostBase Mini calibrates the cartridge …
… and prompts you to perform a test print.
• Place an empty envelope at the right hand
edge of the letter slot and push in as far as
it goes.
As soon as the sensor (in the back right hand
corner of the letter slot) detects the envelope,
the PostBase Mini grips the envelope tightly
and prints the test print.
Test print (example) • On the test print, determine the numbers
where
– the horizontal lines are as exactly next to
each other as possible and
– the vertical partial lines are as exactly
above each other as possible.
The ink cartridge is correctly aligned when
horizontal and vertical partial lines form one
line each at number 5.
• Confirm with the button.
When horizontal and / or vertical partial lines
do not form one line each at number 5:
• Press to continue the procedure of ink
cartridge alignment.

Installation and commissioning 17
Adjust cartridge: horizontal line
• Type the number where the horizontal par-
tial lines are as exactly next to each other
as possible.
In the example, this is number ‘4’.
(If necessary: Press CE to clear the dis-
played number.)
• Confirm and continue with .
Adjust cartridge: vertical line
• Type the number where the vertical partial
lines are as exactly above each other as
possible.
In the example, this is number ‘7’.
(If necessary: Press CE to clear the dis-
played number.)
• Confirm and continue with .
• Place an empty envelope for another test
print.
• Assess the test print. If necessary, repeat
the alignment procedure until a correct
alignment has been obtained.

PostBase Mini
18
• Contact to the data centre / load postage.
To be able to frank with your PostBase Mini,
the PostBase Mini must have the corre-
sponding postage credit available. For this,
a connection to the data centre is necessary.
The exact process, permissible loading
amounts, as well as postage accounting
depend on postal regulations of the respec-
tive countries.
Home screen (example) PostBase Mini shows the Home screen.
Installation is complete.
In the MENU, you can configure the system
settings of your PostBase Mini to your liking
(display brightness, tone signals, standby
time, access control via PIN …). You also
have access to the account function of the
PostBase Mini in the MENU.

The basics of operation 19
4 The basics of operation
In this chapter, you will learn about the basic functions of the PostBase Mini and how
to handle the touch screen.
4.1 Turning the PostBase Mini on / off
Turning on
• Press the button on the operating panel.
The display lighting and button illumination
switch on. The PostBase Mini performs a self
test and then displays the Home screen.
When access control is active, PostBase Mini
prompts you to enter the PIN during the start
routine.
Turning off
• Press the button for three seconds.
The PostBase Mini will complete any current
actions and then switches off. The display
light and button illumination go out and the
touch screen is deactivated.
3 seconds

PostBase Mini
20
Disconnecting from mains
Caution! Make sure to always turn the
PostBase Mini off before disconnecting the
PostBase Mini from mains. Never pull the
mains plug or separate the power supply in
any other way before the printing system has
reached its sealed position. This is the only
way to prevent drying up and to ensure a
permanently high print quality
• Press the button ON/OFF for
three seconds to turn the franking
machine off.
The display light and button illumination go
out.
• Unplug the mains plug of the power supply
unit from the socket.
4.2 Standby
The PostBase Mini franking machine will go
to standby automatically if it is not used for
some time.
The display is dark and the button is illumi-
nated in standby. The touch function is
inactive.
You can ‘wake up’ PostBase Mini by briefly
pressing the button.
Other manuals for Postbase Mini
1
Table of contents
Other FP Postal Equipment manuals