manuals.online logo
Brands
  1. Home
  2. •
  3. Brands
  4. •
  5. Avaya
  6. •
  7. IP Phone
  8. •
  9. Avaya IP Office 9650 User manual

Avaya IP Office 9650 User manual

9650 Model Telephone Instructions
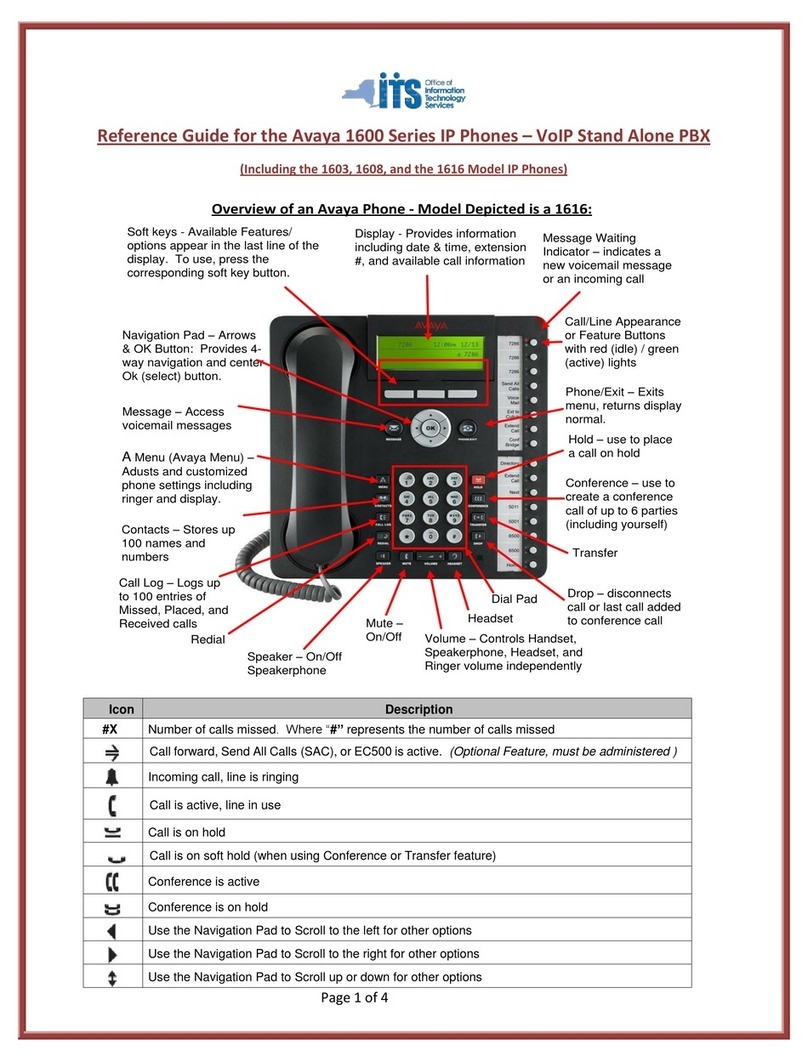
Avaya Menu: You can use the Avaya Menu to adjust and customize
options and settings for your telephone
:
Options & Settings or Phone Settings: Lets you change your call
settings, personalize button labels, adjust brightness and contrast and
select your ring pattern.
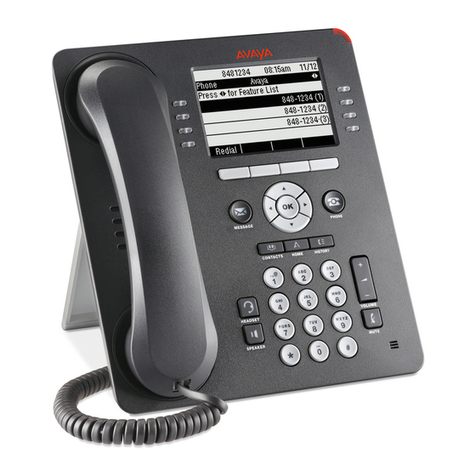
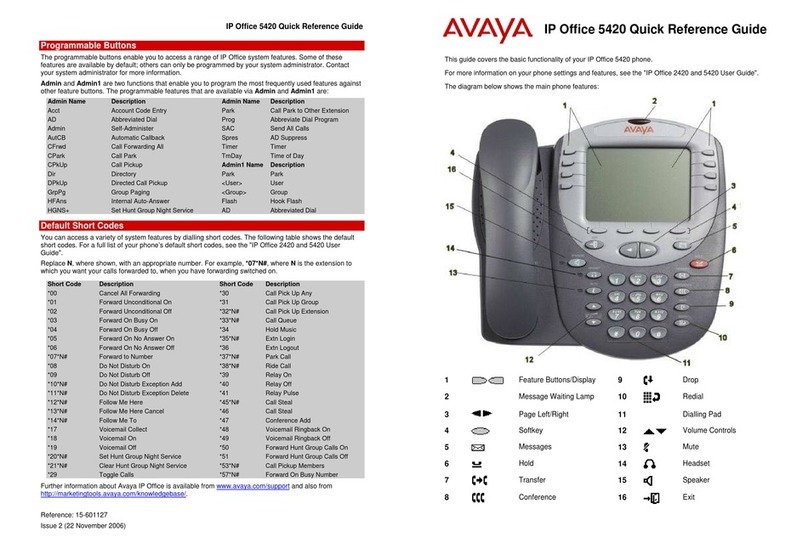
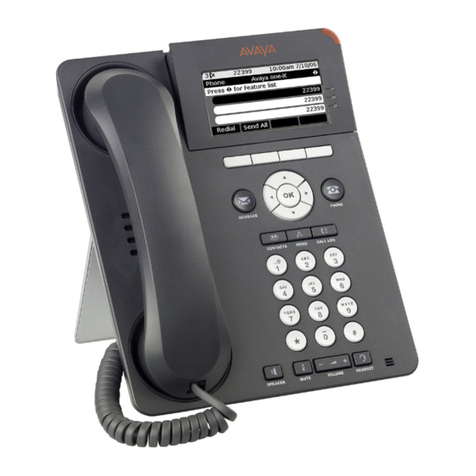
Application buttons, navigation and soft keys
The display screen has three visible application lines that you use to
view and manage your calls, your contacts, your call log, and your
options and settings.
• Press the Phone button to view your calls.
• Press the Contacts button to view your Contacts list.
• Press the Call Log button to see a list of your incoming and
outgoing calls.
Press OK to carry out the action you have selected
Aux buttons: Your phone has two rows of “Aux buttons” below the
soft keys. You can use the Aux buttons for features. The Aux buttons
go with the “Aux button labels” on the bottom two rows of the screen.
There are two sets of Aux buttons. Use the Aux Shift button, located
to the right of the Aux button labels, to switch between the two pages
of Aux buttons.
Each Aux button has an LED, which is illuminated if a call appearance
or feature assigned to that button is active. The Aux Shift button also
has an LED, which is illuminated if there is a call on one of the Aux
buttons on the alternate, "hidden" page.
Aux Buttons and Bridged Lines: If an Aux button is associated with
a bridged line, you can press the Aux button to select it as you would
with a regular call appearance.
Whenever you need to access a bridged line just press the
corresponding Aux button.
• The icon on the Aux button label for a bridged call
appearance shows the status of that call appearance. Use the Aux
button LED and the icon on the Aux button label to view the status of
a bridged line.
Answering and making a call
• If you are not on another call, lift the handset or press the line button
next to the incoming call, press Speaker to answer using the
speakerphone, or press Headset to answer using the headset.
• If you are on another call and the telephone does not automatically
display the incoming call, from the Phone screen scroll to the line with
the incoming call and press Answer or OK. If you are on another call
and the telephone does automatically display the incoming call, you
can press Ans Hold to automatically put the first call on Hold when
you answer the new call. Alternately, you can press Ans Drop to
automatically drop the first call when you answer the new call.
Answering a Call to a Bridged Extension
If an Aux button flashes, press that button or press the Answer soft
key.
Making a call
1. .Lift the handset, or press Speaker or Headset (if applicable) or a
line button for an available
line.
2. Dial the number you want to call.
Putting a Call on Hold::
1. Press Phone to view the main Phone screen, if necessary
2. If you are not active on the line you want to put on hold, select that
line and press HOLD
3. Press RESUME or the line where the call is on hold to take the call
off of hold.
Using voice dialing (if available on your phone)
1. Press Contacts.
If Voice dialing is enabled, a Voice soft key displays.
2. If no tone is generated or if no green bar appears next to the Voice
soft key, press Voice again to restart voice dialing.
3. Within a few seconds or as soon as you hear the tone, say the
name of the person you want to call.
4. When one or more contacts display, press the appropriate soft key.
Transferring a call
1. From the Phone screen, select the line you want to transfer.
2. Press Transfer or OK.
3. Dial the telephone number, or call the person from the Contacts list,
or call the person from the Call Log list.
4. If unattended transfers have been administered, you can hang up
now if you do not want to announce the call. Otherwise, press
Complete or OK
Conference calls: Setting up a conference call
1. From the Phone screen, select your active call.
2. Press Conf.
3. Dial the telephone number, or call the person from the Contacts list,
or call the person from the Call Log list.
4. When the person answers, press Join or OK to add the person to
the existing call.
5. Press Add and repeat these steps to add another person to the
conference call.
6. Press Drop at any time to drop the last person added to the
conference call.
Adding a person on hold to a conference call
1. From the Phone screen, select your active call.
2. Press Conf, or Add if you are already in a conference.
3. Select the call on hold that you want to add to the conference.
4. Press Resume or the line button or the Aux button or OK to take
the call off hold.
5. Press Join to add the person to the conference call.
Dropping a person from a conference call (if available on your
phone)
1. From the Phone screen, select your active call.
2. Press More then Details.
3. Select the person you want to drop.
4. Press Drop.
Contacts
You can save up to 250 names and up to 3 telephone numbers per
name. You can call a contact by speaking the contact name. You can
also import or export a Contact list using a USB device.
Calling a person from the contacts list
1. Press the Contacts button.
2. Select the person or primary number you want to call.
3. Press Call or OK.
Adding a new contact
1. Press Contacts.
2. Press New if this is your first contact list entry, or press More then
New if you already have
entries in your contact list.
3. Enter the name using the dialpad.
4. Select the next field.
5. Enter the telephone number and press Primary if applicable.
6. Select the next field.
7. Select the type of number entered (general, work, mobile, home).
8. If you have another number for this contact, scroll down and repeat
Steps 5 - 7.
9. Press Save or OK.

Call Log
You have a call log that will show the last 99 calls from your phone.
They can be viewed as all or in categories.
Calling a person from the call log
1. Press the Call Log button.
2. Select the person or number you want to call.
3. Press the Call softkey or the OK button.
Adding an entry from the call log to your contacts list
1. Press Call Log.
2. Select the number you want to add to your Contacts list.
3. Press +Contact.
4. Edit the name and telephone number, if necessary.
5. Press Save.
Labels: To re-label any feature button on your phone
Press Menu and and Options (you may have to scroll to find Label)
Press Select or Ok next to Label
Press Edit
Press the button you wish to re-label (you may have to scroll to get to
the button)
Using the dial pad, edit the label (you can put up to 13 characters)
Press Save or OK when done.
Press CANCEL to cancel editing of label
FEATURE BUTTONS
Send Calls: When active sends all your calls directly to you
Voicemail. To use:
1. Scroll to Send Calls
2. Press Select or OK to turn Send calls on or off
Call Forward: To forward you phone to another phone. To use:
1. Scroll to Call Forward and press Select or OK (you will hear
dial tone)
2. Enter the number of where you wish to forward your calls (you
will hear a 3 beep confirmation one), Call forward is now
active.
Press Call Forward to De activate this feature.
Busy Indicator: This button has 2 purposes:
1. As a speed dial one touch button to dial this extension
2. A indicator to let you know this person is active on a call
Directory: Your phone contains a directory of all users in your
building.
To use:
Press Directory and spell out co-workers name.
If you are looking for similarly spelled names:
Press NEXT to scroll to the next name.
Press Call Display to call that number.
Press EXIT to exit the directory if not using Call Display button.
Bridge Appearance: This will be 2 appearances of a co-workers
extension on your phone. These will appear on your first page or on
your aux buttons. These buttons allow you to answer calls for that
person on your phone.
Call Pickup: Use this button to pick up a ringing phone in your pickup
group. You must be part of a pickup group for this button to work.
Intercom: Press Intercom to directly intercom with a co-worker
Using USB Flash Drives with your phone: If your telephone has a
USB interface and you have a USB (Universal Serial Bus) flash drive
(also called a thumb drive or memory stick), you can log into your
phone from anywhere in the world, add contacts to your Contacts list
from an E-mail or other PC software program, and display pictures
from the device on your phone as a screensaver. You can also copy
your contact list from your phone to a USB flash drive, replace the
contents of your phone's current contact list with those on the USB
flash drive, or temporarily use the flash drive's contacts instead of
your phone's contact list.

Other manuals for IP Office 9650

8

Other Avaya IP Phone manuals

Avaya Integral 5 R3.0 User manual

Avaya

Avaya Integral 5 R3.0 User manual

Avaya 1140E User manual

Avaya

Avaya 1140E User manual

Avaya 9641GS User manual

Avaya

Avaya 9641GS User manual

Avaya 3606 User manual

Avaya

Avaya 3606 User manual

Avaya one-X 16-603578 User manual

Avaya

Avaya one-X 16-603578 User manual

Avaya IP OFFICE 2410 User manual

Avaya

Avaya IP OFFICE 2410 User manual

Avaya 9650 Deskphone Edition User manual

Avaya

Avaya 9650 Deskphone Edition User manual

Avaya 9404 User manual

Avaya

Avaya 9404 User manual

Avaya 1600 Series Service manual

Avaya

Avaya 1600 Series Service manual

Avaya Vantage K155 User manual

Avaya

Avaya Vantage K155 User manual

Avaya 4620 User manual

Avaya

Avaya 4620 User manual

Avaya 3641 User manual

Avaya

Avaya 3641 User manual

Avaya one-X 9611G User manual

Avaya

Avaya one-X 9611G User manual

Avaya one-X Deskphone Value Edition 1608 User manual

Avaya

Avaya one-X Deskphone Value Edition 1608 User manual

Avaya 1403 User manual

Avaya

Avaya 1403 User manual

Avaya one-X 1616 User manual

Avaya

Avaya one-X 1616 User manual

Avaya IP Office 4601 User manual

Avaya

Avaya IP Office 4601 User manual

Avaya J129 Instruction Manual

Avaya

Avaya J129 Instruction Manual

Avaya IP Office 9608 User manual

Avaya

Avaya IP Office 9608 User manual

Avaya IP Office 3.2 User manual

Avaya

Avaya IP Office 3.2 User manual

Avaya one-X 9608G User manual

Avaya

Avaya one-X 9608G User manual

Avaya IP Office 1400 Series User manual

Avaya

Avaya IP Office 1400 Series User manual

Avaya one-X Deskphone Value Edition 1608 User manual

Avaya

Avaya one-X Deskphone Value Edition 1608 User manual

Avaya one-X Quick Edition User manual

Avaya

Avaya one-X Quick Edition User manual

Popular IP Phone manuals by other brands

Yealink T42S user guide

Yealink

Yealink T42S user guide

VoIPon AT-530 user manual

VoIPon

VoIPon AT-530 user manual

Cisco 8851 quick start guide

Cisco

Cisco 8851 quick start guide

Aastra 6737i user guide

Aastra

Aastra 6737i user guide

Mitel MiVoice 6940 Quick reference guide

Mitel

Mitel MiVoice 6940 Quick reference guide

Yealink T42G Admin guide

Yealink

Yealink T42G Admin guide

switel DC2000 user manual

switel

switel DC2000 user manual

Aastra 6867i Quick reference guide

Aastra

Aastra 6867i Quick reference guide

NEC UNIVERGE SV9100 DT820 Reference sheet

NEC

NEC UNIVERGE SV9100 DT820 Reference sheet

Dynamix IP Phone user manual

Dynamix

Dynamix IP Phone user manual

Cisco 8800 Series quick start guide

Cisco

Cisco 8800 Series quick start guide

Cisco 7921G - Unified Wireless IP Phone VoIP Release notes

Cisco

Cisco 7921G - Unified Wireless IP Phone VoIP Release notes

Grandstream Networks GXP-1100 user manual

Grandstream Networks

Grandstream Networks GXP-1100 user manual

GE 28861 user guide

GE

GE 28861 user guide

Iwatsu Platinum Series Quick reference guide

Iwatsu

Iwatsu Platinum Series Quick reference guide

Sedna P1K user manual

Sedna

Sedna P1K user manual

Polycom SoundPoint IP 650 user guide

Polycom

Polycom SoundPoint IP 650 user guide

Samsung OfficeServ ITP-5107S user guide

Samsung

Samsung OfficeServ ITP-5107S user guide

manuals.online logo
manuals.online logoBrands
  • About & Mission
  • Contact us
  • Privacy Policy
  • Terms and Conditions

Copyright 2025 Manuals.Online. All Rights Reserved.