Avision AM3130 User manual

4-In-1 MFP Series
Fax User’s Manual
(P/N: 250-0502-E V400)
Regulatory model: 200400003

ii
Trademarks
The brands and product names herein are trademarks or registered trademarks of their
respective holders.
ENERGY STAR®is a U.S. registered mark.
Copyright
©2001 Avision Inc. All rights reserved. No part of this publication may be
reproduced, transmitted, transcribed, stored in a retrieval system, or translated into
any language or computer language, in any form or by any means, electronic,
mechanical, magnetic, optical, chemical, manual, or otherwise, without the prior
written permission of the manufacturer.
Warranty
The information contained in this document(s) is subject to change without notice.
The manufacturer makes no warranty of any kind with regard to this material,
including, but not limited to, the implied warranties of fitness for a particular purpose.
The manufacturer shall not be liable for errors contained herein or for incidental or
consequential damages in connection with the furnishing, performance, or use of this
material.

iii
FCC Radio Frequency Interference Statement
This product has been tested and found to comply with the limits for a
class B digital device, pursuant to Part 15 of the FCC rules. Operation is
subject to the following two conditions: (1) this device may not cause
harmful interference, and (2) this device must accept any interference
received, including interference that may cause undesired operation.
The FCC Class B limits are designed to provide reasonable protection
against harmful interference in a residential installation. This equipment
generates, uses, and can radiate radio frequency energy and, if not
installed and used in accordance with the instructions, may cause
harmful interference to radio communications. However, there is no
guarantee that interference will not occur in a particular installation. If
this equipment does cause harmful interference to radio or television
reception, which can be determined by turning the equipment off and on,
the user is encouraged to try to correct the interference by one or more
of the following measures:
Reorient or relocate the receiving antenna.
Increase the separation between the equipment and receiver.
Connect the equipment into an outlet on a circuit different from that to
which the receiver is connected.
Consult your point of purchase or service representative for additional
suggestions.
CE
This product satisfies the Class B limits of EN55022, EN55024 and safety
requirements of EN 60950.

iv
As an ENNERGY STAR Partner, Avision Inc. has determined that this
product meets the ENNERGY STAR guidelines for energy efficiency.
LASER SAFETY INSTRUCTION
This printer is a page printer which is operated by means of a laser. There is no
possibility of danger from the laser, provided the printer is operated according to the
instructions in this manual. Since radiation emitted by the laser is completely confined
within protective housings and external covers, the laser beams cannot escape from the
machine during any phase of user operation.
•Do not place a coffee cup, vase, or other liquid-filled container on the machine.
Spillage can damage the machine’s electrical parts and insulation.
•Take care not to drop paper clips, staples, or any other metal objects into the
machine.
•Avoid watching the lamp during operation with the Document cover in the open
position. Should you need to copy for a long period with the Document cover open,
it is advisable to arrange a shield for your eyes or to wear sunglasses.
•When clearing paper jams, refer to the instructions in this manual.
•Before disconnecting the plug, turn the machine off. Make sure your hands are dry.
Hold the plug itself, not its cord, when disconnecting it from the receptacle.
•Never attempt to open any fixed cover.
•Do not attempt to alter the machine or its parts.
•Under normal conditions the small quantities of ozone gas produced by the
machine are harmless. However, if the machine is used for an extended period or
within a small room, you should make sure that the area is adequately ventilated.
Also ventilate the room if you notice the machine smalls after a period of frequent or
extended use.
•Do not modify this product, as a fire, electrical shock, or breakdown could result. If
the product employs a laser, the laser beam source could cause blindness.
•Do not attempt to remove the covers and panels which have been fixed to the
product. Some products have a high-voltage part or a laser beam source inside
that could cause an electrical shock or blindness.
•If this product becomes inordinately hot or emits smoke, or unusual odor or noise,

v
immediately turn OFF the power switch, unplug the power cord from the power
outlet, and then call your authorized service representative. If you keep on using it
as is, a fire or electrical shock could result.
•If this product has been dropped or its cover damaged, immediately turn OFF the
power switch, unplug the power cord from the power outlet, and then call your
authorized service representative. If you keep on using it as is, a fire or electrical
shock could result.
•The inside of this product has areas subject to high temperature, which may cause
burns. When checking the inside of the unit for malfunctions such as paper mis-feed,
do not touch the locations (around the fusing unit, etc.) which are indicated by a
“Caution! Hot Surface” caution label.
•Do not store the machine’s consumables in any of these locations:
−Where the temperature or humidity may be excessively high.
−Where flammable items or liquids are stored.
−In direct sunlight.
−In dusty conditions.
CAUTION !
Use of the controls, adjustments, or performance of procedures other than those
specified in this manual may result in hazardous radiation exposure.
This machine is certified as a Class 1 laser product. This means that the machine does
not produce hazardous laser radiation.

vi
Disposal of Waste Equipment
This symbol on the product or on its packaging indicates that the product can
not be disposed of with your other household waste. Instead it should be sent to
appropriate facilities for recovery and recycling in an effort to protect human
health and the environment. Fore more information about where you can drop off
your waste equipment for recycling, please contact your local city office, your
household waste disposal service or the shop where you purchased the product.

vii
Table of Contents
1GETTING TO KNOW YOUR PRODUCT.......................................................................1-1
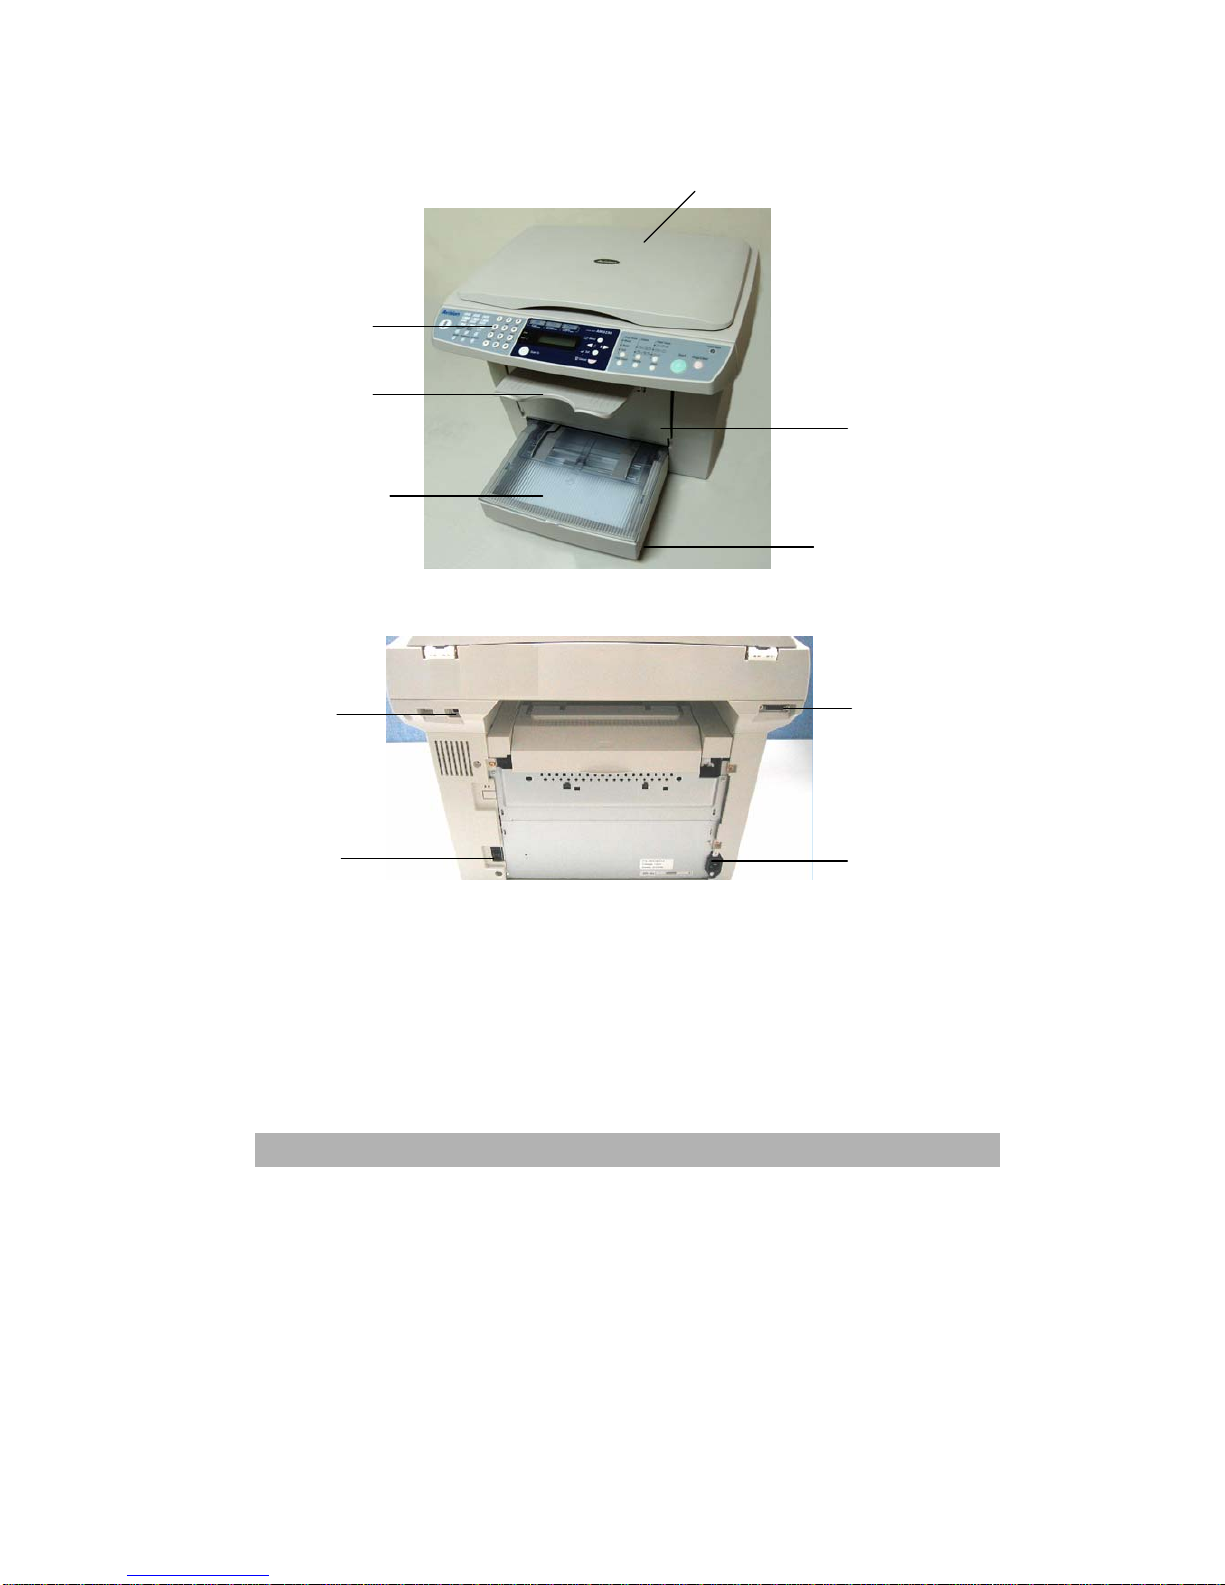
1.1 IDENTIFYING YOUR HARDWARE COMPONENTS.....................................................1-1
1.2 CONTROL PANEL FUNCTIONS...............................................................................1-4
2FAX & REPORT MENU SETTINGS...............................................................................2-1
2.1 ADJUSTING FAX OPTIONS.....................................................................................2-1
2.2 ACCESSING THE FAX SETTINGS ...........................................................................2-2
2.3 MENU TABLE FOR FAX...........................................................................................2-1
2.4 MENU TABLE FOR REPORT ...................................................................................2-5
3SENDING & RECEIVING FAXES..................................................................................3-1
3.1 SENDING A FAX.....................................................................................................3-1
3.2 IMPROVING FAXED IMAGES...................................................................................3-5
3.3 RECEIVING FAXES.................................................................................................3-7
3.4 OPERATION FROM EXTENSION TELEPHONES......................................................3-10
4PRINTING REPORTS......................................................................................................4-1
5INITIAL FAX SETUP.......................................................................................................5-1
5.1 USING THE DIAL PAD TO ENTER CHARACTERS.....................................................5-1
5.2 CHANGING NUMBERS OR NAMES .........................................................................5-1
5.3 INSERTING A PAUSE..............................................................................................5-1
5.4 SETTING THE DATE AND TIME...............................................................................5-2
5.5 SETTING THE FAX HEADER...................................................................................5-3
5.6 SELECTING TONE OR PULSE DIALING MODE .........................................................5-4
5.7 SETTING THE RING TO ANSWER...........................................................................5-5
5.8 ENABLING THE FAX HEADER.................................................................................5-6
5.9 UPDATING THE DEFAULT FAX RESOLUTION ..........................................................5-7
5.10 SETTING THE FAX BRIGHTNESS ...........................................................................5-8
5.11 CHANGING THE RING VOLUME OF THE FAX...........................................................5-9
5.12 TRANSMISSION VERIFICATION REPORT..............................................................5-10
5.13 CHANGING REDIAL COUNT ..................................................................................5-11
5.14 SETTING REDIAL INTERVAL..................................................................................5-12
5.15 ENABLING THE FAX FOOTER...............................................................................5-13
5.16 CHANGING THE DETECT DIAL TONE SETTING......................................................5-14
5.17 REDUCING RECEIVED FAXES...............................................................................5-15
5.18 SECURING RECEIVED FAXES...............................................................................5-16
6SPEED DIALING & PHONE BOOK...............................................................................6-1
6.1 STORING ONE-TOUCH DIAL NUMBERS.................................................................6-1
6.2 STORING &USING SPEED-DIAL NUMBERS...........................................................6-3

viii
6.3 SETTING UP GROUPS DIAL ...................................................................................6-7
6.4 USING QLINK TO MANAGE FAX DATA.................................................................6-11
7SPECIAL FAX..................................................................................................................7-1
7.1 DELAYED FAX........................................................................................................7-1
7.2 BROADCASTING.....................................................................................................7-2
7.3 POLLING ................................................................................................................7-4
7.4 MEMORY MANAGEMENT FOR DELAYED FAX/BROADCASTING/POLLING .............7-5
8TROUBLE SHOOTING FOR FAX..................................................................................8-1
8.1 FAX MAINTENANCE MENU.....................................................................................8-1
8.2 CONNECT TIME......................................................................................................8-1
8.3 TX LEVEL ..............................................................................................................8-3
8.4 ECM......................................................................................................................8-4
8.5 TX SPEED .............................................................................................................8-5
8.6 RX SPEED.............................................................................................................8-6
8.7 SPEED DISPLAY.....................................................................................................8-7
8.8 CODEC DISABLE....................................................................................................8-8
8.9 PROTOCOL REPORT..............................................................................................8-9
8.10 FILE CLEAR .........................................................................................................8-10
8.11 INSTALL LOCATION..............................................................................................8-11
8.12 ERROR CODE......................................................................................................8-12
8.13 TROUBLESHOOTING ............................................................................................8-14
9TECHNICAL SUPPORT..................................................................................................9-1
9.1 SPECIFICATIONS....................................................................................................9-2

1-1
1 Getting to know your product
1.1 Identifying your hardware components
AM3130/AM3230 (Regulatory model: 200400003)
ADF input tray
Media input tray
Priority input tray
ADF lid
USB port ADF port
Power jack
Telephone
port
Paper stopper
Control panel

1-2
AM3130L (Regulatory model: 200400003)
Control panel
Print cartridge
door
Media input tray
Priority input
tray
Cover
Output
tray
USB port ADF port
Power jack
Telephone
port

1-3
Identifying the 4-In-1 product package contents
drum & toner printer paper tray
printer output tray paper stop
not for
AM3130L(Regulatory model:
200400003)
ADF input tray
not for
AM3130L(Regulatory model:
200400003)
Fax Use’s Guide & CD
USB cable
Power cable
Telephone cord

1-4
1.2 Control Panel Functions
XY
Z[
\

1-5
X
Allows you to save on toner by using less
toner to print a document.
Stops an operation at any time.
clears the fax or copy options
Starts a job.

1-6
Y
Selects the document concentration mode for the
current copy job.
Sets the product to automatically collate multiple
copies into sets.

1-
7
Y
Prints 1,2, or 4 original images reduced to fit onto
one sheet of paper.
Prints 1~4 pages reduced to fit onto one sheet of
paper.
Prints 1~2 pages reduced to fit onto one sheet of
paper.
Selects the number of copies.
(Pressing the button one time increases one page.)
Adjusts the brightness of the documents for
the current copy job.
Makes a copy smaller or larger than the
original.

1-8
Z
Lets you access Scan mode.
Lets you access Copy mode.
Lets you access Fax mode.
Turns on when paper jam happens.
Turns on when the toner cartridge is empty.

1-9
ZDisplays messages on the screen to help you set
up and use this product.
Enters Menu Mode and scrolls through the
menus available.
Scrolls through the options available for the
selected menu item.
Confirms the selection on the display.
Scans your original to a designated software.
Deletes entered data or lets you exit the menu by
pressing repeatedly.
[
Dial pad
Dial a number or enter alphabetical characters.

1-10
\
One-Touch keys
These 6 keys give you instant access to 12
previously stored dial numbers.
But only the first 6 stored keys can be applied to
Group Dial function.
Lets you dial stored numbers.
It also lets you look up numbers that are stored in
the dialing memory.
Redials the last number you called.
It also inserts a pause in auto dial numbers.
To access memory locations 7 through 12 in the
One-Touch keys, hold down the Shift key together
with a One-Touch key.
Sets the resolution type when you send a fax.
Adjusts the brightness of the documents for
the current fax job.
Press before dialing if you want to make sure a
fax machine will answer.

2-1
2 Fax & Report Menu Settings
Your product is designed to be easy to use with LCD on-screen programming using the
navigation keys. User-friendly programming helps you take full advantage of all the menu
selections your product has to offer. Since your programming is done on the LCD, we
have created step-by-step on-screen instructions to help you program your product. All
you need to do is follow the instructions as they guide you through the menu selections
and programming options.
2.1 Adjusting Fax Options
You can probably adjust your fax options without the User’s Guide. But to help you
understand the whole picture of fax menu selections and options that are found in the fax
product programs, refer to the Menu table for fax, depicted on the next page. If you want
to understand the other menu selections and options (Common Setup and Copy Setup)
except fax, refer to AM3000 series user’s manual.

2-2
2.2 Accessing the Fax Settings
The navigation keys for the LCD on-screen programming is depicted as below:
cancel the setting or return to previous menu level
Access the menu
Go to the next menu level
Accept an option
Exit the menu by pressing repeatedly
Go back to the previous menu level
Scroll through the current menu level
Exit the menu
This manual suits for next models
2
Table of contents
Other Avision All In One Printer manuals

Avision
Avision AM7100NF User manual

Avision
Avision AM30 Series User manual

Avision
Avision NetDeliver @V1800 User manual

Avision
Avision AM40 Series User manual

Avision
Avision AM30 A Series User manual

Avision
Avision NETDELIVER @V2100 User manual

Avision
Avision NETDELIVER @V2500 User manual

Avision
Avision AM40 Series User manual

Avision
Avision A4 MFP User manual

Avision
Avision MT-0904B User manual