Axis Q1951-E User manual

10/7/21, 12:22 PM
AXIS Q1951-E Thermal Camera User manual
https://help.axis.com/axis-q1951-e
1/36
1. Thermal camera with AXIS Perimeter Defender
2. Horn speaker
3. Flashing beacon
4. PTZ network camera
5. Door controller
6. Surveillance center
Solution overview
P i t t ti
AXIS Q1951-E Thermal Camera

10/7/21, 12:22 PM
AXIS Q1951-E Thermal Camera User manual
https://help.axis.com/axis-q1951-e
2/36
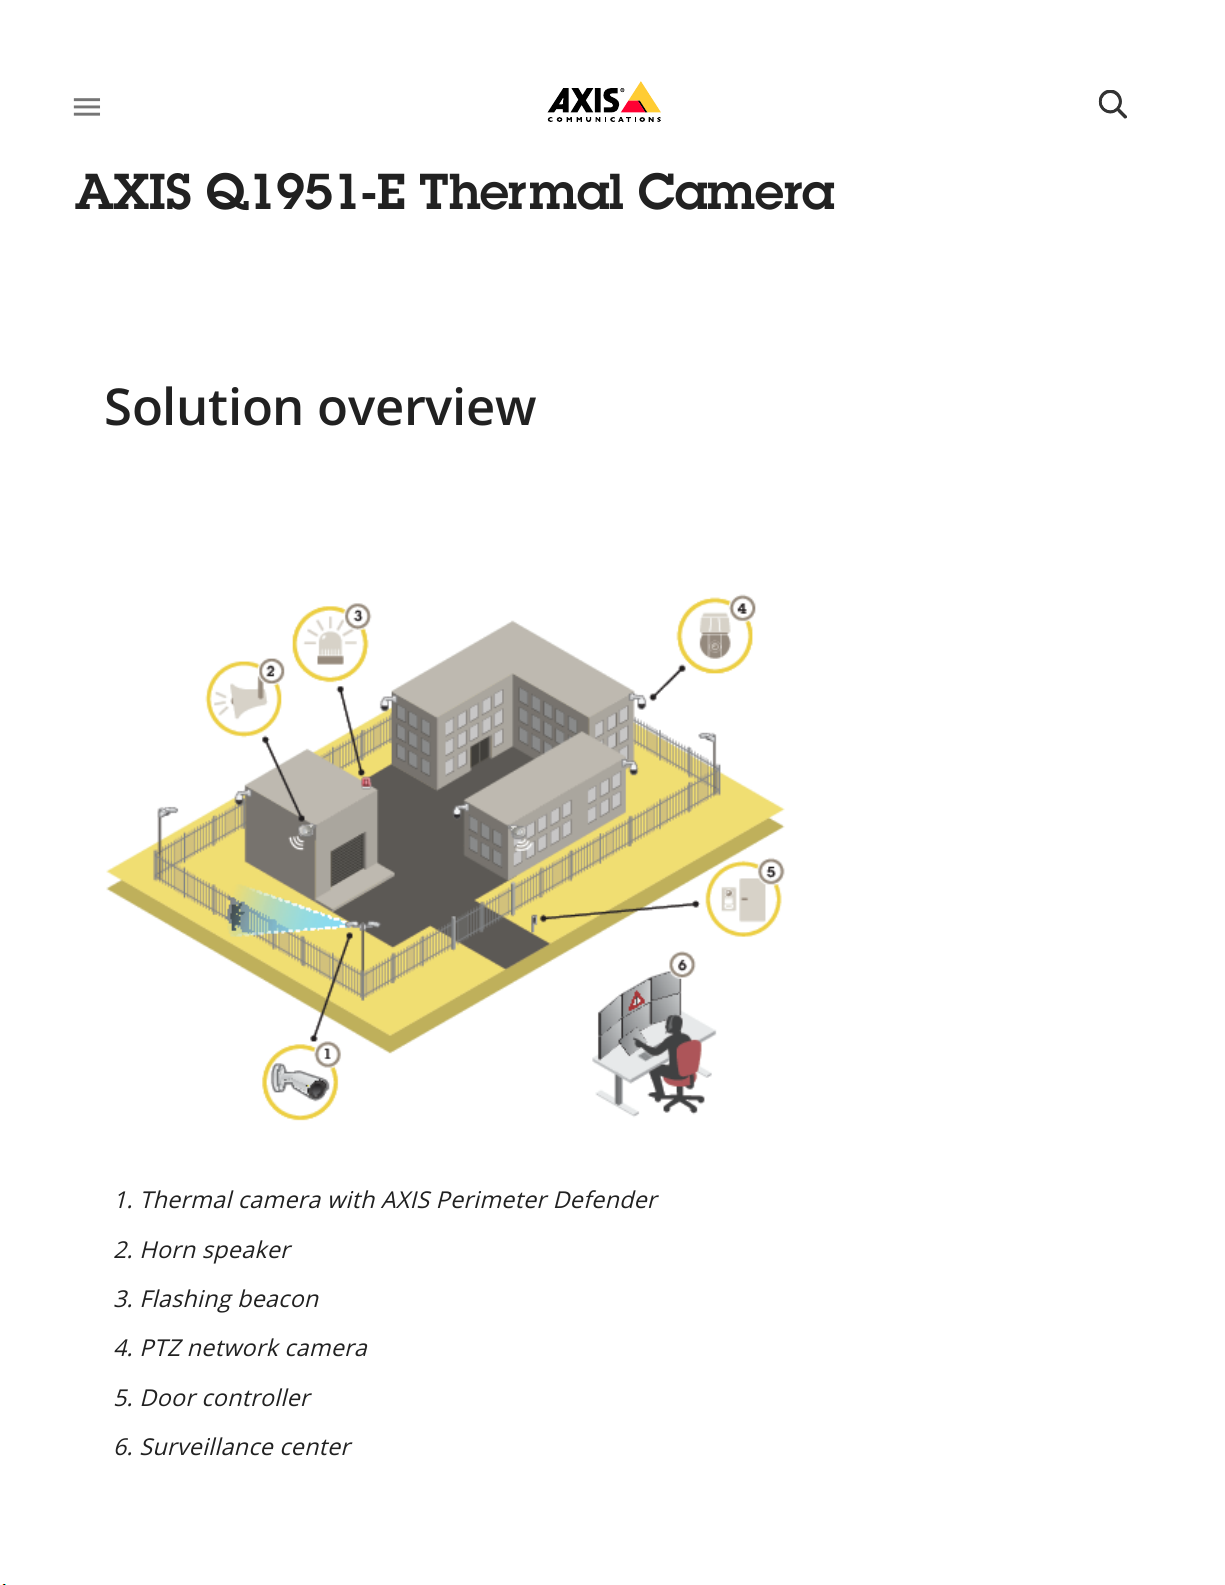
For areas in need of intrusion detection, you can set up perimeter protection using thermal
cameras with analytics. The main objective for perimeter protection is to detect a threat or an
actual intrusion at the earliest possible stage.
To set up perimeter protection, you need to install an analytics application for perimeter
surveillance and protection on your thermal camera. Axis provides the AXIS Perimeter
Defender application for this purpose. You can read more about AXIS Perimeter Defender at
axis.com/products/axis-perimeter-defender
To find Axis devices on the network and assign them IP addresses in Windows®, use AXIS IP
Utility or AXIS Device Manager. Both applications are free and can be downloaded from
axis.com/support.
For more information about how to find and assign IP addresses, go to How to assign an IP
address and access your device.
You can use the device with the following browsers:
Chrome Firefox Edge Safari
Windows recommended recommended ✓
macOS recommended recommended ✓ ✓
Perimeter protection
To let possible intruders know that your perimeter is protected, use a flashing beacon
(3). See Deter intruders with a flashing beacon.
To warn and deter, connect a horn speaker (2) that plays a pre-recorded warning
message. See Deter intruders with audio.
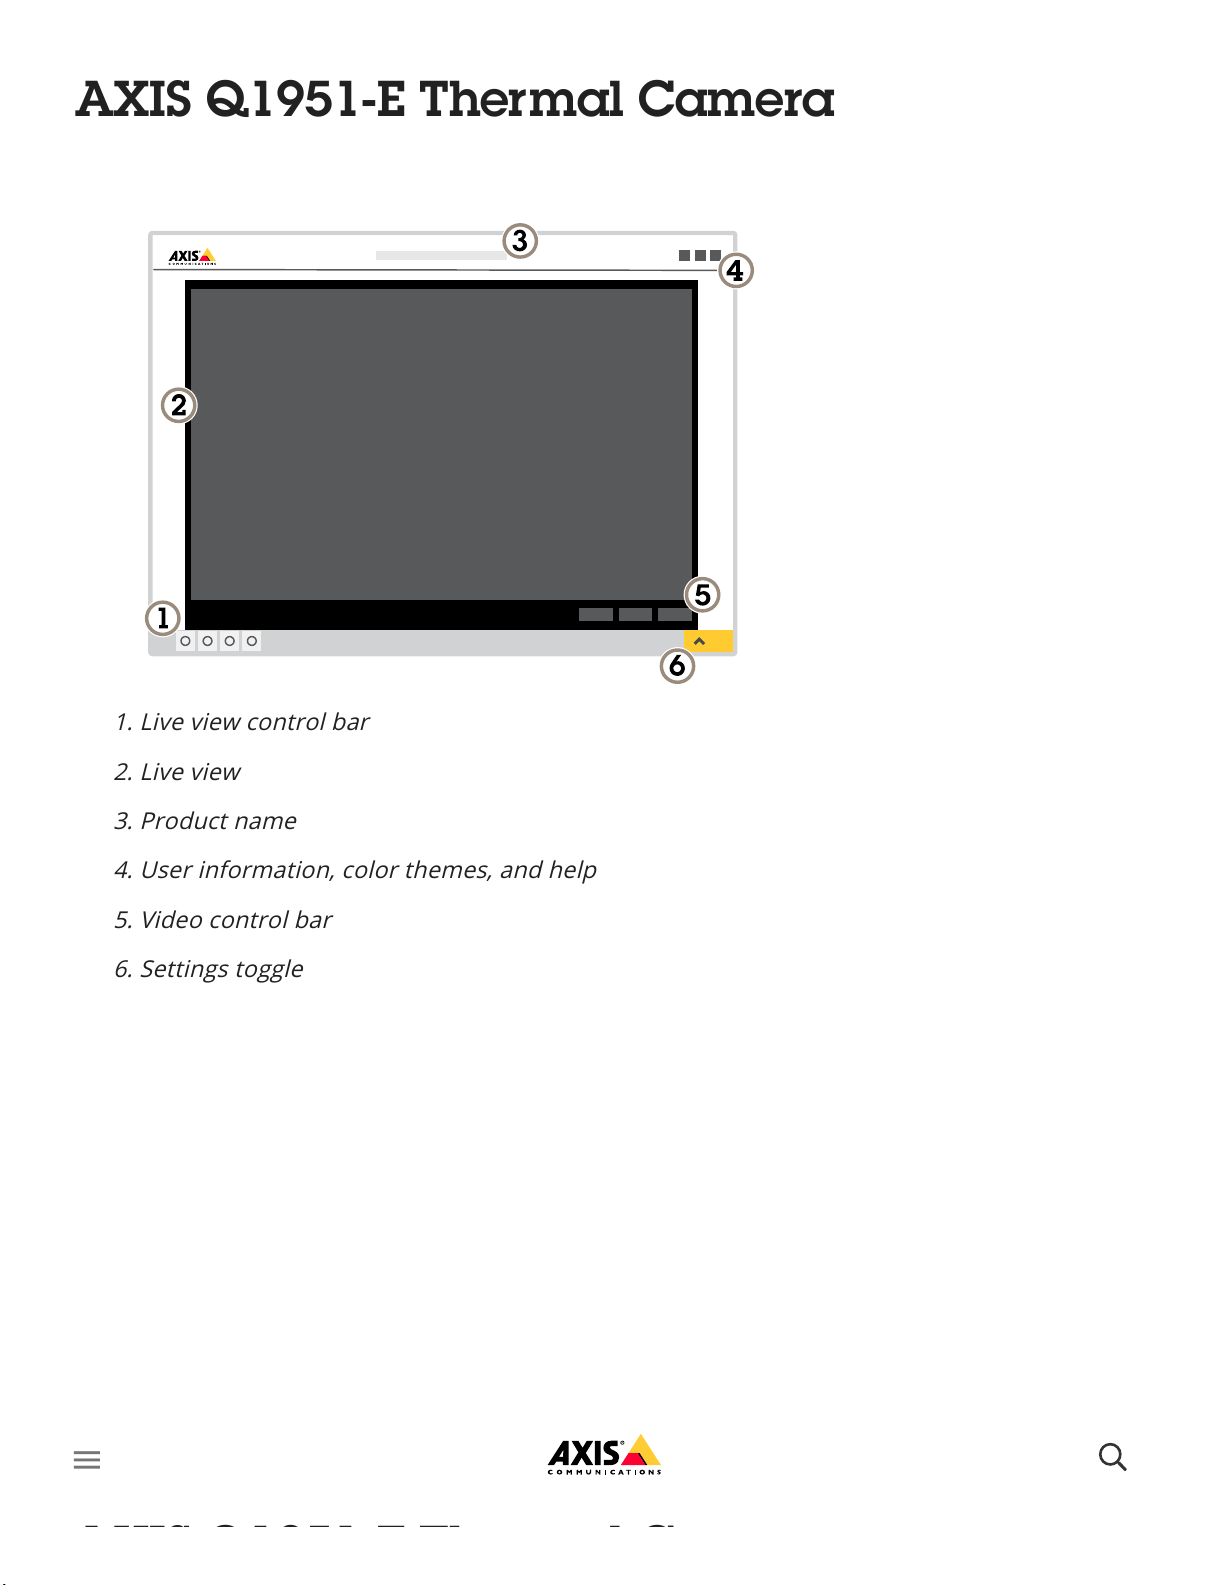
Get started
Find the device on the network
Browser support
TM ® TM ®
®
®
AXIS Q1951-E Thermal Camera

10/7/21, 12:22 PM
AXIS Q1951-E Thermal Camera User manual
https://help.axis.com/axis-q1951-e
3/36
Linux recommended recommended ✓
Other operating systems ✓ ✓ ✓ ✓*
*Supported in iOS and iPadOS
If you need more information about recommended browsers, go to AXIS OS Portal.
Important
The default administrator username is root. If the password for root is lost, reset the
device to factory default settings. See Reset to factory default settings
®
Access the device
1. Open a browser and enter the IP address or host name of the Axis device.
If you do not know the IP address, use AXIS IP Utility or AXIS Device Manager to find the
device on the network.
2. Enter the username and password. If you access the device for the first time, you must set
the root password. See Set a new password for the root account.
3. The live view page opens in your browser.
Verify that no one has tampered with the firmware
To make sure that the device has its original Axis firmware, or to take full control of the device
after a security attack:
1. Reset to factory default settings. See Reset to factory default settings.
After the reset, secure boot guarantees the state of the device.
2. Configure and install the device.
Set a new password for the root account
AXIS Q1951-E Thermal Camera

10/7/21, 12:22 PM
AXIS Q1951-E Thermal Camera User manual
https://help.axis.com/axis-q1951-e
4/36
Support tip: Password security confirmation check
Important
Axis devices send the initially set password in clear text over the network. To protect your
device after the first login, set up a secure and encrypted HTTPS connection and then
change the password.
The device password is the primary protection for your data and services. Axis devices do not
impose a password policy as they may be used in various types of installations.
To protect your data we strongly recommend that you:
Youtube
Axis
Support tip: Password security conrmation cSupport tip: Password security conrmation c……
1. Type a password. Follow the instructions about secure passwords. See Secure passwords.
2. Retype the password to confirm the spelling.
3. Click Create login. The password has now been configured.
Secure passwords
Use a password with at least 8 characters, preferably created by a password generator.
Don’t expose the password.
Change the password at a recurring interval, at least once a year.
AXIS Q1951-E Thermal Camera

10/7/21, 12:22 PM
AXIS Q1951-E Thermal Camera User manual
https://help.axis.com/axis-q1951-e
5/36
1. Live view control bar
2. Live view
3. Product name
4. User information, color themes, and help
5. Video control bar
6. Settings toggle
Webpage overview
AXIS Q1951-E Thermal Camera
AXIS Q1951 E Th l C

10/7/21, 12:22 PM
AXIS Q1951-E Thermal Camera User manual
https://help.axis.com/axis-q1951-e
6/36
7. Settings tabs
This section includes instructions about how to configure your device. If you want to learn
more about how certain features function, go to Learn more.
You can create one or several privacy masks to hide parts of the image.
Youtube
Axis
Configure your device
Adjust the image
Hide parts of the image with privacy masks
AXIS Q1951-E Thermal Camera

10/7/21, 12:22 PM
AXIS Q1951-E Thermal Camera User manual
https://help.axis.com/axis-q1951-e
7/36
How to create a privacy mask
Conguration tip: Using polygonal privacy masConguration tip: Using polygonal privacy mas……
Youtube
Axis
1. Go to Settings > Privacy mask.
2. Click New.
3. Adjust the size, color, and name of the privacy mask according to your needs.
AXIS Q1951-E Thermal Camera

10/7/21, 12:22 PM
AXIS Q1951-E Thermal Camera User manual
https://help.axis.com/axis-q1951-e
8/36
How to change the appearance of the mask
You can add an image as an overlay in the video stream.
Use corridor format to better utilize the full field of view in a long and narrow area, for
example a staircase, hallway, road, or tunnel.
Find out more at axis.com/axis-corridor-format.
Conguration tip: Privacy mask propertiesConguration tip: Privacy mask properties
Show an image overlay
Monitor long and narrow areas
1. Depending on your device, turn the camera or the 3-axis lens in the camera 90° or 270°.
2. If the device doesn’t have automatic rotation of the view, log in to the webpage and go to
Settings > System > Orientation.
3. Click .
4. Rotate the view 90° or 270°.
Stabilize a shaky image with Electronic Image Stabilization (EIS)
AXIS Q1951-E Thermal Camera

10/7/21, 12:22 PM
AXIS Q1951-E Thermal Camera User manual
https://help.axis.com/axis-q1951-e
9/36
Electronic Image Stabilization (EIS) can be used in environments where the product is
mounted in an exposed location and subject to vibrations, for example, wind or passing
traffic. Turn on EIS to get a smoother and steadier image without blur.
EIS also reduces the file size of the compressed image and lowers the bitrate of the video
stream.
Note
When EIS is turned on the image is cropped slightly, lowering the maximum resolution.
This section includes instructions about how to configure your device. To learn more about
how streaming and storage works, go to Streaming and storage.
Important
If you reduce the bandwidth it can result in loss of details in the picture.
Stabilize a shaky image with Electronic Image Stabilization (EIS)
1. Go to Settings > Image > Image correction.
2. Turn on EIS.
View and record video
Reduce bandwidth and storage
1. Go to live view and select H.264.
2. Go to Settings > Stream.
3. Do one or more of the following:
Turn on the Zipstream functionality and select the desired level.
Note
The zipstream settings are used for both H.264 and H.265.
Turn on dynamic GOP and set a high GOP length value.
I th i
AXIS Q1951-E Thermal Camera

10/7/21, 12:22 PM
AXIS Q1951-E Thermal Camera User manual
https://help.axis.com/axis-q1951-e
10/36
Note
Web browsers do not support H.265 decoding. Use a video management system or
application supporting H.265 decoding.
To record video you must first set up network storage, see Set up network storage, or have an
SD card installed.
You can create rules to make your device perform an action when certain events occur. A rule
Increase the compression.
Turn on dynamic FPS.
Set up network storage
To store recordings on the network, you need to set up your network storage.
1. Go to Settings > System > Storage.
2. Click Setup under Network storage.
3. Enter the IP address of the host server.
4. Enter the name of the shared location on the host server.
5. Move the switch if the share requires a login, and enter username and password.
6. Click Connect.
Record and watch video
Record video
1. Go to the live view.
2. To start a recording, click Record. Click again to stop the recording.
Watch video
1. Click Storage > Go to recordings.
2. Select your recording in the list and it will play automatically.
Set up rules and alerts
AXIS Q1951-E Thermal Camera

10/7/21, 12:22 PM
AXIS Q1951-E Thermal Camera User manual
https://help.axis.com/axis-q1951-e
11/36
consists of conditions and actions. The conditions can be used to trigger the actions. For
example, the device can start a recording or send an email when it detects motion, or show an
overlay text while the device is recording.
For more information, visit Get started with rules for events.
Use a flashing beacon light to let possible intruders know that your perimeter is protected.
This example explains how to connect a beacon light and set it up to flash whenever the
thermal camera detects an intrusion. In this example, the beacon light can only be activated
to flash outside office hours, between 18.00 and 08.00 Monday–Friday, and it flashes for 30
seconds each time it is activated.
Note
The maximum length of the connecting wires depends on the wire area and the power
consumption of the flashing beacon.
Deter intruders with a flashing beacon
Required hardware
Connecting wires (one blue and one red, min area: 0.25 mm , max area: 0.5 mm )
2 2
Flashing beacon (12 V DC, max 25 mA)
Connect the devices physically
1. Connect the red wire to pin 2 (DC output, 12 V DC) of the camera’s I/O connector.
2. Connect the other end of the red wire to the connector marked with + on the flashing
beacon.
3. Connect the blue wire to pin 4 (digital output) of the camera’s I/O connector.
4. Connect the other end of the blue wire to the connector marked with - on the flashing
beacon.
Configure I/O ports
You need to connect the flashing beacon to the camera in the camera’s webpage.
1. Go to System > I/O ports.
2. Under Port 2, enter a name for the output module, for example “Flashing beacon”.
3. To make the beacon start flashing when an event occurs, select Open circuit (NO) as
AXIS Q1951-E Thermal Camera

10/7/21, 12:22 PM
AXIS Q1951-E Thermal Camera User manual
https://help.axis.com/axis-q1951-e
12/36
Create a rule
For the camera to send a notification to the beacon to start flashing when something is
detected, you need to create a rule in the camera.
Use a network horn speaker to warn and deter possible intruders.
This example explains how to connect an Axis network horn speaker and set it up to play an
audio clip whenever the thermal camera detects an intrusion. In this example, the horn
speaker can only be activated outside office hours, between 18.00 and 08.00 Monday-Friday.
normal state. .
1. Go to System > Events and add a rule.
2. Enter a name, for example “Flashing beacon”.
3. In the list of conditions, under Application, select the perimeter defender application.
4. Select Use this condition as a trigger.
5. Click + to add another condition.
6. In the list of conditions, under Scheduled and recurring, select Scheduled event.
7. In the list of schedules, select After hours.
8. In the list of actions, under I/O, select Output port.
9. In the port list, select Flashing beacon.
10. Set the duration to 30 seconds.
11. Click Save.
Deter intruders with audio
Connect the devices
1. Go to System > Accessories.
2. Under Network speaker pairing, enter the IP address, username, and password for the
speaker. You need to use an administrator or operator account.
3. Click Connect.
AXIS Q1951-E Thermal Camera

10/7/21, 12:22 PM
AXIS Q1951-E Thermal Camera User manual
https://help.axis.com/axis-q1951-e
13/36
This example explains how to trigger an alarm when the input signal has been cut or short-
circuited. For more information about the I/O connector, see I/O connector.
Youtube
Axis
3. C c Co ect.
Upload audio clip to the camera
1. Go to Audio > Audio clips and click .
2. Click +.
3. Locate and add the audio clip.
4. Click Close.
Create a rule
For the camera to make the speaker play the audio clip when something is detected, you need
to create a rule in the camera.
1. Go to System > Events and add a rule.
2. Enter a name, for example "Deter with audio”.
3. In the list of conditions, under Application, select the perimeter defender application.
4. Select Use this condition as a trigger.
5. Click + to add another condition.
6. In the list of conditions, under Scheduled and recurring, select Scheduled event.
7. In the list of schedules, select After hours.
8. In the list of actions, under Audio clips, select Play audio clip.
9. Under Clip, select your uploaded audio clip.
10. Under Audio output, select 1 for the paired network speaker.
11. Click Save.
Detect tampering with input signal
AXIS Q1951-E Thermal Camera

10/7/21, 12:22 PM
AXIS Q1951-E Thermal Camera User manual
https://help.axis.com/axis-q1951-e
14/36
How to send an email notification when someone tampers with the input signal
How to send an email notication when someHow to send an email notication when some……
Youtube
Axis
How to send an email notication if someone How to send an email notication if someone ……
1. Go to Settings > System > I/O Ports and turn on Supervised I/O.
Create a rule:
1. Go to Settings > System > Events and add a rule.
2. Type a name for the rule.
3. In the list of conditions, select Digital input and then select a port.
4. In the list of actions, select Send notification to email and then select a recipient from the
list. Go to Recipients to create a new recipient.
To create a new recipient, click . To copy an existing recipient, click .
5. Type a subject and a message for the email.
6. Click Save.
Send an email automatically if someone spray paints the lens
AXIS Q1951-E Thermal Camera

10/7/21, 12:22 PM
AXIS Q1951-E Thermal Camera User manual
https://help.axis.com/axis-q1951-e
15/36
How to send an email notification if someone spray paint the lens
1. Go to Settings > System > Detectors.
2. Turn on Trigger on dark images. This will trigger an alarm if the lens is sprayed, covered,
or rendered severely out of focus.
3. Set a duration for Trigger after. The value indicates the time that must pass before an
email is sent.
Create a rule:
1. Go to Settings > System > Events > Rules and add a rule.
2. Type a name for the rule.
3. In the list of conditions, select Tampering.
4. In the list of actions, select Send notification to email.
5. Select a recipient from the list or go to Recipients to create a new recipient.
To create a new recipient, click . To copy an existing recipient, click .
6. Type a subject and a message for the email.
7. Click Save.
Audio
Add audio to your recording
Turn on audio:
1. Go to Settings > Audio and turn on Allow audio.
AXIS Q1951-E Thermal Camera

10/7/21, 12:22 PM
AXIS Q1951-E Thermal Camera User manual
https://help.axis.com/axis-q1951-e
16/36
If the device gets grease stains or becomes heavily soiled, you can clean it with mild, solvent-
free soap or detergent.
NOTICE
Never use harsh detergent, for example gasoline, benzene, or acetone.
Note
Avoid cleaning in direct sunlight or at elevated temperatures, as this may cause stains
when the water droplets dry.
2. Go to Input > Type and select your audio source.
Edit the stream profile which is used for the recording:
3. Go to Settings > Stream and click Stream profiles.
4. Select the stream profile and click Audio.
5. Select the checkbox and select Include.
6. Click Save.
7. Click Close.
Cleaning recommendations
1. Use a can of compressed air to remove any dust or loose dirt from the device.
2. Clean the device with a soft cloth dampened with mild detergent and lukewarm water.
3. Wipe carefully with a dry cloth.
Learn more
Color palettes
AXIS Q1951-E Thermal Camera

10/7/21, 12:22 PM
AXIS Q1951-E Thermal Camera User manual
https://help.axis.com/axis-q1951-e
17/36
Color palettes applied to thermal images help the human eye distinguish image details. The
colors in the palette are artificially created pseudocolors that emphasize temperature
differences.
The product has several color palettes to choose from. If an operator watches the video
stream, you can choose any of the palettes. If the video stream is only used by applications,
select the white-hot palette.
Overlays are superimposed over the video stream. They are used to provide extra information
during recordings, such as a timestamp, or during product installation and configuration. You
can add either text or an image.
The video streaming indicator is another type of overlay. It shows you that the live view video
stream is live.
Decide which compression method to use based on your viewing requirements, and on the
properties of your network. The available options are:
Motion JPEG
Note
To ensure support for the Opus audio codec, the Motion JPEG stream is always sent over
RTP.
Motion JPEG, or MJPEG, is a digital video sequence that is made up of a series of individual
JPEG images. These images are then displayed and updated at a rate sufficient to create a
stream that shows constantly updated motion. For the viewer to perceive motion video the
rate must be at least 16 image frames per second. Full motion video is perceived at 30 (NTSC)
or 25 (PAL) frames per second.
Overlays
Streaming and storage
Video compression formats
AXIS Q1951-E Thermal Camera

10/7/21, 12:22 PM
AXIS Q1951-E Thermal Camera User manual
https://help.axis.com/axis-q1951-e
18/36
The Motion JPEG stream uses considerable amounts of bandwidth, but provides excellent
image quality and access to every image contained in the stream.
H.264 or MPEG-4 Part 10/AVC
Note
H.264 is a licensed technology. The Axis product includes one H.264 viewing client license.
To install additional unlicensed copies of the client is prohibited. To purchase additional
licenses, contact your Axis reseller.
H.264 can, without compromising image quality, reduce the size of a digital video file by more
than 80% compared to the Motion JPEG format and by as much as 50% compared to the
MPEG-4 standard. This means that less network bandwidth and storage space are required
for a video file. Or seen another way, higher video quality can be achieved for a given bitrate.
H.265 or MPEG-H Part 2/HEVC
Note
H.265 is licensed technology. The Axis product includes one H.265 viewing client license.
To install additional unlicensed copies of the client is prohibited. To purchase additional
licenses, contact your Axis reseller.
The Image tab contains camera settings that affect all video streams from the product. If you
change something in this tab, it immediately affects all video streams and recordings.
The Stream tab contains settings for video streams. You get these settings if you request a
video stream from the product and don’t specify for example resolution, or frame rate. When
you change the settings in the Stream tab, it doesn’t affect ongoing streams, but it will take
effect when you start a new stream.
The Stream profiles settings override the settings from the Stream tab. If you request a
stream with a specific stream profile, the stream contains the settings of that profile. If you
request a stream without specifying a stream profile, or request a stream profile that doesn't
exist in the product, the stream contains the settings from the Stream tab.
How do Image, Stream, and Stream profile settings relate to each other?
Bitrate control
AXIS Q1951-E Thermal Camera

10/7/21, 12:22 PM
AXIS Q1951-E Thermal Camera User manual
https://help.axis.com/axis-q1951-e
19/36
With bitrate control, you can manage the bandwidth consumption of your video stream.
Variable bitrate (VBR)
With variable bitrate, the bandwidth consumption varies based on the level of activity in the
scene. The more activity in the scene, the more bandwidth you need. You are guaranteed
constant image quality but it requires storage margins.
Maximum bitrate (MBR)
With maximum bitrate, you can set a target bitrate to handle bitrate limitations in your
system. You may see a decline in image quality or frame rate when the instantaneous bitrate
is kept below the specified target bitrate. You can choose to either prioritize image quality or
frame rate. We recommend that you configure the target bitrate to a higher value than the
expected bitrate. This gives you a margin for additional complexity that needs to be captured.
1. Target bitrate
Average bitrate (ABR)
AXIS Q1951-E Thermal Camera

10/7/21, 12:22 PM
AXIS Q1951-E Thermal Camera User manual
https://help.axis.com/axis-q1951-e
20/36
With average bitrate, the bitrate is automatically adjusted over a longer timescale. This is so
you can meet the specified target and provide the best video quality based on your available
storage. Bitrate is higher in scenes with a lot of activity, compared to static scenes. You are
more likely to get better image quality when needed when using the average bitrate option.
You can define the total storage required to store the video stream for a specified amount of
time (retention time) when image quality is adjusted to meet the specified target bitrate.
Specify the average bitrate settings in one of the following ways:
To calculate the estimated storage need, set the target bitrate and the retention time.
To calculate the average bitrate, based on available storage and required retention time,
use the target bitrate calculator.
kbit/s
s
1
2
1. Target bitrate
2. Actual average bitrate
You can also turn on maximum bitrate and specify a target bitrate within the average bitrate
option.
kbit/s
s
1
2
1. Target bitrate
2. Actual average bitrate
AXIS Q1951-E Thermal Camera
This manual suits for next models
1
Table of contents
Other Axis Thermal Camera manuals