Ayce ZW1012E23010 User manual

GEBRAUCHSANWEISUNG
INSTRUCTIONS DE SERVICE
ISTRUZIONI PER L’USO
ORIGINAL INSTRUCTIONS
Staubsauger I Aspirateur I
Aspirapolvere I Vacuum Cleaner
cleanĕo 2015.11.16

2 3
Vielen Dank für den Kauf dieses Produkts.
Wir bitten Sie, diese Gebrauchsanweisung vor Verwendung aufmerksam durchzulesen.
SICHERHEITSHINWEISE UND WARNUNGEN
Elektrische Sicherheit
• Nehmen Sie das Gerät nicht in Betrieb, wenn das Kabel oder der Stecker beschädigt ist.
• Vergewissern Sie sich, dass die auf dem Typenschild angegebene Spannung mit Ihrer Netz-
spannung übereinstimmt, bevor Sie das Gerät an eine Netzsteckdose anschliessen.
• Schliessen Sie das Gerät an eine geerdete Netzsteckdose, die mit mindestens 10 Ampere be-
lastet werden kann.
• Der Gerätestecker muss genau in die Netzsteckdose passen. Der Stecker darf nicht verändert
werden. Verwenden Sie keine Steckeradapter.
• Das Gerät weder dem Regen noch anderer Feuchtigkeit aussetzen. Gelangt Wasser in das Ge-
rät, besteht erhöhte Stromschlaggefahr.
• Wenn eines der Gerätegehäuse beschädigt wird, sofort den Stecker aus der Netzsteckdose zie-
hen, um eine Stromschlaggefahr zu vermeiden.
• Das Kabel keinen mechanischen Belastungen aussetzen. Das Gerät niemals am Kabel anheben,
tragen oder aus der Netzsteckdose ziehen.
• Prüfen Sie den Zustand des Netzkabels. Beschädigte oder verhedderte Kabel erhöhen das Ri-
siko eines Stromschlags.
• Den Netzstecker nicht mit nassen Händen anfassen.
Reinigung und Wartung
• Verwenden Sie das Gerät nicht, wenn Zubehör oder Gehäuseteile nicht richtig zusammenge-
setzt sind.
• Nehmen Sie das Gerät nicht in Betrieb, wenn angeschlossene Zubehörteile defekt sind. Erset-
zen Sie die defekten Teile sofort.
• Saugen Sie kein Wasser oder sonstige Flüssigkeiten mit dem Gerät auf.
• Nehmen Sie das Gerät nicht in Betrieb, wenn der Ein-/Aus-Schalter defekt ist.
• Überlasten Sie die Leistungsfähigkeit des Geräts nicht.
• Dieses Gerät ist nur für den Haushaltsgebrauch und nicht für den gewerblichen oder industri-
ellen Gebrauch bestimmt.
• Dieses Gerät ist kein Spielzeug. Kinder müssen beaufsichtigt werden, um sicherzustellen, dass
sie nicht mit dem Gerät spielen.
• Dieses Gerät ist nur für den Gebrauch durch Erwachsene bestimmt. Vergewissern Sie sich,
dass dieses Produkt nicht von Personen mit eingeschränkten körperlichen und geistigen Fä-
higkeiten, von Kindern und von Personen, die unsicher im Umgang mit derartigen Geräten sind,
verwendet wird.
• Dieses Gerät muss ausser Reichweite von Kindern und/oder Personen mit eingeschränkten
körperlichen und geistigen Fähigkeiten aufbewahrt werden.
• Vergewissern Sie sich, dass das Ventilatorgitter am Gerät nicht durch Staub, Schmutz oder
Fremdkörper verstopft wird.
• Vergewissern Sie sich, dass der Deckel vor dem Einschalten des Geräts korrekt geschlossen ist.
• Jeglicher Missbrauch oder die Nichtbefolgung der Gebrauchsanweisungen führt zum Erlö-
schen der Garantie.
BESCHREIBUNG DER EINZELTEILE
1. Ein-/Aus-Schalter
2. Saugleistungsregler
3. Staubbeutelfüllstandsanzeige
4. Automatische Kabelaufwicklung
5. Luftauslassabdeckung
6. Saugleistungsschieber
7. Saugschlauch
8. Teleskoprohr
9. Bodendüse
10. Fugenbürste
11. Fugendüse
8
8
8
8
2
1
3
4
5
7
8
9
10
11
6

4 5
GEBRAUCHSANWEISUNG
Befestigen des Saugschlauchs:
Zusammensetzen: Stecken Sie den Saugschlauchanschluss in die Lufteinlassönung. Drücken
Sie den Saugschlauchanschluss in die Önung, bis er hörbar einrastet.
Auseinandernehmen: Ziehen Sie den Saugschlauchanschluss aus der Lufteinlassönung, indem
Sie die zwei Knöpfe zusammendrücken.
Zusammensetzen des Teleskoprohrs und Einsetzen des Zubehörs:
1. Stecken Sie das Teleskoprohr auf den Handgri.
2. Stellen Sie das Teleskoprohr auf die geeignete Länge ein. Drücken Sie den Schieber am Teles-
koprohr nach vorne und ziehen Sie den unteren Teil des Rohrs auf die gewünschte Länge aus.
Lassen Sie dann den Schieber wieder los und in die Ursprungsposition zurückschnappen.
3. Stecken Sie die Bodendüse auf das Teleskoprohr.
1
Connect hose to Cleaner
WhenInstallingthehose,pleaseholdthemainsuctionpipebutton,andaimattheairinlet,then
pushtillitiscompletelylocked.
Telescopic tube
Screwthetelescopictubein
Screwthetelescopictubeout
Slidethetuttonforthandbacktoadjustthe
suctionpower
Slidethebuttontoadjustthelengthoftelescopictube
Floor Brush
Forinstallingafloorbrush,manuallyscrewthetelescopictubeintothefloorbrush
2
forcarpet
forhardfloor
- Turnleftforabetterhard
floorperfmance
- Turnrightwhennotforhard
floorsuction
Connect telescopic tube to dusting brush and crevice tool
On/ off button
Presstoswitchonand
Cord rewind button
Presstorewindthepower
cord
Bodendüse
Für die tägliche Reinigung von Teppichen und Holzböden.
Einstellung der Bodendüse für Teppiche, Fliesenböden oder Holzparkett:
AHarte Fussböden = Bürstenleiste ausgefahren
BTeppiche = Bürstenleiste eingezogen
CNach links schieben zum Saugen von Hartböden
Nach rechts schieben zum Saugen von Teppichböden
Fugenbürste/-düse
• Zum Reinigen von Heizkörpern, Ecken, Rändern, Schubladen, usw.
• Zum Reinigen von Vorhängen, Regalen, Büchern, Lampen und sonstigen empfindlichen Ge-
genständen.
BETRIEB
Staubsaugen
1. Vor dem Gebrauch zuerst das elektrische Kabel in ausreichender Länge herausziehen und den
Stecker in die Wandsteckdose stecken. Die gelbe Kennzeichnung auf dem Kabel zeigt die ma-
ximale Länge an, die nicht überschritten werden darf. Schalten Sie das Gerät durch Drücken
der Ein-/Aus-Taste am Gehäuse ein.
2. Es wird empfohlen, den elektronischen Leistungsregler vor dem Einschalten des Geräts auf
MIN zu stellen.
2
forcarpet
forhardfloor
- Turnleftforabetterhard
floorperfmance
- Turnrightwhennotforhard
floorsuction
Connect telescopic tube to dusting brush and crevice tool
On/ off button
Presstoswitchonand
Cord rewind button
Presstorewindthepower
cord
A B
C

6 7
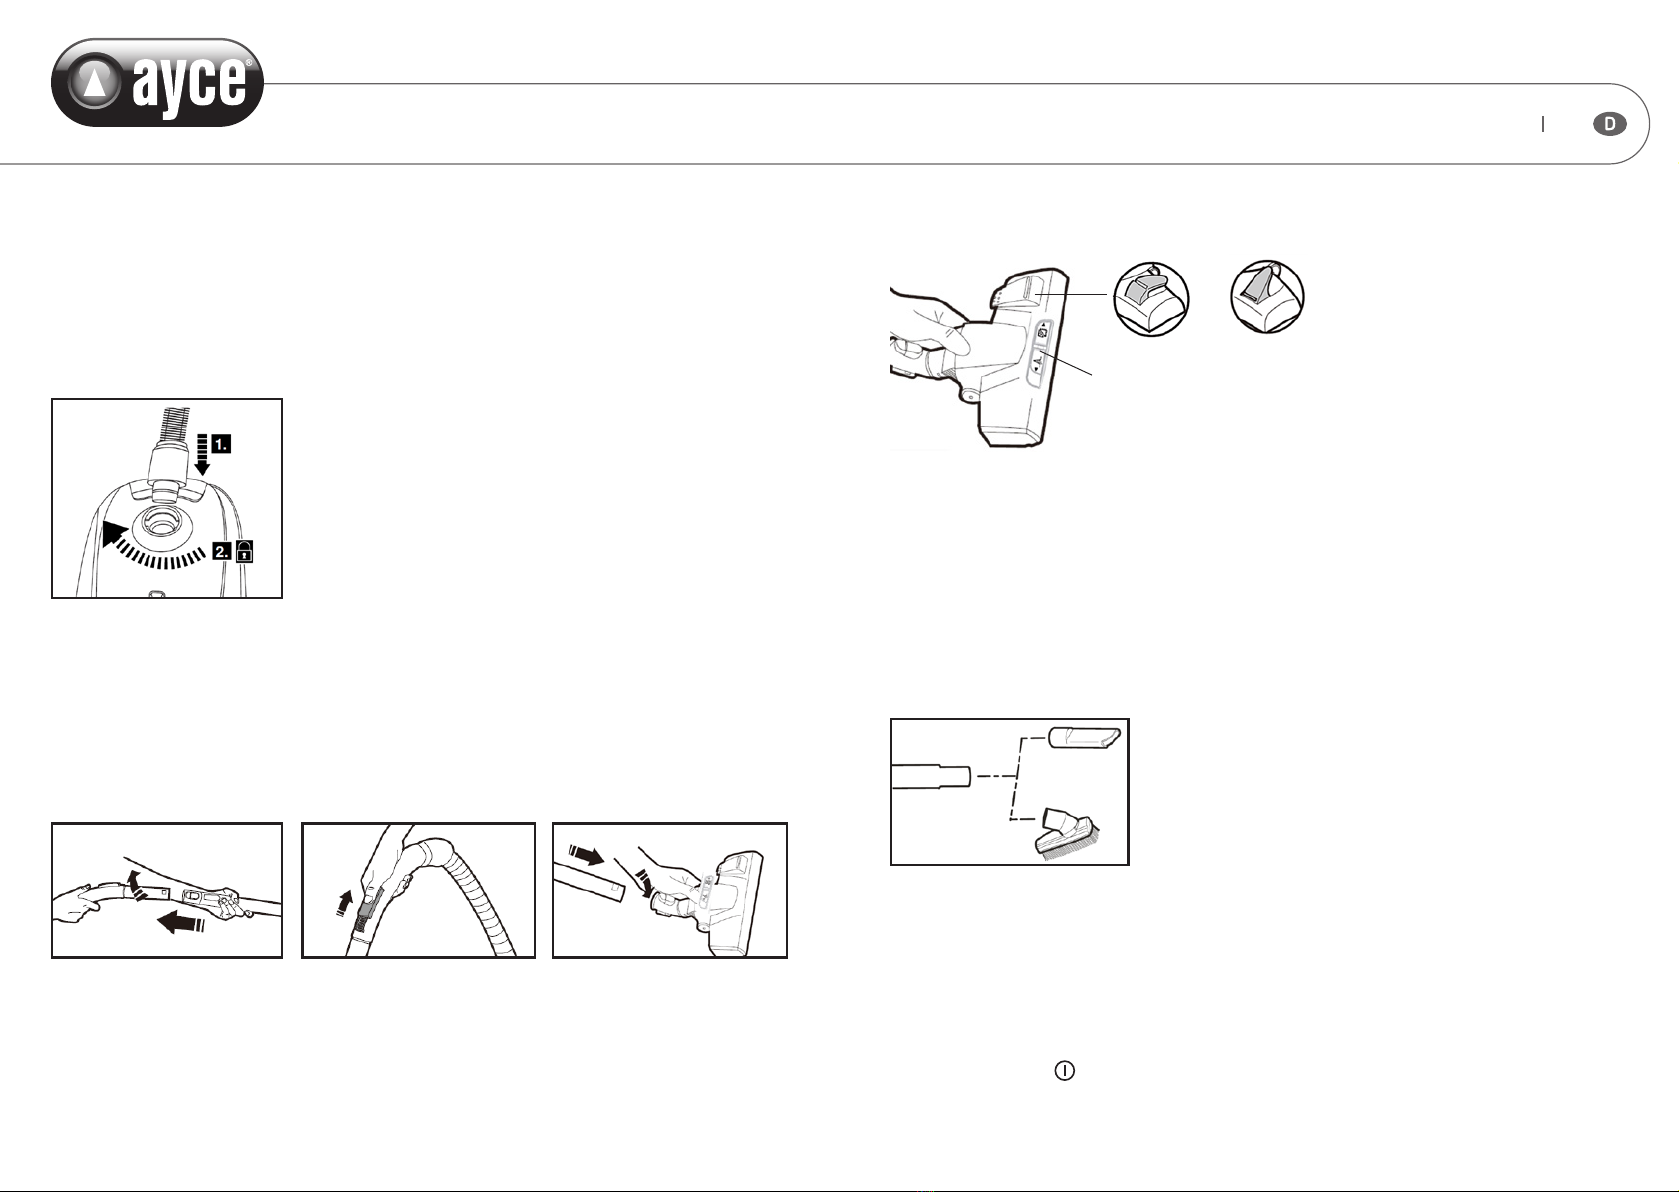
3. Regulieren der Saugleistung: Die Saugleistung des Geräts kann individuell je nach Bedarf mit
dem Leistungsregler eingestellt werden. Wir empfehlen, bei empfindlichen Materialien die
geringste Saugleistung einzustellen. Wählen Sie für Matratzen, Polstermöbel und Teppiche die
mittlere Saugleistung. Für Fliesen, Parkettböden und sonstige robuste Böden kann die maxi-
male Saugleistung verwendet werden.
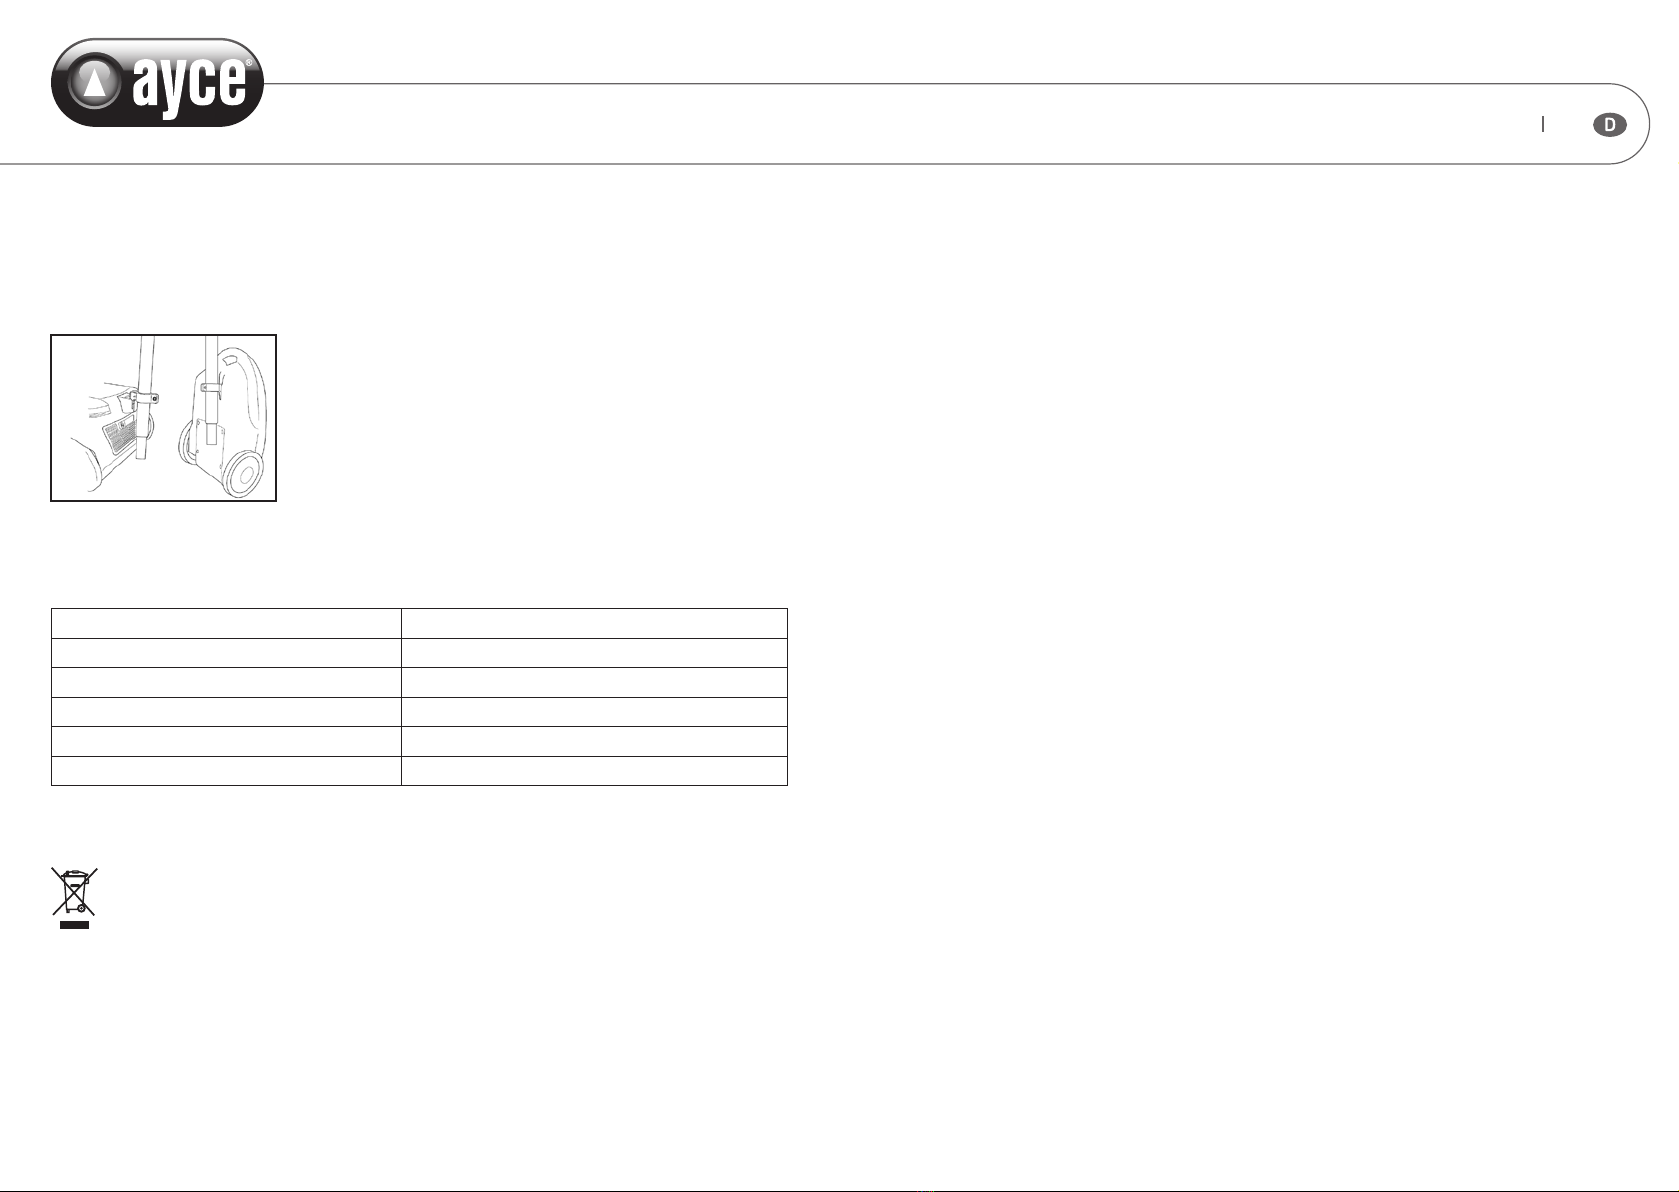
4. Zum Einziehen des Kabels die Taste mit einer Hand drücken und mit der anderen Hand
das Kabel führen, um Schäden durch einen herumschlagenden Stecker zu vermeiden. -> Das
Kabel lässt sich nicht vollständig einziehen: Ziehen Sie das Kabel wieder ein kleines Stück
heraus und drücken Sie dann erneut die Kabelaufrolltaste. Diese Schritte zum Aufrollen des
Kabels können wiederholt werden, bis das Kabel vollständig aufgerollt ist.
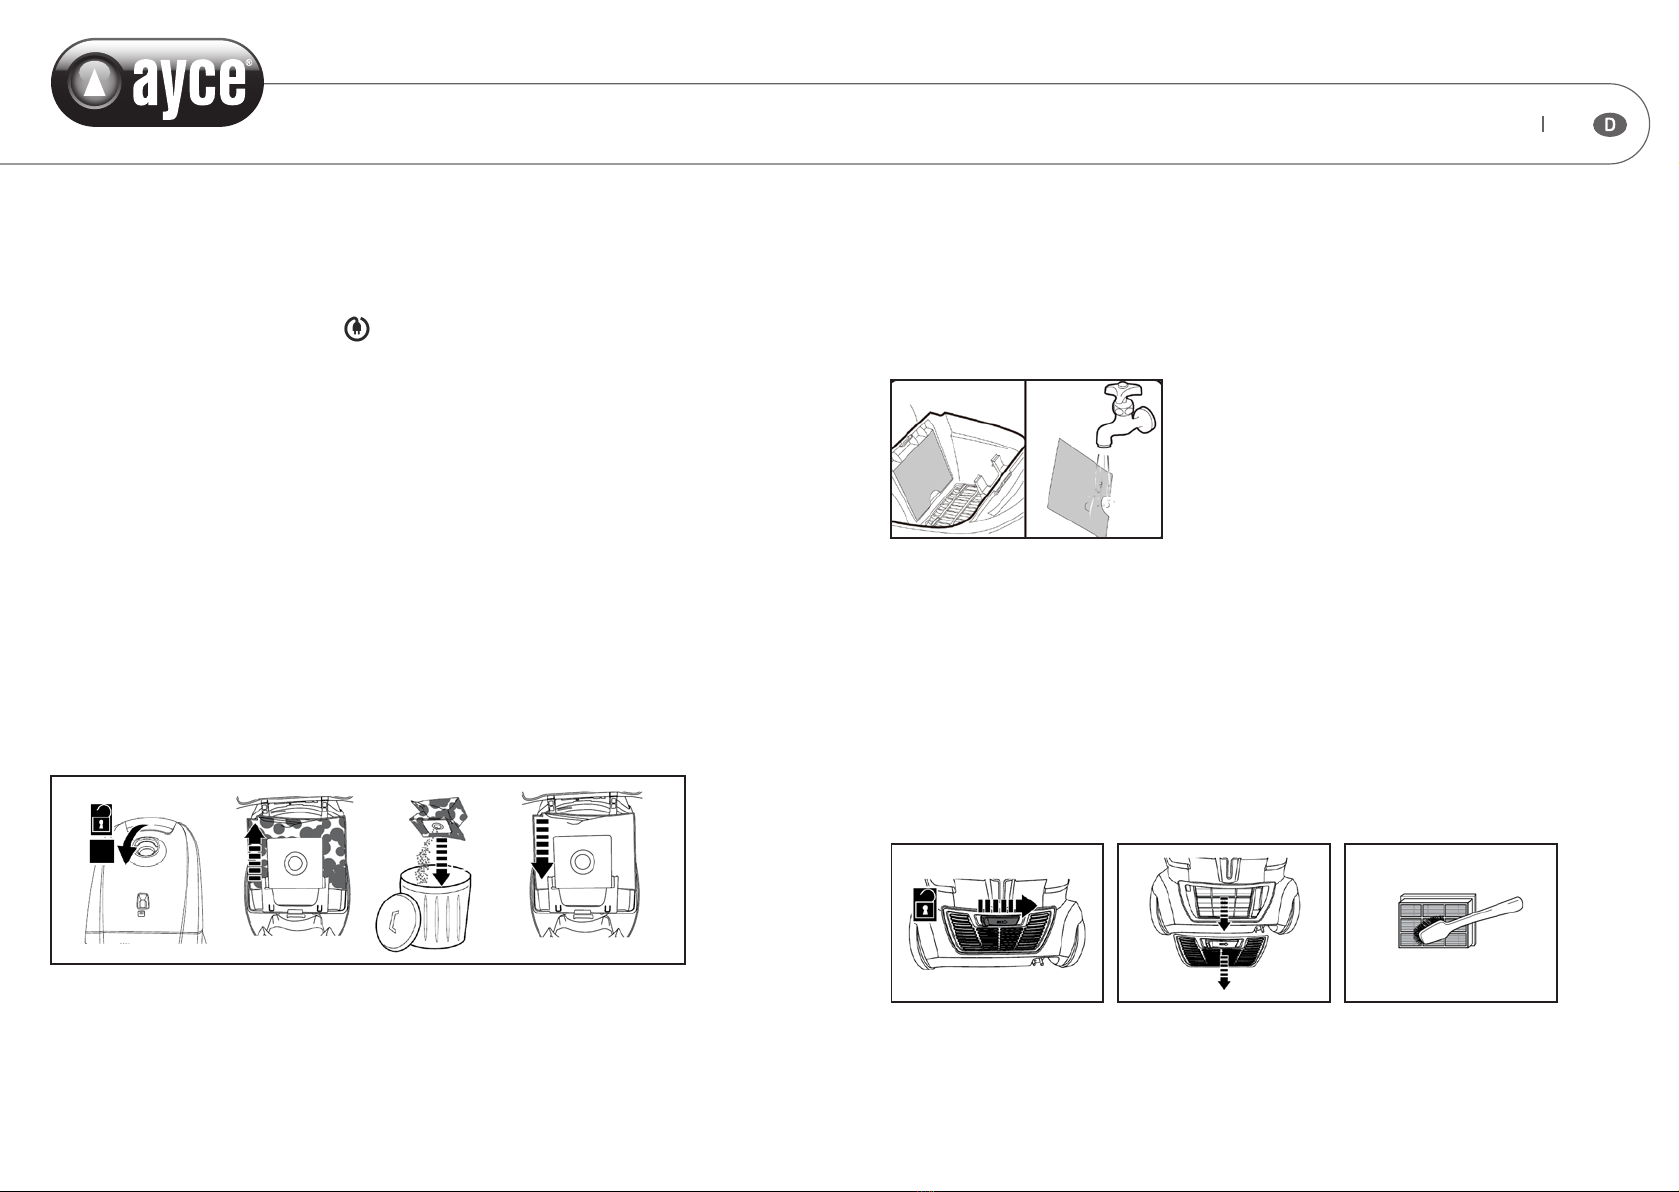
AUSWECHSELN DES STAUBBEUTELS
Anmerkung: Schalten Sie den Staubsauger aus und ziehen Sie vor dem Auswechseln des
Staubbeutels oder der Reinigung des Motorfilters den Netzstecker. Verwenden Sie den Staub-
sauger niemals ohne Staubbeutel bzw. ohne Filter.
Wenn die Staubbeutelfüllstandsanzeige erscheint, muss der Staubbeutel entleert werden.
1. Önen Sie die obere Abdeckung und nehmen Sie den Staubbeutel aus dem Gehäuse heraus.
2. Wechseln Sie den Staubbeutel gegen einen neuen aus (wenn der mitgelieferte Staubbeutel
aufgebraucht ist, ersetzen Sie diesen mit einem Swirl Y12 Staubbeutel).
3. Vergewissern Sie sich, dass der neue Staubbeutel richtig eingesetzt ist.
4. Schliessen Sie die obere Abdeckung wieder. Vergewissern Sie sich, dass der Deckel sicher
eingerastet ist.
Achtung: Ein System verhindert, dass das Gerät ohne Staubbeutel betrieben wird. Wenn der
Staubbeutel nicht richtig eingelegt ist oder fehlt, lässt sich der Deckel nicht schliessen und das
Gerät kann nicht in Betrieb genommen werden (keine Saugleistung).
WARTUNG
Reinigen des Motorfilters
Wenn der Motorfilter schmutzig ist, den Filter herausnehmen und sorgfältig unter fliessendem
Wasser auswaschen. Der Filter muss vollständig trocken sein, bevor er wieder eingesetzt wird.
Reinigen des Abluftfilters (HEPA Filter)
Der Abluftfilter reinigt die Luft ein letztes Mal, bevor sie den Staubsauger verlässt. Der Abluftfilter
kann wie folgt gereinigt werden:
1. Schalten Sie den Staubsauger aus und ziehen Sie den Netzstecker.
2. Önen Sie das Gitter des Abluftfilters.
3. Der Abluftfilter ist sichtbar, nachdem das Gitter geönet wurde.
4. Spülen Sie den Filter unter kaltem fliessenden Wasser aus und lassen Sie ihn trocknen.
5. Legen Sie den Abluftfilter wieder an seinen Platz zurück und setzen Sie das Gitter wieder ein.
4
Power adjust button
Slidethebuttontoadjustthesuctionpower
Replacing or cleaning the dust bag
While the dust bag full indicator lamp light on, it indicates out that the dust bag is full, and
need to be cleaned or replaced.
(1) Confirm the power supply is disconnected.
(2) Lift the locking block of the front cover, and open the front cover.
(3) If a paper bag is used, replace it with a new one.
(4) Dust bag installation: Pull out the bag lock ,Push the dust bag toward at the direction of
the arrow till it reach the bottom of the bag rack, then close the front cover.
Replacing or cleaning filters
(1) Confirm the power supply is disconnected.
(2) Open the front cover, remove the old air inlet filter to rinse and allow the filter to dry,
5
then insert air inlet filter or a new filter and close the front cover.
(3) For replacing the air outlet HEPA, open the air outlet plate, take the dirty air outlet
HEPA out and replace it with a new one, close the air outlet plate.
(4) For washing the filters, please wash them in clean water, vibrate the filters to eliminate
excessive water, then put them at a shady or cool place for air-drying. Please assemble
them to the vacuum cleaner for using after they are completely dry, otherwise the motor
will be damaged.
●Must be washed at an interval of half year at least.
6
Machine Storage
Hangthebrushonthebackhook
Hangthefloorbrushonthebasehook
TroubleShooting
followblowmethodstodealwithanyabnormalproblemshappened,ifcleanerstillcannot
work,pleasecontactthesalesshoporauthorizedservicecenter。
Description
Solutions
Cleaner
don’t
running
- Checkpluginsertfirmlyornot,tounplug,insertsocketagain
- Checkplugelectrifyornot。
- Checkswitchisonornot。

8 9
TECHNISCHE DATEN
Leistung 700 W
Saugkraft 150 W
Kompatibel mit Swirl Y12
Behälterfassungsvermögen 4,5 l
Filter HEPA 13-Filter
Kabel 5 m
ENTSORGUNG
Gerät, Zubehör und Verpackung müssen einer umweltgerechten Wiederverwertung zu-
geführt werden. Nicht mehr gebrauchsfähige Elektrogeräte können zum Recycling beim
Handel abgegeben werden. Werfen Sie Elektrogeräte nicht in den Hausmüll. Gemäss der
Europäischen Richtlinie 2002/96/EG über Elektro- und Elektronik-Altgeräte und ihrer Umset-
zung in nationales Recht müssen nicht mehr gebrauchsfähige Elektrogeräte getrennt, gesam-
melt und einer umweltgerechten Wiederverwertung zugeführt werden.
Aufbewahrung des Staubsaugers
Nach beendeter Reinigung mit dem Staubsauger schalten Sie diesen bitte ab und ziehen Sie den
Netzstecker. Drücken Sie dann auf die Kabelaufrolltaste und rollen Sie das Kabel vollständig auf.
Hängen Sie die Bodendüse an den für die Bodendüse vorgesehenen Haken.
6
Machine Storage
Hangthebrushonthebackhook
Hangthefloorbrushonthebasehook
TroubleShooting
followblowmethodstodealwithanyabnormalproblemshappened,ifcleanerstillcannot
work,pleasecontactthesalesshoporauthorizedservicecenter。
Description
Solutions
Cleaner
don’t
running
- Checkpluginsertfirmlyornot,tounplug,insertsocketagain
- Checkplugelectrifyornot。
- Checkswitchisonornot。

10 11
GARANTIEURKUNDE
Herzlichen Glückwunsch! Sie haben mit dem Kauf dieses Qualitätsprodukts eine
ausgezeichnete Wahl getroen. Unsere Qualitätsverpflichtung schliesst auch
unseren Kundendienst ein. Jumbo bietet einen ausgezeichneten Reparaturdienst an.
Sollte Ihr Gerät entgegen aller Erwartungen bei der privaten Nutzung
innerhalb von FÜNF JAHREN ab Kaufdatum einen Mangel aufgrund von
Material- oder Herstellungsfehlern aufweisen, können Sie unsere Ga-
rantieleistung entsprechend der Rechtsverordnung für Garantieleistun-
gen in Anspruch nehmen, vorausgesetzt dass das Gerät:
– ausschliesslich zweckbestimmt benutzt wurde;
– nicht überladen wurde;
– nicht mit den falschen Zubehörteilen benutzt wurde;
– ausschliesslich von einer Vertragswerkstatt repariert wurde
Die Garantieurkunde ist nur im Zusammenhang mit dem Kassenzettel gültig. Bitte heben Sie
beides sicher auf. Die Garantie betrit nicht Ihr gesetzliches Recht auf Gewährleistung. Die Ga-
rantie ist für einen Zeitraum von FÜNF JAHREN beginnend mit dem Kaufdatum gültig. Bewahren
Sie Ihre Kaufquittung als Beweis für das Kaufdatum sicher auf. Die Garantiezeit kann nur für
die Dauer von erforderlichen Reparaturen verlängert werden. Während der Garantiezeit können
mängelaufweisende Geräte in jeder jeder Jumbo-Filiale zurückgegeben werden. Wir werden uns
die Entscheidung vorbehalten, das Gerät gemäss geltenden Garantiebestimmungen entweder zu
reparieren oder auszutauschen.
Bitte schicken Sie folgende Dokumente bei der Rückgabe Ihres Produktes zur Reparatur mit:
1. Kassenzettel (Kaufnachweis)
2. Diese Garantieurkunde
3. Den ausgefüllten Garantieschein
Wird der Originalkassenzettel nicht beigelegt, dann wird die Reparatur in allen Fällen berechnet.
Nach Auslauf der Garantie können Sie ein mangelhaftes Gerät immer noch zur Reparatur ein-
schicken. Kostenvoranschläge sowie Reparaturen nach Ablauf der Garantiezeit sind in allen Fäl-
len von Ihnen zu bezahlen. Die Garantie betrit nicht Ihr gesetzliches Recht auf Gewährleistung.
CH-Import & Distribution exklusiv durch:
Jumbo-Markt AG, 8305 Dietlikon
www.jumbo.ch
GARANTIESCHEIN
Vorname Nachname
Strasse/Nr. Telefon
Postleitzahl Ort Mobil
Artikelnummer Artikelnummer Barcode (EAN)
Garantie (Bitte ankreuzen) Kaufbeleg Nr./Datum
(Bitte ebenfalls eine Kopie des Kaufbelegs beifügen)
Ja Nein
Das Gerät wurde in der folgenden Jumbo-Filiale gekauft:
Aufgetretene Mängel (bitte auflisten). Bitte beschreiben Sie das Problem oder die Betriebsstörung Ihres Gerätes so genau
wie möglich. So können wir Ihre Beschwerde schneller und ezienter bearbeiten. Eine ungenaue Beschreibung mit Begrif-
fen wie «Gerät funktioniert nicht» oder «Gerät ist kaputt» kann diesen Prozess beträchtlich verlängern.
Zusatzhinweis Servicestelle: Während der Garantiezeit können mängelaufweisende Geräte in jeder Jumbo-Filiale zurück
gebracht werden. Nach Ablauf der Garantiefrist werden die ayce Produkte in jeder Jumbo-Filiale angenommen, damit das
Produkt entsprechend geprüft werden kann.

12 13
Nous vous remercions d’avoir acheté ce produit.
Nous vous demandons de bien vouloir lire attentivement et entièrement ce mode d’emploi avant
l’utilisation.
CONSIGNES DE SÉCURITÉ ET AVERTISSEMENTS
Sécurité électrique
• Ne pas utiliser l’appareil si le câble ou la fiche électrique sont endommagés.
• S’assurer que la tension indiquée sur la plaque signalétique correspond bien à la tension du
secteur avant de brancher l’appareil dans une prise électrique.
• Raccorder l’appareil à une prise secteur reliée à la terre et pouvant supporter une charge d’au
moins 10 ampères.
• La fiche de l’appareil doit être parfaitement adaptée à la prise secteur. La fiche ne doit en aucun
cas être modifiée. Ne pas utiliser d’adaptateur de fiche.
• Ne laisser l’appareil ni sous la pluie ni l’exposer à une quelconque autre source d’humidité. La
pénétration d’eau dans l’appareil augmente le risque de choc électrique.
• Si l’un des boîtiers de l’appareil est endommagé, retirer immédiatement la fiche de la prise
secteur afin d’éviter le risque d’un choc électrique.
• Ne pas soumettre le câble à des contraintes mécaniques. Ne jamais soulever ou porter l’appa-
reil par le câble ou retirer la fiche de la prise de courant à l’aide de celui-ci.
• S’assurer du bon état du câble d’alimentation. Les câbles endommagés ou enchevêtrés aug-
mentent le risque de choc électrique.
• Ne pas toucher la fiche avec les mains mouillées.
Nettoyage et maintenance
• Ne pas utiliser l’appareil si les accessoires ou les parties du boîtier ne sont pas assemblés
correctement.
• Ne pas utiliser l’appareil si les accessoires raccordés sont défectueux. Remplacer immédiate-
ment les pièces défectueuses.
• Ne pas aspirer de l’eau ou d’autres liquides avec l’appareil.
• Ne pas utiliser l’appareil si l’interrupteur marche/arrêt est défectueux.
• Ne pas surcharger la capacité de l’appareil.
• Cet appareil est destiné exclusivement à l’usage domestique et non pour une utilisation profes-
sionnelle ou industrielle.
• Cet appareil n’est pas un jouet. Les enfants doivent rester sous surveillance afin de garantir
qu’ils ne jouent pas avec l’appareil.
• Ce produit est destiné exclusivement à être utilisé par les adultes. S’assurer que ce produit
n’est pas utilisé par des personnes sourant d’un handicap physique ou mental, par des en-
fants et par des personnes qui ne sont pas habituées à utiliser de tels appareils.
• Ranger cet appareil hors de portée d’enfants et/ou de personnes sourant d’un handicap phy-
sique ou mental.
• S’assurer que la grille du ventilateur sur l’appareil n’est pas obstruée par de la poussière, des
salissures ou des objets étrangers.
• S’assurer que le couvercle est parfaitement fermé avant de mettre l’appareil en marche.
• Tout emploi abusif ou le non-respect des instructions d’utilisation rend la garantie caduque.
PIÈCES
1. Interrupteur Marche
2. Variateur de puissance d‘aspiration
3. Indicateur de sac à poussière plein
4. Enroulement automatique du câble
5. Cache de la sortie d’air
6. Curseur de réglage de puissance d‘aspiration
7. Flexible
8. Tube télescopique
9. Buse de sol
10. Brosse à fauteuils
11. Suceur coins
8
8
8
8
2
1
3
4
5
7
8
9
10
11
6

14 15
INSTRUCTIONS DE SERVICE
Fixation du flexible :
Assemblage : Introduire l‘embout du flexible dans l‘orifice d‘aspiration. Pousser l‘embout du
flexible dans l‘orifice d‘aspiration jusqu‘à ce qu‘il s‘enclenche avec un clic audible.
Désassemblage : Sortir l’embout du flexible de l’orifice d’aspiration en appuyant sur tous les deux
boutons.
Assemblage du tube télescopique et mise en place des accessoires :
1. Enficher le tube télescopique sur la poignée.
2. Régler la bonne longueur du tube télescopique. Pousser le coulisseau sur le tube télescopique
vers l’avant et sortir la partie inférieure du tube à la longueur souhaitée. Relâcher le coulisseau
qui reviendra dans sa position d‘origine.
3. Placer la buse de sol sur le tube télescopique.
1
Connect hose to Cleaner
WhenInstallingthehose,pleaseholdthemainsuctionpipebutton,andaimattheairinlet,then
pushtillitiscompletelylocked.
Telescopic tube
Screwthetelescopictubein
Screwthetelescopictubeout
Slidethetuttonforthandbacktoadjustthe
suctionpower
Slidethebuttontoadjustthelengthoftelescopictube
Floor Brush
Forinstallingafloorbrush,manuallyscrewthetelescopictubeintothefloorbrush
2
forcarpet
forhardfloor
- Turnleftforabetterhard
floorperfmance
- Turnrightwhennotforhard
floorsuction
Connect telescopic tube to dusting brush and crevice tool
On/ off button
Presstoswitchonand
Cord rewind button
Presstorewindthepower
cord
Buse de sol
Pour le nettoyage quotidien de vos moquettes et parquets.
Réglage de la buse de sol pour moquettes, sols carrelés ou parquets de bois :
ASols durs = brosse sortie
BMoquettes = brosse retractée
CDéplacer vers la gauche pour de meilleures performances sur sol dur
Déplacer vers la droite lorsque vous ne nettoyez pas un sol dur
Suceur/brosse coins
• Pour le nettoyage de radiateurs, de coins, de bordures, de tiroirs, etc.
• Pour le nettoyage de rideaux, d‘étagères, de livres, de lampes et d‘autres objets sensibles.
FONCTIONNEMENT
Aspirer
1. Sortir susamment de câble avant d‘utiliser l‘appareil puis brancher la fiche électrique. Le
repère jaune sur le câble indique la longueur maximale du câble ne devant pas être dépassée.
Actionner la touche sur le boîtier de l‘appareil pour le mettre en service.
2. Il est recommandé de mettre le variateur de puissance sur MIN avant de mettre l‘appareil en
service.
2
forcarpet
forhardfloor
- Turnleftforabetterhard
floorperfmance
- Turnrightwhennotforhard
floorsuction
Connect telescopic tube to dusting brush and crevice tool
On/ off button
Presstoswitchonand
Cord rewind button
Presstorewindthepower
cord
A B
C

16 17
3. Réglage de la puissance d‘aspiration : la puissance d‘aspiration de l‘appareil peut être réglée
individuellement selon les besoins à l‘aide du variateur de puissance. Il est recommandé de
choisir la puissance la plus faible pour des matériaux sensibles. Sélectionner la puissance
d‘aspiration moyenne pour les matelas, meubles rembourrés et moquettes. La puissance
d‘aspiration maximale peut être sélectionnée pour les carrelages, parquets et autres sols
robustes.
4. Pour enrouler le câble, appuyer avec la main sur la touche et guider le câble avec l‘autre
main afin d‘éviter les dommages dus à des mouvements incontrôlés du câble.
-> Le câble ne s‘enroule pas complètement : dérouler le câble un peu et appuyer de nouveau
sur la touche d‘enroulement. Il est possible de répéter ces opérations pour enrouler le câble
jusqu‘à ce que celui-ci soit entièrement enroulé.
REMPLACEMENT DU SAC À POUSSIÈRES
Note : couper l‘aspirateur et le débrancher avant de remplacer le sac à poussières ou bien
avant le nettoyage du filtre moteur. Ne jamais utiliser l‘aspirateur sans sac à poussières ou sans
filtre.
Nettoyage ou remplacement du sac à poussières::
1. Quand l‘indicateur de remplissage du sac à poussières passe au rouge, il est temps de nettoyer
la poussière.
2. Ouvrir le couvercle supérieur, retirer le sac à poussières du compartiment.
3. Remplacer le sac à poussières en papier par un neuf. Lorsque le sac à poussière joint a été
utilisé, le remplacer par un sac à poussières Swirl Y12.
4. S‘assurer que le sac neuf est correctement positionné. Fermer le couvercle supérieur. S‘assu-
rer qu‘il est bien fixé.
Attention : un système empêche le fonctionnement de l‘aspirateur sans sac à poussières. Si le
sac à poussières n‘est pas inséré correctement ou s‘il n‘est pas en place, le couvercle ne peut
pas être fermé et l‘appareil ne peut pas être mis en marche (pas de puissance d‘aspiration).
ENTRETIEN
Nettoyage du filtre de protection du moteur
Sortir le filtre de protection du moteur s‘il est encrassé, et le rincer abondamment sous l‘eau du
robinet. Le filtre doit être complètement sec avant de le remettre en place.
Nettoyage du filtre de sortie d‘air (filtre HEPA)
Le filtre de sortie d‘air eectue un dernier nettoyage de l‘air avant que celui-ci ne quitte l‘aspira-
teur. Le nettoyage du filtre de sortie d‘air s‘eectue de la manière suivante :
1. Mettre l‘aspirateur hors service et débrancher la fiche électrique du secteur.
2. Ouvrir la grille du filtre de sortie d‘air.
3. Le filtre de sortie d‘air est visible après ouverture de la grille.
4. Rincer le filtre sous l‘eau courante froide et le laisser sécher.
5. Remettre le filtre de sortie d‘air en place et remettre ensuite la grille.
4
Power adjust button
Slidethebuttontoadjustthesuctionpower
Replacing or cleaning the dust bag
While the dust bag full indicator lamp light on, it indicates out that the dust bag is full, and
need to be cleaned or replaced.
(1) Confirm the power supply is disconnected.
(2) Lift the locking block of the front cover, and open the front cover.
(3) If a paper bag is used, replace it with a new one.
(4) Dust bag installation: Pull out the bag lock ,Push the dust bag toward at the direction of
the arrow till it reach the bottom of the bag rack, then close the front cover.
Replacing or cleaning filters
(1) Confirm the power supply is disconnected.
(2) Open the front cover, remove the old air inlet filter to rinse and allow the filter to dry,
5
then insert air inlet filter or a new filter and close the front cover.
(3) For replacing the air outlet HEPA, open the air outlet plate, take the dirty air outlet
HEPA out and replace it with a new one, close the air outlet plate.
(4) For washing the filters, please wash them in clean water, vibrate the filters to eliminate
excessive water, then put them at a shady or cool place for air-drying. Please assemble
them to the vacuum cleaner for using after they are completely dry, otherwise the motor
will be damaged.
●Must be washed at an interval of half year at least.
5
then insert air inlet filter or a new filter and close the front cover.
(3) For replacing the air outlet HEPA, open the air outlet plate, take the dirty air outlet
HEPA out and replace it with a new one, close the air outlet plate.
(4) For washing the filters, please wash them in clean water, vibrate the filters to eliminate
excessive water, then put them at a shady or cool place for air-drying. Please assemble
them to the vacuum cleaner for using after they are completely dry, otherwise the motor
will be damaged.
●Must be washed at an interval of half year at least.
5
then insert air inlet filter or a new filter and close the front cover.
(3) For replacing the air outlet HEPA, open the air outlet plate, take the dirty air outlet
HEPA out and replace it with a new one, close the air outlet plate.
(4) For washing the filters, please wash them in clean water, vibrate the filters to eliminate
excessive water, then put them at a shady or cool place for air-drying. Please assemble
them to the vacuum cleaner for using after they are completely dry, otherwise the motor
will be damaged.
●Must be washed at an interval of half year at least.
6
Machine Storage
Hangthebrushonthebackhook
Hangthefloorbrushonthebasehook
TroubleShooting
followblowmethodstodealwithanyabnormalproblemshappened,ifcleanerstillcannot
work,pleasecontactthesalesshoporauthorizedservicecenter。
Description
Solutions
Cleaner
don’t
running
- Checkpluginsertfirmlyornot,tounplug,insertsocketagain
- Checkplugelectrifyornot。
- Checkswitchisonornot。

18 19
CARACTÉRISTIQUES TECHNIQUES
Puissance 700 W
Puissance d’aspiration 150 W
Compatible avec Swirl Y12
Capacité du réservoir 4,5 l
Niveau sonore ≤72 dB(A)
Filtre HEPA 13
Câble 5 m
MISE AU REBUT
L‘appareil, ses accessoires et son emballage doivent subir un recyclage écologique. Les
appareils électriques inutilisables peuvent être remis dans le commerce pour leur recyclage.
Ne jetez pas les appareils électriques dans les ordures ménagères. Les appareils électriques
inutilisables doivent être collectés séparément et subir un recyclage écologique conformément à la
directive européenne 2002/96/CE relative aux anciens appareils électriques et électroniques et sa
mise en application dans le droit national.
Rangement de l’aspirateur
Une fois le nettoyage terminé avec l’aspirateur, mettre celui-ci hors service et débrancher la
fiche secteur. Actionner ensuite la touche d’enroulement du câble et enrouler le câble en totalité.
Accrocher la buse de sol au crochet prévu à cet eet.
6
Machine Storage
Hangthebrushonthebackhook
Hangthefloorbrushonthebasehook
TroubleShooting
followblowmethodstodealwithanyabnormalproblemshappened,ifcleanerstillcannot
work,pleasecontactthesalesshoporauthorizedservicecenter。
Description
Solutions
Cleaner
don’t
running
- Checkpluginsertfirmlyornot,tounplug,insertsocketagain
- Checkplugelectrifyornot。
- Checkswitchisonornot。

20 21
CERTIFICAT DE GARANTIE
Félicitations ! Vous avez fait un excellent choix avec l’achat de ce produit de qualité. Notre en-
gagement en matière de qualité inclut également notre service après-vente. Jumbo ore un
excellent service de réparation.
Si, contre toute attente, vous deviez être confronté à des défaillances
imputables au matériels ou à des défauts d’ouvrage dans le cadre
d’une utilisation privée dans les CINQ ANS à compter de la date d’achat,
nous assumerons la garantie conformément aux dispositions légales
régissant la garantie, dans la mesure où :
– L’appareil a été utilisé uniquement pour la fonction prévue.
– L’appareil n’a pas été en surcharge.
– L’appareil n’a pas été utilisé avec des accessoires non compatibles.
– L’appareil a été réparé uniquement par un atelier agréé.
Le certificat de garantie est uniquement valide s’il est accompagné du ticket de caisse. Veuillez
les conserver tous deux en lieu sûr. La garantie commerciale n’aecte pas vos droits de garan-
tie légale. Le produit est garanti pendant une période de CINQ ANS à partir de la date d’achat.
Conservez votre ticket de caisse en lieu sûr, comme preuve de la date d’achat. La période de
garantie peut uniquement être étendue pour la durée d’une réparation nécessaire. Durant la
période de garantie, les appareils défectueux peuvent être retournés à tout magasin Jumbo.
Nous procéderons à notre discrétion soit à la réparation, soit au remplacement de l’appareil, en
conformité avec les dispositions en vigueur régissant la garantie.
Veuillez joindre les documents suivants lors du retour de votre produit pour réparation :
1. Le ticket de caisse (preuve d’achat)
2. Ce document de garantie
3. Le certificat de garantie complété
Si vous n’avez pas joint le ticket de caisse original, la réparation sera facturée, dans tous les cas.
Vous avez toujours la possibilité de retourner l’appareil pour réparation, après expiration de la
garantie. Les devis tout comme les réparations vous seront facturés dans tous les cas, une fois
la période de garantie passée. Cette garantie n’aecte pas vos droits de garantie légale.
CH-Import & Distribution exclusivement par :
Jumbo-Markt SA, 8305 Dietlikon
www.jumbo.ch
BON DE GARANTIE
Prénom Nom
Rue/numéro. Téléphone
Code postal Localité Portable
Référence Code-barres (EAN)
Garantie (veuillez cocher) Ticket de caisse no / Date
(veuillez également joindre une copie du ticket de caisse)
Oui Non
L’appareil a été acheté dans la succursale Jumbo suivante :
Défauts (veuillez les énumérer) Veuillez décrire le problème et le dysfonctionnement de votre appareil aussi précisément
que possible. Nous pourrons ainsi traiter vos réclamations de manière plus rapide et ecace. Une description imprécise,
comme par exemple « L’appareil ne fonctionne pas » ou « L’appareil est cassé » peut prolonger considérablement cette
procédure.
Indications complémentaires: Pendant la période de garantie, les appareils défectueux peuvent être rapportés dans
chaque magasin Jumbo. A l’expiration de la période de garantie, les produits seront repris dans chaque magasin Jumbo
pour contrôle.

22 23
8
8
8
8
2
1
3
4
5
7
8
9
10
11
6
La ringraziamo per aver acquistato questo prodotto.
La preghiamo di leggere con attenzione l’integralità di queste istruzioni prima di utilizzare il pro-
dotto.
ISTRUZIONI DI SICUREZZA E AVVERTENZE
Sicurezza parte elettrica
• Non utilizzare l’apparecchio nel caso in cui il cavo o la spina risultino essere danneggiati.
• Prima di collegare l’apparecchio a una presa elettrica, accertarsi che la tensione indicata sulla
targhetta identificativa corrisponda alla tensione di rete.
• Collegare l’apparecchio a una presa di rete con messa a terra con carico minimo di 10 Ampère.
• La spina dell’apparecchio deve adattarsi perfettamente alla presa. La spina non deve essere
modificata in alcun modo. Non utilizzare alcun adattatore per prese.
• Non esporre l’apparecchio alla pioggia o ad altre fonti di umidità. Eventuali infiltrazioni di acqua
nell’apparecchio aumentano il rischio di folgorazione.
• In caso di danneggiamento di uno dei contenitori dell’apparecchio, estrarre subito la spina dalla
presa di rete per evitare il rischio di folgorazione.
• Non esporre il cavo a carichi meccanici. L’apparecchio non deve essere mai sollevato, spostato o
estratto dalla presa, prendendolo per il cavo.
• Verificare lo stato del cavo di alimentazione. Eventuali cavi danneggiati o intrecciati aumentano
il rischio di folgorazione.
• Non toccare la spina dalla presa con le mani bagnate.
Pulizia e manutenzione
• Non utilizzare l’apparecchio nel caso in cui eventuali accessori o parti del contenitore non siano
correttamente assemblati.
• Non utilizzare l’apparecchio in presenza di accessori difettosi. Sostituire subito i componenti
difettosi.
• Non aspirare acqua o altri liquidi con l’apparecchio.
• Non utilizzare l’apparecchio nel caso in cui l’interruttore on-o risultasse difettoso.
• Non sovraccaricare la capacità dell’apparecchio.
• Questo apparecchio è destinato esclusivamente all’utilizzo in ambiente domestico e non può
essere utilizzato per scopi commerciali o industriali.
• Questo apparecchio non è un giocattolo. È consigliabile sorvegliare i bambini per accertarsi che
non giochino con l’apparecchio.
• L’apparecchio è indicato esclusivamente per utilizzo da parte di adulti. Accertarsi che questo
prodotto non venga utilizzato da persone con limitate capacità fisiche e psichiche, da bambini e
da persone non in grado di utilizzare correttamente apparecchiature di questo tipo.
• Questo apparecchio deve essere tenuto al di fuori dalla portata di bambini e/o di persone con
limitate capacità fisiche e psichiche.
• Accettarsi che la griglia del ventilatore sull’apparecchio non sia ostruita da polvere, sporco o
corpi estranei.
• Accettarsi che il coperchio sia chiuso correttamente prima di accendere l’apparecchio.
• Ogni abuso o mancato rispetto delle istruzioni d’uso comporta la decadenza della garanzia.
PEZZI
1. Pulsante ON/OFF
2. Pulsante di regolazione della potenza
3. Indicatore sacchetto/filtro pieno
4. Avvolgimento automatico del cavo
5. Griglia di copertura dello scarico dell’aria
6. Cursore per la regolazione della potenza d‘aspirazione
7. Tubo flessibile
8. Tubo flessibile
9. Spazzola per pavimenti
10. Spazzola per poltrone
11. Bocchetta per giunti

24 25
ISTRUZIONI PER L’USO
Fissaggio del tubo flessibile:
Montaggio: introdurre l’estremità del tubo flessibile nell’orifizio d’aspirazione. Spingere l’estre-
mità del tubo flessibile nell’orifizio d’aspirazione fino a quando non si udrà il clic di bloccaggio.
Smontaggio: rimuovere l’estremità del tubo flessibile dall’orifizio d’aspirazione premendo sul pul-
sante rosso.
Montaggio del tubo telescopico e utilizzo degli accessori:
1. Inserire il tubo telescopico sull’impugnatura.
2. Regolare il tubo telescopico alla lunghezza desiderata. Spingere in avanti la guida di scorrimen-
to situata sul tubo telescopico ed estrarre la parte inferiore del tubo alla lunghezza desiderata.
Rilasciare la guida di scorrimento, che tornerà così nella sua posizione originale.
3. Montare la spazzola per pavimenti sull’estremità del tubo telescopico.
1
Connect hose to Cleaner
WhenInstallingthehose,pleaseholdthemainsuctionpipebutton,andaimattheairinlet,then
pushtillitiscompletelylocked.
Telescopic tube
Screwthetelescopictubein
Screwthetelescopictubeout
Slidethetuttonforthandbacktoadjustthe
suctionpower
Slidethebuttontoadjustthelengthoftelescopictube
Floor Brush
Forinstallingafloorbrush,manuallyscrewthetelescopictubeintothefloorbrush
2
forcarpet
forhardfloor
- Turnleftforabetterhard
floorperfmance
- Turnrightwhennotforhard
floorsuction
Connect telescopic tube to dusting brush and crevice tool
On/ off button
Presstoswitchonand
Cord rewind button
Presstorewindthepower
cord
Spazzola per pavimenti
Per la pulizia quotidiana di moquette e parquet.
Regolazione della spazzola per la pulizia di moquette, pavimenti a piastrelle o parquet:
APavimenti duri = spazzola fuori
BMoquette/tappeti = spazzola ritratta
CFar scorrere a sinistra per ottenere risultati migliori di aspirazione su pavimenti rigidi
Far scorrere a destra quando non si usa l’aspirapolvere su pavimenti rigidi
Bocchetta/spazzola per giunti
• Per la pulizia di radiatori, angoli, bordi, cassetti, ecc.
• Per la pulizia di tende, scaali, libri, lampade e altri oggetti delicati.
FUNZIONAMENTO
Aspirazione
1. Prima di utilizzare l’aspirapolvere, srotolare il cavo a una lunghezza suciente e inserire la
spina nella presa di corrente murale. Il punto di riferimento di colore giallo situato sul cavo
indica la lunghezza massima di estrazione del cavo. Premere il pulsante situato sull’aspi-
rapolvere per avviarlo.
2. Consigliamo di collocare il variatore di potenza sulla posizione MIN prima di accendere l’aspi-
rapolvere
2
forcarpet
forhardfloor
- Turnleftforabetterhard
floorperfmance
- Turnrightwhennotforhard
floorsuction
Connect telescopic tube to dusting brush and crevice tool
On/ off button
Presstoswitchonand
Cord rewind button
Presstorewindthepower
cord
A B
C

26 27
3. Regolazione della potenza d’aspirazione: la potenza d’aspirazione dell’aspirapolvere può
essere regolata individualmente, secondo le esigenze, per mezzo dell’apposito variatore di
potenza. Consigliamo di scegliere la potenza più bassa per la pulizia di materiali sensibili.
Selezionare la potenza d’aspirazione media per la pulizia di materassi, mobili imbottiti e mo-
quette. La potenza d’aspirazione massima può essere selezionata per la pulizia di pavimenti
in piastrelle, parquet e altri pavimenti resistenti.
4. Per riavvolgere il cavo, premere con una mano il pulsante . e guidare il cavo con l’altra
mano al fine di evitare eventuali danni o lesioni causati dai movimenti incontrollati del cavo.
-> Se il cavo non si riavvolge completamente tirarlo un po’ e premere di nuovo sul pulsante di
riavvolgimento. È possibile ripetere queste operazioni al fine di riavvolgere completamente il
cavo.
SOSTITUZIONE DEL SACCHETTO PER LA POLVERE
Nota: Spegnere l’aspirapolvere e staccare la spina dalla presa di corrente prima di sostituire il
sacchetto per la polvere o prima di pulire il filtro motore. Non utilizzare mai l’aspirapolvere senza
sacchetto per la polvere o senza filtro.
Pulizia o sostituzione del sacchetto della polvere:
1. Quando l’indicatore diventa rosso, il sacchetto deve essere svuotato o sostituito.
2. Aprire la calotta superiore, rimuovere il sacchetto della polvere dall’alloggiamento.
3. Se il sacchetto è di carta, sostituirlo con uno nuovo. Se il sacchetto per la polvere in dotazione
è pieno, sostituirlo con un sacchetto Swirl Y12.
4. Assicurarsi che il sacchetto nuovo sia collocato nella posizione corretta. Chiudere la calotta
superiore. Assicurarsi che sia ben chiusa.
Attenzione: un dispositivo integrato impedisce il funzionamento dell’aspirapolvere in assenza del
sacchetto per la polvere. Nel caso in cui il sacchetto non sia correttamente inserito o sia assente,
il coperchio non potrà essere richiuso e l’aspirapolvere non potrà essere avviato (potenza d’aspi-
razione nulla).
MANUTENZIONE
Pulizia del filtro di protezione del motore
Rimuovere il filtro di protezione del motore nel caso in cui sia sporco e sciacquarlo abbondante-
mente sotto il getto d’acqua del rubinetto. Il filtro deve essere completamente asciutto prima di
essere rimontato.
Pulizia del filtro dell’aria di scarico (filtro HEPA)
Il filtro dell’aria di scarico esegue un ultimo filtraggio dell’aria prima della sua fuoriuscita dall’a-
spirapolvere. La pulizia di questo filtro si compie nel modo seguente:
1. Spegnere l’aspirapolvere e staccare la spina della corrente.
2. Aprire la griglia del filtro dell’aria di scarico.
3. Il filtro dell’aria di scarico è visibile dopo l’apertura della griglia.
4. Lavare il filtro con acqua corrente fredda e lasciarlo asciugare.
5. Ricollocare al suo posto il filtro dell’aria di scarico e rimontare poi la griglia.
4
Power adjust button
Slidethebuttontoadjustthesuctionpower
Replacing or cleaning the dust bag
While the dust bag full indicator lamp light on, it indicates out that the dust bag is full, and
need to be cleaned or replaced.
(1) Confirm the power supply is disconnected.
(2) Lift the locking block of the front cover, and open the front cover.
(3) If a paper bag is used, replace it with a new one.
(4) Dust bag installation: Pull out the bag lock ,Push the dust bag toward at the direction of
the arrow till it reach the bottom of the bag rack, then close the front cover.
Replacing or cleaning filters
(1) Confirm the power supply is disconnected.
(2) Open the front cover, remove the old air inlet filter to rinse and allow the filter to dry,
5
then insert air inlet filter or a new filter and close the front cover.
(3) For replacing the air outlet HEPA, open the air outlet plate, take the dirty air outlet
HEPA out and replace it with a new one, close the air outlet plate.
(4) For washing the filters, please wash them in clean water, vibrate the filters to eliminate
excessive water, then put them at a shady or cool place for air-drying. Please assemble
them to the vacuum cleaner for using after they are completely dry, otherwise the motor
will be damaged.
●Must be washed at an interval of half year at least.
5
then insert air inlet filter or a new filter and close the front cover.
(3) For replacing the air outlet HEPA, open the air outlet plate, take the dirty air outlet
HEPA out and replace it with a new one, close the air outlet plate.
(4) For washing the filters, please wash them in clean water, vibrate the filters to eliminate
excessive water, then put them at a shady or cool place for air-drying. Please assemble
them to the vacuum cleaner for using after they are completely dry, otherwise the motor
will be damaged.
●Must be washed at an interval of half year at least.
5
then insert air inlet filter or a new filter and close the front cover.
(3) For replacing the air outlet HEPA, open the air outlet plate, take the dirty air outlet
HEPA out and replace it with a new one, close the air outlet plate.
(4) For washing the filters, please wash them in clean water, vibrate the filters to eliminate
excessive water, then put them at a shady or cool place for air-drying. Please assemble
them to the vacuum cleaner for using after they are completely dry, otherwise the motor
will be damaged.
●Must be washed at an interval of half year at least.
6
Machine Storage
Hangthebrushonthebackhook
Hangthefloorbrushonthebasehook
TroubleShooting
followblowmethodstodealwithanyabnormalproblemshappened,ifcleanerstillcannot
work,pleasecontactthesalesshoporauthorizedservicecenter。
Description
Solutions
Cleaner
don’t
running
- Checkpluginsertfirmlyornot,tounplug,insertsocketagain
- Checkplugelectrifyornot。
- Checkswitchisonornot。

28 29
DATI TECNICI
Potenza 700 W
Potenza di aspirazione 150 W
Compatibile con Swirl Y12
Capacità del serbatoio 4,5 l
Livello acustico ≤72 dB (A)
Filtro HEPA 13
Cavo 5 m
SMALTIMENTO
Prevedere un riciclaggio nel rispetto dell’ambiente per l‘apparecchio, accessori e confezione.
Gli utensili elettrici non più funzionanti possono essere resi al punto d’acquisto per essere poi
riciclati. Non abbandonare gli utensili elettrici nei rifiuti domestici. Ai sensi della Direttiva Eu-
ropea 2002/96/CE in materia di apparecchi elettrici ed elettronici obsoleti e della relativa conversione
nella legislazione nazionale gli apparecchi ed utensili elettrici non più funzionanti devono essere
raccolti separatamente e destinati ad essere riciclati nel rispetto dell’ambiente.
Sistemazione dell’aspirapolvere
Dopo aver terminato l’utilizzo dell’aspirapolvere, spegnerlo e sconnettere la spina elettrica.
Azionare poi il pulsante di riavvolgimento del cavo e riavvolgerlo completamente. Appendere la
spazzola per pavimenti all’apposito gancio.
6
Machine Storage
Hangthebrushonthebackhook
Hangthefloorbrushonthebasehook
TroubleShooting
followblowmethodstodealwithanyabnormalproblemshappened,ifcleanerstillcannot
work,pleasecontactthesalesshoporauthorizedservicecenter。
Description
Solutions
Cleaner
don’t
running
- Checkpluginsertfirmlyornot,tounplug,insertsocketagain
- Checkplugelectrifyornot。
- Checkswitchisonornot。

30 31
ATTO DI GARANZIA
Congratulazioni! Acquistando questo prodotto di qualità ha fatto un’ottima scelta. Il nostro ob-
bligo di garanzia si estende anche al nostro servizio clienti. Jumbo ore un eccellente servizio
di riparazione.
Qualora l’apparecchio, contro ogni aspettativa, in caso di utilizzo privato,
presenti, entro CINQUE ANNI dalla data di acquisto, un’anomalia di fun-
zionamento riconducibile a difetti di materiale o di produzione, lei potrà
usufruire della nostra prestazione di garanzia in conformità alle dispo-
sizioni legali in vigore in materia di prestazioni di garanzia, a condizione
che l’apparecchio:
– sia stato utilizzato esclusivamente per la destinazione d’uso prevista;
– non sia stato sovraccaricato;
– non sia stato utilizzato con accessori inadeguati;
– sia stato riparato esclusivamente presso un centro autorizzato.
L’atto di garanzia è valido solo in abbinamento allo scontrino di cassa. La invitiamo pertanto a
conservare entrambi in un luogo sicuro. La presente garanzia commerciale non pregiudica il suo
diritto alla garanzia legale ai sensi di legge. La garanzia è valida per un periodo di CINQUE ANNI
a partire dalla data di acquisto. Si raccomanda di conservare lo scontrino di acquisto in un luogo
sicuro a testimonianza della data di acquisto. Il periodo di garanzia può essere prolungato solo
per la durata degli interventi di riparazione necessari. Durante il periodo di garanzia è possibile
restituire gli apparecchi difettosi presso qualsiasi filiale Jumbo. Ci riserviamo il diritto di stabilire
se l’apparecchio in questione, in conformità alle disposizioni di garanzia in vigore, debba essere
riparato oppure sostituito.
In caso di restituzione del prodotto, la preghiamo di inviare i seguenti documenti ai fini della
riparazione:
1. Scontrino di cassa (prova di acquisto)
2. Il presente atto di garanzia
3. Il cedolino di garanzia compilato
Qualora non venga allegato lo scontrino di cassa originale, gli interventi di riparazione eseguiti
saranno in ogni caso addebitati. Al termine della garanzia è comunque possibile inviare un appa-
recchio difettoso per la riparazione. I costi preventivati e gli interventi di riparazione al termine
del periodo di garanzia saranno tuttavia a suo carico. La presente garanzia commerciale non
pregiudica il suo diritto alla garanzia legale a norma di legge.
Importazione e distribuzione esclusiva per la Svizzera:
Jumbo-Markt AG, 8305 Dietlikon
www.jumbo.ch
CERTIFICATO DI GARANZIA
Prenome Cognome
Strada/numero Telefono
Codice postale Città Telefono cellulare
Codice articolo Codice a barre (EAN)
Garanzia (contrassegnare con una crocetta) Prova di acquisto n°/data
(allegare anche una copia della prova di acquisto)
Si No
L’apparecchio è stato acquistato presso la seguente filiale Jumbo:
Anomalie riscontrate (si prega di elencare) descrivere il problema o l’anomalia di funzionamento dell’apparecchio il più
precisamente possibile. In tal modo saremo in grado di evadere il reclamo in modo più rapido ed eciente. Una descrizione
imprecisa con indicazioni quali «L’apparecchio non funziona» o «L’apparecchio è guasto» possono prolungare notevolmen-
te tale processo
Indicazione complementare: Durante il periodo di garanzia, gli apparecchi difettosi possono essere restituiti presso qual-
siasi punto vendita Jumbo. Dopo la scandenza del periodo di garanzia i prodotti ayce vengono accettati presso tutte le filiali
Jumbo, anché il prodotto possa essere di nuovo adeguatamente esaminato.

32 33
8
8
8
8
2
1
3
4
5
7
8
9
10
11
6
IMPORTANT SAFETY INSTRUCTIONS
BEFORE USING THIS APPLIANCE READ ALL INSTRUCTIONS AND CAUTIONARY MARKINGS IN
THIS MANUAL.
When using the cleaner, you should observe the following basic safety precausions:
• Please don’t power it when not in use, please unplug it when not in use or before mainte-
nance;
• In order to reduce the danger of electric shock, please don’t use it outdoors or on a wetland;
• Don’t use it as a toy for children, please pay close attention to safety when a child uses or
comes closer to the cleaner;
• Use only the accessories described in the Guide and provided by the factory;
• Do not use with damaged cord or plug. If cleaner is not working as it should, has been drop-
ped, damaged, left outdoors, or dropped into water, or if the cord damaged. Return it to an
appointed customer center for check, repair or regulation;
• Please don’t use the cord as a handle to pull and lift the cleaner, be careful not to grip the cord
when closing the door, please don’t pull the cord to and fro over a sharp edge or corner, don’t
let the cord be pressed by the machine, and make the cord far away from a heat source;
• When unplugging, please don’t pull directly the cord, it’s necessary to pull directly the plug
instead of the cord;
• Don’t touch the plug or operate the cleaner with a wet hand, and don’t use the cleaner outdoo-
rs or on a wetland;
• Never let any object to block the outlet so as to restrict the airflow, at that time it’s necessary
to clear o the dust, cloth stripes, hair and any of the objects that reduce the airflow volume;
• Never let the hair, clothes, fingers and dierent parts of the body close to the openings and
moving parts of the cleaner;
• Please don’t use the cleaner to absorb hard or sharp objects such as the glass, nails, screws,
coins, etc., otherwise the machine or the filter will be damaged;
• Please don’t use the cleaner to absorb any burning or smoking objects such as hot ash, ciga-
rette studs, match sticks and so on;
• Please don’t use it when there is no dustbag set up;
• It’s necessary to turn o the control switches before it is powered or the power is cut o;
• Be especially careful when use it to clean a staircase;
• Please don’t use the cleaner to absorb combustible or inflammable liquids (cleaning liquid,
gasoline, perfume and so on) or use it in the area where they may possibly exist;
• Please don’t absorb the toxic substances (bleaching powder, ammonia water and so on);
• When connect or dismantle the hose, please make the machine in the state of being powered
o, and when reeling the cord, please don’t let the plug tossed up abruptly;
• It should be used only on an indoor dry floor;
• Don’t use it beyond the scope indicated in the User’s Guide;
• This machine should be used under the rated voltage and current. The over rated current will
heat and soften the cord. When using it, don’t stumble on the cord!
• The machine should be preserved indoors in a cool and dry place;
• Please don’t immerse the cleaner in the water or other liquids;
• Please don’t use the cleaner to clean your pets or other animals;
• When the cleaner is in operation or being powered, it’s necessary to make your head (eyes,
ears, mouth and so on) far away from the suction inlet.
• This appliance is not intended for use by persons (including children) with reduced physical,
sensory or mental capabilities, or lack of experience and knowledge, unless they have been
given supervision or instruction concerning use of the appliance by a person responsible for
their safety.
PARTS LIST
1. On/O button
2. Power adjust button
3. Bag full indicator
4. Cord rewinder
5. Air outlet cover
6. Suction power control
7. Suction handle with hose
8. Telescopic tube
9. Floor brush
10. Dusting brush
11. Crevice tool

34 35
INSTRUCTION MANUAL
Connect the hose to the cleaner
When connecting the hose, please press the main suction pipe button, point the end at the air
inlet and push it in until it is completely locked.
Telescopic tube / Floor brush
1. Screw the telescopic tube in
2. Slide the button to adjust the length of telescopic tube. Move the slider back and forth to
adjust the suction power.
3. To fit the floor brush, manually screw the telescopic tube into the floor brush.
1
Connect hose to Cleaner
WhenInstallingthehose,pleaseholdthemainsuctionpipebutton,andaimattheairinlet,then
pushtillitiscompletelylocked.
Telescopic tube
Screwthetelescopictubein
Screwthetelescopictubeout
Slidethetuttonforthandbacktoadjustthe
suctionpower
Slidethebuttontoadjustthelengthoftelescopictube
Floor Brush
Forinstallingafloorbrush,manuallyscrewthetelescopictubeintothefloorbrush
2
forcarpet
forhardfloor
- Turnleftforabetterhard
floorperfmance
- Turnrightwhennotforhard
floorsuction
Connect telescopic tube to dusting brush and crevice tool
On/ off button
Presstoswitchonand
Cord rewind button
Presstorewindthepower
cord
Floor brush
For daily cleaning of carpets, wooden floors .
Setting the floor brush for carpets , tile floors or wood parquet:
A Hard floors = Extended brush strip
B Carpets = Pulled in brush strip
C Slide to the left for a better hard floor performance
Slide to the right when not cleaning hard floors
Dusting brush/crevice tool
• Cleaning corners or other unaccessible places.
• For cleaning of curtains , shelves , books , lamps and other sensitive objects .
OPERATION
Vacuum cleaning
1. First pull out the cable suciently and insert the plug into the wall socket. The yellow marking
on the cable indicates the maximum length which must not be exceeded. Turn o the machine
by pressing the On/O button .
2. It is recommended to set the electronic power controller to MIN before turning on the unit.
2
forcarpet
forhardfloor
- Turnleftforabetterhard
floorperfmance
- Turnrightwhennotforhard
floorsuction
Connect telescopic tube to dusting brush and crevice tool
On/ off button
Presstoswitchonand
Cord rewind button
Presstorewindthepower
cord
A B
C

36 37
3. Suction power adjustment: The suction power of the device can be adjusted individually ac-
cording to need with the power regulator. We recommend to set the suction power to mini-
mum for sensitive materials. Select medium power for mattresses, upholstered furniture and
carpets. For tiles, parquet flooring and other robust flooring the maximum suction power can
be used.
4. To retract the cable press the button with one hand and with the other hand control the
cable to avoid damage by a resounding plug. -> If the cable does not fully retract: Pull the
cable back out a bit then press again the cable retract. These steps can be repeated until the
cable is completely rolled up.
REPLACING OR CLEANING THE DUST BAG
Note: Always turn o and unplug the vacuum cleaner and before changing the dust bag or
cleaning the motor filter. Never use the vacuum cleaner without the dust bag nor filter.
When the ‘dust bag full’ indicator lamp comes on, it indicates that the dust bag is full and needs
to be cleaned or replaced.
1. Confirm the power supply is disconnected.
2. Lift the front cover lock and open the front cover.
3. If a paper bag is used replace it with a new one.
4. Dust bag installation: Release the bag lock, slide the dust bag in the direction of the arrow
until it reaches the bottom of the bag rack, then close the front cover.
Caution: A system prevents the device to operate without a dust bag . When the dust bag is not
inserted correctly or missing, the lid will not close and the unit can not be put into operation (no
suction power).
MAINTENANCE
For cleaning an air inlet filter
1. Confirm the power supply is disconnected.
2. Open the front cover, remove the old air inlet filter, rinse and allow to dry. Then insert the air
inlet filter or a new filter and close the front cover.
Replacing or cleaning the air outlet filter (HEPA Filter)
1. To replace the air outlet HEPA, open the air outlet cover, remove the dirty air outlet HEPA and
replace it with a new one. Then close the air outlet cover.
2. To clean the filters, wash them in clean water, shake to eliminate excess water, then put them
in a shady or cool place to air-dry. Please wait until they are completely dry before refitting
them to the vacuum cleaner to avoid damage to the motor. Must be washed at least every six
months.
4
Power adjust button
Slidethebuttontoadjustthesuctionpower
Replacing or cleaning the dust bag
While the dust bag full indicator lamp light on, it indicates out that the dust bag is full, and
need to be cleaned or replaced.
(1) Confirm the power supply is disconnected.
(2) Lift the locking block of the front cover, and open the front cover.
(3) If a paper bag is used, replace it with a new one.
(4) Dust bag installation: Pull out the bag lock ,Push the dust bag toward at the direction of
the arrow till it reach the bottom of the bag rack, then close the front cover.
Replacing or cleaning filters
(1) Confirm the power supply is disconnected.
(2) Open the front cover, remove the old air inlet filter to rinse and allow the filter to dry,
5
then insert air inlet filter or a new filter and close the front cover.
(3) For replacing the air outlet HEPA, open the air outlet plate, take the dirty air outlet
HEPA out and replace it with a new one, close the air outlet plate.
(4) For washing the filters, please wash them in clean water, vibrate the filters to eliminate
excessive water, then put them at a shady or cool place for air-drying. Please assemble
them to the vacuum cleaner for using after they are completely dry, otherwise the motor
will be damaged.
●Must be washed at an interval of half year at least.
5
then insert air inlet filter or a new filter and close the front cover.
(3) For replacing the air outlet HEPA, open the air outlet plate, take the dirty air outlet
HEPA out and replace it with a new one, close the air outlet plate.
(4) For washing the filters, please wash them in clean water, vibrate the filters to eliminate
excessive water, then put them at a shady or cool place for air-drying. Please assemble
them to the vacuum cleaner for using after they are completely dry, otherwise the motor
will be damaged.
●Must be washed at an interval of half year at least.
5
then insert air inlet filter or a new filter and close the front cover.
(3) For replacing the air outlet HEPA, open the air outlet plate, take the dirty air outlet
HEPA out and replace it with a new one, close the air outlet plate.
(4) For washing the filters, please wash them in clean water, vibrate the filters to eliminate
excessive water, then put them at a shady or cool place for air-drying. Please assemble
them to the vacuum cleaner for using after they are completely dry, otherwise the motor
will be damaged.
●Must be washed at an interval of half year at least.
6
Machine Storage
Hangthebrushonthebackhook
Hangthefloorbrushonthebasehook
TroubleShooting
followblowmethodstodealwithanyabnormalproblemshappened,ifcleanerstillcannot
work,pleasecontactthesalesshoporauthorizedservicecenter。
Description
Solutions
Cleaner
don’t
running
- Checkpluginsertfirmlyornot,tounplug,insertsocketagain
- Checkplugelectrifyornot。
- Checkswitchisonornot。

38 39
TECHNICAL DATA
Rated power 700 W
Suction power 150W
Compatible with Swirl Bag Y12
Dust Capacity 4,5 l
Filter HEPA 13 air Outlet
Cable 5 m
DISPOSAL
Appliances, accessories and packaging must be recycled in an environmentally respon-
sible manner. Electrical appliances which are not longer serviceable can be returned
to retailers for recycling. Do not include electrical appliances in domestic rubbish. As
required by EU Directive 2002/96/EC on Waste Electrical and Electronic Equipment as well as
legislation enacting this into national law, electrical equipment which is no longer serviceable
must be collected separately and recycled in an environmentally responsible manner.
Machine storage
Please confirm the power supply is disconnected and the power cord is rewinded up.
Put the floor brush’s fixing clasp into the hook at the middle part of the vacuum cleaner.
6
Machine Storage
Hangthebrushonthebackhook
Hangthefloorbrushonthebasehook
TroubleShooting
followblowmethodstodealwithanyabnormalproblemshappened,ifcleanerstillcannot
work,pleasecontactthesalesshoporauthorizedservicecenter。
Description
Solutions
Cleaner
don’t
running
- Checkpluginsertfirmlyornot,tounplug,insertsocketagain
- Checkplugelectrifyornot。
- Checkswitchisonornot。
Table of contents
Other Ayce Vacuum Cleaner manuals

Ayce
Ayce 1330882-800W User manual

Ayce
Ayce VHS01A17Z0C User manual

Ayce
Ayce MR04 User manual

Ayce
Ayce MWW305-20L-1250WA User manual

Ayce
Ayce VSM01C16Q User manual

Ayce
Ayce KPA12 User manual

Ayce
Ayce VC-912 User manual

Ayce
Ayce VC-906RS User manual

Ayce
Ayce MWA302B-18L-800W User manual

Ayce
Ayce ZW0926 User manual