manuals.online logo
Brands
  1. Home
  2. •
  3. Brands
  4. •
  5. B.E.G.
  6. •
  7. Security Sensor
  8. •
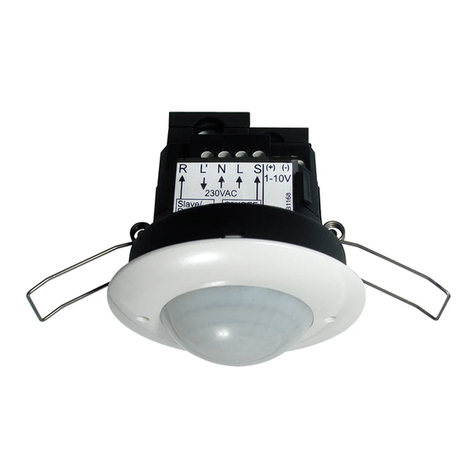
  9. B.E.G. LUXOMAT PD9-M-1C+HVAC User guide

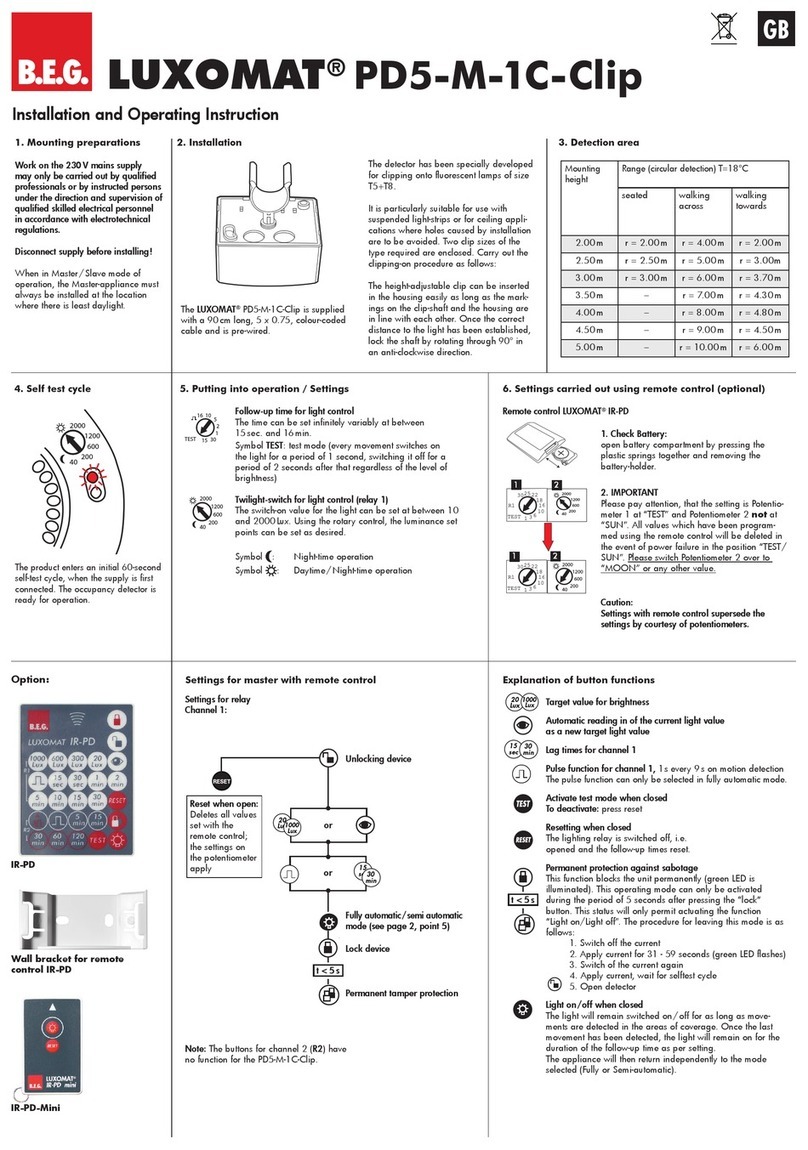
B.E.G. LUXOMAT PD9-M-1C+HVAC User guide

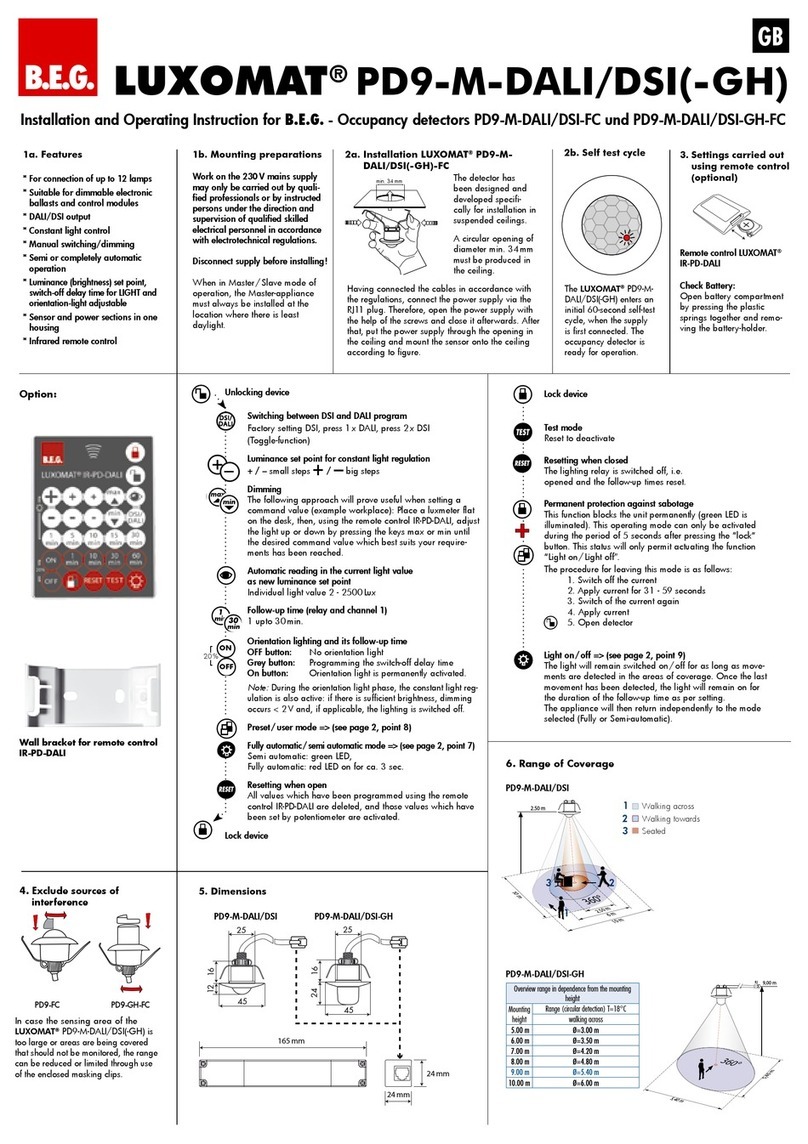
Installation and Operating Instruction for
B.E.G. -
Occupancy detectors
PD9-M-1C+HVAC
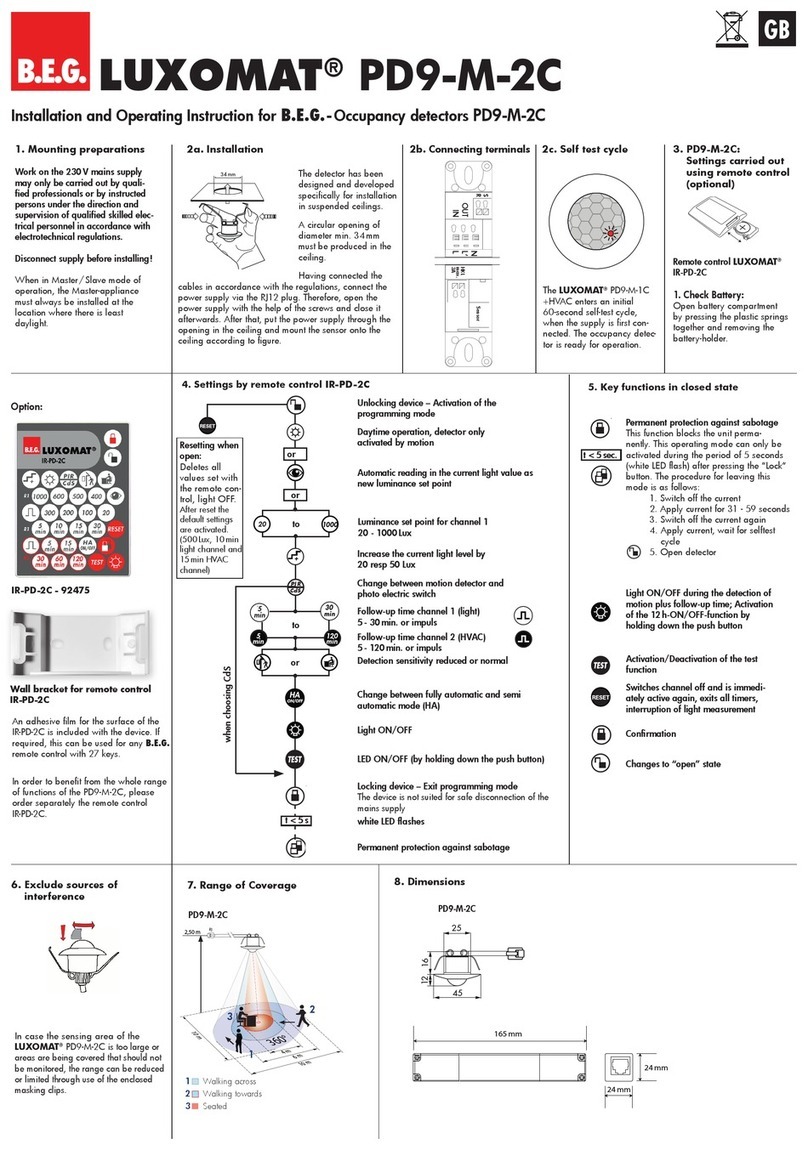
3. PD9-M-1C+HVAC:
Settings carried out
using remote control
(optional)
Remote control
LUXOMAT®
IR-PD-2C
1.
Check Battery
:
Open battery compartment
by pressing the plastic springs
together and removing the
battery-holder.
1. Mounting preparations
Work on the 230 V mains supply
may only be carried out by quali-
fied professionals or by instructed
persons under the direction and
supervision of qualified skilled elec-
trical personnel in accordance with
electrotechnical regulations.
Disconnect supply before installing!
When in Master/Slave mode of
operation, the Master-appliance
must always be installed at the
location where there is least
daylight.
2a. Installation
Option:
The
LUXOMAT®
PD9-M-1C
+HVAC enters an initial
60-second self-test cycle,
when the supply is first con-
nected. The occupancy detec-
tor is ready for operation.
2c. Self test cycle
B.E.G.
LUXOMAT®PD9-M-1C+HVAC
2b. Connecting terminals
7. Range of Coverage
In case the sensing area of the
LUXOMAT®
PD9-M-1C+HVAC
is too
large or areas are being covered that
should not be monitored, the range can
be reduced or limited through use of the
enclosed masking clips.
6. Exclude sources of
interference
1 Walking across
2 Walking towards
3 Seated
quer zum Melder gehen
frontal zum Melder gehen
Unterkriechschutz
PD9-M-1C+HVAC
8. Dimensions
HKL
max.
3A
N
L‘
L
S
RSensor
OUT
IN
165 mm
24 mm
24 mm
45
25
12 16
PD9-M-1C+HVAC
GB
10 m
6 m
4 m
10 m
360°
2,50 m
RJ
2
3
1
Wall bracket for remote control
IR-PD-2C
An adhesive film for the surface of the
IR-PD-2C is included with the device. If
required, this can be used for any B.E.G.
remote control with 27 keys.
In order to benefit from the whole range
of functions of the PD9-M-1C+HVAC,
please order separately the remote
control IR-PD-2C.
IR-PD-2C - 92475
4. Settings by remote control IR-PD-2C
Unlocking device – Activation of the
programming mode
Locking device – Exit programming mode
The device is not suited for safe disconnection of the
mains supply
Change between fully automatic and semi
automatic mode (HA)
Luminance set point for channel 1
20 - 1000 Lux
Automatic reading in the current light
value as
new luminance set point
Change between motion detector and
photo electric switch
Increase the current light level by
20 resp 50 Lux
Light ON/OFF
Resetting when
open
:
Deletes all
values set with
the remote con-
trol, light OFF.
After reset the
default settings
are activated.
(500Lux, 10 min
light channel and
15 min HVAC
channel)
or
1000
20 to
+
Follow-up time channel 1 (light)
5 - 30 min. or impuls
Follow-up time channel 2 (HVAC)
5 - 120min. or impuls
to
LED ON/OFF (by holding down the push button)
Detection sensitivity reduced or normal
Daytime operation, detector only
activated by motion
or
PI R
CdS
Permanent protection against sabotage
white LED ashes
when choosing CdS
or


120
min
5
min
max
50
Lux
1500
Lux
ON
OFF
t < 5 s


5
min

 

HA
ON/OFF
The detector has been
designed and developed
specifically for installation
in suspended ceilings.
A circular opening of
diameter min. 34 mm
must be produced in the
ceiling.
Having connected the
cables in accordance with the regulations, connect the
power supply via the RJ12 plug. Therefore, open the
power supply with the help of the screws and close it
afterwards. After that, put the power supply through the
opening in the ceiling and mount the sensor onto the
ceiling according to figure.
34 mm
5. Key functions in closed state
Light ON/OFF during the detection of
motion plus follow-up time; Activation
of the 12 h-ON/OFF-function by
holding down the push button
Switches channel off and is immedi-
ately active again, exits all timers,
interruption of light measurement
Permanent protection against sabotage
This function blocks the unit perma-
nently. This operating mode can only be
activated during the period of 5 seconds
(white LED flash) after pressing the “Lock“
button. The procedure for leaving this
mode is as follows:
1. Switch off the current
2. Apply current for 31 - 59 seconds
3. Switch off the current again
4. Apply current, wait for selftest
cycle
5. Open detector
Changes to “open” state
Activation/Deactivation of the test
function
Conrmation
t < 5 sec.
max
50
Lux
1500
Lux
ON
OFF
13. Full/Semi automatic mode
(see functions IR-PD-2C)
Fully automatic operation (presence)
In this operating mode, the lighting switches automati-
cally on and off for increased comfort, depending on
presence and brightness.
Semiautomatic operation (absence)
(semiautomatic can only be activated via the remote
control)
In this operating condition, in order to gain increased
savings, the lighting is energized only after being
manually switched on.
Switch-off takes place automatically.
In semi-automatic mode, switching-on must always be
carried manually.
As many (closer-contact) buttons as desired can be
wired in parallel on the “S” button input (ON/OFF).
14. Wiring diagram
15. Connections
PD4-M-2C new
M = HKL Funktion
optional
T1 = NO Taster für Halbautomatikbetrieb
Slave zur Erweiterung des Erfassungsbereichs
Master Slave
Übersicht
L
N
NOL´
LN
C1
N L
R
SNO
C2
T1 E1 M1
R
M1 = HVAC function
optional:
T1 = NO - Push button for semi automatic;
Extension of the detection area with Slave-
devices
The device distinguishes between 2 procedures:
• Reading in with lighting switched on:
The switch-on value is determined automatically.
Determining the switch-on value:
1. Press the “eye“ push button
2. Switch off the light (2 seconds later)
3. Read in the brightness
4. Switch-on value = Read brightness
• Reading in with lighting switched off:
When the push button is pressed, the current
brightness is specified as the switch-on value. The
switch-off value is determined automatically.
If the brightness has been modified, the switch-off
threshold is recalculated.
Each time the push button is pressed, the device
increases the current switch-on value in increments of
20 lux for a current switch-on value of < 100 lux and
in increments of 50 lux for a current switch-on value
of > 100 lux.
Standard sensitivity for most applications
Reduced sensitivity for outdoor applications
1000
20
+
9. Explanation of the remote control
button functions
9 a. In the initialisation period
12 h Light ON/OFF (party function)
Activated by “Light“ - push button
Deactivated by “Reset“- push button (default)
Corridor function (see point 11a)
Activated by “30 min“- push button – R2
Deactivate by “60min“- push button – R2 (default)
Forced shutdown (see point 11c)
Activated by “impulse“ - push button – R2
Deactivate by “5 min“- push button (default)
9 b. In opened state
This push button opens the detector and the following
functions can then be programmed.
Attention: The detector is closed automatically:
• after every voltage recovery
• after 3 minutes
The state changes to “closed“.
In the first 5 seconds, the white LED flashes every 0.5
seconds. During this time, sabotage protection can be
activated.
When the pulse function is active, a pulse of 1sec. is
generated every 9 sec. If the pulse function is activated
via remote control, the pause between 2 pulses can be
modified. After activating the function via the “Pulse“
push button, select the desired time within 5 sec.:


5
min = 9 sec., 

10
min = 10 sec., 

15
min = 15 sec., 

30
min =
30 sec.
The “Test“ push button can be used to set the LED ON/
OFF function. To do this, hold down the push
button for 3 sec.
Please note that in the open state and in test
mode, the LED indicators are always ON.
Twilight switch function (CdS)
If the CdS function is active, the detector acts as a
simple twilight switch. Only the brightness can be set in
this mode. Movements are no longer indicated by the
red LED.
Push button acknowledgement:
Each push of a button is indicated by lamp acknowl-
edgement and by the white LED.
“Light ON“ status: OFF/ON (approx. 0.5 sec. each)
“Light OFF“ status: ON/OFF (approx. 0.5 sec. each)
Change between fully automatic and semi
automatic mode
PI R
CdS
1. If the switch-on threshold has been modified by the potentiometer
or remote control, the switch-off threshold stored in the EEPROM
is deleted and is then recalculated on the next activation.
Determining the switch-off value
1. Switch on for 5 min. with dark and motion
2. Light OFF for 2 sec.
3. Internal calculation of the switch-off value
2. If the eye push button is pressed, the switch-off threshold is
recalculated. See also Remote control–> Eye section
3. Switch-off delay
If the determined switch-off threshold is exceeded during opera-
tion, the detector only switches off after a delay of approx.
15 minutes. This compensates for any brief fluctuations in the
brightness.
10. Switch-off threshold brightness
The “Corridor“ and “Light ON/OFF“ functions are mutually
exclusive. If both are activated, the detector performs the corridor
function.
The behaviour when the push button is pressed is defined as
follows:
Corridor function activated
Light ON:
Push button pressed briefly: Light OFF -> Active after 5 sec.
Push button held down: Light OFF -> Active after 5sec.
Light OFF:
Push button pressed briefly: Light ON as long as motion + Lag time
Push button held down: Light ON as long as motion + Lag time
11a. Behaviour of external push button/IR “Light“
12 h Light ON/OFF activated
Light ON:
Push button pressed briefly: Light OFF -> Active after 5 sec.
Push button held down: 12 h OFF
Light OFF:
Push button pressed briefly: Light ON as long as motion + Lag time
Push button held down: 12 h ON
12 h Light ON/OFF deactivated
Light ON:
Push button pressed briefly: Light OFF as long as motion + Lag time
Push button held down: Light OFF as long as motion + Lag time
Light OFF:
Push button pressed briefly: Light ON as long as motion + Lag time
Push button held down: Light ON as long as motion + Lag time
11b. Behaviour of external push button/IR “Light“
Forced shutdown active
Light OFF:
Light OFF: Push button pressed briefly: Light ON for approx. 30 min.,
then forced shutdown if the set brightness is still exceeded.
11c. Behaviour of external push button/IR
“Forced shutdown“
Activation of light for 12 h via mains interruption
1. Interrupt current
2. Apply current for 2 to 5 sec.
3. Interrupt current again
4. Apply current
5. Detector is now ON for 12 h
Exiting sabotage
1. Interrupt current
2. Apply current for 30 to 60sec.
3. Interrupt current again
4. Apply current
5. Detector is in simple closed state
230 V AC permanently at the slave input
If 230 V AC is applied at the slave input for longer than 10 sec., the
light is switched on permanently. When the 230 V is removed, the
light is switched off and automatic mode is activated.
230 V AC for 1 - 3 sec. at push button connection S
If 230 V AC is applied for 1 - 3sec. at push button connection
S, this is interpreted as a slave signal at slave connection R. This
ensures that the detector is compatible with previous versions.
12. Other functions
HKL
max.
3A
N
L‘
L
S
RSensor
OUT
IN
L
N
R
Slave M1
T1
E1


30
min


60
min


5
min
HA
ON/OFF
Connection of sensor and power supply by means of R J12
Power supply: 230 V~ ±10 %
Power consumption: < 1W
Degree of protection/class:
IP20 / II
Settings: by remote control
Light values:
20 - 1000 Lux
Extension of the detection area:
with Slaves
Area of coverage:
circular 360°
Range Ø H 2.50m/T=18°C: seated 4.0
0m
/ tangential
10 m / radial 6m
Recommended height for mounting
2 - 3 m
Light measurement:
daylight and artificial light
• One channel to switch the lighting
Type of contact:
NOC/with pretravel tungsten
contact
Contact load:
2300 W cos ϕ=1 /
1150 VA cos ϕ= 0.5
Time-settings:
5 min
.
- 30 min.
/ test
•
Channel 2 for control devices (only reacts on motion)
Contact load: 230V~, 3 A cos ϕ=1, μ-Contact
Follow-up time: 5min. - 120min. with time delay
of 5min. for follow-up time >
15min./
Alarm impulse
Dimensions H x Ø [mm]
PD9-M-1C+HVAC: Ø 45 x H 28 mm
Power supply L165 x W 24 x H 24 mm
Technical data PD-Slave
Power supply: 230 V~ ±10 %
Impulse output: Optocoupler max. 2 W
Impulse duration: 2 sec. or 9 sec.
Dimensions: see above
Declaration of Conformity: The product complies with the low
voltage recommendation 2006/95/EC and the EMV recommendation
2004/108/EC.
18. Technical data
Type RAL9010 RAL9006
PD9-M-1C+HVAC (Master) 92976 —
PD9-S-FP (Slave) 92905 92906
LUXOMAT®Remote control:
IR-PD-2C 92475
IR-PD-Mini 92159
Accessory:
Cover ring for PD9 white 92238
Cover ring for PD9 silver 92237
Cover ring for PD9 anthracite 92235
16. Article / Part-Nr. / Accessory
MAN 7679 – 190213–1
17. LED-functional indicators, fault-finding
The functional indicators in the case of the
LUXOMAT®
PD9-
M-1C+HVAC (red and green LED‘s)
Red LED indicating self-checking mode (over a period of 60
seconds following mains‘-supply lock-on)
Flashing at intervals of 1 second
EEPROM/memory empty
Flashing rapidly
EEPROM/memory contains information
Red LED as an indicator of status
Flashing irregularly
Movements are detected within the area of coverage
Flashing regularly
Detector identifies bright, light off
(dependent upon operating mode)
Not illuminated
Detector identifies darkness, light on
(dependent upon operating mode)
Flashing extremely rapidly
Too bright / Too dark / Undefined
Red LED as an acknowledgement of receipt for
commands from the remote control
Illuminated for 2 seconds
Signal validly received
Illuminated for 0.5 seconds
Command not accepted, detector blocked
Flashing extremely rapidly
Command not accepted, occurs, for example, when an
attempt is made to input twilight-value are too bright or too
dark
Lights up for 3 seconds
Display
automatic: Lights up for 3 seconds
Flashing for 3 seconds
Display
semi automatic
Green LED as an indicator of status for
“Permanent protection against sabotage”
Flashing irregularly
Movement are detected within the area of coverage
Flashing regularly
Detector identifies bright, light off
(dependent upon operating mode)
Not illuminated
Detector identifies darkness, light on
(dependent upon operating mode)
lluminated for 2 seconds
Signal validly received
(only possible for status “Light on/Light off”)

This manual suits for next models

1

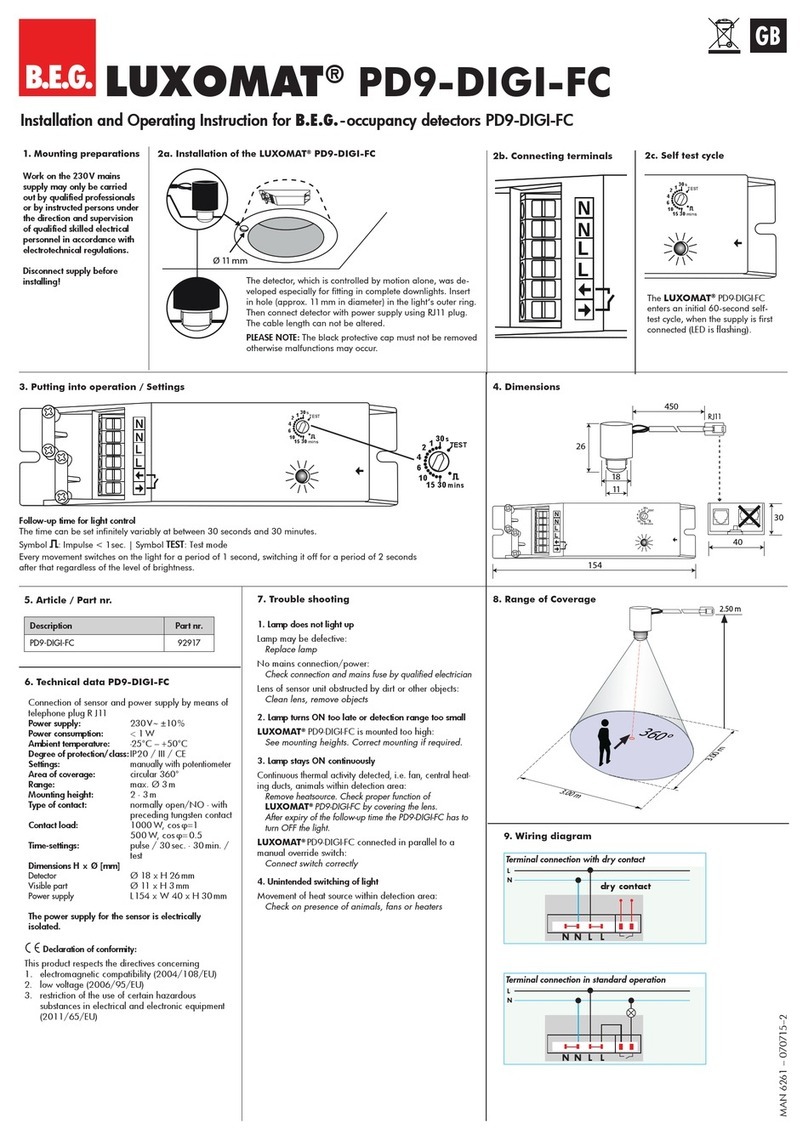
Other B.E.G. Security Sensor manuals

B.E.G. LUXOMAT Indoor 180/R-2W UK Service manual

B.E.G.

B.E.G. LUXOMAT Indoor 180/R-2W UK Service manual

B.E.G. LUXOMAT PD4-M-1C-SM User guide

B.E.G.

B.E.G. LUXOMAT PD4-M-1C-SM User guide

B.E.G. LUXOMAT PD4-S Series User manual

B.E.G.

B.E.G. LUXOMAT PD4-S Series User manual

B.E.G. LUXOMAT PD4-M-2C-DS User guide

B.E.G.

B.E.G. LUXOMAT PD4-M-2C-DS User guide

B.E.G. LUXOMAT PD4-S-GH User guide

B.E.G.

B.E.G. LUXOMAT PD4-S-GH User guide

B.E.G. MINI-S-PP-FC User guide

B.E.G.

B.E.G. MINI-S-PP-FC User guide

B.E.G. LUXOMAT 180-SC Service manual

B.E.G.

B.E.G. LUXOMAT 180-SC Service manual

B.E.G. Luxomat PD2-S User manual

B.E.G.

B.E.G. Luxomat PD2-S User manual

B.E.G. LUXOMAT LC-Click 140 Owner's manual

B.E.G.

B.E.G. LUXOMAT LC-Click 140 Owner's manual

B.E.G. LUXOMAT PD9-DIGI-FC User guide

B.E.G.

B.E.G. LUXOMAT PD9-DIGI-FC User guide

B.E.G. Luxomat BL4 User manual

B.E.G.

B.E.G. Luxomat BL4 User manual

B.E.G. 93386 User manual

B.E.G.

B.E.G. 93386 User manual

B.E.G. LUXMAT PD4-S User guide

B.E.G.

B.E.G. LUXMAT PD4-S User guide

B.E.G. LUXOMAT PD4-M-2C-DUO User manual

B.E.G.

B.E.G. LUXOMAT PD4-M-2C-DUO User manual

B.E.G. LUXOMAT PD4-S-DAA4G User guide

B.E.G.

B.E.G. LUXOMAT PD4-S-DAA4G User guide

B.E.G. LUXOMAT PD4-S Series User guide

B.E.G.

B.E.G. LUXOMAT PD4-S Series User guide

B.E.G. Luxomat PD2N-M-1C-LED User manual

B.E.G.

B.E.G. Luxomat PD2N-M-1C-LED User manual

B.E.G. LUXOMAT PD9-M-DIM User guide

B.E.G.

B.E.G. LUXOMAT PD9-M-DIM User guide

B.E.G. LUXOMAT PD4-M-DAA4G User guide

B.E.G.

B.E.G. LUXOMAT PD4-M-DAA4G User guide

B.E.G. LUXOMAT PD4-M-1C-C-PS User manual

B.E.G.

B.E.G. LUXOMAT PD4-M-1C-C-PS User manual

B.E.G. LUXOMAT net PD11-KNX-FLAT-ST User manual

B.E.G.

B.E.G. LUXOMAT net PD11-KNX-FLAT-ST User manual

B.E.G. PD4-M-1C-GH-SM User guide

B.E.G.

B.E.G. PD4-M-1C-GH-SM User guide

B.E.G. LUXOMAT LC-Mini 120 Owner's manual

B.E.G.

B.E.G. LUXOMAT LC-Mini 120 Owner's manual

B.E.G. LUXOMAT PD4-S Series User manual

B.E.G.

B.E.G. LUXOMAT PD4-S Series User manual

Popular Security Sensor manuals by other brands

Solight 1D22 user manual

Solight

Solight 1D22 user manual

Siemens FDF241-9 Installation

Siemens

Siemens FDF241-9 Installation

D-Parts fontastic Series quick start guide

D-Parts

D-Parts fontastic Series quick start guide

PCB Piezotronics 117B184 Installation and operating manual

PCB Piezotronics

PCB Piezotronics 117B184 Installation and operating manual

Hioth CT-SMZB2004-HM user manual

Hioth

Hioth CT-SMZB2004-HM user manual

Viking VE-ARSW product manual

Viking

Viking VE-ARSW product manual

Blocklychain TH-104 manual

Blocklychain

Blocklychain TH-104 manual

Fisher Darex 715004 Instructions for use

Fisher Darex

Fisher Darex 715004 Instructions for use

SAL PIXIE SMS861CD/BTAM quick start guide

SAL

SAL PIXIE SMS861CD/BTAM quick start guide

DMP Electronics 1128INT installation guide

DMP Electronics

DMP Electronics 1128INT installation guide

Redwall REDSCAN RLS-3060SH installation instructions

Redwall

Redwall REDSCAN RLS-3060SH installation instructions

Fibergate 5041210 DynaRound RG Hatch Guard Yellow installation instructions

Fibergate

Fibergate 5041210 DynaRound RG Hatch Guard Yellow installation instructions

YUSHI YUT-28 Series manual

YUSHI

YUSHI YUT-28 Series manual

Niko Swiss Garde 360 EB installation instructions

Niko

Niko Swiss Garde 360 EB installation instructions

Burster 8655 Operation manual

Burster

Burster 8655 Operation manual

Apollo REACH RW1000-460APO quick start guide

Apollo

Apollo REACH RW1000-460APO quick start guide

Jasco 52251/ZW6307 manual

Jasco

Jasco 52251/ZW6307 manual

SICK GR18 Series operating instructions

SICK

SICK GR18 Series operating instructions

manuals.online logo
manuals.online logoBrands
  • About & Mission
  • Contact us
  • Privacy Policy
  • Terms and Conditions

Copyright 2025 Manuals.Online. All Rights Reserved.