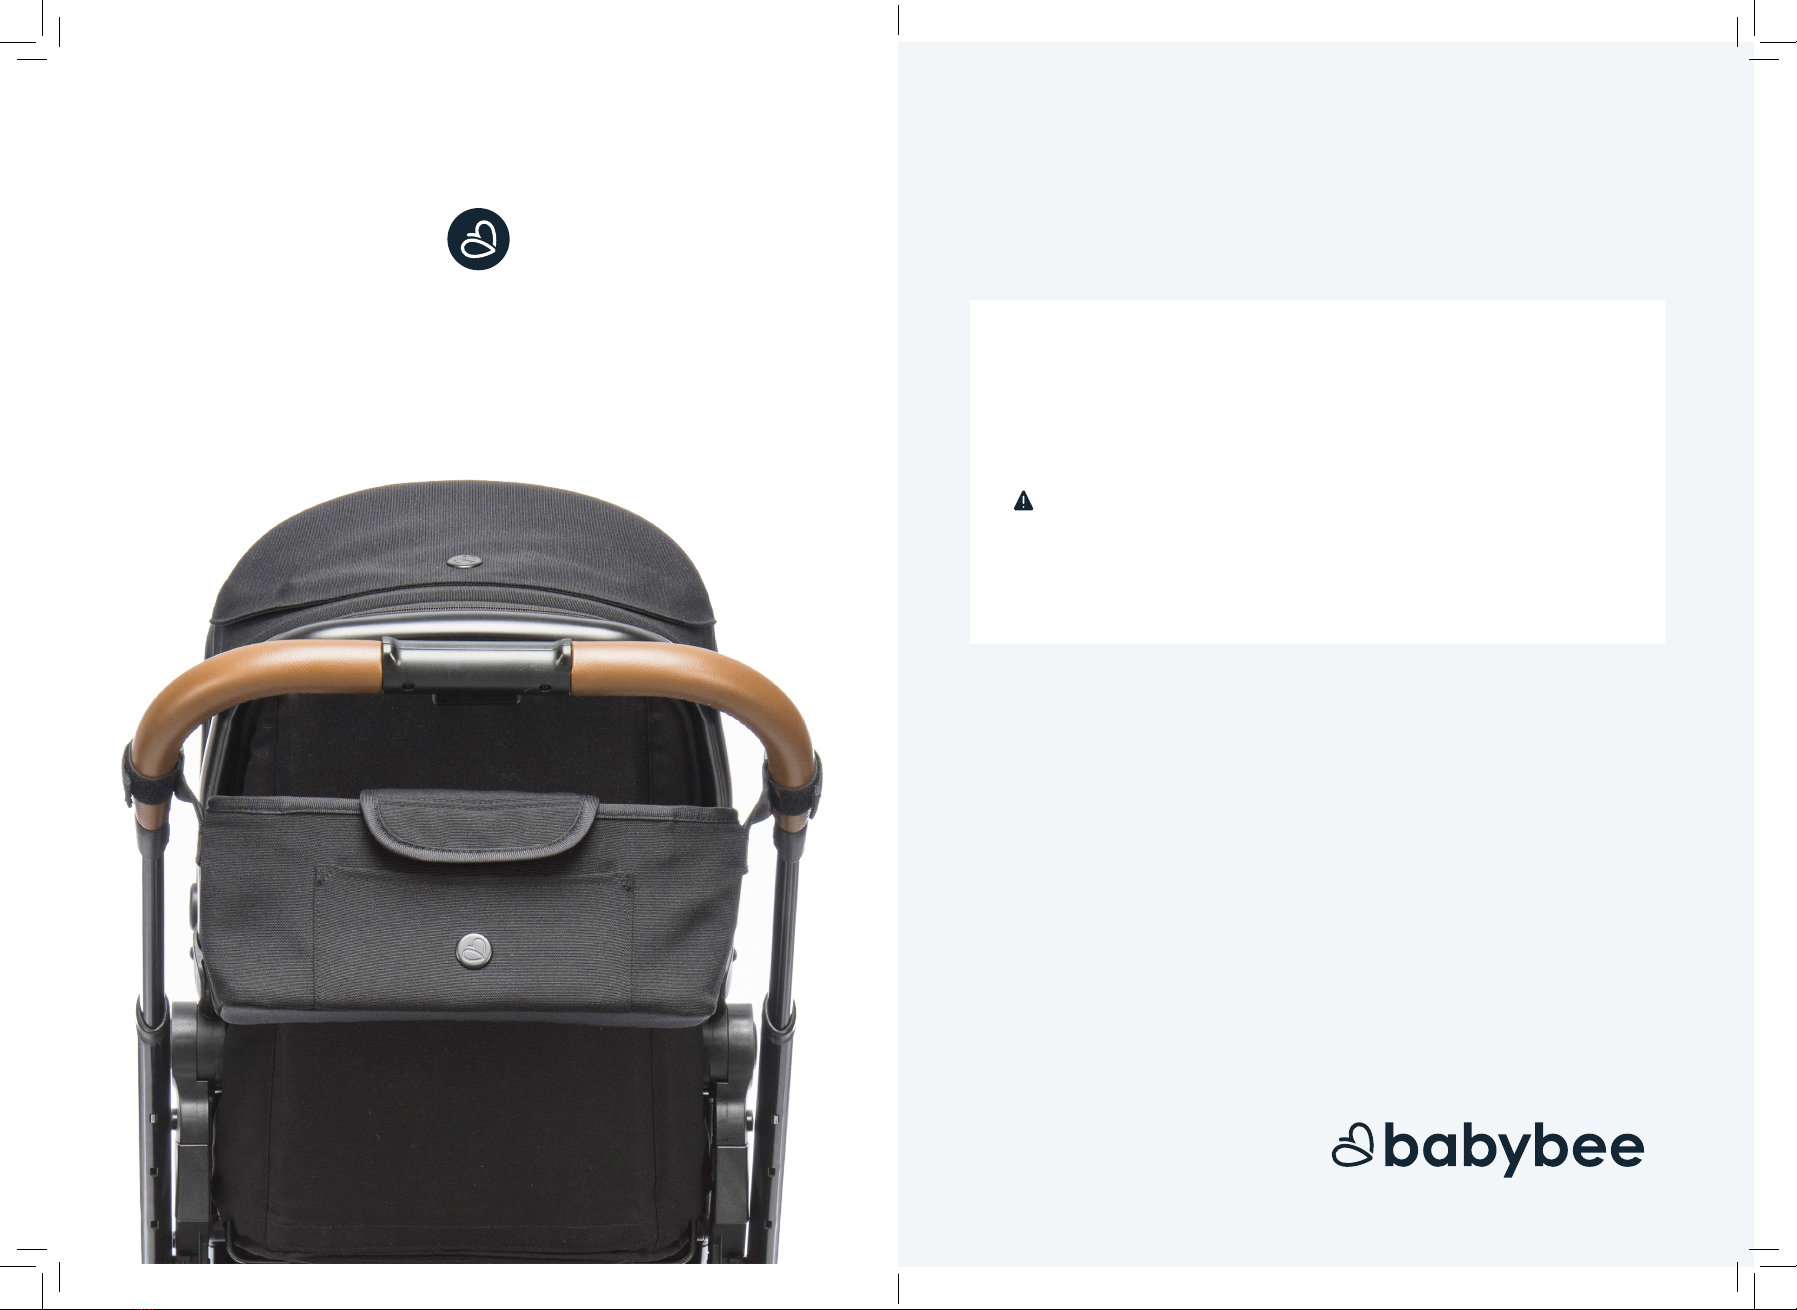
Babybee DUO User manual

DUO Manual
IMPORTANT! Keep For Future Reference
20882013
babybeeprams.com.au

2
Before we start, there’s a few important things you
need to be aware of:
Return Policy
If you decide that the DUO is not
pramFree
Return Policy when returned in
original condition and packaging (with
no signs of usage). Please be mindful
of this when unboxing and setting up.
Refer to our website for full terms
and conditions.
Enjoy the ride, from all of us at
The safety of your family is our number one priority. Please take
the time to carefully read this manual and all warning notices on
22-24 before getting started. Incorrect assembly or use
can result in serious injury or even death.
WARNING
To prevent injury from choking, carefully remove and
immediately move out of reach all protective packaging, with the
exception of the outer cardboard packaging. Never leave your
children unattended with the pram or packaging.
Support
If at any stage you require assistance
with set up or use, please refer to
our 'After Sales Support' page on our
videos and FAQ’s. Or feel free to
email us anytime at:
hello@babybeeprams.com.au
Welcome aboard and
thanks for choosing
Babybee.

3
What’s in the box
Please check that you have all the correct parts
before getting started.
Stroller Seat
Belly bar
Handlebar bag
2x Rear wheels
Bassinet, mattress, liner
head barrier + cover
UV/Mosquito/Sleep cover
(may be located in seat footrest)
Seat liner
User Manual
2x Double adaptors
2x Rain covers
13 - Harness covers
011
5
2.3
6
7
4
Contents
3What’s in the box checklist
5Setting up your frame
7 Double or single mode?
Configurations
Rear brake
Front swivel wheels
4Rear wheels
4Adjusting the footrest
5Safety harness
6Canopy
6Adjusting the handlebar
Folding the Stroller
8Free accessories
Tips for maintaining your pram
20 Cleaning
21 Warranty
22 Safety warnings
9
4Seat recline
1213
8
Step 3: Setting up your bassinet
Step 4: Setting up your seat & canopy

Setting up your frame
To open the frame from
the folded position,
release the black frame
lock located on the side
of the frame.
Lift the handlebar
upwards. Place your foot
on the brake bar to
secure the frame while it
opens. Ensure you hear
the frame “click” into
place.
To attach the rear wheels
push the release buttons
located on the sides of
the brake bar and then
insert each wheel pin into
the sides of the brake bar
until you hear a “click”.
Give them a tug to
ensure they are attached
securely.
2
1Next, insert each front
wheel pin into the centre
of the socket ensuring you
hear them “click” in. Give
ensure they are secure.
Your frame should
now be set up.
4
6
5
click!
click!
click!

Double or Single mode?
There is an increased risk of the stroller tipping if used in double mode
with only one child in the seat. Please be mindful of this and hold the
stroller at all times if you are doing so.
When using the stroller in single
mode, no adaptors are necessary and
the bassinet or seat can be attached
directly into the central connectors.
(Note: if using a Maxi Cosi car capsule,
you will always need to first insert the
capsule adaptors).
When using the stroller in double
mode you will need to first attach two
sets of adaptors.
The first set attach into the central
connectors for the “top position”. To
remove them simply push the
buttons on the side and lift off.
The second set will slide onto the
guides at the front of the frame for
the “lower position”. To remove them
you will need to release the button at
the top of the connector before
sliding off.
1
2
87
It is safe to use your pram with any combination of Maxi Cosi Car Capsules
(selected models only), bassinets or seats facing any direction you like.
Configurations
The Babybee DUO was designed to be as versatile as possible to accommodate
the changing needs of your family.
The DUO offers over 18 configurations as both a single and double stroller:
2 Seats:
Both seats can fully recline
Top seat can recline only
2 Bassinets:

Car Capsule:
109
Seat can not recline in any configuration with capsule
Single mode:
Step 3 -
Setting up your bassinet
Using the fabric handles, pull the
black metal rods firmly into place.
This will give your bassinet its
structure.
Zip up the fabric and insert the
head barrier then the bassinet
mattress, firmly pressing around all
edges.
Starting from the right side when
standing at the foot end of the
bassinet, zip the foot cover onto the
opposite end to the canopy. Then
attach the press studs on the sides
of the foot cover onto the insides of
the canopy connectors to hold it in
the correct position.
To release the canopy, press the
round buttons on the side of the
canopy frame.
2
1
4
Attaching the bassinet to the frame:
Attach the bassinet onto either the central connectors of the frame for single
mode or the lower connectors for double mode. To release, lift the bassinet
release buttons upwards and lift the bassinet up. The bassinet can face either
direction, with parent facing being the preferable option for your child's
development.

Step 4 -
Setting up your seat & canopy
Line up the seat
connectors with the frame
and press downwards.
Listen for the ‘click’ and
ensure it is securely
locked in place.
To recline the seat, press
the large, round, buttons
on the sides of the seat
connectors and tilt the
seat forward or back.
To remove the seat press
the oval buttons on the
sides of the seat
connectors and lift up.
Note: The seat can be
faced in the forward or
rear facing position.
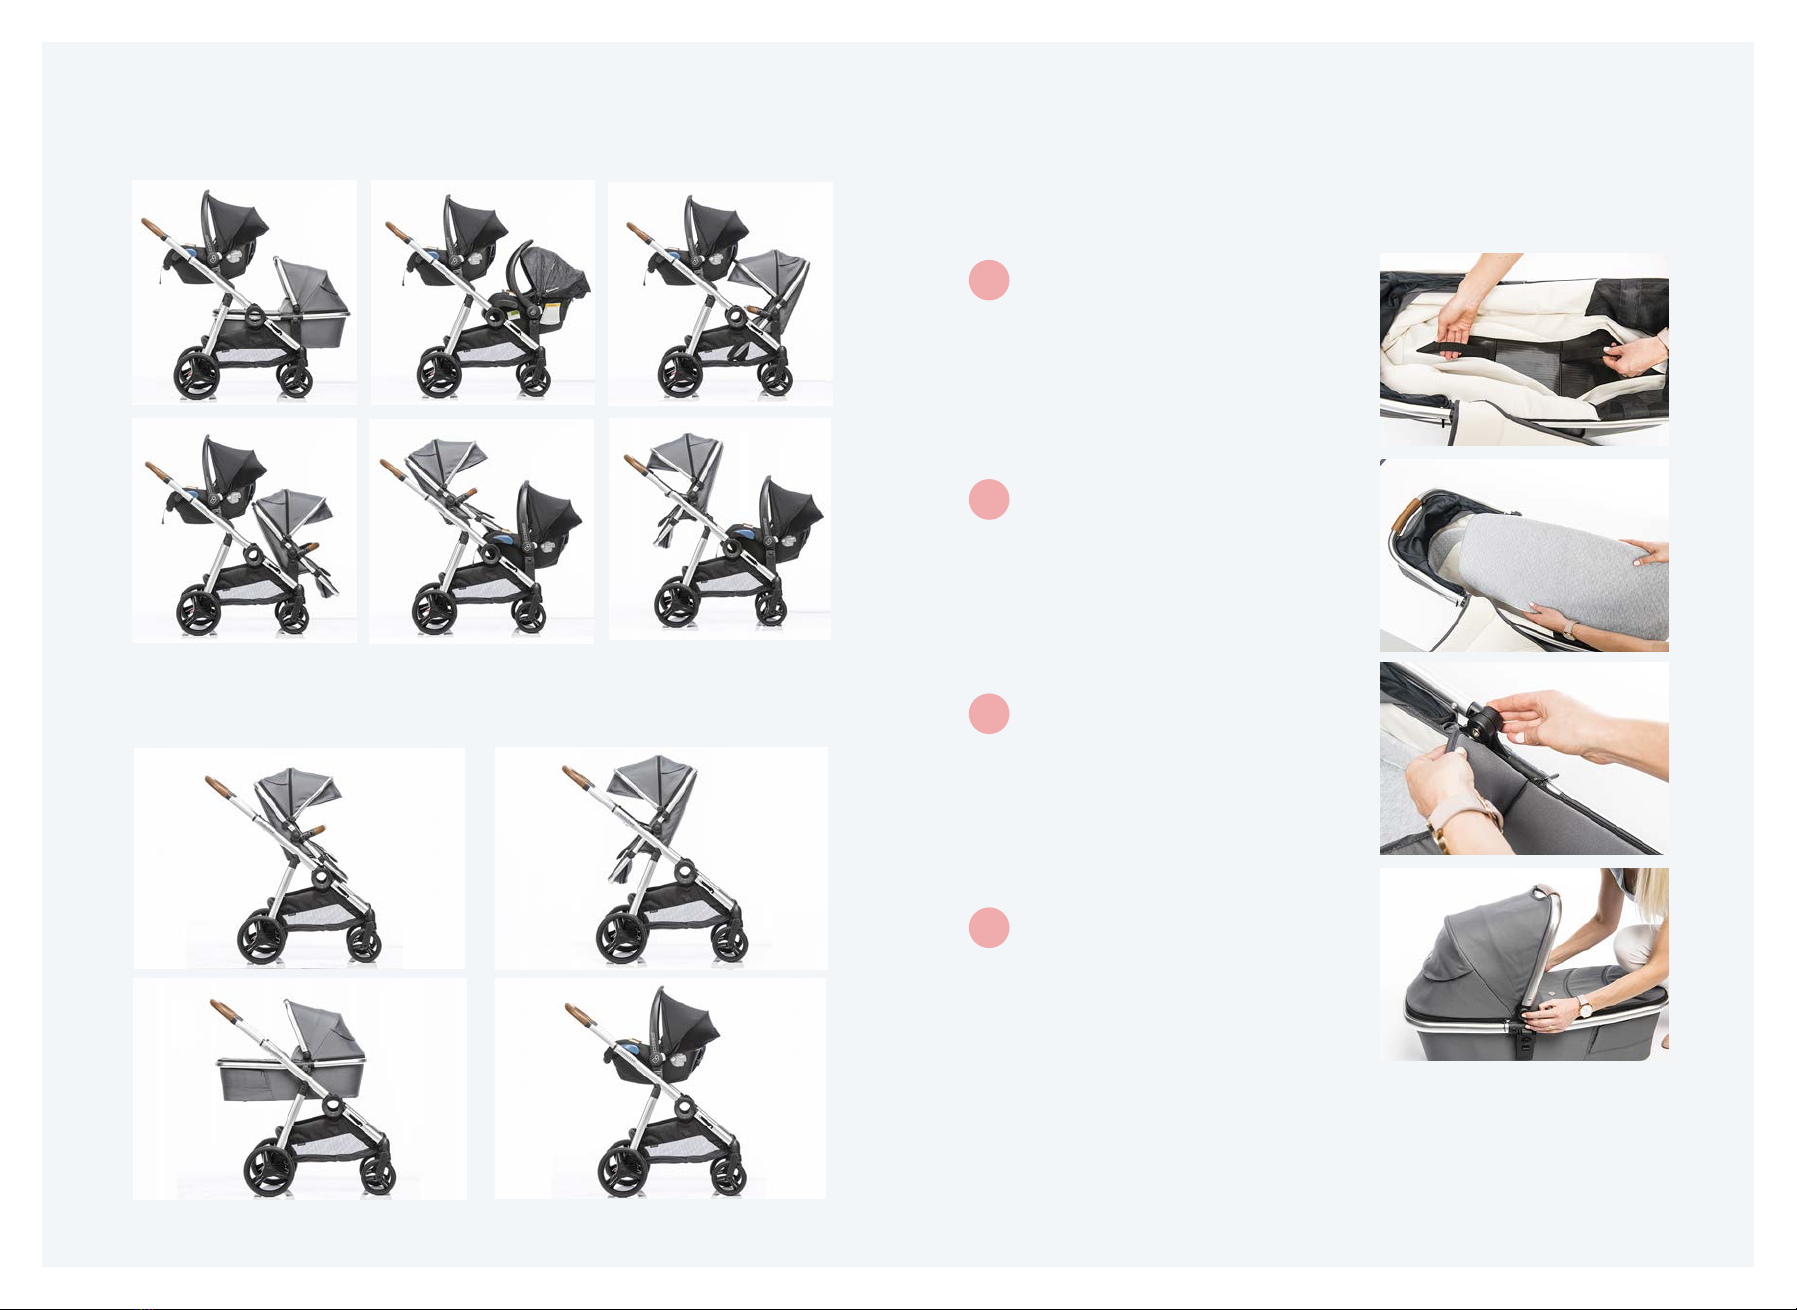
• This stroller seats two passengers with a maximum weight limit of 20kg each.
• Not suitable for a child under 6 months old who cannot sit up unaided.
•Do not allow your child to climb unassisted into the stroller.
Refer to page 15 for instructions
on adjusting your harness.
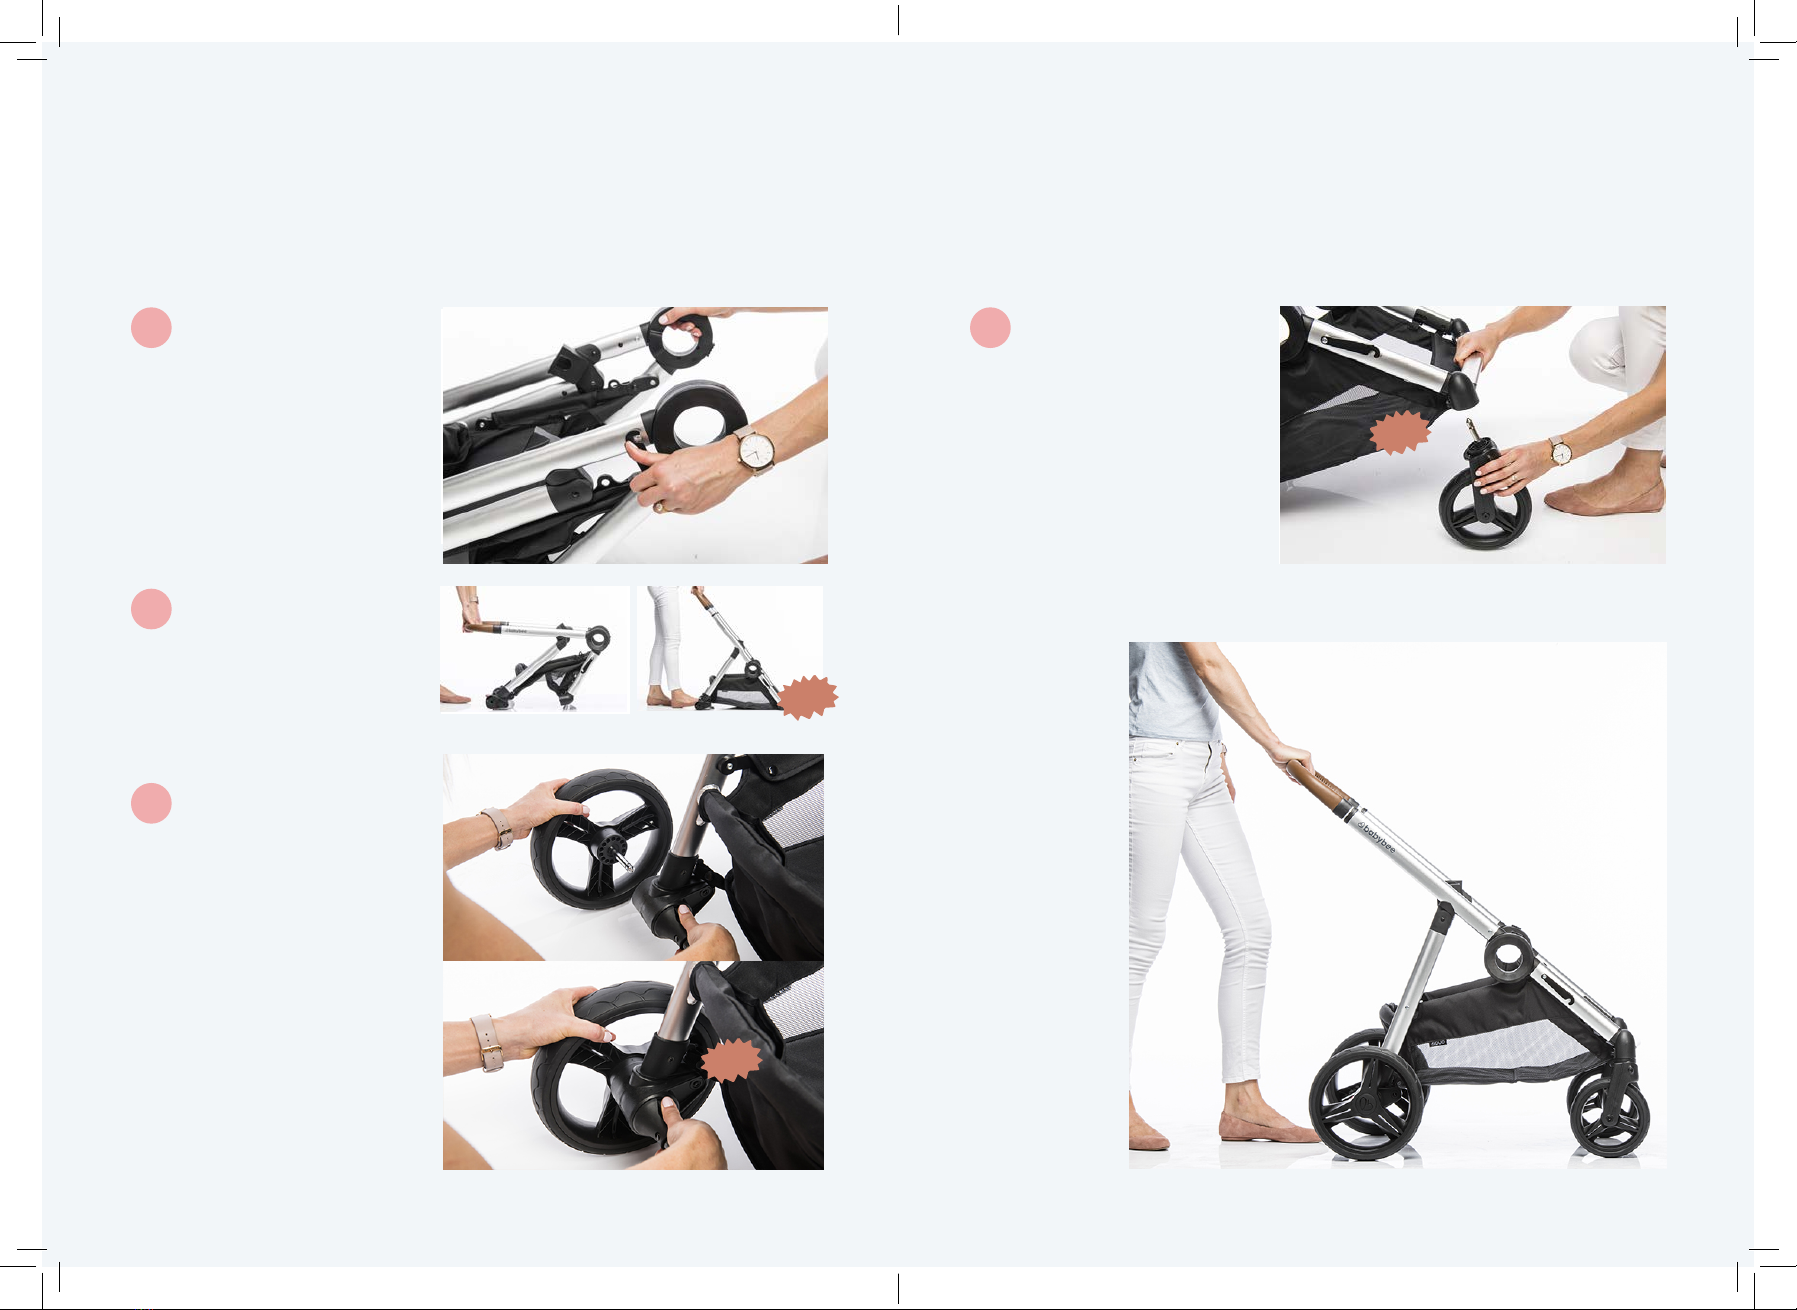
click!
1
2
• Please ensure that your child correctly wears the tted and adjusted safety
harness at all times with all 5 straps secured.
• Never leave the harness buckled when not tted to the child in the stroller.
The harness can form loops which may cause a strangulation hazard.
TIP:Your canopy visor may need a little TLC after shipping. To get it
looking nice and new again simply apply heat from a clothes steamer or
hair dryer to remove any wrinkles (just be careful not to scorch the fabric).
This is not covered under warranty.
4To secure the canopy, first
ensure that it is zipped onto the
seat.
Next attach the plastic
canopy connectors onto the
sides of the frame (TIP: attach
from top to bottom). You’ll notice
a round guide on each side, the
connectors should attach
over these guides.
Finally, insert the belly bar into
the belly bar sockets on the seat
frame. Always give the bar a firm
tug to ensure its secure.
Note: To remove from one side
or both, press the button on the
side you want to release, and
pull the belly bar out.
6
5
1211
3
click!
click!

Using your DUO
Correct use:
Any vehicle with moving parts needs to be used and treated with care and
given regular maintenance to remain safe and in good condition. Please be gentle,
9DUO looking and feeling newer
for longer!
Front swivel wheels:
When travelling fast along straight surfaces or across uneven terrain, the front
wheels may spin or cause what's commonly known as as “wheel shudder”.
Rear brake:
When stopping, use the brake at all times by pressing down on the bottom of
To lock the front swivel wheels into
place, press down on the wheel lock
buttons (located on the back of the
wheel sockets). To go back to 360°
swivel mode press the buttons up
again.
To remove the wheels you will need to
use a flat screw driver or similar tool to
carefully press in the silver button
located on the wheel hub. Please take
care whilst doing this.
Rear wheels:
To remove the rear wheels, press the
button located on the brake bar and
Basket:
The DUO basket has been tested
with more weight may cause the
basket to break.
Adjusting the footrest:
Lift the foot rest and it will click into
the highest position. To release, press
both footrest buttons simultaneously
and lower.
Reclining the seat:
Press the large, round buttons located
on the sides of the seat connectors and
recline the seat to the desired position.
1413

Using your DUO
Safety Harness:
Always engage the brake before placing your child in the stroller.
Always use the harness when your
child is in the stroller. Always adjust
the harness appropriately for your
child’s size.
Adjust the length of each strap
To release press the button
in the middle of the buckle.
Always give the harness a
tug to ensure it’s secure.
Depending on your child’s
height, thread the shoulder
strap through the appropriate
slot on the seat.
Ensure it is thread through
the corresponding slot of the
seat liner.
Adjust the strap length using
the buckle as required.
straps into the central buckle.
To secure the harness:
To adjust the height of the
harness straps:
Having trouble?
Visit our website for a video tutorial
on how to adjust the harness.
Canopy:
Adjust the canopy as needed to protect your child from the sun and wind. For
maximum protection, use the zip to extend the canopy to its maximum length.
Adjusting The Handlebar:
Push the button in the middle of the handlebar and pull or push to your
desired height. It may require a slight “jiggle” to adjust.
65
Never leave your little one directly exposed to the sun, always ensure the
canopy is adjusted correctly.
Adjusting The Bassinet Ventilation:
The bassinet has an inbuilt sun visor. Simply pull this out when needed. The
foot end of the bassinet fabric can also be unzipped to expose a mesh panel,
allowing additional air flow through the bassinet. Similarly the canopy
peekaboo flap can be opened for more air flow.

8
Folding the Stroller
Before folding, ensure that the front wheels are unlocked and the
handlebar is at the lowest height position.
Remove the second seat/bassinet by lifting the release levers on
either side (the stroller can be folded with one seat in the forward
facing position only).
Standing at the front of the stroller, push the black sliding buttons
located on the black circular handles and the seat will fold
backwards.
Ensure you use the black frame lock located on the side of the
frame to keep the frame locked in place.
Then you can lift the frame up using the circular handles.
• Always take great care when folding the frame.
•Ensure children are out of reach of the stroller.
• Do not carry bags from the handlebar other than the one provided by Babybee.
• Do not use parts or accessories that are not approved for use with the Babybee
ROVER range.
•Always supervise and monitor your child regularly whilst the pram is covered.
Rain Covers(compatible with seat
& bassinet)
The rain covers can be stored in the pockets at the
back of the basket. Simply place them over the seat
and bassinets as shown. The open flap should be at
the top, this is to access the bassinet handle.
Handlebar bag
Secure the straps to the handlebar by
threading the Velcro through the plastic
guide. Ensure it’s as tight as possible to
prevent it from falling down the frame. Be
careful carrying liquids in the handlebar bag.
Hot liquids may burn you or your child. The
maximum weight limit that the bag can hold is
2kg.
7
Free Accessories
UV / Mosquito / Sleep Cover
The cover is located in the zipped pocket under the foot rest.
Remove the cover, place it over the canopy and attach the elastic
to the back of the canopy connectors and then tuck under the
footrest.
Note: Compatible with seat only

Tips for maintaining
your pram.
safety of your pram. To keep your DUO in good
working condition and ensure that it lasts as long as
possible will require regular maintenance and you
will need to service your pram every 6 months.
Regular maintenance
should include:
Inspecting the locking devices, levers,
joints, buttons, brakes, wheels, safety
secure, moving freely and in fully
working order.
If any parts of the pram have become
cause. Then try a light application of a
sprayable silicone lubricant, ensuring
that it penetrates between the
components. (Note: Only use lubricant
labeled ‘Silicone Lubricant’, other
lubricants can deteriorate the plastic
parts of your pram and also attract dirt
and dust e.g. DO NOT use standard
We recommend WD-40 SPECIALIST
Silicon Lubricant or SCA Silicone
Spray available from Supercheap
Auto, Bunnings and most hardware
stores.
Preventing rust
& mold
After exposure to wet or damp
conditions (especially trips to the beach,
snow or in the rain), leave the pram
fully open in a warm, well ventilated
environment to prevent rust and mold.
You may need to dry with a soft, lint
free cloth. Left damp it will encourage
mildew, mold or rust to form, damaging
the pram.
Correct Use
The DUO has been designed for urban
living and weekend adventures which
means it’s ideal for walking on sealed
footpaths, in shopping centers, cafes
and down at your local park. Use of the
DUOterrain
will clearly place more stress on the
frame and wheels and cause it to wear
out faster. For this reason we
recommend “weekend adventures” and
Ensure children are not present when applying silicon lubricant or allowing it to dry.
Always spray outside or in a well ventilated area. Ensure you use minimal product and
wipe away excess solution before use.
POISONOUS, TOXIC SUBSTANCE. USE WITH CARE.
Storage
• Do not leave the pram in direct
sunlight for prolonged periods of
time to avoid colour fade.
• Do not leave in your car on days
of extreme heat or near any heat
• Do not store the stroller with
heavy items on top of it.
ventilated and safe place.
Spare Parts
• The brakes and wheels are
subject to normal wear and should
be replaced if necessary.
• Spare parts are available for
purchase on the Spare Parts
page of our website:
babybeeprams.com.au
If the part you require is not listed
please email us for a quote.
Cleaning Instructions
• Use a soft brush to brush down
the pram and remove any dirt
or dust making sure you get into
all the nooks and crannies (i.e inside
the wheel hubs, inside the joints
from all folding parts etc). You
could also give it a good vacuum.
with steel wool.
• All plastic, fabric and metal parts
of the pram may be sponged clean
with a soft cloth in warm water and
a mild detergent.
• Wipe dry with a soft towel or cloth
and allow all parts to dry thoroughly
before using.
• The seat liner and bassinet
mattress liner are machine washable
on a delicate setting (maximum
newer for longer.
Do not
. Do not immerse the seat or canopy
in water, sponge clean only.
. Do not clean with abrasive materials
or using ammonia, bleach, solvents,
. Do not press or iron.
. Do not rub or wring fabric.
. Do not tumble dry.
. Do not dry clean.
Failing to adhere to these maintenance
and cleaning instructions could damage
void your warranty.
• Do not clean your pram with
children around.
• Do not dismantle or alter any
part of the folding mechanisms,
frame, brake axel or wheels for
cleaning or any other reason.
• Do not use if any part is broken,
torn or missing. Replacement
parts are available from our
website or by contacting us.
209

Warranty Information
DUO
year defects warranty to cover
against faults in materials and
workmanship when your pram is
used under normal conditions,
according to our user manuals
and f
Please note: this excludes your free
accessories and accessories sold
separately.
are in addition to other rights and
remedies under the law in relation to
consumer goods: Our goods come with
guarantees that cannot be excluded
under the Australian Consumer Law.
You are entitled to a replacement
or refund for a major failure and for
compensation for any other reasonably
foreseeable loss or damage. You are
also entitled to have the goods
repaired or replaced if the goods fail to
be of acceptable quality and the failure
does not amount to a major failure.
The warranty period starts from the
date that your pram is dispatched from
our warehouse and is valid in Australia
only.
To make a claim email us at:
a detailed description, video and/or
photos of the defect and a photo of the
batch number, which is located inside
the back of your basket. Our warranty
team will then determine the best
way to resolve any defects or faults.
Babybee reserves the right to repair,
exchange or replace the damaged item
with a replacement part. Some parts
may be replaced with newer model
parts as the pram is improved over
time.
The warranty is not valid in the
following cases:
• Defects or faults resulting from
improper assembly, care or use
as outlined in our user manual;
• Defects or faults resulting from an
accident, airline or transport damage;
• Normal wear and tear, including
scratches to the frame or colour fading
of the fabrics;
• Damage to handle/belly bar grips or
of normal handling and daily use;
• Corrosion, mold or rust due to
extreme environmental conditions,
including high humidity, salt spray,
snow or due to lack of regular
maintenance.
• Products that are purchased second
hand or from an unauthorised
distributor;
• Using a part or accessory that is not
compatible with the product and/or not
manufactured by Babybee Prams;
• If you or a third party has attempted
to modify or repair the pram without
having received written permission
from Babybee Prams.
• Claims from anyone other than the
original purchaser (i.e. no longer valid
if gifted or sold to another individual)
• Damage resulting from extreme heat
conditions (i.e. leaving in car on hot
days)
• Customer dissatisfaction with the
functionality, colour or design.
Safety Warnings
The Babybee DUO is designed and
tested to comply with AS/
hazards associated with prams and
strollers which could result in
serious injury or even death:
• The pram or stroller rolling away
from the carers control
• Falls
Please read and follow the bellow
warning notices before using your
stroller:
To avoid injury or death:
• Always apply the brakes
whenever the pram/
stroller is stationary.
• Do not leave children
unattended.
• Secure the child in the stroller
harness at all times.
• Do not carry extra children or
bags on the pram/stroller.
• Make sure children are clear
of any moving parts if you
adjust the pram/stroller.
• This stroller seats two passengers
each
•
old who cannot sit up unaided.
• Do not allow your child to climb
unassisted into the stroller.
Safety Harness
• Please ensure that your child correctly
secured.
• Never leave the harness buckled when
harness can form loops which may
cause a strangulation hazard.
• Maximum weight that can be carried
• Do not use the bassinet once the
child can sit up unaided.
• Not to be used for overnight or
unsupervised sleeping.
Do not recline.
• Do not add additional mattress or
padding inside the bassinet.
• To reduce the risk of SIDS,
paediatricians recommend healthy
infants be placed on their backs
to sleep, unless otherwise advised
by your physician.
2221

Accessories &
replacement parts
• Do not use parts or accessories
that are not approved for use with
the Babybee DUO range. Doing so
may be unsafe and may also void
your warranty. (e.g. toddler
boards, bag hooks, rain covers
etc)
Carrying your stroller
your own and your children’s
Do not lift or carry the stroller when
occupied by your child.
Do not lift or carry the stroller when
fully assembled. Only lift and carry
after folding.
Always remove the car capsule,
bassinet or second seat prior to
folding and carry the frame and
seat/bassinet separately.
Ensure that the automatic frame
lock is engaged before lifting or
carrying the stroller.
Make sure the stroller and all parts
are secured when being
transported in a vehicle.
Safety Warnings
Continued
General safety
• This is not a toy. Do not allow your
child to climb, stand on or play
with the stroller.
• Do not use the pram in a manner
for which it is not designed.
• Keep children clear of the pram
before making any adjustments.
• Not suitable for running, rollerblading
or skating.
• Remove your child and fold the
stroller/pram when going up or down
stairs or escalators.
• Take your child out of the stroller
when travelling by bus, tram or train.
• Gentle sloping surfaces may be
unstable. On steeper sloping and
uneven surfaces, there is a possibility
that the pram may tip over and you
may need to remove your child.
• Do not use if any part is broken, torn
or missing. Replacement parts are
available from our website or
by contacting us.
• Do not use or leave the pram near
• Never leave rain covers, canopy/
bassinet covers on or over the pram
indoors, in a hot atmosphere or near
a heat source. Always supervise
whilst the pram is covered.
• Always ensure that the frame and
the seat/bassinet/car capsule are
correctly engaged before using the
product.
• Do not overload the pram with
additional children, bags, other items
or accessories.
• Bags and other items must not be
hung from the handle bar as they
may damage the frame or otherwise
cause the pram to become
unbalanced and tip over.
• Do not allow children to stand on the
axle/brake bar between the wheels.
This is unsafe and could damage the
stroller.
Maximum weight limits:
• Maximum weight for a child in the
• Maximum weight for items in the
basket is 8kg.
• Maximum weight for the handlebar
2.
Supervision
• Never leave your child unattended
with the stroller. It should only be
used under adult supervision.
43
Others using your pram
• If the stroller is being used by
someone unfamiliar with it (such as
grandparents) always explain to
them how the stroller works and
its safety features.
Wrist tether strap
• Always use the wrist tether strap to
stop the pram/stroller rolling away.

5
WIN
with #babybeeprams
We love nothing more
than seeing our Babybee babes
out and (buzzing) about on
daily adventures.
Tag us in your pics,
on Facebook or Instagram for your
chance to win a prize each month
and be featured on the official
Babybee social media accounts:
@babybeeprams
Ready to roll

Designer style.
Unbeatable value.
babybeeprams.com.au
Babybee prams babybeeprams
hello@babybeeprams.com.au
2019 DUO2JFebruary 9
to change. Please see website for current version.
Table of contents
Other Babybee Stroller manuals

Babybee
Babybee DUO2 User manual

Babybee
Babybee ROVER User manual

Babybee
Babybee rover3 User manual

Babybee
Babybee ROVER 3 Bassinet User manual

Babybee
Babybee LUNA User manual

Babybee
Babybee Bassinet User manual

Babybee
Babybee Comet plus User manual

Babybee
Babybee ROVER Bassinet User manual

Babybee
Babybee DUO3 User manual

Babybee
Babybee DUO3 User manual