manuals.online logo
Brands
  1. Home
  2. •
  3. Brands
  4. •
  5. Balanced Body
  6. •
  7. Fitness Equipment
  8. •
  9. Balanced Body Allegro CC User manual

Balanced Body Allegro CC User manual

Contact Us
1-800-PILATES | +1-916-388-2838
pilates.com | info@pilates.com
400-335 | version 07.02.18
Safety First: A guide to proper maintenance
and safe use of your Pilates equipment.
For over 35 years, Balanced Body has been introducing
safety-related innovations to Pilates equipment. Many of our
improvements are now industry standards, resulting in Pilates
equipment that’s safer today than ever before.
Safety depends on proper maintenance and safe use, in addition
to the quality of the equipment. This guide was created to help
you use and maintain your equipment for optimum safety. Please
read it through carefully and keep for future reference. If you have
any questions, give us a call. Failure to follow these instructions
may result in serious injury.
Springs
Spring inspections are critical to maintain your equipment in
safe operating condition. All Balanced Body springs should be
replaced at least every two years. Certain environments and
usages can shorten the expected life of the springs and you may
need to replace the springs more frequently. Therefore, it is very
important to inspect springs on a regular basis since worn or
old springs lose resilience and may break during use. Injury may
result if a spring breaks during use.
During use, do not allow springs to recoil in an uncontrolled
manner. This will damage the spring and shorten its expected life.
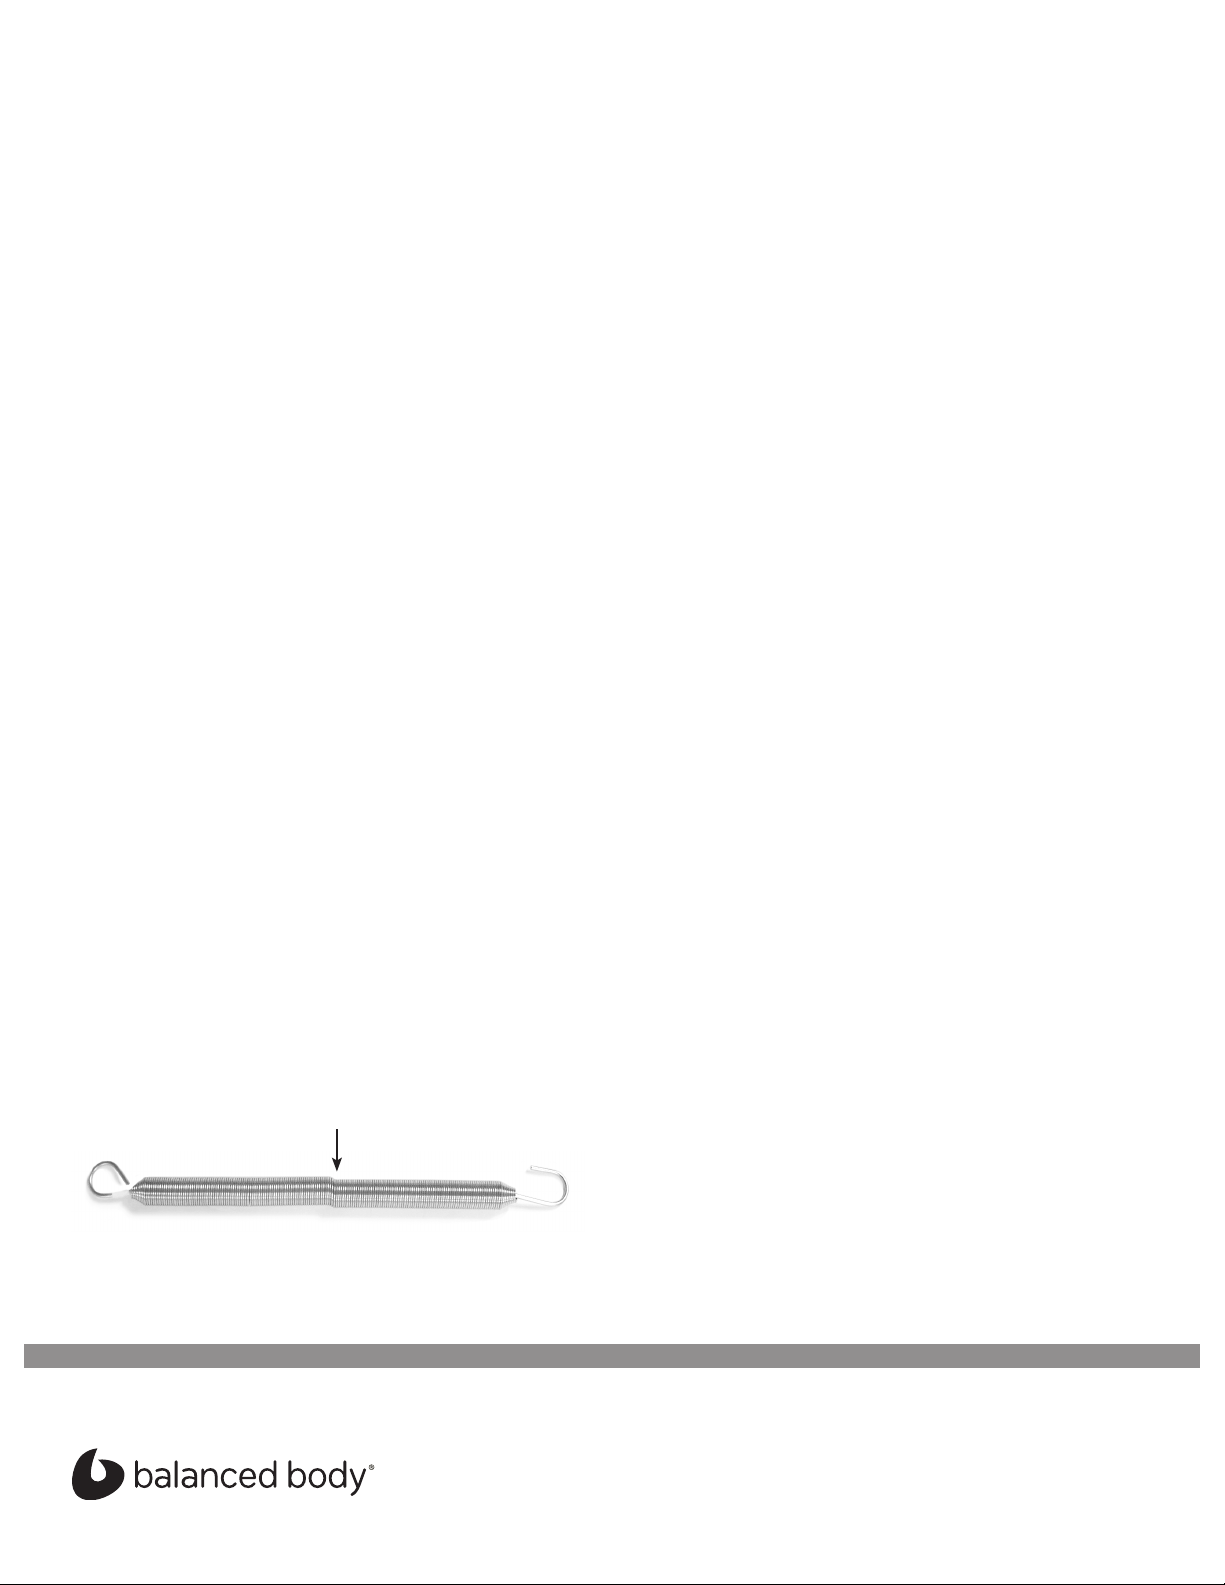
Inspect springs for gaps and kinks (weekly or monthly,
depending on frequency of use). Look for gaps and kinks
between the coils when the spring is at rest. It is not unusual
for the spring to have a very small gap on the tapered end (a
gap is sometimes created during the manufacturing process).
However, there should be no gaps in the body of the spring. If you
see any gaps or kinks in the body of the spring, discontinue use
and replace the springs immediately. See Figure 1. Additionally,
corrosion anywhere on the coils will shorten the life of the spring.
Discontinue using the spring immediately if you see any rust or
oxidation during inspection.
Kink
Figure 1
Rope and strap wear (quarterly). Ropes should be replaced if you
can see the core of the rope through the outer lining, or if the
ropes are flattened. Straps should be replaced as soon as any
fraying is noticed. Be sure to check the sections of rope or straps
that attach to the clips and run through the pulleys.
Secure the carriage. When your Reformer is not in use, be sure
that at least two springs secure the carriage to the springbar.
Footstrap under tension in box work. When using the box and
footstrap, be sure the footstrap is under tension (with snaps
pulling from the top of the eyebolt) before beginning the
exercise.
REFORMER WHEEL AND TRACK MAINTENANCE
Clean the tracks and wheels (weekly). For smooth carriage travel
and to maintain the longevity of the wheels, we recommend that
you wipe down the tracks once a week.
Disconnect the springs and clean the entire length of the tracks
with a soft cloth and a mild commercial cleaner such as Simple
Green®, Fantastik® or 409®. Do not use abrasive cleansers or
pads, as they can damage the anodizing on the rails. To clean
the wheels, hold the cloth against the wheels while you move the
carriage. If you feel a bump in the ride, dirt has adhered to the
surface of the rails or wheels. Clean hair and debris out of the
rails. Hair can wrap around the wheel axles and eventually build
up and cause wheel failure. Use tweezers to remove hair from
the wheels.
Contact Us
1-800-PILATES | +1-916-388-2838
pilates.com | info@pilates.com
400-335 | version 07.02.18
Lubrication. Reformers rarely need lubrication. Occasionally,
a sidewheel may squeak. If this happens, lightly spray a small
amount of dry silicone on a cloth and wipe the aluminum
tracking rail where the sidewheel makes contact. “Dry” silicone
does not have an oil base. Oil-based (“wet”) silicone and WD40
should not be used as they attract dirt. Never spray silicone near
or inside the wheels – this can wash the lubricant out of the
bearings and ruin the bearings. You can purchase dry silicone
at most hardware and auto parts stores. Pulleys sometimes
require lubrication to stop a squeak. Direct a very quick spray of
dry silicone or Teflon spray into the pulley. Be careful not to over
spray. You may want to remove ropes to avoid getting silicone
on them.
UPHOLSTERY CLEANING & MAINTENANCE
Cleaning. You can extend the life of upholstery by keeping it
clean and free of dirt, oil and perspiration. After each use, wipe
down the upholstery with a solution of mild soap and water. Then
wipe it down with clean water and dry with a soft towel.
Disinfecting. Equipment upholstery is coated with BeautyGard®,
which offers antibacterial protection. If you want additional
disinfection, use any off-the-shelf disinfectant spray or solution,
such as Pine Sol®or Lysol®. Since disinfectants will leave a
fragrance residue buildup with repeated use, we recommend
wiping down the disinfected area with clean water using a sponge
or soft towel.
To order replacement parts, or if you have any questions,
please call:
Questions? Call Balanced Body at 1-800-745-2837 (US and
Canada), or +1-916-388-2838 (all other countries).
Email: inf[email protected].
Contact Us
1-800-PILATES | +1-916-388-2838
pilates.com | info@pilates.com
400-274 | version 07.02.18
How to assemble the Allegro® CC Reformer
PARTS LIST
Part number Description Qty
950-002 Complete footbar 1
950-020 Pivot bolts and washers 1 kit
950-228 Shoulder rest with brackets 1 pair
616-400 Locking shoulder post 2
GEN8000 Twist lock plunger knobs 2
210-070 Soft Touch Ropes 1 pair
210-064 Double loops (Soft Touch) 1 pair
950-225 Allegro riser with pulley 2
GEN9050 5/16” Allen wrench 1
ALL0060 Allegro wrench 1
SPR9070 Red spring 3
SPR9071 Blue spring 1
SPR9241 Yellow spring 1
DVD8414 Introductory DVD 1
IMPORTANT PRECAUTIONS:
PLEASE READ WARNING
To reduce the risk of serious injury, read the following
important precautions before using the Allegro.
»Read all instructions in this manual before using the
Allegro CC. Review the Setup and Safety video included
with the Allegro before using the equipment. Use the
Allegro only as described in these instructions and the
video.
»It is the responsibility of the owner to ensure that all
users of the Allegro CC are adequately informed of all
precautions.
»Use the Allegro CC only on a level surface. Keep hands
and feet away from all moving parts. When the Allegro
is not in use, leave at least two springs connected to the
carriage. Keep children under the age of 12 and pets away
from the Allegro at all times.
»If you feel pain, dizziness, or shortness of breath, stop
exercising immediately.
»Before beginning any exercise program, consult your
physician.
2
INSTALL THE SHOULDER RESTS
1. Note the two protruding studs on the bottom of the shoulder
rests. Lower the shoulder rest studs into the keyholes and
slide away from the carriage pad. See Figure A.
Note: The shoulder rests can be installed in two positions. One
position is wider, and more comfortable for broad shoulders.
Swap the left and right shoulder rests to change between
standard and wide configurations.
2. Now screw the locking shoulder posts onto the exposed bolt
on each shoulder rest. See Figure B.
Using the Locking Shoulder Posts:
Turn the posts clockwise to tighten them and lock the
shoulder rests into position. Over tightening the posts will
make them difficult to remove, they should be snug but not
too tight. To remove the shoulder rests, turn the post counter
clockwise 1-2 turns and gently slide the shoulder rests toward
the carriage.
Figure C shows the storage position for the shoulder rests.
Note the key hole slots at the head end of the Allegro CC frame.
INSTALL THE BLACK PLUNGER KNOBS
3. Look through the large
threaded hole in the trunnion
and line it up with one of the
holes in the frame.Screw the
plunger knob into the large
hole until it is completely
threaded in.See Figure D.
4. Repeat on other side. Tighten
both plunger knobs securely
with the included open end
wrench.
To move the trunnions, pull the ball of the plunger knobs away
from the frame and turn 90° to lock out. To re-engage the
plunger turn the knob until it snaps into one of the holes in
the side of frame.
Note: Make sure both trunnion plates are locked in the same
horizontal position before moving on.
INSTALL THE FOOTBAR
5. Pick up the footbar so the seam of the footbar cover is away
from the carriage pad.
6. While squeezing the footbar
plunger levers, guide the
footbar over the outsides of
the trunnion plates. Align
each footbar pin with the top
hole in the trunnion plate.
While continuing to support
the footbar, release the footbar
plunger levers to engage
the trunnion plate. Be sure
the pins on both sides are
engaged. See Figure E.
Figure C
Figure A
Figure B
Figure D
Plunger
Knob
Trunnion
Plate
Figure E
Plunger
Lever
Trunion Plate
Top Hole
Washer
Shoulder Bolt
3
7. Pivot the footbar slightly until the large hole at the bottom
of the footbar aligns with the remaining hole in the trunnion
plate.
8. Slide the shoulder bolt with one washer through the large
footbar hole. Then screw the shoulder bolt into the trunnion
plate as tightly as possible with the large allen wrench. Repeat
on the other side. See Figure E.
INSTALL THE RISERS
9. Remove locking pins from the
frame. Insert the risers
through the holes on the top
of the frame. Turn the risers
until the attached pulleys point
straight down the frame toward
the footbar. See Figure F.
10. Reinsert locking pins until the
metal ring touches the frame.
You may need to jiggle or
slightly lift or rotate the riser
to get the locking pins in all
the way.
ATTACH THE ROPES
11. To attach the ropes, first engage at least one spring from
the carriage to the frame to keep the carriage in the home
position. Unroll the ropes and separate them.
12. The Allegro CC now comes with Soft Touch Ropes that do not
have the dog-clips to attach the loops. The clip will no longer
drag on or bang into the frame! Follow the images below to
install your loops. See Figure G.
13. Rest the loops over the shoulder rests. Thread the other end of
each rope through a riser pulley and back into the cam cleats
on the carriage to adjust the length. Be sure to go through the
chrome eyestraps on both sides of the cam cleats. Always push
the rope firmly down into the cleats to ensure a good grip.
STORING THE ALLEGRO CC REFORMER
Stacking
To see a demonstration of how to stack the Allegro CC, watch the
Setup and Safety portion of the Allegro CC Introductory/Level 1
DVD. Attach the springs to keep the carriage from moving. Move
the footbar to the “down” position. Remove the shoulder rests
and store in the slots at the head of the frame. Put the head rest
down. Remove the risers and store in the holes on the sides of
the frame. Place the ropes and loops inside the Allegro CC frame
not on the carriage. Alternate the orientation of the Allegro CC‘s
as you stack them. Place the head end feet onto the standing
platform of the Allegro CC below, and so on. Stack a maximum
of 5 reformers with no legs (3 with legs). Do not stack Reformer
with Towers.
Standing
It is absolutely critical that the
Allegro CC footbar be set and
locked in the correct position
for standing storage. Move
and lock the footbar into the
position closest to the foot-end
of the Reformer frame. Raise
the footbar to its highest
position. Lift the head-end of
the Allegro CC frame to waist
height. Then raise the frame to
vertical. Use your foot to steady
the wheeled end of the frame
as you lift to vertical. The
vertical Allegro CC will come
to rest on the footbar and the
transport wheels.
See Figure H.
Figure F
Locking Pin
Figure G
21
3 4
Figure H
Contact Us
1-800-PILATES | +1-916-388-2838
pilates.com | info@pilates.com
400-274 | version 07.02.18

Other Balanced Body Fitness Equipment manuals

Balanced Body Allegro 2 Reformer User manual

Balanced Body

Balanced Body Allegro 2 Reformer User manual

Balanced Body Arm Chair User manual

Balanced Body

Balanced Body Arm Chair User manual

Balanced Body Allegro Reformer User manual

Balanced Body

Balanced Body Allegro Reformer User manual

Balanced Body CenterLine Reformer User manual

Balanced Body

Balanced Body CenterLine Reformer User manual

Balanced Body Ladder Barrel Manual

Balanced Body

Balanced Body Ladder Barrel Manual

Balanced Body Allegro Reformer Administrator Guide

Balanced Body

Balanced Body Allegro Reformer Administrator Guide

Balanced Body Rialto with Riser Konnector Instruction Manual

Balanced Body

Balanced Body Rialto with Riser Konnector Instruction Manual

Balanced Body Allegro Instruction sheet

Balanced Body

Balanced Body Allegro Instruction sheet

Balanced Body Allegro Reformer User manual

Balanced Body

Balanced Body Allegro Reformer User manual

Balanced Body Studio Reformer User manual

Balanced Body

Balanced Body Studio Reformer User manual

Balanced Body Reformer Trapeze Combination Administrator Guide

Balanced Body

Balanced Body Reformer Trapeze Combination Administrator Guide

Balanced Body Trapeze Table (Cadillac) Administrator Guide

Balanced Body

Balanced Body Trapeze Table (Cadillac) Administrator Guide

Balanced Body F.I.T. Quick start guide

Balanced Body

Balanced Body F.I.T. Quick start guide

Balanced Body IQ REFORMER User manual

Balanced Body

Balanced Body IQ REFORMER User manual

Balanced Body Reformer with Tower Instruction sheet

Balanced Body

Balanced Body Reformer with Tower Instruction sheet

Balanced Body Allegro Legs Kit Instruction sheet

Balanced Body

Balanced Body Allegro Legs Kit Instruction sheet

Balanced Body Contrology Cadillac User manual

Balanced Body

Balanced Body Contrology Cadillac User manual

Balanced Body Cadillac Trapeze Table Administrator Guide

Balanced Body

Balanced Body Cadillac Trapeze Table Administrator Guide

Balanced Body Allegro 2 Reformer Programming manual

Balanced Body

Balanced Body Allegro 2 Reformer Programming manual

Balanced Body CoreAlign Quick setup guide

Balanced Body

Balanced Body CoreAlign Quick setup guide

Balanced Body Exo Chair Guide

Balanced Body

Balanced Body Exo Chair Guide

Balanced Body Reformer with Tower Instruction sheet

Balanced Body

Balanced Body Reformer with Tower Instruction sheet

Balanced Body Legacy Reformer User manual

Balanced Body

Balanced Body Legacy Reformer User manual

Balanced Body Wall Tower Administrator Guide

Balanced Body

Balanced Body Wall Tower Administrator Guide

Popular Fitness Equipment manuals by other brands

Weslo Gym 750 Manuale d'istruzioni

Weslo

Weslo Gym 750 Manuale d'istruzioni

Cortex Omega LGC-10 owner's manual

Cortex

Cortex Omega LGC-10 owner's manual

Xterra ERG500 ROWER owner's manual

Xterra

Xterra ERG500 ROWER owner's manual

Casall INFINITY 1.3X 93013 user manual

Casall

Casall INFINITY 1.3X 93013 user manual

Insportline AB100 user manual

Insportline

Insportline AB100 user manual

True SPL-1100 owner's manual

True

True SPL-1100 owner's manual

ISE SY-5430B user manual

ISE

ISE SY-5430B user manual

Bowflex SelectTect BDS1642 Assembly instructions

Bowflex

Bowflex SelectTect BDS1642 Assembly instructions

Vmax Fitness Pulser 2 user manual

Vmax Fitness

Vmax Fitness Pulser 2 user manual

Tunturi PT 20 user manual

Tunturi

Tunturi PT 20 user manual

ARGENTRADE G119X Instructions for assembly and use

ARGENTRADE

ARGENTRADE G119X Instructions for assembly and use

Klarfit Ultimate Tower manual

Klarfit

Klarfit Ultimate Tower manual

gorilla sports 100856 manual

gorilla sports

gorilla sports 100856 manual

SPORTS ART 805p owner's manual

SPORTS ART

SPORTS ART 805p owner's manual

CYBEX VR1 Biceps Triceps owner's manual

CYBEX

CYBEX VR1 Biceps Triceps owner's manual

Limbs & Things 60430 user guide

Limbs & Things

Limbs & Things 60430 user guide

LesMills SMARTBAR Instructions for use and warranty

LesMills

LesMills SMARTBAR Instructions for use and warranty

pedalo 19070000 manual

pedalo

pedalo 19070000 manual

manuals.online logo
manuals.online logoBrands
  • About & Mission
  • Contact us
  • Privacy Policy
  • Terms and Conditions

Copyright 2025 Manuals.Online. All Rights Reserved.