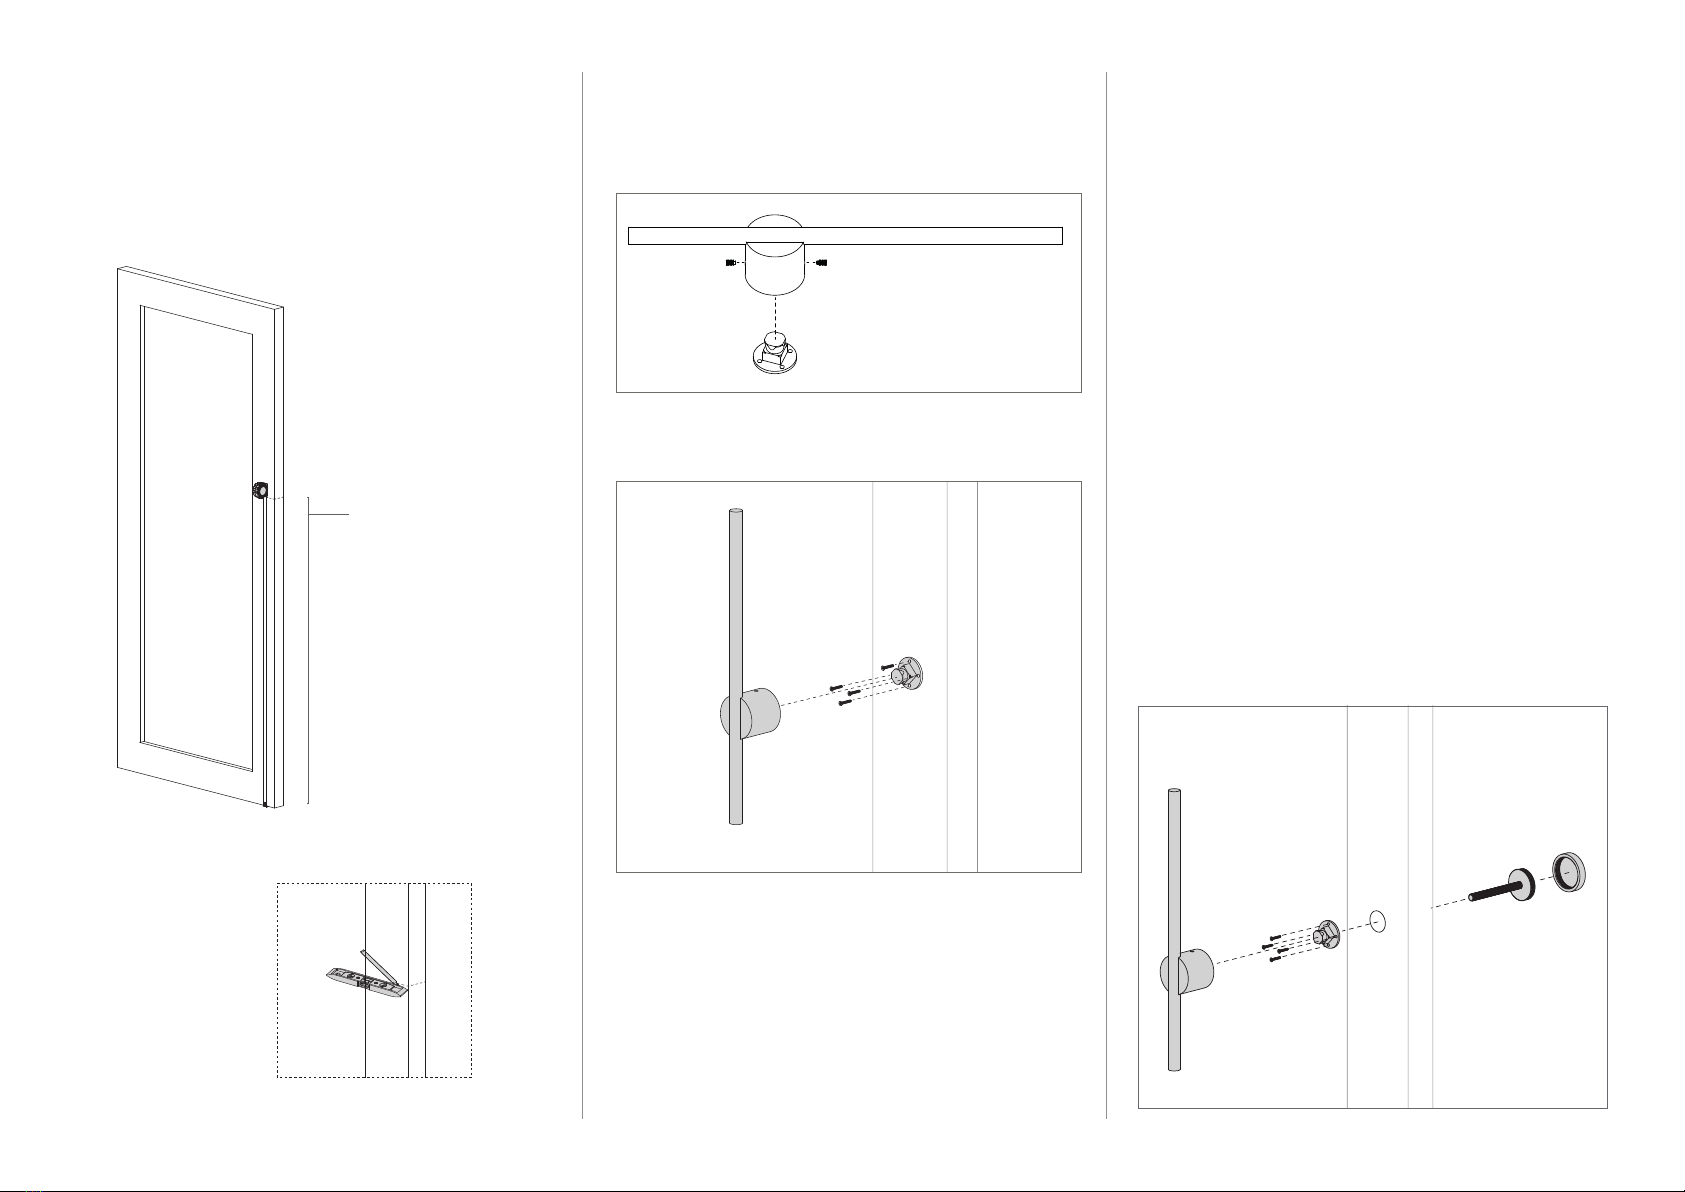
2.1 Remove fixing plate from the pull handle by
loosening top and bottom grub screws.
2. Fitting the Pull Handle
(face fix method)
3.1 Drill a small pilot hole through the centre fixing point
marked in step 1.1
3.2 Drill 10mm hole through pilot hole from both sides
of the door.
3.3 Remove cover from secure-fix rear plate and insert
bolt through inner cover, passing it through the back
of the door via the drill hole.
3.4 If required, mark a cutting point for excess bolt,
ensuring there is enough thread for front fixing plate
(approximately 20mm). Cut excess bolt and pass
back through drill hole.
3.5 Remove fixing plate from the pull handle by
loosening top and bottom grub screws.
3.6 Loosely screw the fixing plate onto the bolt thread,
lining the screw holes up with the horizontal and
vertical lines.
3.7 Mark the twelve & six o’clock screw holes and drill
pilot holes.
3.8 Install fixing screws at twelve & six o’clock to prevent
movement.
3.9 Tighten rear bolt and replace secure-fix rear plate
cover.
3A Insert pull handle onto fixing plate and tighten grub
screws, alternating between the two and tightening
a few threads at a time until tight
4.1 Repeat Steps 1.1 and 1.3 on both sides of the door.
4.2 Drill a small pilot hole through the centre fixing
point marked in 1.1.
4.3 Drill 10mm hole through pilot hole from both sides
of the door.
4.4 Pass fixing bolt through the back of the door via
the drill hole.
4.5 If required, mark a cutting point for excess bolt,
ensuring there is enough thread for front and rear
fixing plates (approximately 20mm). Cut excess
bolt and pass back through drill hole.
4.6 Remove fixing plates from the pull handles by
loosening top and bottom grub screws.
4.7 Firmly screw the fixing plates onto each end of the
bolt thread, lining the screw holes up with the
horizontal and vertical lines.
4.8 Mark the twelve & six o’clock screw holes on both
fixing plates and drill pilot holes.
4.9 Install fixing screws at twelve & six o’clock on both
fixing plates to prevent movement.
4A Insert pull handles onto front and rear fixing plate
and tighten grub screws, alternating between
the two and tightening a few threads at a time
until tight.
3. Fitting the Pull Handle
(rear fix method)
4. Fitting the Pull Handle
(back-to-back rear fixing – handle pair)
*Image used for illustration purposes only.
Associati
Install
Instructions
1.1 Mark the centre fixing point on the face of your
door at the desired height and horizontal distance
from the door edge. (Figure 1)
1.2
Use a spirit level to draw intersecting horizontal and
vertical lines through the fixing point. (Figure 2)
1. Marking the Door
2.2 Place the fixing plate on the fixing point, lining the
screw holes up with the horizontal and vertical lines.
2.3 Mark the twelve o’clock screw hole, remove the
fixing plate, and drill a pilot hole at twelve o’clock.
2.4 Install fixing plate using single screw through twelve
o’clock pilot hole.
2.5 Adjust fixing plate ensuring it sits level with horizon-
tal lines and drill three remaining screw holes.
2.6 Install 3 remaining screws.
2.7 Insert pull handle onto fixing plate and tighten grub
screws, alternating between the two and tightening
a few threads at a time until tight.
Figure 2.
Figure 1.
(1)
(6)
(7)
(7) (7)
(6)
(6)
(2)
(3) (9)
(1)
(1)
(1)
(5)
2.1 Remove fixing plate from the pull handle by
loosening top and bottom grub screws.
2. Fitting the Pull Handle
(face fix method)
3.1 Drill a small pilot hole through the centre fixing point
marked in step 1.1
3.2 Drill 10mm hole through pilot hole from both sides
of the door.
3.3 Remove cover from secure-fix rear plate and insert
bolt through inner cover, passing it through the back
of the door via the drill hole.
3.4 If required, mark a cutting point for excess bolt,
ensuring there is enough thread for front fixing plate
(approximately 20mm). Cut excess bolt and pass
back through drill hole.
3.5 Remove fixing plate from the pull handle by
loosening top and bottom grub screws.
3.6 Loosely screw the fixing plate onto the bolt thread,
lining the screw holes up with the horizontal and
vertical lines.
3.7 Mark the twelve & six o’clock screw holes and drill
pilot holes.
3.8 Install fixing screws at twelve & six o’clock to prevent
movement.
3.9 Tighten rear bolt and replace secure-fix rear plate
cover.
3A Insert pull handle onto fixing plate and tighten grub
screws, alternating between the two and tightening
a few threads at a time until tight
4.1 Repeat Steps 1.1 and 1.3 on both sides of the door.
4.2 Drill a small pilot hole through the centre fixing
point marked in 1.1.
4.3 Drill 10mm hole through pilot hole from both sides
of the door.
4.4 Pass fixing bolt through the back of the door via
the drill hole.
4.5 If required, mark a cutting point for excess bolt,
ensuring there is enough thread for front and rear
fixing plates (approximately 20mm). Cut excess
bolt and pass back through drill hole.
4.6 Remove fixing plates from the pull handles by
loosening top and bottom grub screws.
4.7 Firmly screw the fixing plates onto each end of the
bolt thread, lining the screw holes up with the
horizontal and vertical lines.
4.8 Mark the twelve & six o’clock screw holes on both
fixing plates and drill pilot holes.
4.9 Install fixing screws at twelve & six o’clock on both
fixing plates to prevent movement.
4A Insert pull handles onto front and rear fixing plate
and tighten grub screws, alternating between
the two and tightening a few threads at a time
until tight.
3. Fitting the Pull Handle
(rear fix method)
4. Fitting the Pull Handle
(back-to-back rear fixing – handle pair)
*Image used for illustration purposes only.
Associati
Install
Instructions 1.1 Mark the centre fixing point on the face of your
door at the desired height and horizontal distance
from the door edge. (Figure 1)
1.2 Use a spirit level to draw intersecting horizontal and
vertical lines through the fixing point. (Figure 2)
Preferred product height
1. Marking the Door
2.2 Place the fixing plate on the fixing point, lining the
screw holes up with the horizontal and vertical lines.
2.3 Mark the twelve o’clock screw hole, remove the
fixing plate, and drill a pilot hole at twelve o’clock.
2.4 Install fixing plate using single screw through twelve
o’clock pilot hole.
2.5 Adjust fixing plate ensuring it sits level with horizon-
tal lines and drill three remaining screw holes.
2.6 Install 3 remaining screws.
2.7 Insert pull handle onto fixing plate and tighten grub
screws, alternating between the two and tightening
a few threads at a time until tight.
Figure 2.
Figure 1.
(1)
(6)
(7)
(7) (7)
(6)
(6)
(2)
(3) (9)
(1)
(1)
(1)
(5)
2.1 Remove fixing plate from the pull handle by
loosening top and bottom grub screws.
2. Fitting the Pull Handle
(face fix method)
3.1
Drill a small pilot hole through the centre fixing point
marked in step 1.1
3.2 Drill 10mm hole through pilot hole from both sides
of the door.
3.3 Remove cover from secure-fix rear plate and insert
bolt through inner cover, passing it through the back
of the door via the drill hole.
3.4 If required, mark a cutting point for excess bolt,
ensuring there is enough thread for front fixing plate
(approximately 20mm). Cut excess bolt and pass
back through drill hole.
3.5 Remove fixing plate from the pull handle by
loosening top and bottom grub screws.
3.6 Loosely screw the fixing plate onto the bolt thread,
lining the screw holes up with the horizontal and
vertical lines.
3.7 Mark the twelve & six o’clock screw holes and drill
pilot holes.
3.8
Install fixing screws at twelve & six o’clock to prevent
movement.
3.9 Tighten rear bolt and replace secure-fix rear plate
cover.
3A Insert pull handle onto fixing plate and tighten grub
screws, alternating between the two and tightening
a few threads at a time until tight
4.1 Repeat Steps 1.1 and 1.3 on both sides of the door.
4.2 Drill a small pilot hole through the centre fixing
point marked in 1.1.
4.3 Drill 10mm hole through pilot hole from both sides
of the door.
4.4 Pass fixing bolt through the back of the door via
the drill hole.
4.5 If required, mark a cutting point for excess bolt,
ensuring there is enough thread for front and rear
fixing plates (approximately 20mm). Cut excess
bolt and pass back through drill hole.
4.6 Remove fixing plates from the pull handles by
loosening top and bottom grub screws.
4.7 Firmly screw the fixing plates onto each end of the
bolt thread, lining the screw holes up with the
horizontal and vertical lines.
4.8 Mark the twelve & six o’clock screw holes on both
fixing plates and drill pilot holes.
4.9 Install fixing screws at twelve & six o’clock on both
fixing plates to prevent movement.
4A Insert pull handles onto front and rear fixing plate
and tighten grub screws, alternating between
the two and tightening a few threads at a time
until tight.
3. Fitting the Pull Handle
(rear fix method)
4. Fitting the Pull Handle
(back-to-back rear fixing – handle pair)
*Image used for illustration purposes only.
Associati
Install
Instructions 1.1 Mark the centre fixing point on the face of your
door at the desired height and horizontal distance
from the door edge. (Figure 1)
1.2 Use a spirit level to draw intersecting horizontal and
vertical lines through the fixing point. (Figure 2)
Preferred product height
1. Marking the Door
2.2 Place the fixing plate on the fixing point, lining the
screw holes up with the horizontal and vertical lines.
2.3 Mark the twelve o’clock screw hole, remove the
fixing plate, and drill a pilot hole at twelve o’clock.
2.4 Install fixing plate using single screw through twelve
o’clock pilot hole.
2.5 Adjust fixing plate ensuring it sits level with horizon-
tal lines and drill three remaining screw holes.
2.6 Install 3 remaining screws.
2.7 Insert pull handle onto fixing plate and tighten grub
screws, alternating between the two and tightening
a few threads at a time until tight.
Figure 2.
Figure 1.
(1)
(6)
(7)
(7) (7)
(6)
(6)
(2)
(3) (9)
(1)
(1)
(1)
(5)
2.1 Remove fixing plate from the pull handle by
loosening top and bottom grub screws.
2. Fitting the Pull Handle
(face fix method)
3.1 Drill a small pilot hole through the centre fixing point
marked in step 1.1
3.2 Drill 10mm hole through pilot hole from both sides
of the door.
3.3 Remove cover from secure-fix rear plate and insert
bolt through inner cover, passing it through the back
of the door via the drill hole.
3.4 If required, mark a cutting point for excess bolt,
ensuring there is enough thread for front fixing plate
(approximately 20mm). Cut excess bolt and pass
back through drill hole.
3.5 Remove fixing plate from the pull handle by
loosening top and bottom grub screws.
3.6 Loosely screw the fixing plate onto the bolt thread,
lining the screw holes up with the horizontal and
vertical lines.
3.7 Mark the twelve & six o’clock screw holes and drill
pilot holes.
3.8 Install fixing screws at twelve & six o’clock to prevent
movement.
3.9 Tighten rear bolt and replace secure-fix rear plate
cover.
3A Insert pull handle onto fixing plate and tighten grub
screws, alternating between the two and tightening
a few threads at a time until tight
4.1 Repeat Steps 1.1 and 1.3 on both sides of the door.
4.2 Drill a small pilot hole through the centre fixing
point marked in 1.1.
4.3 Drill 10mm hole through pilot hole from both sides
of the door.
4.4 Pass fixing bolt through the back of the door via
the drill hole.
4.5 If required, mark a cutting point for excess bolt,
ensuring there is enough thread for front and rear
fixing plates (approximately 20mm). Cut excess
bolt and pass back through drill hole.
4.6 Remove fixing plates from the pull handles by
loosening top and bottom grub screws.
4.7 Firmly screw the fixing plates onto each end of the
bolt thread, lining the screw holes up with the
horizontal and vertical lines.
4.8 Mark the twelve & six o’clock screw holes on both
fixing plates and drill pilot holes.
4.9 Install fixing screws at twelve & six o’clock on both
fixing plates to prevent movement.
4A Insert pull handles onto front and rear fixing plate
and tighten grub screws, alternating between
the two and tightening a few threads at a time
until tight.
3. Fitting the Pull Handle
(rear fix method)
4. Fitting the Pull Handle
(back-to-back rear fixing – handle pair)
*Image used for illustration purposes only.
Associati
Install
Instructions 1.1 Mark the centre fixing point on the face of your
door at the desired height and horizontal distance
from the door edge. (Figure 1)
1.2 Use a spirit level to draw intersecting horizontal and
vertical lines through the fixing point. (Figure 2)
Preferred product height
1. Marking the Door
2.2 Place the fixing plate on the fixing point, lining the
screw holes up with the horizontal and vertical lines.
2.3 Mark the twelve o’clock screw hole, remove the
fixing plate, and drill a pilot hole at twelve o’clock.
2.4 Install fixing plate using single screw through twelve
o’clock pilot hole.
2.5 Adjust fixing plate ensuring it sits level with horizon-
tal lines and drill three remaining screw holes.
2.6 Install 3 remaining screws.
2.7 Insert pull handle onto fixing plate and tighten grub
screws, alternating between the two and tightening
a few threads at a time until tight.
Figure 2.
Figure 1.
(1)
(6)
(7)
(7)
(3) (9)
(1)
2.1 Remove fixing plate from the pull handle by
loosening top and bottom grub screws.
2. Fitting the Pull Handle
(face fix method)
3.1 Drill a small pilot hole through the centre fixing point
marked in step 1.1
3.2 Drill 10mm hole through pilot hole from both sides
of the door.
3.3 Remove cover from secure-fix rear plate and insert
bolt through inner cover, passing it through the back
of the door via the drill hole.
3.4 If required, mark a cutting point for excess bolt,
ensuring there is enough thread for front fixing plate
(approximately 20mm). Cut excess bolt and pass
back through drill hole.
3.5 Remove fixing plate from the pull handle by
loosening top and bottom grub screws.
3.6 Loosely screw the fixing plate onto the bolt thread,
lining the screw holes up with the horizontal and
vertical lines.
3.7 Mark the twelve & six o’clock screw holes and drill
pilot holes.
3.8 Install fixing screws at twelve & six o’clock to prevent
movement.
3.9 Tighten rear bolt and replace secure-fix rear plate
cover.
3A Insert pull handle onto fixing plate and tighten grub
screws, alternating between the two and tightening
a few threads at a time until tight
4.1 Repeat Steps 1.1 and 1.3 on both sides of the door.
4.2 Drill a small pilot hole through the centre fixing
point marked in 1.1.
4.3 Drill 10mm hole through pilot hole from both sides
of the door.
4.4 Pass fixing bolt through the back of the door via
the drill hole.
4.5 If required, mark a cutting point for excess bolt,
ensuring there is enough thread for front and rear
fixing plates (approximately 20mm). Cut excess
bolt and pass back through drill hole.
4.6 Remove fixing plates from the pull handles by
loosening top and bottom grub screws.
4.7 Firmly screw the fixing plates onto each end of the
bolt thread, lining the screw holes up with the
horizontal and vertical lines.
4.8 Mark the twelve & six o’clock screw holes on both
fixing plates and drill pilot holes.
4.9 Install fixing screws at twelve & six o’clock on both
fixing plates to prevent movement.
4A Insert pull handles onto front and rear fixing plate
and tighten grub screws, alternating between
the two and tightening a few threads at a time
until tight.
3. Fitting the Pull Handle
(rear fix method)
4. Fitting the Pull Handle
(back-to-back rear fixing – handle pair)
*Image used for illustration purposes only.
Associati
Install
Instructions 1.1 Mark the centre fixing point on the face of your
door at the desired height and horizontal distance
from the door edge. (Figure 1)
1.2 Use a spirit level to draw intersecting horizontal and
vertical lines through the fixing point. (Figure 2)
Preferred product height
1. Marking the Door
2.2 Place the fixing plate on the fixing point, lining the
screw holes up with the horizontal and vertical lines.
2.3 Mark the twelve o’clock screw hole, remove the
fixing plate, and drill a pilot hole at twelve o’clock.
2.4 Install fixing plate using single screw through twelve
o’clock pilot hole.
2.5 Adjust fixing plate ensuring it sits level with horizon-
tal lines and drill three remaining screw holes.
2.6 Install 3 remaining screws.
2.7 Insert pull handle onto fixing plate and tighten grub
screws, alternating between the two and tightening
a few threads at a time until tight.
Figure 2.
Figure 1.
(1)
(6)
(7)
(7) (7)
(6)
(6)
(2)
(3) (9)
(1)
(1)
(1)
(5)
2.1 Remove fixing plate from the pull handle by
loosening top and bottom grub screws. (Figure 3.)
2. Fitting the Pull Handle
(face fix method)
2.2 Place the fixing plate on the fixing point, lining the
screw holes up with the horizontal and vertical lines.
2.3 Mark the twelve o’clock screw hole, remove the
fixing plate, and drill a pilot hole at twelve o’clock.
2.4 Install fixing plate using single screw through twelve
o’clock pilot hole.
2.5 Adjust fixing plate ensuring it sits level with
horizontal lines and drill three remaining screw holes.
(Figure 4.)
2.6 Install 3 remaining screws.
2.7 Insert pull handle onto fixing plate and tighten grub
screws, alternating between the two and tightening
a few threads at a time until tight.
Figure 3.
Figure 4.
(1)
(6)
(7)
(6)
(1)
(5)


