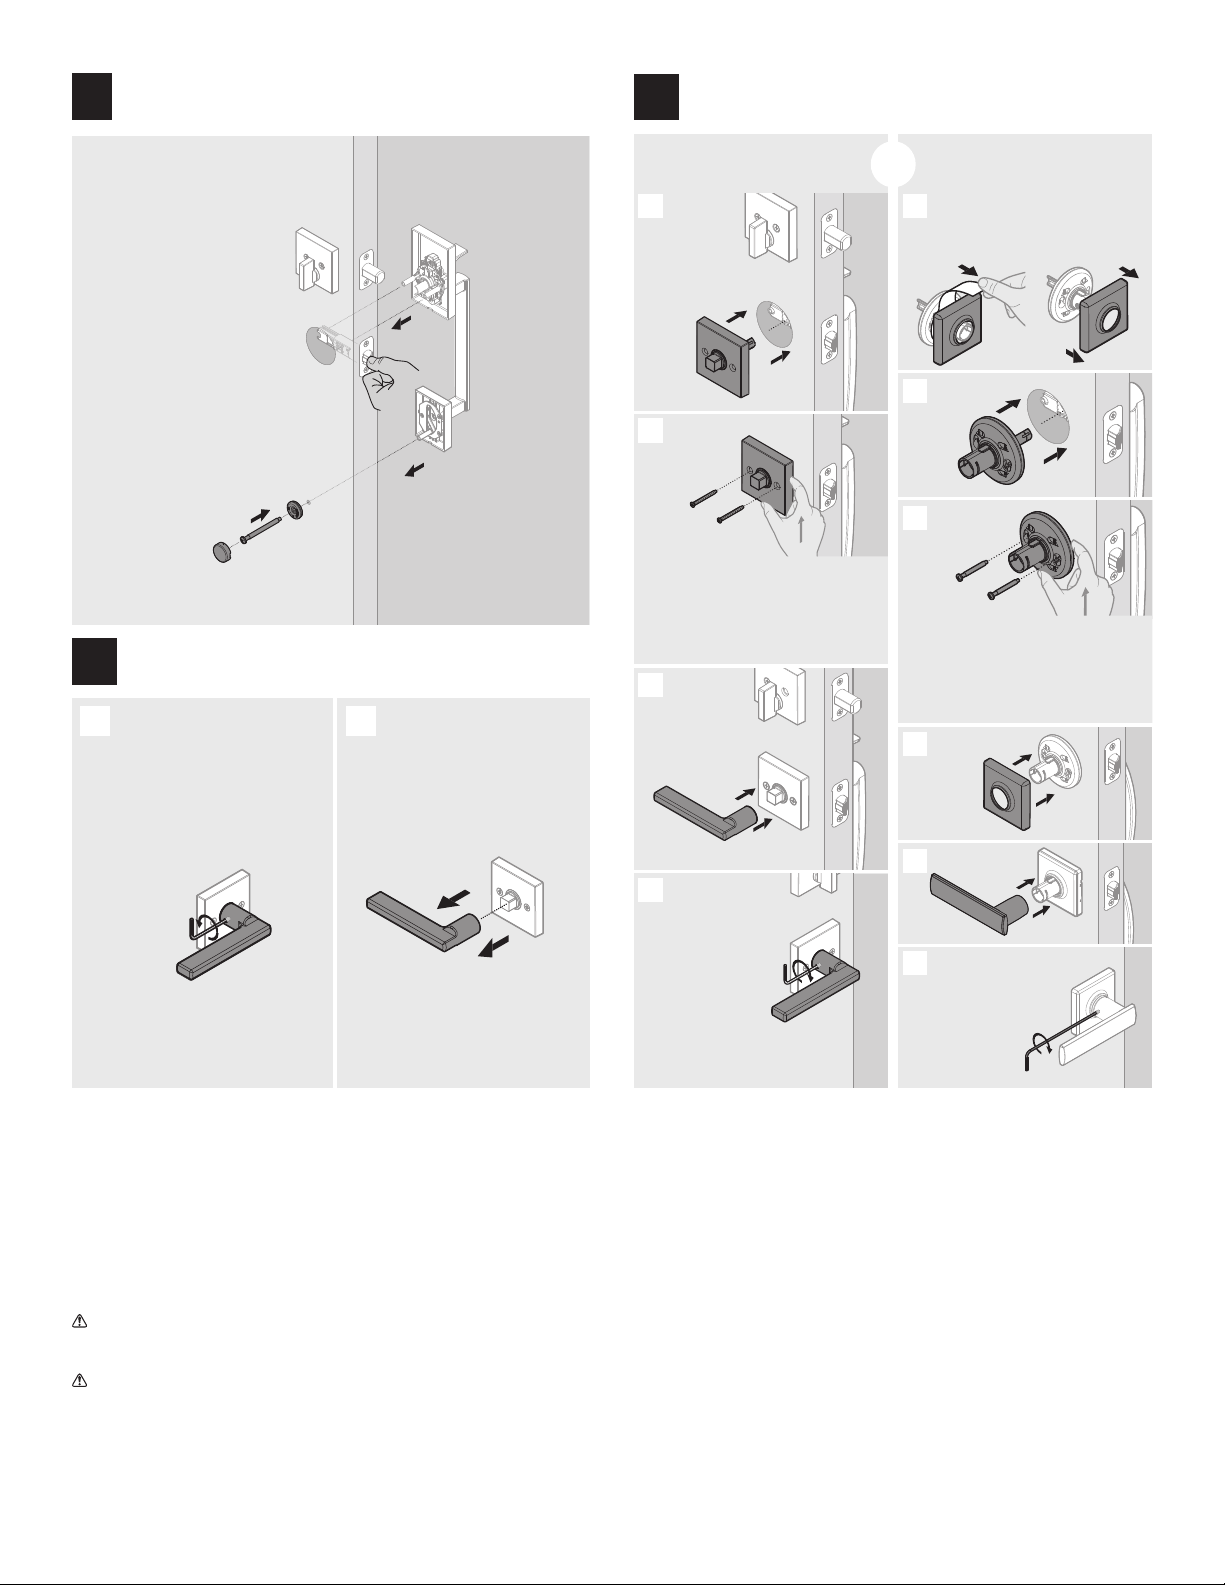
manuals.online logo
Brands
  1. Home
  2. •
  3. Brands
  4. •
  5. Kwikset
  6. •
  7. Door Lock
  8. •
  9. Kwikset 971MRL SQT 15 User manual

Kwikset 971MRL SQT 15 User manual

This manual suits for next models

4

Other Kwikset Door Lock manuals

Kwikset 907 15 SMT User manual

Kwikset

Kwikset 907 15 SMT User manual

Kwikset 62541/01 User manual

Kwikset

Kwikset 62541/01 User manual

Kwikset Powerbolt 2 User manual

Kwikset

Kwikset Powerbolt 2 User manual

Kwikset 62873/01 User manual

Kwikset

Kwikset 62873/01 User manual

Kwikset 699 FN User manual

Kwikset

Kwikset 699 FN User manual

Kwikset Kevo User manual

Kwikset

Kwikset Kevo User manual

Kwikset Powerbolt 2 Installation manual

Kwikset

Kwikset Powerbolt 2 Installation manual

Kwikset Signature Series User manual

Kwikset

Kwikset Signature Series User manual

Kwikset 665 User manual

Kwikset

Kwikset 665 User manual

Kwikset 00883351666312 User manual

Kwikset

Kwikset 00883351666312 User manual

Kwikset 816 User manual

Kwikset

Kwikset 816 User manual

Kwikset SMARTCODE User manual

Kwikset

Kwikset SMARTCODE User manual

Kwikset Smartcode 914 User manual

Kwikset

Kwikset Smartcode 914 User manual

Kwikset 818 User manual

Kwikset

Kwikset 818 User manual

Kwikset 405CSLRDT-26SV1 User manual

Kwikset

Kwikset 405CSLRDT-26SV1 User manual

Kwikset SMARTCODE 9260CNT-514S User manual

Kwikset

Kwikset SMARTCODE 9260CNT-514S User manual

Kwikset 69926-001 User manual

Kwikset

Kwikset 69926-001 User manual

Kwikset Smartcode 914 User manual

Kwikset

Kwikset Smartcode 914 User manual

Kwikset 62889 / 01 User manual

Kwikset

Kwikset 62889 / 01 User manual

Kwikset 69925-001 User manual

Kwikset

Kwikset 69925-001 User manual

Kwikset Burbank User manual

Kwikset

Kwikset Burbank User manual

Kwikset Kevo User manual

Kwikset

Kwikset Kevo User manual

Kwikset 159 User manual

Kwikset

Kwikset 159 User manual

Kwikset Premis Installation guide

Kwikset

Kwikset Premis Installation guide

Popular Door Lock manuals by other brands

Dorma MUNDUS PREMIUM US 10 Mounting instruction

Dorma

Dorma MUNDUS PREMIUM US 10 Mounting instruction

Defiant LG600BRA4BGT Instructions for installation

Defiant

Defiant LG600BRA4BGT Instructions for installation

TRU-BOLT M1740024 manual

TRU-BOLT

TRU-BOLT M1740024 manual

Opera ARCA SLIDE installation instructions

Opera

Opera ARCA SLIDE installation instructions

tell CODELOCK CL5500 Series installation instructions

tell

tell CODELOCK CL5500 Series installation instructions

ABH LR6000 installation instructions

ABH

ABH LR6000 installation instructions

Assa Abloy effeff 827A-IP Mounting instructions

Assa Abloy

Assa Abloy effeff 827A-IP Mounting instructions

Iseo MA1A installation guide

Iseo

Iseo MA1A installation guide

ID Lock 150 user manual

ID Lock

ID Lock 150 user manual

Lockly ACCESS TOUCH PRO user manual

Lockly

Lockly ACCESS TOUCH PRO user manual

iLoq G50S user guide

iLoq

iLoq G50S user guide

SDC Z7835 installation instructions

SDC

SDC Z7835 installation instructions

ilco 452 Installation

ilco

ilco 452 Installation

Samsung shs-h705 user guide

Samsung

Samsung shs-h705 user guide

TRU-BOLT 08102017 user manual

TRU-BOLT

TRU-BOLT 08102017 user manual

CDVI 500-LADJ quick start guide

CDVI

CDVI 500-LADJ quick start guide

Igloohome Deadbolt 2S Metal Grey Installer/user guide

Igloohome

Igloohome Deadbolt 2S Metal Grey Installer/user guide

eSSL FL-300 user manual

eSSL

eSSL FL-300 user manual

manuals.online logo
manuals.online logoBrands
  • About & Mission
  • Contact us
  • Privacy Policy
  • Terms and Conditions

Copyright 2025 Manuals.Online. All Rights Reserved.

Make sure the interior
turnpiece is vertical.
Asegúrese de que la
perilla interioreste vertical.
interior torque blade
paleta de torsión interior
top hole on door
el oriicio superior
de la puerta
Make sure latch bolt is fully extended.
Asegúrese de que el pestillo esté
completamente extendido.
D-shaped hole
oriicio en
forma de D
interior
interior
The mounting plate
should be pre-installed
on the interior. If
removed, re-install.
La placa de
montaje debe ser
pre-instalada en el
interior. Si se removio,
reinstale la placa.
A
B
C
23/8" (60 mm)
or • o
23/4" (70 mm)
13/4" — 21/4"*
44 mm — 57 mm*
51/2"
140 mm
21/8"
54 mm
21/8"
54 mm
1"
25 mm
1"
25 mm
*Call Kwikset to order
a service kit for 21/4"
(57 mm) thick doors.
*Llame a Kwikset para
ordenar un kit de servicio
para puertas gruesas
con un espesor de
entre 57 mm (21/4”).
B
Insert the interior
torque blade through
the D-shaped hole
in the latch.
Inserte la paleta de
torsión interior a a
través del oriicio
en forma de D
en el pestillo.
1 / 2
Installation Guide
Guía de instalación
18003275625
www.kwikset.com
Parts in the box
Piezas en la caja
Note: Installation is the same, regardless of model shown.
Nota: La instalación es la misma sin importar el modelo que se ilustre.
Required tools
Herramientas necesarias
If drilling a new door, use
the supplied template and
the complete door drilling
instructions available at
kwikset.com/doorprep.
Si va a perforar una
puerta nueva, utilice la
plantilla suministrada y las
instrucciones completas
para la perforación de
la puerta disponibles en
kwikset.com/doorprep
Interior Deadbolt
Cerrojo interior
Handleset fasteners
Sujetadores del conjunto de manija
Lever Option 1: Visible Screws
Opción 1: Palanca con tornillos visibles
Lever Option 2: Hidden Screws
Opción 2: Palanca con tornillos escondidos
A
E1
E2
G1
G2
C1
C2
D
F1 H1
F2
H2
F3
F4
Install exterior
deadbolt according
to the instructions
that came with the
exterior parts.
Instale el cerrojo
exterior de acuerdo
con las instrucciones
que acompañan a
las partes exteriores.
64478002 Rev 02
971 LEP
A
A
A
B (x2)
Keep parallel.
Mantengala
paralela.
D
Adjust and install latches
according to the instructions that
came with the exterior parts.
Ajuste y instale los pestillos en
acuerdo con las instrucciones que
acompañan a las partes exteriores.
Adjust and install latches
Ajuste y instale los pestillos
2
Install deadbolt interior
Instale el cerrojo interior
3
Prepare door and check dimensions
Prepare la puerta y revise las dimensiones
1
Tighten the
pre-installed
set screw.
A
Push up on lever base while
tightening screws to keep latch
horizontal and centered.
Empuje hacia arriba la base de palanca
mientras ajusta los tornillos para mantener
el pestillo en forma horizontal y centrada.
Push up on lever base while
tightening screws to keep latch
horizontal and centered.
Empuje hacia arriba la base de palanca
mientras ajusta los tornillos para mantener
el pestillo en forma horizontal y centrada.
WARNING: This Manufacturer advises that no lock can provide complete security by itself. This lock may be defeated by forcible or technical means, or evaded by
entry elsewhere on the property. No lock can substitute for caution, awareness of your environment, and common sense. Builder’s hardware is available in multiple
performance grades to suit the application. In order to enhance security and reduce risk, you should consult a qualiied locksmith or other security professional.
ADVERTENCIA: El fabricante se permite informar que ningún bloqueo solo puede ofrecer una seguridad completa. Este bloqueo puede ser
puesto fuera por la fuerza o por medios técnicos o evitarse mediante el uso de otra entrada en la propiedad. Sin bloqueo puede reemplazar el
seguimiento de su entorno y el sentido común. Diferentes grados de materiales de instalación están disponibles para diferentes aplicaciones. Con
el in de aumentar la seguridad y reducir el riesgo, usted debe consultar a un cerrajero caliicado u otro profesional de la seguridad.
©2018 Spectrum Brands, Inc.
Ajuste el tornillo
de ijación
preinstalado.
2 / 2
clockwise
sentido horario
Pull on paper insert to separate
rose cover and lever base.
Tire de la tapa de papel para separar
la roseta y la base de la palanca.
Install rose
cover.
Instale la
roseta.
Tighten the pre-
installed set screw.
clockwise
sentido
horario
Register your product at www.kwikset.com/productregistration
Rate your product at www.kwikset.com/reviews
Registre su producto en www.kwikset.com/productregistration
Clasiique su producto en www.kwikset.com/reviews
Ajuste el tornillo de
ijación preinstalado.
C
B
D
A
C
B
D
E
F
or
o
E2
E2
F3 (x2)
D
C2
C1
E1
G1
G2
G2
G2
G2
F4
H2
H2
E1
H1 (x2)
Install handleset
Instale el conjunto de manija
4
Option 2 (Hidden screws)
Opción 2 (Tornillos escondidos)
Option 1 (Visible screws)
Opción 1 (Tornillos visibles)
Install lever
Instale la palanca
6
Remove lever or knob (if needed)
Retire la palanca o perilla (si es necesario)
5
Install the handleset
according to the
instructions that came
with the exterior parts.
Instale el conjunto de
manija en acuerdo
con las instrucciones
que acompañan a las
partes exteriores.
counterclockwise
antihorario
A B
Loosen the pre-
installed set screw.
Aloja el tornillo de
ijación preinstalado.