Barthelme AQUALUC User guide

AQUALUC –
MONTAGE- UND GEBRAUCHSANWEISUNG.
MADE IN
GERMANY.
Vielen Dank, dass Sie sich für dieses qualitativ hochwertige Produkt aus dem Hause Barthelme entschie-
den haben!
1. Allgemeine Informationen zur bestimmungsgemäßen Verwendung
Bitte diese Anleitung vor der Montage/Inbetriebnahme des LED-Bandes aufmerksam lesen und aufbe-
wahren! Sollten Sie dieses LED-Band an Dritte weitergeben, so geben Sie bitte auch diese Anleitung mit.
Bei diesem Produkt handelt es sich um eine hochwertige flexible LED-Lichtlinie mit Schutzklasse IP67/68.
Sie ist u.a. gegen Kraftsto, Säure, Lösungsmittel, Salz, Feuchtigkeit und Abrieb resistent. Der hohe Kup-
feranteil in den Leiterbahnen, die Stromkonstanter und die wärmeleitende Ummantelung sorgen für eine
hohe Qualität und für eine lange Lebensdauer.
Das AQUALUC dient nur zu Beleuchtungszwecken und darf nicht anders, als in dieser Anleitung beschrie-
ben, verändert oder modifiziert werden. Bei Nichtbeachtung dieser Anleitung kann die korrekte Funktion
eingeschränkt oder das Produkt beschädigt werden. In diesem Falle übernehmen wir keinerlei Haftung.
ACHTUNG
Der minimale Biegeradius des AQUALUC beträgt 5 cm bzw. 9 cm bei AQUALUC 25 HP.
Dieser Radius darf nicht unterschritten oder das Band geknickt werden,
da das AQUALUC sonst beschädigt werden könnte!
Beachten Sie die Biegerichtung des Bandes (siehe Abbildung 2).
Bei Nichtbeachtung erlischt die Gewährleistung.

2. Lieferung/Lieferumfang
Bitte überprüfen Sie nach Erhalt die Unversehrtheit der Ware. Der Lieferumfang umfasst eine Rolle
AQUALUC inklusive Anschlusskabel auf einer Spule.
3. Anwendungsgebiete
Beispiele für Einsatzmöglichkeiten des AQUALUC:
• Akzentbeleuchtungen • Beleuchtungen in Außen-, Wellness-, Spa- und Poolbereichen
• Architekturbeleuchtungen • Backlight für Buchstabenbeleuchtungen
• Schisbau • Messebeleuchtungen
• Treppenbeleuchtungen • Barbeleuchtungen uvm
.
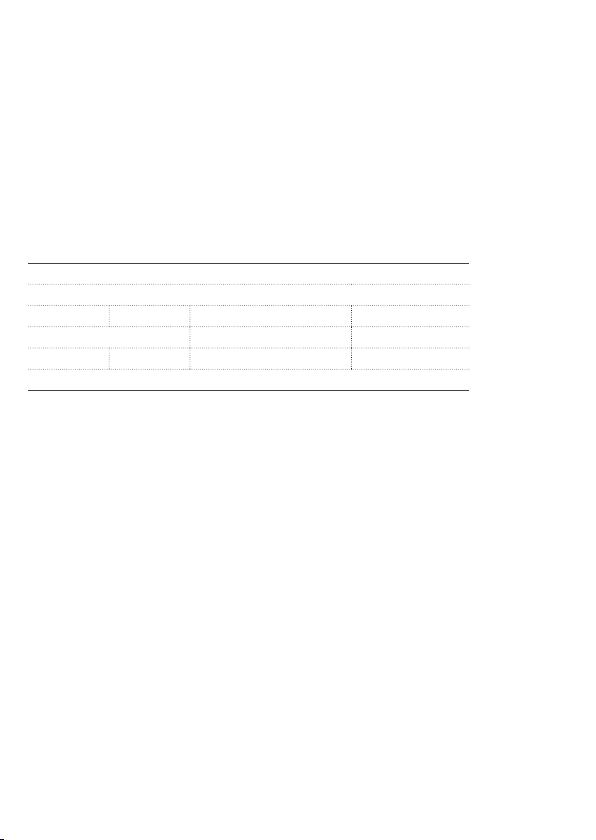
4. Technische Daten [Auszug]
5. Montage und Inbetriebnahme
5.1 Montage- und Verarbeitungshinweise
• Die Verarbeitungstemperatur des AQUALUC liegt zwischen 15 °C und 35 °C. Niedrigere Temperaturen haben
einen negativen Einfluss auf die Flexibilität und können zu Beschädigungen des Bandes führen.War das AQUALUC
vorher niedrigeren oder höheren Umgebungstemperaturen ausgesetzt, muss es langsam auf die Verarbei-
tungstemperatur gebracht werden.
• Zu beachten ist, dass sich bei Temperaturänderungen am Einbauort das AQUALUC geringfügig ausdehnt bzw.
zusammenzieht. Dies stellt keinen Produktmangel dar, sondern ist ein normaler physikalischer Vorgang. Konkret
bedeutet dies, dass sich eine lineare thermische Längenausdehnung von ca. 1 mm pro Meter und 15 °C Tempera-
turänderung ergibt. Diese zusätzlich benötigte Dehnungsfuge sollte immer mit einbezogen werden.
• Um eine Beschädigung des AQUALUC zu vermeiden, besonders beim Abrollen oder Anbringen, ist es wichtig,
dass das Produkt stets von zwei Personen montiert wird. Dies gilt insbesondere ab einem Längenmaß von einem
Meter (1 m). Dabei sollte auch darauf geachtet werden, dass das Produkt möglichst nicht durchhängt, da sonst
irreparable Schäden entstehen können (siehe Abbildung 1). Zudem darf die Ummantelung des Produkts nicht
beschädigt werden, da ansonsten kein ausreichender Schutz des LED-Bandes mehr gewährleistet ist. Es ist stets
darauf zu achten den jeweiligen Biegeradius nicht zu unterschreiten!
• Der minimale Biegeradius des AQUALUC beträgt 5 cm (Achtung: bei AQUALUC 25 HP beträgt der minimale Bie-
geradius 9 cm!). Dieser Radius darf nicht unterschritten oder das Band geknickt werden, da das AQUALUC sonst
beschädigt wird (siehe Abbildung 2).
• Das Produkt ist für die Montage auf dem Boden, an der Wand oder an der Decke im In- und Outdoorbereich
geeignet. Zu beachten ist, dass das Produkt auf einem sauberen, stabilen, ebenen und kippfesten Untergrund
montiert wird.
• Die Montage kann je nach Untergrund und Verwendungszweck mit den Haltebügeln (Art. 40100100), dem hitzebe-
ständigen doppelseitigen Klebeband (Art. 30033009) oder dem Konstruktionsklebsto (Art. 63500030) erfolgen
.
AQUALUC 14 AQUALUC 25 AQUALUC 25 HP AQUALUC 33
24 V DC Betriebsspannung
Outdoor IP67/68 Schutzklasse
24 W | 12 W 26 W | 13 W 64 W 48 W | 24 W Typ. Leistung
2.700 K | 3.200 K | 4.600 K | 6.500 K 3.500 K | 4.400 K | 6.400 K | 9.000 K RGB Farbtemperaturen
14 mm 25 mm 25 mm 33 mm LED Abstand
13,5 x 6 mm Abmessung B x H
Detaillierte technische Informationen erhalten Sie im entsprechenden Datenblatt auf www.barthelme.de

» Bei Verwendung der Haltebügel wird empfohlen, etwa alle 25 cm einen Bügel anzubringen, um einen sicheren
Halt des AQUALUC zu gewährleisten. Bei der Montage der Bügel ist darauf zu achten, dass diese nicht die LEDs
verdecken, da dies sonst zu einem ungleichmäßigen Lichtbild führt.
» Bei der Benutzung des Klebebandes ist darauf zu achten, dass die Oberfläche, auf die das Band aufgebracht
werden soll, sowohl eben und glatt, als auch trocken und sauber (frei von Fett, Öl, Silikon und Schmutzparti-
keln) ist, um eine bestmögliche Klebewirkung zu erzielen. Die Oberfläche des LED-Bandes kann ggf. mit einem
weichen, feuchten Tuch gereinigt werden. Im Falle gröberer Verschmutzungen kann auch ein handelsübliches
Reinigungsmittel ohne scheuernde Elemente verwendet werden.
Das Klebeband wird auf der Unterseite des AQUALUC bzw. auf der entsprechenden Montagefläche befestigt.
Anschließend wird das LED-Band festgedrückt. Der Anpressdruck sollte 10-15 N/cm² nicht überschreiten,
damit die LEDs bzw. die Elektronik des AQUALUC nicht beschädigt wird.
» Bei Auswahl des Konstruktionsklebstoes ist auf einen gleichmäßigen und leicht wellenförmigen Auftrag
bzw. Verteilung zu achten. Hierbei ist die Menge des Klebers an die Größe der Klebefläche anzupassen.
• Individuelle Längenanpassung (optional):
Um das AQUALUC zu kürzen, darf das Band nur im 90°-Winkel an den gekennzeichneten Stellen (gestrichelte
Linie mit Scherensymbol) mit einer Schere oder einem Cutter-Messer getrennt werden (siehe Abbildung 3).
ACHTUNG: Hierbei verliert das AQUALUC seine Schutzklasse IP67/68! Um das oene Ende gegen Feuchtigkeit
zu schützen, muss dieses mit Hilfe des AQUALUC-Endkappen-Sets (Art. 40100200) wieder abgedichtet werden.
Die Endkappe ist hierzu mit der Önung nach oben auf eine waagerechte Unterlage zu legen und dann mit zwei
Tropfen PU aus der Spritze zu befüllen. Anschließend muss das oene Ende des AQUALUC für mindestens 10
Sekunden fest in die Endkappe gedrückt werden. Die zu verdrängende Luft und evtl. überschüssige Flüssigkeit
können seitlich aus der Endkappe entweichen. Das PU benötigt ca. 8 Stunden um komplett auszuhärten. Erst
danach darf das AQUALUC weiter verarbeitet werden.
Die Wiederherstellung der Schutzklasse IP67/68 kann hierdurch jedoch nicht garantiert werden, da dies im We-
sentlichen von der Sorgfalt und Genauigkeit beim Abdichtvorgang abhängig ist!
ABBILDUNG 1:
BEI DER MONTAGE ZU BEACHTEN
Das Produkt sollte stets von zwei Personen montiert werden, um ein Durchhängen des LED-Bandes zu
verhindern.

Biegeradius
›= 50 mm
›= 90 mm
Biegeradius
›= 50 mm
›= 90 mm
ABBILDUNG 3:
AQUALUC RICHTIG KÜRZEN
ABBILDUNG 2:
BIEGERADIUS AQUALUC 14 | 25 | 33 ›= 50 mm
BIEGERADIUS AQUALUC 25 HP ›= 90 mm
13,5 mm
6 mm
Biegerichtung LED-Streifen
LED-Streifen

5.2 Anschluss/Inbetriebnahme
• Nachdem das AQUALUC mechanisch montiert wurde, kann es verdrahtet und in Betrieb genommen werden.
• Der elektrische Anschluss darf nur durch eine Elektrofachkraft durchgeführt werden, die mit den geltenden
Richtlinien vertraut ist! Zu beachten ist, dass keines der Geräte bei Inbetriebnahme unter Spannung steht!
• Zum Betrieb des AQUALUC wird ein entsprechend der Leistung des Bandes dimensioniertes Netzteil und ggf.
ein Steuergerät (zum Dimmen bei einfarbig bzw. für Farbwechsel/Dimmen bei RGB) benötigt. Als Steuergeräte
empfehlen wir z.B die CHROMOFLEX Pro Controller 66000041 (einfarbig) und 66000043 (RGB).
• Das AQUALUC ist für den Betrieb an 24 V DC konzipiert. Bei Nichtbeachtung bzw. Betrieb mit abweichender Span-
nung kann dies zum Defekt des Bandes führen! In diesem Falle übernehmen wir keinerlei Haftung.
• Die beiden Ausgangsklemmen des Netzteiles werden mit den Eingangsklemmen des Steuergerätes verbunden
(bei Weißtönen mit nicht gewünschter Dimmfunktion direkt an das Anschlusskabel des Bandes anschließen).
• Nun wird das Kabel des AQUALUC an die entsprechend gekennzeichneten ausgangsseitigen Klemmen des Steu-
ergerätes angeschlossen (siehe hierzu Bedienungsanleitung des Steuergerätes).
Aderbelegung einfarbig: weiß: +24 V DC / grau: 0 V
Aderbelegung RGB: weiß: +24 V DC / rot: 0 V / grün: 0 V / blau: 0 V
• Nachdem das Netzteil an 230 V AC angeschlossen wurde, ist das Produkt betriebsbereit.
• Beim Anschluss mehrerer AQUALUC an einem Netzteil/Controller ist darauf zu achten, dass sowohl Netzteil, als
auch Controller ausreichend Leistung zur Verfügung stellen können!
6. Betrieb und Sicherheitshinweise
• Nur eine Elektrofachkraft darf die Installation von LED Modulen (mit Netzgerät) unter Beachtung aller gültigen
Vorschriften und Normen vornehmen!
• Die Polung ist zu beachten! Bei falscher Polung erfolgt keine Lichtemission bzw. kann das LED Modul Schaden
nehmen!
• Das Produkt darf nur betrieben werden, wenn es einwandfrei funktioniert. Im Fehlerfall muss das Produkt sofort
ausgeschaltet werden und darf erst wieder nach Überprüfung durch eine Elektrofachkraft betrieben werden.
Ein Fehlverhalten ist gegeben, wenn:
»sichtbare Beschädigungen am Produkt auftreten
»das Produkt nicht einwandfrei funktioniert oder flackert
»eine Überhitzung zu erkennen ist bzw. das Band verbrannt riecht
• Mechanische Belastungen des LED-Bandes sind zu vermeiden!
• Einen sicheren Betriebszustand ermöglicht nur die elektrische Parallelschaltung. Von der elektrischen Reihen-
schaltung der LED Module wird ausdrücklich abgeraten. Unsymmetrische Spannungsfälle können zu einer star-
ken Überlastung und Zerstörung einzelner Module führen.
• Auf die Dimensionierung der Stromversorgung ist zu achten! Dimmen ist nur mittels PWM-Verfahren möglich.
• Die Leuchte darf nicht auf bzw. in der Nähe von heißen Gegenständen/Oberflächen montiert werden.
• Kinder dürfen nicht unbeaufsichtigt mit elektrischen Produkten spielen! Kinder können Gefahren im Umgang mit
elektrischer Energie nicht immer richtig einschätzen.
7. Reinigung
Die Reinigung des LED-Bandes ist mit einem weichen, feuchten Tuch durchzuführen. Im Falle gröberer Verschmut-
zungen kann auch ein handelsübliches Reinigungsmittel ohne scheuernde Elemente verwendet werden.

8. Zubehör
40100100 AQUALUC
Haltebügel, 10 Stück + 20 Schrauben
30033009 Hitzebeständiges Doppelklebeband, 33 m x 9 mm
63500030 Konstruktionsklebsto
einkomponentig, festelastisch, weiß, Kartusche 290 ml
40100200 AQUALUC Endkappen-Set, mit PU Spritze und 10 Endkappen
40100110 AQUALUC
Endkappe, 10 Stück
9. Entsorgung
Wenn das Gebrauchsende des LED-Bandes erreicht ist, trennen Sie das Band bitte vom Netz und entsorgen es
nach den in Ihrem Land geltenden Umweltvorschriften. Elektro- und Elektronikabfälle dürfen nicht mit dem nor-
malen Hausmüll entsorgt werden! Bei Fragen zur Entsorgung setzen Sie sich bitte mit Ihrer kommunalen Entsor-
gungsstelle in Verbindung.
* Änderungen vorbehalten
STAND 06|2016
© JOSEF BARTHELME GMBH & CO. KG Oedenberger Straße 149 | 90491 Nürnberg | Germany
V1.4|160530|HAS|DE|EN

MADE IN
GERMANY.
Thank you for choosing this high-quality product from Barthelme!
AQUALUC –
INSTRUCTIONS FOR INSTALLATION
AND OPERATION
1. General information for intended use
Please read these instructions carefully prior to installation and initial operation of the LED stripe and
keep in a safe place. Should you pass this LED stripe on to a third party, please also include these
instructions.
This product is a high quality flexible LED-luminaire with protection class IP67/68. Amongst other things,
it is resistant against fuel, acid, solvent, salt, humidity and abrasion. The high quantity of copper in the
circuit paths, the current limiter and the thermal conductive coating ensure high quality and a long lifetime.
The AQUALUC is only to be used for lighting purposes and may not be changed or modified in any way
which is not described in these instructions. Non-observance of these instructions may inhibit the correct
functionality or cause damage to the product. In this case we do not assume any liability.
ATTENTION
The minimum bending radius of the AQUALUC is 5 cm and 9cm for AQUALUC 25 HP.
The minimum bending radius may not be exceeded and the stripe may not be bent,
otherwise the AQUALUC could be damaged!
Please observe the bending DIRECTION of the stripe (see illustration 2).
Any warranty will be void in case of non-compliance.

2. Delivery/Scope of delivery
After receipt of the goods please check whether the delivery is complete and whether the items are intact.
The delivery consists of one reel AQUALUC including a connection cable.
3. Area of application
Examples for applications of the AQUALUC:
• accent illumination • illumination for outdoor, wellness, spa and pool areas
• architectural illumination • backlight for illumination of letters
• shipbuilding • exhibition lighting
• stairway illumination • illumination for bars, and many more
4. Technical data [extract]
5. Installation and commissioning
5.1 Installation and processing guidelines
•
The processing temperature range of the AQUALUC is between 15°C and 35°C. Temperatures below
this can negatively influence the flexibility of the stripe and can result in damage. If the AQUALUC was
previously exposed to lower or higher temperatures, then it must be slowly brought into the processing
temperature range.
•
Please note that the AQUALUC can marginally expand or contract with changes in temperature at the
installation location. This is not a defect in the product but a normal physical process. Specifically, this
means that there is a linear thermal expansion of approx. 1 mm per meter and 15 °C change in tempe-
rature. This extra expansion gap should always be taken into consideration prior to installation.
•
To avoid damaging the AQUALUC, especially during unrolling or mounting, it is important that two people
install the product. This is especially valid for a length of one meter (1 m) or more. Care should be taken
that the product does not sag otherwise irrevocable damage can occur (see illustration 1). Furthermore,
the encapsulation of the product may not be damaged otherwise a sucient protection of the LED stripe
cannot be ensured. It is important to never exceed the minimum bending radius!
•
The minimum bending radius of the AQUALUC is 5 cm (ATTENTION: the minimum bending radius for
AQUALUC 25 HP is 9 cm!). The minimum bending radius may not be exceeded and the stripe may not be
bent, otherwise the AQUALUC could be damaged (see illustration 2).
•
The product is suitable for installation on the floor, wall or ceiling - indoors and outdoors. Make sure that the
product is mounted on a clean, flat and stable surface.
•
Depending on the surface and the application, the installation can be performed with the retaining bracket
(Art. 40100100), with thermal conductive double-sided adhesive tape (Art. 30033009) or with construction
adhesive (Art. 63500030).
Detailed technical information can be found in the relevant data sheet at www.barthelme.de
AQUALUC 14 AQUALUC 25 AQUALUC 25 HP AQUALUC 33
24 V DC operating voltage
Outdoor IP67/68 protection class
24 W | 12 W 26 W | 13 W 64 W 48 W | 24 W typical power
2,700 K | 3,200 K | 4,600 K | 6,500 K 3,500 K | 4,400 K | 6,400 K | 9,000 K RGB colour temperatures
14 mm 25 mm 25 mm 33 mm LED pitch
13.5 x 6 mm
dimensions
width x height

» When using the retaining bracket it is recommended to install a bracket approx. every 25 cm to ensure
a secure holding of the AQUALUC. When installing the bracket it is important not to cover the LEDs - as
this can result in an uneven illumination.
» If you use adhesive tape, please ensure that the surface to be taped is dry, even, and clean (no fat,
oil, silicone and dust particles). To achieve best adhesion, the surface of the AQUALUC should also be
clean (if necessary clean the surface of the LED stripe with a soft, slightly damp cloth. To remove more
severe stains use a standard cleansing material without abrasive elements).
Fix the tape on the bottom side of the AQUALUC or on the mounting surface and press the LED stripe
firmly. The contact pressure should not exceed 10-15 N/cm
2
, otherwise the LEDs or the electronic
parts of the AQUALUC could be damaged.
» If you select the construction adhesive then it is important to ensure an even and slight wave form dis-
tribution. The amount of adhesive used should be relative to the size of the required adhesive surface.
•
Individual length adjustment (optional):
To shorten the AQUALUC, the stripe may only be cut in a 90° angle, on the marked points (dashed line
with scissors symbol), with a pair of scissors or cutting knife (see illustration 3).
ATTENTION: in this case the AQUALUC loses its IP-rating IP67/68! To protect the open end against mois-
ture, you will need to seal it with the aid of the AQUALUC mini end cap set (Art. 40100300).
To do this, place the end cap on a flat surface with the opening facing upward. Drizzle two drops of PU
from the syringe into the end cap. Held vertically, the open end of the AQUALUC mini should then be
firmly pushed downward into the end cap for at least 10 seconds. Displaced air and possible fluid may
escape from the side of the end cap. The PU requires approx. 8 hours to firmly set. Only after this time
may the AQUALUC be further processed.
A restoration of the IP-rating IP67/68 cannot be guaranteed as this depends on the care and accuracy
during the sealing process!
ILLUSTRATION 1:
PLEASE NOTE BEFORE INSTALLATION
The product should always be installed by two people in order to avoid a sagging of the LED stripe.

bending radius
›= 50 mm
›= 90 mm
bending radius
›= 50 mm
›= 90 mm
ILLUSTRATION 3:
CORRECTLY SHORTENING THE AQUALUC
ILLUSTRATION 2:
BENDING RADIUS AQUALUC 14 | 25 | 33 ›= 50 mm
BENDING RADIUS AQUALUC 25 HP ›= 90 mm
13.5 mm
6 mm
bending direction LED stripe

5.2 Connection/commissioning
• Following the mechanical installation of the AQUALUC it may now be connected and put into operation.
• Only a qualified electrician, who is familiar with the applicable standards and guidelines, is permitted to per-
form the electrical connection. Ensure that none of the devices are energized during the initial operation!
• To operate the AQUALUC, a power supply unit suitable for the specifications of the stripe is required. If applicable,
a control unit (for dimming of single colours or colour change/dimming of RGB), may be required. We recom-
mend, for example, the controller CHROMOFLEX Pro Controller 66000041 (white) and 66000043 (RGB).
• The AQUALUC is designed for 24 V DC operation. Non-observance or operation with a dierent voltage can dama-
ge the stripe. In this case we do not assume any liability.
• Connect both output terminals of the power supply with the input terminal of the controller (if you do not use
the white tone dimming function, connect the output terminals directly to the connection cable of the stripe).
• Now connect the cable of the AQUALUC to the terminals on the marked output side of the controller (see also
the controller manual).
Wire allocation single colour: white: +24 V DC / grey: 0 V
Wire allocation RGB: white: +24 V DC / red: 0 V / green: 0 V / blue: 0 V
• The product is ready for operation once the power supply unit has been connected to 230 V AC.
• If you connect more than one AQUALUC to a power supply/controller, make sure that the power supply unit and
the controller can provide sucient power.
6. Operation and safety advice
• Only a qualifed electrician, who is familiar with the applicable regulations and guidelines, is permitted to install
the LED modules (with power supply).
• Please pay attention to the polarity! With an incorrect polarity, there will be no light emission and the LED module
may be damaged!
• Operate the product only if it functions properly. In case of malfunction, switch the product o immediately and
operate it again only after a qualified electrician has verified the functionality.
A malfunction can be deemed when:
» damage to the product is visible
» the product does not function properly or it flickers
» overheating is visible or the stripe smells burnt
• Avoid mechanical pressure on the LED stripes!
• Only a parallel connection provides a safe operating state. We explicitly advise against a series connection of the
LED modules. Asymmetric voltage drops may cause a severe overloading and destruction of single modules.
• Please pay attention to the dimensioning of the power supply! Dimming is only possible with the PWM method.
• Do not install the luminaire on or next to hot items/surfaces.
• Do not leave children unattended with electrical products! Children are not always able to recognize the dangers
of electrical energy.
7. Cleaning
Clean the LED stripe with a soft, slightly damp cloth. To remove more severe stains use a standard cleansing
material without abrasive elements.

VERSION 06|2016
© JOSEF BARTHELME GMBH & CO. KG Oedenberger Straße 149 | 90491 Nuremberg | Germany
8. Accessories
40100100 Retaining bracket, 10 pieces + 20 screws
30033009 Heat resistant double-sided tape, 33 m x 9 mm
63500030 Construction adhesive,
one component, firm-elastic, white, cartridge 290 ml
40100200 AQUALUC end cap set, with PU syringe and 10 end caps
40100110 AQUALUC end caps, 10 pieces
9. Disposal
If the LED stripe can no longer be used, disconnect it from the power supply and dispose of it according to the
environmental regulations of your country. Electronic and electrical waste may not be disposed of in the household
rubbish. If you have any questions regarding the disposal, please contact your local waste management company.
* Subject to change.
V1.4|160530|HAS|DE|EN
Table of contents
Languages:
Other Barthelme Lighting Equipment manuals