Bauhn MPP 6000-S User manual

6000MAH SOLAR CHARGER
BATERÍA EXTERNA SOLAR DE 6000mAh
English ........05
Español .......xx
User Manual
Manual del usuario

Contents
2
VI.1.0.us
Contents
Overview / Use ....................................................................................................... 3
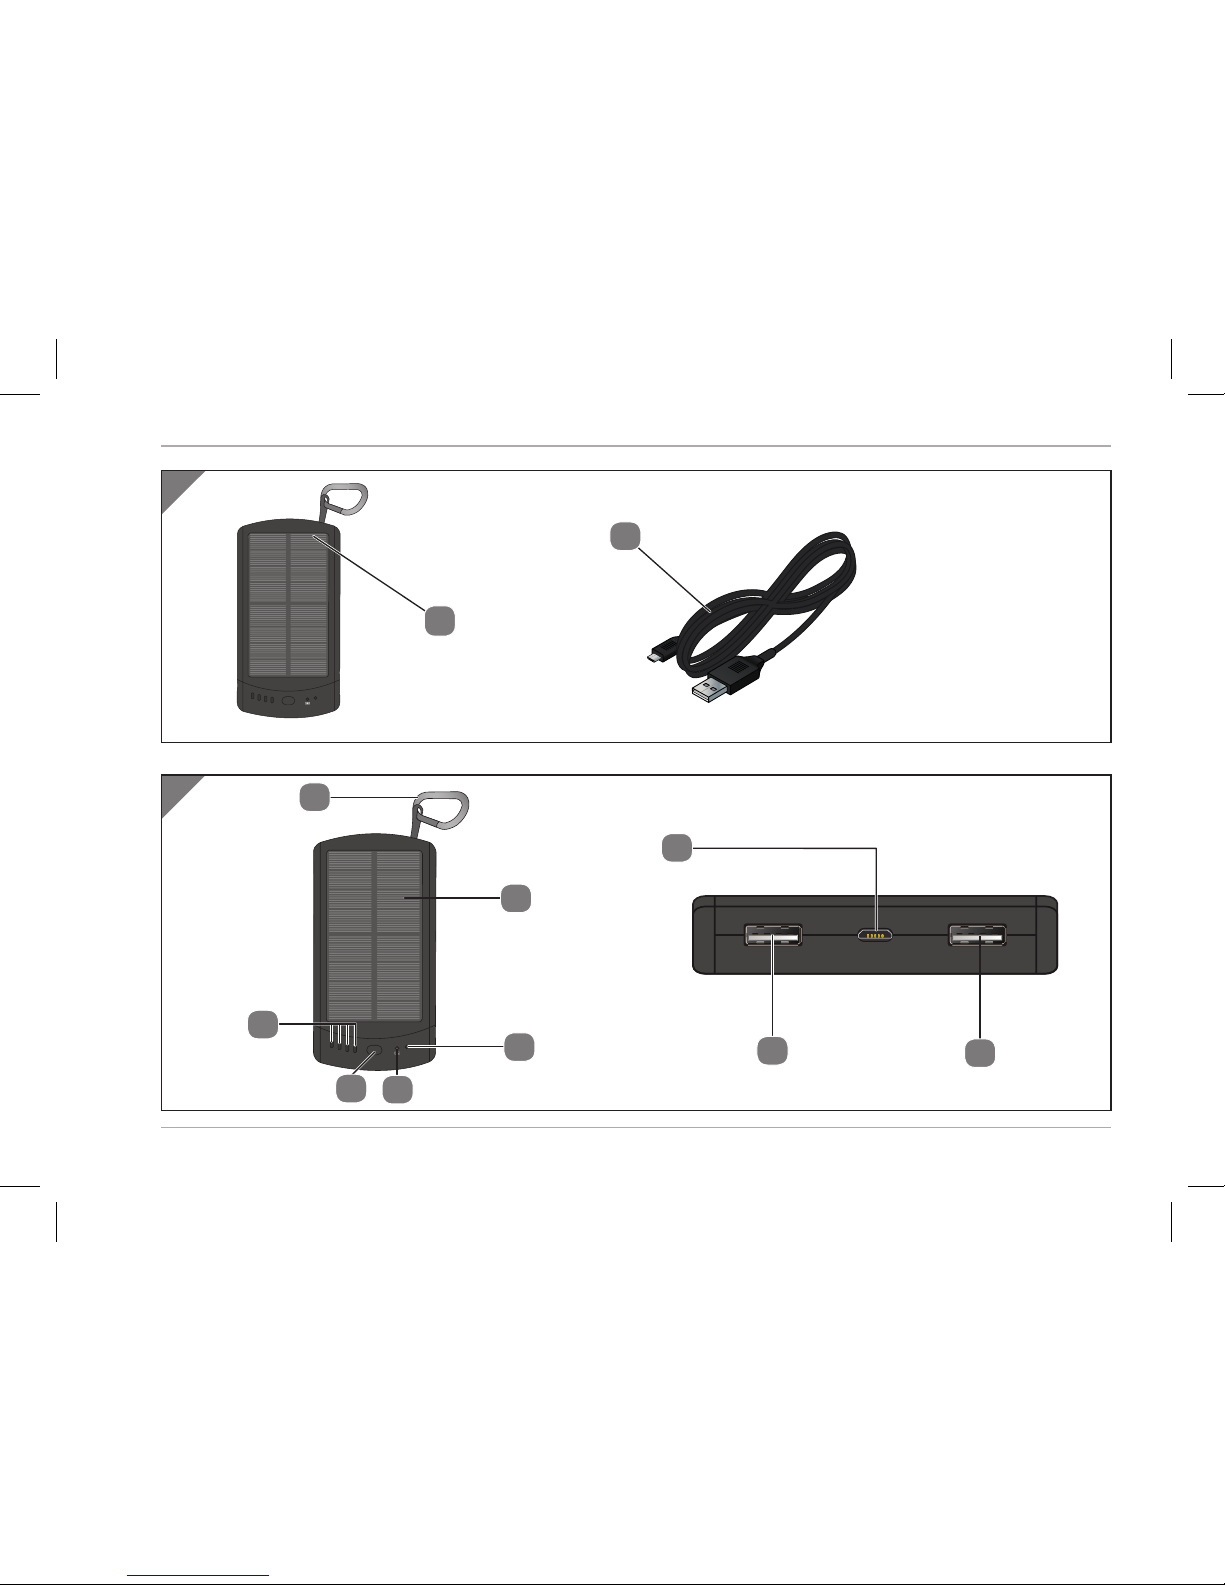
Product contents/device parts.............................................................................. 4
Charging the Solar Charger ................................................................................... 5
Charging your Solar Charger using a USB wall, USB car or USB computer port...... 6
Replenish your Solar Charger via sunlight. ..................................................................6
Solar Charger charging time ...........................................................................................6
Working with the LED lights....................................................................................7
Charging your devices with the solar charger ..................................................... 8
Charging your portable devices.....................................................................................8
Using the optimized USB ports .............................................................................. 9
Usage Chart...................................................................................................................... 10
Trouble Shooting...................................................................................................12
Safety & General Information...............................................................................13
Cleaning.................................................................................................................14
Technical specification..........................................................................................15

Overview / Use
3
A
B
Solar
25%
50%
75%
100%
Solar
25%
50%
75%
100%
1
2
3
5
4
6
7
8
10
11
9

Product contents/device parts
4
Product contents⁄device parts
1Bauhn Solar Charger
2Micro USB cable
3Carabiner
4Solar panel
5Solar indicator
6Solar status LED
7Power button
8Power level indicator
9USB 1 connector (Trickle Charge)
10 Micro USB connector (Input)
11 USB S connector (Rapid Charge)

Charging the Solar Charger
5
Charging the Solar Charger
Charging your Solar Charger
using a USB wall port
Charging your Solar Charger
via Sunlight
Charging your Solar Charger
using a USB car port
Charging your Solar Charger
using a USB device port
Solar
25%
50%
75%
100%
Note:
• AC adapter (optional)
• Car charger (optional)
• Micro USB charging cable (included)

Charging the Solar Charger
6
Charging your Solar Charger using a USB wall, USB car or USB
computer port.
Charge the battery fully prior to using the Solar Charger. Charging time of the battery
depends on the selected charging source and its output. Using the micro cable provided,
connect the cable to the middle port between the two USB outputs. Connect the other end of
the cable to your computer’s USB port, a wall charger (optional) or car charger (optional).
Replenish your Solar Charger via sunlight.
You can charge the Solar Charger with the solar panel 4. Ensure that the solar panel 4
receives enough sunlight. Once there is enough sunlight, the solar status LED 6will be lit
permanently and the solar indicator 5will flash green.
If the solar indicator 5does not light up, there is not enough sunlight available. In that case,
change the position of the device or put the device into direct sunlight. Both LEDs will go out
when the Solar Charger is fully charged.
The Solar Charger is designed to give you endless charges on your adventure by replenishing
itself from natural sunlight.
Solar Charger charging time
• 50%-100% = 6hrs
• 75%-100% = 4hrs

Working with the LED lights
7
Working with the LED lights
Power button
Power level indicator
Solar indicator
Solar
25%
50%
75%
100%
You can also check the charging level of the Solar Charger without charging it or charging
another device. Briefly press the power button 7. The power level indicators 8show the
current charging status of the Solar Charger for approx. 20 seconds.
LED display Charging status
4 LED lights are on 100 %
3 LED lights are on 75 %
2 LED lights are on 50 %
1 LED light is on 25 % or less

Charging your devices with the solar charger
8
Charging your devices with the solar charger
Solar
25%
50%
75%
100%
Charging your portable devices
• Using your USB charging cable that came with your phone, plug it into the USB I or USB S port.
• The Micro USB charging cable included in the box can also be used with your devices that
use Micro USB to charge.
• Hold the power button for 3-5 seconds until the LED light comes on.
• To shut off the device, press down the power button for 3-5 seconds until the LED light
turns off.

Using the optimized USB ports
9
Using the optimized USB ports
USB I
(Trickle Charge)
USB S
(Rapid Charge)
• iPad - Fast charge
• iPhone - Fast charge
• Smartphone - Fast charge
• E-book - Fast charge
• iPhone - Regular charge
• Blackberry - Fast charge
• Smartphone - Fast charge
• E-book - Fast charge
INPUT
The two ports are labeled as USB I and USB S.
USB S is optimized for charging Android, Blackberry and windows Smartphones and tablets.
It will also charge iPods and iPhones but at a slightly lower rate. An iPad will not charge from
this port.
USB I is optimized for optimal charging of Apple devices including iPads. It will also charge
Android and other devices.
For all other USB devices not mentioned above the best performance will be achieved using
the USB S charge port.

Using the optimized USB ports
10
The high powered solar charger is designed for both USB ports to be used at the same time.
Either port will provide up to 2.1 A to a single device. When two devices are plugged in at the
same time the output will be 1 A each.
Usage Chart
Typical charging times using the Solar Charger.
Time Smartphones Tablets
30 min 50% 30%
1 hr 70% 50%
1.5 hrs 100% 70%

Using the optimized USB ports
11
Below some examples of how your devices will run when using the Solar Charger.
Tablets Smartphone Action Cams Games GPS
Watch movies
3.5 hrs
Shoot video
8.5 hrs
Shoot video 8.5
hrs
Playtime 20 hrs Navigation 30
hrs
Browse web 10
hrs
Browse web
20 hrs
Full charges
4 X
Full charges
7 X
Full charges
3 X
Full charges
1 X
Full charges
4 X
Listen to music
120 hrs
GPS 18 hrs

Trouble Shooting
12
Trouble Shooting
The mobile device is not charged
• Briefly depress the On/Off button 7to start the charging operation.
• Check whether the Solar Charger’s battery is full.
• Check that the mobil device is correctly connected to the Solar Charger.
• Check if the connected mobile devices do not exeed a charging current of least 60mAh and
a maximum of 2.1 mAh.
The battery of the Solar Charger is not charged via the solar panel.
• Ensure that the solar panel 4receives enough sunlight.
The battery of the Solar Charger is not charged via the USB cable.
• Check whether the Solar Charger’s battery is full.
• Some computers switch off the power supply of the USB connections when the computer is
switched off. Ensure that computer is switched on.
If you cannot solve the problem by performing the above steps, contact the
customer service.

Safety & General Information
13
Safety & General Information
− Please read this user manual carefully and follow all instructions.
− To avoid any damage or malfunction, DO NOT drop device from high places.
− Keep device away from humidity, water or any other liquid. To avoid electrical shock,
explosion, and injury to the device or yourself, DO NOT operate the device if it is exposed to
moisture or any form of liquid.
− Keep away from children.
− DO NOT leave device exposed for prolonged periods in a hot car.
− DO NOT modify, repair or disassemble device, especially the battery – doing so will void the
warranty.
− DO NOT place heavy objects on the device.
− Unplug this device during lightning storms.
− The battery used in this device may present a risk of fire or chemical burn if mistreated.

Cleaning
14
Cleaning
Solar battery and panel maintenance
• It is best to shut the battery off when not in use.
Cleaning the solar panel
• With a dry, lint-free cloth, lightly wipe the surface to remove any dirt or dust.
• To avoid damage, do not clean the solar panel with hard materials or liquids.

Technical specification
15
Technical specification
Model: Bauhn MPP 6000-S
Battery: Integrated lithium polymer rechargeable battery 3.7 V; 6000 mAh
Input voltage: 5V ; 1 A max.
Output voltage: 5V ; 1 A max. (Trickle Charge)
5V ; 2.1A max. (Rapid Charge)
Minimal output current: 60mA
Connections: 2x USB (output), 1x Micro USB (input)
Operating temperature: 32°F to 113 °F
Storage temperature: 32°F to 122 °F
Weight: approx. 0.34lbs
Dimensions: 5.11in x 2.99 in x 0.63 in
We reserve the right to make technical and optical changes to the product as part
of product improvements.

DISTRIBUTED BY • DISTRIBUIDO POR:
ALDI INC., BATAVIA, IL 60510
WWW.ALDI.US
USA
YEAR WARRANTY
AÑOS DE GARANTÍA
3
AFTER SALES SUPPORT •
SERVICIO POSVENTA
MODEL/MODELO:
MPP 6000-S
53547
06/2017
info@supra-electronics.com
1 800 270 5071
USA
VI.1.0.us
Table of contents
Other Bauhn Batteries Charger manuals

Bauhn
Bauhn MD 16704 User manual

Bauhn
Bauhn AAPDQT-0622-D User manual

Bauhn
Bauhn AMPDQ2-1221 User manual

Bauhn
Bauhn ABTWPDQ-0222-C User manual

Bauhn
Bauhn SPANISH TEXT User manual

Bauhn
Bauhn ABTWPDQ-0223-C User manual

Bauhn
Bauhn AMPDQ-1222-C User manual

Bauhn
Bauhn ADWC-0623 User manual

Bauhn
Bauhn ABTWPDQ-0224-C User manual
Popular Batteries Charger manuals by other brands

Schumacher Electric
Schumacher Electric Speed Charge SC-200A owner's manual

Griffin Technology
Griffin Technology PowerDuo user guide

Orbis
Orbis VIARIS CITY instruction manual

Insignia
Insignia NS-GXBOCK101 Quick setup guide

Intermec
Intermec CN2 Instructions & assembly

Blackweb
Blackweb BWA17WI015 Product guide