TURNING ON/OFF
Turning ON
Method 1: Open the charging case by swivelling the lid 180 degrees to
the left or right. Take both earbuds out from the charging case, they will
turn on and connect with each other automatically
Method 2: Whilst the earbuds are o, press and hold the multi-function
button on both earbuds for 2 seconds. LEDs on both earbuds will ash
blue for 1-2 seconds and you will hear a voice prompt “Power ON” from
both earbuds
Turning OFF
Method 1: Put the earbuds back into the charging case and close
completely, they will turn o automatically
Method 2: Whilst the earbuds are on, press and hold the multi-function
button on both earbuds for 8 seconds. LEDs on both earbuds will ash
red for 1-2 seconds and you will hear a voice prompt “Power OFF” from
both earbuds
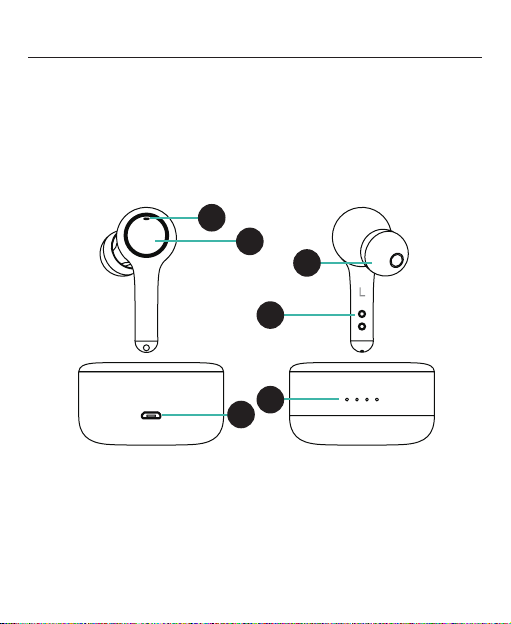
CONTROLS
You can control a variety of dierent functions on your mobile device
using the smart touch controls on your earbuds. If you try move an
earbud, these functions may activate. We recommend moving the
earbuds using the stem part of the earbud to avoid any unnecessary
activation
Play/Pause Music Short press the multi-function button once
Volume Up Long press the multi-function button on the right earbud
(keep holding the multi-function button and the volume will
keep going up, there will be a warning sound when you
reach the maximum volume)
Volume Down Long press the multi-function button on the left earbud
(keep holding the multi-function button and the volume will
keep going down, there will be a warning sound when you
reach the lowest volume)
Next Track Double press the multi-function button on the right earbud
Previous Track Double press the multi-function button on the left earbud
Answer/End Call Short press the multi-function button once
Reject Incoming
Call
Press and hold the multi-function button for 2 seconds
when a call is incoming
Activate Voice
Assistant
Triple press the multi-function button on either earbud.
Press it again to cancel
Factory Reset The earbuds must be turned o rst before resetting, quick
triple press each of earbuds successively
LED INDICATOR GUIDE
Status Description Voice Prompt
Power On Blue LED Flash light
about 1 second
“Power On”
Power O Red LED Flash light
about 1 second
“Power O”
Pairing Blue & Red LED ashes
alternately on master earbud
“Pairing”
Connect Both earbuds LEDs will
turn o
“Connected”
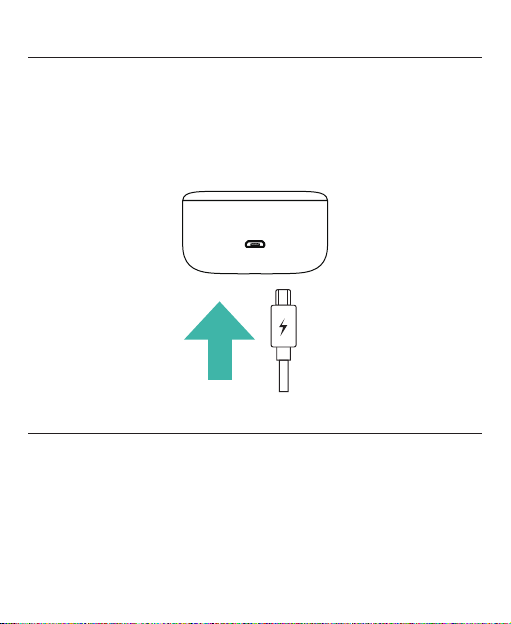
Charging Red LED is bright when the
earphone is charging
N/A
TECH SPECS
Bluetooth version: V5.0
Music playtime: 6.5 hours
Earbud battery: 2 x 60mAh
Wireless distance: 10m
Charging case battery: 500mAh
Charging voltage: 5V
AFTER SALES SUPPORT
Phone number: 1300 663 907
PAIRING
1. Take both earbuds out from the charging case, they will power on
and connect with each other automatically. On rst use, you will
hear a voice prompt “pairing”
2. Enable Bluetooth on your device and select “HE190044” from the
list to connect. You will hear a voice prompt “connected”
Warranty Details
The product is guaranteed to be free from defects in workmanship and parts for
a period of 12 months from the date of purchase. Defects that occur within this
warranty period, under normal use and care, will be repaired, replaced or
refunded at our discretion. The benets conferred by this warranty are in
addition to all rights and remedies in respect of the product that the
consumer has under the Competition and Consumer Act 2010 and similar
state and territory laws.
Our goods come with guarantees that cannot be excluded under the Australian
Consumer Law. You are entitled to a replacement or refund for a major failure
and for compensation for any other reasonably foreseeable loss or damage.
You are also entitled to have the goods repaired or replaced if the goods fail
to be of acceptable quality and the failure does not amount to a major
failure.
AFTER SALES SUPPORT
REGISTER YOUR PURCHASE ATwww.aldi.com.au/en/about-aldi/product-registration/TO KEEP
UP-TO-DATE WITH IMPORTANT PRODUCT INFORMATION
1300 663 907
AUS YEAR WARRANTY
1
TRUE WIRELESS EARBUDS
customercare@balcobrands.com
MODEL: HE190044 PRODUCT CODE: 703710 12/2021
Repair and Refurbished Goods or Parts Notice
AFTER SALES SUPPORT
1300 663 907
AUS YEAR WARRANTY
1
TRUE WIRELESS EARBUDS
customercare@balcobrands.com
Unfortunately, from time to time, faulty products are manufactured which need to
be returned to the Supplier for repair.
Please be aware that if your product is capable of retaining user-generated data
(such asles stored on a computer hard drive, telephone numbers stored on a
mobile telephone, songs stored on a portable media player, games saved on a
games console or les stored on a USB memory stick) during the process of repair,
some or all of your stored data may be lost.
We recommend you save this data elsewhere prior to sending the product for
repair.
You should also be aware that rather than repairing goods, we may replace them
withrefurbished goods of the same type or use refurbished parts in the repair
process.
Please be assured though, refurbished parts or replacements are only used
where they meet ALDI’s stringent quality specications.
If at any time you feel your repair is being handled unsatisfactorily, you may
escalate your complaint. Please telephone us on1300 663 907 or write to us at:
Balco Brands Pty Ltd
PO Box 537 Bayswater Business Centre, Victoria, Australia
1300 663 907 - Hours: Mon-Fri 8:30am - 6:00pm AEST
customercare@balcobrands.com
MODEL: HE190044 PRODUCT CODE: 703710 12/2021