Be Cool STORM User manual
INSTRUCCIONES
GEBRAUCHSANWEISUNG
INSTRUÇÕES
INSTRUCTIONS
INSTRUCTIONS
ISTRUZIONI
•
•
•STORM
IM 1442,01 STORM BE COOL ins.indd 1 13/03/13 11:53

2
STORM
E
ADVERTENCIAS
•Porfavor,leadetenidamenteelmanualdeinstruccionesantesdeusarnuestro
producto.
•LasilladeautoSTORMesundispositivodeseguridadyúnicamenteesseguro
cuandoesutilizadodeconformidadconelmanualdeinstrucciones.
•Elproductosólodebeserutilizadoenunasientoorientadohaciadelanteque
estédotadoconuncinturóndeseguridadautomáticodetrespuntosdeancla-
je,homologadosegúnelReglamentoECER16uotrasnormasequivalentes.
•Elproductopuedeserutilizadotantoenelasientodelanterocomoenelasien-
totrasero.Detodasformas,seaconsejaqueseinstaleenelasientotrasero.
•Elproductohasidoaprobadosegúnlasmásestrictasnormasdeseguridadeu-
ropeas(ECER44/04)yesidóneoparaelGrupoI(9-18kg)yGrupoII(15-25kg).
•CualquieralteraciónoadiciónaldispositivosinlaoportunaautorizacióndeBE
COOLpuedealterargravementelaseguridaddelsistemaderetención.
•Noseguircuidadosamentelasinstruccionesparaelcorrectousodelsistemade
retenciónpuedeserpeligrosoparalaseguridaddelbebé.
•Estedispositivodeseguridadnopuedeserusadosinsutapizado,niserreem-
plazadoporotroquenoseaeloriginal,yaqueésteformaparteintegrantede
lascaracterísticasdeseguridaddelsistema.
•Nuncadejeasuhijodesatendidoenelcoche.
RECOMENDACIONES
•Guardeestelibrodeinstruccionesparafuturasconsultas.
•Asegúresedequedentrodelautomóvil,tantoelequipajecomocualquierotro
objetosusceptibledecausardañosencasodeaccidente,esténdebidamente
jadosoresguardados.
•LasilladeautoSTORMdeberáestarjadadebidamenteconloscinturonesde
seguridadaunquenoseestéutilizando,yaqueencasodeaccidentepodría
resultardespedidaprovocandodañosalosocupantesdelvehículo.
•NUNCAYBAJONINGÚNCONCEPTOllevealbebédentrodelautomóvilen
brazosofueradelasilladeauto.Aunquepuedaresultarextraño,encasode
accidente,lafuerzaprovocadaenunchoqueatansólo40km/h,leharíacom-
pletamenteimposiblelacorrectaretencióndesubebé.
•RecuerdenousarlasilladeautoSTORMenautomóvilesdotadosdeair-bag
frontal,anoserquepuedaserdesconectado,casoquedeberáconsultarcon
elfabricanteocomerciovendedordesuautomóvil.
IM 1442,01 STORM BE COOL ins.indd 2 13/03/13 11:53

3
STORM
GB
WARNINGS
•Beforeusingourproduct,please,readtheinstructionmanualcarefully.
•TheSTORMcarseatisasafetydeviceanditisonlysafewhenusedin
accordancewiththeinstructionmanual.
•Theproductmustbeonlybeusedonaforwardfacingseatthatistted
withanautomatic3-pointsafetybeltwhichisapprovedaccordingtoECE
R16oranequivalentstandard.
•Theproductmaybeusedoneitherthefrontorthebackseat.However,
werecommendthatitisttedonthebackseat.
•The product has been approved according to the strictest European
safetystandards(ECER44/04)andissuitableforGroupI(9-18kg)and
GroupII(15-25kg).
•Anyalterationoradditiontothedevicewithoutdueauthorisationfrom
BECOOLmayseriouslycompromisethesafetyoftheretentionsystem.
•Iftheinstructionsforthecorrectuseoftheretentionsystemarenotfol-
lowedcarefully,baby’ssafetywillbeendangered.
•Thissafetydevicecannotbeusedwithoutitsfabriccovering,normayit
bereplacedbyanyotherthatisnotidenticaltotheoriginal,sinceitforms
anintegralpartofthesystem’sfeatures.
•Neverleaveyourchildunattendedinthecar.
RECOMMENDATIONS
•Keepthisinstructionbookforfuturereference.
•Makesurethatanyluggageorotherobjectsinsidethecarthatmaycause
damageincaseofanaccidentareproperlystoredandrestrained.
•STORMcarseatmustbeappropriatelyfastenedwithsafetybeltseven
whennotinusebecauseinthecaseofanaccidentthismaybesentying
causinginjurytoanyoftheoccupantsofthecar.
•NEVERUNDERANYCIRCUMSTANCEshouldyoucarryyourbabyinyour
armsinthecar,oroutofthecarseat.Althoughitmayseemstrange,in
caseofanaccident,evenatonly40km/hrtheforceissuchthatitwould
becompletelyimpossibletoholdontoyourbaby.
•RemembernottousetheSTORMcarseatincarswithfrontseatairbags,
unlesstheycanbedisconnected,itisrecommendedthatyoushouldcon-
sultwiththemanufacturersorthesalesagentofyourcar.
IM 1442,01 STORM BE COOL ins.indd 3 13/03/13 11:53

4
STORM
D
ANMERKUNGEN
• Bitte lesen Sie vor Gebrauch unseres Produktes aufmerksam die Bedienungsanleitung
durch.
• DerSTORMAutositzisteineSicherheitsvorrichtungundnursicher,wennergemäßder
Bedienungsanleitungverwendetwird.
• DasProduktdarfnuraufeinemSitzinFahrtrichtung,dermiteinemautomatischenDrei-
punkt-SicherheitsgurtnachdereuropäischenRichtlinieECER16bzw.einervergleichbaren
Normausgestattetist,angebrachtwerden.
• DasProduktkannsowohlaufdemVorder-alsauchaufdemRücksitzverwendetwerden.Es
wirdjedochinallenFälleneineAnbringungaufdemRücksitzempfohlen.
• DasProduktwurdenachdenstrengsteneuropäischenSicherheitsnormen(ECER44/04)
zugelassenundistidealfürdieGruppeI(9-18kg)undGruppeII(15-25kg).
• Jede Veränderung oder Hinzufügung bei der Vorrichtung ohne entsprechende Geneh-
migungvonBECOOLkanndieSicherheitdesRückhaltesystemsschwerbeeinträchtigen.
• WennSiedieAnweisungenzumrichtigenGebrauchdesRückhaltesystemsnichtsorgfältig
befolgen,kanndieSicherheitIhresBabysgefährdetwerden.
• DieseSicherheitsvorrichtungdarfwederohneihrenBezugverwendetnochdurcheinen
anderen,nichtoriginalenersetztwerden,dadiesereinenwesentlichenBestandteilderSi-
cherheitssystemsbildet.
• LassenSieIhrKindnieunbeaufsichtigtimAuto.
EMPFEHLUNGEN
• BewahrenSiedieseBedienungsanleitungfürzukünftigeNachfragenauf.
• VergewissernSiesich,dassimAutosowohldasGepäckalsauchjederandereGegenstand,
der bei einem Unfall Verletzungen verursachen könnte, ordnungsgemäß befestigt oder
verstautsind.
• DerSTORMAutositzmussmitdenSicherheitsgurtenordnungsgemäßbefestigtsein,auch
wennernichtbenutztwird,daerbeieinemUnfallherausgeschleudertunddieFahrzeugin-
sassenverletzenkönnte.
• FührenSieIhrBabyimAutoNIEUNDUNTERKEINENUMSTÄNDENimArmoderaußer-
halbdesAutositzesmitsich.Auchwennesmerkwürdigerscheinenmag,würdendiebei
einemZusammenstoßvonnur40kmproStundehervorgerufenenKräfteesIhnenvöllig
unmöglichmachen,dasBabyrichtigfestzuhalten.
• DenkenSiedaran,denSTORMAutositznichtinmitFrontalairbagsausgestattetenAutos
zuverwenden.Wennernichtausgeschaltetwerdenkann,müssenSiesichvomHersteller
oderHändlerIhresAutosberatenlassen.
IM 1442,01 STORM BE COOL ins.indd 4 13/03/13 11:53

5
STORM
F
AVERTISSEMENTS
•S’ilvousplait,lisezattentivementcemanueld’instructionsavantd’utilisernotre
produit.
•LesiègeautoSTORMestundispositifderetenueetilestableuniquements’il
estutiliséconformémentauxinstructions.
•Ceproduitdoitêtreinstalléuniquementorientéversl’avant,surunsiègedoté
d’uneceinturedesécuritéautomatiqueàtroispointsd’ancrage,homologuée
selonlanormeECER16ouautresnormeséquivalentes.
•Ceproduitpeutêtreutiliséaussibiensurlesiègeavantquelesiègearrière.
Toutefois,ilestpréférabledel’installersurlesiègearrière.
•Ceproduitrépondauxnormeseuropéennesdesécuritélesplusstrictes(ECE
R44/04)etilestidéalpourleGroupeI(9-18kg)etGroupeII(15-25kg).
•Unealtérationouunajoutquelconqueaudispositifsansl’approbationdeBE
COOLpeutaltérergravementlasécuritédusystèmederetenue.
•Nepassuivrescrupuleusementlesinstructionspourunebonneutilisationdu
systèmederetenuepeutêtredangereuxpourlasécuritédubébé.
•Cedispositifdesécuriténedoitpasêtreutilisésanssahousse,niêtreremplacé
paruneautrequinesoitpasl’originale,carcettedernièrefaitpartieintégrante
descaractéristiquesdusystèmedesécurité.
•Nelaissezjamaisvotreenfantsanssurveillancedanslavoiture.
RECOMMANDATIONS
•Gardercelivred’instructionspourdefuturesconsultations.
•Vériezqu’àl’intérieurdel’automobile,touslesbagagesoutoutautreobjet
pouvantblesserencasd’accident,sontcorrectementmaintenusourangés.
•LesiègeautoSTORMdevraêtrecorrectementxéaveclesceinturesdesécu-
ritémêmelorsqu’iln’estpasutilisé,carencasd’accidentilpourraitêtreprojeté
etblesserlesoccupantsduvéhicule.
•JAMAISETSOUSAUCUNPRÉTEXTElorsquevousêtesdansl’automobilevous
nedevezprendrelebébédansvosbrasoulelaisserhorsdusiègeauto.Même
sicelaparaîtincroyable,lorsd’unaccident,laforceencasdechocàunevitesse
de40km/hsimplement,rendimpossiblederetenircorrectementlebébé.
• Rappelez-vousqu’ilnefautpasutiliserlesiègeautoSTORMdanslesautomobiles
dotéesd’airbagsfrontaux,àmoinsdepouvoirlesdésactiver,cedontvousdevrez
vousinformerauprèsdufabricantoudurevendeurdevotreautomobile.
IM 1442,01 STORM BE COOL ins.indd 5 13/03/13 11:53

6
STORM
P
ADVERTÊNCIAS
•Porfavor,leiaatentamenteomanualdeinstruçõesantesdeusaronossopro-
duto.
•AcadeiradaautoSTORMéumdispositivodesegurança,sendoseguroapenas
quandoutilizadoemconformidadecomomanualdeinstruções.
•Oprodutoapenasdeveserutilizadonumassentoorientadoparaafrentee
equipadocomumcintodesegurançaautomáticodetrêspontosdexação,
homologadosegundooRegulamentoECER16ououtrasnormasequivalentes.
•Oprodutopodeserutilizadotantonoassentofrontalcomonoassentotrasei-
ro.Noentanto,érecomendadaainstalaçãonoassentotraseiro.
•OprodutofoiaprovadosegundoasmaisrigorosasnormasdesegurançaEu-
ropeias(ECER44/04)eéidóneoparaoGrupoI(9-18kg)eGrupoII(15-25kg).
•QualqueralteraçãoouadiçãoaodispositivosemadevidaautorizaçãodaBE
COOLpodealterargravementeasegurançadosistemaderetenção.
•Nãocumprircuidadosamenteasinstruçõesparaousocorrectodosistemade
retençãopodeserperigosoparaasegurançadobebé.
•Estedispositivodesegurançanãopodeserusadosemrevestimento,nemser
substituídoporoutroquenãosejaooriginal,jáqueomesmoéparteintegran-
tedascaracterísticasdesegurançadosistema.
•Nuncadeixeoseulhosozinhonoautomóvel.
RECOMENDAÇÕES
•Guardeestemanualdeinstruçõesparafuturasconsultas.
•Assegure-sedequedentrodoautomóvel,tantooequipamentocomoqual-
queroutroobjectosusceptíveldeprovocardanosemcasodeacidente,estão
devidamentexadosouresguardados.
•AcadeiradeautoSTORMdeveráestardevidamentexadacomoscintosde
segurançamesmoquenãoseutilizem,poisemcasodeacidentepoderiaresul-
tardespedidaprovocandodanosaosocupantesdoveículo.
•NUNCA EM CASO ALGUM deixe o bebé dentro do automóvel ou fora da
cadeiradoautomóvel.Emcasodeacidente,aforçaprovocadaduranteum
choqueaumavelocidadedeapenas40km/h,fazcomquesejapraticamente
impossívelacorrectaretençãodoseubebé.
•RecordequenãousaracadeiradeautoSTORMemautomóveisequipados
comairbagfrontalexceptoquandoforpossíveldesactivaromesmo,devendo
nestecasoconsultarofabricanteouovendedordoseuautomóvel.
IM 1442,01 STORM BE COOL ins.indd 6 13/03/13 11:53

7
STORM
I
AVVERTENZE
• Perfavore,leggereconattenzioneilmanualediistruzioniprimadiusareilnostro
prodotto.
• IlseggiolinoperautoSTORMèundispositivodisicurezzaedèafdabilesolose
vieneutilizzatosecondolenormepresentinelmanualediistruzioni.
• Ilprodottodeveessereutilizzatosolosuunsedileorientatoinavantiedotatodi
cinturedisicurezzaautomaticheatrepuntidiancoraggio,omologatesecondoil
RegolamentoECER16oaltrenormeequivalenti.
• Ilprodottopuòessereutilizzatosiasulsedileanteriorechesuquelloposteriore.Ad
ognimodo,siconsigliadiinstallarlosulsedileposteriore.
• Ilprodottoèstatoapprovatosecondolepiùrigidenormedisicurezzaeuropee(ECE
R44/04)edèidoneoperilGruppoI(9-18kg)eGruppoII(15-25kg).
• QualunquemodicaoaggiuntaaldispositivosenzalarelativaautorizzazionediBE
COOLpuòcomprometteregravementelasicurezzadelsistemaditrattenuta.
• Lamancataosservanzadelleistruzioniperilcorrettousodelsistemaditrattenuta
puòcomportaregraviconseguenzeperlasicurezzadelbambino.
• Questodispositivodisicurezzanonpuòessereusatosenzailsuorivestimento,il
qualenonpuòesseresostituitodaunaltrononoriginaledatocheformaparteinte-
grantedellecaratteristichedisicurezzadelsistema.
• Nonlasciaremaiilbambinoinautoprivodivigilanza.
RACCOMANDAZIONI
• Conservarequestolibrettodiistruzioniperconsultazionifuture.
• Assicurarsicheall’internodell’automobilesiaibagaglichequalunquealtrooggetto
cheincasodiincidentepossamuoversiecausaredannisianocorrettamentessati
oprotetti.
• IlseggiolinoperautoSTORMdeveesseressatocorrettamenteconlecinturedi
sicurezzaanchequandononvieneutilizzato,altrimentiincasodiincidentepotrebbe
venirescagliatoeprovocaredanniaglioccupantidelveicolo.
• Dentrol’autonontenereMAIEPERNESSUNMOTIVOilbambinoinbraccioose-
dutofuoridalseggiolino.Anchesepuòsembrareincredibile,incasodiincidentela
forzaprovocatainunimpattoavvenutoasoli40km/hrenderebbecompletamente
impossibiletrattenereilbambinoinmodoefcace.
• Attenzione:nonusaremaiilseggiolinoperautoSTORMinautomobilidotatedi
air-bagfrontale,amenochequestononpossaesseredisinserito.Vericarequesta
possibilitàconsultandoilfabbricanteoilvenditoredelveicolo.
IM 1442,01 STORM BE COOL ins.indd 7 13/03/13 11:53

8
STORM
IM 1442,01 STORM BE COOL ins.indd 8 13/03/13 11:53

9
STORM
1. Revestimientodetela
2. Enganche
3. Chasis
4. Ejeyllave
5. Dispositivodecierre
6. Compartimentoparaelmanualdeinstalación
7. Enganchedelcinturónabdominal
8. Pegatinadeinstalación
9. Placademetaldelcinturón
10. Guíaparaelcinturón
11. Soporte
12. Respaldo
13. SPS(SideProtectionSystem)
14. Almohadillaparalacabeza
15. Ranurasdelcinturón
16. Protectoresdelcinturón
17. Bandadelhombro
18. Cierre
19. Correadelaentrepierna
20. Cojinete
21. Botóndereglaje
22. Tapadelregulador
23. Palancaderegulación
24. Bandagraduable
1. FabricCover
2. Hook
3. Shell
4. ShaftandLock
5. Lock-OffDevice
6. Installationmanualstorage
7. LapBeltHook
8. InstallationSticker
9. BeltYoke
10. Beltguide
11. Base
12. Backrest
13. SPS(SideProtectionSystem)
14. HeadPillow
15. BeltSlots
16. BeltPads
17. ShoulderBelt
18. Buckle
19. CrotchStrap
20. Cushion
21. CenterAdjuster
22. AdjusterCover
23. PositioningHandle
24. AdjusterBelt
DEUTSCH
ESPAÑOL
ITALIANO
ENGLISH
PORTUGUÊS
FRANÇAIS
1. Revêtementtextile
2. Crochet
3. Châssis
4. Systèmedeverrouillage
5. Dispositifdefermeture
6. Compartimentpourlemanueld’installation
7. Attachedelaceintureabdominale
8. Étiquetteauto-collanted’installation
9. Plaqueenmétaldelaceinture
10. Guide-ceinture
11. Base
12. Dossier
13. SPS(SideProtectionSystem)
14. Oreillettepourlatête
15. Rainuresdelaceinture
16. Protectionsmatelasséesdessangles
17. Sangled’épaule
18. Boucledefermeture
19. Sangled’entre-jambes
20. Coussinet
21. Boutonderéglage
22. Cachedusystèmederéglage
23. Manettederéglage
24. Sangled’ajustement
1. Revestimentodetela
2. Engate
3. Chassis
4. Eixoechave
5. Dispositivodefecho
6. Compartimentoparaomanualdeinstalação
7. Engatedocintoabdominal
8. Autocolantesdeinstalação
9. Placademetaldocinto
10. Guiaparaocinto
11. Suporte
12. Encosto
13. SPS(SideProtectionSystem)
14. Almofadaparaacabeça
15. Ranhurasdocinto
16. Protectoresdocinto
17. Tiradoombro
18. Fecho
19. Correiadeentrepernas
20. Suporte
21. Botãodeajuste
22. Tampadoregulador
23. Alavancaderegulação
24. Tiragraduável
1. Rivestimentoditela
2. Gancio
3. Telaio
4. Pernoechiave
5. Dispositivodichiusura
6. Scompartoperilmanualediinstallazione
7. Ganciodellacinturaaddominale
8. Adesivodiinstallazione
9. Placcadimetallodellecinture
10. Guidaperlacintura
11. Supporto
12. Schienale
13. SPS(SideProtectionSystem)
14. Cuscinoperlatesta
15. Fessureperlecinture
16. Protezionidellecinture
17. Cinturapettorale
18. Chiusura
19. Cinghiaspartigambe
20. Cuscinetto
21. Pulsantediregolazione
22. Rivestimentodeldispositivodiregolazione
23. Levadiregolazione
24. Cinghiadiregolazione
1. Stoffbezug
2. Haken
3. Schale
4. AchseundSchlüssel
5. Verschlussvorrichtung
6. FachfürInstallationsanleitung
7. HakendesBeckengurtes
8. Einbauaufkleber
9. MetallplattedesGurtes
10. Gurtführung
11. Sockel
12. Rückenlehne
13. SPS(SideProtectionSystem)
14. Kopfpolster
15. Gurtschlitze
16. Gurtpolster
17. Schultergurt
18. Gurtschloss
19. Schrittgurt
20. Polster
21. Einstellknopf
22. Reglerabdeckung
23. Verstellhebel
24. Verstellband
IM 1442,01 STORM BE COOL ins.indd 9 13/03/13 11:53

10
STORM
1
2
IM 1442,01 STORM BE COOL ins.indd 10 13/03/13 11:53
11
STORM
3
4
IM 1442,01 STORM BE COOL ins.indd 11 13/03/13 11:53

12
STORM
4
5
IM 1442,01 STORM BE COOL ins.indd 12 13/03/13 11:53

13
STORM
5
6
IM 1442,01 STORM BE COOL ins.indd 13 13/03/13 11:53

14
E
1
CONSEJOS DE INSTALACIÓN
Instalación de la silla de seguridad para auto-
móvil con un cinturón de seguridad de 3 pun-
tos de anclaje
La silla STORM sólo puede utilizarse con un cin-
turón de seguridad automático de tres puntos
de anclaje. (Fig. 1)
La silla STORM debe colocarse orientada hacia
delante en los asientos traseros del automóvil
utilizando los cinturones de seguridad existen-
tes. No obstante, en el caso de algunas sillas, si
la instalación no queda bien ajustada, sugerimos
que pruebe otra silla en su vehículo.
Cinco posiciones de la silla de seguridad para
automóvil
La silla STORM puede utilizarse en cinco posi-
ciones. (Fig. 2):
Pulse la palanca de regulación debajo de la parte
delantera del asiento hacia delante o hacia atrás
(encontrará el accionador situado debajo), suel-
te la palanca en la posición deseada hasta que
oiga un “clic”.
2INSTALACIÓN
Método de instalación para el Grupo I (9-18 kg)
a) Coloque la silla STORM en la posición más re-
clinada 3 o 4. (Fig. 3)
b) Quite el eje de instalación tirando de la pieza
móvil de la llave de la silla STORM. (Fig. 4-A)
c) Tire y empuje el chasis hacia delante, a conti-
nuación haga pasar el cinturón del coche entre
el chasis y la silla fijando el cinturón del coche
en el cierre y compruebe que el cinturón no esté
torcido. (Fig. 5)
* Asegúrese de que la banda del hombro pasa
por la parte superior del asiento y por el dispo-
sitivo de cierre (Fig. 5-A) y que el cinturón abdo-
minal pasa horizontalmente por encima del en-
ganche del cinturón abdominal (Fig. 5-B). Junte
las bandas del hombro y abroche el cinturón de
seguridad. (Fig. 5-C)
d) Vuelva a colocar el chasis en su posición origi-
nal, coloque el eje de instalación en el orificio y
bloquee el dispositivo empujando la pieza móvil
situada al otro lado hasta que oiga un “clic”. (Fig.
4-B)
e) Ajuste el chasis a la posición más cómoda para
su hijo.
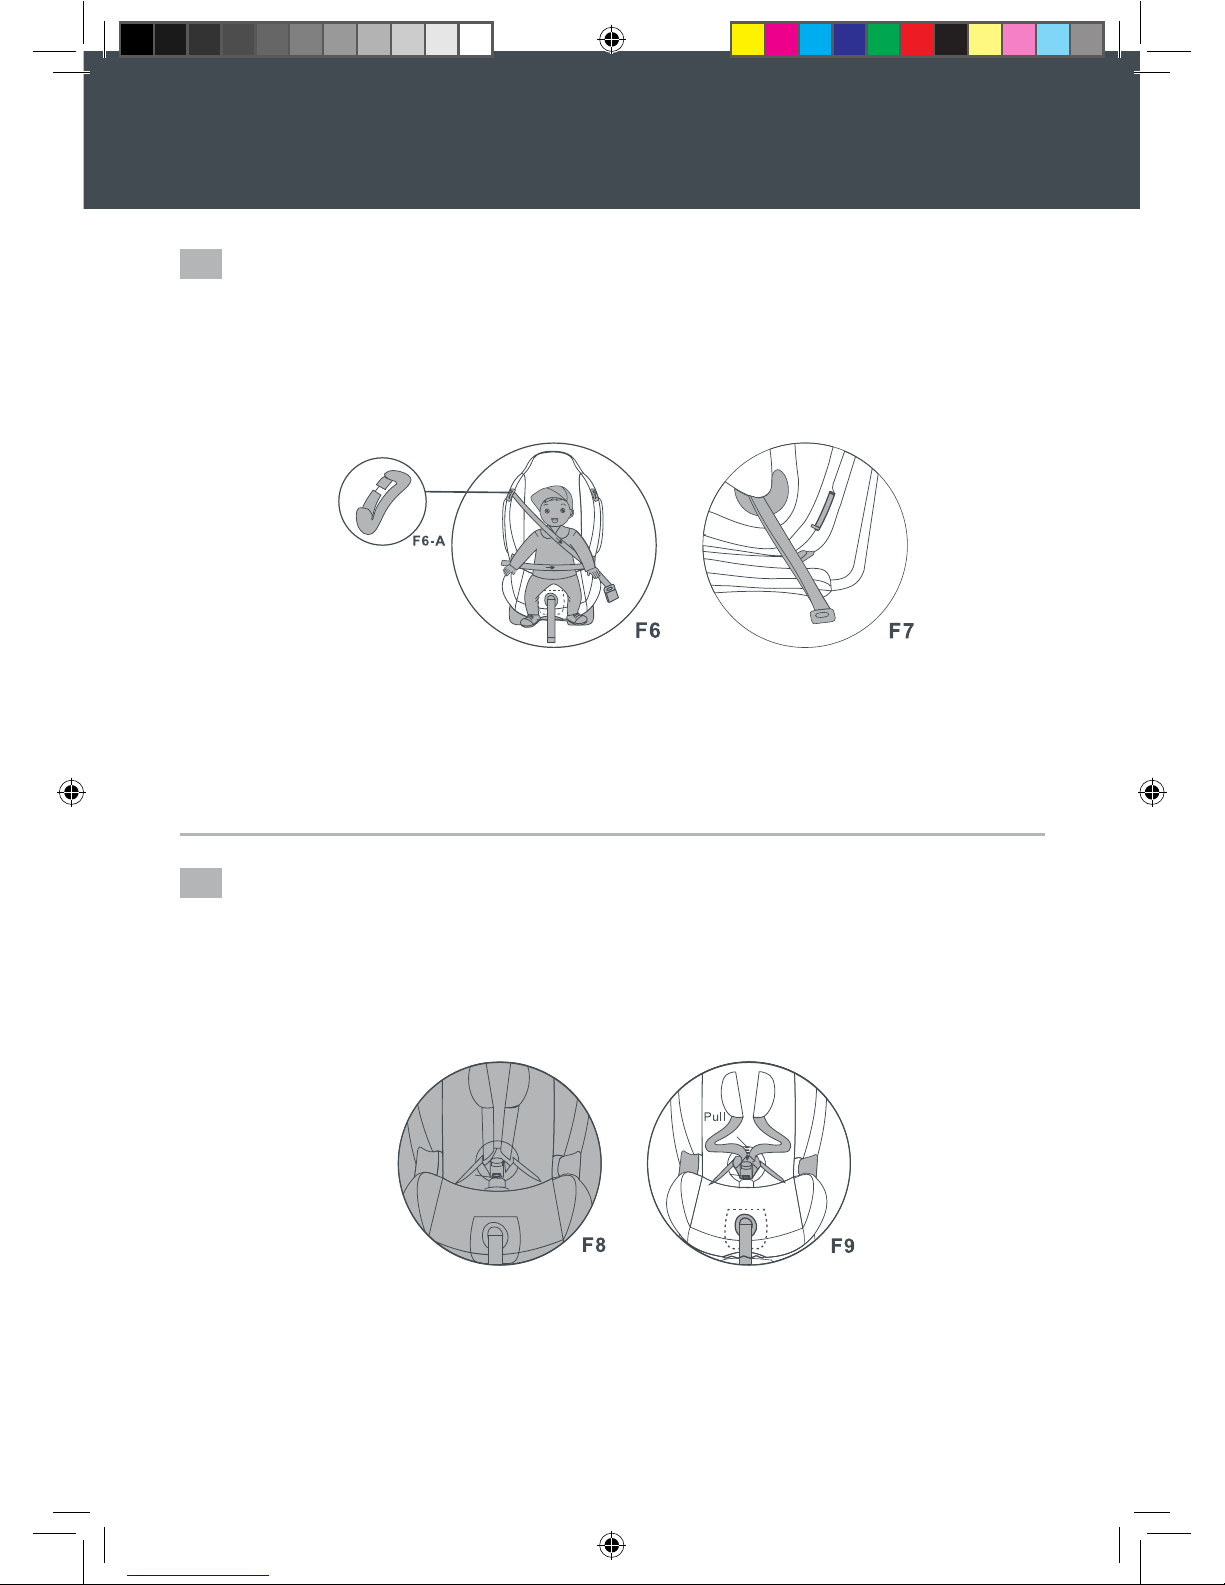
3Método de instalación para el Grupo II (15-
25 kg)
El método de instalación es para niños pertene-
cientes al Grupo II (15-25 kg). Quite en primer
lugar el sistema del arnés, incluyendo los pro-
tectores del cinturón, el cierre y la correa de la
entrepierna. A continuación instale las bandas
del hombro y el cinturón abdominal pasando el
cinturón abdominal y la banda del hombro del
vehículo por el enganche (Fig. 6-A) situado en la
parte superior del chasis y por encima de la guía
para el cinturón. (Fig. 6-7)
4
Cómo debe sentar a su hijo en la silla STORM
a) Afloje las bandas del hombro pulsando el bo-
tón graduable y tirando de las bandas del hom-
bro hacia usted.
Importante: No tire de los protectores del cin-
turón. (Fig. 8-9)
b) Abra el cierre pulsando el botón rojo. (Fig. 10)
c) Coloque los cinturones sobre los laterales del
chasis. (Fig. 11)
d) Coloque a su hijo en la silla y asegúrese de
que esté libre de juguetes u otros objetos duros.
(Fig. 12)
e) Coloque las partes del cierre una encima de la
otra e introdúzcalas en el cierre. (Fig. 13)
f) Asegúrese de que las bandas del hombro que-
dan bien ajustadas al tamaño de su hijo tirando
de la banda graduable. (Fig. 14)
¡Advertencia! Una vez que haya terminado la ins-
talación, compruébela intentando moverla, no
debería moverse más de una pulgada (2,54 cm.)
a lo largo del recorrido de la banda; si se mueve,
apriete las correas o intente instalarla de nue-
vo. Los cinturones nunca deben estar torcidos.
Cuando no pueda fijar las partes del cinturón en
el cierre, deberá desbloquear el cierre pulsando
el botón rojo y volver a intentarlo.
5
Modificar la altura de las bandas del hombro
a) Ha conseguido colocar las bandas del hombro
a una buena altura cuando la banda desaparece
en el chasis un poco por encima del hombro del
niño. Compruebe que las bandas del hombro es-
tén bien colocadas sobre los hombros del niño.
(Fig. 15)
b) Afloje las bandas del hombro pulsando el
botón graduable del ajustador y tirando de las
bandas del hombro hacia usted lo máximo po-
sible. Importante: No tire de los protectores del
cinturón. (Fig. 9)
c) Coloque la silla en la posición más reclinada.
IM 1442,01 STORM BE COOL ins.indd 14 13/03/13 11:53

15
Lista de control
Para mayor seguridad, repase esta lista de
control antes de emprender su viaje.
Controle que el sistema de cinturones de ar-
nés esté bien ajustado de modo que su hijo
esté bien atado. Controle que las bandas del
hombro se encuentren a la altura correcta.
Controle regularmente que la banda del cin-
turón de la silla de auto para bebés no esté
dañada. Si esto fuera así, no use el producto y
póngase en contacto con su proveedor o im-
portador (véase la lista de direcciones en la
tarjeta de servicio).
Controle que su silla de auto para bebés esté
bien atada con el cinturón del coche.
Si tiene más preguntas, por favor póngase en
contacto con su proveedor.
Debe tener a mano los siguientes datos:
-El número de serie que figura abajo en la tar-
jeta de servicio.
-La marca y el tipo de vehículo y el asiento en
el que utiliza la silla de auto para bebés.
-La edad y el peso del niño.
INSTRUCCIONES
GEBRAUCHSANWEISUNG
INSTRUÇÕES
INSTRUCTIONS
INSTRUCTIONS
ISTRUZIONI
•
•
•
d) Retire las bandas del hombro de la placa de
metal del cinturón. (Fig. 16-A)
e) Pase las bandas del hombro por el chasis y por
el revestimiento, y sáquelas fuera de los protec-
tores del cinturón, comprobando que el cierre
quede fijado de modo que se evite que los cintu-
rones queden torcidos. (Fig. 17)
f) Cuando desee colocar los cinturones desde o
en la posición más baja, coloque la silla STORM
en la posición más reclinada.
g) Cuando desee colocar los cinturones desde o
en la posición superior, coloque la silla STORM
en la posición sentada.
h) Coloque los protectores del hombro a la al-
tura deseada y pase de nuevo las correas de los
hombros por los protectores del hombro, por el
revestimiento y por el chasis. (Fig. 18)
i) Fije las bandas del hombro sobre la placa de
metal del cinturón. (Fig. 19-A)
MANTENIMIENTO Y LIMPIEZA
General
a) Puede limpiar el asiento con agua templada y
jabón. No utilice productos de limpieza agresi-
vos como abrasivos o disolventes.
b) El revestimiento debe ser lavado a mano a una
temperatura máxima de 30ºC. No utilice seca-
dora.
c) Se aconseja comprar un revestimiento adicio-
nal desde la adquisición del asiento del vehículo
de modo que pueda seguir utilizándolo cuando
un revestimiento debe ser limpiado.
Paso 1. Saque la silla de su vehículo. Compruebe
que todos los juguetes hayan sido retirados an-
tes de iniciar la limpieza.
Paso 2. Aspire las partículas de comida y la
suciedad con un aspirador inalámbrico. Si es
posible, utilice un accesorio del aspirador por-
tátil para limpiar las zonas pequeñas y de difícil
acceso de la silla.
Paso 3. Limpie las partes de plástico de la silla
con agua y jabón suave.
Paso 4. Quite todo el revestimiento de la silla,
si es posible, y lávelo en un ciclo para prendas
delicadas.
Paso 5. Limpie las manchas en la silla si no puede
quitar el revestimiento; compruebe que puede
utilizar jabón en el material de la silla de seguri-
dad verificando las directrices de embalaje.
Paso 6. Vuelva a instalar la silla de seguridad
una vez limpia en su vehículo, y preste especial
atención a que estén todas las piezas de la silla
y a que hayan sido instaladas de forma segura
y correcta.
6CAMBIO DEL REVESTIMIENTO
Retirada y sustitución del revestimiento y de
los protectores del cinturón
a) Afloje los protectores del cinturón. (Véase
Modificar la altura de las bandas del hombro).
b) Afloje el revestimiento. (Fig. 20)
c) Pase los cinturones, las partes del cierre y el
cierre por el revestimiento.
d) Quite el revestimiento.
e) Después del lavado, puede volver a instalar
los protectores del cinturón y coloque el revesti-
miento en el chasis.
f) Vuelva a pasar el cierre, las partes del cierre y
los cinturones a través del revestimiento, y fije el
revestimiento junto al botón graduable/palanca
de regulación.
g) Fije el revestimiento en todas las partes con
los enganches.
h) Fije el cierre y pase los cinturones por sus pro-
tectores, por el revestimiento y por el chasis.
i) Fije las bandas del hombro sobre la placa de
metal del cinturón.
j) Fije el revestimiento, detrás de los enganches.
IM 1442,01 STORM BE COOL ins.indd 15 13/03/13 11:53

16
GB
1INSTALLATION TIPS
Installing the car seat with a 3-point safety
belt
The STORM can only be used with automatic
3-point safety belt. (Fig. 1)
The STORM can be fitted in a forward-facing
position in the rear seats of the car by using
the existing seat belts. However, on some
seats, if the installation is not properly fitted,
we suggest try another seat in your car.
Five positions of the car seat
The STORM can be used in Five
positions (Fig. 2):
Pull the positioning handle under the front
of the seat forwards or backwards (feel the
spring underneath), release the handle on
your required position while hearing a distinct
click.
2INSTALLATION
Installing method for Group I (9-18 kg)
a) Place the STORM in the sleeping position 3
or 4. (Fig. 3)
b) Remove the installation shaft by pulling the
moveable part of the lock from the STORM.
(Fig. 4-A)
c) Pull and hold the shell forward, the thread
the seat belt between the shell and the base,
fasten the seat belt with the seat buckle, and
ensure the belt is not twisted. (Fig. 5)
* Make sure the shoulder belt go from top of
the seat and through the lock-off device (Fig.
5-A) and the lap belt go horizontally over lap
belt hook (Fig. 5-B) and joint with the shoulder
belt and buckle up the seat. (Fig. 5-C)
d) Return the shell to its original position, and
thread the installation shaft into the hole and
lock the device by pushing the moveable part
on the other side until hear a distinct click.
(Fig. 4-B)
e) Adjust the shell to your child’s most com-
fortable position.
3Installing method for Group II (15-25 kg)
The installation method is for child within
Group II (15-25 Kg). Removing the harness sys-
tem first, includind the belt pads, buckle and
crotch strap, then install the shoulder and lap
belt by threading the vehicle’s lap and shoul-
der belt through the hook (Fig. 6-A) on the top
of shell and over the belt guide. (Fig. 6-7)
4Placing your child in the STORM
a) Loosen the shoulder belts by pressing the
release button and pull the shoulder belts to-
wards you.
Important: Do not pull on the belt pads when
doing so. (Fig. 8-9)
b) Press the red button to open the buckle.
(Fig. 10)
c) Part the belts over the sides of the shell.
(Fig. 11)
d) Position your child into the shell and make
sure that there are no toys or other hard ob-
jects in the shell. (Fig. 12)
e) Match buckle tongue sections together and
insert them into the buckle. (Fig. 13)
f) Make sure the shoulder belts fit your child
snugly by pulling the adjuster belt. (Fig. 14)
Note! When you have done the installation,
check it by trying to move it, it shoudn’t
move than an inch side along the belt path,
if it does, tighten the straps or try installing
it again. The belts should never be twisted.
If you are unable to click the buckle sections
into the buckle, unlock the buckle by pressing
the red button and try again.
5
Adjusting the height of the shoulder belts
a) The correct belt height of the shoulder belts
is attained when the belt disappears into the
shell slightly above the shoulder of the child.
Ensure that the shoulder belts fit comfortably
over the child’s shoulder. (Fig. 15)
b) Loosen the shoulder belts by pressing the
release button of the adjuster and pulling the
shoulder belts towards you as far as possible.
Important: Do not pull the belt pads when do-
ing so. (Fig. 9)
c) Place the shell of the seat in the sleeping
position.
d) Remove the shoulder belts from the yoke.
IM 1442,01 STORM BE COOL ins.indd 16 13/03/13 11:53

17
INSTRUCCIONES
GEBRAUCHSANWEISUNG
INSTRUÇÕES
INSTRUCTIONS
INSTRUCTIONS
ISTRUZIONI
•
•
•
(Fig. 16-A)
e) Pull the shoulder belts through the shell
and cover out of the belt pads, ensuring that
the buckle remains fixed to prevent the belts
from twisting. (Fig. 17)
f) If you wish to alter the belts from or the low-
est positions, place the STORM in the sleep-
ing position.
g) If you wish to alter the belts from or to the
higher positions, place the STORM in the sit-
ting position.
h) Place the shoulder pads at the desired
height and thread the shoulder straps back
through the shoulder pads, cover and shell.
(Fig. 18)
i) Connect the shoulder belts to the belt yoke.
(Fig. 19-A)
MAINTENANCE & CLEANING
General
a) The car seat can be cleaned using lukewarm
water and soap. Do not use aggresive clean-
ers like abrasives or thinner.
b) The cover should be washed by hand at a
maximum temperature of 30ºC. Do not put it
in the dryer.
c) It is advisable to buy an extra cover when
purchasing the car seat that you can continue
using it when one cover is being washed.
Step 1. Take the car seat out of your car. En-
sure all your baby’s car toys are put away be-
fore you begin cleaning it.
Step 2. Suck up food particles and dirt with
a cordless vacuum. If possible, use a port-
able vacuum cleaner’s furniture attachment
to clean the small, hard-to-reach areas of the
car seat.
Step 3. Clean off the plastic portions of the
seat with gentle soap and water.
Step 4. Remove the entire car seat cover, if
possible and run it through your washing ma-
chine gentle cycle.
Step 5. Spot clean the stained spots on the car
seat if you cannot remove the cover, make cer-
tain you can use the soap on the car seat’s ma-
terial by ckecking the package’s guidelines.
Step 6. Re-install the clean car seat in your car,
and take special care that all parts of the car
seat are present and installed safely and cor-
rectly.
6CHANGING THE COVER
Removing and replacing the cover and belt
pads
a) Loosen the belts pads. (See adjusting the
height of the shoulder belts).
b) Loosen the cover all around. (Fig. 20)
c) Pull the belts, buckle tongues and buckle
through the cover.
d) Remove the cover.
e) After washing, attach the belt pads and
place the cover on the shell.
f) Thread the buckle, tongues and belts
through the cover and fasten the cover at the
release button/positioning handle.
g) Secure the cover on the pins.
h) Close the buckle and thread the belts
through the belt pads, cover and shell.
i) Connect the shoulder belts to the belt yoke.
j) Fasten the cover all around, behind the pins.
Checklist
For safety’s sake read through this checklist
before you set off.
Check that the harness belt system fits prop-
erly and tightly around your child and that the
shoulder belts are at the correct height.
Check regularly that the belt in the baby car
seat is not damaged. If it is damaged do not
use your product in any circumstances and
contact your supplier or importer (see ad-
dress list in the service card).
Check that you have secured your baby car
seat with the seat belt.
If you have any questions, please contact your
supplier
Make sure that you have the following details
to hand:
-Serial number underneath on the service
card.
-Mark and type of vehicle and seat on which
the baby car seat used.
-Age and weight of your child.
IM 1442,01 STORM BE COOL ins.indd 17 13/03/13 11:53

18
D
1EINBAUHINWEISE
Einbau des Pkw-Sicherheitssitzes mit einem
3-Punkt-Sicherheitsgurt
Der STORM Sitz darf nur mit einem automati-
schen 3-Punkt-Sicherheitsgurt verwendet werden
(Abb. 1).
Der STORM Sitz muss in Fahrtrichtung auf den
Pkw-Rücksitzen mit den vorhandenen Sicherheits-
gurten angebracht werden.
Trotzdem wird bei einigen Sitzen empfohlen,
wenn der Einbau nicht passt, einen anderen Sitz
in Ihrem Fahrzeug zu testen.
5-fach verstellbarer Pkw-Sicherheitssitz
Der STORM Sitz kann in fünf Positionen verwen-
det werden (Abb. 2):
Drücken Sie den Verstellhebel unter der Vorder-
seite des Sitzes nach vorne oder hinten (Sie finden
den sich unterhalb befindlichen Steller). Lassen
Sie den Hebel in der gewünschten Position los, bis
Sie ein Klicken hören.
2EINBAU
Einbaumethode für die Gruppe I (9-18 kg)
a) Bringen Sie den STORM Sitz in die am weitesten
zurückgelehnte Position 3 oder 4 (Abb. 3).
b) Entfernen Sie die Einbauachse durch Ziehen
des beweglichen Schlüsselteils des STORM Sitzes
(Abb. 4-A).
c) Ziehen und drücken Sie die Schale nach vorne,
anschließend führen Sie den Autogurt zwischen
der Schale und dem Sitz durch, befestigen den
Autogurt im Schloss und überprüfen, ob der Gurt
nicht verdreht ist (Abb. 5).
*Vergewissern Sie sich, dass der Schultergurt
durch den oberen Teil des Sitzes und die Ver-
schlussvorrichtung (Abb. 5-A) und der Beckengurt
waagerecht über den Haken des Beckengurtes
läuft (Abb. 5-B). Verbinden Sie die Schultergurte
und schließen Sie den Sicherheitsgurt (Abb. 5-C).
d) Bringen Sie die Schale erneut in ihre Ursprungs-
position zurück, bringen Sie die Einbauachse in
der Öffnung an und arretieren Sie die Vorrichtung
durch Drücken des sich auf der anderen Seite be-
findenden beweglichen Teils, bis Sie ein Klicken
hören (Abb. 4-B).
e) Stellen Sie die Schale in der für Ihr Kind be-
quemsten Position ein.
3Einbaumethode für die Gruppe II (15- 25 kg)
Die Einbaumethode für Kinder der Gruppe II (15-
25 kg). Entfernen Sie zuerst das Hosenträger-
Gurtsystem einschließlich der Gurtpolster, des
Gurtschlosses und des Schrittgurtes. Danach brin-
gen Sie die Schultergurte und den Beckengurt an
und führen den Beckengurt und den Schultergurt
des Fahrzeuges durch den sich im oberen Teil der
Schale befindenden Haken (Abb. 6-A) und über
die Gurtführung. (Abb. 6-7)
4Richtiges Hineinsetzen Ihres Kindes in den
STORM Sitz
a) Lockern Sie die Schultergurte durch Drücken
des Verstellknopfes und ziehen Sie die Schulter-
gurte zu sich hin. Wichtig: Ziehen Sie nicht an den
Gurtpolstern (Abb. 8-9).
b) Öffnen Sie das Schloss (Abb. 10) durch Drücken
des roten Knopfes.
c)Legen Sie die Gurte über die Seiten der Schale
(Abb. 11).
d) Setzen Sie Ihr Kind in die Schale und vergewis-
sern Sie sich, dass in der Schale keine Spielzeuge
oder andere harte Gegenstände liegen (Abb. 12).
e) Legen Sie die Teile des Schlosses übereinander
und führen Sie sie in das Schloss ein (Abb. 13).
f) Vergewissern Sie sich durch Ziehen am Verstell-
band, dass die Schultergurte auf die Größe Ihres
Kindes richtig eingestellt sind (Abb. 14).
Hinweis! Sobald Sie den Einbau beendet haben,
überprüfen Sie es durch Bewegen des Sitzes, der
sich entlang des Bandverlaufs nicht mehr als einen
Zoll (2,54 cm) bewegen lassen darf; wenn er sich
bewegt, ziehen Sie die Gurte fest oder bringen
Sie ihn erneut an. Die Gurte dürfen nie verdreht
sein. Wenn Sie die Gurtteile nicht im Schloss be-
festigen können, müssen Sie das Schloss durch
Drücken des roten Knopfes öffnen und es erneut
versuchen.
5Änderung der Schultergurthöhe
a) Sie haben die Schultergurte in die richtige
Höhe gebracht, wenn der Gurt etwas oberhalb
der Schulter des Kindes in der Schale verschwin-
det. Überprüfen Sie, ob die Schultergurte über
den Schultern des Kindes richtig angebracht sind
(Abb. 15).
b) Lockern Sie die Schultergurte durch Drücken
des Verstellknopfes des Verstellers und ziehen
Sie die Schultergurte so weit wie möglich zu sich
hin. Wichtig: Ziehen Sie nicht an den Gurtpolstern
(Abb. 9).
c) Bringen Sie den Sitz in die am weitesten zurück-
gelehnte Position.
d) Ziehen Sie die Schultergurte aus der Metallplat-
te des Gurtes (Abb. 16-a).
e) Führen Sie die Schultergurte durch die Schale
und den Bezug und ziehen Sie sie aus den Gurt-
IM 1442,01 STORM BE COOL ins.indd 18 13/03/13 11:53

19
INSTRUCCIONES
GEBRAUCHSANWEISUNG
INSTRUÇÕES
INSTRUCTIONS
INSTRUCTIONS
ISTRUZIONI
•
•
•
Checkliste
Gehen Sie diese Checkliste zur größeren Si-
cherheit vor Antritt der Reise durch.
Überprüfen Sie, ob das Hosenträgergurt-
system richtig eingestellt ist, damit Ihr Kind
richtig angeschnallt ist. Überprüfen Sie, ob
sich die Schultergurte auf der richtigen Höhe
befinden.
Überprüfen Sie regelmäßig, ob das Gurtband
des Autositzes für Babys nicht beschädigt ist.
Ist dies der Fall, dürfen Sie das Produkt nicht
verwenden und müssen sich mit Ihrem Liefe-
ranten oder Importeur in Verbindung setzen
(siehe Adressenliste auf der Servicekarte).
Überprüfen Sie, ob Ihr Babyautositz mit dem
Autogurt richtig angeschnallt ist.
Wenn Sie weitere Fragen haben, setzen Sie
sich bitte mit Ihrem Lieferanten in Verbin-
dung.
Sie müssen folgende Daten zur Hand haben:
-Die Seriennummer, die unten auf der Service-
karte steht.
-Fahrzeugmarke und Fahrzeugtyp und den
Sitz, auf dem der Babyautositz verwendet
wird.
-Das Alter und Gewicht des Kindes.
polstern heraus. Überprüfen Sie dabei, dass das
Gurtschloss befestigt bleibt, um ein Verdrehen
der Gurte zu verhindern. (Abb. 17)
f) Wenn Sie die Gurte von oder in der niedrigs-
ten Position anbringen wollen, müssen Sie den
STORM Sitz in die am weitesten zurückgelehnte
Position bringen.
g) Wenn Sie die Gurte von oder in der höchs-
ten Position anbringen wollen, müssen Sie den
STORM Sitz in die Sitzposition bringen.
h) Bringen Sie die Schultergurte in der gewünsch-
ten Höhe an und führen Sie die Schultergurte er-
neut durch die Schulterpolster, den Bezug und die
Schale. (Abb. 18)
i) Befestigen Sie die Schultergurte auf der Metall-
platte des Gurtes (Abb. 19-a).
PFLEGE UND REINIGUNG
Allgemein
a) Sie können den Sitz mit lauwarmem Wasser und
Seife reinigen. Verwenden Sie keine aggressiven
Reinigungsmittel wie Scheuer- oder Lösungsmit-
tel.
b) Der Bezug muss mit der Hand bei einer Tem-
peratur von höchstens 30°C gewaschen werden.
Verwenden Sie keinen Trockner.
c) Es wird empfohlen, beim Kauf des Fahrzeugsit-
zes einen zusätzlichen Bezug zu kaufen, um den
Sitz weiter verwenden zu können, wenn der Bezug
gereinigt werden muss.
Schritt 1: Entfernen Sie den Sitz aus Ihrem Fahr-
zeug. Überprüfen Sie, ob alle Spielzeuge Ihres
Kindes entfernt wurden, bevor Sie mit der Reini-
gung beginnen.
Schritt 2: Saugen Sie alle Essensreste und Schmutz
mit einem schnurlosen Staubsauger auf. Wenn
möglich, verwenden Sie ein Zubehörteil des trag-
baren Staubsaugers, um die kleinen und schwer
zu erreichenden Bereiche des Sitzes zu reinigen.
Schritt 3: Reinigen Sie die Kunststoffteile des Sit-
zes mit Wasser und milder Seife.
Schritt 4: Entfernen Sie, wenn möglich, den kom-
pletten Bezug des Sitzes und reinigen Sie ihn in
einem Waschgang für empfindliche Kleidung.
Schritt 5: Entfernen Sie die Flecken vom Sitz,
wenn Sie den Bezug nicht abnehmen können;
überprüfen Sie unter Zuhilfenahme der Hinweise,
dass Sie Seife auf dem Material des Sicherheitssit-
zes verwenden können.
Schritt 6: Bauen Sie den Sicherheitssitz nach
seiner Reinigung erneut in Ihr Fahrzeug ein und
achten Sie besonders darauf, dass alle Teile des
Sitzes vorhanden sind und sie sicher und richtig
eingebaut werden.
6AUSTAUSCH DES BEZUGES
Entfernung und Austausch des Bezuges und der
Gurtpolster
a) Lockern Sie die Gurtpolster (siehe Änderung
der Schultergurthöhe).
b) Lösen Sie den Bezug (Abb. 20).
c) Führen Sie die Gurte, die Schlossteile und das
Schloss durch den Bezug.
d) Entfernen Sie den Bezug.
e) Nach dem Waschen können Sie die Gurtpolster
und den Bezug an der Schale erneut anbringen.
f) Führen Sie das Schloss, die Schlossteile und die
Gurte erneut durch den Bezug und befestigen Sie
den Bezug am Verstellknopf/Verstellhebel.
g) Befestigen Sie den Bezug an allen Seiten mit
den Haken.
h) Befestigen Sie das Schloss und führen Sie die
Gurte durch ihre Gurtpolster, den Bezug und die
Schale.
i) Befestigen Sie die Schulterbänder auf der Me-
tallplatte des Gurtes.
j) Befestigen Sie den Bezug hinter den Haken.
IM 1442,01 STORM BE COOL ins.indd 19 13/03/13 11:53

20
F
1CONSEILS D’INSTALLATION
Installation du siège-auto pour l’automobile avec
la ceinture de sécurité à 3 points d’ancrage
Le siège-auto STORM s’utilise uniquement avec
une ceinture de sécurité automatique à trois points
d’ancrage. (Fig. 1)
Le siège-auto STORM doit être installé orienté vers
l’avant sur les sièges arrière de l’automobile en utili-
sant les ceintures de sécurité existantes.
Cependant, avec certains sièges-auto, si l’installa-
tion n’est pas correctement ajustée, nous vous sug-
gérons d’essayer un autre siège-auto dans votre
véhicule.
Cinq positions du siège-auto pour l’automobile
Le siège-auto STORM peut s’utiliser dans cinq posi-
tions différentes. (Fig. 2)
Poussez la manette de réglage, située sous la par-
tie avant du siège, vers l’avant ou vers l’arrière
(vous trouverez le système de commande situé en
dessous), lâchez la manette dans la position dési-
rée jusqu’à ce que vous entendiez un « clic ».
2INSTALLATION
Méthode d’installation pour le Groupe I (9-18 kg)
a) Installez le siège-auto STORM dans la position la
plus inclinée 3 ou 4. (Fig. 3)
b) Libérez le système de verrouillage en tirant sur la
pièce mobile de ce dernier. (Fig. 4-A)
c) Tirez et poussez le châssis vers l’avant, puis faites
passer la ceinture de la voiture entre le châssis et le
siège tout en fixant la ceinture de la voiture dans le
système de fermeture et assurez-vous que la cein-
ture n’est pas entortillée. (Fig. 5)
*Vérifiez que la sangle d’épaule passe bien par la
partie supérieure du siège et par le dispositif de
fermeture (Fig. 5-A), et que la ceinture abdominale
passe horizontalement par-dessus le crochet de
la ceinture abdominale (Fig. 5-B). Rassemblez les
sangles d’épaule et bouclez la ceinture de sécurité.
(Fig. 5-C)
d) Remettez le châssis dans sa position originale,
installez le système de verrouillage dans l’orifice et
bloquez le verrou en poussant la pièce mobile si-
tuée de l’autre côté jusqu’à ce que vous entendiez
un « clic ». (Fig. 4-B)
e) Ajustez le châssis dans la position la plus confor-
table pour votre enfant.
3Méthode d’installation pour le Groupe II (15-
25 kg)
La méthode d’installation concerne les enfants ap-
partenant au Groupe II (15-25 kg). Retirez d’abord
le système du harnais, y compris les protections
matelassées des sangles, la boucle de fermeture
et la sangle d’entre-jambes. Ensuite, installez les
sangles d’épaule et la ceinture abdominale en
faisant passer la ceinture abdominale et la sangle
d’épaule du véhicule par le crochet (Fig. 6-A) situé
sur la partie supérieure du châssis et par-dessus le
guide pour la ceinture. (Fig. 6-7)
4Comment vous devez assoir votre enfant dans
le siège-auto STORM
a) Desserrez les sangles d’épaule en appuyant
sur le bouton-poussoir et en tirant les sangles
d’épaules vers vous.
Important: Ne tirez pas sur les protections matelas-
sées des sangles. (Fig. 8-9)
b) Ouvrez la boucle de fermeture en appuyant sur
le bouton rouge. (Fig. 10)
c) Placez les ceintures sur les côtés latéraux du
châssis. (Fig. 11) Installez votre enfant dans le
siège-auto et vérifiez que ce dernier ne contient
pas de jouets ou d’objets durs. (Fig. 12)
e) Placez les parties du dispositif de fermeture l’une
par-dessus l’autre et introduisez-les dans la boucle.
(Fig. 13)
f) Vérifiez que les sangles d’épaule restent bien
ajustées à la taille de votre enfant en tirant sur la
sangle d’ajustement. (Fig. 14)
Avertissement! Une fois l’installation terminée,
contrôlez-la en essayant de la faire bouger, elle ne
doit pas bouger de plus d’un pouce (2,54 cm) sur
tout le parcours de la sangle ; si elle bouge, serrez
les sangles ou recommencez l’installation. Les cein-
tures ne doivent jamais rester entortillées.
Quand vous ne pouvez pas fixer toutes les parties
de la ceinture dans la boucle de fermeture, vous
devez débloquer le dispositif de fermeture en ap-
puyant sur le bouton rouge et essayer de nouveau.
5Modifier la hauteur des sangles d’épaule
a) Vous avez réussi à placer les sangles d’épaule à
la bonne hauteur lorsque la sangle disparaît dans
le châssis un peu au-dessus de l’épaule de l’enfant.
Vérifiez que les sangles d’épaule sont bien instal-
lées un peu plus haut que les épaules de l’enfant.
(Fig. 15)
b) Desserrez les sangles d’épaule en appuyant sur
le bouton poussoir du système de réglage et en ti-
rant les sangles d’épaule le plus possible vers vous.
Important : Ne tirez pas sur les protections mate-
lassées de la ceinture. (Fig. 9)
c) Installez le siège-auto dans la position la plus in-
clinée.
d) Retirez les sangles d’épaule de la plaque en mé-
IM 1442,01 STORM BE COOL ins.indd 20 13/03/13 11:53
Table of contents
Languages:
Other Be Cool Car Seat manuals

Be Cool
Be Cool atomic User manual

Be Cool
Be Cool Flow Iso-Fix User manual

Be Cool
Be Cool SPACE User manual

Be Cool
Be Cool wagon User manual

Be Cool
Be Cool PickUp User manual

Be Cool
Be Cool easy User manual

Be Cool
Be Cool Fit User manual

Be Cool
Be Cool Saturn User manual

Be Cool
Be Cool STORM isofix User manual

Be Cool
Be Cool Sun User manual

Be Cool
Be Cool mars User manual

Be Cool
Be Cool Thunder ISO-FIX User manual

Be Cool
Be Cool JET User manual

Be Cool
Be Cool Star User manual

Be Cool
Be Cool Thunder ISO-FIX User manual

Be Cool
Be Cool tornado User manual

Be Cool
Be Cool foldy User manual

Be Cool
Be Cool JET i-fix User manual

Be Cool
Be Cool All Aboard User manual

Be Cool
Be Cool box User manual


