Coto baby Salsa Q User manual

salsa q
/
KINDERAUTOSITZ
GRUPPE 1,2,3 KG
VON 9 BIS 36 KG
DE
SK
HU
RO
U
/
36
,3
,
,3
,
36

Instrukcja obsługi ................................................................................... 1
Instruction manual ................................................................................ 8
P
...................................................
15
Bedienungsanleitung ...........................................................................
23
Návod k použití ....................................................................................... 31
....................................... 34
PL
CZ
GB
RU
D
gwarancja/warranty//garantie/
záruní podmínky/jótállási jegy/garantie
Manual ............................................................................................................ 40
SK
Manual ............................................................................................................ 47
HU
Manual ............................................................................................................ 56
RO


CLICK


1
PL
Szanowni Klienci,
Dzikujemy za wybranie produktu Coto baby. Nasze wyroby projektujemy z myl
o ich bezpieczestwo i funkcjonalnoci. Niniejsza instrukcja obsługi pomoe
Pastwu wykorzysta wszystkie walory naszego produktu oraz przedstawi
niezbdne informacje dotyczce okresowej konserwacji.
Prosimy o dokładne zapoznanie si z jej treci, stosowanie si do jej zalece
oraz zachowania na przyszło.

2
PL
OSTRZEENIA
Przed przystpieniem do uytkowania produktu przeczytaj instrukcj i zachowaj j na
póniej.
OSTRZEENIE: Ten fotelik jest przeznaczony dla Grupy I (9-18 kg), Grupy II (15-25 kg)
i Grupy III (22-36 kg); lub dla grupy wiekowej od 9 miesicy do 12 roku ycia.
OSTRZEENIE: Przeczytaj dokładnie niniejsz instrukcj obsługi i zawsze przestrzegaj
zalece producenta. Fotelik gwarantuje bezpieczestwi wyłcznie jeli jest
prawidłowo zamontowany zgodnie z instrukcj obsługi.
OSTRZEENIE: Samochodowe pasy bezpieczestwa musz przebiega przez czerwone
przelotki fotelika. Nigdy nie zapinaj pasa w inny sposób.
OSTRZEENIE: Najbezpieczniejszym miejscem zamocowania fotelika s tylne
siedzenia samochodu. Fotelik musi by zamontowany przodem do kierunku jazdy i
połczony z 3-punktowymi pasami bezpieczestwa posiadajcymi homologacj ECE
R44/04. Nigdy nie montuj fotelika na siedzeniu wyposaonym w przedni poduszk
powietrzn, poniewa grozi to powanymi urazami, a nawet mierci.
OSTRZEENIE: Przed montaem fotelika upewnij si, e w samochodzie nie znajduj
si luzem przedmioty cikie lub o ostrych/szpiczastych krawdziach.
OSTRZEENIE: Samochodowe pasy bezpieczestwa nie mog by skrcone.
OSTRZEENIE: Fotelik musi by uywany wraz z tapicerk. Naley uywa wyłcznie
oryginalej tapicerki, poniewa ma ona wpływ na bezpieczestwo fotelika.
OSTRZEENIE: Fotelik zawsze musi by przypity pasami bezpieczestwa.
OSTRZEENIE: Upewnij si, e 5-punktowe pasy bezpieczestwa fotelika s
odpowiednio dopasowane do dziecka. Powinny by dopasowane do ciasno, tak aby
maksymalnie 1 lub 2 palce zmieciły si midzy pasami a klatk piersiow dziecka.
OSTRZEENIE: Nigdy nie pozostawiaj dziecka w foteliku bez opieki.
OSTRZEENIE: Pilnuj by dziecko nie bawiło si klamr od pasów bezpieczestwa.

3
PL
ELEMENTY FOTELIKA
1. Dwignia regulacji zagłówka.
2. Przelotka pasa naramiennego (Grupa III).
3. Przelotka pasa naramiennego (Grupa II).
4. Zagłówek.
5. Mechanizam odblokowujcy oparcie.
6. Skorupa fotelika.
7. Oparcie.
8. Naklejka instruktaowa.
9. Przelotka pasa biodrowego.
10. Przelotka pasa biodrowego.
11. Sprzczka.
12. Baza.
13. System ochrony bocznej.
14. Poduszka pod główk.
15. Tapicerka.
16. Osłonki na szelki.
17. Pasek naramienny.
18. Centralna klamra.
19. Pasek krokowy.
20. Osłonka a centraln klamr.
21. Wkładka do siedzenia.
22. Osłona mechanizmu regulacji pasów.
23. Pasek do regulacji napicia pasów.
24. Dwignia regulacji pochylenia fotelika.
INSTRUKCJA OBSŁUGI
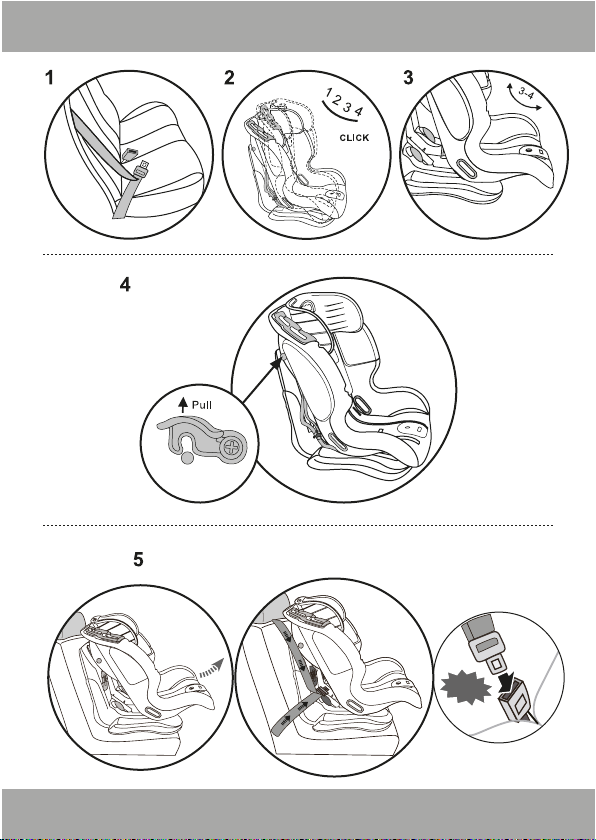
Monta fotelika przy pomocy 3-punktowych pasów bezpieczestwa.
Ten fotelik samochodowy moe by montowany wyłcznie za pomoc automatycznych
3-punktowych pasów bezpieczestwa (rys. 1). Fotelik montujemy przodem do
kierunku jazdy na tylnym siedzeniu samochodu za pomoc pasów, w które wyposaony
jest samochód.
Cztery pozycje pochylenia fotelika.
Fotelik posiada 4 pozycje pochylenia siedziska (rys. 2). Regulacji dokonujemy za
pomoc dwigni, która znajduje si pod siedziskiem z przodu fotelika.

4
PL
INSTRUKCJA OBSŁUGI
Monta fotelika dla Grupy I (9-18 kg)
a) Ustaw fotelik w pozycji do spania 3 lub 4 (rys. 3)
b) Odbezpiecz mechanizm blokujcy oparcie pociagajc dwigni do góry i wycigni
metalow o (rys. 4)
c) Odchyl oparcie do przodu, nastpnie poprowad pasy midzy oparciem a baz
fotelika i wepnij je w kalmr (upewnij si, e pasy nie s skrcone). Pasy powinny
przebiega od góry bazy, przez mechanizm blokujcy pasy i przelotk pasa biodrowe-
go do klamry (rys. 5). Nastpnie nacignij pasy, aby zabezpieczy fotelik.
d) Opu oparcie, wsu metalow o, a nastpnie zablokuj mechanizm blokujcy
oparcie wciskajc dwigni w dół (rys. 6)
e) Ustaw fotelik w jednej z 4 pozycji.
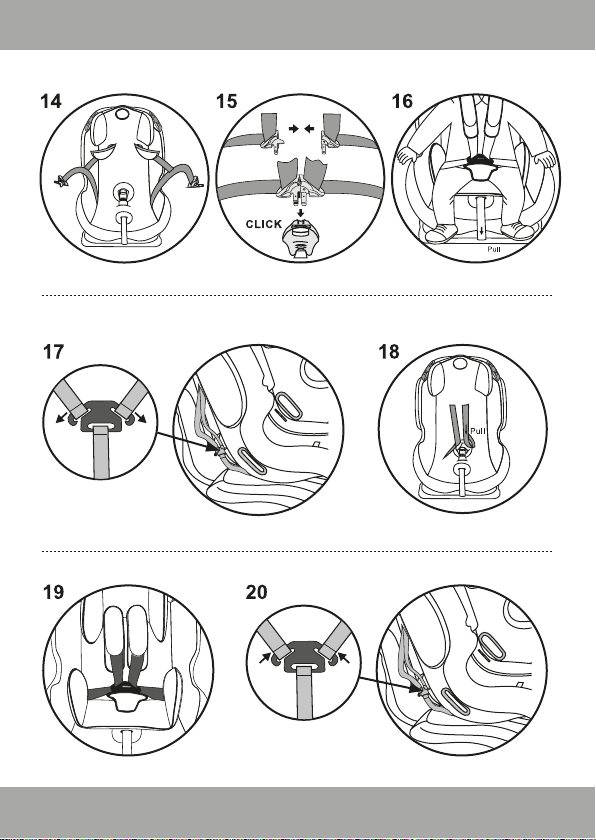
Monta fotelika dla Grupy II (15-25 kg) i Grupy III (22-36 kg).
Ta metoda montau fotelika przeznaczona jest dla dzieci z Grupy II (15-25 kg) i Grupy
III (22-36 kg).
a) Wymaga ona zdemontowania 5-punktowych pasów bezpieczestwa fotelika wraz z
osłonkami na paski naramienne, centraln klamr i paskiem krokowym (patrz:
„Regulacja wysokoci pasków naramiennych” w dalszej czci instrukcji).
b) Ustaw wysoko zagłówka pocigajc za dwigni w jego tylnej czci.
c) Posad dzieco w foteliku.
d) Przymocuj fotelik do siedziska za pomoc pasów bezpieczestwa tak, aby pas
naramienny przebiegał przez odpowiedni dla danej grupy przelotk w górnej czci
oparcia (rys. 7, 8), a pas biodrowy przez 2 przelotki na połczeniu siedziska z
oparciem (rys. 9).
e) Zapnij pasy (rys. 10)

5
PL
INSTRUKCJA OBSŁUGI
Umieszczanie dziecka z Grupy I (9-18 kg) w zamontowanym foteliku.
a) Poluzuj paski naramienne naciskajc przycisk na mechanizmie regulacji pasów (w
przedniej czci siedziska) i pocignij za paski (rys. 11, 12). Uwaga: nie pocigajc za
osłonki na paskach.
b) Wcinij czerwony przycisk na centralnej klamrze aby j rozłczy (rys. 13).
c) Odchyl paski na zewntrz fotelika (rys. 14).
d) Umie dziecko w foteliku i upewnij si, e nie ma w nim zabawek albo innych
twardych przedmiotów.
e) Połcz widełki pasków naramiennych, a nastpnie wepnij je w centraln klamr
(rys. 15).
f) Nacignij pasy za pomoc paska w przedniej czci siedziska (rys. 16).
UWAGA: Po wykonaniu powyszych czynnoci upewnij si, e fotelik jest prawidłowo
przymocowany. Prawidłowo zamontowany fotelik nie powinien si ruszy wicej, ni 3
cm w jedn stron. Jeli luz jest wikszy, docignij pasy lub spróbuj ponownie. Pasy
nie mogby skrcone.
Regulacja wysokoci pasków naramiennych.
Prawidłowa wysoko pasków naramiennych to taka, w której paski wchodz w
oparcie fotelika nieco ponad ramionami dziecka. Upewnij si, e paski nie uciskaj
ramion dziecka.
a) Poluzuj paski naramienne wciskajc przycisk na mechanizmie regulacji pasów (w
przedniej czci siedziska) i pocigajc za paski, tak aby maksymalnie je wcign.
Uwaga: Nie pocigaj za osłonki na paskach (rys. 11, 12).
b) Ustaw fotelik w maksymalnie pochylonej pozycji lub odblokuj oparcie i pochyl do
przodu.
c) Zdejmij paski ze sprzczek znajdujcych si za oparciem (rys. 17).

6
PL
INSTRUKCJA OBSŁUGI
Regulacja wysokoci pasków naramiennych.
d) Wycignij paski z oparcia fotelika, tapicerki oraz osłonek na pasy przez otwory.
Nastpnie wycignij paski połczone z osłonkami. Centralna klamra powinna by
zapita podczas tej czynnoci, eby zapobiec skrcaniu si pasów (rys. 18).
e) Wybierz otwory na optymalnej wysokoci, a nastpnie przełó przez nie paski
połczone z osłonkami i zapnij na je górn (mniejsz) klamr. Przełó paski
naramienne przez osłonki i wybrane otwory w oparciu, a nastpnie zapnij na doln
(wiksz) klamr (rys. 19, 20). Nacignij pasy uywajc paska w przedniej czci
siedziska.
KONSERWACJA
1. Tapicerk fotelika mona pra rcznie w wodzie o temperaturze nie przekraczaj-
cej 30ºC przy uyciu mydła lub delikatnego detergentu.
2. Nie naley pra tapicerki w pralce, ani te wirowa mechanicznie.
3. Nie naley uywa wybielacza. Uywa wolno jedynie delikatnych detergentów.
4. Naley regularnie sprawdza ustawienie 5-punktowych pasów bezpieczestwa
fotelika oraz pasów samochodowych.
5. Plastikowe czci fotelika mona czyci wilgotn szmatk lub gbk.
6. Naley usuwa twarde i ostre przedmioty z fotelika przed posadzeniem dziecka.
7. Tapicerk mona odkurza odkurzaczem z kocówk do samochodu. Naley to robi
delikatnie aby nie uszkodzi tapicerki.

7
PL
WARUNKI GWARANCJI
1. Gwarancji udziela si na okres 36 miesicy od daty zakupu.
2. Gwarant zapewnia nabywcy prawidłowe działanie wyrobu przy uytkowaniu zgodnie
z przeznaczeniem i instrukcj obsługi.
3. Podstawowym sposobem załatwienia reklamacji jest naprawa wyrobu przywracajc
mu warto uytkow.
4. Gwarancja przysługuje jedynie pierwotnemu nabywcy i nie podlega przeniesieniu na
inne osoby.
5. Reklamacje z tytułu wad przyjmuje punkt sprzeday detalicznej.
6. W przypadku wystpienia wad naley zwróci si do punktu sprzeday detalicznej z:
wyrobem, oryginaln kart gwarancyjn podpisan przez sklep i przypitym paragonem
lub dowodem zakupu.
7. Reklamowany wyrób naley odda do naprawy w stanie czystym.
8. Fakt i dat wykonania naprawy gwarancyjnej serwis powiadcza na karcie gwarancy-
nej.
9. Karta gwarancyjna stanowi podstaw do realizacji uprawnie gwarancyjnych.
10. Nie udziela si gwarancji, jeeli:
- wyrób nie został dostarczony do serwisu w komplecie z oryginalnym dowodem zakupu,
- uszkodzenia spowodowane s nieprawidłowym uytkowaniem lub konserwacj
przeprowadzon niezgodnie z instrukcj obsługi - uszkodzenia powstały w wyniku
wypadku,
- naprawy produktu wykonane były przez osoby trzecie.
11. Gwarancja nie obejmuje normalnego zuycia, zwizanego z codzienn eksploatacj.
12. Gwarant nie bdzie odpowiadał za zniszczenia tkanin spowodowane długotrwałym
działaniem promieni słonecznych.
13. Gwarancja na sprzedany towar nie wyłcza, nie ogranicza, ani nie zawiesza
uprawnie kupujcego wynikajcych z niezgodnoci towaru z umow.
14. Wszelkie inne sprawy i spory reguluj sdy.

8
GB
Dear Clients,
We would like to thank you for choosing Coto baby product. Our products are
manufactured thinking of the safety and functionality. This manual shall help you
to use all benefits of our Product and present you all necessary information
concerning periodically maintenance.
Please read this content very carefully and comply with its recommendations as
well as keep for future.

9
GB
WARNINGS
Before use read carefully this manual and keep it for future.
WARNING: This car seat is intended for use by Group I (9-18 kg), Group II (15-25 kg)
and Group III (22-36 kg); or by children between 9 months old ans 12 years old.
WARNING: Read the instruction manual carefully and always adthere to the
manufacturers recommendations. The car seat will guarantee safety only if installed
properly and in accordance with the instruction manner.
WARNING: The car seat belts must be threaded through the red belt slots. Always
attach the child car seat in this manner.
WARNING: The safest place for the child car seat is in the rear of the car. The child
car seat must be fitted so that is facing in the direction of the travel and attached by
three point seat belts which are ECE R16 certified. Never fit the child car seat where
there is a front air bag as if it went off there would be a danger of serious or even
fatal injuries.
WARNING: Before fitting the child car seat make sure there are no loose heavy or
sharp objects in the vehicle.
WARNING: The seat belts should not be twisted.
WARNING: The child car seat must be used together with the fabric cover. For safety
reasons only the original fabric cover should be used.
WARNING: The child car seat must always be attached by the car’s seat belts.
WARNING: Make sure that the five point child car seat harness is adjusted for your
child. It should fit quite snugly, so that no more than one or two fingers can be
inserted between the child car seat harness and child’s chest.
WARNING: Never leave the child in the child car seat unsupervised.
WARNING: Make sure the child does not play with the safety buckle.

10
GB
ELEMENTS OF THE CHILD CAR SEAT
1. Lifting Handle
2. Gr. III Belt Guide Slot.
3. Gr. II Belt Guide Slot.
4. Headrest.
5. Peg.
6. Shell.
7. Backrest.
8. Stickers (Installation Sticker; ECE mark, Warning Notice).
9. Belt Guide Hole.
10. Lap Belt Guide.
11. Belt Yoke.
12. Base.
13. Side Protection System.
14. Head Pillow.
15. Cushion.
16. Shoulder Belt Pad.
17. Shoulder Belt.
18. Central Buckle.
19. Crotch Strap.
20. Buckle Pad.
21. Sitting Pillow.
22. Adjuster Cover.
23. Adjuster Belt.
24. Positioning Handle.
INSTRUCTION MANUAL
Three point seat belt system child car seat fitting.
The child car seat can only be fitted to an automatic three point seat belt system (fig.
1). The child car seat should be front facing and attached vy the seat belts of the
vehicle.
Four child car seat positions.
The child car seat can be adjusted to any one of four positions (fig. 2). To adjust the
child car seat use the positioning hande located at the front under the seat.

11
GB
INSTRUCTION MANUAL
Group I (9-18 kg) child car seat fitting.
a) Adjust the child car seat to the sleeping position 3 or 4 (fig. 3).
b) Release the lock-off device securing the backrest by pulling the lever upwards and
remove the metal inner rod (fig. 4).
c) Pull the backrest forward and then thread the seat belt between the backrest and
the child car seat base and clip it into the backle (make sure the seat belts is not
twisted). The seat belt should run across the top of the base, through the shaft and
lock and lap belt hook to the buckle (fig. 5). Next pull the seat belt tight to secure
the child car seat.
d) Push back the backrest, insert the metal inner rod and then lock the lock-off
device by pushing the lever down (fig. 6).
e) Adjust the child car seat to one of the four positions.
Group II (15-25 kg) ad Group III (22-36 kg) child car seat fitting.
This method of fitting the child car seat is intended for Group II (15-25 kg) and Group
III (22-36 kg) children.
a) It requires the removal of the 5 point harness from the child car seat together with
the shoulder belt pads, central buckle and the crotch strap (see: „Adjusting the
height of the shoulder belts” in the instruction manual).
b) Adjust the height of the headrest by pulling the liffting handle.
c) Place the child in the seat.
d) Attach the child car seat to the car seat with the seat belts, so that the shoulder
belt is slotted through the correct guide slot for your child’s group (fig. 7,8), and the
lap belt through the 2 lap belt guides (fig. 9).
e) Buckle the seat belts (fig. 10).

12
GB
INSTRUCTION MANUAL
Strapping a Group I (9-18 kg) child into the fitted car seat.
a) Loosen the shoulder belts by pressing the centre adjuster (front of the cushion) and
pull the belts (fig. 11, 12). Attention: do not pull the belt pads.
b) Press the red button of the buckle to release it (fig. 13).
c) Pull the harness straps to the outside of the child car seat (fig. 14).
d) Place the child in the car seat and make sure there are no toys or other hard items
in it.
e) Connect the brackest of the shoulder straps and the clip them into the buckle (fig.
15).
f) Tighten the harness by ussing the adjuster belt (fig. 16)
ATTENTION: Once the above steps have been completed, make sure that the child car
seat is fitted properly. A properly fitted child car seat should not move by more than 3
cm in any one direction. If required, tighten the seat belts or try again. The seat belts
should not be twisted.
Adjusting the height of shoulder belts.
The shoulder belts should be adjusted to the slots just above the child’s shoulders.
Make sure that the shoulder belts do not pinch the child’s shoulders.
a) Loosen the shoulder belts by pressing the centre adjuster (front of the cushion) and
pull the belts in order to extend them fully. Attention: Do not pull the belt pads (fig.
11, 12).
b) Adjust the seat to its maximum forward tilt position or release the backrest and tilt
it forward.
c) Remove the belts from the clasps behind the backrest (fig. 17).

13
GB
INSTRUCTION MANUAL
Adjusting the height of shoulder belts.
d) Remove the belts from the backrest, the fabric cover and the pads of the car child
seat. Next pull out the belts connected with the pads. The buckle should be clipped to
stop the belts from twisting (fig. 18).
e) Select the slots at the correct height and then thread the belts connected with the
pads and clip them to the upper (smaller) buckle. Thread the shoulder belts through
the pads and the selected slots in the backrest and then clip them to the lower
(larger) buckle (fig. 19, 20). Tighten the belts by pulling on the adjuster belt.
MAINTENANCE
1. The fabric cover may be hand washed in lukewarm water (max. 30ºC) in soap or
mild detergent.
2. The fabric cover should not be machine washed or tumble dried.
3. Do not bleach. Use only mild detergents.
4. The positioning of the 5 point safety harness and the seat belts should be checked
regularly.
5. Plastic elements of the child car seat may be wiped with a wet cloth or sponge.
6. Hard and sharp objects should be removed from the child car seat prior to
strapping the child in.
7. The fabric cover may be hovered with a car vacuum cleaner. Special care should be
taken so that the fabric cover is not damaged.

14
GB
WARRANTY
1. The warranty is valid for 36 months from the date of purchase.
2. The warranty ensures the buyer that the product will function properly when
used according to the operating instructions.
3. The basic method of dealing with a complaint is to repair the product restoring
its usability and value.
4. This warranty applies only to the original purchaser and is not transferable to
any other person.
5. The warranty claims are accepted only by the retailer.
6. For the complaint to be accepted, the product must be returned to the retailer
together with the original warranty card signed by the store and the original
receipt or proof of purchase.
7. The product has to be cleaned before returning it to the retailer.
8. The repair service will mark the date and type of performed repair on the
warranty card.
9. The warranty card is required for the complaint to be accepted.
10. No guarantee can be given if:
- The product has not been delivered to the retailer together with the original proof
of purchase.
- Damage was caused by an improper usage or maintenance performed not
according to the instructions.
- Damage was caused by an accident.
11. The warranty does not cover normal wear and tear associated with the daily
operation.
12. Guarantor is not be liable for damage or bleaching of the colors caused by a
long-term fabric exposure to sunlight.
13. The warranty does not exclude, limit or suspend the rights of the buyer arising
from the non-confirmity.
14. All other matters and disputes are governed bythe courts.
Other Coto baby Car Seat manuals

Coto baby
Coto baby SWING User manual

Coto baby
Coto baby Salsa Q Pro User manual

Coto baby
Coto baby Salsa Q Pro User manual

Coto baby
Coto baby SALVO User manual

Coto baby
Coto baby RUMBA PRO User manual

Coto baby
Coto baby Salsa Q Pro User manual

Coto baby
Coto baby SOLARIO User manual

Coto baby
Coto baby Lunaro User manual

Coto baby
Coto baby Jazz Baby User manual
Popular Car Seat manuals by other brands

Beflye
Beflye BFL102A manual

Peg-Perego
Peg-Perego Viaggio Shuttle 120 Instructions for use

Evenflo
Evenflo Maestro Sport Exclusive RightFit Belt Path owner's manual

Dr. Schandelmeier
Dr. Schandelmeier Medisafe Space Traveller instruction manual

NORAUTO
NORAUTO 2274434-NO0537-ZY15 Safety information

BOB Gear
BOB Gear NUNA user guide