Befaco MIDI THING User manual

M I D I T H I N G
U S E R M A N U A L

M I D I T H I N G P O W E R & I N T R O
P O W E R I N G T H E
M O D U L E
U S E R M A N U A L
T H A N K S F O R P U R C H A S I N G A M O D U L E F R O M B E FA C O !
B E F O R E Y O U P L U G T H I S M O D U L E I N . . .
1. Disconnect your cabinet from the mains.
2. Triple check the power cord polarity. The coloured line on the cable (pin
number one) is the -12V rail.
3. Connect the cable to the POWER connector. If you plug the module
backwards or to the ICSP connector, you might burn it out and
unfortunately this is not covered by the warranty.
4. If you have any questions please drop us a mail.
I N T R O D U C T I O N M I D I T H I N G : F O U R C H A N N E L M I D I T O C V I N T E R FA C E
The module allows you to convert MIDI messages into CV/Gate signals, featuring several functional modes
supporting multiple channels and polyphony as well as a drum trigger mode. With the simple press of a button
you are able to change between modes, automatically detect MIDI channels, enter calibration mode and change
several settings like clock resolutions or retrigger mode. This manual has been updated for firmware
version 2.0 released in April's 2018.
F I R S T L O O K B R I E F V I E W O F T H E F R O N T PA N E L C O N N E C T I O N S A N D
C O N T R O L S
1. CV Outputs (1-4)
Function varies with selected mode
2. Gate Outputs (1-4)
Function varies with selected mode
3. Clock
Clock output
4. Start/Stop
Start/Stop output
5. Mode Button
Used to enter Learn or Menu mode. Can also be
used to send an “All Notes Off” MIDI message.
6. LEDs
Indicates when MIDI notes are received or a mode
is selected
7. MIDI in
MIDI input
.1

M I D I T H I N G R E F E R E N C E
F U N C T I O N A L
M O D E S
U S E R M A N U A L
O V E R V I E W A N D L E A R N
INTRODUCTION
When initialised, MIDI Thing will default to QUAD mode (see modes section in page 3)
listening on MIDI channels 1,2, 3 and 4 and converting the first 120 MIDI notes (0 - 119)
into 10 volts (corresponding to 10 octaves with 12 notes per octave). Keep these voltage and
octave ranges in mindi when setting up your oscillator to ensure you get the frequencies
you want. A MIDI note ON received will be converted into the equivalent voltage at the CV
out (following V/oct) and a Gate High on the gate out. The gate will go down when its Note
OFF is received.
MIDI Thing can be configured by using the push button on the front panel in conjunction
with sending the appropriate MIDI notes. You will therefore need to have a MIDI interface
attached to the module to change the modes, calibrate it or set it up. We recommend using
a MIDI keyboard or the piano roll of your favorite DAW.
To configure the module you simply need to press and hold the MODE button. After holding
it down for 3 seconds, the LEARN Led will light up and after 5 seconds the MODE Led will
light up. Releasing the push button while either Led is lit will select the relevant menu.
You can send a Panic! message (all notes off) by shortly pressing push button.
LEARN MENU
In Learn mode you will teach MIDI Thing which note on your keyboard corresponds to the
bottom of the scale (MIDI note 0/0 volts). While doing so, MIDI Thing will also automatically
detect the MIDI channels you are broadcasting on.
To enter Learn mode press the push button until the Learn Led is lit and then
release. You can cancel Learn mode at any time with a short press of the push button.
While in Learn mode, the LEARN led and first active CV channel LEDs will remain lit. As a
MIDI note is received, MIDI Thing will assume this note to be MIDI note 0 (0 volts) for that
CV channel. MIDI channel you are broadcasting on will be assigned for that CV channel.
Once the first CV channel has been configured the next CV channel LED will be lit and the
module will be waiting for another note to arrive.
This process will be repeated for each active CV channel (Appendix 1 for Learn's blocks
diagram).
.2
Example
MIDI Thing is set up to QUADMIDI mode and we want to
configure it to listen to channels 5,6,7 and 8, starting at
the second octave of the keyboard (MIDI note 24).
Press the button until Learn LED is lit then release it. CV
channel 1 LED will be lit. Now we send MIDI note 24 on
channel 5 to assign it to CV channel 1
the led for CV channel 2 will be lit and the module will
be waiting for the next note to arrive. Now we send MIDI
note 24 on channel 6 to assign it to C V channel 2.
We then repeat the process for channels 7 and 8. When
the p rocess finishes both Learn and Mode LEDs will light
for a m oment, which means that data has been saved.
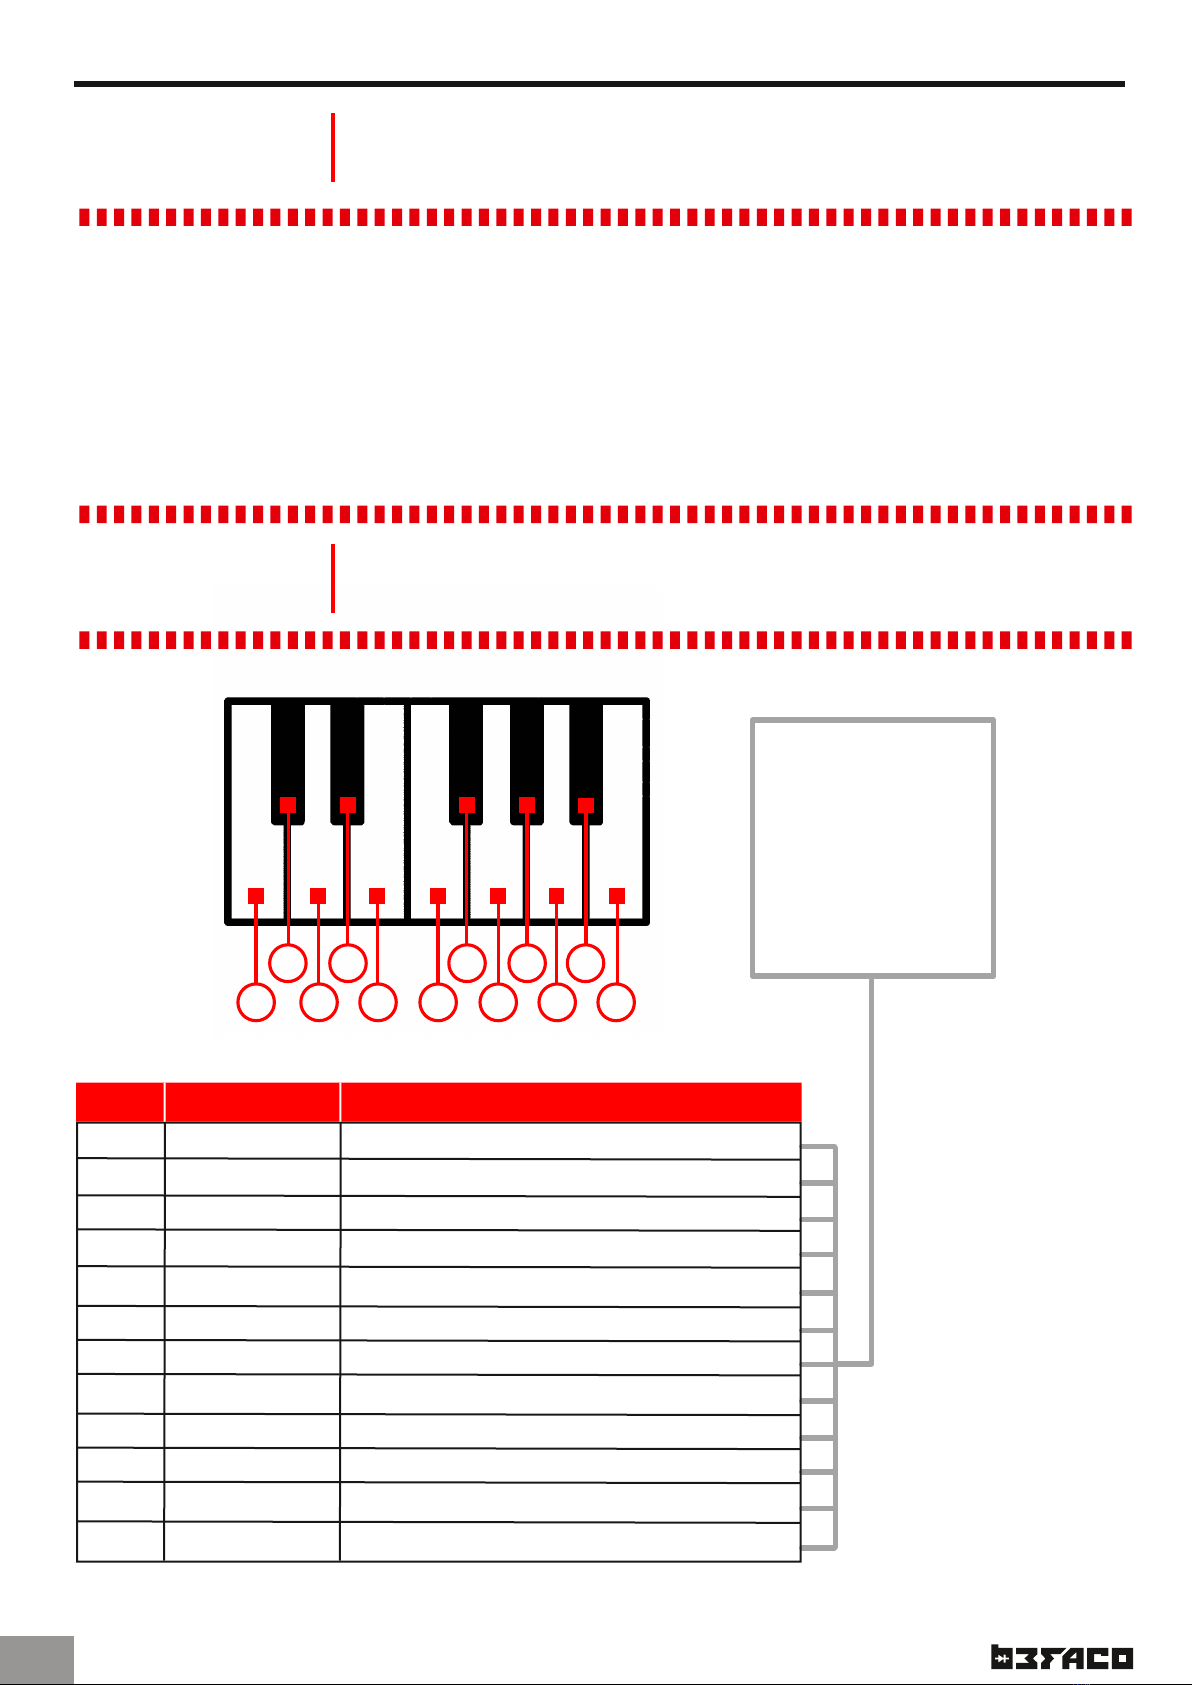
Splitting the keyboard: Should
you wish, you can send several notes
on the same MIDI channel. This will
split the channel into parts and
assign them to different CV outs.
Keep in mind that MIDI notes received
set the low end of our CV range, so
you will need to set the higher notes
first.
If a higher note is sent as you
attempt to split the channel note the
device indicates its unhappiness by
flashing the Clock LED while waiting
for a valid note to arrive

CDEFGAB
C# D# F# G# A#
M I D I T H I N G R E F E R E N C E
F U N C T I O N A L
M O D E S
U S E R M A N U A L
C O N F I G U R I N G M I D I T H I N G
CONFIGURATION MENU
In this mode MIDI Thing can be configured and calibrated. All configuration will be done via
MIDI by sending notes on certain channels. We recommend using a MIDI keyboard or the
piano roll of your favourite DAW.
To enter the configuration Menu, press the push button until the Mode LED is
illuminate (wait for the LEARN Led to turn off) then release the button. You can exit Mode
Menu at any time with a short press of the push button.
.3
There are twelve
functional modes.
Each of them can be
selected by sending a
MIDI note (in any
octave) on CHANNEL
1 while in MENU
Mode. See notes in
F U N C T I O N A L
M O D E S M O D E S
C
C#
D
D#
E
F
F#
G
G#
A
A#
B
NOTE
MONO
DUAL
QUAD
PERCTRIG
DUOFIRST
DUOLAST
DUOHIGH
DUOLOW
POLYFIRST
POLYLAST
POLYHIGH
POLYLOW
MODE
MONOPHONIC
DUAL MONOPHONIC
QUAD MONOPHONIC
MULTITRIGGER
DUOPHONIC - PRIORITY FIRST NOTE
DUOPHONIC - PRIORITY LAST NOTE
DUOPHONIC - PRIORITY HIGHEST NOTE
DUOPHONIC - PRIORITY LOWEST NOTE
POLYPHONIC - PRIORITY FIRST NOTE
POLYPHONIC - PRIORITY LAST NOTE
POLYPHONIC - PRIORITY HIGHEST NOTE
POLYPHONIC - PRIORITY LOWEST NOTE
FUNCTION

MONO
Complete monophonic mode with regular CV/
Gate, Velocity, Pitch Bend and Modulation Wheel
outputs. Perfect for basslines, leads and
monophonic patches in general played with
keyboard.
DUAL
Two channels CV/Gate monophonic mode with
extra Velocity output per channel. Good to make
monophonic patches with suboscilators. In this
mode Gate outputs 3 and 4 are unused.
QUAD
This is Midi Thing's default mode, a four channel
CV/Gate mono mode. Perfect for sequencing
multiple oscillators.
PERCTRIG
This mode provides eight trigger outputs mapped
to drum midi notes. Useful for percussion sets.
This mode works only with MIDI channel 10.
DUOPHONIC MODES
Duophonic CV/Gate modes with priority to First,
Last, Higher and Lowest note. Each channel has
its own Velocity output (CV ouputs 3-4). In these
modes Gate outputs 3 and 4 are unused.
POLYPHONIC MODES
Polyphonic CV/Gate modes with priority to First,
Last, Higher and Lowest note. Up to four notes.
Perfect for chords!
NOTE PRIORITY
We need a way to tell the synth which
notes will prevail when we add a new
note once the polyphony is already
complete: Two notes in DUO and four
notes in POLY modes.
If priority set to FIRST note, Midi
Thing prioritize the first notes
pressed, so new notes will never
sound.
For the case that the LAST note has
priority, the effect will be the
opposite: Midi Thing will output the
new note, removing the first note
which was pressed.
The procedure is the same for HIGH
and LOW priority modes but
depending if a note is higher or lower
M I D I T H I N G R E F E R E N C E
F U N C T I O N A L
M O D E S
U S E R M A N U A L
Q U I C K R E F E R E N C E TA B L E S
.4
All modes
have
individual
Clock and
Start/Reset
OUTPUTS
CV1
CV2
CV3
CV4
GT1
GT2
GT3
GT4
CK/ST
NOTE
VELOCITY
PITCH BEND
MOD WHEEL
GATE
N/A
N/A
N/A
YES
MONO
CH 1 NOTE
CH 1 VEL
CH 2 NOTE
CH 2 VEL
CH 1 GATE
N/A
CH 2 GATE
N/A
YES
DUAL
CH 1 NOTE
CH 2 NOTE
CH 3 NOTE
CH 4 NOTE
CH 1 GATE
CH 2 GATE
CH 3 GATE
CH 4 GATE
YES
QUAD
36 (TRIGG)
38 (TRIGG)
42 (TRIGG)
45 (TRIGG)
46 (TRIGG)
47 (TRIGG)
48 (TRIGG)
49 (TRIGG)
YES
TRIG
NOTE 1
VEL 1
NOTE 2
VEL 2
GATE 1
N/A
GATE 2
N/A
YES
DUO
NOTE 1
NOTE 2
NOTE 3
NOTE 4
GATE 1
GATE 2
GATE 3
GATE 4
YES
POLY

RETRIG OFF
NOTE 1
CV
GATE
02
13810
6
4511
NOTE 2
RETRIG ON
CV
GATE
79
M I D I T H I N G R E F E R E N C E
F U N C T I O N A L
M O D E S
U S E R M A N U A L
S Y S T E M S E T T I N G S
.5
RUNNING CLOCK
Pressing Notes 4 (E) and 5 (F) will set
ON or OFF running clock mode. This
mode will cause MIDI Thing to turn off
clock messages processing when a
STOP message arrives. MIDI clock will
resume when a START message is
received.
This mode is perfect for machines, like
those from Elektron, which keep
sending MIDI even after STOP has been
pressed.
CLOCK RESOLUTION
A MIDI clock signal will be sent from
your MIDI device to the MIDI Thing at a
rate of 24ppqn (parts per quarter
note). By default MIDI Thing scales this
down by a factor of six to output
4ppqn for syncing with outer devices,
however it is possible to change this
RETRIGGER ON/OFF
You can activate or deactivate retrigger
mode pressing notes 0 (C) or 2 (D).
When retrigger is ON every time a Note ON
arrives the gate will briefly go low, even if
the Note OFF of the previous note hasn't yet
arrived.
When retrigger is OFF, the gate will only
trigger for a new note if the Note OFF for
the previous MIDI note has been received. In
the Monophonic modes this means that if a
note is pressed and held while another note
is pressed, there will be no gate for the
second note (to trigger an envelope for
instance), although the CV will change. In
retrigger mode, every time a note is pressed
a new gate is created.
0 (C). Retrigger OFF
2 (D). Retrigger ON
4 (E). Running clock OFF
5 (F). Running clock ON
1 (C#). /24 (Default)
3 (D#). /48
6 (F#). /12
8 (G#). /6
10 (A#). /3
7 (G). Reset
9 (A). ST/SP Gate
11 (B). Enter Calibration
RETRIGGER MODE
CLOCK MODE
CLOCK RESOLUTION
CALIBRATION MODE
SYSTEM MODE
By broadcasting on Channel 2 while in
MODE you are able to change system
options and calibrate CV channels. Midi
Thing has four groups of settings:
Retrigger Mode, Clock Mode, Clock
Resolution and Calibration.
Each of them is related to a specific
group of notes of the first octave.
(see the table below)
ST/SP BEHAVIOUR

M I D I T H I N G R E F E R E N C E
F U N C T I O N A L
M O D E S
U S E R M A N U A L
S Y S T E M S E T T I N G S
CALIBRATION
In this mode you can calibrate the output voltages from the CV channels. This will be
accomplished by sending MIDI notes on MIDI channels 1 to 4 as described below.
To enter calibration send midi note 11 (B) on channel 2 when in the MODE menu.
This process must be performed either with a precision multimeter (three decimal
recommended) or by connecting CV out to a VCO Volt/Oct input and measuring the
frequency/note value with a tuner.
The firmware calibrates between the first and middle note of each octave (C and F#), and
interpolates values between them.
There are 20 calibration points. Between each calibration point there should be an increase
of 0.500 volts (e.g., 0.500v for first F#, 1.000v for first C1, 1.500v for second F#, 2.000v for
next C, etc…) in order to keep a linear rise and to track Volt/Oct accurately.
With your multimeter or tuner ready to measure you can change each calibration point’s CV
value by pressing the semitone above or below it on your MIDI instrument (see diagram
below). Keep adjusting until you get the correct voltage reading or frequency. Press the
"main" note (C or F#) after adjusting in order to double-check the current value.
To Exit Calibration Mode just press the button again.
.6
ST/SP BEHAVIOUR
You can configure the ST/SP output to either behave as a reset or ST/SP gate.
Send Note 7 (G) to select Reset mode. In this mode a trigger is sent when a ST or continue
message is received.
Send Note 9 (A) to select ST/SP mode. The output will be high when a ST message is
received and low when SP arrives.
Tip
You can use callibration procedure to
tune oscillators that do not track at
1V/Oct.
Keep in mind callibration will be only
valid for that oscillator, making other
oscillators misbehave.
LED activity:
LEARN LED will stay on whan you press
one of the calibration keys (F# and C)
Every time you change a value with a
higher of lower key both LEARN and
MODE LEDs will blink twice.

M I D I T H I N G R E F E R E N C E
P R O G R A M I N G
U S E R M A N U A L
U P D AT I N G M I D I T H I N G
.7
LOADING FIRMWARE
This module is based on the Arduino platform and features an Atmega328 microcontroller
with Arduino UNO bootloader. An ICSP header is available on the board to reprogram it.
Read carefully about Arduino programming via ICSP before attempting to reprogram Midi
Thing.
Please beware that if you are not familiar with these concepts and you try to load a
new firmware you risk disabling your module!
In order to program/upgrade the module follow these steps:
1. Get an Arduino Programmer
We normally use an USBasp programmer like this one https://www.ebay.com/itm/USBASP-USB-ISP-
Programmer-for-Atmel-AVR-ATMega328-ATMega32U4-Arduino-/322662323277
2. Download Arduino IDE
Go to the official Arduino website https://www.arduino.cc/en/Main/Software and download the latest version of
Arduino IDE for your operating system and install it.
3. Download the firmware
Go to https://github.com/Befaco/midithing and press "clone or download" to download the repository to your
computer. Extract the zip file and copy "firmware" folder to your sketchbook folder.
4. Install the libraries
Download the libraries (Bounce, mcp4728 and MIDI) and install them following the instructions from this
link https://www.arduino.cc/en/Guide/Libraries
5. Connecting the module
Connect the programmer to the ICSP conector in the back of the module. Pay special attention to
the pinout when you plug the module. You can check this link for more information about ICSP
https://www.arduino.cc/en/Tutorial/ArduinoISP
6. Upgrading
Press "Open" and search the file "firmware.ino" located on the "firmware" folder. Go to "Sketch" and
hit "Upload using programmer".
If everything goes well you should see a "Done uploading" message in a few seconds. If something
happens during the upgrade, check your Arduino settings following the instructions of this link
https://www.arduino.cc/en/Guide/Troubleshooting

MIDI Thing firmware v1 was coded with
love by Sergio Retamero:
sergio.retamero@gmail.com
Performance boost, bug fixing and extra
awesomeness by Jeremy Bernstein:
jeremy.d.bernstein@googlemail.com
Firmware v2 coding:
Quad Polyphonic modes were implemented
by Jeremy Bernstein.
New configuration system, duophonic
modes implementation, clock modes, a
touch of beauty to the interface and a
gazillion little details no living person
could ever imagine by Alberto "Numeríco"
Navarro:
albertonafu@gmail.com
Calibration method inspired on Mutable
instruments CVpal.
Thanks to everyone that took the time to
finger point bugs, provide feedback and
made loads of suggestions. Special thanks
to Jonatan "Jessica Fletcher" Bernabeu.
M I D I T H I N G R E F E R E N C E
M I S C E L L A N E A
U S E R M A N U A L
C R E D I T S
.8
Power draw:
+12 32mA -12 8mA +5 0
Size:
6HP wide 30mm deep
Module information:
https://www.befaco.org/en/midi-thing/
M I S C E L L A N E A S P E C S

M I D I T H I N G L E A R N M O D EU S E R M A N U A L
.9

M I D I T H I N G M E N U M O D EU S E R M A N U A L
.10
Table of contents
Other Befaco Recording Equipment manuals

Befaco
Befaco Chopping Kinky V1 User manual

Befaco
Befaco AC/DC User manual

Befaco
Befaco VCMC User manual

Befaco
Befaco NOISE PLETHORA V1 User manual

Befaco
Befaco BURST User manual

Befaco
Befaco TRS User manual

Befaco
Befaco HEX MIX VCA User manual

Befaco
Befaco STAmp 1U User manual

Befaco
Befaco FXBOY V1 User manual

Befaco
Befaco PONY VCO User manual