Belling FSE60DOTi Firmware update

Belling
FSE Induction DO B3 UK
Users Guide & Installation
Handbook
Part No 083486800 Date 06/05/2015

3.010
CONTENTS & INTRODUCTION
CONTENTS
• SAFETY
• USING THE PRODUCT
• CLEANING
• INSTALLATION INSTRUCTIONS
• TECHNICAL DATA
• CUSTOMER CARE
INTRODUCTION
Thank you for buying this British-
built appliance from us.
This guide book is designed to help you
through each step of owning your new
cooker, from installation to use. Please
read it carefully before you start using
your product, as we have endeavored to
answer as many questions as possible,
and provide you with as much support as
we can.
If,however,youshouldndsomething
missing, or not covered, please contact
our Customer Care team. Their number is
located on the back page of this book.
For customers outside the UK and North-
ern Ireland, please contact your local
supplier.
When you dial this number you will hear a
recorded message and be given a number
of options. This indicates that your call
has been accepted and is being held in a
queue. Calls are answered in strict rota-
tion as our Customer care representatives
become available.
Alternatively, general information, spares
and service information is available from
our website. The address is located on the
back page of this book.
WARRANTY
Your new appliance comes with our 12
month guarantee, protecting you against
electrical and mechanical breakdown. To
register your appliance please call 0844
481 0182, complete the registration form
included or register online at the web
address located on the back page of this
book.
For full terms & conditions of the manu-
facturer’s guarantee, refer to the website
on the back of this book.
In addition, you may wish to purchase
anextendedwarranty.Aleaetexplain-
ing how to do this is included with your
appliance.
European Directives
As a producer and a supplier of cooking
appliances we are committed to the pro-
tection of the environment and are in the
compliance with the WEEE directive. All
our electric products are labelled accord-
ingly with the crossed out wheeled bin
symbol. This indicates, for disposal pur-
poses at end of life, that these products
must be taken to a recognised collection
points, such as local authority sites/local
recycling centres
This appliance Complies with European
Community Directives (CE) for household
and similar electrical appliances and Gas
appliances where applicable.
This appliance conforms to European Di-
rective 2009/125/EC regarding Eco design
requirements for energy-related products
Our policy is one of constant development
and improvement, therefore we cannot
guarantee the strict accuracy of all of our
illustrationsandspecications-changes
may have been made subsequent to
publishing.

SAFETY
5.130
BEFORE USING THE PRODUCT
Make sure that you have removed all
packaging and wrapping. Some of the
items inside this appliance may have ad-
ditional wrapping.
It is advised that you turn the ovens and/
or grill on for a short while. This will burn
off any residues left from manufacturing.
There may be a smell which accompanies
this process - but this is nothing to worry
about and is harmless.
It is recommended that you wash the
oven shelves, baking tray, grill pan and
grillpantrivetbeforetheirrstuseinhot
soapy water. This will remove the protec-
tive oil coating.
WARNING! - The
appliance and its
accessible parts become
hot during use. Care
should be taken to avoid
touching heating elements.
Children less than 8
years of age shall be kept
away unless continously
supervised.This appliance
can be used by children
aged from 8 years and
above and persons with
reduced physical sensory
or mental capabilities or
lack of experience and
knowledge if they have
been given supervision or
instruction concerning the
use of the appliance in a
safe way and understand
the hazards involved.
Children shall not play with
the appliance. Cleaning
and user maintenance shall
not be made by children
without supervision.
WARNING! - Unattended
cooking on a hob with fat
or oil can be dangerous
andmayresultinre.
NEVER try to extinguish a
rewithwater,butswitch
off the appliance and then
covertheamewithalid
or damp cloth.
WARNING! - Danger of
re:Donotstoreitems
on the cooking surfaces.
WARNING! - Servicing
should be carried out only
by authorised personnel.
WARNING! - The
appliance must never
be disconnected from
the mains supply during
use, as this will seriously
affect the safety and
performance, particularly
in relation to surface

SAFETY
5.130
temperatures becoming
hot and gas operated parts
notworkingefciently.
Thecoolingfan(iftted)
is designed to run on after
the control knob has been
switched off.
WARNING! - Do not
spray aerosols in the
vicinity of this appliance
while it is in operation.
WARNING! - Do not store
oruseammableliquidsor
items in the vicinity of this
appliance.
WARNING! - Do not
modify this appliance.
WARNING! - Do not use
harsh abrasive cleaners or
sharp metal scrapers to
clean the oven door glass
since they can scratch the
surface, which may
result in shattering of the
glass.
WARNING! - Do not
operate the appliance
without the glass panel
correctlytted.
WARNING! - There is a
risk of electric shock, so
always make sure you have
turned off and unplugged
your appliance before
starting. Always allow
the product to cool down
before you change a bulb.
WARNING! - Accessible
parts may become hot
when the grill is in use.
children should be kept
away.
WARNING! - Never place
food, or dishes on the
base of the main oven, the
element is here and it will
cause over heating.
WARNING! - Do not
modify the outer panels of
this appliance in any way.
WARNING! - This
appliance must be earthed.
WARNING! - The top
element gets extremely hot
when in use, so take care
to avoid touching it.

SAFETY
5.130
ELECTRIC INDUCTION
HOB
WARNING:- Unattended
cooking on a hob can
be dangerous and may
resultinre.NEVERtry
toextinguisharewith
water, but switch off the
appliance and then cover
amee.g.withalidora
damp cloth.
Dangerofre:donot
store items on the cooking
surface.
If the surface is cracked,
broken or shattered,
switch off the appliance
to avoid the possibility of
electric shock and call for a
service engineer’s visit.
Metallic objects such as
knives, forks, spoons and
lids should not be placed
on the hob surface since
they can get hot.
Ensure you switch off the
appropriate cook zone
individually or (by the
central on/off key if touch
control) when you have
nishedcooking,donot
rely upon the automatic
pan detection system as
your means of switching
“off” the appliance. This
induction hob complies
with the applicable EMC
and EMF standards.
Therefore it should not
interfere with other
electronic units. Persons
ttedwithapacemakeror
any other electrical implant
should clarify with their
doctor or the producer of
the implant, whether there
implant is adequate and
fail-safe, the pacemaker
must be designed in
compliance with the
appropriate regulations.
Caution: This appliance is for cooking
purposes only. It must not be used
for other purposes, for example room
heating.
OVEN/GRILL
Do
• Always take care when removing food
from the oven as the area around the

SAFETY
5.130
cavity may be hot.
• Always use oven gloves when han-
dling any utensils that have been in
the oven as they will be hot.
• Always make sure that the oven
shelves are resting in the correct po-
sition between two runners. Do not
place the oven shelves on top of the
highest runner, as this is not stable
and can lead to spillage or injury.
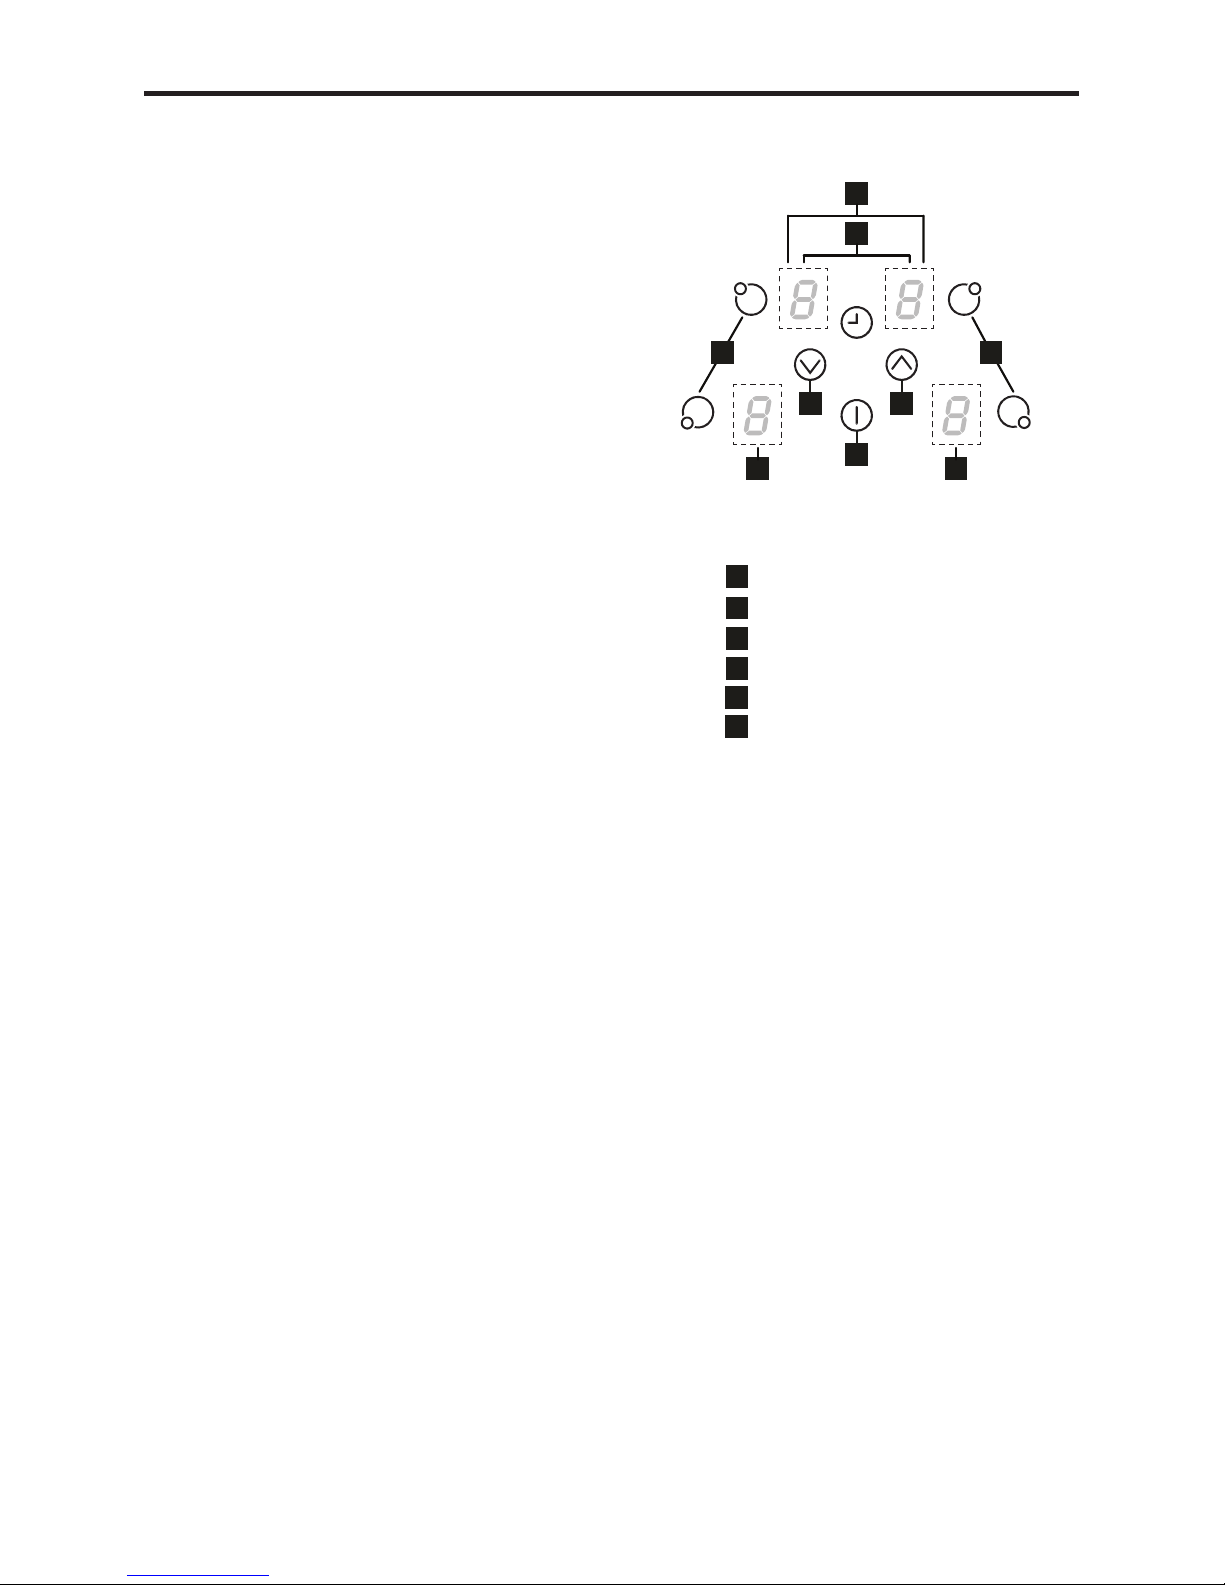
AlwaysusetheMinuteMinder(iftted)
if you are leaving the oven unattended -
this reduces the risk of food burning.
Do Not
• Never place items on the door while
it is open.
• Never wrap foil around the oven
shelvesorallowfoiltoblocktheue.
• Never drape tea towels near the oven
whileitison;thiswillcauseare
hazard.
• Never pull heavy items, such as tur-
keys or large joints of meat, out from
the oven on the shelf, as they may
overbalance and fall.
• Never use this appliance to heat any-
thing other than food items and do
not use it for heating the room.
• Do not spray aerosols in the vicinity
of this appliance while it is in opera-
tion.
• Donotstoreoruseammableliquids
or items in the vicinity of this appli-
ance.
• Do not modify this appliance.
GENERAL
Do
• Always ensure that pan bases are
dryandatbeforeusingthemonthe
hob.
• Always position pans over the
centre of the heat zone, and turn
the handles to a safe position so
they cannot be knocked or grabbed.
Always use pans which are no smaller
than 100mm (4”), or no larger than
250mm (10”).
• Always match the size of pan to the
size heat zone – do not use large
pans on small zones or vice versa.
• Always lift pans onto and off the
hob, rather than sliding them across
the surface, to avoid marks and
scratches.
Do Not
• If the appliance has a glass hobtop,
never drag pans across the ceramic
surface as this will lead to scratches
and damage.
• Never use double pans, rim-based
pans, old or misshapen pans, or
anypanthatisnotstableonaat
surface.
• Never leave cooking fat, or oil, unat-
tended.
• Never use commercial simmering
aids, or heat diffusers, as they create
excessive heat and can damage the
surface of the hob.
• Never use the hob for any other
purpose than cooking food.
• Never leave plastic cooking utensils
close or on top of the hob as these
can melt due to the warm hob.
• Never leave any cook zone on with-
out a pan covering it. This causes a
rehazard.
• Never leave pans overhanging the
edge of the hob. The surface of the
hob is smooth. If pans are knocked
they may move on the hob top.
• Never leave pans on the hob when

SAFETY
5.130
you’re not around - take them off the
cook zone
FIRE SAFETY ADVICE
Mostkitchenresoccurwhenpeopleare
distracted or leave things unattended, so
remember:
If you’re called away from the cooker - by
the phone or someone at the door, either
take pans off the heat, or switch off your
hob.
Don’t let yourself be distracted while
cooking.
Ifyoudohaveareinthekitchen,don’t
take any risks - get everyone out of your
home and call the Fire Brigade.
If a pan catches re:
• Do not move it - it is likely to be
extremely hot.
• Turn off the heat if it’s safe to do so
- but never lean over a pan to reach
the controls.
• Ifyouhaveareblanket,putitover
the pan.
• Ifyouhaveputthereout,leavethe
pan to cool completely.
Deep-fat frying presents more dan-
gers in your kitchen.
• Neverllachippan(orotherdeep-
fat fryer) more than one-third full of
oil
• Donotuseareextinguisherona
pan of oil - the force of the extin-
guishercanspreadthereandcre-
ateareball.
If you have an electrical re in the
kitchen:
• Pull the plug out, or switch off the
power at the fuse box - this may be
enoughtostopthereimmediately
• Smothertherewithareblanket,
or use a dry powder or carbon diox-
ide extinguisher
• Remember:neverusewateronan
electricalorcookingoilre.

USING THE HOB - INDUCTION
Before using your hob
It is recommended that you clean and
wash the hob surface before using for the
rsttime.Applyathincoatofceramic
hob cleaner to the hob to maintain and
protect it. See the customer care section
for details of how to obtain all the avail-
able cleaning products.
TOUCH CONTROLS
The touch controls for your induction hob
have been designed to provide you with
ngertipcontrolofyourhob,providing
accurate and repeatable power settings
for cooking and an easy clean surface
that can be easily wiped over. When a
cook zone is activated the power setting is
displayed for each zone individually.
Using the Touch Controls.
Usetheatofyournger,notthetip,the
controls respond to touch, so you don’t
need to apply any pressure.
Always ensure the control area is clean,
dry and free from of any objects (e.g.
utensils, tea towels and cloths), spillages
andwatermaymakethecontrolsdifcult
to operate.
A warning will be activated and will beep
to attract your attention. ER03 will be
displayed and the control will switch off
after 10 seconds. Please remove any
objects and clean the control area as ap-
propriate.
Basic Control Functions
Child Lock “L”
This feature is to help prevent accidental
switching on of the hob, especially by
young children.
To Activate:
1) Select the On/Off Key.
2) Simultaneously touch the right hand
front (RHF) cook zone and the down [-]
key, the hob should beep.
3)RemovengersandtouchtheRHF
cook zone again. (L should appear in all
the cook zone displays).
4) Switch off the hob.
When you now switch on the hob “L” will
appear in all the cook zone displays. The
child lock feature will be permanently acti-
vated, to de-activate follow the procedure
below.
1
2
3
4
5
Note;
Generic illustration shown above your
appliance may visually dier.
COOK ZONE KEYS
INDIVIDUAL COOK ZONE DISPLAYS
POWER DOWN KEY (-)
POWER UP KEY (+)
ON/OFF KEY
6TIMER DISPLAYS
11
2
6
2 2
3
3 4
5

USING THE HOB
To de-activate the child lock:
1) Select the On/Off Key. (L will be dis-
played on all Cook Zones).
2) Simultaneously touch the RHF cook
zone and the down [-] key, the hob
should beep.
3)Removengersandtouchthedown[-]
key again. (The hob should switch off).
4) When you now switch on the hob “0”
will be displayed in all cook zone displays,
the hob can now be used normally.
Central On/Off switch
The central on/off switch enables all of
the cooking zones to be switched off
simultaneously at a touch of a key.
To switch on the hob
The hob is switched On by touching
the“ON/OFF” key for 1 sec.
A beep sounds and all the heater displays
show a full stop in the cook zone display.
If a heater is not selected in 10 seconds,
the hob will turn off automatically.
The hob is switched off by touching
the“ON/OFF” key for 1 second. A beep
sounds and all the heaters are switched
off.
Switching on an individual hob cook
zone
To switch on a cook zone it is necessary
to actuate every cooking zone by means
oftwooperations:
1) Touch the required cook zone key for
approximately 1 second a beep sounds
and the heater display shows the power
level with normal brightness.
The cook zones that are not selected are
dimmed. When the cook zone selec-
tionisnishedafter10seconds,abeep
sounds and all the heater displays that
were dimmed show the power levels with
normal brightness.
2) Select the required power setting using
the up +/down – keys.
Switching off an individual hob cook
zone
Once the cook zone is selected, it can be
switched off by touching the down [-] key
until the corresponding display shows “0”.
Power Boost
Temporarily boost the power to a cook
zone by approximately 30%. All cook
zones can be boosted for a period of up
to 5 minutes. After 5 minutes a beep
sounds and the heater will return to level
“9”.
Quick Operation
With the cook zone at power level 0,
touch the down [-] key the power level
will raise straight to 9.
With the cook zone at power level 9,
touch the up [+] key the power level will
raise to the Power Boost level and a beep
sounds and the heater display shows “P”.
MINUTE MINDER
The minute minder uses the displays for
the two rear cook zones, either side of the
clock symbol.
The minute minder beeps when the set
time has expired – it does not switch off
any zone.
To operate
1) Turn on the hob, using the on/off key.
2) Ensure that no cooking zones have
been selected. Select the minute minder
by pressing the up [+] and down [-] keys
simultaneously – the display will show 00.
3) Set the minute minder by pressing the

USING THE HOB
up [+] and down [-] keys. Pressing down
[-]rstsetsthetimerto30minutes.This
can then be adjusted using the up [+] and
down [-] keys.
4) The maximum time that can be set is
99 minutes.
5)The minute minder is now set and be-
gins counting down.
6) You can now use the hob as normal.
7) If the hob is turned off then minute
minderoperationisshownbyashing
dots on the display.
When the time is up
1) The minute minder will beep and the
timerdisplayashes.
2) Touch any key to stop.
Additional minute minder informa-
tion
Tomodifyorcanceltheminuteminder:-
1) Follow steps 1 to 5 above if the hob is
turned off.
2) Follow steps 2 to 5 above if the hob is
turned on.
3) Setting back to zero will cancel the
minute minder.
TIMER AUTO SWITCH OFF
The timer uses the displays for the rear
cook zones, either side of the clock
symbol. The timer can be set to automati-
cally turn off a cooking zone. All four cook
zones can be simultaneously timed to turn
off automatically.
Cook zones can be set for a maximum
time of 99 minutes.
Warning: Never leave the hob unattend-
ed when in use, even when you have set
the timer to turn off the cook zone.
To operate
1) Select the cook zone to be timed,
ensuring power level is already set before
selecting timer.
2) Select the timer by pressing the up [+]
and down [-] keys simultaneously – the
timer display will show 00
3) Set the timer by pressing the up [+]
anddown[-]keys.Pressingdown[-]rst
sets the timer to 30 minutes. This can
then be adjusted using the up [+] and
down [-] keys.
4) The timer indicator in the display stops
ashingandisnotdisplayed.Operationof
a timer is shown by a stationary dot in the
cook zone display for the timed cook zone.
When the time is up
1)Thetimerdisplaywillash,thetimer
will beep and the cook zone will automati-
cally turn off.
2) The timed cook zone display will show
aashingdot.
3) Touch any key to stop the beeping.
Additional timer information
To modify or cancel a timer follow steps 1
to 4 above in “To operate”. Setting back to
zero will cancel the timer.
To set the timer for additional zones follow
steps 1 to 4 above in “To operate”.
To check the timer setting for a cook zone
select a timed cook zone and then press
the up [+] and down [-] keys simultane-
ously to show the time remaining.
If multiple timers have been set then the
timerscanbecheckedasfollows:-
1) Ensure that a cooking zone has not

USING THE HOB
been selected.
2) Select the timer by pressing the up [+]
and down [-] keys simultaneously.
3) Press the up [+] and down [-] keys
as many times as necessary to display
the timer for the required cook zone
(the active cook zone times are cycled
clockwise). The stationary dot in the cook
zonedisplaywillashwhenthetimeris
displayed for that zone.
4) If the minute minder has also been
setitwillbedisplayedrst.Inthiscase
other timed cooking zones are shown by a
stationary dot in the cook zone display.
Pan Detection
As soon as you lift the pan off the zone
the power is automatically reduced, help-
ing to save energy.
The above “U” symbol appears when a
zone has been activated but no pan has
been placed on the cook zone,
If the “U” symbol does not disappear
when a pan is placed on the zone it
indicates that the pan is not suitable for
induction cooking.
Note
This means the hob only uses power
when a suitable pan is placed on the
zone, this reduces the energy used during
the cooking process, i.e. when you take
your pan off the zone the hob automati-
cally reduces the power, and only switches
back on when you replace the pan.
• WARNING:- Ensure you switch off
the appropriate cook zone individually
or by the central on/off key when you
havenishedcooking,donotrely
upon the automatic pan detection
system as your means of switching
“off” the appliance.
• The appliance must never be
disconnected from the mains supply
during use as this will seriously
affect the safety and performance,
particularly in relation to surface
temperatures becoming hot and
component parts not working
efciently.Thecoolingfan(iftted)
is designed to run on after the cook
zones have been switched off.
• This induction hob complies with the
applicable EMC and EMF standards.
Therefore it should not interfere
with other electronic units. Persons
ttedwithapacemakeroranyother
electrical implant should clarify with
their doctor or the producer of the
implant, whether there implant is
adequate and fail-safe,
• The pacemaker must be
designed in compliance with the
appropriate regulations.
PANS AND COOKWARE FOR INDUC-
TION HOBS
Pans and Cookware for induction cooking
zones must be made of ferrous mate-
rial such as cast iron and have magnetic
properties. The base must also be of the
correct diameter.
It’simportantthatgoodqualityatbot-
tomed pans are used.
If a pan creates a large air gap over the
middle of the cooking zone, the accuracy
of the temperature sensing can be af-
fected.
Always ensure that pan bases are dry
before using them on the hob.
Get a magnet, if a magnet doesn’t stick to
your pan, it is not suitable for use on the
induction hob.
Beware:-Notallinductionpansareof
the same quality due to their construc-
tion. Pans that use enamelled/laminated/
encapsulatedbasescanbedifcultto

USING THE HOB
detect, especially small pans (e.g. milk
pans). We recommend that you buy pans
that are marked/advertised as being suit-
able for induction.
This problem is not with induction hob
but with the pan type, they can have
bases which are magnetic but are not
thick enough! If you experience problems
with small pans we recommend that you
try a larger pan or a pan of a different
construction. Solid cast iron pans give the
best performance.
Induction Cook
Zone
Smallest Recom-
mended Diameter
(mm)
LHF 130
LHR 130
RHR 130
RHF 130
Cookware made of enamelled steel or
with aluminium or copper bottoms can
leave discolorations on the ceramic glass
surfacewhicharedifcultorimpossibleto
remove.
Pans unsuitable for Induction:
Pans made of copper, stainless steel, alu-
minium, oven proof glass, wood, ceramic
and terra-cotta.
Overheat Pan Protection
The hob is equipped with additional safety
systems that help to prevent cookware
from overheating, providing an additional
level of safety not available on conven-
tional hobs such as gas and ceramic hobs.
Helpsreducetheriskofrethroughmis-
use use of hob.
If there is an overheat situation the hob
will display the appropriate code detailed
in the “hob status codes table”.
Approximate Glass
Temperature oCHob Action
255
Cooking zone
switches off with the
error message “E2”
265
All cooking zones are
switched off with the
errors message “E2”
Note:
The safety temperature control of the
pansisonlypossiblewithqualityatbot-
tomed pans suitable for induction cook-
ing; Poor quality pans can create air gaps
between the glass and the pan, which
affects the accuracy of the temperature
control.
Residual Heat Indicators
If glass surface is above 65oC when the
cook zone is switched off an “H “will be
displayed in the cook zone display until
the glass surface drops below approxi-
mately 63oC.
This feature not only warns you against
hot surfaces but also indicates that there
is residual heat which can be used as
temporary warm zone.
Note:
The cook zone itself does not heat up, but
the ceramic glass does get hot because
of the hot pan conducting heat back onto
the hob glass.
Auto Stand by
The Hob will automatically switch off if
left (with pan) on for an extended period
of time, see maximum running times
below.

USING THE HOB
Power Level
Maximum
Operation Time
hours
1 8
2 6
3 5
4 5
5 4
6 1.5
7 1.5
8 1.5
9 1.5
P (Power Boost) Max 5mins
Energy Saving Tips
Always place cookware on the cooking
zone before it is switched on. When ever
possible place lids on pans.
TROUBLESHOOTING
The hob produces a smell the rst
few times it is used
Heat a pan full of water on each zone for
half an hour.
Pans make a noise during cooking
This is caused by vibration due to the pas-
sage of energy from the hob to the pan.
On a high setting this is quite normal for
certain types of saucepan. It will not dam-
age the hob.
The hob makes a slight clicking
sound
This is caused by the distribution of power
between two heating zones on the same
side of the hob.
The hob won’t work. The indicators
don’t come on
The electricity supply is not reaching the
appliance (faulty supply or connection);
Check the fuses and the cut-out switch.
Refer to Troubleshooting chart and if
problems persist call, the customer service
hot line for further assistance.
The fan keeps working for a few min-
utes after the hob has been turned
off
Therearecoolingfansttedtothis
appliance which will operate when the
appliance is on and until the appliance is
sufcientlycooled.
Appliance Errors Fault Description Action
ER03 and
permanent tone
Continuous button actuation; control
switches off after 10 s Clean the user interface.
E2 Over temperature Allow system to cool
E3
1. Pot/pan not suitable, example Loss of
magnetic properties because of tempera-
ture at bottom of pot.
2. Power of cooking zones
permanently exceeded
1. This error is reset after 30 s; the cooking zone can be
used again. The pot/pan must be removed if the fault keeps
reoccurring.
2. The power unit must be replaced if the error continues to
be displayed even when no pot/pan is present on the cooking
zone.
E/H Invariable resistor fault Induction module must be cool

USING THE GRILL - ELECTRIC
Caution: Accessible parts may be
hot when the grill is used - young
children should be kept away.
A grill pan handle can be purchased as an
optional extra from our spares department
quotingthepartnumbersbelow:
Handle - 082283705
Handle grip - 082469100
Complete grill pan pack - 012635666
Contact details can be found on the
customer care page.
If cleaning the grill pan when it is hot, use
oven gloves to move it.
Food for grilling should be positioned
centrally on the trivet.
Using the grill
Important: The grill door must be fully
open when the grill is used.
Open the grill door. Turn the control knob
to the required setting. For best cooking
results, we recommend that you preheat
the dual grill for 3 minutes and the single
grill for 5 minutes.
For grilling small quantities of food, the
centre (economy) grill can be used with
the grill trivet inverted. For large quanti-
ties of food, the full grill can be used.
Push the grill pan towards the back of the
shelf, to position it under the grill.
The speed of grilling can be controlled by
adjusting the grill setting or by selecting a
higher or lower shelf position. For toast-
ing, and for grilling foods such as bacon,
sausages or steaks, use a higher shelf
position. For thicker foods such as chops
or chicken joint pieces, use a middle to
low shelf position.
The grill trivet, inside the grill pan, can be
inverted to give a high or low position, or
it may be removed.
To switch off, turn the control knob to the
off position.
Using aluminium foil
Using aluminium foil to cover the grill pan,
or putting items wrapped in foil under the
grillcreatesarehazard.
The cooling fan
When the grill is switched on, the cool-
ing fan comes on to keep the fascia and
control knobs cool during grilling. The fan
may continue to operate for a period after
the grill has been switched off.
During use the fan may cycle on and off,
this is normal.
Alternatively, you may have grill symbols
similar to these below.
or Full grill at 1/4
power
Centre grill at full
power
Full grill area at
full power
Types of grill
Variable rategrill:
has adjustable heat settings
1 (low) to 8 (high) or 5 (high) - de-
pending on the model.
Single grill:hasonegrillelement.The
grill pan trivet MUST be inverted when
using the single grill function.
Dualgrill: has two grill elements which
can be used together, or as a single
grill.
7.101

8.100
USING THE TOP OVEN - ELECTRIC (if tted)
When you are cooking keep children
away from the vicinity of the oven.
Caution: The top element gets
extremely hot when in use, so
take extra care to avoid touch-
ing it.
The top oven is a conventional oven.
Note:Thetopovenisnotcontrolledby
theprogrammer(iftted).
To turn on the top oven
Turn the temperature control knob until
the required temperature is selected.
The red thermostat indicator will come on
until the selected temperature is reached,
and then go off; it will turn on and off
periodically as the thermostat operates to
maintain the selected temperature.
To switch off, return the top oven control
knob to the off position.
Important: Never put items directly on
the base of the oven, or cover the oven
base with foil, as this may cause the ele-
ment to overheat. Always position items
on the shelf.
The cooling fan
When the top oven is switched on, you
will hear the cooling fan come on - this
keeps the fascia and control knobs of the
appliance cool during cooking. The fan
may continue to operate for a period after
the oven control has been switched off.
Preheating
The oven must be preheated when cook-
ing frozen or chilled foods, and we rec-
ommend preheating for yeast mixtures,
batters,soufés,andwhiskedsponges.
Preheat the oven until the indicator light
switchesoffforthersttime,thiswill
take up to 15 minutes depending on the
temperature selected.
If you are not preheating the oven, the
cooking times in the following guide may
need to be extended, as they are based
on a preheated oven.
Shelf positions
There are either 3 or 4 shelf positions,
depending on which model you have
purchased. These are counted from the
bottom of the oven upwards, so shelf
position 1 is the lowest.
When cooking frozen or chilled food, use
the highest possible shelf position, while
allowing some clearance between the
food and the top element.
The oven shelf must be positioned with
the up-stand at the rear of the oven and
facing up. Position baking trays and roast-
ing tins on the middle of the shelves, and
leave one clear shelf position between
shelves, to allow for circulation of heat.
When using the top oven
As part of the cooking process, hot air is
expelled through a vent at the top of the
oven(s). When opening the oven door,
care should be taken to avoid any possible
contact with potentially hot air, since this
may cause discomfort to people with sen-
sitive skin. We recommend that you hold
the underneath of the oven door handle.

8.100
USING THE TOP OVEN - ELECTRIC (if tted)
TOP OVEN BAKING GUIDE
Cooking times
These times are based on cooking in a
preheated oven.
These cooking times are approximate,
because the size and type of cooking dish
willinuencetimeaspersonalprefer-
ences.
Shelf positions
As a general guide, when cooking frozen
or chilled food, use the highest pos-
sible shelf position, while allowing some
clearance between the food and the top
element. Follow the instructions given on
packaging.
Item Temperature
(°C)
Shelf
Position
Approximate cooking time
Small cakes
Victoria sandwich
(2 x 180mm / 7”)
Swiss roll
Semi rich fruit cake
(180mm x 7”)
Scones
Meringues
180
160
200
140
215
90 - 100
1
1
1
1
1
1
15 - 20 mins
20 - 25 mins
8 - 12 mins
2¼ - 2¾ hours
10 - 15 mins
2 - 3 hours
Shortcrust pastry
Puff/akypastry
Choux pasrty
200 - 210
200 - 210
200 - 210
1
1
1
Depends on size & type of cook-
ingdish&alsothelling
Biscuits
Sponge pudding
Milk pudding
160 - 200
150
140
2
1
1
10 - 20 mins
30 - 45 mins
2 - 2½ hours
Cooking temperatures
The temperature settings and time given
in the Baking Guides are based on dishes
made with block margarine. If soft tub
margarine is used, it may be necessary
to reduce the temperature setting. If a
recipe gives a different temperature set-
ting to that shown in the guide, the recipe
instruction should be followed.
Because the top oven is more compact,
it may be necessary to reduce cooking
temperaturesspeciedinrecipesbyupto
20°C.
Use the baking guide as a reference for
determining which temperatures to use.

9.100
USING THE MAIN OVEN - ELECTRIC
Accessible parts may be
hot when the oven is used.
Young children should be
kept away.
To switch on the oven
Turn the oven control knob(s) to the
required setting.
Theredthermostatindicator(iftted)will
come on until the selected temperature
is reached and then go off; it will turn
on and off periodically as the thermostat
operates to maintain the selected tem-
perature.
To switch off, return the control knob to
the off position.
When using the oven
As part of the cooking process, hot air
is expelled through a vent in the oven.
When opening the oven door, care should
be taken to avoid any possible contact
with potentially hot air, since this may
cause discomfort to people with sensitive
skin. We recommend that you hold the
underneath of the oven door handle.
PREHEATING
Fanned oven
When cooking sensitive items such as
soufeandYorkshirepuddingsor,when
cooking bread, we recommend that the
oven is preheated until the neon switches
offforthersttime.Foranyothertypes
of cooking, a preheat may not be re-
quired.
Conventional oven
Preheating is always required
Manual Operation (fanned only)
The programmer must be set to manual
operation before the main oven can be
used. If A (Auto) is on the programmer
display, return the oven to manual by
pressing the up and down buttons simul-
taneously Any programme which has been
set is cancelled.
The cooling fan
The cooling fan may operate when the
main oven is on and may continue to op-
erate for a period after the oven has been
switched off.
OVEN FURNITURE
Oven shelves
The oven shelf must be positioned with
the upstand at the rear of the oven and
facing upwards.
Position baking trays and roasting tins on
the middle of the shelves.
Baking tray and roasting tins
For best cooked results and even brown-
ing, the recommended size baking trays
and roasting tins that should be used are
as follows;
Baking tray 350mm x 250mm
This size of baking tray will hold up to 12
small cakes.
Roasting tin 370mm x 320mm
We recommend that you use good quality
cookware. Poor quality trays and tins may
warp when heated, leading to uneven
baking results.

9.100
USING THE MAIN OVEN - ELECTRIC
Slow cooking ( Setting or 100°C)
• Make sure that frozen foods are thor-
oughly thawed before cooking.
• Do not slow cook joints of meat
or poultry weighing more than
2¼kg/4½lb.
• Preheat the oven to 170°C and cook
for 30 minutes, then adjust the oven
control to or 100°C (slow cook
setting) for the remainder of the
cooking time.
• Slow cooking times will be about 3
times as long as conventional cooking
times.
• Do not open the oven door unneces-
sarily during slow cooking, as this will
result in heat loss at low tempera-
tures.
• Alwaysusedisheswithtightlytting
lids.Torectifybadlyttinglids,place
foil over the dish underneath the lid.
Aluminium foil
Use foil only to cover food or cooking
dishes, using foil to cover the shelves or
ovenbasecreatesarehazard.
Cooking with a fanned oven
As this is a high efciency oven,
you may notice the emission of
steam from the oven when the door
is opened. Please take care when
opening the door.
If you are used to cooking with a conven-
tionalovenyouwillndanumberofdif-
ferences to cooking with a fan oven which
willrequireadifferentapproach:
There are no zones of heat in a fan oven
as the convection fan at the back of
the oven ensures an even temperature
throughout the oven.
This makes it ideal for batch baking - eg;
when planning a party as all the items will
be cooked within the same length of time.
Foods are cooked at a lower temperature
than a conventional oven, so conven-
tional recipe temperature may have to be
reduced. Please refer to the conversion
chart.
Preheating is generally not necessary as a
fan oven warms up quickly.
Thereisnoavourtransferenceinafan
oven, which means you can cook strong
smellingfoodssuchasshatthesame
time as mild foods - eg; milk puddings.
When batch baking foods that will rise
during cooking - eg; bread - always
ensure that enough space has been left
between the shelves to allow for the rise.
Notes:
When 2 or more shelves are being used, it
may be necessary to increase the cooking
time slightly.
Because the 2 oven shelves are wider
than in many ovens, it is possible to cook
2 items per shelf - eg; 2 victoria sand-
wiches or 2 casseroles.
Although you need to keep in mind the
points ‘To help the air circulate freely’
with careful choice of dishes and tins, it
is possible to cook a complete meal, and
perhaps something else for the freezer, in
the oven at the same time.
When roasting meats, you will notice that
fat splashing is reduced, which is due in
part to the lower oven temperatures, and
will help keep cleaning of the oven to a
minimum.
Because a fan oven has an even tem-
perature throughout the oven, there is no
need to follow the shelf positions given in
the baking guide.

9.100
USING THE MAIN OVEN - ELECTRIC
There is no need to interchange dishes
onto different shelves part way through
cooking, as with a conventional oven.
To help the air circulate freely
Position the shelves evenly within the
oven and maintain a clearance from the
oven roof and base.
If more than one cooking dish or bak-
ing tray is to be used on a shelf, leave a
gap of at least 25mm between the items
themselves and the oven interior.
Defrosting and cooling in the
main oven
To defrost frozen foods, turn the main
oven control to the defrost position, place
the food in the centre of the oven and
close the door.
To cool foods after cooking prior to refrig-
erating or freezing, turn the main oven
control to the defrost position and open
the door.
Defrosting times
Smallorthinpiecesoffrozenshormeat
-eg;shlets,prawns&mincewilltake
approximately 1 - 2 hours.
Placing the food in a single layer will
reduce the thawing time.
A medium sized casserole or stew will
take approximately 3 - 4 hours.
A 1½kg/3lb oven ready chicken will take
approximately 5 hours, remove the giblets
as soon as possible.
Be safe
Do not defrost stuffed poultry using this
method.
Do not defrost larger joints of meat and
poultry over 2kg/4lb using this method.
Never place uncooked food for defrosting
next to cooked food which is to be cooled,
as this can lead to cross contamination.
Defrostingmeat,poultry,andshcanbe
accelerated using this method but make
sure they are completely thawed before
cooking thoroughly. Place meat and poul-
try on a trivet in a meat tin.
MAIN OVEN BAKING GUIDE
Cooking times & temperatures
The temperature settings and times given
in the baking guide are based on dishes
made with block margarine. If soft tub
margarine is used it may be necessary to
reduce the temperature setting.
Allow enough space between shelves for
food that will rise during cooking.
Do not place items on the oven base as
this will prevent air circulating freely.

9.100
USING THE MAIN OVEN - ELECTRIC
Note:Thisisafannedoven,therefore
some adjustment will have to be
made to conventional cooking tempera-
tures. The table below shows conven-
tional cooking temperatures, fanned oven
temperatures and gas marks. For opti-
mum results,
conventional temperatures need to be
converted to fanned oven temperatures.
For example, an item which would nor-
mally cook at a conventional temperature
of 180 °C, will now cook at the fanned
oven temperature of 160°C.
Conventional temperature
(°C)
Fanned Oven
(°C)
Gas Mark
100
110
130
140
150
160
180-190
200
220
230
250
100
110
120
130
140
150
160
170
180
190
200
1/4
1/4
1/2
1
2
3
4-5
6
7
8
9
Food Type Temperature
settings (°C)
Time
Approx.
Shelf
Position
Cakes
Small cakes
Victoria sandwich
Semi rich fruit cake
Christmas cake
Conv
190
180
150
150
Fanned
160
160
125
125
15 - 25
20 - 30
2.5HRS - 3HRS
2.5HRS - 3HRS
2 - 4
3
2
2
Puddings
Bread and butter pud-
ding
Fruit crumble
170
200
150
175
45 - 1hr
40 - 1hr
3
3
Miscellaneous
Yorkshirepudding:
large
small
Shortcrust pastry
220
220
200
200
200
180
40 - 48
15 - 20
Depends on
lling
4 - 5
4 - 5
4 - 5
Other Belling Cooktop manuals

Belling
Belling FSG 60 DO Firmware update

Belling
Belling BDC604S User manual

Belling
Belling BCT60CSS User manual

Belling
Belling FSE 60 I User manual

Belling
Belling BDC64CE User manual

Belling
Belling BCT60CER User manual

Belling
Belling BCT90INTP User manual

Belling
Belling BDC64CE User manual

Belling
Belling BGH604WBG Operation manual

Belling
Belling BDC604BK User manual

Belling
Belling BDC64INF User manual

Belling
Belling SmartWheel BCT60INFZ User manual

Belling
Belling BCT60INTP User manual

Belling
Belling FSG 60 DO/DOP User manual

Belling
Belling Design BDC95IN2F User manual

Belling
Belling Mini Richmond BMR60DODF User manual

Belling
Belling IHTK60 Firmware update

Belling
Belling CFE60MFTi Firmware update