Berkel HOME LINE PLUS Series User manual

MANUALE D’USO
USER MANUAL
GEBRAUCHSANLEITUNG
MANUEL D’INSTRUCTIONS
MANUAL DEL USUARIO
NÁVOD K POUŽITÍ
BETJENINGSVEJLEDNING
IT
EN
KÄYTTÖOHJE
BRUKSANVISNING
BRUKSANVISNING
HANDLEIDING
MANUAL DE INSTRUÇÕES
MANUAL DE INSTRUCTIUNI
FI
NL
DE
ES
FR
CS
DA
SV
RO
NO
PT
HOME LINE PLUS 200
HOME LINE PLUS 250
HOME LINE PLUS SERIES

(A) (B)
SAFETY
(C) (D1)
(F)
(E)(D2)
(G)

3
MODELLO / MODEL: HL PLUS 200 - HL PLUS 250
ATTENZIONE! RISCHIO DI TAGLIO.
ACHTUNG! SCHNEIDGEFAHR.
WARNING! CUTTING RISK.
ATTENTION ! RISQUE DE COUPURE
AVVERTENZA: La lama è molto tagliente, come un coltello. Per qualsiasi operazione di
pulizia e manutenzione che coinvolge lo smontaggio della lama, assicurarsi di prestare
assoluta attenzione a tenere le mani lontano dal bordo della lama stessa. Utilizzare sempre
un apposito guanto protettivo antitaglio. Per rimuovere la lama, utilizzare sempre l’estrattore
lama. Per afferrare la lama utilizzare sempre e soltanto l’apposito estrattore lama.
Assicurarsi che nessuno si avvicini alla lama, quando estratta.
ACHTUNG: Die Klinge ist sehr scharf, wie ein Messer. Achten Sie bei allen Reinigungs-
und Wartungsarbeiten, bei denen der Masser entfernt werden muss, unbedingt darauf,
dass Ihre Hände nicht in die Nähe des Messers gelangen. Verwenden Sie immer einen
geeigneten schnittfesten Schutzhandschuh. Verwenden Sie immer den Messerabzieher,
um den Messer zu entfernen. Verwenden Sie den Messerabzieher immer nur zum Greifen
des Messers.
WARNING: The blade is very sharp, like a knife. For any cleaning and maintenance operation
that involves dismalting of the blade, make sure to pay extra attention to keep hands far
away from the edge of the blade itself. Always use protective, cut resistant gloves. To remove
the blade, always use the blade extractor. Always hold the blade by the blade extractor only.
Make sure nobody gets close to the blade when extracted.
AVERTISSEMENT : La lame est très coupante, tel un couteau. Pour toute opération de
nettoyage et d’entretien qui implique le démontage de la lame, s’assurer de prêter une
attention absolue à garder les mains éloignées du bord de la lame. Toujours utiliser des gants
de protection anti-coupure appropriés. Pour retirer la lame, toujours utiliser l’extracteur de
la lame. Pour prendre la lame, toujours utiliser uniquement l’extracteur de lame approprié.
S’assurer que personne ne s’approche de la lame lorsqu’elle est extraite.
VAN BERKEL INTERNATIONAL S.r.l. - via Ugo Foscolo, 22 - 21040 Oggiona S. Stefano (VA) - Italia
theberkelworld.com

4
MODELLO / MODEL / MODÈLE / MODELL: HL PLUS 200 - HL PLUS 250
¡ATENCIÓN! RIESGO DE CORTE
POZOR! NEBEZPEČÍ POŘEZÁNÍ
OBS! SKÆREFARE
VAROITUS! LEIKKUUVAARA
ADVERTENCIA: la cuchilla está muy alada, tanto como un cuchillo. Para cualquier
operación de limpieza y mantenimiento que implique el desmontaje de la cuchilla,
asegúrese de prestar especial atención de tener las manos lejos del borde de la cuchilla.
Utilice siempre un guante protector contra cortes. Para extraer la cuchilla, utilice siempre
el extractor de cuchilla.
Para sujetar la cuchilla, utilice siempre y únicamente el extractor de cuchilla.
UPOZORNĚNÍ: Nůž je velmi ostrý, jako ostří. Při jakémkoli čištění či údržbě, během kterých
je nutné demontovat nůž, se ujistěte o tom, že věnujete maximální pozornost udržování
rukou v bezpečné vzdálenosti od okraje nože. Vždy použijte příslušné rukavice na ochranu
před pořezáním. K odstranění nože vždy použijte vytahovač nože. Když berete nůž do
rukou, vždy použijte výhradně příslušný vytahovač nože. Ujistěte se, že když je nůž vyjmut,
nikdo se k němu nemůže přiblížit.
ADVARSEL: Klingen er meget skarp, som en kniv. For enhver rengørings- og
vedligeholdelsesoperation, hvor det er nødvendigt at skille klingen ad, skal du sørge for
at holde dine hænder væk fra kanten af klingen. Brug altid en egnet beskyttelseshandske
mod skæring. Brug altid klingeudtrækkeren til at fjerne klingen.
Brug altid og kun den specielle klingeudtrækker til at tage fat om klingen.
Sørg for, at ingen kommer i nærheden af klingen, når den trækkes ud.
VAROITUS: Terä on hyvin terävä, se on kuin veitsi. Ole erittäin varovainen ja pidä kädet
kaukana terän reunasta kaikenlaisissa puhdistus- ja huoltotehtävissä, joita varten terä
tulee purkaa. Käytä aina asianmukaisia viiltosuojakäsineitä. Käytä terän irrotuksessa aina
terän ulosvedintä. Ottaaksesi kiinni terästä käytä aina ja ainoastaan asianmukaista terän
ulosvedintä. Varmista, että kukaan ei pääse terän lähelle, kun se on irrotettuna.
VAN BERKEL INTERNATIONAL S.r.l. - via Ugo Foscolo, 22 - 21040 Oggiona S. Stefano (VA) - Italia
theberkelworld.com

5
ADVARSEL! FARE FOR KUTT
OBSERVERA! RISK ATT SKÄRA
OPGELET! RISICO OP SNIJWONDEN
ATENÇÃO! RISCO DE CORTE
OBS: Skjærebladet er skarpt som en kniv. Vær svært forsiktig og hold hendene unna kanten på
skjærebladet når det utføres en hvilken som helst rengjøring eller vedlikehold hvor skjærebladet
demonteres. Bruk alltid en kuttsikker vernehanske. Bruk alltid bladuttrekkeren når skjærebladet
skal fjernes. Bruk alltid og kun den tilhørende bladuttrekker for å ta tak i skjærebladet.
Forsikre deg om at ingen kommer i nærheten av skjærebladet når dette er trekt ut.
VARNING: Klingan är mycket vass, som en kniv. För alla typer av rengörings- och
underhållsarbete som rör nedmontering av klingan, ska ni vara noga med att hålla händerna
på avstånd från klingans kant. Använd alltid speciella skyddshandskar mot skärskador.
Använd alltid klingutdragaren för att avlägsna klingan. Använd alltid endast den särskilda
klingutdragaren för att gripa tag i klingan. Säkerställ att ingen närmar sig klingan när den
är utdragen.
WAARSCHUWING: Het mes is zeer scherp, als een keukenmes. Voor elke handeling van
reiniging en onderhoud waarvoor het mes moet worden gedemonteerd moet u zeer goed
opletten dat de handen uit de buurt van de rand van het mes blijven. Gebruik altijd een
speciale snijbestendige veiligheidshandschoen. Gebruik om het mes te verwijderen altijd de
mesverwijderaar. Gebruik om het mes te pakken altijd alleen de speciale mesverwijderaar.
Zorg ervoor dat er niemand dicht bij het mes komt, wanneer het is verwijderd.
ADVERTÊNCIA: A lâmina é muito aada, como uma faca. Ao realizar qualquer operação
de limpeza e manutenção que envolva a desmontagem da lâmina, preste a máxima
atenção e mantenha as mãos afastadas do gume da própria lâmina. Utilize sempre luvas
de protecção contra cortes. Para remover a lâmina, utilize sempre o extrator de lâmina.
Para segurar a lâmina utilize sempre e somente o extractor fornecido.
Ninguém deve se aproximar da lâmina durante toda a operação.
MODELLO / MODEL / MODÈLE / MODELL: HL PLUS 200 - HL PLUS 250
VAN BERKEL INTERNATIONAL S.r.l. - via Ugo Foscolo, 22 - 21040 Oggiona S. Stefano (VA) - Italia
theberkelworld.com

6
ATENȚIE! RISC DE TĂIERE
AVERTISMENT: Lama este foarte ascuțită, ca un cuțit. Pentru orice operațiune de curățare și
întreținere care implică demontarea lamei, țineți mâinile departe de marginea lamei. Folosiți
întotdeauna o mănușă de protecție anti-tăiere. Pentru a îndepărta lama, folosiți întotdeauna
extractorul de lamă.
Pentru a prinde lama folosiți întotdeauna exclusiv extractorul de lamă.
Asigurați-vă că nimeni nu se apropie de lamă când este extrasă.
MODELLO / MODEL / MODÈLE / MODELL: HL PLUS 200 - HL PLUS 250
VAN BERKEL INTERNATIONAL S.r.l. - via Ugo Foscolo, 22 - 21040 Oggiona S. Stefano (VA) - Italia
theberkelworld.com

7
Fig. 2
M2
M1
E
N
L
KEYPAD
MOTOR
M+
N
L
G
KEY
SW
S2
T1
RLY1
C1
L
C6 C0
C2
T1
transformer
RLY 1
relè
C6,C0
capacitor
C1
capacitor
C2
capacitor
L
capacitor

8
MANUALE D’USO: Affettatrice elettrica Home Line Plus
MODELLO:
HL PLUS 200 - HL PLUS 250
COMPONENTI
PRINCIPALI
1. Pulsante di avviamento
(bianco)
2. Pulsante di arresto (rosso)
3. Targhetta di identicazione,
dati tecnici e marcatura CE
4. Piedino
5. Manopola regolazione
spessore fetta
6. Piastra spessimetro
7. Protezione paradita
8. Piatto portamerce
9. Pressamerce
10. Lama
11. Guscio proteggi lama
12. Disco paralama
13. Basamento
14. Maniglia del pressamerce
15. Cavo di alimentazione
16. Asportalama
IT
Fig. 1
13
7
6
14 9
8
10 11
12
4
3
15
16
5
1
2

9
DESCRIZIONE
Affettatrice elettrica per uso
domestico con lama circolare,
progettata per affettare esclu-
sivamente prodotti alimentari
del tipo e nei limiti dimensio-
nali indicati nel presente ma-
nuale. Le parti principali che
compongono la macchina
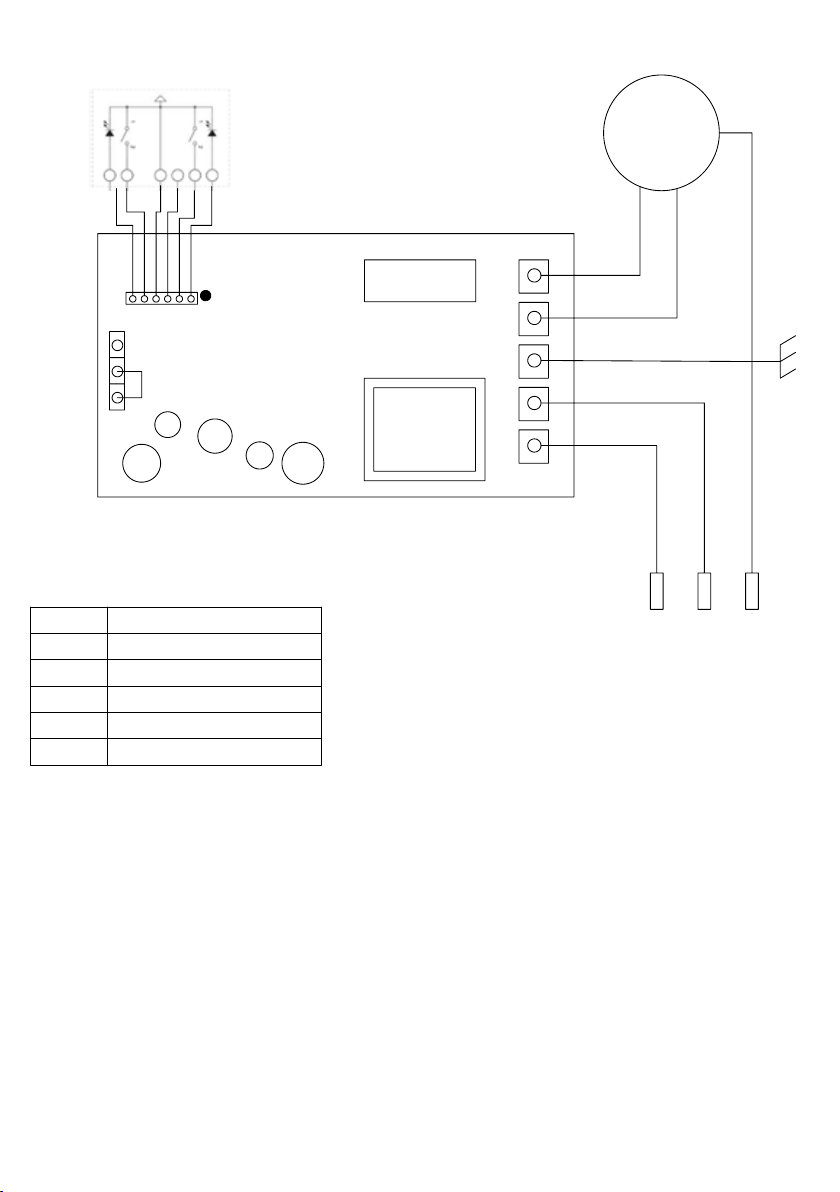
sono illustrate alla gura 1. Lo
schema elettrico è riportato
alla gura 2.
DICHIARAZIONE DI
CONFORMITÀ
Le macchine descritte in
questo manuale sono con-
formi alle direttive 2006/95/
CE, 2004/108/CE, 2012/19/UE,
2011/65/CE, al regolamento eu-
ropeo (EC) 1935/2004 ed ai re-
lativi standard quali EN60204-
1, EN60335-1, EN60335-2-14.
SICUREZZA
Per la vostra sicurezza, fate at-
tenzione alle seguenti istruzio-
ni:
- leggere attentamente tutte
le istruzioni prima di usare la
macchina;
- il prodotto non è indicato per
l’utilizzo da parte dei bambini;
- utilizzare la macchina solo se
propriamente istruiti e in per-
fetto stato psico-sico;
- non usare la macchina in al-
cun modo differente da come
indicato nel presente manuale;
- installare la macchina in con-
formità alle istruzioni riportate
al paragrafo ‘Installazione’;
- installare la macchina in luo-
go al di fuori della portata di
personale estraneo alle opera-
zioni relative all’impiego;
- utilizzare la macchina con
grande concentrazione, non
distrarsi durante l’uso;
- evitare l’uso da parte di per-
sonale che non abbia letto e
compreso a fondo il contenuto
del presente manuale;
- non indossare indumenti svo-
lazzanti o con maniche aperte;
- non permettere ad alcuno, al
di fuori dell’operatore, di avvi-
cinarsi durante l’operazione di
taglio del prodotto;
- non rimuovere, coprire o mo-
dicare le targhette collocate
sul corpo macchina e, in caso
di danneggiamento delle stes-
se, sostituirle prontamente;
- non rimuovere le protezioni
e non modicare o escludere
le protezioni meccaniche ed
elettriche;
- affettare unicamente i pro-
dotti consentiti, non tentare
prove di taglio con prodotti di
tipo proibito;
- mantenere la zona di appog-
gio del prodotto affettato, la
zona di lavoro tutt’intorno alla
macchina e il piano pavimen-
to operatore sempre puliti ed
asciutti;
- non utilizzare la macchina
come supercie d’appoggio e
non appoggiarvi alcuno ogget-
to estraneo alle normali opera-
zioni di taglio;
- non usare l’affettatrice quan-
do, a seguito di normale usura,
la distanza tra il lo della lama
e l’anello para lama ha supe-
rato i 5 mm, in tal caso con-
tattare il produttore o uno dei
Centri Servizio Autorizzati per
cambiare la lama;
- non impiegare la macchina
con collegamenti elettrici di
tipo ‘volante’, a mezzo di cavi
provvisori o non isolati;
- controllare periodicamente
lo stato del cavo di alimenta-
zione e del pressacavo sul cor-
po macchina, sostituirlo pron-
tamente quando necessario
rivolgendosi per l’intervento a
personale qualicato;
- arrestare immediatamente
la macchina in caso di difetto,
funzionamento anomalo, so-
spetto di rottura, movimenti
non corretti, rumori insoliti;
- prima di eseguire la pulizia o
di effettuare interventi di ma-
nutenzione scollegare la mac-
china dalla rete di alimentazio-
ne elettrica;
- utilizzare guanti protettivi per
le operazioni di pulizia e di ma-
nutenzione;
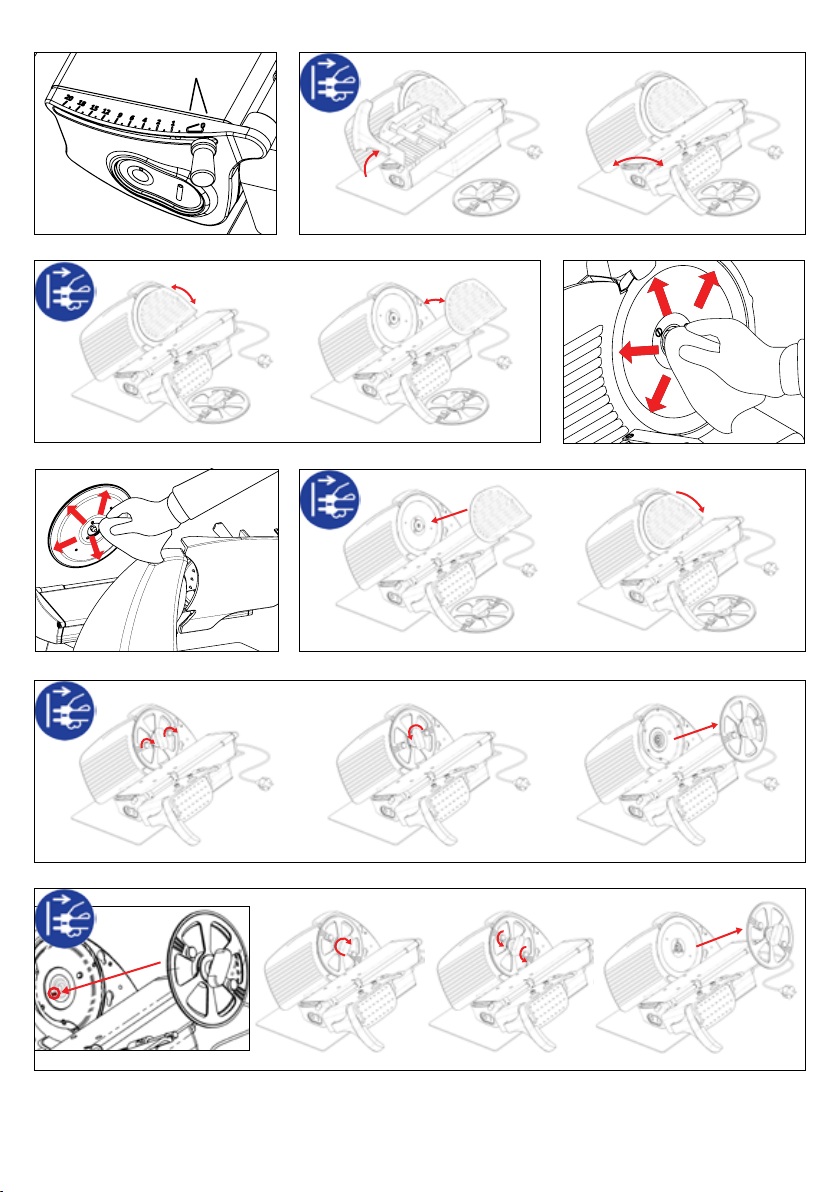
- porre e rimuovere la merce
da affettare sul piatto scorre-
vole solo con il carrello com-
pletamente arretrato e con la
manopola regolazione spesso-
re posizionata in sicurezza (Fig.
A);
- per il movimento del piatto
portamerce durante l’opera-
zione di taglio usare esclusiva-
mente la maniglia di manovra
posta sul braccio o impugna-
tura del pressamerce;
- non è ammesso l’uso di ac-
cessori per il taglio che non sia-
no stati forniti dal costruttore a
corredo della macchina.
Il costruttore declina ogni re-
sponsabilità diretta ed indi-
retta derivante da uso inap-
propriato, modiche e/o
riparazioni non autorizzate
effettuate sulla macchina non
autorizzate, utilizzo di accesso-
ri e ricambi non originali.
La macchina non può essere
impiegata in luoghi aperti e/o
esposta agli agenti atmosferici
e in ambienti con vapori, fumi
o polveri corrosivi e/o abrasivi,
con rischio di incendio o esplo-
sione e comunque ove sia pre-
scritto l’impiego di componen-
ti antideagranti.
- Condizioni ambientali d’uso:
- Temperatura da
- 5°C a +40°C
- Umidità max 95%
NON AFFETTARE:
- prodotti alimentari congelati;
- prodotti alimentari surgelati;
- prodotti alimentari con ossa
(carne e pesce);
- ogni altro prodotto non desti-
nato all’uso alimentare.
ATTENZIONE! ll motore
potrebbe surriscaldarsi!
Dopo 15 minuti di uso conti-
nuativo, spegnere la macchina
!

10
e lasciare raffreddare il motore.
La lama è in grado di recide-
re parti del corpo. Per questa
ragione non estendere mai la
mano nella zona di taglio tra la
vela e la lama se la leva di rego-
lazione spessore (5) non sia in
posizione di sicurezza (Fig. A).
Durante le operazioni di pu-
lizia lama ed aflatura, fare
estrema attenzione a tenere
le mani il più lontano possi-
bile dall’area non protetta. Si
raccomanda l’uso di guanti
di protezione.
INSTALLAZIONE
Installare la macchina su di
un piano ben livellato, liscio,
asciutto ed adatto a sostenere
il peso della macchina stessa
più la merce da affettare.
AVVERTENZA: Vericare che
non ci siano impedimenti alla
corsa del piatto ed al carica-
mento della merce da affetta-
re sul piatto stesso.
La macchina deve essere in-
stallata nelle immediate vici-
nanze di una presa a norme
CEE derivata da un impianto
conforme alle normative vi-
genti provvisto di:
- protezione magneto-termica;
- interruttore automatico diffe-
renziale;
- impianto di messa a terra.
Prima di eseguire l’allaccia-
mento vericare che le caratte-
ristiche della rete di alimenta-
zione elettrica concordino con
quelle indicate sulla targhetta
dati della macchina.
USO DELL’AFFETTATRICE
ATTENZIONE! Lama af-
lata, pericolo di taglio!
Controllare che la manopola di
regolazione spessore fetta (5)
sia in posizione di sicurezza (in
posizione 0) (Fig. A).
1. Arretrare completamente il
piatto portamerce (8) verso l’o-
peratore, in posizione di carico;
2. sollevare il pressamerce (9) e
porlo in posizione di riposo;
3. appoggiare la merce da af-
fettare sul piatto a ridosso della
sponda verticale del piatto (8),
lato operatore. Bloccare con il
pressa merce esercitando una
leggera pressione;
4. regolare lo spessore della
fetta. Azionare la lama (10) pre-
mendo il pulsante di accensio-
ne. Impugnare la maniglia del
pressamerce (14) ed iniziare il
movimento alternativo di ta-
glio;
5. al termine delle operazioni
di taglio riportare in sicurez-
za la manopola regolazione
spessore ed arretrare il carrello.
Arrestare il movimento della
lama premendo il pulsante di
spegnimento (2).
PULIZIA
Mantenere una pulizia accura-
ta della macchina. Se utilizza-
ta, deve essere pulita almeno
una volta al giorno o con mag-
gior frequenza se necessario.
Dopo un periodo di inattività
si raccomanda la pulizia anche
prima dell’utilizzo.
Pericolo di scossa elettrica!
Prima di procedere alla pu-
lizia della macchina, scol-
legare la spina della rete di
alimentazione elettrica e
portare in sicurezza la mano-
pola di regolazione spessore.
ATTENZIONE! Lama af-
lata, pericolo di taglio!
Controllare che la manopola di
regolazione spessore fetta (5)
sia in posizione di sicurezza (in
posizione 0) (Fig. A).
Prodotti per la pulizia:
utilizzare esclusivamente ac-
qua e detersivo schiumoso
biodegradabile per stoviglie
con PH 7-8, impiegando un
panno morbido, spugnoso e
uno spazzolino di nylon semiri-
gido per le zone del piatto, del
pressamerce appuntito e della
zona retrostante la lama. NON
utilizzare utensili abrasivi come
spugne rigide o lo spazzolino
di nylon semirigido per pulire
le zone verniciate della mac-
china. Non pulire la macchina
con getti d’acqua o vapore o
con metodi similari.
Basculamento del piatto per le
operazioni di pulizia (Fig. B):
1. assicurarsi che la macchina
sia spenta;
2. assicurarsi che la manopola
di regolazione spessore fetta
(5) sia in posizione di sicurezza
(in posizione 0) (Fig. A)
3. arretrare completamente il
piatto portamerce (8) verso l’o-
peratore;
4. spingere gradatamente ver-
so l’alto il piatto facendolo ruo-
tare in senso orario.
ATTENZIONE! Lama af-
lata, pericolo di taglio!
Controllare che la manopola di
regolazione spessore fetta (5)
sia in posizione di sicurezza (in
posizione 0) (Fig. A).
Procedere alla rimozione di:
- coprilama:
ruotare di qualche grado in
senso antiorario il coprilama
(Fig. C); 2 ) estrarre il coprila-
ma afferrandolo con entram-
be le mani .
- pressamerce:
svitare in senso antiorario la
maniglia del pressamerce
no alla completa rimozione
del pressamerce stesso.
- lama:
1) ssare l’estrattore alla lama
utilizzando i due pomelli la-
terali presenti sull’estrattore
(Fig. F);
2) ruotare in senso anti-o-
rario la manopola centrale
dell’estrattore tenendo fer-
mamente uno dei due po-
melli laterali 3) estrarre la
lama afferrando l’estrattore
con entrambe le mani.
.
ATTENZIONE! Lama af-
lata, pericolo di taglio!
!
!
!
!

11
Per le operazioni di pulizia
dell’area di aflatura, del piat-
to, del pressamerce e della
lama si raccomanda l’uso di
guanti di protezione.
Proseguire con la pulizia di:
- lato posteriore della lama: con
la lama montata sull’estrattore
lama premere un panno umi-
do sulla supercie della lama
e spostarlo lentamente dal
centro verso l’esterno, come in
gura (Fig. D2). Asciugare, nel-
lo stesso modo, utilizzando un
panno asciutto;
- guscio proteggi lama: pulire
il guscio proteggi lama aiu-
tandosi, se necessario, con uno
spazzolino di nylon semirigido
- corpo macchina: pulire il cor-
po macchina con un panno
umido o una spugna morbi-
da. Asciugare con cura tutte le
parti della macchina utilizzan-
do un panno morbido.
Inne, procedere al riassem-
blaggio di:
- lama:
1) ruotare la puleggia no a
posizionare il perno rosso sul
lato sinistro ( o verso l’opera-
tore ) ( Fig. G)
2) inserire la lama nella pu-
leggia assicurandosi di far
entrare il perno rosso in uno
dei tre fori presenti sulla
lama
3) ssare la lama alla puleg-
gia avvitando in senso orario
la manopola centrale dell’e-
strattore tenendo ferma-
mente uno dei due pomelli
laterali
4) rimuovere l’estrattore dal-
la lama svitando i due po-
melli laterali assicurandosi
che la lama sia fermamente
ssata alla puleggia.
- coprilama:
1) rimontare il coprilama
come in gura E;
2) ruotare di qualche grado
in senso orario il coprilama,
no a bloccarlo nella sua po-
sizione iniziale;
- piatto portamerce:
ruotare il piatto portamerce
e riportarlo nella posizione
di taglio premendo legger-
mente verso il basso no allo
scatto (Fig.B):.
MANUTENZIONE
Manutenzione della lama
Per mantenere la lama afila-
ta e funzionale, consigliamo di
detergerla regolarmente. Non
lavare la lama in lavastoviglie.
Manutenzione degli scorri-
menti
Per mantenere gli scorrimenti
lineari della macchina in con-
dizioni ottimali oliare le barre
utilizzando lubricanti Berkel,
l’utilizzo di altri oli potrebbero
danneggiare gli scorrimenti.
ASSISTENZA
Non sono forniti pezzi di ri-
cambio all’interno dell’imballo.
Tutte le attività di riparazione e
sostituzione (quali sostituzione
o riparazione di lama, cinghia,
componenti elettrici, parti
strutturali, etc.) devono essere
svolte esclusivamente da per-
sonale autorizzato dal produt-
tore stesso.
Nel caso fosse necessaria una
riparazione, si raccomanda di
ritornare la macchina al pro-
duttore o ad un Centro Servizi
Autorizzato.
Per informazioni riguardo i
centri servizi, rivolgersi a:
service@berkelinternational.
com.
ATTENZIONE! E’ obbli-
gatorio sostituire la
lama quando la distanza tra
il lo della lama stessa ed il
bordo interno della protezio-
ne supera i 5 mm.
GARANZIA E
RESPONSABILITÀ
Il produttore fornisce macchi-
ne con una garanzia di durata
24 mesi, a partire dalla data
di acquisto. La garanzia copre
solo i difetti riscontrati facen-
done un uso appropriato e
secondo le condizioni d’uso
previste dal manuale. La ga-
ranzia non copre difetti dovuti
a trasporto, incompetenza o
negligenza dell’acquirente, in-
stallazione o posizionamento
improprio, danni da usura, vol-
taggio superiore al 10% del va-
lore nominale. Inoltre, la garan-
zia non copre intrinsecamente
soggetti ad usura, quali la lama
e le mole dell’aflatoio, eccetto
nel caso di evidente difetto di
produzione.
Il produttore declina qualsiasi
responsabilità diretta e indiret-
ta derivante da:
- mancata osservanza delle
istruzioni presenti nel manuale;
- uso non conforme alla nor-
mativa dominante nel paese
di installazione;
- modiche e/o riparazioni sul-
la macchina non autorizzate;
- uso di accessori e parti di ri-
cambio non originali;
- eventi eccezionali.
Il trasferimento di proprietà
della macchina, comporta
l’immediato sollevamento da
ogni responsabilità da parte
del produttore, con eccezione
per l’osservanza della direttiva
2006/42/CE (responsabilità per
qualsiasi difetto di produzione
del prodotto).
La targhetta di identicazione
sulla base della macchina regi-
stra il produttore, la macchina,
le informazioni tecniche ed il
marchio CE.
DEMOLIZIONE E
SMALTIMENTO
La macchina è composta da:
- lega d’alluminio;
- inserti e componenti vari in
acciaio inossidabile;
- parti elettriche e cavi elettrici;
- motore elettrico;
- plastica, etc.
!

12
+Se lo smaltimento è afdato
a terze parti, rivolgersi solo a
compagnie autorizzate per l’e-
liminazione dei materiali sopra
indicati. Il dispositivo contiene
materiali che possono essere re-
cuperati o riciclati. Una corretta
raccolta differenziata ne facilita
il riciclaggio. A ne vita deposita-
re il dispositivo presso in punto
di raccolta. E’ possibile ottenere
informazioni sullo smaltimento
dalle autorità locali.
Risoluzione problemi
INCONVENIENTE CAUSA PROBABILE RIMEDIO
Premendo il pulsante di accensione
la macchina non si avvia Mancanza di
alimentazione o circuito di
controllo difettoso
Controllare che la spina sia
inserita correttamente, se il
problema persiste contattare il
Centro Servizi
Premendo il pulsante di
avviamento la macchina si avvia
ma non si accende l’indicatore
luminoso di funzionamento
Spia difettosa Non utilizzare la macchina con
indicatore luminoso spento.
Interpellare il servizio assistenza
Premendo il pulsante di arresto la
macchina non si ferma Circuito di commando
difettoso Arrestare immediatamente
la macchina staccando la
spina dalla rete ed interpellare
immediatamente il Centro Servizi
Eccessiva resistenza alla
movimentazione dei componenti
scorrevoli (pressamerce, carrello)
Lubricazione guide di
scorrimento non effettuata
periodicamente
Effettuare la lubricazione
periodica utilizzando lubricanti
Berkel

13
Nota: A seguito della continua ricerca per migliorare sempre i nostri prodotti, le speciche tecniche sono
soggette a possibili variazioni.
CARATTERISTICHE TECNICHE
HOME LINE PLUS 200 250
A 140 mm 183 mm
B 200 mm 200 mm
C 140 mm 183 mm
D 292 mm 315 mm
E 290 mm 290 mm
F 328 mm 340 mm
G 390 mm 390 mm
H 480 mm 490 mm
I 530 mm 552 mm
L 538 mm 566 mm
SPECIFICHE
Capacità di taglio circolare 140 mm 183 mm
Capacità di taglio rettangolare 200x140h mm 200x183h mm
Massimo spessore fetta 0 - 18 mm 0 - 18 mm
Diametro lama 195 mm 250 mm
Peso 12,5 kg 14,5 kg
Potenza motore 0,19 kW 0,19 kW
Speciche elettriche 230 V - 50 Hz 230 V - 50 Hz

14
USER MANUAL: Electrical Slicer Home Line Plus
MODEL:
HL PLUS 200 - HL PLUS 250
GENERAL PLAN
OF THE MACHINE
1. Start button (white)
2. Stop button (red)
3. Identication plate,
technical information
and CE marking
4. Foot
5. Thickness adjustment knob
6. Thickness gauge plate
7. Safety guards
8. Meat table
9. Product press holder
10. Blade
11. Blade guard
12. Blade cover
13. Baseplate
14. Product holder knob
15. Power cable
16. Blade extractor
EN
Fig. 1
13
7
6
14 9
8
10 11
12
4
3
15
16
5
1
2

15
DESCRIPTION
Electrical slicer machine for
home use with circular blade,
designed solely to slice food
products of the types and
within the dimensional limits
indicated in this manual. The
main parts that make up this
machine are illustrated in g-
ure 1. Electrical diagrams are
reported in Fig. 2.
DECLARATION OF
CONFORMITY
The machines described in this
manual comply with 2006/95/
CE, 2004/108/CE, 2012/19/
UE, 2011/65/CE, with Europe-
an Regulation (EC) 1935/2004
and with relative standards
such EN60204-1, EN60335-1,
EN60335-2-14.
SAFETY
Please observe the following
instructions for your safety:
- carefully read all instructions
before using the machine;
- the product is not intended
to be used by children;
- use the machine only if you
have been properly trained
and are in perfect psychologi-
cal and physical condition;
- do not use the machine in
any way other than as de-
scribed in this manual;
- install the machine in con-
formity to the instructions
indicated in the “Installation”
section;
- install the machine in a loca-
tion out of the reach of person-
nel unauthorised to operate it;
- stay highly concentrated
when using the machine and
avoid any distraction during use;
- do not allow the machine
to be used by personnel who
have not read and fully com-
prehended the content of this
manual;
- do not wear baggy clothing
or clothing with open sleeves;
- do not allow anyone besides
the operator to approach dur-
ing product cutting operations;
- do not remove, cover or mod-
ify the tags located on the
machine body and, in case
of damage of these, replace
them promptly;
- do not remove the protec-
tions and do not modify or by-
pass the mechanical and elec-
trical protective devices;
- slice only the permitted
products. Do not attempt cuts
on prohibited type products;
- always keep the sliced prod-
uct resting surface, the work
area all around the machine
and the operator oor area
clean and dry;
- do not use the machine as
a resting surface and do not
place any objects on it which
are foreign to normal cutting
operations;
- do not use the slicer when,
due to normal wear, the dis-
tance between the edge of the
blade and the blade protec-
tion exceeds 5 mm;
- in this case, contact the man-
ufacturer or an Authorised
Service Centre to change the
blade;
- do not use the machine with
“movable” type electrical con-
nections, with temporary or
non insulated cables;
- periodically check the con-
dition of the power cable and
the cable gland on the ma-
chine body. Replace it prompt-
ly when necessary, requesting
operation by qualied person-
nel;
- immediately stop the ma-
chine in the event of a defect,
abnormal operation, suspicion
of breakdown, incorrect move-
ment, unusual noises;
- before cleaning or carrying
out maintenance, disconnect
the machine from the electri-
cal mains;
- use protective gloves for the
cleaning and maintenance op-
erations;
- place and remove the goods
to be sliced on the sliding
meat table only with the car-
riage completely pulled back
and with the thickness adjust-
ment lever placed in the safety
position (Fig. A);
- for movement of the meat ta-
ble during cutting operations
use only the manoeuvring
handle located on the arm or
the product holder grip;
- use of cutting accessories
which were not provided by
the manufacturer with the ma-
chine is prohibited;
- the device cannot be used
without the meat table or
product holder.
The manufacturer declines any
direct and indirect responsi-
bility stemming from inappro-
priate use, unauthorised mod-
ications and/or repair carried
out on the machine, or use of
non original accessories and
replacement parts.
The machine may not be used
in open areas and/or areas
which are exposed to atmos-
pheric agents and in environ-
ments with vapours, fumes or
corrosive and/or abrasive pow-
ders, with risk of re or explo-
sion and in any case where the
use of anti-explosive compo-
nents is required.
Environmental conditions of
use:
- Temperature
from -5°C to +40°C
- Max. humidity 95%
DO NOT SLICE:
- frozen food products;
- deep frozen food products;
- any other product not intend-
ed for food use.
WARNING! The motor
may overheat! After 15
minutes of continuous use,
switch off the machine and let
the motor cool.
The blade can sever parts of
the body. For this reason, never
!

16
extend hands into the cutting
area between the gauge plate
and the blade if the thickness
adjustment lever (5) is not in
the safety position (in position
0) (Fig. A).
Take extreme care to keep
hands as far away as pos-
sible from the cutting area
during blade cleaning and
sharpening. The use of pro-
tective gloves is recommend-
ed.
INSTALLATION
Install the machine on a level,
smooth and dry surface suita-
ble for supporting the weight
of the machine itself plus the
products to be sliced.
WARNING: Verify that
there are no obstacles to
table travel and to the loading
of products to be sliced onto
the table itself.
The machine must be installed
in the immediate vicinity of
an EEC standard outlet con-
nected to a system which is in
conformity with the prevailing
regulations and which has:
- magneto-thermic protection;
- automatic differential switch;
- earthing system.
Before carrying out electrical
hook up verify that the charac-
teristics of the electrical power
mains are in agreement with
those indicated on the ma-
chine information plate.
USE OF THE SLICER
WARNING! Blade is
sharp, cutting hazard!
Check that the slice thickness
adjustment knob (5) is in the
safety position (in position 0)
(Fig. A).
1. Pull the meat table (8) back
all the way toward the opera-
tor, in the loading position;
2. lift the product holder (9)
and put it into the standby po-
sition;
3. rest the product to be sliced
on the table near the vertical
edge of the table (8) on the
operator side. Block it with the
product holder, applying slight
pressure;
4. adjust the slice thickness.
Activate the blade (10) by
pressing the on button. Grip
the product holder handle (14)
and begin alternative cutting
motion;
5. at the end of cutting opera-
tions return the slice thickness
adjustment knob to the safety
position and pull the carriage
back. Stop the blade motion
by pressing the off button (2).
CLEANING
Keep the machine thorough-
ly clean. If used, it should be
cleaned at least once a day
and more often if necessary.
After a period of inactivity,
the machine should also be
cleaned before use.
Risk of electric shock! Be-
fore cleaning the machine,
disconnect the plug from
the electrical mains socket
and return the slice thick-
ness adjustment knob to the
safety position.
WARNING! Blade is
sharp, cutting hazard!
Check that the slice thickness
adjustment knob (5) is in the
safety position (in position 0)
(Fig. A).
Cleaning products:
use only water and biodegrad-
able foaming detergent for
dishwashers with PH 7-8, us-
ing a soft, spongy cloth and a
semi-rigid nylon brush for the
sharp areas of the table, the
sharped product holder and
the back area of the blade.
Do not use abrasive cleaning
tools, such as rigid sponges
or semi-rigid nylon brush, to
clean the painted areas of the
slicer.
Do not clean the machine with
jets of water or steam or similar
methods.
Table tilting for cleaning oper-
ations (Fig. B):
1. make sure that the machine
is switched off;
2. make sure that the thickness
adjustment knob (5) is in safety
mode (position 0) (Fig. A);
3. pull the meat table (8) back
all the way toward the operator;
4. gradually push the table up-
ward, rotating it clockwise.
WARNING! Check that
the slice thickness adjust-
ment knob (5) is in the safety
position (in position 0) (Fig. A)..
Remove the:
- blade cover:
1) Rotate the blade cover of
few degrees anticlockwise
(Fig. C); 2) Extract the blade
cover holding it with both
hands;
2) a spring facilitates the ex-
traction of the blade cover
(Fig. C);
- product holder:
unscrew the product holder
handle in the anticlockwise
direction until the product
holder is completely re-
moved.
- blade:
1) Fix the extractor to the
blade using the two side
knobs on the extractor (Fig.
F);
2) Rotate the central knob of
the extractor anticlockwise
while holding one of the two
side knobs rmly
3) extract the blade by hold-
ing the extractor with both
hands.
WARNING! Blade is
sharp, cutting hazard!
Use protective gloves when
cleaning sharpening areas, the
table, the product holder and
the blade.
Clean the:
!
!
!
!
!

17
- back of the blade: with the
extractor holding the blade,
press a damp cloth on the sur-
face of the blade and slowly
move it from the center out-
wards, as shown in the gure
(Fig.D2). Dry it, in the same way,
using a dry cloth;
- blade protector shell: clean
the blade protector shell using,
if necessary, a semi-rigid nylon
brush
- machine body: clean with a
damp cloth or a soft sponge.
Carefully dry all parts of the
machine using a soft cloth.
Finally, assemble the:
- blade:
1) rotate the pulley until the
red pin is positioned on the
left side (or towards the op-
erator) (Fig.G)
2) insert the blade into the
pulley making sure to insert
the red pin into one of the
three holes on the blade
3) x the blade to the pulley
by turning the central knob
of the extractor clockwise
while holding one of the two
side knobs rmly
4) remove the extractor from
the blade by unscrewing the
two side knobs making sure
that the blade is rmly xed
to the pulley.
- blade cover:
1) replace the blade cover as
in the gure E;
2) slightly rotate the blade
cover clockwise until it locks
into its initial position;
- meat table:
lift the meat table and move
it to the cutting position,
pressing down lightly until it
clicks (Fig. B).
MAINTENANCE
Blade maintenance
Cleanse the blade regularly to
keep it sharp and functional.
Do not wash the blade in the
dishwasher.
Slice maintenance
To keep the linear sliding of
the machine in optimal condi-
tions, oil the bars using Berkel
lubricants, the use of other oils
could damage the sliding.
SERVICE
No replacement parts are sup-
plied in the package. All repair
and replacement activities
(such as replacement or repair
of the blade, belt, electrical
components, structural parts,
etc.) must be carried out solely
by persons authorised by the
manufacturer.
If a repair is required, it is ad-
visable to return the machine
to the manufacturer or to an
Authorised Service Centre.
For information about services
centres, contact:
service@berkelinternational.
com.
WARNING! The blade
must be replaced when
the distance between the
edge of the blade itself and
the internal edge of the pro-
tection exceeds 5 mm.
WARRANTY
AND RESPONSIBILITY
The manufacturer provides
machines with a warranty of
24 months starting from the
date of purchase. The warran-
ty covers only those defects if
used properly and according
to the conditions of use provid-
ed by the manual. The warran-
ty does not cover defects due
to transport, the purchaser’s
incompetence or negligence,
improper installation or place-
ment, damage due to wear, or
voltage greater than 10% of the
nominal value. Furthermore,
the warranty does not cover
components inherently sub-
ject to wear, such as the blade
and sharpener wheels, except
in the case of obvious produc-
tion defects.
The manufacturer declines any
direct and indirect responsibil-
ity stemming from:
- failure to observe the instruc-
tions in this manual;
- use which does not conform
to regulations in the country of
installation;
- unauthorised modications
and/or repairs on the machine;
- use of non original accesso-
ries or replacement parts;
- exceptional event.
The transfer of machine own-
ership involves the immediate
release from any responsibility
by the manufacturer, with the
exception of compliance with
Directive 2006/42/EC (liability
for any manufacturing defect
of the product).
The identication plate at the
base of the machine registers
the manufacturer, the ma-
chine, technical information
and the CE marking.
DEMOLITION
AND DISPOSAL
The machine is composed of:
- aluminium alloy;
- inserts and various compo-
nents in stainless steel;
- electrical parts and electrical
cables;
- electric motor;
- plastic, etc.
If disposal is entrusted to a
third party, contact only au-
thorised companies for dispos-
al of the materials mentioned
above. The device contains ma-
terials which can be recovered
or recycled. Proper separate
collection facilitates recycling.
At the end of machine life,
deposit in your device at a col-
lection point. Information on
disposal can be obtained from
local authorities.
!

18
Troubleshooting
PROBLEM PROBABLE CAUSE REMEDY
The machine does not start when
the on button is pressed No power or defective
control circuit Check if the plug has been
inserted correctly. Contact a
Service Centre if the problem
persists
When the start button is pressed,
the machine starts but
the operation indicator light
does not switch on
Defective indicator light Do not use the machine with
the indicator light off. Contact a
service centre
When the stop button is pressed,
the machine does not stop Defective control circuit Immediately stop the machine
by pulling the plug out of the
socket and immediately contact
a service centre
Excessive resistance to
sliding component movement
(product holder, carriage).
Sliding guide lubrication
not performed
periodically
Perform periodic
lubrication using Berkel
lubricants.

19
DATA SHEET
Note: The technical features and appearance of the products may be subject to changes without
prior notice.
HOME LINE PLUS 200 250
A 140 mm 183 mm
B 200 mm 200 mm
C 140 mm 183 mm
D 292 mm 315 mm
E 290 mm 290 mm
F 328 mm 340 mm
G 390 mm 390 mm
H 480 mm 490 mm
I 530 mm 552 mm
L 538 mm 566 mm
SPECIFICHE
Circular cutting capacity 140 mm 183 mm
Rectangular cutting capacity 200x140h mm 200x183h mm
Max slice thickness 0 - 18 mm 0 - 18 mm
Blade diameter 195 mm 250 mm
Weight 12,5 kg 14,5 kg
Motor rating 0,19 kW 0,19 kW
Electrical specications 230 V - 50 Hz 230 V - 50 Hz

20
GEBRAUCHSANLEITUNG: Elektrische Aufschnittmaschinen Home Line Plus
MODELL:
HL PLUS 200 - HL PLUS 250
HAUPTKOMPONENTEN
1. Starttaster (weiss)
2. Stopptaster (rot)
3. Typenschild, technische
daten und CE
kennzeichnung
4. Fuss
5. Reglerknopf fur die
schnittdick
6. Platte fuhrerlehr
7. Sicherheitseinrichtungen
8. Schneidgutplatte
9. Anschlagplatte
10. Messer
11. Messerschutz
12. Messerschutzscheibe
13. Sockel
14. Griff anschlagplatte
15. Stromkabel
16. Messerabzieher
DE
Fig. 1
13
7
6
14 9
8
10 11
12
4
3
15
16
5
1
2
Other manuals for HOME LINE PLUS Series
1
This manual suits for next models
2
Table of contents
Languages:
Other Berkel Kitchen Appliance manuals

Berkel
Berkel VOLANO P15 User manual

Berkel
Berkel X13-PLUS Service manual

Berkel
Berkel Suprema Series User manual

Berkel
Berkel VOLANO B300 Troubleshooting guide

Berkel
Berkel 829E User manual

Berkel
Berkel X13 Owner's manual

Berkel
Berkel 909FS Quick start guide

Berkel
Berkel 909/1 Owner's manual

Berkel
Berkel 909E Owner's manual

Berkel
Berkel 829E Owner's manual