Berlebach Albatros User manual

®
Berlebach
Qualität seit 1898
Quality since 1898
Mehr innovative Produkte,
Zubehör und Stative sowie
Informationen über Ihr Produkt
finden sie auf unserer Homepage.
www.berlebach.de
15 kg
30 lbs
115 mm
4.5 in
2 x 43°
®
Berlebach Stativtechnik
Wolfgang Fleischer
Chemnitzer Str. 2
D-09619 Mulda/ Germany
: +49(0) 37320-1201/1209
:+49(0) 37320- 1202
: www. berlebach.de
®
Berlebach
2-Wege-Neiger Albatros
Mit Schnellkupplung 160 für
Schwalbenschwanzprofile
2-Way Tilt Head Albatros
With Dovetail
Quick-Release Coupling 160
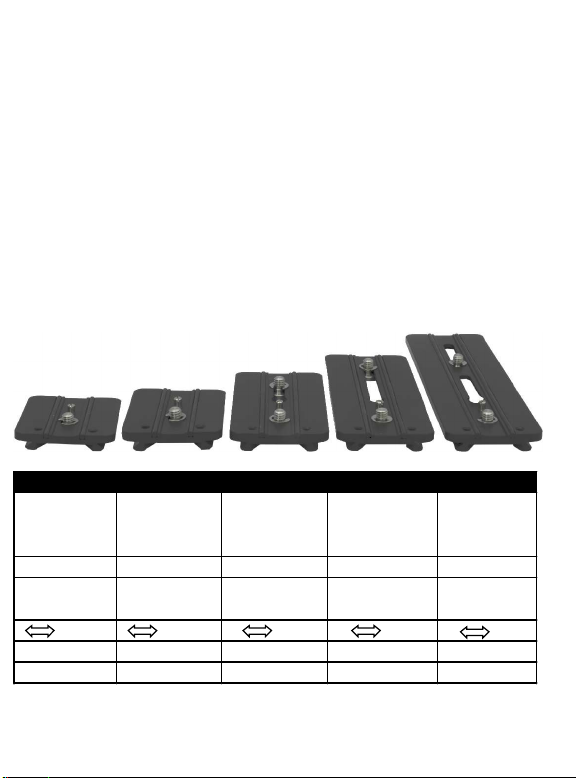
Zum Lieferumfang für die Schnellkupplung 160
gehört die Wechselplatte 050/87.
Alle Wechselplatten haben einen versetzbaren
Video-Pin und eignen sich damit besonders zur
Aufnahme von Spektiven, Video- und
Mittelformatkameras und Kameras.
Wichtiger Hinweis! Auch ArcaSwiss-
Wechselplatten können verwendet werden.
Jedoch ist sowohl das Einsetzen als auch das
Herausnehmen nur mit gedrücktem
Sicherungsstift möglich.
The Quick release plate 050/87 is included with
the quick release coupling 160.
All quick release plates have an adjustable video
pin and are thus particularly suitable for use with
spotting scopes, video and medium format
cameras, as well as cameras.
Important Notice! When using Arca Swiss-quick
release plates, the plate can be inserted and
removed only in one direction only when the
safety pin is pressed.
050/40 050/57 050/87 050/117 050/157
Item no./
Art.Nr.:
320280
Item no./
Art.Nr.:
320281
Item no./
Art.Nr.:
320282
Item no./
Art.Nr.:
320283
Item no./
Art.Nr.:
320284
1 x 1/4" 1 x 1/4" 2 x 1/4" 2 x 1/4" 2 x 1/4"
locking pin/
Video-Pin
locking pin/
Video-Pin
locking pin/
Video-Pin
locking pin/
Video-Pin
locking pin/
Video-Pin
0 17 . 47 . 77 . 117
40 mm 57 mm 87 mm 117 mm 157 mm
38 g 50 g 80 g 100 g 130 g

Locking
The Berlebach Albatros tripod head is securely locked
by tightening just one single locking knob 1 . With
the locking knob 1 loosened, the ball head allows
guided movements without accidental tipping.
Friction Control
First loosen the locking knob 1 and then carefully
tighten the friction control knob 2 to adjust the
amount of friction required. Turn clockwise to
increase the friction and counterclockwise to
decrease the friction.
Panorama Function
The vertical axis can be blocked as a basis for
panoramic photography. First loosen Center-screw 4
one turn, turn the head in a middle position (Locking
knob 1 unfixed) and push down the Position-lock 6 .
Quick Release Coupling
To remove the quick release plate, loosen the
knurled knob 8, press safety pin 9 , and pull out the
quick release plate alongside.
To insert the quick release plate, push the plate
alongside into the receiver, moving it forward with
the safety pin 9 depressed until the desired position
has been reached and the pin latches into the
corresponding notch.
Retighten the knurled knob 8 .
Handle
The handle 12 can be attached to both sides of the
head. To fix the handle in any position, use the hex
wrench for fixing..
and working with L Bracket
Now you can turn the Platform 4 until the Position
Lock snaping into place. The following positions are
aviable.
A 2-Way-Mode for camera-L-bracked
B 2-Way-Mode for camera with dovetailplate
C Panorama-Mode for camera-L-bracked
D Panorama-Mode for camera with dovetailplate
A
BD
C
®
Berlebach
7
8
1
4
2
9
Bedienteile
1 Feststellschraube
2 Friktionsschraube
3 Wechselplatte
4 Oberteil
5 Mittelschraube
6 Positionssperre
7 Dosenlibelle
8 Rändelschraube
9 Sicherungsstift
10 Schwenkarmaufnahme
11 Innensechskantschlüssel
12 Schwenkarm
Controls
Locking knob 1
Friction control knob 2
Quick-Change Plate 3
Platform 4
Center-screw 5
Position-lock 6
Circular level 7
Knurled knob 8
Safety pin 9
Base for handle 10
Hex-wrench 11
Pan and tilt handle 12
5
12
11
10
6
3
8
Feststellung
Der Albatros wird durch Festziehen von nur einer ein-
zigen Feststellschraube 1 komplett fixiert. Ist die
Feststellschraube 1 gelöst, erlaubt der Kugelneiger
geführte Bewegungen, ohne unerwünscht seitlich
wegzukippen.
Friktionsvoreinstellung
Lösen sie zuerst die Feststellschraube 1 und ziehen
anschließend die Friktionsschraube 2 so fest an, bis
sie den gewünschten Gleitwiderstand erhalten.
Drehen im Uhrzeigersinn erhöht die Friktion und
Drehen gegen den Uhrzeigersinn verringert die
Friktion.
Panoramafunktion und Arbeiten mit
Winkelschienen an der Kamera
Als Basis für die Panoramafotografie kann die
Vertikalachse blockiert werden. Dazu Mittelschraube
5 mit Sechskantschlüssel 11 eine Umdrehung lösen,
Kopf mittig positionieren (Feststellschraube 1
geöffnet lassen), Positionssperre 6 nach unten
drücken und Oberteil 4 drehen bis die
Positionssperre 6 wieder einrastet, zum Schluss
Mittelschraube 5 wieder anziehen.
Folgende Positionen des Oberteils sind möglich:
A - 2-Wege Modus mit Kamerawinkel
B - 2-Wege Modus mit Schnellwechselplatte
C - Panorama-Modus mit Kamerawinkel
D - Panorama-Modus mit Schnellwechselplatte
Schnellkupplung
Entfernen der Wechselplatte: Rändelschraube 8
lösen, Sicherungsstift 9 drücken und Wechselplatte
in Längsrichtung herausziehen.
Einsetzen der Wechselplatte: Wechselplatte in
Längsrichtung einschieben, Position einrichten und
Rändelschraube 8 feststellen.
Schwenkarm
Der Schwenkarm 12 kann an beiden Seiten beliebig
befestigt werden. Dazu den Innensechskantschlüssel
11 herausnehmen und Schwenkarm nach Belieben
montieren.
Operation of the Tripod Head
®
Berlebach
Qualität seit 1898
Quality since 1898
Mehr innovative Produkte,
Zubehör und Stative sowie
Informationen über Ihr Produkt
finden sie auf unserer Homepage.
www.berlebach.de
15 kg
30 lbs
115 mm
4.5 in
2 x 43°
®
Berlebach Stativtechnik
Wolfgang Fleischer
Chemnitzer Str. 2
D-09619 Mulda/ Germany
: +49(0) 37320-1201/1209
:+49(0) 37320- 1202
: www. berlebach.de
®
Berlebach
2-Wege-Neiger Albatros
Mit Schnellkupplung 160 für
Schwalbenschwanzprofile
2-Way Tilt Head Albatros
With Dovetail
Quick-Release Coupling 160
Zum Lieferumfang für die Schnellkupplung 160
gehört die Wechselplatte 050/87.
Alle Wechselplatten haben einen versetzbaren
Video-Pin und eignen sich damit besonders zur
Aufnahme von Spektiven, Video- und
Mittelformatkameras und Kameras.
Wichtiger Hinweis! Auch ArcaSwiss-
Wechselplatten können verwendet werden.
Jedoch ist sowohl das Einsetzen als auch das
Herausnehmen nur mit gedrücktem
Sicherungsstift möglich.
The Quick release plate 050/87 is included with
the quick release coupling 160.
All quick release plates have an adjustable video
pin and are thus particularly suitable for use with
spotting scopes, video and medium format
cameras, as well as cameras.
Important Notice! When using Arca Swiss-quick
release plates, the plate can be inserted and
removed only in one direction only when the
safety pin is pressed.
050/40 050/57 050/87 050/117 050/157
Item no./
Art.Nr.:
320280
Item no./
Art.Nr.:
320281
Item no./
Art.Nr.:
320282
Item no./
Art.Nr.:
320283
Item no./
Art.Nr.:
320284
1 x 1/4" 1 x 1/4" 2 x 1/4" 2 x 1/4" 2 x 1/4"
locking pin/
Video-Pin
locking pin/
Video-Pin
locking pin/
Video-Pin
locking pin/
Video-Pin
locking pin/
Video-Pin
0 17 . 47 . 77 . 117
40 mm 57 mm 87 mm 117 mm 157 mm
38 g 50 g 80 g 100 g 130 g

®
Berlebach
Qualität seit 1898
Quality since 1898
Mehr innovative Produkte,
Zubehör und Stative sowie
Informationen über Ihr Produkt
finden sie auf unserer Homepage.
www.berlebach.de
15 kg
30 lbs
115 mm
4.5 in
2 x 43°
®
Berlebach Stativtechnik
Wolfgang Fleischer
Chemnitzer Str. 2
D-09619 Mulda/ Germany
: +49(0) 37320-1201/1209
:+49(0) 37320- 1202
: www. berlebach.de
®
Berlebach
2-Wege-Neiger Albatros
Mit Schnellkupplung 160 für
Schwalbenschwanzprofile
2-Way Tilt Head Albatros
With Dovetail
Quick-Release Coupling 160
Zum Lieferumfang für die Schnellkupplung 160
gehört die Wechselplatte 050/87.
Alle Wechselplatten haben einen versetzbaren
Video-Pin und eignen sich damit besonders zur
Aufnahme von Spektiven, Video- und
Mittelformatkameras und Kameras.
Wichtiger Hinweis! Auch ArcaSwiss-
Wechselplatten können verwendet werden.
Jedoch ist sowohl das Einsetzen als auch das
Herausnehmen nur mit gedrücktem
Sicherungsstift möglich.
The Quick release plate 050/87 is included with
the quick release coupling 160.
All quick release plates have an adjustable video
pin and are thus particularly suitable for use with
spotting scopes, video and medium format
cameras, as well as cameras.
Important Notice! When using Arca Swiss-quick
release plates, the plate can be inserted and
removed only in one direction only when the
safety pin is pressed.
050/40 050/57 050/87 050/117 050/157
Item no./
Art.Nr.:
320280
Item no./
Art.Nr.:
320281
Item no./
Art.Nr.:
320282
Item no./
Art.Nr.:
320283
Item no./
Art.Nr.:
320284
1 x 1/4" 1 x 1/4" 2 x 1/4" 2 x 1/4" 2 x 1/4"
locking pin/
Video-Pin
locking pin/
Video-Pin
locking pin/
Video-Pin
locking pin/
Video-Pin
locking pin/
Video-Pin
0 17 . 47 . 77 . 117
40 mm 57 mm 87 mm 117 mm 157 mm
38 g 50 g 80 g 100 g 130 g
Table of contents
Other Berlebach Camera Accessories manuals

Berlebach
Berlebach Minitripod User manual

Berlebach
Berlebach SPEEDY User manual

Berlebach
Berlebach K70 User manual

Berlebach
Berlebach 31008 User manual

Berlebach
Berlebach 153 050/57 User manual

Berlebach
Berlebach 510 User manual

Berlebach
Berlebach Pegasus User manual

Berlebach
Berlebach 31008 User manual

Berlebach
Berlebach Large Tripod Dolly User manual

Berlebach
Berlebach Multi-Precision Tilt Head 553 User manual


