© Arnulf Betzold GmbH 1/8
Lärmampel PRO – Bedienungsanleitung
Nr./Art. 74446 + Nr./Art. 74747
Warnhinweise für sicheren und korrekten Gebrauch
Achtung:
1. Bewahren Sie die Anleitung zum späteren Gebrauch auf.
2. Die Lärmampel PRO ist ausschließlich für die Verwendung in Unterrichts-situationen
oder unter ähnlichen Gegebenheiten geeignet.
3. Sie ist kein Spielzeug.
4. Setzen Sie die Lärmampel PRO niemals Hitze, Feuchtigkeit oder Nässe aus. Es
besteht die Gefahr eines Kurzschlusses.
5. Verwenden Sie nur den Batterypack in Verbindung mit dem Netzteil.
Bei normalen Batterien besteht die Gefahr, dass sie auslaufen.
6. Überprüfen Sie vor jeder Benutzung, ob Kabel, Stecker, Netzteil und
Gehäuse intakt sind. Verwenden Sie die Lärmampel PRO nicht, wenn
Beschädigungen an den einzelnen Komponenten sichtbar sind.
7. Wischen Sie die Lärmampel PRO ausschließlich mit einem weichen Tuch ab.
Verwenden Sie keine alkoholhaltigen Reinigungsmittel. Diese können die Oberäche
beschädigen.
8. Setzen Sie den Batterypack weder Feuer noch hohen Temperaturen aus.
9. Das Gerät ist so aufzustellen, dass das Steckernetzteil zur Trennung vom
Versorgungsnetz leicht zugänglich ist.
10. Wenn das Gerät nicht in der vorgesehenen Weise benutzt wird, kann der vom Gerät
unterstützte Schutz beeinträchtigt sein.
Lieferumfang
Lärmampel PRO (H x B x T): 47 x 14,5 x 7,8 cm
Wie stelle/hänge ich die Lärmampel PRO auf?
1. Tisch: Sie können die Lärmampel PRO auf den Tisch stellen.
2. Wand: Dafür nden Sie an der Rückseite 2 Aufhängungen, oben und unten.
Die Lärmampel PRO kann mit Nägeln oder Schrauben an der Wand befestigt
werden. Wählen Sie das Befestigungsmaterial entsprechend der Wandbe-
schaffenheit.
3. Stativ: Klappen Sie dazu die beiden Befestigungsclips auf der Rückseite der Lärmampel
PRO nach oben. Nun können Sie diese an einem passenden Stativ befestigen.
4. Stahltafel: Die Lärmampel PRO ist auf der Rückseite mit 4 Schraubvorrichtungen
versehen. Hier kann man die optional erhältlichen Magnete anbringen. Damit hält sie
auf allen metallischen Untergründen, wie z. B. einer Stahltafel oder einem Whiteboard.
®
Wo stelle/hänge ich die Lärmampel PRO auf?
1. Wählen Sie einen Ort, an dem es nicht zu heiß ist oder die Lärmampel PRO Feuchtig-
keit oder Nässe ausgesetzt ist.
2. Die Lärmampel PRO reagiert immer auf die am nächsten gelegenen
Geräusche. Platzieren Sie die Ampel z. B. neben einem offenen Fenster, wird das Gerät
auf die Geräusche draußen ebenfalls reagieren.
3. Testen Sie verschiedene Standorte und nden Sie so den für Sie und Ihre Gruppe
passenden Standort. Wir empfehlen einen Standort in der Nähe der Gruppe.
Inbetriebnahme der Lärmampel
Einlegen bzw. Wechseln des Batterypacks
1A. Öffnen Sie das Fach mithilfe eines Schraubendrehers (Kreuz) auf der
Rückseite der Lärmampel PRO.
2A. Entnehmen Sie den Batterypack aus dem Batteriefach, indem Sie das Anschlusskabel
vorsichtig aus der weißen, zweipoligen Anschlussbuchse ziehen.
3A. Stecken Sie das Anschlusskabel in die rechte, zweipolige, weiße Anschluss-
buchse (siehe Foto). Legen Sie den optional erhältlichen Batterypack Typ NiMH 4,8 V
in das Fach ein.
4A. Schließen Sie das Fach wieder.
Sie können Ihre Lärmampel mit dem Batterypack (Nr./Art. 74748) nachrüsten.
Anzeige des Ladezustandes:
Grün leuchtet – Akku ist geladen
Grün blinkt – Akku wird geladen
Rot leuchtet – Akku ist bald leer
Nr./Art. 74747 inkl. Batterypack
Nr./Art. 74446 ohne Batterypack
Netzteil Netzteil
Anleitung Anleitung
Batterypack (Typ NiMH 4,8 V)
Nr./Art. 74747 inkl. Batterypack Nr./Art.
74446 ohne Batterypack
1. Der Batterypack wird automatisch
über das Gerät geladen, sobald die
Lärmampel mit dem Steckernetzteil
verbunden ist. (Das Netzteil ist für das
europäische Stromnetz ausgelegt.) Der
Ladevorgang kann bis zu 10 Stunden
andauern.
1. Schließen Sie bitte zuerst das Netzteil
an der Ampel an. Anschließend verbinden
Sie das Netzteil mit dem Stromnetz (Das
Netzteil ist für das europäische Stromnetz
ausgelegt.)
2. Nach dem Laden des Batterypacks
entfernen Sie das Netzteil wieder. Die
Lärmampel PRO kann nun ohne das
Netzteil betrieben werden.
2. Achten Sie beim Verlegen des Strom-
kabels darauf, dass das Stromkabel nicht
aufgescheuert, mitgezogen oder geknickt
werden kann.
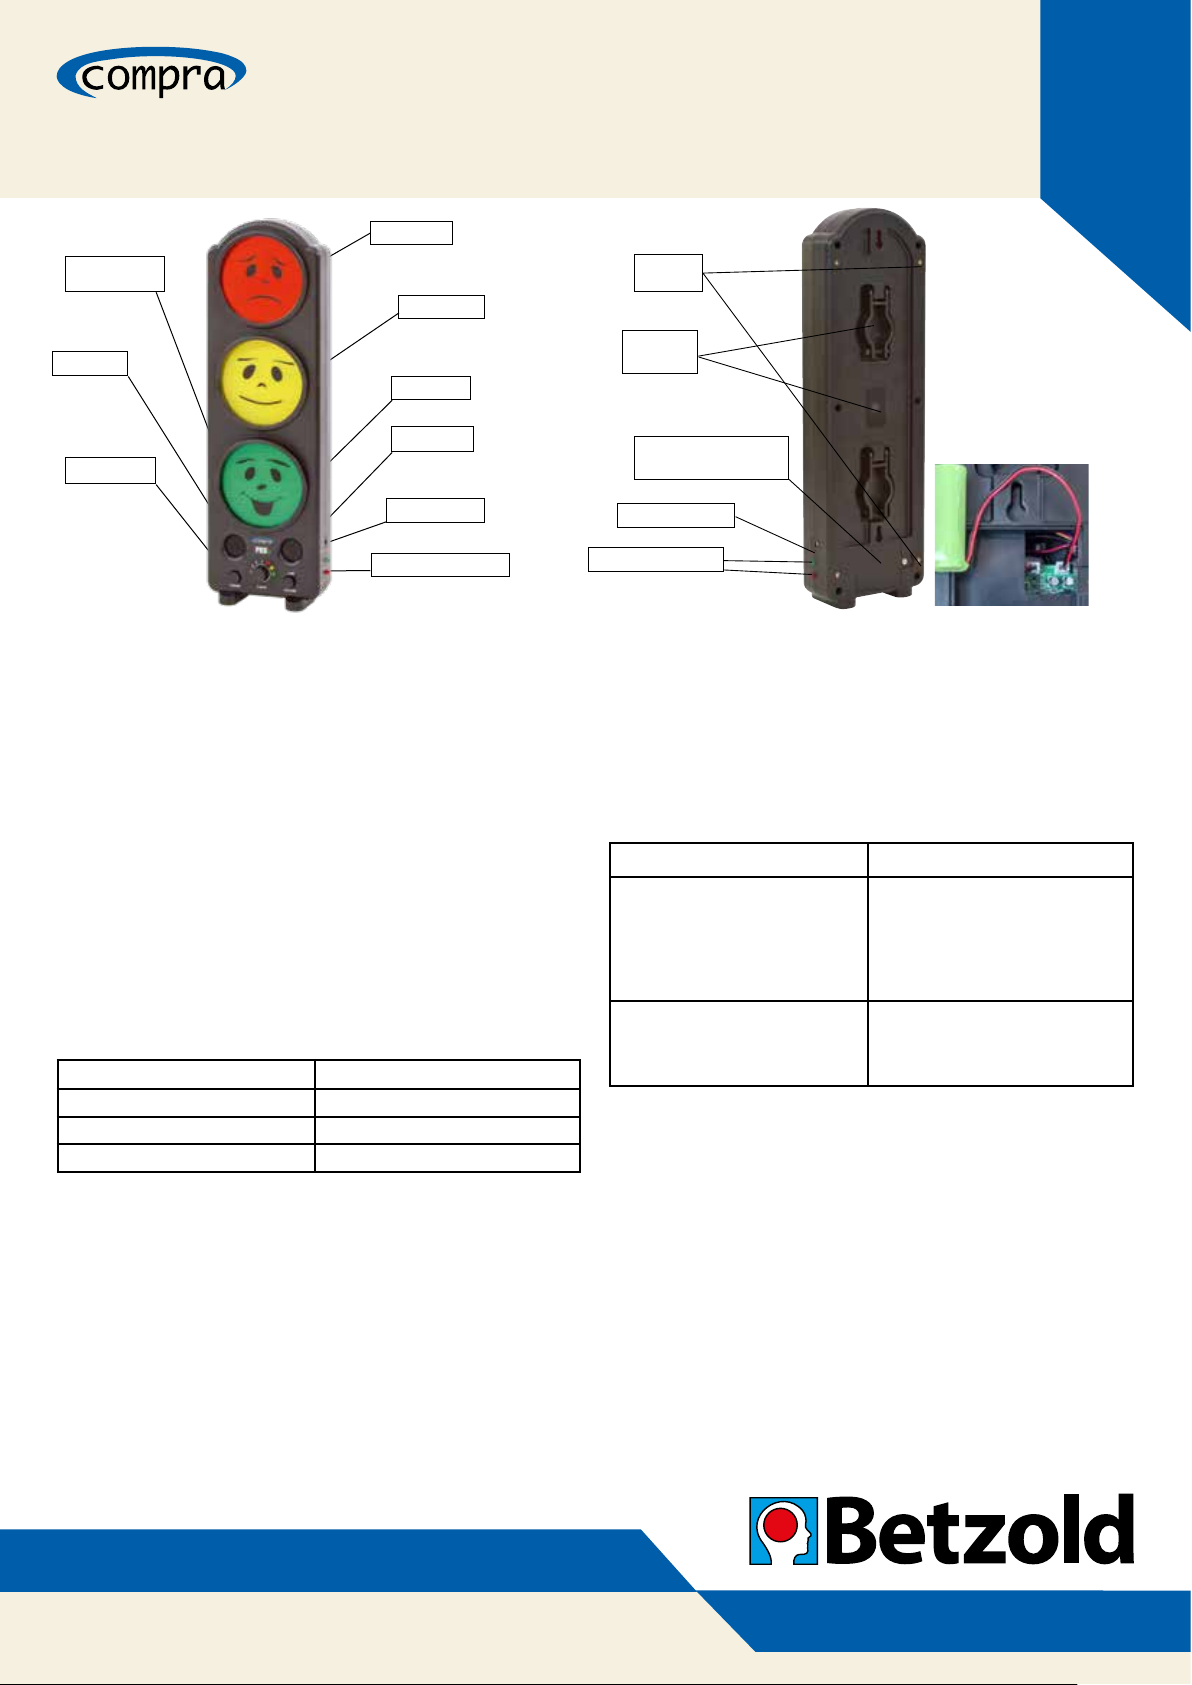
Magnete
(optional)
Stativauf-
hängung
Hier öffnen, um den
Batterypack einzulegen
oder zu wechseln.
Akkuleuchten
Netzteilanschluss
Regler für
Lautstärkegrenze
Rote Lampe
Lautsprecher
Gelbe Lampe
Power an/aus
Grüne Lampe
Mikrofon
Sirene laut/leise
Netzeingang