Beurer GL30 mg/dL User manual

BLOOD GLUCOSE
MONITORING SYSTEM
Step by step
instructions for use
GL30
GB
Beurer GmbH. Söflin
g
er Straße 218. 89077 Ulm. German
y
.
www.beure
r
-medical.com


Beurer GL30 mg/dL 1
Contents of GL30 mg/dL Blood Glucose Monitor
1Getting to know your instrument ........................... 2
1.1 Contents and purchasing supplies .........................................2
1.2 Monitor functions ....................................................................3
1.3 Health information ..................................................................3
1.4 Explanation of symbols ..........................................................4
2Warning and safety information............................. 5
3Description of monitor and accessories............... 8
3.1 Lancing device and lancets ....................................................8
3.2 Blood glucose monitor............................................................8
3.3 Test strips.............................................................................11
4Operation and Basic Settings .............................. 13
4.1 Inserting and replacing batteries ..........................................13
4.2 Making basic settings ...........................................................13
4.3 Checking code number (coding) ..........................................14
5The measurement.................................................. 15
5.1 Taking a blood sample .........................................................15
5.2 Measuring blood glucose .....................................................18
5.3 Evaluating results .................................................................19
5.4 Function check with control solution.....................................21
6Memory ................................................................... 23
6.1 Displaying averages and single values ................................23
6.2 Deleting stored values..........................................................24
7Storage and maintenance of the monitor ........... 25
8In the event of problems ....................................... 25
9GL30 mg/dL Technical specifications ................. 27
10 Guarantee and Customer Service........................ 29

Beurer GL30 mg/dL 2
1 GETTING TO KNOW YOUR INSTRUMENT
Before your first blood glucose test read the Instructions for Use and all accompanying
information carefully and completely. Keep these instructions in a safe place where they
can also be read by other persons using the device.
1.1 Contents and purchasing supplies
Check that the external packaging of the Beurer GL30 mg/dL blood glucose monitor-
ing system is undamaged and that all components are included:
A 1 blood glucose monitor GL30 mg/dL REF 162.544
B 10 test strips REF 162.511
C 1 lancing device with AST cap for taking blood samples at
different parts of the body
REF 162.501
D 10 sterile lancets REF 162.513
E 1 handy bag REF 162.502
F 2 alkaline batteries 1.5 V AAA (in bag)
Instructions for Use, additional information
If the packaging is seriously damaged or the contents are incomplete, please return the
monitor to your dealer.
The blood glucose monitor, the test strips and the separately purchased control solutions
are specially designed to work together. Use only test strips and control solutions that are
designed for this monitor.
Note
Use only original accessories supplied by the manufacturer.

Beurer GL30 mg/dL 3
Purchasing supplies
You can obtain test strips, control solution and lancets without a prescription.
Article REF
50 test strips REF 457.00
control solution MEDIUM REF 457.02
control solution HIGH REF 457.03
control solution LOW REF 457.04
100 lancets REF 457.01
1.2 Monitor functions
This device is intended for measurement of the blood glucose content in human blood. It
is suitable for self-testing. The monitor can perform the following functions quickly and
easily:
• display and store your readings (mg/dL)
• display the average values of your blood glucose readings for 7, 14, 21, 28, 60 and 90
days
• setting date and time
• setting the temperature unit (°C or °F)
• coding the monitor
The monitor also permits the following control functions:
• display of the ambient temperature and warning of unsuitable temperatures
• change battery display when batteries are low
Note
• Do not use the monitor to diagnose diabetes but for regular blood glucose
monitoring only.
• Consult your doctor to set insulin dosages.
1.3 Health information
The table below shows blood glucose values for persons without diabetes for comparison
with your own readings.
Time of day Blood glucose range without diabetes
Before breakfast 70 – 105 mg/dL
Before lunch 70 – 110 mg/dL
1 hour after meals Below 160 mg/dL
2 hours after meals Below 120 mg/dL
Between 2 and 4 a.m. Over 70 mg/dL
Source: Krall,L.P., and Beaser, R.S :Joslin Diabetes Manual. Philadelphia: Lea and Febiger (1989),1 8

Beurer GL30 mg/dL 4
1.4 Explanation of symbols
The following symbols can be found on the packaging, the nameplate of the monitor and
the accessories:
In-vitro diagnostics
Manufacturer
Serial number
Observe the Instructions
for Use.
Temperature range
+4°C to +40°C
PCT: Certification sym-
bol for products that are
exported to the Russian
Federation and CIS
countries
Not for reuse / single use
only
Green Dot: German dual
waste disposal system
Use by
Contents sufficient for
<n> tests
Maximum storage period in
months after opening / Art.-Nr. Order number
Batch
Sterilised by irradiation
(lancets)
Blood glucose meas-
urement unit
Attention, read accompany-
ing documentation
Biohazard, danger of
infection
The symbols in the Instructions for Use denote the following:
WARNING
Warning of risk of injury or health hazards
CAUTION
Safety information about possible damage to monitor and accessories
Note
Important information

Beurer GL30 mg/dL 5
2 WARNING AND SAFETY INFORMATION
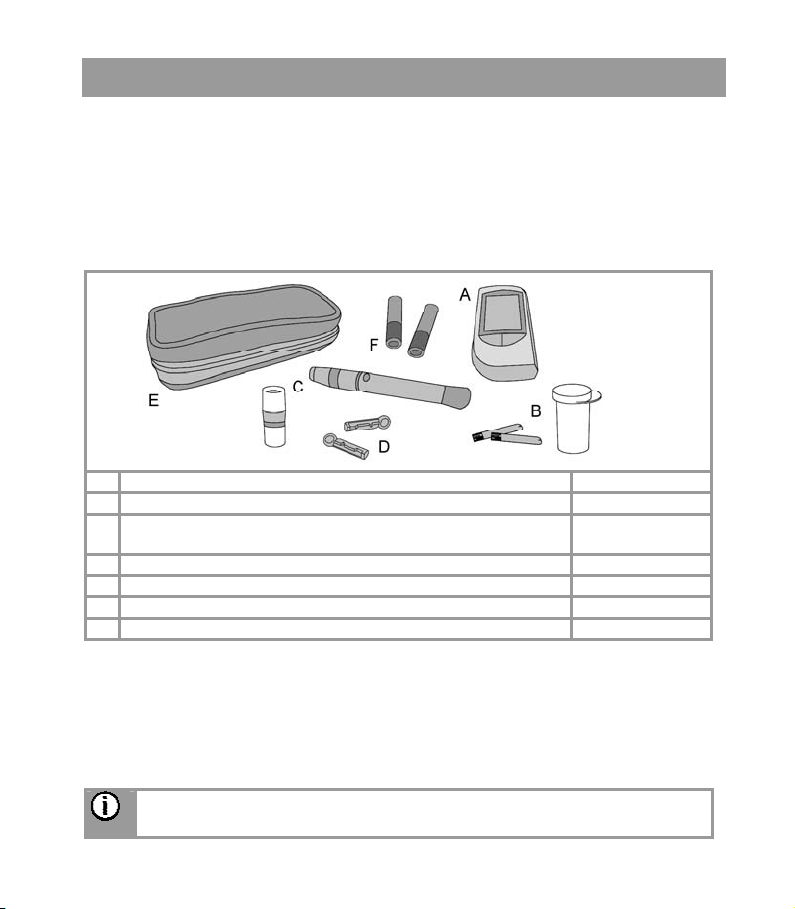
Infection hazard
All components of the monitor and accessories may come into contact with hu-
man blood and may therefore be sources of infection.
WARNING
• This monitor must display the blood sugar content in mg/dL. The unit
of measure mg/dL follows the blood sugar value. If your monitor does
not display mg/dL, contact customer services immediately. You risk
damaging your health if you perform a blood sugar measurement us-
ing an unfamiliar unit of measure, since values may be interpreted in-
correctly and cause the wrong corrective measures to be taken.
• This monitor must be used by one person only. Use of the same monitor by
more than one person may cause infection.
• The lancing device is suitable for self-testing. Never use the lancing device
and lancet with other persons (danger of infection).
• Use a new sterile lancet for every blood sample (single-use only).
Readings
WARNING
• The readings that you take may only be used for information purposes –
they are not a substitute for a medical examination! Discuss your readings
with a doctor regularly. Never change your doctor's instructions without dis-
cussing your changes with the doctor.
• Accurate readings are only possible if the code number on the display is
identical to the code number on the test strip container. Check the number
before every test.
• Dehydration or excessive fluid loss, such as by sweating, may result in
incorrect readings.
• A very high or very low haematocrit value (proportion of red blood cells)
may cause inaccurate readings. If the haematocrit value is very high (over
60%), the blood glucose reading may be too low; if the haematocrit value is
very low (under 20%), it may be too high. If you do not know your haema-
tocrit value, ask your doctor.
• Do not use test strips to monitor the blood glucose of newborns.
• Metabolites such as uric acid, ascorbic acid, acetominophen, dopa, methyl
dopa, L dopa, and tolbutamide do not influence the results if they are in the
physiological value range.
• Lipaemia effects: Elevated blood triglycerides up to 2000 mg/dL have
virtually no influence on the results. However, triglycerides above this level
may influence the blood glucose test results.

Beurer GL30 mg/dL 6
• Use only fresh whole capillary blood. Do not use serum or plasma.
• Take capillary blood without squeezing the puncture site. If the site is
squeezed the blood will be diluted with tissue fluid and the test result will be
inaccurate.
• Do not use the test strips at altitudes above 3275 m.
Note
The Beurer GL30 mg/dL blood glucose monitor is suitable for measuring
whole capillary blood.
Storage and care
WARNING
• Keep monitor and accessories out of reach of small children. Small parts,
such as lancets, batteries or test strips, may cause fatal injuries if swal-
lowed. If a part has been swallowed, seek medical help immediately.
• The container with the test strips includes a desiccating agent that could
cause skin and eye irritation if inhaled or swallowed. Keep the container
away from small children.
Batteries/saving readings
WARNING
• Batteries can be fatal if swallowed. You should store the batteries out of
reach of small children. If a battery has been swallowed, seek medical help
immediately.
• Never throw batteries into the fire. Danger of explosion!
CAUTION
• Remove the batteries if they are flat or if the monitor is not going to be
used for a longer period. This prevents any damage as a result of leakage.
• Batteries should not be recharged or reactivated in any other way. Batter-
ies must not be dismantled or short-circuited.
• Do not use rechargeable batteries.
Note
• When the batteries are changed, the stored readings are retained. The
date and time are retained when batteries are replaced and when the bat-
teries are flat.
• When changing the batteries, always use two batteries of the same type,
brand and capacity. You should preferably use alkaline batteries.

Beurer GL30 mg/dL 7
Repairs
Note
• Never open the monitor. If these instructions are not heeded, the warranty
becomes null and void.
• Never attempt to repair the monitor yourself. We can no longer guarantee
perfect functioning if you do.
• If the monitor requires repair, please send it to our Customer Service.
Disposal
WARNING
• When disposing of monitor components, strictly observe the generally
applicable precautions for working with blood. Dispose of all blood samples
and materials that you come into contact with correctly to prevent injury
and infection of other persons.
• Dispose of test strips and lancets in a sharps container after use.
Note
• Used, completely discharged batteries must be disposed of in specially
marked collection containers, at toxic waste collection points or electrical
product retailers. You are legally obliged to dispose of the batteries.
Batteries containing pollutants are marked with the following symbols:
Pb = battery contains lead,
Cd = battery contains cadmium,
Hg = battery contains mercury.
• The appliance should be disposed of according to Regulation
2002/96/EC – WEEE (Waste Electrical and Electronic
Equipment). In case of queries, please contact the municipal
authorities responsible for waste disposal in your area.

Beurer GL30 mg/dL 8
3 DESCRIPTION OF MONITOR AND ACCESSORIES
3.1 Lancing device and lancets
1
234
56
1: Cap
2: Safety shield of lancet
3: Sterile lancet
4: Lancet holder
5: Trigger button
6: Trigger setting mechanism
3.2 Blood glucose monitor
Front Back
1: Slot for test strips
2: LCD display
3: Code button “C”
4: Save button “M”
1: Two AAA 1.5V alkaline batteries
2: SET button

Beurer GL30 mg/dL 9
Display symbols for blood glucose readings:
1: Code
2: Arrow symbol for test strips
3: Results display
4: Low blood glucose (low)
5: High blood glucose (high)
6: Test strip symbol
7: Speaker (non-functional)
8: Blood drop symbol
9: Blood glucose unit mg/dL
10: Blood glucose unit mmol/L
(non-functional)
11: Ketone test recommended
12: Normal blood glucose value
13: Memory symbol

Beurer GL30 mg/dL 10
Other display symbols:
14: Temperature symbol
15: Date: month-day
16: Time: hour-minute
17: Replace battery symbol
18: CTL for control solution
19: DAY AVG for average reading
7,14,21,28,60,90 days
20: AM (morning)
21: PM (afternoon)
Note
The blood glucose monitor is supplied with the following basic settings:
• Blood glucose unit: mg/dL
• Temperature unit: °C

Beurer GL30 mg/dL 11
3.3 Test strips
Front Back
1: Slot for taking blood
2: Handling area
3: Contacts
The back is indicated by the X symbol.
Insert the test strip into the unit with the contacts first. Make sure that
the front of the test strip is facing you.
Read carefully the following information on the handling and storage of your test strips. All
instructions must be followed to ensure that the test strips will give accurate test results.
WARNING
A test strip must be used only once and on only one patient.

Beurer GL30 mg/dL 12
Handling test strips
Note
• Before using the strips for the first time check that the seal on the container
is intact. If a container seal is damaged, do not use the test strips.
• Close container tightly immediately after removing a test strip.
• Do not use test strips after the use-by date. If expired test strips are used,
test results may be inaccurate. The use-by date can be found on the con-
tainer beside the hourglass icon .
• The test strips can be stored for up to three months after opening the
container. Write this use-by date (date of opening + 3 months ) on the la-
bel. The storage time is reduced if it extends beyond the use-by date (see
date beside the hourglass icon ).
• Do not use the test strips if one of the use-by dates (
/ ) has expired.
• The test strips can be touched anywhere with clean, dry hands.
• Use the test strip for measurement immediately on removal from the con-
tainer.
• Do not bend, cut or alter test strips in any way.
• Do not use test strips for measurements if they have come into contact with
liquids.
Storing test strips
Note
• Store test strips in a cool, dry place above +4°C and below +40°C. Keep
test strips away from direct sunlight or heat. Do not store in a refrigerator.
• The relative humidity must be between 10% and 85%.
• Store test strips in their original container – never place them in a different
container.

Beurer GL30 mg/dL 13
4 OPERATION AND BASIC SETTINGS
4.1 Inserting and replacing batteries
Note
Two batteries are included with your blood glucose monitor. The batteries are
in the bag.
1 Remove the battery cover on the back of the monitor (see "3.2 Blood glucose
monitor" page 8).
2 When you replace batteries, always replace both batteries. The monitor retains
the date and time while the batteries are replaced. Reset the date and time if the
battery replacement takes longer than usual (see "4.2 Making basic settings"
page 13).
3 Insert two new AAA 1.5 V alkaline batteries. Make absolutely sure that you
insert them with the correct polarity as marked. Do not use rechargeable batter-
ies.
4 Replace the battery cover carefully
If the 'change battery' symbol appears, the battery is almost flat. Replace all
batteries as soon as possible. The display shows E-b if the batteries are so flat that
readings cannot be taken.
4.2 Making basic settings
1 The monitor must be switched off. Remove the battery cover on
the back of the monitor (see "3.2 Blood glucose monitor" page 8).
2 Press the "SET" button.
The year display starts blinking.

Beurer GL30 mg/dL 14
3 Setting date and time
Note
• It is vital to set the date and time. Only in this way
is it possible to save and subsequently retrieve
your measured values with the right date and time.
• Time is shown in 12 hour format. Times before 12
midday are AM. Times after 12 midday are PM.
Example: 'PM 1:00' for 13:00 hours.
Set the year (calendar up to 2049) by pressing the M button.
Confirm with "SET".
The month display starts blinking. Proceed in the same way for
month, day, hour and minute.
4 Setting temperature unit
Press the M button to switch between °C and °F. Confirm with
"SET".
5 "dEL" is displayed and the Memory symbol starts blinking.
(Caution: all previously stored results will be deleted if you press
M now.)
Press the "SET" button. "OFF" is displayed briefly and the moni-
tor automatically switches off.
Replace the battery cover carefully
4.3 Checking code number (coding)
Test strips are classified into different code ranges because of variations in production
conditions. This is why coding is required when you
• open a new container of test strips
• find that the code numbers of the monitor and the test strip container do not match
when conducting a test.
Coding the monitor
1 There are no test strips in the monitor and it is switched off.
2 Hold the monitor with the display facing you.
3 Press the C button. The initial display is shown briefly and then SEL. The current
code number flashes.

Beurer GL30 mg/dL 15
4 The new, valid code number is printed on the test strip container. Press the C
button repeatedly to set the new code number. The number is increased by one
every time the button is pressed. Press and hold the button to make the process
faster. After code 75 the monitor continues to count from code 51.
5 Save the new code number with the M button. The monitor switches off auto-
matically.
5 THE MEASUREMENT
WARNING
If you drop the lancing device with a lancet inserted, pick it up carefully and
dispose of the lancet.
CAUTION
• Use the lancing device with lancets from the manufacturer only. Using
different lancets may affect the function of the lancing device.
• If the lancing device is from a different manufacturer, read its Instructions
for Use.
5.1 Taking a blood sample
Preparing to take the blood sample
1 Select part of body for blood sample. You can take blood samples with the
lancing device from the fingerprints or other parts of the body such as palm of
the hand, lower arm, upper arm, thigh or shin. We recommend taking blood
samples from the fingerprints. Apply the lancing device slightly off-centre on the
fingerprint, not the centre, for a less painful puncture.
WARNING
• If hypoglycaemia is suspected: always take blood from the
fingerprint. Reason: changes in the blood glucose level can be
measured quickly in blood samples taken from the fingerprints.
• Blood samples from the fingerprints and samples from other
parts of the body (AST) may have significantly different results.
Always consult your doctor before starting testing at other parts
of the body.
2 Have the following at hand: monitor, container with test strips, lancing device,
sterile lancet. You will also need the AST cap if you are taking samples from
other parts of the body.

Beurer GL30 mg/dL 16
3 Wash your hands with soap and warm water before taking the sample. In addi-
tion to optimum hygiene this will also give you good circulation in the finger tips.
Dry your hands carefully. Make sure that the puncture site is clean if you take
the blood sample at a different part of the body (AST).
WARNING
If you have cleaned the puncture site with alcohol, make sure that
the site is completely dry before taking the reading.
Taking a blood sample
WARNING
• Take the sample at a different puncture site for every test, for example use
a different finger or the other hand. Repeated puncture wounds at one
puncture site may cause inflammation, loss of feeling or scarring.
• Do not use the AST cap for taking a blood sample from the finger.
• Never compress the finger to increase the size of the drop of blood. Under
compression the blood will be diluted with tissue fluid and the test result
may be inaccurate.
• Note that poor circulation at the puncture site, which may be the result of
cold or disease, may lead to inaccurate results.
1 Unscrew the cap from the lancing device.
2 Insert a sterile lancet into the lancing device and press
the lancet into position.
3 Unscrew the safety shield from the lancet while hold-
ing the lancet shaft firmly. Keep the safety shield so
the used lancet can be safely discarded after taking
the blood sample.

Beurer GL30 mg/dL 17
4 Different caps are required depending where you take
the blood sample: Fingerprints: cap (grey).
Other parts of the body: AST cap (transparent).
Place the selected cap on the lancing device and
screw it on tightly.
5 Five different puncture depths can be set on the lanc-
ing device.
• 1 to 2: soft or thin skin
• 3: normal skin
• 4 to 5: thick or calloused skin
Rotate the cap in the appropriate direction until the
arrow indicates the desired puncture depth.
6 Pull the trigger setting mechanism back until it clicks
audibly. If it does not click, it is possible that the lanc-
ing device was already accidentally set when the
lancet was inserted.
7 The lancing device is now ready to take a blood sam-
ple. Make sure that the blood remains in drop form
and is not smeared.
Blood sample from the fingerprint
Position the lancing device firmly and slightly off-
centre on the fingerprint. Press the trigger button.
Remove the lancing device from the
finger. A rounded drop of blood at least
0.5 microlitre in volume (approx.
1.2 mm, original size: ) must be
formed.
Blood sample from other parts of the body (AST)
Find a soft position away from a bone with no visible
veins and little hair. Warm the puncture site for good
circulation by massaging the area gently. Press and
hold the lancing device against the puncture site for a
few seconds and then press the trigger button. Con-
tinue to hold the lancing device against the skin until a
rounded drop of blood has formed under the cap.
Maintain the pressure until the drop has a volume of at
least 0.5 microlitre in volume (approx. 1.2 mm, original
size: ). Carefully remove the lancing device from the
skin.

Beurer GL30 mg/dL 18
8 If there is insufficient blood, repeat steps 5 to 7 with
the device set to a greater puncture depth.
9 Unscrew the cap carefully from the lancing device and
pull it off.
10 Place the safety shield flat on a hard surface. Press
the tip of the lancet into the safety shield so the lancet
no longer projects.
11 Pull the lancet carefully out of the lancing device and
dispose of the lancet in a sharps container.
Carefully dispose of all blood samples and materials
that have come into contact with them. This will pre-
vent injury and infection of other people.
12 Screw the cap (grey) on again.
5.2 Measuring blood glucose
1 Hold the monitor with the display facing you.
2 Insert a test strip into the monitor with the contacts first. Make sure that the
front of the test strip is facing you. The test strips can be touched anywhere
with clean, dry hands.
3 The monitor switches on automatically and shows consecutively the initial
display, the ambient temperature, and the code number. The monitor is ready
for a test as soon as the flashing blood drop symbol is displayed.
4 If the numbers are not identical remove the test strip and code the monitor
see "4.3 Checking code number (coding)" page 14.
Table of contents
Other Beurer Blood Glucose Meter manuals