Beurer GL40 User manual

0483
Beurer GmbH •Söflinger Straße 218 •89077 Ulm, Germany
www.beurer.com
instructions for use
GL40
GB
mg/dL
germanlengineering
Codefree
BLOOD GLUCOSE MONITOR
Step by step

2 Beurer GL40 mg/dL

Beurer GL40 mg/dL 3
Contents
1 About Your Beurer Blood Glucose Monitoring Device .......................................4
1.1 Delivery scope, replacement parts and accessories .............................................................5
1.2 Functions of the unit...............................................................................................................6
1.3 Signs and symbols................................................................................................................. 6
2 Safety information and warnings ..................................................................................7
3 Description of units and accessories........................................................................10
3.1 Blood Glucose Monitoring device........................................................................................ 10
3.2 Lancing device and needle lancets...................................................................................... 11
3.3 Display symbols................................................................................................................... 11
3.4 Test strips.............................................................................................................................12
4 Using the unit for the first time and basic settings ............................................ 13
4.1 Removing the battery insulation strips, replacing the batteries...........................................13
4.2 Basic settings.......................................................................................................................14
5 Measuring your blood glucose.....................................................................................14
5.1 Acquiring blood samples ..................................................................................................... 15
5.2 Measuring the blood glucose value .....................................................................................18
5.3 Evaluating a blood glucose measured value ....................................................................... 19
5.4 Functional check with control solution ................................................................................ 21
6 Measurement memory .....................................................................................................22
6.1 Displaying individual values ................................................................................................. 23
6.2 Displaying average blood glucose values............................................................................23
6.3 Deleting the measured value memory ................................................................................. 24
6.4 Transferring measured values to a computer.......................................................................24
7 Storage and maintenance of the unit........................................................................ 25
8 Troubleshooting ...................................................................................................................26
9 Technical specifications .................................................................................................27
10 Guarantee and customer service..............................................................................29

4 Beurer GL40 mg/dL
1 About Your beurer blood Glucose MonitorinG device
Dear Customer,
Thank you for choosing one of our products. Our name stands for high-quality, thoroughly tested
products for applications in the areas of heat, weight, blood pressure, body temperature, pulse, gen-
tle therapy, massage and air.
Please read these instructions for use carefully and keep them for later use, be sure to make them
accessible to other users and observe the information they contain.
With kind regards
Your Beurer team
About Your Beurer Blood Glucose Monitoring Device
The Blood Glucose Monitoring device is designed for fast, uncomplicated measurement of blood
glucose.
You can use it to determine your blood glucose content, save the measured values and display the
average of the measured values.
The large display with background lighting makes the measured values easy to read. The user-friendly
design with the handy measurement strips and reduction of the operating controls to 2 buttons guar-
antees simple, yet accurate measurements.
The device can be connected directly to a PC using the USB cable provided. You can evaluate the
measured values on your PC using blood glucose diary software and use the results to monitor your
blood glucose values.
Beurer blood glucose software is available as a free download at www.beurer.com

Beurer GL40 mg/dL 5
1.1 Delivery scope, replacement parts and accessories
Inspect your set for external damage to the carton packaging and for completeness of the content.
Before use, ensure that all packaging materials are removed and that there is no visible damage to
the unit or accessories. When in doubt, do not use the unit and contact your dealer or the customer
service address provided.
A1 Blood Glucose Monitoring device
B1 lancing device with AST cap for taking blood samples from alternative sites
C10 test strips
D10 sterile needle lancets
E2 button cell batteries 3 V CR2032 (pre-installed)
F1 practical carry case
G1 USB cable
These instructions for use, additional information material
•Iftheboxhassustainedextensivedamageorifanycontentsaremissing,pleasereturnthesystem
to the retailer.
•TheBloodGlucoseMonitoringdevice,teststripsandcontrolsolutions(LEVEL1+LEVEL2-avail-
able to purchase separately) are all designed to be used together. Therefore use only the test strips
and control solution intended for this measuring device.
Note
•Onlyusethemanufacturer'soriginalaccessories.

6 Beurer GL40 mg/dL
Purchasing supplies
Test strips, control solution and lancets are also available for purchase without a prescription.
Item REF
50 test strips REF 464.01
Control solution LEVEL 1 and 2 REF 464.07
100 needle lancets REF 457.01
1.2 Functions of the unit
This device is intended for measuring the blood glucose content of human blood. It is also suitable
for individual, self-testing.
Using this measuring device, you can quickly and easily:
•Measureyourbloodglucose.
•Displayandsaveyourmeasuredvalues.
•Displayyouraveragebloodglucosemeasurementsfromthelast7,14,30and90days.
•Setthetimeanddate.
•uploadyourstoredmeasuredvaluestoaPCforevaluation.
The measuring device also features the following control functions:
•Awarningintheeventofunsuitabletemperatures.
•Batterychangereminderwhenbatterypowerislow.
Warning
• This unit is only to be used for regular monitoring and not for the diagnosis of diabetes.
• Discuss your insulin dose with your doctor.
1.3 Signs and symbols
The symbols on the packaging and the nameplate of the measuring device and accessories have
the following meaning:
In vitro diagnostics Manufacturer
Serial number Please observe the Instructions
for Use
Temperature limit
+2°Cto+30°C PCT: certification symbol for
products that are exported to
the Russian Federation and
members of the CIS
Not for re-use/For single use
only
Use by
Green dot (Der Grüne Punkt):
German dual waste collection
system

Beurer GL40 mg/dL 7
Maximum shelf life after initial
opening in months Contents sucient for <n> tests
Batch designation /
Art.-Nr.
Order number
Sterilised by radiation (lancets) Unit of measurement for blood
glucose value
Warning, please observe ac-
companying documents Biohazard, risk of infection
The following symbols in these instructions mean
Warning
Warning instruction indicating a risk of injury or damage to health.
Important
Safety note indicating possible damage to the unit/accessories.
Note
Important information to be noted.
2 sAfetY inforMAtion And wArninGs
Risk of infection
All components of the measuring device and accessories may come into contact
with human blood, and are therefore a possible source of infection.
Warning
•
This measuring device must display the blood glucose content in mg/dL. The unit of measure
mg/dL appears next to each blood glucose level reading. Be sure to contact customer service
if your measuring device does not display mg/dL. You risk damaging your health if you per-
form a blood glucose measurement using an unfamiliar unit of measure, since values may be
interpreted incorrectly and cause the wrong corrective measures to be taken.
•
If the measuring device is used by more than one person, follow the generally applicable rules con-
cerning disinfection, safety and contamination.
•
Medical professionals and others who use this system on more than one patient should be aware
that all products or items that come into contact with human blood should be handled as though
they could transfer pathogens, even after cleaning them.
•
The lancing device is suitable for self-testing. Never share the lancing device or needle lancet with
others. Never use it on more than one patient (Risk of infection!).
•
Use a new sterile needle lancet for each blood test (for one-time use only).

8 Beurer GL40 mg/dL
General notes
Warning
•Donotusetheunitnearstrongelectromagneticelds,wirelesssystemsormobiletelephones.
Measuring blood glucose
Warning
•
The measured values you determine are useful for information purposes only – they are not intended
to replace consultation with your doctor. Discuss your measured values with your doctor regularly.
Do not change any aspects of your treatment unless instructed by your doctor.
•
Water deficiency or a large loss of fluid, for example by sweating, can lead to false measurement
results.
•
A very high or very low haematocrit value (proportion of red blood cells) can lead to incorrect meas-
urements. With a very high haematocrit value (over 60%), the displayed blood glucose value may be
too low. If you have a very low haematocrit value (below 20%), the blood glucose value may be too
high. If you do not know your haematocrit value, ask your doctor.
•
Do not use the test strips to take blood glucose measurements of newborn infants.
•
Metabolites such as ibuprofen, sodium salicylate, tetracycline, tolbutamide, unconjugated bilirubin,
cholesterol, creatinine, triglycerides, galactose, maltose, xylose, paracetamol, gentisic acid, levodopa,
dopamine, methyldopa, uric acid and ascorbic acid do not aect the result so long as they lie within
the physiological value range.
•
Do not use this unit to test any seriously ill patient.
Warning
•Lipemia eects: Increased blood triglycerides up to 3000 mg/dL hardly aect the results. Above this
level, however, the blood glucose test may be aected.
•Only use fresh capillary whole blood. Do not use serum or plasma.
•Use capillary blood obtained without squeezing the puncture site. Squeezing causes interstitial fluid
to dilute the blood and leads to a false measurement result.
•Do not use the test strips at elevations over 3048 m.
Note
•
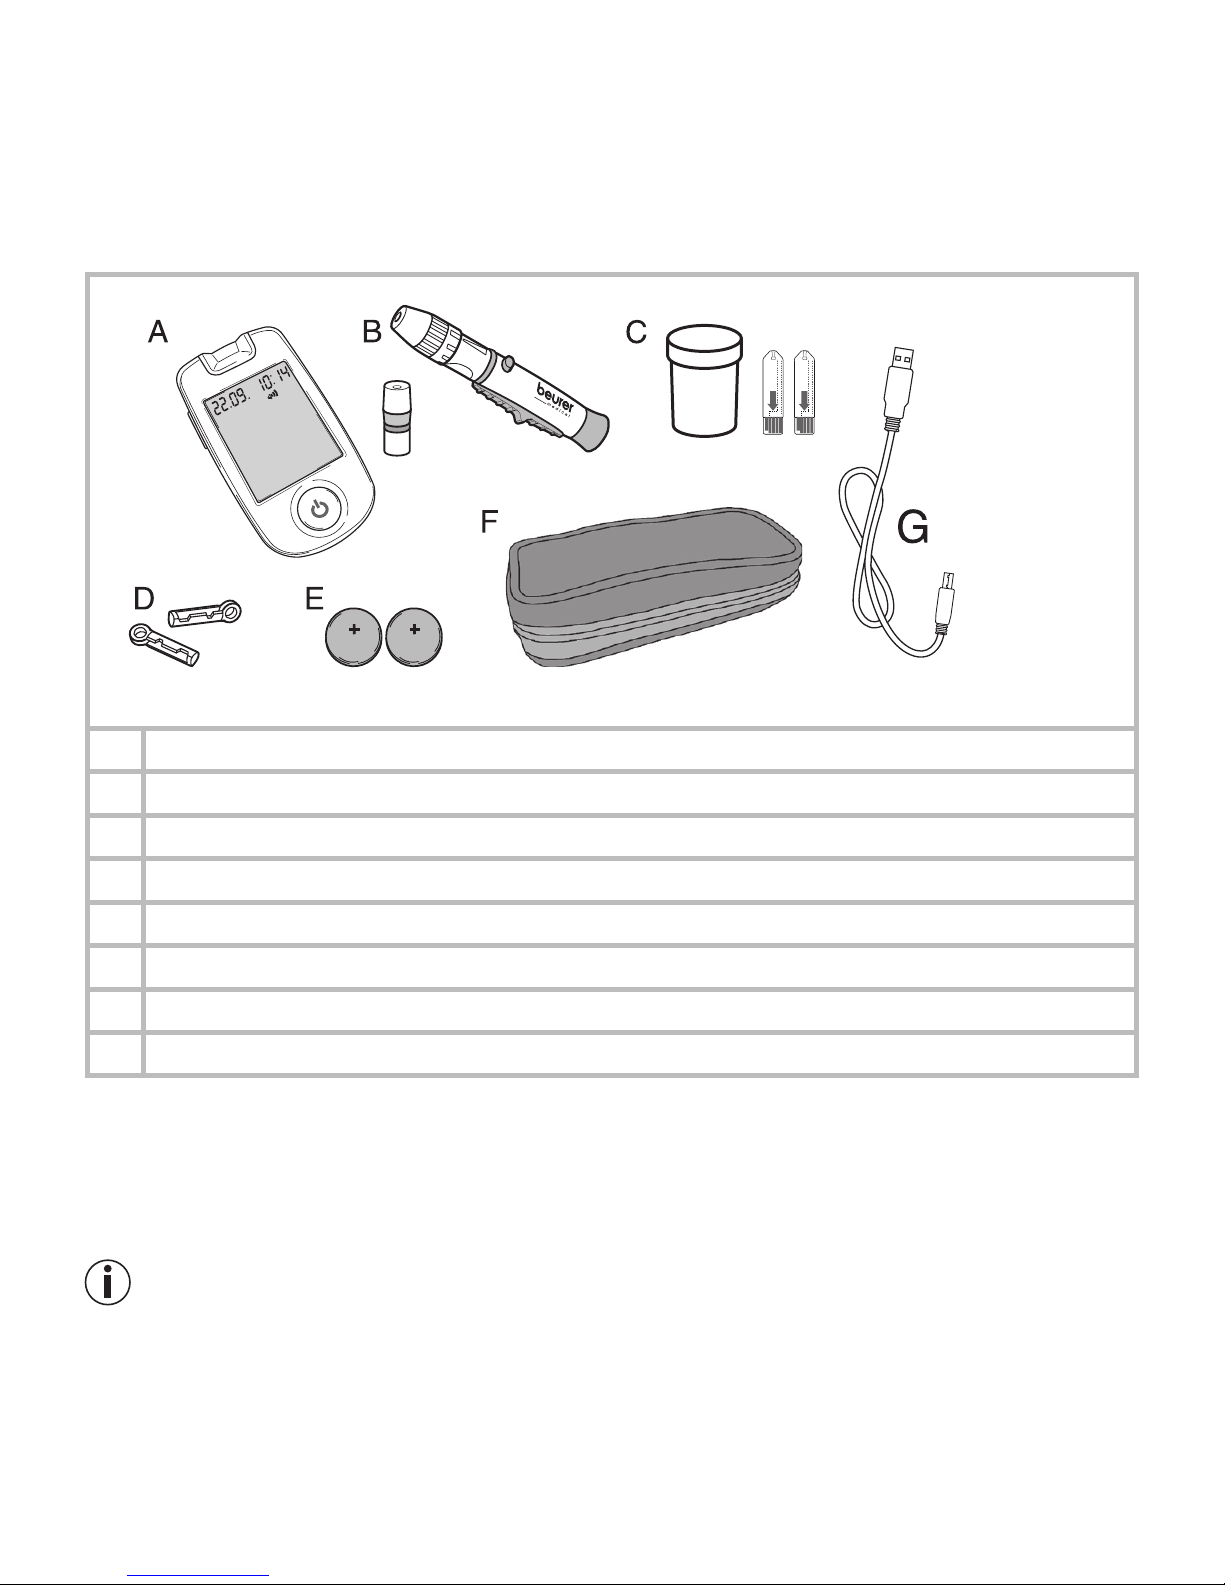
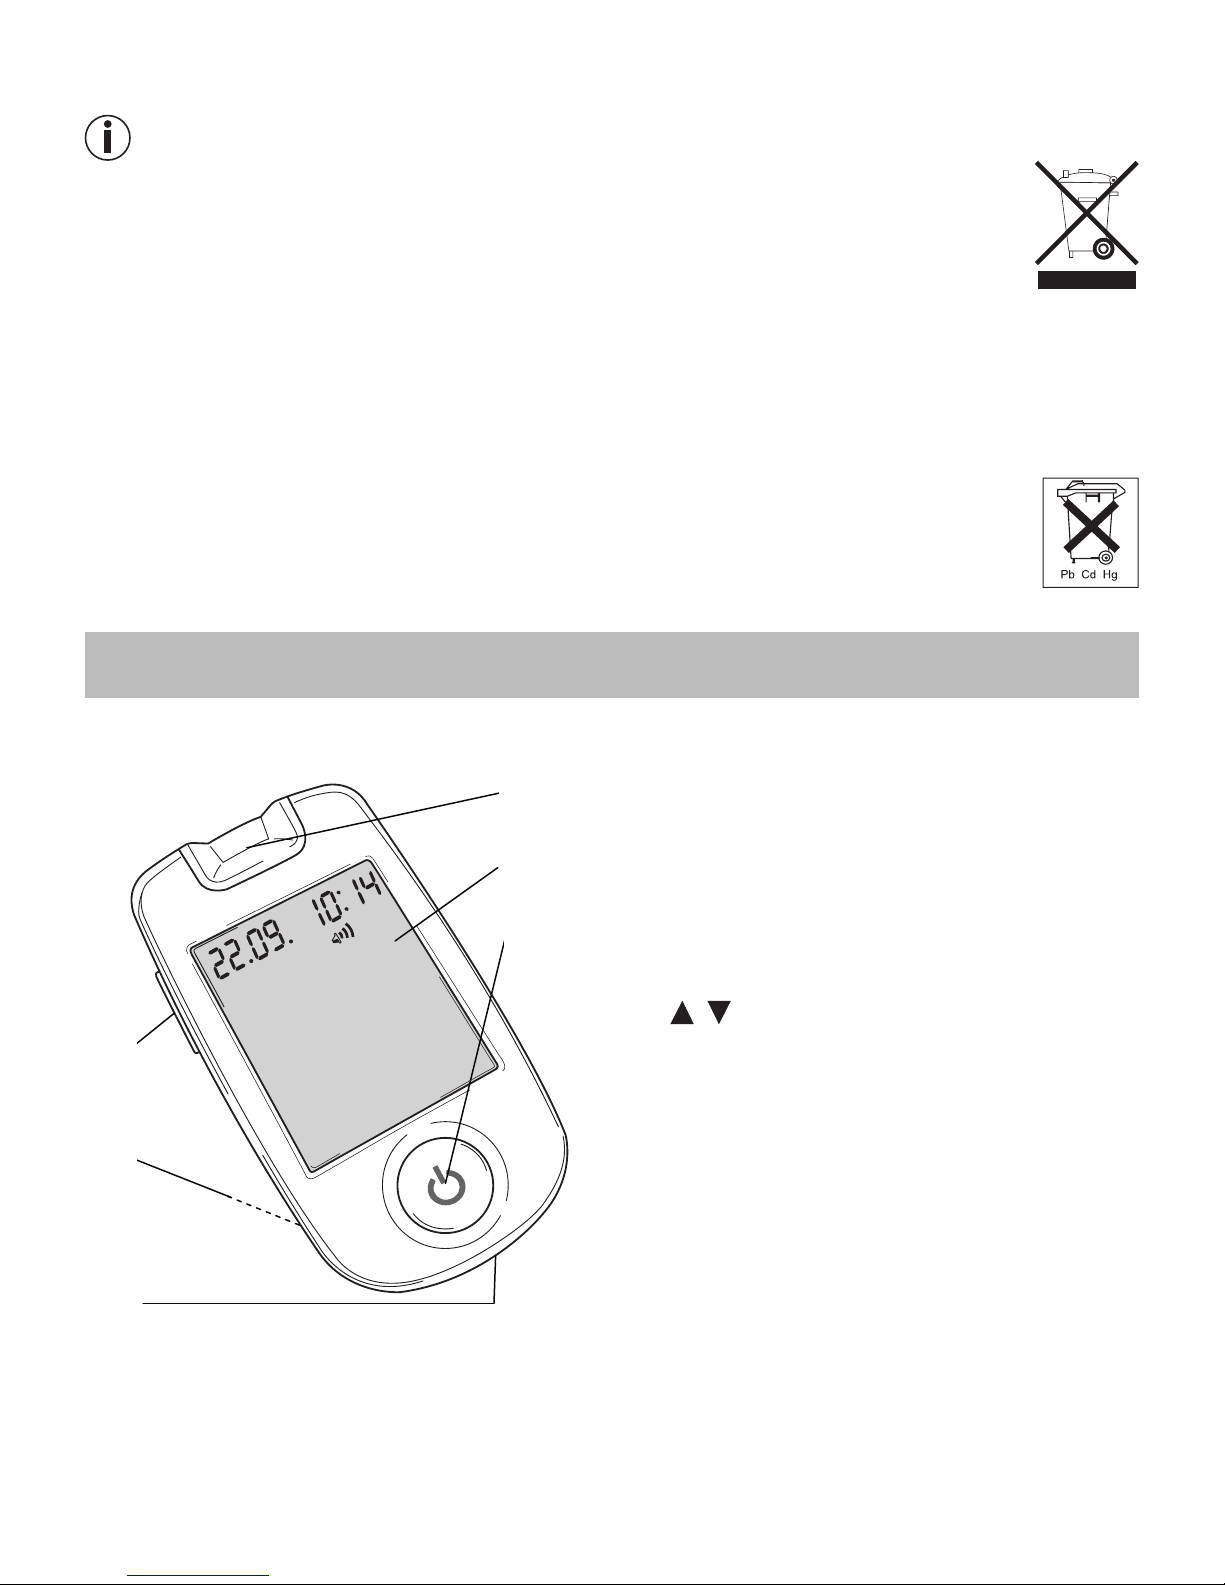
The Beurer GL40 mg/dL measuring system is suitable for measuring capillary whole blood.
Storage and maintenance
Warning
•
Store the measuring device and accessories out of the reach of young children. Small parts, such as
needle lancets, batteries or test strips, can be life-threatening if swallowed. If parts are swallowed,
seek medical advice immediately.
•
The test strip container contains a desiccant that may cause skin or eye irritations if inhaled or swal-
lowed. Keep the container out of reach of young children.
The measuring device is made from precision and electronic components. The accuracy of the meas-
ured values and service life of the unit depend on careful use:

Beurer GL40 mg/dL 9
•
Protect the unit and accessories from impacts, moisture, dirt, large temperature fluctuations and di-
rect sunlight. Do not store the unit, the test strips and the control solution in a refrigerator, bathroom
or car!
•
Do not let the unit fall.
Batteries/Saving measured values
Warning
•
Make sure batteries are not accessible to children. Children can put batteries in their mouth and swal-
low them. This can cause severe harm to their health. In this case, consult a physician immediately!
•
Normal batteries must not be recharged, heated or thrown into an open flame (danger of explosion!).
Important
•
Do not disassemble or short-circuit the batteries.
•
Always replace all batteries at the same time and use batteries of the same type. Do not use any
rechargeable batteries.
•
Leaking batteries may damage the unit. If you do not intend to use the unit for a prolonged period,
remove the batteries from the battery compartment.
Caution!
•
Leaking or damaged batteries can cause burns if they come into contact with your skin. In this case,
wear suitable safety gloves.
Note
•
The stored blood glucose measured values are retained when you replace the batteries. The date
and time are also retained when you replace the batteries and when the batteries are empty.
•
Only use lithium-ion batteries.
Repairs
Note
•
Never open the unit. Opening the unit invalidates the guarantee.
•
Do not perform any repairs on the unit yourself, otherwise correct functioning of the unit can no
longer be guaranteed.
•
If repairs are required, please contact customer service.
Disposal
Warning
•
When disposing of the materials of the measuring device, be sure to observe the generally applica-
ble safety precautions for handling blood. Carefully dispose of all blood samples and materials with
which you or your patients have come into contact, in order to prevent injury and infection of others.
•
After use, dispose of the test strips and lancets in a sharp-proof container.

10 Beurer GL40 mg/dL
Note
In the interest of protecting the environment, the unit must not be thrown out with the
household waste at the end of its service life. Please dispose of the unit in accordance
with EU directive 2002/96/EC – WEEE (Waste Electrical and Electronic Equipment). For
any queries, please contact the municipal authority responsible for disposal.
Standard and rechargeable batteries should not be disposed of along with household waste. As a
consumer, you are legally obliged to return used batteries for proper disposal.
You can hand in your used batteries at public collection points in your district or sales outlets where
batteries of this type are sold.
The codes below are printed on batteries containing harmful substances:
•
Pb = Battery contains lead,
•
Cd = Battery contains cadmium,
•
Hg = Battery contains mercury.
3 description of units And Accessories
3.1 Blood Glucose Monitoring device
2
1
3
4
6
5
1Receptacle for test strips, with lighting
2 Display
3ON/OFF button
4Computer port
5Battery compartment (underside)
6rocker button

Beurer GL40 mg/dL 11
3.2 Lancing device and needle lancets
1Cap with scale for adjusting the puncture
depth
2Protective disk for the lancet
3Sterile needle lancet
4Lancet holder
5Release button
6Tensioning device
7Lancet ejector
3.3 Display symbols
1 Date
2 Time
3 Computer connection active
4 Measured value display, HI /
LO display, average blood glucose
5 Blood glucose unit mg/dL
6 Blood glucose unit mmol/L
not functional
7 Battery change symbol
8 Symbol to apply blood
9 Temperature symbol
10 Blood drop symbol
11 Test strip symbol
12 Memory symbol
13 Error symbol
14 Speaker symbol
1
2
3
4
5
6
7
8
9
10
11
12
13
14
Note
The measuring device is supplied with the following basic settings:
•
Blood glucose unit: mg/dL
•
Beep on

12 Beurer GL40 mg/dL
3.4 Test strips
Front view Rear view
3
2
1
1 Slit for blood collection
2 Hold here
3 Contacts
You will know which side is the rear from
the contact panels.
Insert the test strip into the unit so that the contacts are visible in the slit. Ensure that the front side
of the test strip is facing you.
Note
Read the following information about handling and storing your test strips carefully. The test strips
are guaranteed to yield accurate measurement results only if you observe all instructions.
Warning
•Eachteststripistobeusedonlyonce and only for one patient!
Handling test strips
Note
•Onceyouhaveremovedtheteststrip,tightlyclosethecontaineragainimmediately.

Beurer GL40 mg/dL 13
•Donotuseteststripsiftheexpirydatehaspassed.Theuseofexpiredteststripscanleadtoinac-
curate measurements. The expiry date is located on the container next to the hourglass symbol
.
•
The test strips can be kept for three months once the container is open. Make a note of when this
timewillrunout(dateofopening+3months ) on the label. The shelf life decreases if the expiry
date is reached before the end of the 3 months (see the date next to the hourglass symbol ).
•
Do not use the test strips if either of these dates has expired ( / ).
•
Any part of the test strip may be handled with dry, clean hands.
•
Use the test strips immediately upon removal from the container.
•
Do not bend, cut, or otherwise modify the test strip.
•
Do not use test strips that have come into contact with liquids for the blood glucose measurement.
Storing test strips
Note
•
Storeteststripsinacool,dryplacebetween+2°Cand+30°C.Protectteststripsagainstdirectsun-
light or heat. Do not store test strips in the fridge.
•
Permitted relative humidity under 90%.
•
Store test strips only in the original container – never use another container.
4 usinG the unit for the first tiMe And bAsic settinGs
4.1 Removing the battery insulation strips, replacing the batteries
Note
•
Two batteries are included in the delivery
scope of your blood-glucose monitoring
device.
They are already inserted in the battery
compartment.
•
Before using the unit the first time, you
must remove the insulation strip.
1
Remove the cover of the battery compartment on the underside of the unit.
2
When you perform a battery change, remove all batteries. While changing the batter-
ies, the device retains the date and time as long as one of the batteries remains inserted.
If the replacement takes a long time, you may have to adjust the date and time afterwards (see
"Basic settings" on page 14).
3
Insert two new batteries of type CR 2032 3V.
Ensure that the batteries are inserted with the correct polarity, according to the diagram. See
the diagram inside the battery compartment.
4
Carefully replace the lid on the battery compartment.

14 Beurer GL40 mg/dL
Note
•
When the battery change symbol appears, the batteries are almost empty. Replace both bat-
teries as soon as possible.
•
When “
LP
” is displayed, the batteries are so empty that no more measurements are possible.
4.2 Basic settings
1
Remove the batteries and then reinsert them. A beep sounds.
The year display flashes.
2
Setting the date and time
Note
•You must set the date and time. Only if you do that can you save your measured values cor-
rectly with the date and time and later retrieve them.
•The time is displayed in 24-hour format.
Set the year (calendar extends to 2099) by pressing the or button.
Confirm via the ON/OFF button [3].
The day display flashes.
Repeat the above procedure for the day, month, hours and minutes.
"" and the speaker symbol are displayed.
3
Turning the beep on/o
To turn o the beep, press the or button. " " is displayed.
The speaker symbol disappears from the display.
Confirm via the ON/OFF button [3].
4
The measuring device switches o automatically.
5 MeAsurinG Your blood Glucose
Warning
•
If the protective disc on a lancet needle has already been removed, do not use the lancet needle.
•
If you drop the lancing device while a needle lancet is inserted, pick it up carefully and dispose of
the lancet.
Important
•
Use the lancing device only with needle lancets from the manufacturer. Use of other needle lancets
can impair the function of the lancing device.
•
If the lancing device is manufactured by a third party, consult their instructions for use.

Beurer GL40 mg/dL 15
5.1 Acquiring blood samples
Preparing to take the blood sample
1
Choose a site on the body from where you wish to take the blood sample. You can use the
lancing device to take a blood sample from the fingertip or alternative sites such as the palm
of the hand, forearm or upper arm. We recommend that you take the blood sample from the
fingertip. To make the blood sample as pain-free as possible, do not take the blood directly
from the centre of the fingertip, but instead from slightly to the side of the centre.
Warning
•
If you suspect hypoglycaemia: be sure to draw blood from the fingertip. This is because
changes in the blood glucose level can be measured quickly in blood samples from the fin-
gertip.
•
Measuring from a fingertip and another part of the body (AST) can lead to significantly dier-
ent measured values. Always consult your doctor before starting to test at alternative sites.
2
Have the following components ready: Measuring device, container of test strips, lancing de-
vice, and a sterile needle lancet. If obtaining a blood sample from a site other than the fingertip,
you will also need the AST cap.
3
Before taking the sample, wash your hands using soap and warm water. In addition to optimal
hygienic conditions, this is also ensures good circulation of blood through the fingertips. Dry
your hands carefully. Also ensure that your lancing site is hygienically clean if taking a blood
sample from an alternative site (AST).
Warning
If you wipe the lancing site with alcohol, ensure that the site has dried completely before be-
ginning the measurement.
Taking a blood sample
Warning
•
Change the prick point for each test, e.g. another finger or the other hand. Repeated pricks at the
same point can lead to inflammation, numbness or scars.
•
Do not use the AST cap to take a blood sample from the finger.
•
Never squeeze the finger to obtain a larger droplet of blood. Squeezing causes interstitial fluid to
dilute the blood; this can lead to a false measurement result.
•
Note that inadequate circulation at the puncture site, for example caused by cold or illness, can lead
to inaccurate measurements.

16 Beurer GL40 mg/dL
1Twist to remove the cap from the lancing device.
2Place a sterile needle lancet in the lancing device and push
the lancet firmly into place.
3
Remove the protective disc from the lancet by twisting while
holding the shaft of the lancet firmly. Retain the protective
disc so that you can safely dispose of the used needle lancet
after taking the blood sample.
4
You will need to use a dierent cap depending on the site
from which you want to take the sample:
Fingertip: Cap
Other body parts: AST cap (transparent)
Place the selected cap on the lancing device and twist it
into place.
5Setting the puncture depth:
You can preset six dierent puncture depths on the lancing
device by turning the cap. A small bar means a shallow
puncture depth, and a large bar means a deep puncture
depth.
The dierence in puncture depth between the smallest and
largest click position is approx. 2 millimetres
•Smallbar(1to2): Delicateorthinskin
•Mediumbar(3to4):Normalskin
•Largebar(5to6): Thickorroughskin
Turn the cap to the required click position until the arrow in-
dicates the desired puncture depth.

Beurer GL40 mg/dL 17
6
Pull back the tensioning device until you hear it click into
place.
If it does not engage, the lancing device may have uninten-
tionally already been tensioned when inserting the needle
lancet and could already be engaged.
7The lancing device can now be used to take the blood sam-
ple.
Ensure that the blood remains in a droplet form and is not
smeared.
Blood sample from the fingertip
Place the lancing device firmly against the finger, slightly to
the side of the centre of the fingertip. Press the release but-
ton.
Lift the lancing device from the finger. You need a round
blood drop of at least 0.6 microlitres to form (corresponds to
approx. 1.4 mm, original size: ).
Blood sample from an alternative site (AST)
Choose a site that is soft, not next to a bone, with no visible
veins and without excessive body hair. Warm the puncture
site to ensure good circulation, for example by lightly mas-
saging
the area. Place and hold the lancing device against the
puncture site for a few seconds and press the release button.
Continue to hold the lancing device against your skin until a
round droplet of blood has formed under the cap. Keep ap-
plying pressure until the size of the blood drop is at least 0.6
microlitres (corresponds to approx. 1.4 mm, original size: ).
Lift the lancing device carefully away from the skin.
8If insucient blood was collected, increase the puncture
depth and repeat steps 5 to 7.
9Untwist the cap and carefully remove it from the lancing
device.

18 Beurer GL40 mg/dL
10 Place the protective disk you kept earlier flat on a hard
surface. Pierce the protective disk with the tip of the
needle so that the needle is covered.
11 Slide the lancet ejector towards the needle lancet until
the needle lancet is released from the lancing device.
Dispose of the lancet in a sharp-proof container.
Carefully dispose of all blood samples and materials
with which you have come into contact. This prevents
injury and prevents infection spreading to other people.
12
T
wist the (white) cap back in place.
5.2 Measuring the blood glucose value
1Hold the measuring device so that the display is facing you.
2Insert a test strip, contacts first, into the unit. Ensure that the front side is facing you.
You can handle any part of the test strip with clean, dry hands.
3The unit switches on automatically and shows the start display. As soon as the hand
and symbols are flashing, the unit is ready to perform measurements.

Beurer GL40 mg/dL 19
4Hold the blood collection slit (at the point of the test strip)
against the blood droplet. Do not press the puncture site
(fingertip or other body part) against the test strip. The
blood must not be smeared. The blood is sucked into the
slit.
Warning:
Hold the blood collection slit of the test strip against the blood
droplet until the slit is completely filled and you hear a beep.
Withdrawing the test strip from the blood droplet before the
beep may lead to incorrect measurements.
5Once the slit is filled with blood, the unit performs the blood glucose measurement.
The measuring device counts down for approx. five seconds. Then the measurement
result is shown in the display.
Read the measured value.
For explanations and corrective measures concerning measured values, see the next
Chapter "Evaluating a blood glucose measured value", page 19.
If an error message is displayed, read the Chapter "Troubleshooting", page 26.
6Remove the test strip from the unit and dispose of it carefully in accordance with the
applicable guidelines in order to prevent infection of other people.
Note
•
If the unit does not begin the measurement, do not subsequently apply more blood. Instead, remove
the test strip and end the test procedure. Start again using a new test strip.
•
If the test strip is already in the unit and you do not put any blood on it within two minutes, the unit
switches o. Remove the test strip then and reinsert it into the slot, so that the unit switches on
again automatically.
•
If you experience diculties applying blood to the test strip correctly, contact customer service.
•
If you are measuring in a dimly lit room, press the ON/OFF button to switch on the unit.
The test strip area lighting turns on and makes it easier for you to insert the test strip.
In addition, the backlighting turns on for the results display.
5.3 Evaluating a blood glucose measured value
Your Blood Glucose Monitoring device can process measured values between 20 and 630 mg/dL.
The warning message " " is displayed for measured values below 20 mg/dL. The warning message
"" is displayed for a measured value above 630 mg/dL.
Warning
•
If you suspect that the blood glucose values are incorrect, first repeat the test and, if necessary, per-
form a function test using the control solution. If you consistently have reason to doubt the results,
contact your doctor.

20 Beurer GL40 mg/dL
Blood glucose
The following table shows a classification of blood glucose values according to the guidelines of the
German Diabetes Association (DDG).
Time of blood glucose
measurement
Normal blood
glucose values
Suspicion Diabetes
On an empty stomach
below 100 mg/dL 100-110 mg/dL Above ≥ 110 mg/dL
2 hours after eating below 140 mg/dL 140 –200 mg/dL Above ≥ 200 mg/dL
Source: Deutsche Diabetes Gesellschaft (DDG) 2008
Evaluating critical measured values
Display Blood glucose Action
Hypoglycaemia
Below 20 mg/dL
Immediate medical attention required.
Low blood glucose
Below 70 mg/dL
Eat a suitable snack or small meal.
Followyourphysician'sinstructions.
High blood glucose
With an empty stomach
Above 100 mg/dL
2 hours after eating
Above 140 mg/dL
If the value remains high 2 hours after
your last meal, this may indicate hyper-
glycaemia (high blood glucose). Discuss
with your doctor any possible action to
take in this case.
High blood glucose, possibly
ketones
Above 240 mg/dL
Perform a ketone test. Consult your
doctor.
Very high blood glucose
Above 630 mg/dL
Repeat the measurement with a
new test strip. If the display shows
the same result again: Seek medical
advice immediately.
Other manuals for GL40
2
Table of contents
Other Beurer Blood Glucose Meter manuals