manuals.online logo
Brands
  1. Home
  2. •
  3. Brands
  4. •
  5. BH FITNESS
  6. •
  7. Treadmill
  8. •
  9. BH FITNESS T7 User manual

BH FITNESS T7 User manual

BH Fitness • 20155 Ellipse • Foothill Ranch • CA • 92610
www.bhfitness.com
Treadmill Owner’s Manual
BH Fitness T7
BH FITNESS
20155 Ellipse Foothill Ranch CA 92610
Phone: 949-206-0330 Fax: 949-206-0013
Email: f[email protected]
Web: www.bhnorthamerica.com and www.bhfitness.com
Issued: 18 July 2008 (v1)
Revised: 20 November 2008 (v2)
T7 Treadmill
BH Fitness • 20155 Ellipse • Foothill Ranch • CA • 92610
www.bhfitness.com • Phone 949-206-8152 • Fax 949-206-0013
1
TABLE OF CONTENTS
SECTION PAGE
Safety Instructions . . . . . . . . . . . . . . . . . . . . . . . . . . . . . . . . . . . . . . . . . . . . . 2
Assembly . . . . . . . . . . . . . . . . . . . . . . . . . . . . . . . . . . . . . . . . . . . . . . . . . . . . 5
Maintenance. . . . . . . . . . . . . . . . . . . . . . . . . . . . . . . . . . . . . . . . . . . . . . . . . . 10
Lubricating and adjusting the belt. . . . . . . . . . . . . . . . . . . . . . . . . . . . . . . . . . 11
Removing and washing the bottle holder . . . . . . . . . . . . . . . . . . . . . . . . . . . . 14
Fitness and Exercise . . . . . . . . . . . . . . . . . . . . . . . . . . . . . . . . . . . . . . . . . . . 15
Troubleshooting . . . . . . . . . . . . . . . . . . . . . . . . . . . . . . . . . . . . . . . . . . . . . . . 17
Computer Console . . . . . . . . . . . . . . . . . . . . . . . . . . . . . . . . . . . . . . . . . . . . 18
Warranty . . . . . . . . . . . . . . . . . . . . . . . . . . . . . . . . . . . . . . . . . . . . . . . . . . . . 25
T7 Treadmill
BH Fitness • 20155 Ellipse • Foothill Ranch • CA • 92610
www.bhfitness.com • Phone 949-206-8152 • Fax 949-206-0013
2
USER SAFETY INSTRUCTIONS
PRECAUTIONS
This treadmill has been designed and constructed to provide maximum safety. Nevertheless
certain precautions should be taken when using exercise equipment. The following safety
instructions should also be taken into consideration: Always observe basic safety precautions
when using the treadmill including the following:
1. Users should pass a full medical examination before they embark upon any type of
exercise program.
2. For safety maintain a minimum clearance around the treadmill. Maintain 18 inches on the
front and on each side of the treadmill plus 24 inches at the rear of the treadmill.
3. To guarantee your safety and that of the equipment read through the entire manual
carefully before assembling and/or using the treadmill.
4. To ensure correct and safe use of the equipment make sure that all those who use the
machine have read this manual or are aware of its content. The contents of this manual
should form part of your training program.
5. To reduce the risk of electric shock always unplug the unit before proceeding to carry out
cleaning and/or maintenance tasks.
6. To reduce the risk of burns fire electrical shocks or personal injuries observe the following
precautions:
7. Do not allow children or people who are unfamiliar with the operation of the appliance get
too near and/or on the unit. Under no circumstances must this appliance be used as a toy.
8. Do not leave the treadmill operating unsupervised. Unplug the unit from the power supply
when not in use and before cleaning it or removing any of its component parts. Never
adjust the drive belt while the treadmill is being used.
9. Install and use the treadmill on a flat stable surface. Do not place it alongside walls or
furniture. Check the unit before each use and make sure that the belt is in good condition.
10. Keep the treadmill in good working order.
11. The treadmill must only be used as described in this manual. Do not use accessories that
are not recommended by the manufacturer as these may cause injuries.
12. The treadmill can only be used by one person at a time.
SAVE THESE INSTRUCTIONS
T7 Treadmill
BH Fitness • 20155 Ellipse • Foothill Ranch • CA • 92610
www.bhfitness.com • Phone 949-206-8152 • Fax 949-206-0013
3
TREADMILL SAFETY AND GENERAL INSTRUCTIONS
Carefully read through the instructions contained in this manual. It provides you with important
information about assembly safety and use of the machine.
1. For safety maintain a minimum clearance around the treadmill. Maintain 18 inches on the
front and on each side of the treadmill plus 24 inches at the rear of the treadmill.
2. This unit has been designed for professional use. The weight of the user must not exceed
400 lbs.
3. Keep your hands well away from any of the moving parts.
4. The owner is responsible for ensuring that anyone who uses the machine is informed about
all of the necessary precautions.
5. Be careful when stepping on or off the treadmill. Use the side supports whenever
necessary. Start the exercise on the treadmill belt at a speed of less than 1.8 miles/hr.
6. Do not step off the belt while it is still in motion.
7. Keep your body and head facing forward toward the console.
8. Never try to turn around while using the equipment.
9. Do not start the machine while there is someone on it.
10. Wear appropriate clothing and footwear for the exercise. Do not wear baggy clothing. Tie
your hair up if it is long.
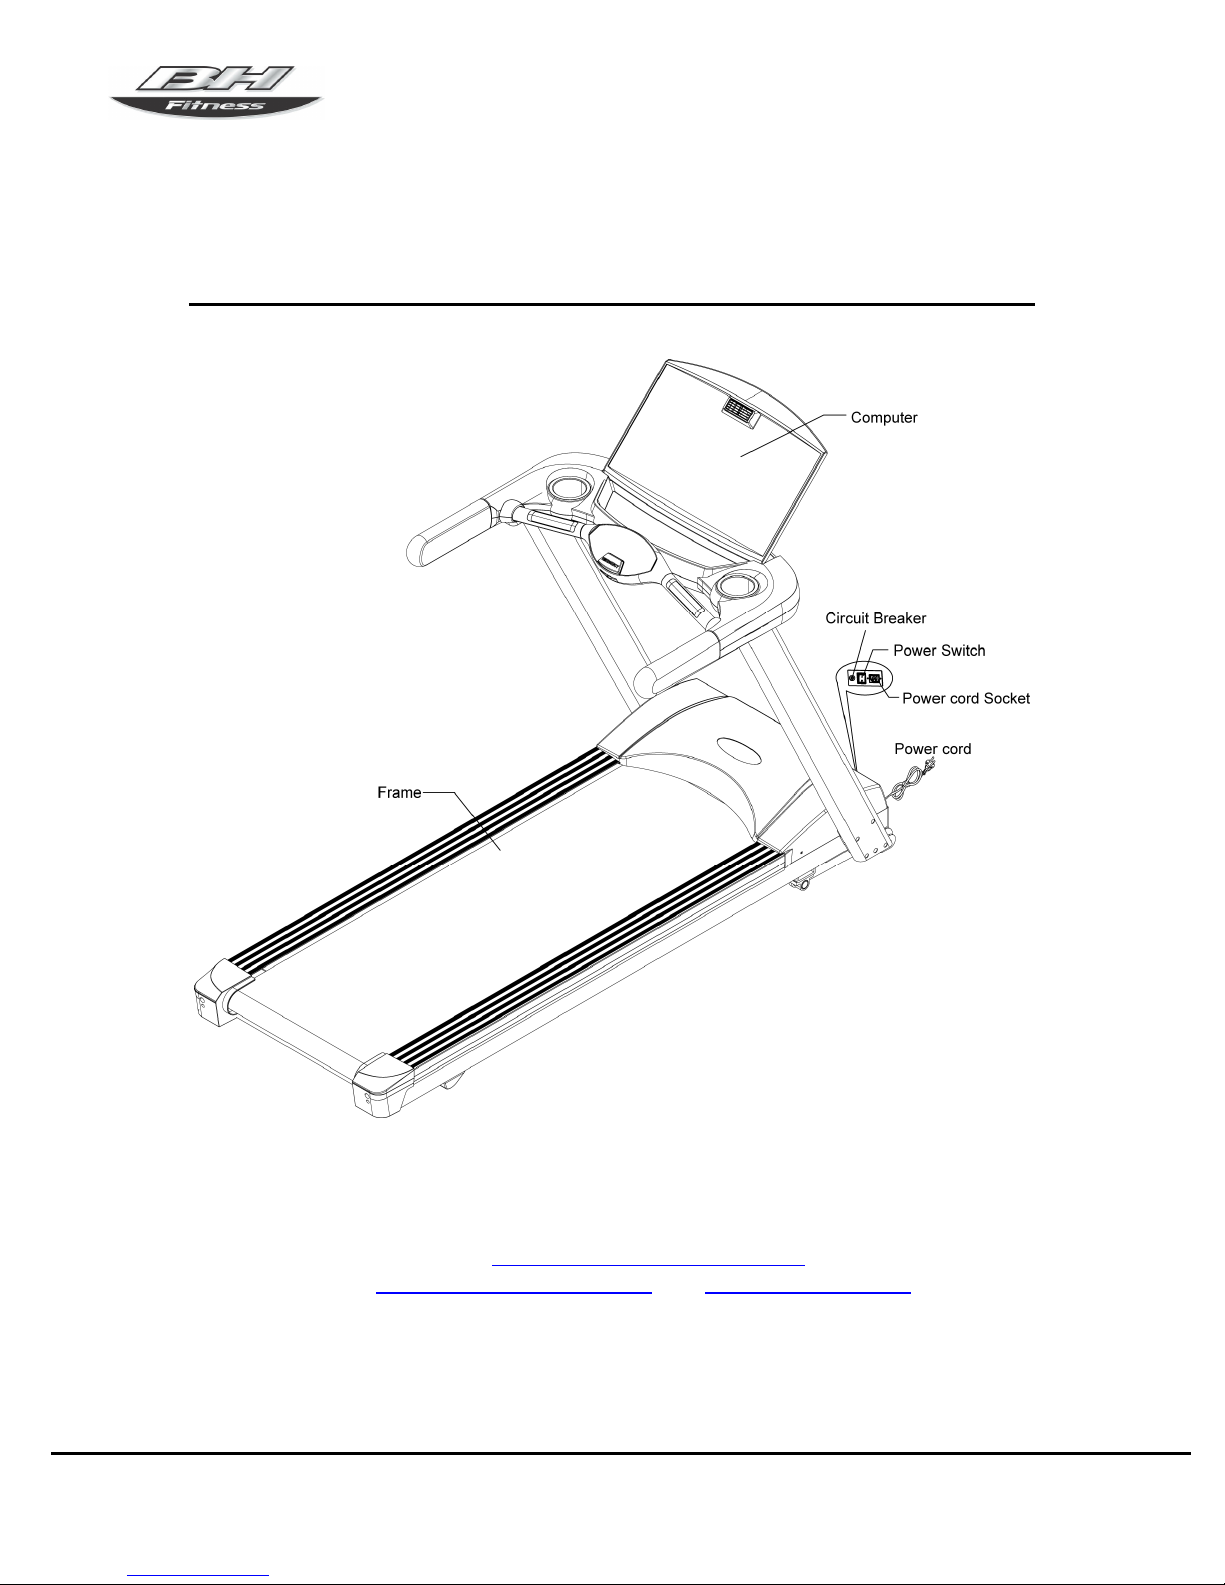
11. Do not exert too much force on the frame of the machine. Do not lean against the computer
console or the machine casing.
12. Do not drop or insert objects into any of the openings on the machine. Keep hands and
towels well away from moving parts.
13. Do not overexert yourself or exercise beyond your capabilities. Stop exercising immediately
if you are in pain or feel strange and seek professional medical advice.
14. To prevent the risk of electric shock keep liquids away from all electrical components
(motor switches etc.). Do not rest anything on the casing the treadmill belt or the
computer console. Place liquids on the storage rack inside the appropriate container.
15. Do not use the equipment if it is damaged does not work correctly or if it has been dropped
from a height or fallen in water. Take the equipment to a technical service center to have it
checked and repaired.
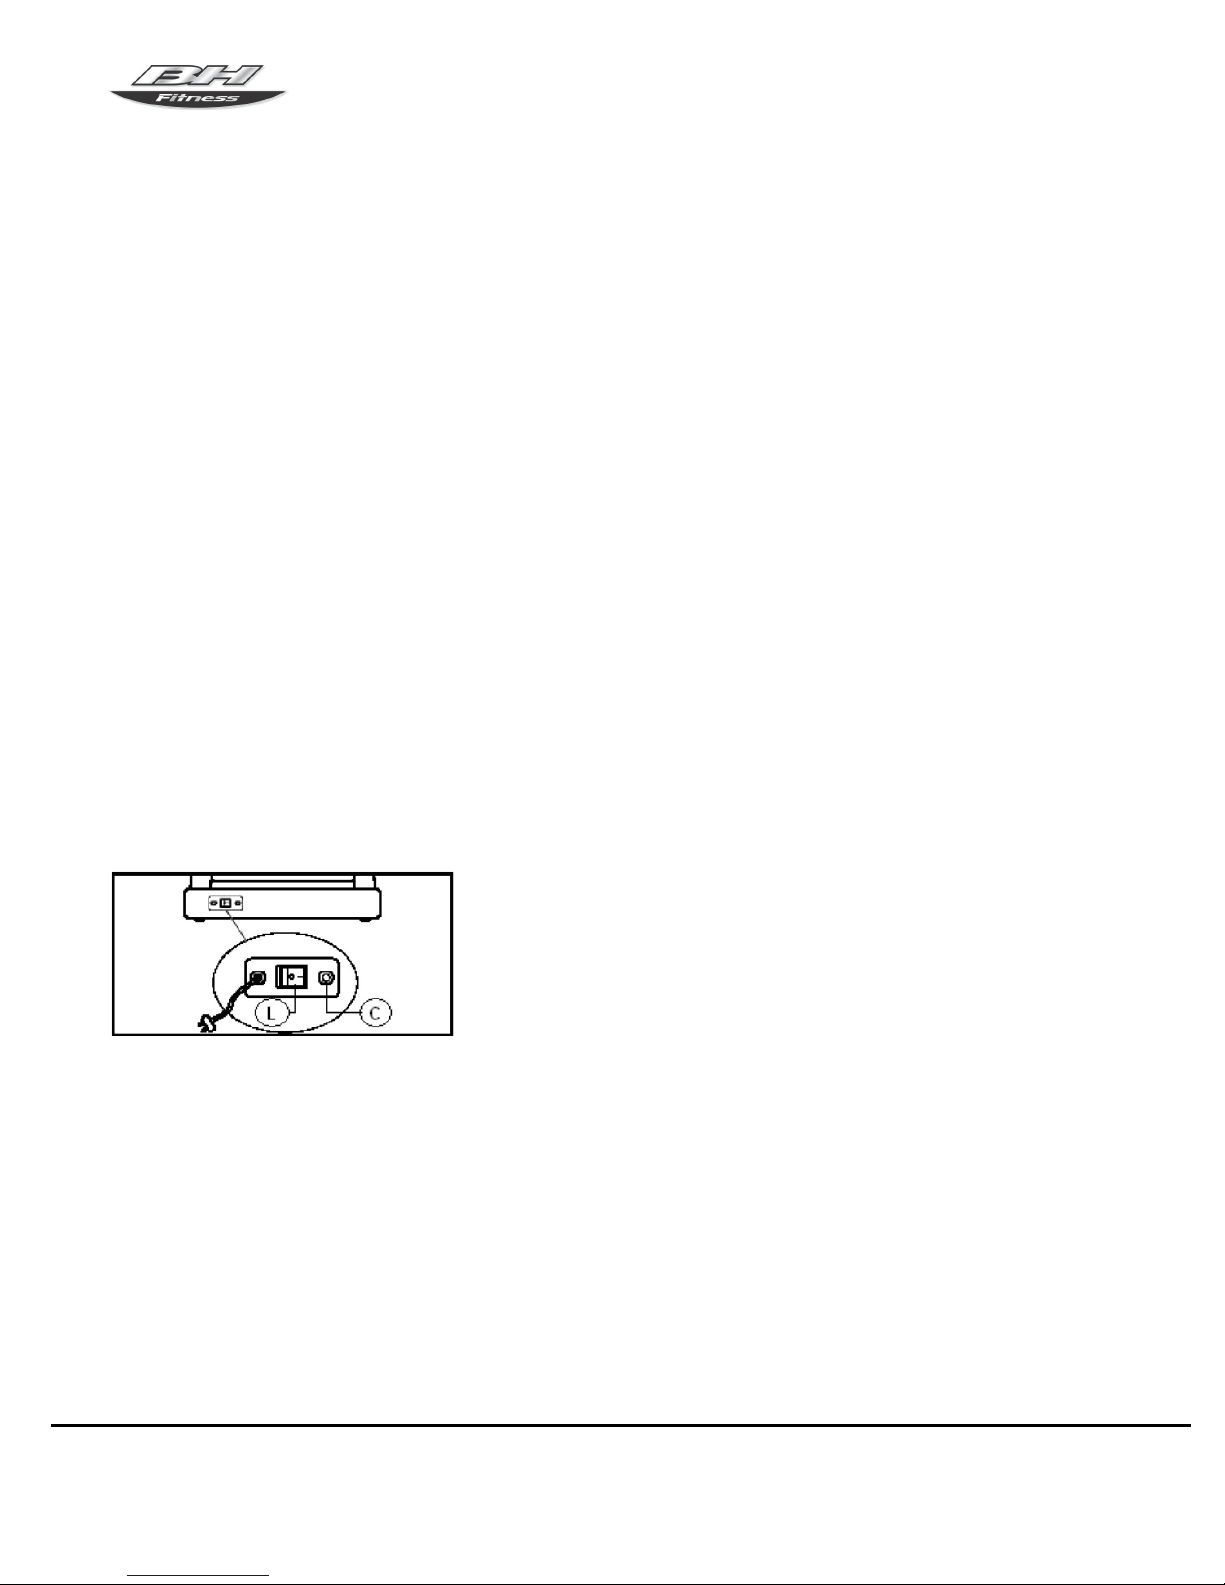
16. Make sure that the supply voltage is suitable for the machine before plugging it in. The
voltage output must be 110 V-120V 20 Amp and the outlet must have the same pin layout
as the plug. If this is not the case please consult your technical service center.
17. The equipment must only be connected to a dedicated electrical circuit with an earth
ground connection. If not the user risks receiving an electric shock. Make sure that the wall
outlet has the same pin layout as the plug on the appliance. See Fig. A.
GROUNDED
OUTLET
GROUNDING
PIN
Fig A.
T7 Treadmill
BH Fitness • 20155 Ellipse • Foothill Ranch • CA • 92610
www.bhfitness.com • Phone 949-206-8152 • Fax 949-206-0013
4
TREADMILL SAFETY AND GENERAL INSTRUCTIONS
18. Do not use the machine if the power cord becomes damaged or worn.
19. Do not tug on the power cord in order to unplug the unit.
20. Keep the plug and power cable away from hot surfaces.
21. Do not use the equipment in areas where aerosol sprays are used.
22. Do not use the machine outdoors.
23. Do not attempt any maintenance and/or repair work other than that stated in this manual.
For more complicated tasks please get in touch with your technical assistance service.
SAFETY BREAKER
This model is equipped with an electronic circuit breaker to protect both the electronic and
electrical circuits. Figure B.
The circuit breaker will be automatically triggered if the unit is subjected to abnormal force or
heat.
Should this occur:
1. Set switch (L) located on the main body to the “0” (OFF) position.
2. Press the circuit button (C) to reset the unit.
3. Next set switch (L) to the “I” (ON) position and the unit will be ready for use again.
Should the circuit breaker trip repeatedly then the most probable causes are:
-Abnormal working conditions
-Treadmill belt in need of lubricant (Figure (7))
-Solvent based lubricants used (use BH type)
-Belt is too tight.
Plug the unit into a wall socket with a ground terminal. Set switch (L) to Position [1].
Figure B
T7 Treadmill
BH Fitness • 20155 Ellipse • Foothill Ranch • CA • 92610
www.bhfitness.com • Phone 949-206-8152 • Fax 949-206-0013
5
ASSEMBLY
ASSEMBLY INSTRUCTIONS
Take the unit out of the box and place it on the floor as shown in Figure 1. Verify that the parts
are undamaged and quantities are correct.
ATTENTION: The assistance of a second person is advisable for the assembly work.
Follow the assembly instructions step by step:
ITEM DESCRIPTION
Qty
A Computer Console 1
B Frame 1
C Handle/Holder Set 1
D Right Upright 1
E Left Upright 1
F Bottle Holder 2
G Bottle 1
ITEM Description Qty
a
SK-415 Bolt
8
b
Nylon Nut M8
4
c
Truss Hex Bolt M8xP1.25x45
2
d
Plastic Handle
2
e
Hex Wrench 6mm x 80mm x
80mm
1
f
Hex Wrench 5mm x 80mm x
80mm
1
g
Power Switch Cover
1
h
T Shaped Wrench 8mm x 200mm
1
i
Sleeve Spanner (wrench) + Screw
Driver
1
j
Bottle of SILICONE Lubricant
1
k
Power Cord
1
T7 Treadmill
BH Fitness • 20155 Ellipse • Foothill Ranch • CA • 92610
www.bhfitness.com • Phone 949-206-8152 • Fax 949-206-0013
6
1. As required use the fishing line inside
of uprights (D E) to bring wire up from
Frame throught upright to the top of
upright.
2. One assembler hold the upright.
3. Second assembler tighten the left and
right uprights (E D) on the frame with
Bolt (a). Be careful not to damage
wires.
4. Pass wire from Upright into
Handle/Holder Set (C) through cup
holder space to the rear of (C). See
small figure.
5. Fasten Handle/Holder Set (C) onto
uprights (D E) with Nylon Nut (b).
6. Verify wire appears at the rear of (C).
See small figure.
Bring wire to rear
E
D
T7 Treadmill
BH Fitness • 20155 Ellipse • Foothill Ranch • CA • 92610
www.bhfitness.com • Phone 949-206-8152 • Fax 949-206-0013
7
7.
Remove the two fasteners and the
cover under the computer console (A)
according to the arrowhead in the
right drawing. Save two fasteners for
reuse.
NOTE: Two Assemblers are required.
8. Connect the lower control wire of
Handle/Holder Set (C) and the upper
control wire of Computer Console (A).
9. Fasten the computer on Holder (C)
with Bolt (c).
10. Reinstall the cover under the
computer console (A). Reuse the two
fasteners removed in step 7.
11. Tighten the computer console (A)
with plastic handles (d).
T7 Treadmill
BH Fitness • 20155 Ellipse • Foothill Ranch • CA • 92610
www.bhfitness.com • Phone 949-206-8152 • Fax 949-206-0013
8
12. Put the bottle holders (F) into the
Holder (C) and turn to hold firmly.
13. As required install the Power Switch
Cover (g) over the Power cord (k).
14. As required insert the Power cord
into the Frame.
15. As required screw the Cover (g) to
the Frame.
T7 Treadmill
BH Fitness • 20155 Ellipse • Foothill Ranch • CA • 92610
www.bhfitness.com • Phone 949-206-8152 • Fax 949-206-0013
9
ASSEMBLY CONTINUED
POSITION THE TREADMILL
1. For safety maintain a minimum clearance around the treadmill. Maintain 18 inches on the
front and on each side of the treadmill plus 24 inches at the rear of the treadmill.
NOTE: Safe movement of the treadmills is explained in the MAINTENANCE section of this
manual.
T7 Treadmill
BH Fitness • 20155 Ellipse • Foothill Ranch • CA • 92610
www.bhfitness.com • Phone 949-206-8152 • Fax 949-206-0013
10
MAINTENANCE
LEVELING
Once the unit has been placed into its final position for doing exercise make sure that the
treadmill sits flat on the floor and that it is level. This can be achieved by doing the following:
A) - Switch the treadmill on to see if the console shows that the treadmill is at zero inclination
level.
B) – Once you have checked the inclination place a spirit level on the running belt
.
MOVEMENT & STORAGE
NOTE: Lift and roll the treadmill using two people.
NOTE: To prevent accidents DO NOT move the treadmill across uneven floors.
The treadmill is easier to roll if the incline is higher than zero. Unplug the power cord prior to
moving the treadmill. To move the treadmill tilt the treadmill so that the front wheels rest on
the floor.
T7 Treadmill
BH Fitness • 20155 Ellipse • Foothill Ranch • CA • 92610
www.bhfitness.com • Phone 949-206-8152 • Fax 949-206-0013
11
MAINTENANCE
LUBRICATION
Figure 7. Use the bottle of lubricant (h) to lubricate the inside of the belt in order to keep your
unit in top condition and to ensure that friction between the belt and the board is kept to a
minimum (due to different running styles always apply more lubrication to the area where you
place your feet during the exercise). It is advisable to lubricate the base of the belt every 3-12
months depending on how often it is used.
If the belt starts to slip after lubrication then check the tension of the belt. To tension the belt
Figure 8 take the Allen key (m) and with the machine set to 2.5 miles/hr (4 km/h) turn screws
(R & L) one full turn in a clockwise direction.
Table I
Operating Speed Recommended lubrication period
for home use. Lubricate monthly
for business use
1 to 3.7 miles (1 to 6 km) per hour 1 year
3.7 to 7.4 miles (6 to 12 km) per hour 6 months
7.4 to 9.9 miles (12 to 16 km) per hour 3 months
D n t use s lvent based lubricants.
Figure 7 Figure 8
m
T7 Treadmill
BH Fitness • 20155 Ellipse • Foothill Ranch • CA • 92610
www.bhfitness.com • Phone 949-206-8152 • Fax 949-206-0013
12
MAINTENANCE
ADJUSTING THE BELT
If your unit is not seated evenly on the four contact points this may cause the belt shown on
Figure 8 area (X) to shift sideways. Rigorous quality control adjusts and checks the running
belt. However due to weight differences and individual styles of running the belt may be prone
to shift sideways.
If the belt does shift to the left or right stop the machine and adjust the belt.
NOTE: Over tightening of the belt can lead to a loss of speed on the machine and even stretch
the belt itself. Bear In mind that one turn of the right screw (R) in a clockwise direction has the
same effect on the position of the belt as one turn of the left screw (L) in a counterclockwise
direction. Consequently in the event of excessive belt movement you can use either of the two
screws in order to avoid over tightening the belt.
BELT SHIFTED TO THE RIGHT (Figure 8)
1. Turn off and unplug the treadmill each time before using the hex wrench.
2. Use the hex wrench to turn the right hexagonal head socket a 1/4 turn clockwise.
3. Turn on treadmill for a few minutes at a speed of 2.5 mph (4 km/h) and check belt location.
4. If the belt is not centered then turn the left hexagonal head socket a 1/4 turn
counterclockwise.
5. If the belt is not centered then repeat steps.
BELT SHIFTED TO THE LEFT (Figure 8)
1. Turn off and unplug the treadmill each time before using the hex wrench.
2. Use the hex wrench to turn the left hexagonal head socket a 1/4 turn clockwise.
3. Turn on treadmill for a few minutes at a speed of 2.5 mph (4 km/h) and check belt location.
4. If the belt is not centered then turn the right hexagonal head socket a 1/4 turn
counterclockwise.
5. If the belt is not centered then repeat steps.
TREADMILL CLEANING
Switch the unit off and unplug the power cable. Use a damp cloth or towel to clean the dust off
the treadmill especially the side bars and the electronic console. Do not use solvents.
NOTE: Unplug the treadmill before using a vacuum near the treadmill.
Use a vacuum cleaner to carefully vacuum around the visible components (belt structure
etc.). You can increase the INCLINE in order to vacuum the underside of the unit. You can
vacuum the inside of the motor housing by removing the cover that protects the motor (be
careful with the wires).
NOTE: Press STOP to lower the INCLINE.
T7 Treadmill
BH Fitness • 20155 Ellipse • Foothill Ranch • CA • 92610
www.bhfitness.com • Phone 949-206-8152 • Fax 949-206-0013
13
MAINTENANCE
TIGHTENING THE FASTENERS
Check the c nnecti ns and tighten all the parts n y ur unit every three m nths.
Use of this machine with worn parts e.g. the drive belt running belt or rollers may cause the
user injury. If you are unsure about the condition of any part we recommend that you replace it
with original spare parts. The use of other spare parts may cause injuries or affect the
performance of the machine.
T7 Treadmill
BH Fitness • 20155 Ellipse • Foothill Ranch • CA • 92610
www.bhfitness.com • Phone 949-206-8152 • Fax 949-206-0013
14
MAINTENANCE CONTINUED
REMOVING & WASHING THE BOTTLE HOLDER
To check if the Bottle Holder is held loosely gently push the Bottle Holder up from beneath. If
this does not release the Bottle Holder then remove as follows:
RIGHT BOTTLE HOLDER REMOVAL OR INSTALLATION:
Gently grasp the Bottle Holder from beneath or on the rim. Turn it clockwise to unfasten.
Once the Holder is loosened lift the Holder up and out of the hole.
To install a Bottle Holder into the right hole:
Move away the wires.
Insert the Holder into the hole and gently turn counterclockwise to fasten.
LEFT BOTTLE HOLDER REMOVAL OR INSTALLATION:
Gently grasp the Bottle Holder from beneath or on the rim. Turn it counter-clockwise to
unfasten.
Once the Holder is loosened lift the Holder up and out of the hole.
To install a Bottle Holder into the left hole:
Move away the wires.
Insert the Holder into the hole and gently turn clockwise to fasten.
BOTTLE HOLDER WASHING
Please wash the Bottle Holders by hand only. The Bottle Holders cannot be placed into the
dishwasher or microwave.
Left Bottle Holder hole
Right Bottle Holder hole
Bottle Holder
Bottle Holder
T7 Treadmill
BH Fitness • 20155 Ellipse • Foothill Ranch • CA • 92610
www.bhfitness.com • Phone 949-206-8152 • Fax 949-206-0013
15
FITNESS AND EXERCISE
FITNESS
All doctors agree that regular exercise is a good way to control our weight make us more fit
and help us to relax. Before starting any exercise program it is advisable to consult your
doctor. You will achieve better results based on his/her advice or suggestions. Exercise
programs vary depending on age and physical condition.
ADVANTAGES OF EXERCISE
Regular exercise below a certain level for 15/20 minutes becomes aerobic. Aerobic exercise is
basically exercise that uses oxygen. Normally this is a continuous exercise without pauses. In
addition to sugars and fats the body also needs oxygen. Regular exercise improves the body’s
ability to supply oxygen to all of the muscles and at the same time improve lung function the
heart’s pumping capacity and better blood circulation. In short the energy produced during
exercise burns kilocalories (known as calories).
EXERCISE & WEIGHT CONTROL
The food we eat is transformed into among other things energy (calories) for our body. If we
take in more calories than we burn then the result is an increase in weight and vice versa if we
burn more calories than we eat we lose weight. When resting the body burns around 70
calories per hour to keep our vital functions active. The table shows approximate energy use
for an average person doing various activities.
Table II
ACTIVITY CALORIES USED PER HOUR
Walking moderate pace 140
Housework 150
Swimming (400 m/h) 300
Dancing 350
Walking brisk (6 km/h) 370
Tennis 420
Cycling (30 km/h) 500
Squash 690
EXERCISE PROGRAM
Regardless of whether your goal is to become more fit control your weight or for
physiotherapy always remember that your exercise should be gradual planned varied and
not too demanding. We recommend that you should exercise 3 to 5 times per week.
Before beginning a session it is important to do a warm-up for 2-3 minutes at low speed. This
will help protect your muscles and prepare your cardio respiratory system.
The next stage will last 15-20 minutes at a pulse rate of between 65 to 75% or between 75 to
85% for those already accustomed to exercise. At a later stage once we have become fit we
can divide this time between both levels but always remembering that the pulse rate must not
exceed 85% (aerobic area) and never reach the maximum heart rate limit that corresponds to
our age.
T7 Treadmill
BH Fitness • 20155 Ellipse • Foothill Ranch • CA • 92610
www.bhfitness.com • Phone 949-206-8152 • Fax 949-206-0013
16
FITNESS AND EXERCISE
When you have finished it is important to relax the muscles. This can be done by walking at a
low speed for 2-3 minutes until the heart rate drops below the 65% line. This will prevent
muscle pain especially after an intense session. It is also advisable to finish the program with
some relaxation exercises on the floor.
FINAL NOTE
We hope that you enjoy your unit. You will soon notice the benefits of your controlled exercise
program. You will feel better have more energy and suffer less stress. You will see for yourself
that it is worth staying in shape with BH Fitness.
T7 Treadmill
BH Fitness • 20155 Ellipse • Foothill Ranch • CA • 92610
www.bhfitness.com • Phone 949-206-8152 • Fax 949-206-0013
17
TROUBLESHOOTING
Table III
PROBLEM CHECKS SOLUTIONS
1. The c ns le d es
n t switch n.
1a) Make sure that the
machine is plugged in and the
ON/OFF switch is in
position I.
1b) Verify that the console
electric supply cable is
connected.
1a) Plug the machine into the
power supply. Set the switch
to position I.
1b) Connect the console
electric supply cable.
2. The treadmill d es n t
w rk
Check if the electrical outlets
fuse or circuit breaker has
shut off.
Repair fuse or circuit breaker.
Contact a qualified electrician
if required. Plug the treadmill
into a dedicated 110-120V 15
or 20 Amp outlet to ensure the
treadmill receives the
appropriate amount of current
to function correctly. The
outlet must not supply
electricity to any other device.
3. Walking m ti n is jerky
n the treadmill.
3a) Check if the belt is
lubricated.
3b) Check the tension on the
running belt.
3c) Check the tension on the
AC motor drive belt drive belt.
3a) Lubricate the sliding belt.
3b) Adjust the belt tension.
3c) Adjust the drive belt
tension.
4. The treadmill belt skews
ff center.
4a) Check if the machine is
level on the floor.
4b) Check if the machine
wobbles.
4c) Check alignment of the
front and rear rollers.
4a 4b) Use the adjustable
feet to level the machine.
4c) Align the front and rear
rollers.
T7 Treadmill
BH Fitness • 20155 Ellipse • Foothill Ranch • CA • 92610
www.bhfitness.com • Phone 949-206-8152 • Fax 949-206-0013
18
CONSOLE OPERATION
T7 Treadmill
BH Fitness • 20155 Ellipse • Foothill Ranch • CA • 92610
www.bhfitness.com • Phone 949-206-8152 • Fax 949-206-0013
19
CONSOLE OPERATION CONTINUED
SAFETY KEY & CLIP
Your BH Fitness treadmill is equipped with a safety key that will disable the treadmill if it is not
in place. You should attach the clip end to your clothing. The magnet end goes into the recess
of the console. If at any time you need to stop the treadmill quickly simply pull the safety key
off the console. This will cut all power to the treadmill and it will come to a complete stop. To
resume your workout place the safety key back in place. You will then need to program your
workout again.
BEFORE STARTING
Straddle the running belt and stand on the side rails. Insert the safety key and attach the rope
to your clothing. Do not stand on the walking belt while starting or stopping the treadmill.
KEY FUNCTIONS
UPPER CONTROLS:
ENTER – This key is used to input changes to programs.
These keys are used to change values during program setup. They cannot be used
to adjust the speed and inclination while a program is operating.
TIME – This will read the number of minutes left in the program that you have selected except
in “9 HOLE” and “QUICKSTART”. In “9 HOLE” and “QUICKSTART” it will read the
number of minutes that you have been exercising.
CALORIES – This reading is the amount of body heat in calories burned during your workout.
As with all pieces of exercise equipment this is an estimated value.
INCLINE – Incline will read as a percent of incline.
PULSE – Pulse will read in Beats Per Minute (BPM).
SPEED – This is how fast you are moving in terms of Miles Per Hour (MPH).
DISTANCE – Total distance traveled during your workout displayed in miles.

Other manuals for T7

1

This manual suits for next models

1

Other BH FITNESS Treadmill manuals

BH FITNESS T6 Sport User manual

BH FITNESS

BH FITNESS T6 Sport User manual

BH FITNESS G6511 Operator's manual

BH FITNESS

BH FITNESS G6511 Operator's manual

BH FITNESS LKT8 User manual

BH FITNESS

BH FITNESS LKT8 User manual

BH FITNESS G6520 Operator's manual

BH FITNESS

BH FITNESS G6520 Operator's manual

BH FITNESS LK590 User manual

BH FITNESS

BH FITNESS LK590 User manual

BH FITNESS Mycron T200 Operator's manual

BH FITNESS

BH FITNESS Mycron T200 Operator's manual

BH FITNESS TR101i BZ6340VE Operator's manual

BH FITNESS

BH FITNESS TR101i BZ6340VE Operator's manual

BH FITNESS SK6900TV User manual

BH FITNESS

BH FITNESS SK6900TV User manual

BH FITNESS G6520U Operator's manual

BH FITNESS

BH FITNESS G6520U Operator's manual

BH FITNESS TS1 - User manual

BH FITNESS

BH FITNESS TS1 - User manual

BH FITNESS LK590 User manual

BH FITNESS

BH FITNESS LK590 User manual

BH FITNESS YG0900 Operator's manual

BH FITNESS

BH FITNESS YG0900 Operator's manual

BH FITNESS i.F8 Dual G6428UW Operator's manual

BH FITNESS

BH FITNESS i.F8 Dual G6428UW Operator's manual

BH FITNESS 3265723 Operator's manual

BH FITNESS

BH FITNESS 3265723 Operator's manual

BH FITNESS G6587 Operator's manual

BH FITNESS

BH FITNESS G6587 Operator's manual

BH FITNESS G6261 Operator's manual

BH FITNESS

BH FITNESS G6261 Operator's manual

BH FITNESS TS5 - User manual

BH FITNESS

BH FITNESS TS5 - User manual

BH FITNESS G799TVC Operator's manual

BH FITNESS

BH FITNESS G799TVC Operator's manual

BH FITNESS G6426U Operator's manual

BH FITNESS

BH FITNESS G6426U Operator's manual

BH FITNESS TS4 - User manual

BH FITNESS

BH FITNESS TS4 - User manual

BH FITNESS Instructions for assembly and use User manual

BH FITNESS

BH FITNESS Instructions for assembly and use User manual

BH FITNESS BT7050 User manual

BH FITNESS

BH FITNESS BT7050 User manual

BH FITNESS T6 Sport User manual

BH FITNESS

BH FITNESS T6 Sport User manual

BH FITNESS BT6443 Operator's manual

BH FITNESS

BH FITNESS BT6443 Operator's manual

Popular Treadmill manuals by other brands

Reebok RBTL11981 user manual

Reebok

Reebok RBTL11981 user manual

NordicTrack NTHK99900 user manual

NordicTrack

NordicTrack NTHK99900 user manual

NordicTrack 4300 R NTL15941 user manual

NordicTrack

NordicTrack 4300 R NTL15941 user manual

NordicTrack 4500 R NTL20920 user manual

NordicTrack

NordicTrack 4500 R NTL20920 user manual

LIFESTYLER 831.297140 user manual

LIFESTYLER

LIFESTYLER 831.297140 user manual

Cosco Fitness SX-2277 manual

Cosco Fitness

Cosco Fitness SX-2277 manual

Weslo Cadence 800 Treadmill Manual Del Usuario

Weslo

Weslo Cadence 800 Treadmill Manual Del Usuario

Skandika Fitness MARATHON 9 Assembly instructions and user guide

Skandika Fitness

Skandika Fitness MARATHON 9 Assembly instructions and user guide

HEALTH RIDER Soft Strider LX user manual

HEALTH RIDER

HEALTH RIDER Soft Strider LX user manual

Pro-Form PFTL72580 user manual

Pro-Form

Pro-Form PFTL72580 user manual

Life Span LFTM-VFOLD user manual

Life Span

Life Span LFTM-VFOLD user manual

Pro-Form 730 Treadmill owner's manual

Pro-Form

Pro-Form 730 Treadmill owner's manual

Pro-Form PFTL49490 user manual

Pro-Form

Pro-Form PFTL49490 user manual

Life Span TR1200i owner's manual

Life Span

Life Span TR1200i owner's manual

Pro-Form 635 Bedienungsanleitung

Pro-Form

Pro-Form 635 Bedienungsanleitung

Pro-Form 1200 Zlt Treadmill Manual Del Usuario

Pro-Form

Pro-Form 1200 Zlt Treadmill Manual Del Usuario

Pro-Form 3.9 Xm Treadmill Manuel de l'utilisateur

Pro-Form

Pro-Form 3.9 Xm Treadmill Manuel de l'utilisateur

Life Span GOLD 2.0 owner's manual

Life Span

Life Span GOLD 2.0 owner's manual

manuals.online logo
manuals.online logoBrands
  • About & Mission
  • Contact us
  • Privacy Policy
  • Terms and Conditions

Copyright 2025 Manuals.Online. All Rights Reserved.