IMPORTANT SAFETY INSTRUCTIONS
1. Read and follow all instructions and warnings in this manual. Keep for future reference.
2. Do not install near any heat sources such as radiators, heat registers, stoves or other apparatus
(including ampliers).
3. Do not install the unit near water or where moisture is present.
4. Clean with a dry cloth.
5. Unplug this apparatus during lightning storms or when unused for long periods of time.
6. Protect the power cord from being walked on or pinched particularly at plug, convenience
receptacles, and the point where it exits from the apparatus.
7. Refer all servicing to qualied service personnel. Servicing is required when the apparatus has been
damaged in any way, such as when the power-supply cord or plug is damaged, liquid has been
spilled or objects have fallen into the apparatus, the apparatus has been exposed to rain or moisture,
does not operate normally, or has been dropped.
8. To completely disconnect this equipment from the AC mains, disconnect the power supply cord plug
from the AC receptacle.
CAUTION: To reduce the risk of electrical shock, inspect the premises carefully.
Do not use the unit if proper equipment grounding cannot be veried.
FEATURES
INSTALLATION STEPS
1. Connect the VGA source device to the transmitting unit of the B-200-1CAT-VGA. If connecting
to a component video source, use a VGA-component breakout cable and link it between the
video source and the transmitting unit of the B-200-1CAT-VGA.
2. Connect the VGA display to the receiving unit of the B-200-1CAT-VGA. If connecting to a
component video display, use a VGA-component breakout cable and link it between
the video display and the receiving unit of the B-200-1CAT-VGA.
3. Connect a Cat-5/5e/6 cable between the transmitting and receiving units, make sure it is
properly connected and terminated to 568B.
4. Plug in a 5V DC power supply unit to the power jack of the receiving unit of the B-200-1CAT-VGA.
Plug in the other 5V DC power supply into the transmitting unit.
6. If the monitor is displaying blurred video or not displaying at all, adjust the EQ and Gain rotary
controls to improve the picture. Use the GAIN rotary control to adjust the gain to an appropriate
level for a range of input signal levels (brightness), and the EQ rotary control to equalize the wave
form of the receiving video signal (sharpness). Begin with adjusting the EQ to get the input video
displayed rst, and then adjust the GAIN according to the video you see on the screen.
7. RGB delay control [De-skew] oers the exible functionality to allow skew compensation in
arrival time among the red, green, and blue color channels of the VGA signal due to long distance
transmission or via low quality cable. Dial the rotary arrow to choose the RED, GREEN, or BLUE
color channel, then use the push-in buttons to increase or decrease the delay correction for the
selected channel. There are 31 steps in total. Each step represents a 2-nanosecond time dierence
for adjusting the delay between each color individually. Adjust RGB selector back and forth until
the optimal visual quality is reached.
TIPS
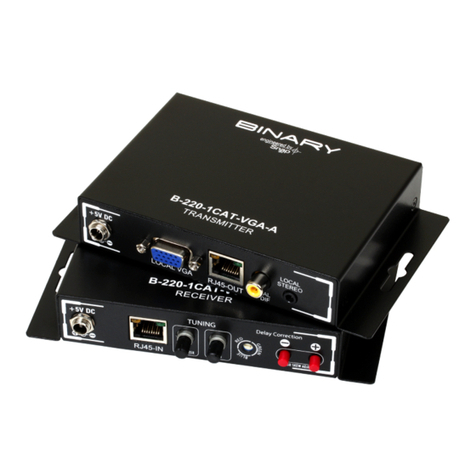
Front Panel — Transmitter Front Panel — Receiver
Rear Panel — Receiver
Rear Panel — Transmitter
+5V DC: inter-locked power jack to connect to
5V DC power supply unit
LOCAL VGA: VGA loop-out to a local VGA display or
component video display via a VGA-component
breakout cable
RJ45-OUT: plug in a Cat-5/5e/6 cable that needs
to be linked to the RJ-45 connector of the receiving
unit of the B-200-1CAT-VGA.
+5V DC power jack: connect to 5V DC power supply unit
RJ45-IN: Plug in a Cat-5/5e/6 cable here to be linked to RJ45-OUT
of the transmitting unit of the B-200-1CAT-VGA
EQUALIZER: Rotary control for signal equalization, ex. equalizing
the waveform of video signal, to the chosen RGB channel
GAIN: Rotary control for gain control, ex. adjusting the
amplitude of video signal, to the chosen RGB channel
RGB Selector: For selecting the respective R/G/B color channel
for de-skew correction of VGA/component signal
RGB SKEW ADJUST “—“: Push-button adjustment to decrease
delay control on respective R/G/B color channel that is chosen
by the RGB selector. (set in 2-nanosecond increments)
RGB SKEW ADJUST “+“: Push-button adjustment to increase
delay control on respective R/G/B color channel that is chosen
by the RGB selector. (set in 2-nanosecond increments)
VGA-IN: VGA input from a video source VGA-OUT: VGA output to a remote video display
Pin 1 RED Red Video
Pin 2 GREEN Green Video
Pin 3 BLUE Blue Video
Pin 4 N/C Not Connected
Pin 5 GND Ground (HSync)
Pin 6 RED_RTN Red Return
Pin 7 GREEN_RTN Green Return
Pin 8 BLUE_RTN Blue Return
Pin 9 SENSE +5V DC from gfx adapter
Pin 10 GND Ground (Vvsync, DDC)
Pin 11 N/C Monitor ID
Pin 12 SDA PC Data
Pin 13 HSync Horizontal Sync
Pin 14 VSync Vertical Sync
Pin 15 SCL PC Clock
12
3
5
10
12 13 14 1511
986
7
4
Pair of Cat-5/5e/6 Cable Associated Denition
Green
Blue RED Channel of VGA
Orange GREEN Channel of VGA
Brown BLUE Channel of VGA
Performance Rating Type of Cat5/6 Cable
Wiring Shielding Cat5 Cat5e Cat6
Solid
Unshielded
(UTP) *** **** *****
Shielded (STP) *** *** ****
Stranded
Unshielded
(UTP) *** **
Shielded (STP) * * **
Termination Please use EIA/TIA-568-B
termination (T568B) at all times
CONTENTS
(1) transmitter
(1) receiver
(2) In-line power
adapters
(4) Metal mounting
screws
(8) rubber feet
(1) manual
(1) screw driver
