bk ultrasound bk3500 User manual

16-01410-EN-04
April 2017
For Professional Users Only
User Guide
bk3500 Ultrasound System

LEGAL MANUFACTURER
BK Medical ApS
Mileparken 34
2730 Herlev
Denmark
Tel.:+45 4452 8100/Fax:+45 4452 8199
www.bkultrasound.com
Email: [email protected]
The serial number label on a BK product contains information about the year of manufacture.
BK Medical ApS Customer Satisfaction
Input from our customers helps us improve our products and services. As part of our customer
satisfaction program, we contact a sample of our customers a few months after they receive their orders.
If you receive an email message from us asking for your feedback, we hope you will be willing to
answer some questions about your experience buying and using our products. Your opinions are
important to us. You are of course always welcome to contact us via your BK service representative or
by contacting us directly.
If you have comments about the user documentation, please write to us at the email address above. We
would like to hear from you.
System Software
•
NOT FAULT TOLERANT
. THE SOFTWARE IS NOT FAULT TOLERANT. BK Medical HAS
INDEPENDENTLY DETERMINED HOW TO USE THE SOFTWARE IN THE DEVICE, AND MS HAS
RELIED UPON BK Medical TO CONDUCT SUFFICIENT TESTING TO DETERMINE THAT THE
SOFTWARE IS SUITABLE FOR USE.
•
EXPORT RESTRICTIONS
. You acknowledge that Windows 8 Embedded is of US-origin. You agree to comply
with all applicable international and national laws that apply to Windows 8 Embedded, including the U.S. Export
Administration Regulations, as well as end-user, end-use and country destination restrictions issued by U.S. and
other governments. For additional information on exporting Windows 8 Embedded, see http://
www.microsoft.com/exporting/
•
The bk3500 Ultrasound System is closed. Any modification of or installation of software to the system may
compromise safety and function of the system. Any modification of or installation of software without written
permission from BK Medical will immediately void any warranty supplied by BK Medical. Such changes will also
void any service contract and result in charges to the customer for restoration of the original bk3500 Ultrasound
System.
Trademarks:
DICOM is the registered trademark of the National Electrical Manufacturers Association for its standards publications
relating to digital communications of medical information.
Microsoft and Windows are either registered trademarks or trademarks of Microsoft Corporation in the United States
and/or other countries.
bk3500 = Ref. Type 2300
© 2017 BK Medical
Information in this document may be subject to change without notice.

3
Contents
Chapter 1 Introduction . . . . . . . . . . . . . . . . . . . . . . . . . . . . . . . . . . . . . . . . . . . . . . . . . . . . . . . . . . . . . . . 5
Essential Performance . . . . . . . . . . . . . . . . . . . . . . . . . . . . . . . . . . . . . . . . . . . . . . 5
Intended Use . . . . . . . . . . . . . . . . . . . . . . . . . . . . . . . . . . . . . . . . . . . . . . . . . . . . . 6
Modes of Operation . . . . . . . . . . . . . . . . . . . . . . . . . . . . . . . . . . . . . . . . . . . . . . . . 6
Indications for Use . . . . . . . . . . . . . . . . . . . . . . . . . . . . . . . . . . . . . . . . . . . . . . . . 7
Contraindications. . . . . . . . . . . . . . . . . . . . . . . . . . . . . . . . . . . . . . . . . . . . . . . . . . 7
Transducer Specific Considerations and Contraindications for T7P2m . . . . 7
Chapter 2 Getting Started . . . . . . . . . . . . . . . . . . . . . . . . . . . . . . . . . . . . . . . . . . . . . . . . . . . . . . . . . . . . 9
The bk3500 System . . . . . . . . . . . . . . . . . . . . . . . . . . . . . . . . . . . . . . . . . . . . . . . . 9
Before You Start . . . . . . . . . . . . . . . . . . . . . . . . . . . . . . . . . . . . . . . . . . . . . . . . . 10
Turning System On and Off . . . . . . . . . . . . . . . . . . . . . . . . . . . . . . . . . . . . . 10
Connecting Transducers . . . . . . . . . . . . . . . . . . . . . . . . . . . . . . . . . . . . . . . . 11
Barcode Reader. . . . . . . . . . . . . . . . . . . . . . . . . . . . . . . . . . . . . . . . . . . . . . . 11
Control Panel . . . . . . . . . . . . . . . . . . . . . . . . . . . . . . . . . . . . . . . . . . . . . . . . . . . . 12
Quick Access . . . . . . . . . . . . . . . . . . . . . . . . . . . . . . . . . . . . . . . . . . . . . . . . . . . . 13
Quick Exam Start-Up . . . . . . . . . . . . . . . . . . . . . . . . . . . . . . . . . . . . . . . . . . 13
Starting an Exam Using the Touch Screen Buttons . . . . . . . . . . . . . . . . . . . 18
Monitor and Touch Screen Display. . . . . . . . . . . . . . . . . . . . . . . . . . . . . . . . . . . 21
Battery . . . . . . . . . . . . . . . . . . . . . . . . . . . . . . . . . . . . . . . . . . . . . . . . . . . . . . . . . 23
Charging the Battery. . . . . . . . . . . . . . . . . . . . . . . . . . . . . . . . . . . . . . . . . . . 23
Battery Status. . . . . . . . . . . . . . . . . . . . . . . . . . . . . . . . . . . . . . . . . . . . . . . . . . . . 24
Information Available on the Monitor . . . . . . . . . . . . . . . . . . . . . . . . . . . . . 24
Battery Life. . . . . . . . . . . . . . . . . . . . . . . . . . . . . . . . . . . . . . . . . . . . . . . . . . 25
Chapter 3 Safety Information . . . . . . . . . . . . . . . . . . . . . . . . . . . . . . . . . . . . . . . . . . . . . . . . . . . . . . . . 27
Safety Information. . . . . . . . . . . . . . . . . . . . . . . . . . . . . . . . . . . . . . . . . . . . . . . . 27
Safety Symbols and Information on the Equipment . . . . . . . . . . . . . . . . . . . . . . 27
General Safety Precautions . . . . . . . . . . . . . . . . . . . . . . . . . . . . . . . . . . . . . . . . . 29
Mechanical Safety . . . . . . . . . . . . . . . . . . . . . . . . . . . . . . . . . . . . . . . . . . . . . . . . 30
Explosion Hazards. . . . . . . . . . . . . . . . . . . . . . . . . . . . . . . . . . . . . . . . . . . . . . . . 31
Electrical Safety. . . . . . . . . . . . . . . . . . . . . . . . . . . . . . . . . . . . . . . . . . . . . . . . . . 31
ESD Training . . . . . . . . . . . . . . . . . . . . . . . . . . . . . . . . . . . . . . . . . . . . . . . . 31
Interference . . . . . . . . . . . . . . . . . . . . . . . . . . . . . . . . . . . . . . . . . . . . . . . . . . . . . 32
Electrical Noise. . . . . . . . . . . . . . . . . . . . . . . . . . . . . . . . . . . . . . . . . . . . . . . 32
Electromagnetic Interference . . . . . . . . . . . . . . . . . . . . . . . . . . . . . . . . . . . . 32
RF (Radio Frequency) Interference . . . . . . . . . . . . . . . . . . . . . . . . . . . . . . . 32
Installation . . . . . . . . . . . . . . . . . . . . . . . . . . . . . . . . . . . . . . . . . . . . . . . . . . . . . . 33
Connecting Other Equipment . . . . . . . . . . . . . . . . . . . . . . . . . . . . . . . . . . . . . . . 34
Network Connection . . . . . . . . . . . . . . . . . . . . . . . . . . . . . . . . . . . . . . . . . . . . . . 34
Network Security . . . . . . . . . . . . . . . . . . . . . . . . . . . . . . . . . . . . . . . . . . . . . 34
Network Printing . . . . . . . . . . . . . . . . . . . . . . . . . . . . . . . . . . . . . . . . . . . . . 34
Connectors . . . . . . . . . . . . . . . . . . . . . . . . . . . . . . . . . . . . . . . . . . . . . . . . . . 35
EMC Requirements . . . . . . . . . . . . . . . . . . . . . . . . . . . . . . . . . . . . . . . . . . . 37
Isolation of DICOM Network. . . . . . . . . . . . . . . . . . . . . . . . . . . . . . . . . . . . 38

4
Wireless Networks . . . . . . . . . . . . . . . . . . . . . . . . . . . . . . . . . . . . . . . . . . . . 38
Medical Equipment. . . . . . . . . . . . . . . . . . . . . . . . . . . . . . . . . . . . . . . . . . . . 39
Non-Medical Equipment . . . . . . . . . . . . . . . . . . . . . . . . . . . . . . . . . . . . . . . 39
Battery Support System. . . . . . . . . . . . . . . . . . . . . . . . . . . . . . . . . . . . . . . . . . . . 40
Computer Security. . . . . . . . . . . . . . . . . . . . . . . . . . . . . . . . . . . . . . . . . . . . . . . . 40
Printer . . . . . . . . . . . . . . . . . . . . . . . . . . . . . . . . . . . . . . . . . . . . . . . . . . . . . . . . . 40
Touch Screen . . . . . . . . . . . . . . . . . . . . . . . . . . . . . . . . . . . . . . . . . . . . . . . . . . . . 40
Service and Repair. . . . . . . . . . . . . . . . . . . . . . . . . . . . . . . . . . . . . . . . . . . . . . . . 41
Transducers . . . . . . . . . . . . . . . . . . . . . . . . . . . . . . . . . . . . . . . . . . . . . . . . . . . . . 41
During an Examination . . . . . . . . . . . . . . . . . . . . . . . . . . . . . . . . . . . . . . . . . . . . 41
Checking the Date . . . . . . . . . . . . . . . . . . . . . . . . . . . . . . . . . . . . . . . . . . . . 41
Verifying the Transducer Type. . . . . . . . . . . . . . . . . . . . . . . . . . . . . . . . . . . 42
Measurements. . . . . . . . . . . . . . . . . . . . . . . . . . . . . . . . . . . . . . . . . . . . . . . . 42
VFI - Vector Flow Imaging . . . . . . . . . . . . . . . . . . . . . . . . . . . . . . . . . . . . . 43
Puncture . . . . . . . . . . . . . . . . . . . . . . . . . . . . . . . . . . . . . . . . . . . . . . . . . . . . 43
Acoustic Output. . . . . . . . . . . . . . . . . . . . . . . . . . . . . . . . . . . . . . . . . . . . . . . . . . 44
General . . . . . . . . . . . . . . . . . . . . . . . . . . . . . . . . . . . . . . . . . . . . . . . . . . . . . 44
Monitor Display . . . . . . . . . . . . . . . . . . . . . . . . . . . . . . . . . . . . . . . . . . . . . . 45
Thermal and Mechanical Indices . . . . . . . . . . . . . . . . . . . . . . . . . . . . . . . . . 45
Acoustic Output Measurement . . . . . . . . . . . . . . . . . . . . . . . . . . . . . . . . . . . 47
Functions Affecting Acoustic Output. . . . . . . . . . . . . . . . . . . . . . . . . . . . . . 48
Default Acoustic Output. . . . . . . . . . . . . . . . . . . . . . . . . . . . . . . . . . . . . . . . 48
Clinical Measurements: Ranges and Accuracies. . . . . . . . . . . . . . . . . . . . . . . . . 48
Geometric Measurements . . . . . . . . . . . . . . . . . . . . . . . . . . . . . . . . . . . . . . . 50
Time Measurements . . . . . . . . . . . . . . . . . . . . . . . . . . . . . . . . . . . . . . . . . . . 50
Doppler Measurements. . . . . . . . . . . . . . . . . . . . . . . . . . . . . . . . . . . . . . . . . 50
Index . . . . . . . . . . . . . . . . . . . . . . . . . . . . . . . . . . . . . . . . . . . . . . . . . . . . . . . . . . . . . . . . . . . . . . . . . . . . . 51
Appendix A Warnings and Cautions Displayed on the System . . . . . . . . . . . . . . . . . . . . . . . . . 53
English source version
16-01410-EN-04

bk3500 User Guide
(16-01410-EN-04) Introduction
5
Chapter 1
Introduction
This user guide is for the bk3500 ultrasound system.
Before using the equipment, please make yourself familiar with the information in
the accompanying user information documents. Some documents are printed. Make
sure that you also read the transducer user guide and specifications for each
transducer that you use.
Table 1-1. User information documentation that accompanies the equipment.
Improper use
Failure to follow safety instructions or use for purposes other than those described in
the user manuals constitutes improper use.
Essential Performance
The system can provide 2D ultrasound echo and flow imaging systems as an aid in
diagnosis, data processing and -transfer, and guidance of puncture and biopsy.
The system can perform simple geometric measurements and calculations.
The system can guide biopsy- and puncture needles.
The system is free from artefacts or distortion in the image or error of a displayed
value, which can be attributed to a physiological effect and which may alter the
diagnosis.
The system displays correct numerical values associated with the diagnosis to be
performed.
Document Information
System User Guide Introductory information, safety information, getting started.
Quick Start Guide User interface, basic operating instructions.
System Advanced User Guide Information about advanced functions, glossary.
Product Data for system Specifications for the system, including disinfection methods that can be
used. Indications for use for each transducer that can be used with the
system.
Technical Data (BZ2100) Acoustic output data, clinical measurements (ranges and accuracies),
factory default power levels and data about EMC (electromagnetic
compatibility) for all transducers. Pro Package calculation formulas.
Care and Cleaning Cleaning, disinfection, sterilization, checking, storing and disposing of
BK medical equipment. Includes environmental limits.
Transducer User Guide Specific instructions for the transducer and puncture attachments.
Product Data for each transducer Specifications for the transducer, including disinfection methods that
can be used.

6
Chapter 1 April 2017
bk3500 User Guide
(16-01410-EN-04)
The As Low As Reasonably Achievable (ALARA) principle is used and safety
related indications (MI, TIS, TIB, etc) are displayed as worst-case values.
The system does not generate unintended or excessive ultrasound output or
transducer surface temperature.
There is no unintended or uncontrolled motion of transducer assemblies intended for
intra-corporeal use.
Intended Use
The system is intended for diagnostic ultrasound imaging or fluid flow analysis of
the human body, data processing and guidance of puncture and biopsy.
The system performs simple geometric measurements and calculations in the
following areas:
•
Emergency Medicine
•
Anesthesia
•
MSK
•
Vascul a r
•
Cardiology
•
OB/GYN
Modes of Operation
•
B-Mode (including Tissue Harmonic imaging)
•
M-Mode
•
PWD Mode
•
CFM Mode
•
Power Doppler
•
CW Doppler

bk3500 User Guide
(16-01410-EN-04) Introduction
7
Indications for Use
The system is a diagnostic ultrasound imaging system used by qualified and trained
healthcare professionals for ultrasound imaging, human body fluid flow analysis and
puncture and biopsy guidance.
The clinical applications and exam types include:
•
Fetal (including Obstetrics)
•
Abdominal
•
Pediatric
•
Small Organ (also known as Small Parts)
•
Adult Cephalic (also known as Adult Transcranial)
•
Neonatal Cephalic
•
Transvaginal
•
Transrectal
•
Musculoskeletal (Conventional and Superficial)
•
Cardiac Adult
•
Transesophageal Cardiology
•
Peripheral Vessel (also known as Peripheral Vascular)
Indications for use are different for different transducers. The Product Data sheet for
the system contains a table listing the indicated uses for each transducer that can be
used with the system.
Contraindications
•
The bk3500 ultrasound system is not intended for ophthalmic use or any use
causing the acoustic beam to pass through the eye.
•
The Cardiac Adult application is not intended for direct use on the heart.
Transducer Specific Considerations and Contraindications for T7P2m
Transesophageal or transgastric echocardiographs produce clinical data that are
unavailable from any other view, but there are some considerations as to which
patients you should use the T7P2m for. First of all, the ability of a patient to swallow
or accommodate the transducer, but all gastro-esophageal diseases or abnormalities
must be considered as well.

8
Chapter 1 April 2017
bk3500 User Guide
(16-01410-EN-04)
Contraindications
•
Esophageal spasm
•
Esophageal stricture
•
Esophageal laceration
•
Esophageal perforation
•
Esophageal diverticula (e.g. Zenker’s diverticulum).
•Large diaphragmatic hernia may significantly hinder TEE imaging because
of lack of transducer mucosal approximation.
•Atlantoaxial disease and severe generalized cervical arthritis: TEE should
never be performed if there is any question about stability of cervical spine.
•Patients who received extensive radiation to the mediastinum: this can cause
significant difficulty in probe manipulation within the esophagus and is a
relative contraindication if the anatomy of the esophagus is not known.
•
Upper gastrointestinal bleeding significant dysphagia and odynphagia are also
relative contraindications.
NOTE:
These contraindications are typical examples of what the examining
physician must consider before the examination. The list is not all-inclusive.
bk3500 User Guide
(16-01410-EN-04) GettingStarted
9
Chapter 2
Getting Started
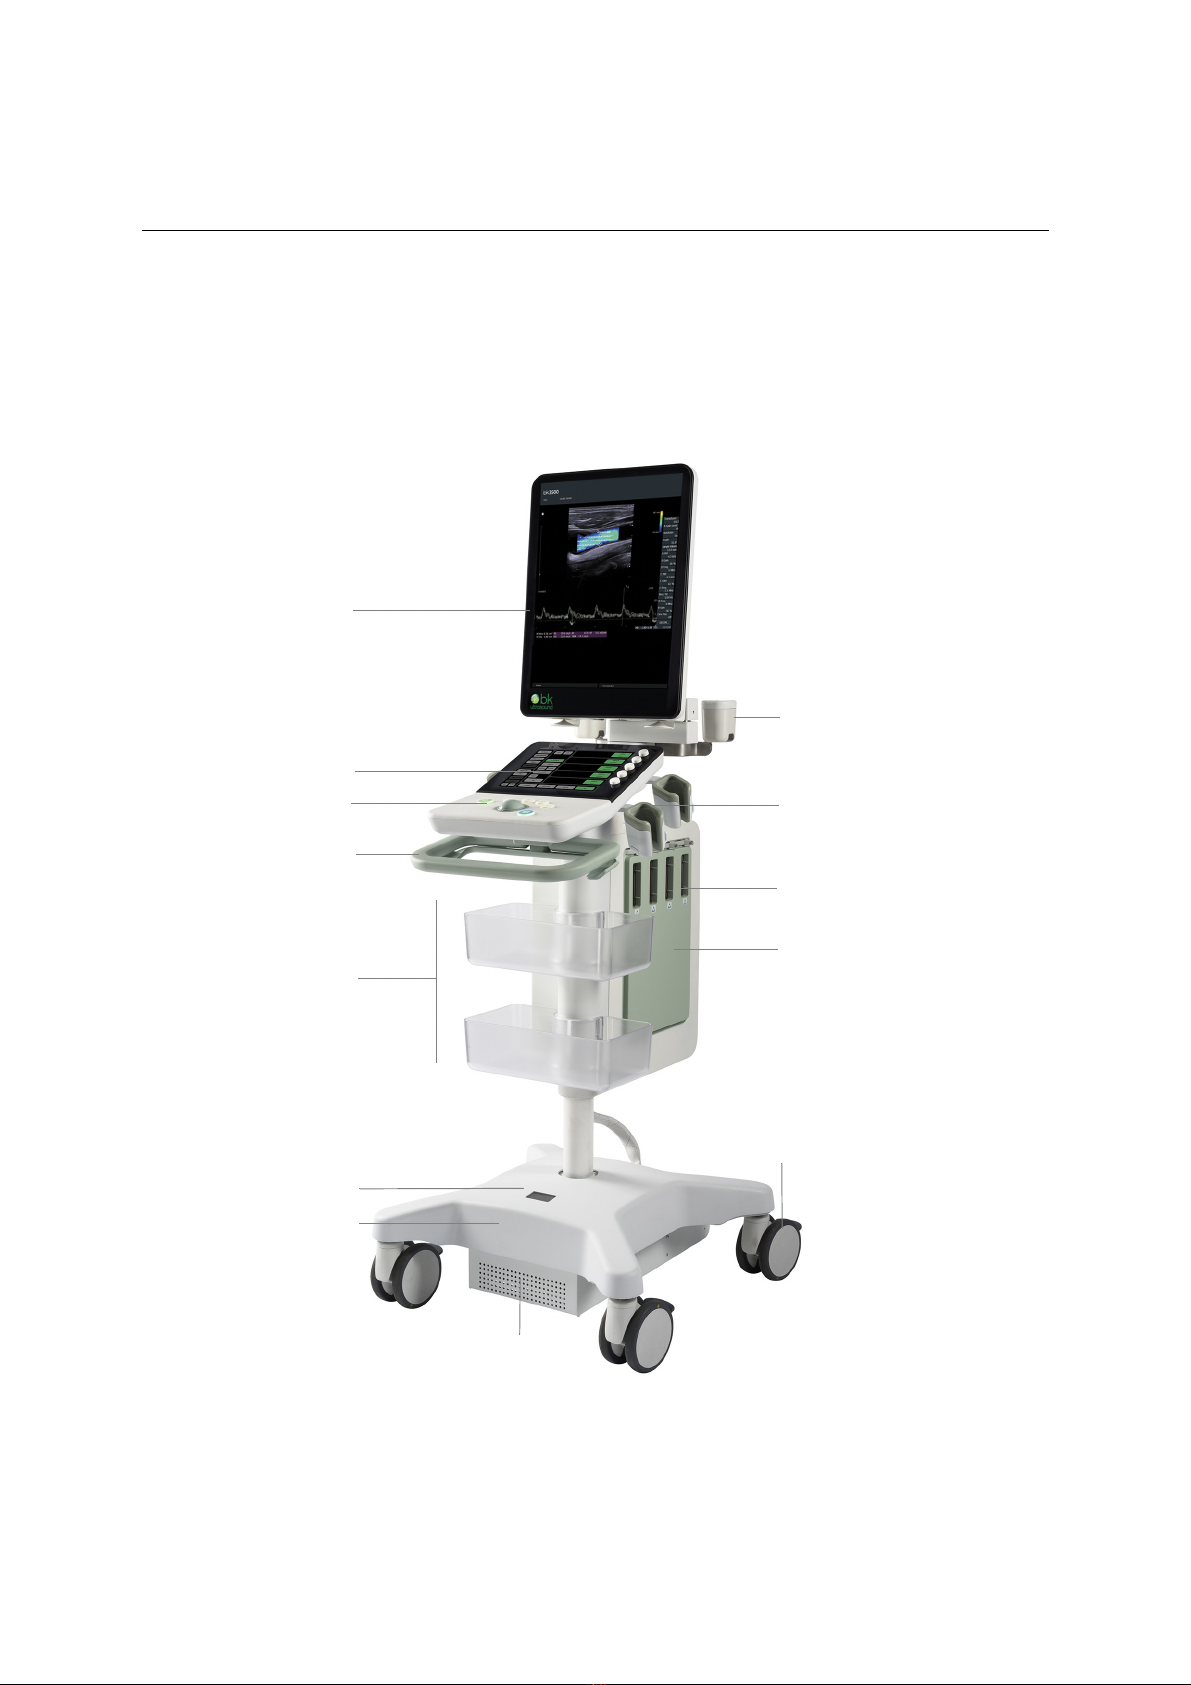
The bk3500 System
Monitor
Control panel
Transducer
Touch screen
Scan engine
Transducer
Battery cover
Battery display
Front handle with
release handles
Battery
sockets
holders
compartment
Endotransducer
holder
Baskets for accessories
Lockable wheels
10
Chapter 2 April 2017
bk3500 User Guide
(16-01410-EN-04)
Before You Start
Before you turn on the system, make sure that the installation has been approved by
a qualified electrician or by hospital safety personnel.
Read the battery support warnings (warnings with BS numbers) in “Battery Support
System” on page 40.
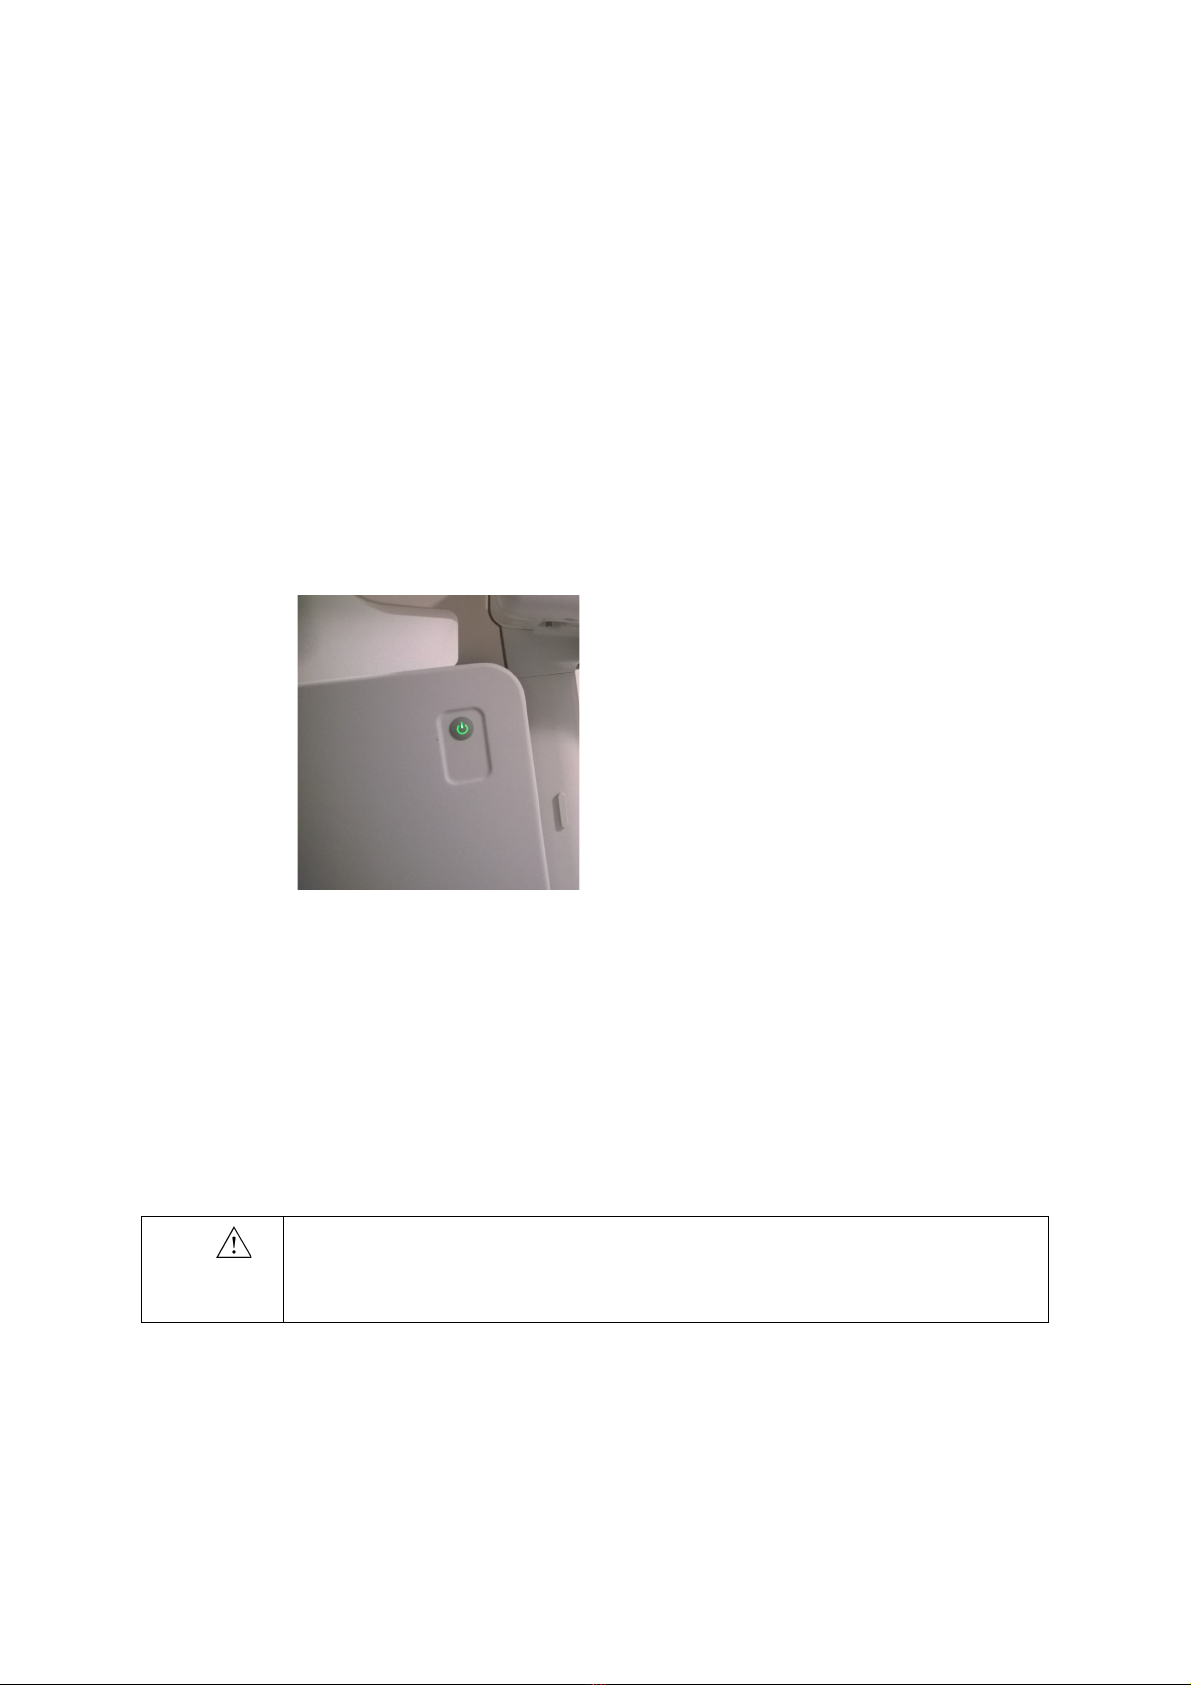
Turning System On and Off
When you turn the system on or off, you must give the system enough time to save
and recover open files and unsaved data. Otherwise, a serious system failure may
occur that requires technical support.
Make sure the battery is charged. (If it is not, plug in the imaging system to use it or
to charge the battery.)
Figure 2-1. The power button on the scan engine.
To turn on:
Press the power button
once
, then wait until startup screen disappears.
If the battery is empty, it is not necessary to turn off the imaging system. Plug the
system into a power outlet to recharge the battery while you run on power from the
mains power supply.
To turn off:
Make sure system is running. Press the power button
once
.
Caution
BS-c2
Never shut down a system with a battery module simply by unplugging it from the
wall. To preserve battery power, shut down the system properly.
bk3500 User Guide
(16-01410-EN-04) GettingStarted
11
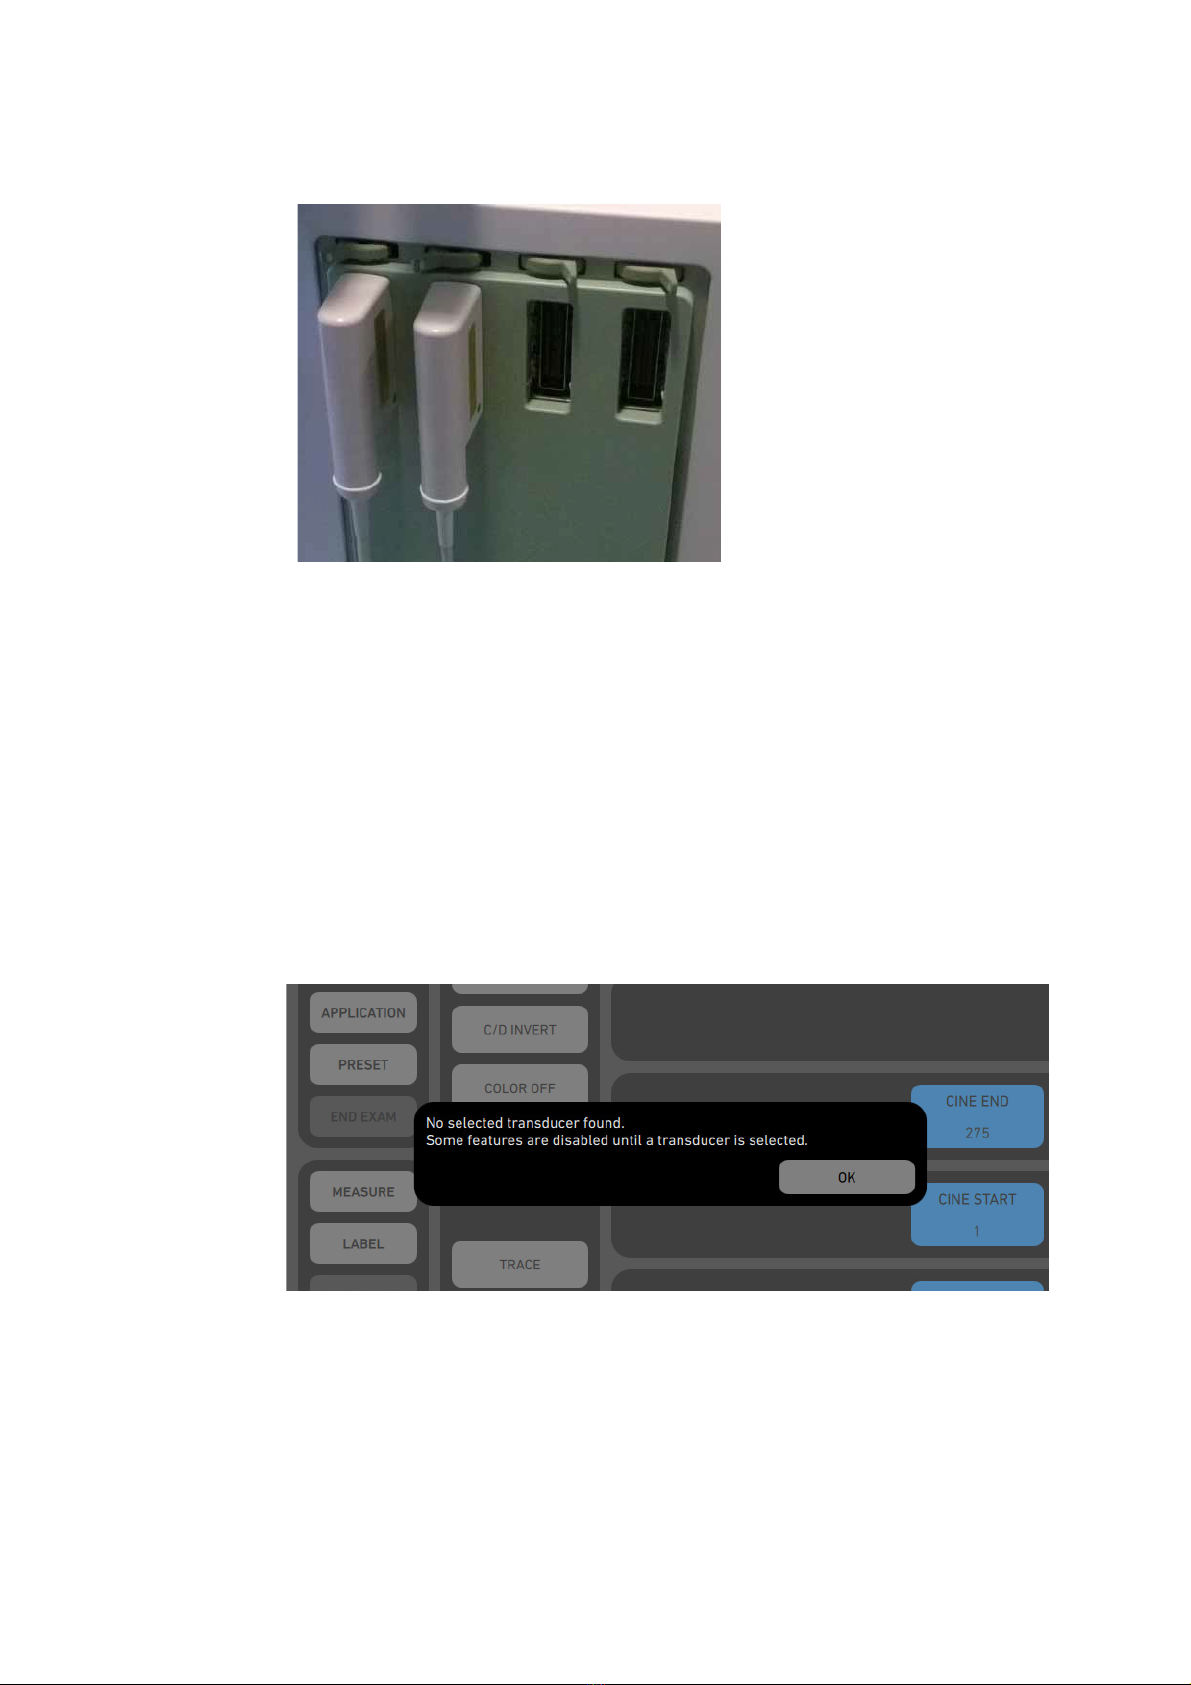
Connecting Transducers
Figure 2-2. Transducer plugs and sockets.
To connect:
1
Insert transducer plug into socket with locking lever to the right.
2
Turn locking lever on socket to the left.
To discon nect:
1
Freeze image.
2
Turn locking lever on socket to the right.
3
Remove plug from socket.
NOTE:
If more than one transducer is connected, select a different transducer before
you disconnect. Otherwise, the following message will be displayed on the touch
screen:
Figure 2-3. Message if the active transducer is disconnected.
Barcode Reader
To enter Patient Information with the barcode reader:
1
Tap the touch screen
Patient
button.
2
With the cursor in the
Patient ID
field, scan the relevant patient barcode with
the barcode reader.
12
Chapter 2 April 2017
bk3500 User Guide
(16-01410-EN-04)
3
Continue entering the patient/exam data as required.
NOTE:
Fields that will accept data entry via the keyboard will also accept data
scanned with the barcode reader. Simply ensure that the cursor is located in the
required field then scan the
relevant
barcode.
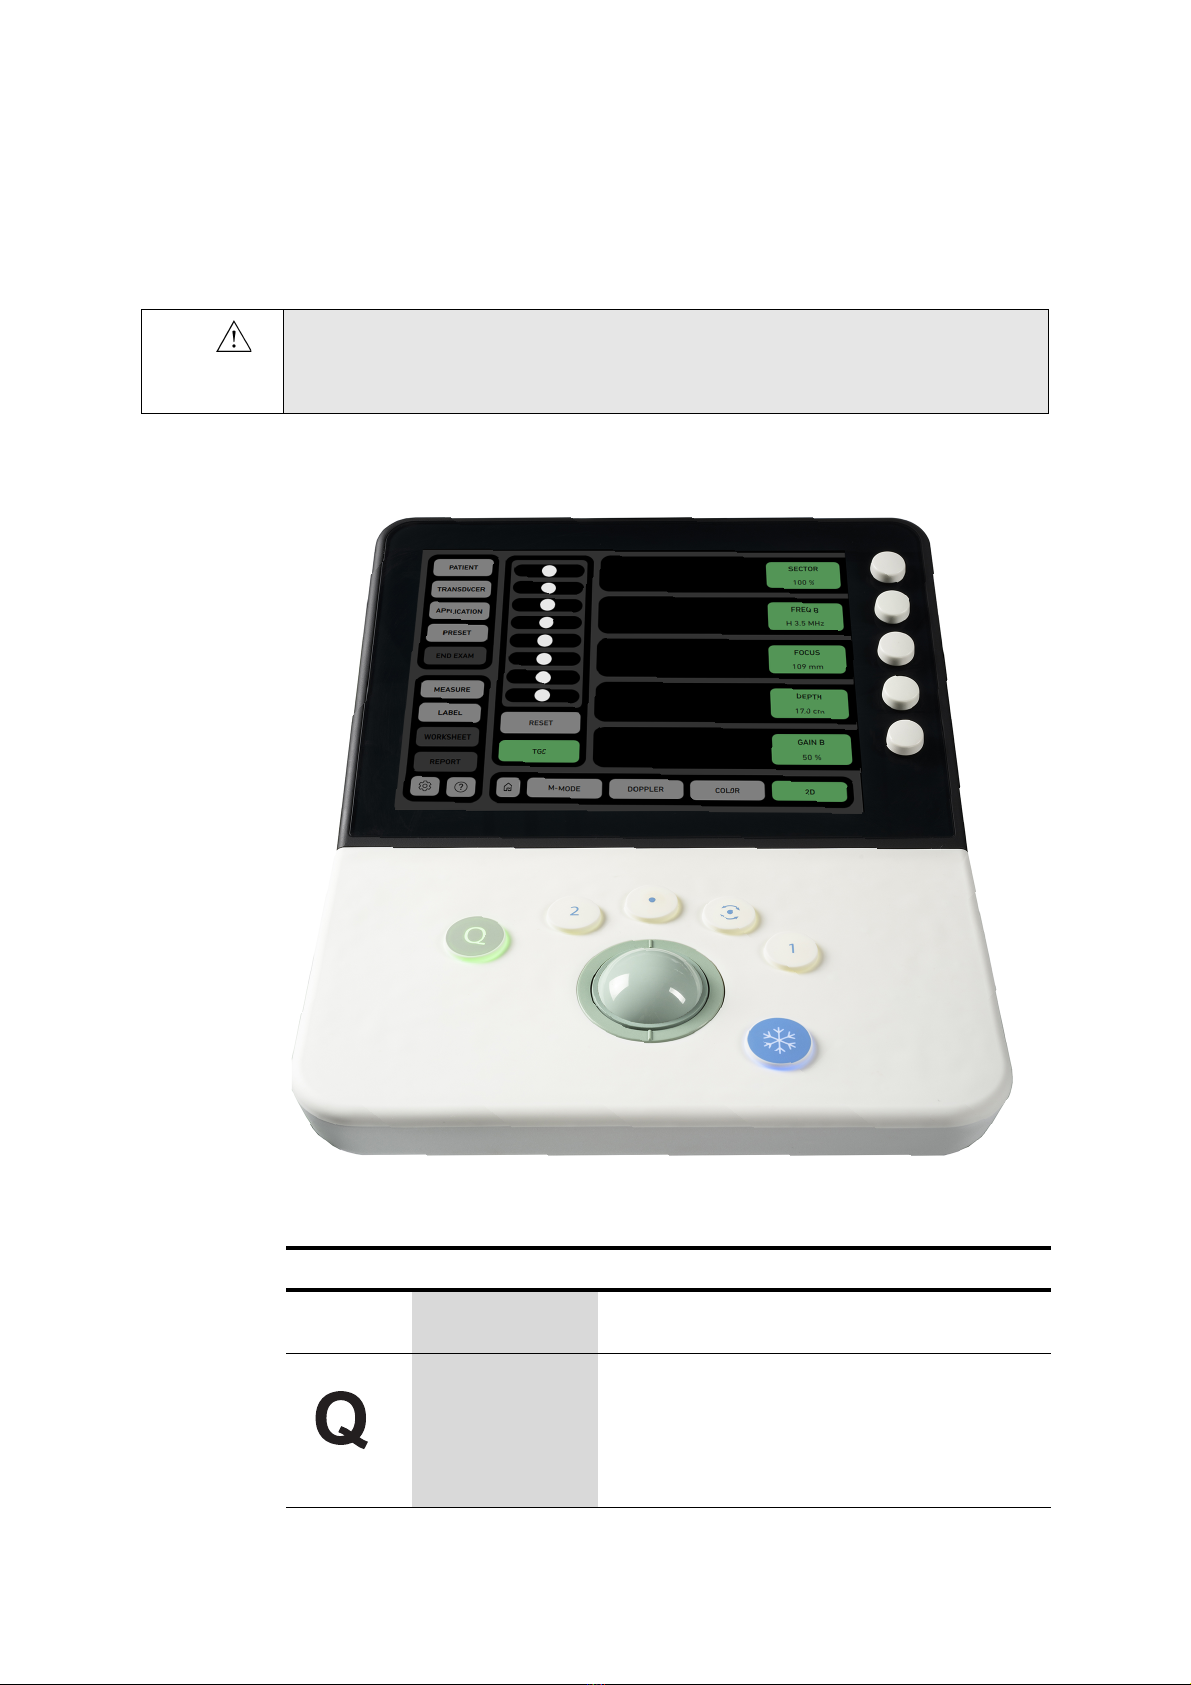
Control Panel
Figure 2-4. The control panel and touch screen.
WARNING
SR-w2
To avoid personal injury, connecting/disconnecting the barcode reader and/or printer
must be carried out only by BK personnel or authorized representatives.
Icon System Control Functionality
Trackball
Positions the mouse cursor, measurement cursor
and label.
QUICK ACCESS
button
Opens the quick exam start-up workflow. When the
exam has started, the
Q
button works as an
Auto
button which will automatically optimize the image
settings.

bk3500 User Guide
(16-01410-EN-04) GettingStarted
13
Quick Access
The
Q
button provides the following basic functions:
•
Quick exam start-up
Quick Exam Start-Up
Once the
Q
button
is selected, users can navigate through the Quick Exam Start-
up using the touch screen:
1
Enter
Patient
Information.
2
Select
Transducer
.
3
Select
Application
(Exam type).
4
Select Imaging
Preset
.
5
Begin the exam.
2
Button
Live image: Stores a prospective video clip.
Frozen image: Stores a retrospective video clip.
•
SELECT
Button
Provides a wide variety of functions depending on the
imaging state, for example toggles between
moving/resizing the color box and selects/sets
measurements, labels, etc.
UPDATE
Button
Provides a wide variety of functions depending on the
imaging state, for example toggles between image
views and image mode and rotates the transducer on
the bodymark icon.
1
Button
Stores the current image.
FREEZE
Button Freezes/unfreezes live imaging. A snowflake icon is
displayed on the monitor when the image is frozen.
Touch Screen Dials
Five dials that control touch screen options, which
change depending on the imaging mode/state. Once
the touch screen option is tapped, turn the related dial
to make the relevant adjustments.
Touch Screen
Displays selectable options. Touch screen buttons may
change depending on the chosen imaging
mode/state or action.
Icon System Control Functionality

14
Chapter 2 April 2017
bk3500 User Guide
(16-01410-EN-04)
For the Quick Exam Start-Up:
1
Press the control panel
Q
button.
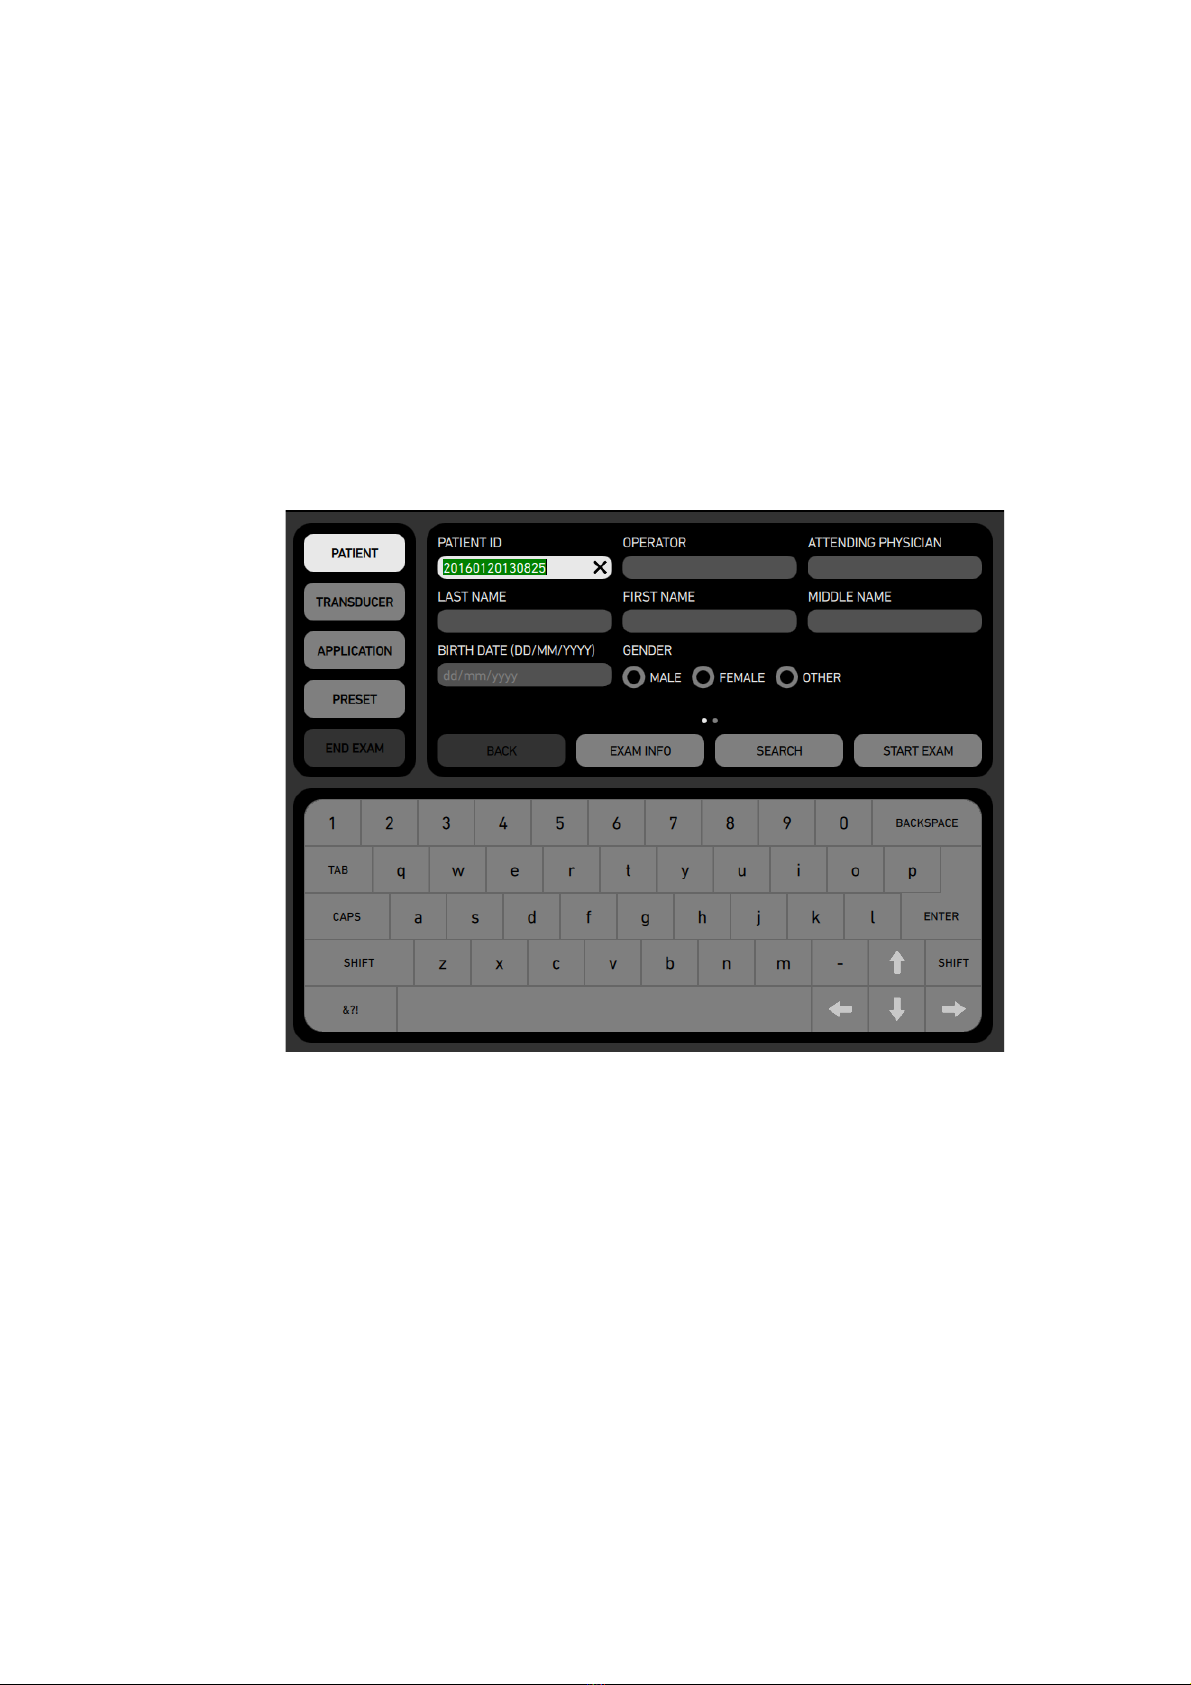
2
Enter
Patient
information.
The
Patient ID
is filled in automatically with a timestamp, but you can change
this to a relevant ID or use a barcode reader. See “Barcode Reader” on page 11.
Figure 2-5. Patient window.
3
Swipe the screen from right to left to enter additional patient information.
Figure 2-6. Second screen in Patient window.
bk3500 User Guide
(16-01410-EN-04) GettingStarted
15
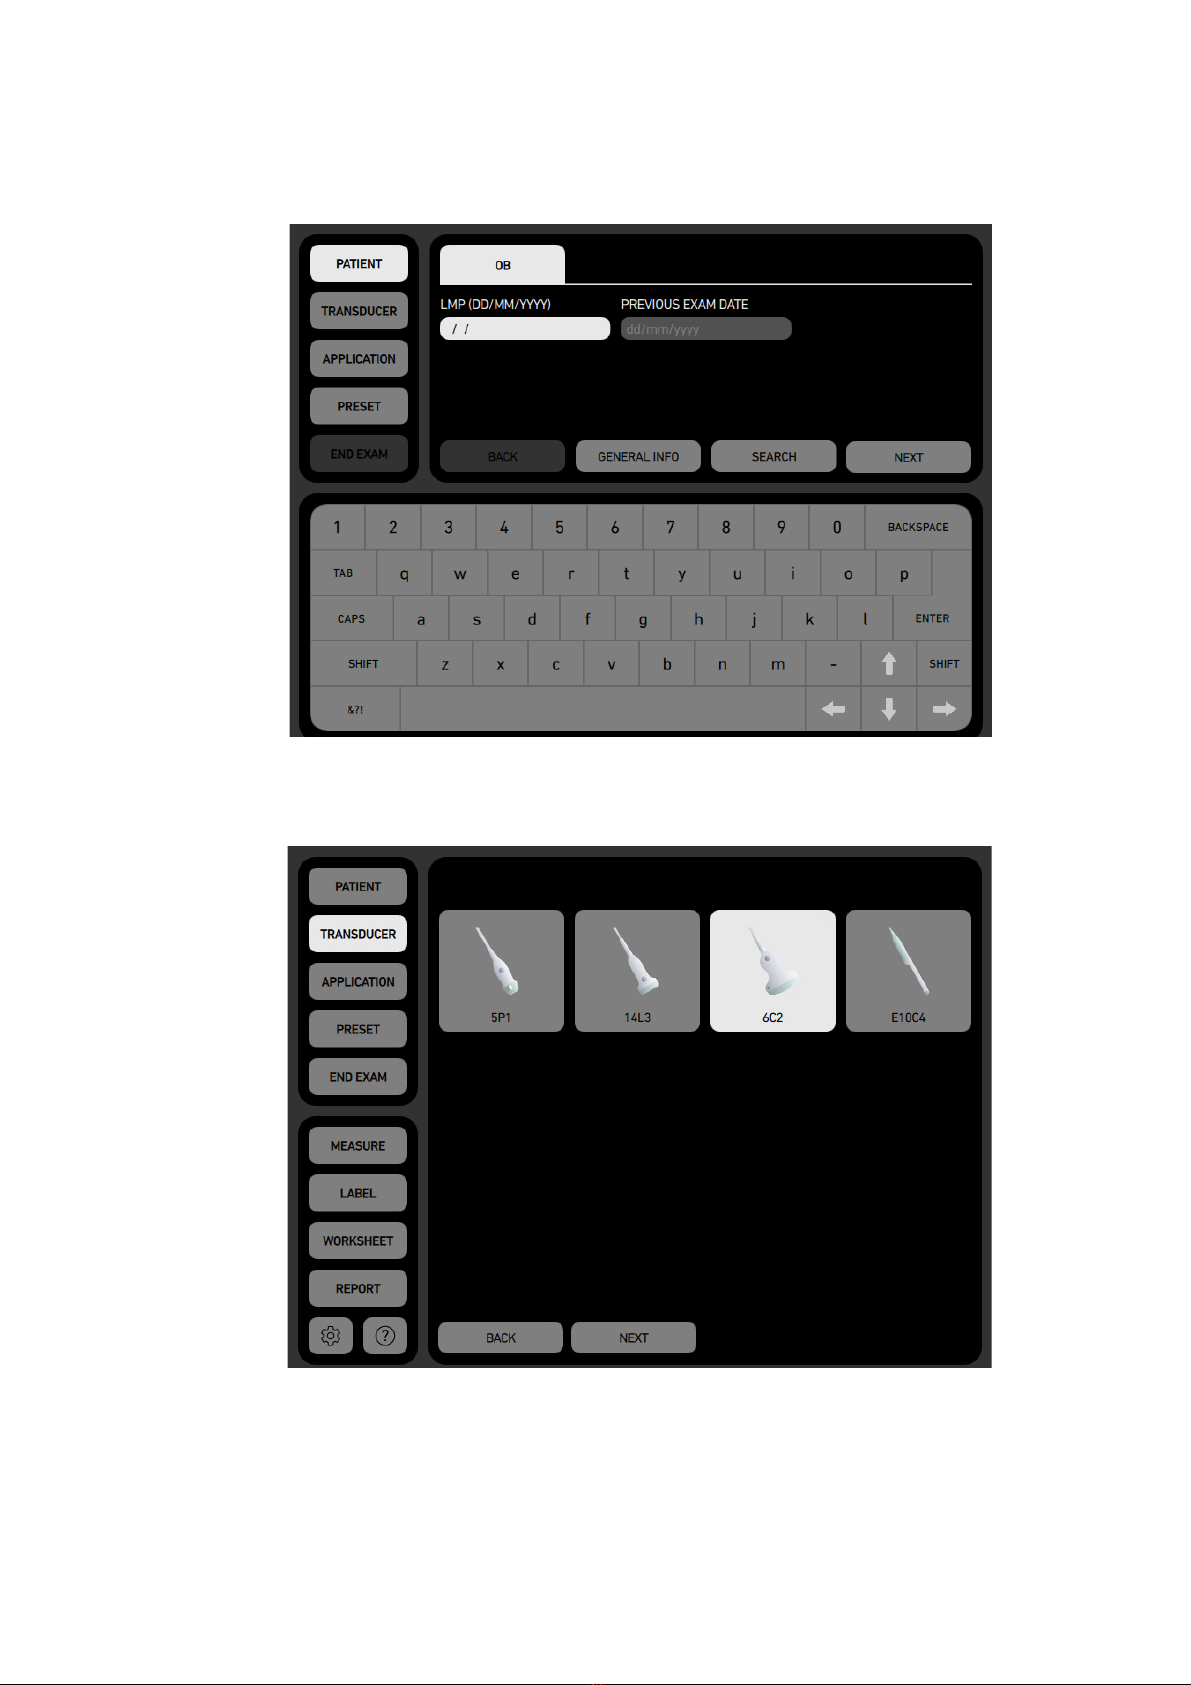
4
Tap the
Exam Info
button to add specific information relevant for the exam, and
tap
Next
.
Figure 2-7. Exam Info window.
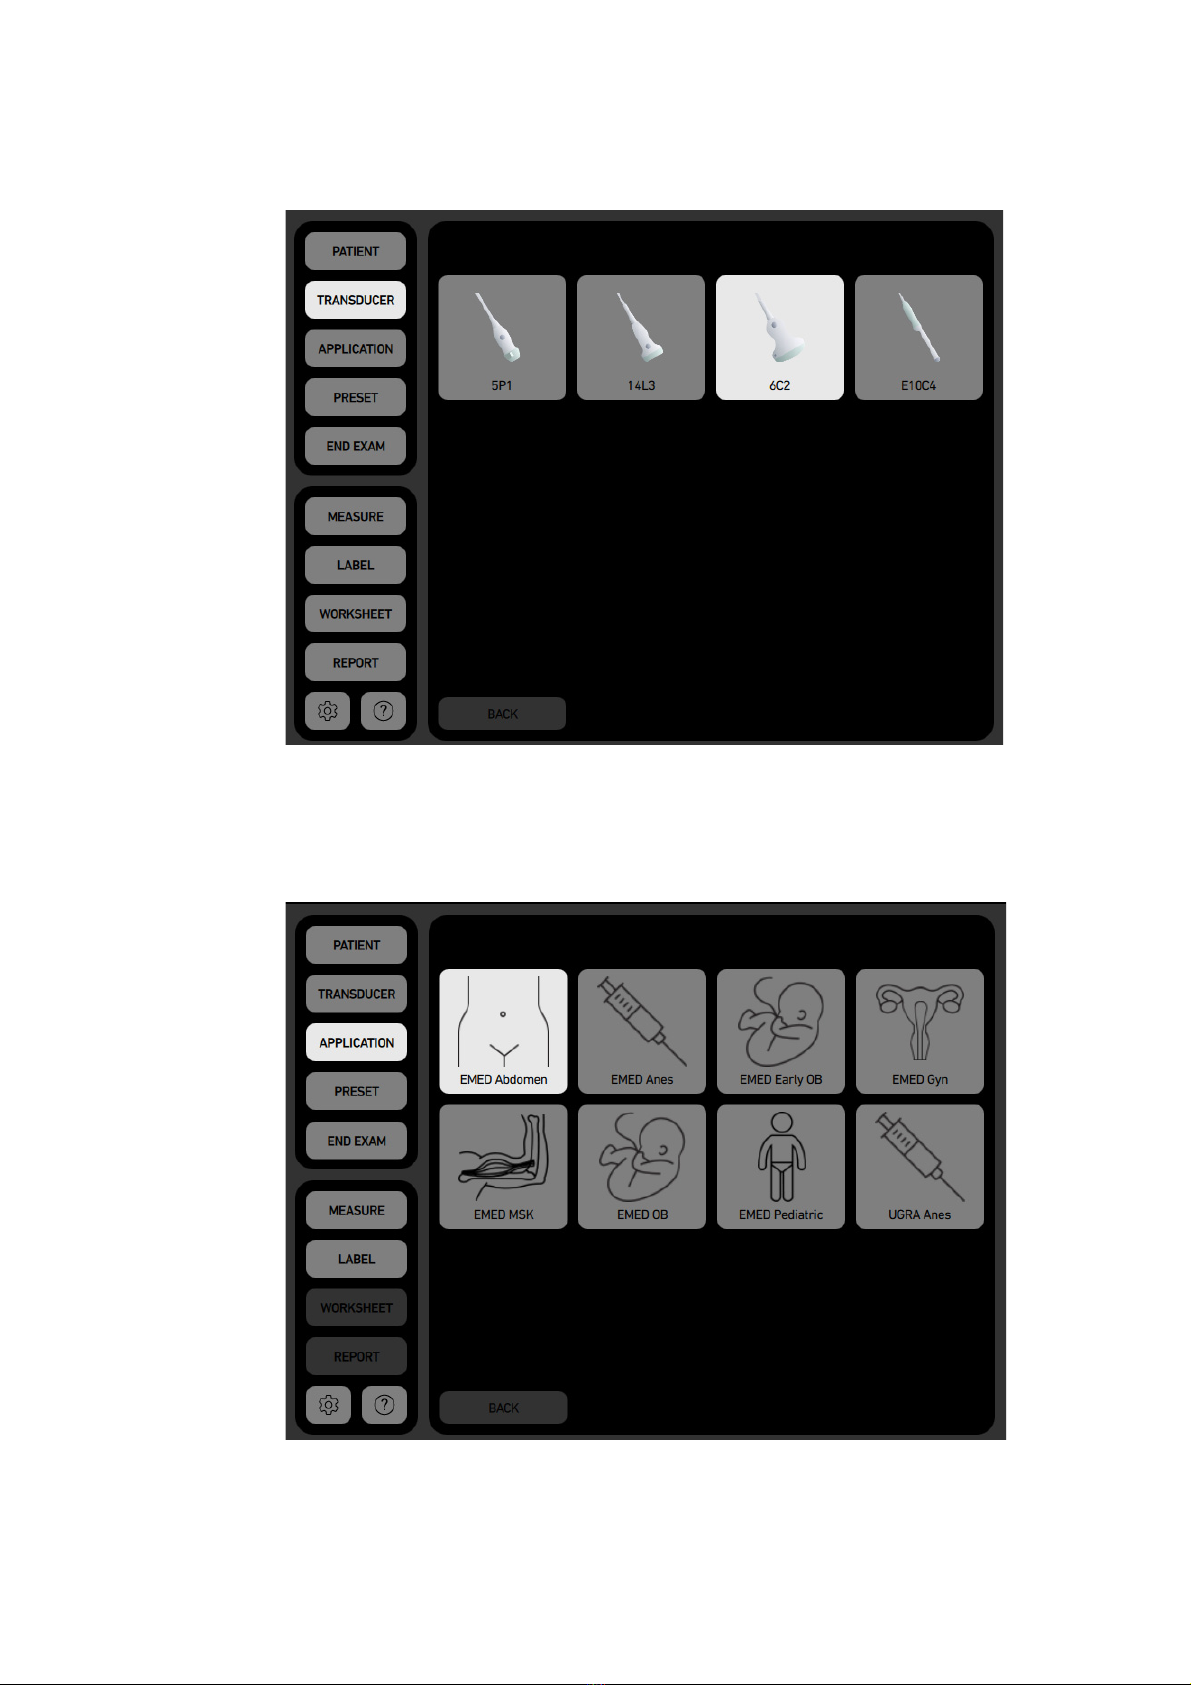
5
Select
Transducer
(in this case
6C2
is selected).
Figure 2-8. List of available transducers (those that are plugged in).
16
Chapter 2 April 2017
bk3500 User Guide
(16-01410-EN-04)
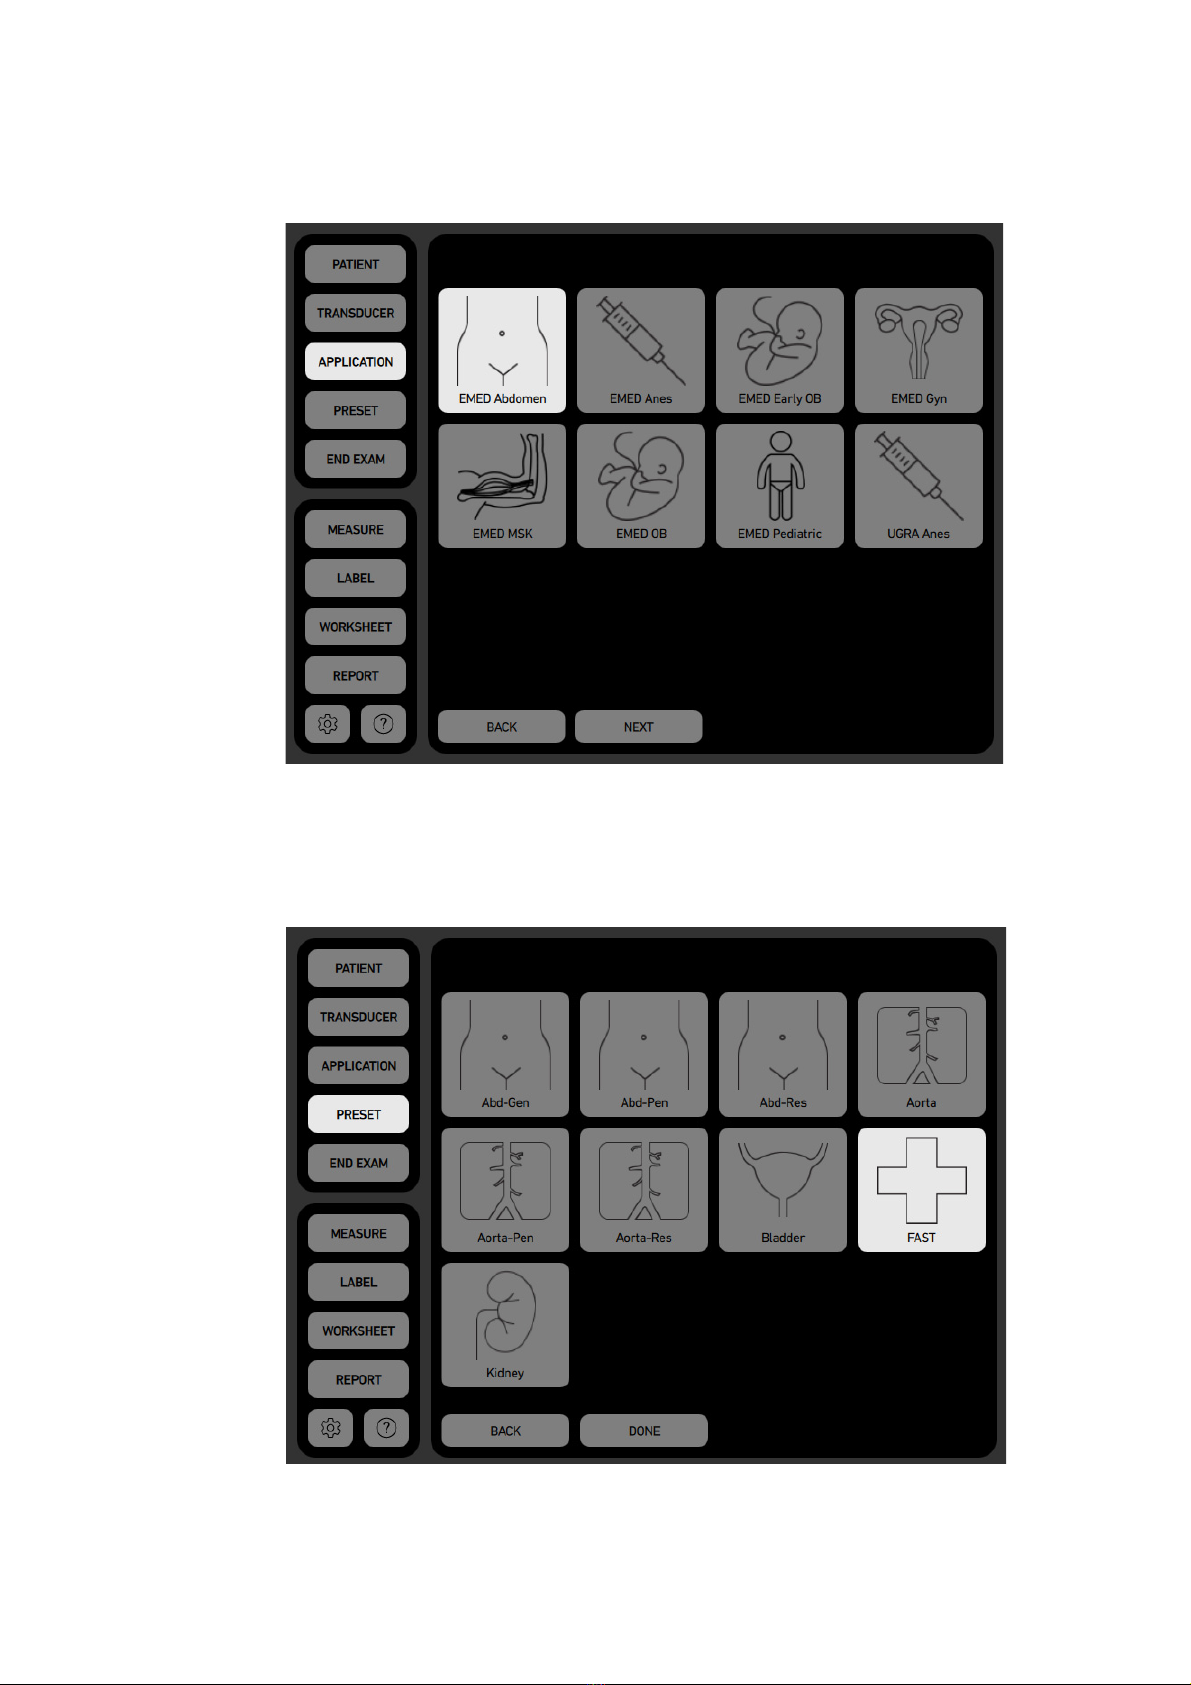
6
Select
Application
(the exam type you intend to perform). The applications
available depend on the selected transducer (in this case
6C2
).
Figure 2-9. List of available applications.
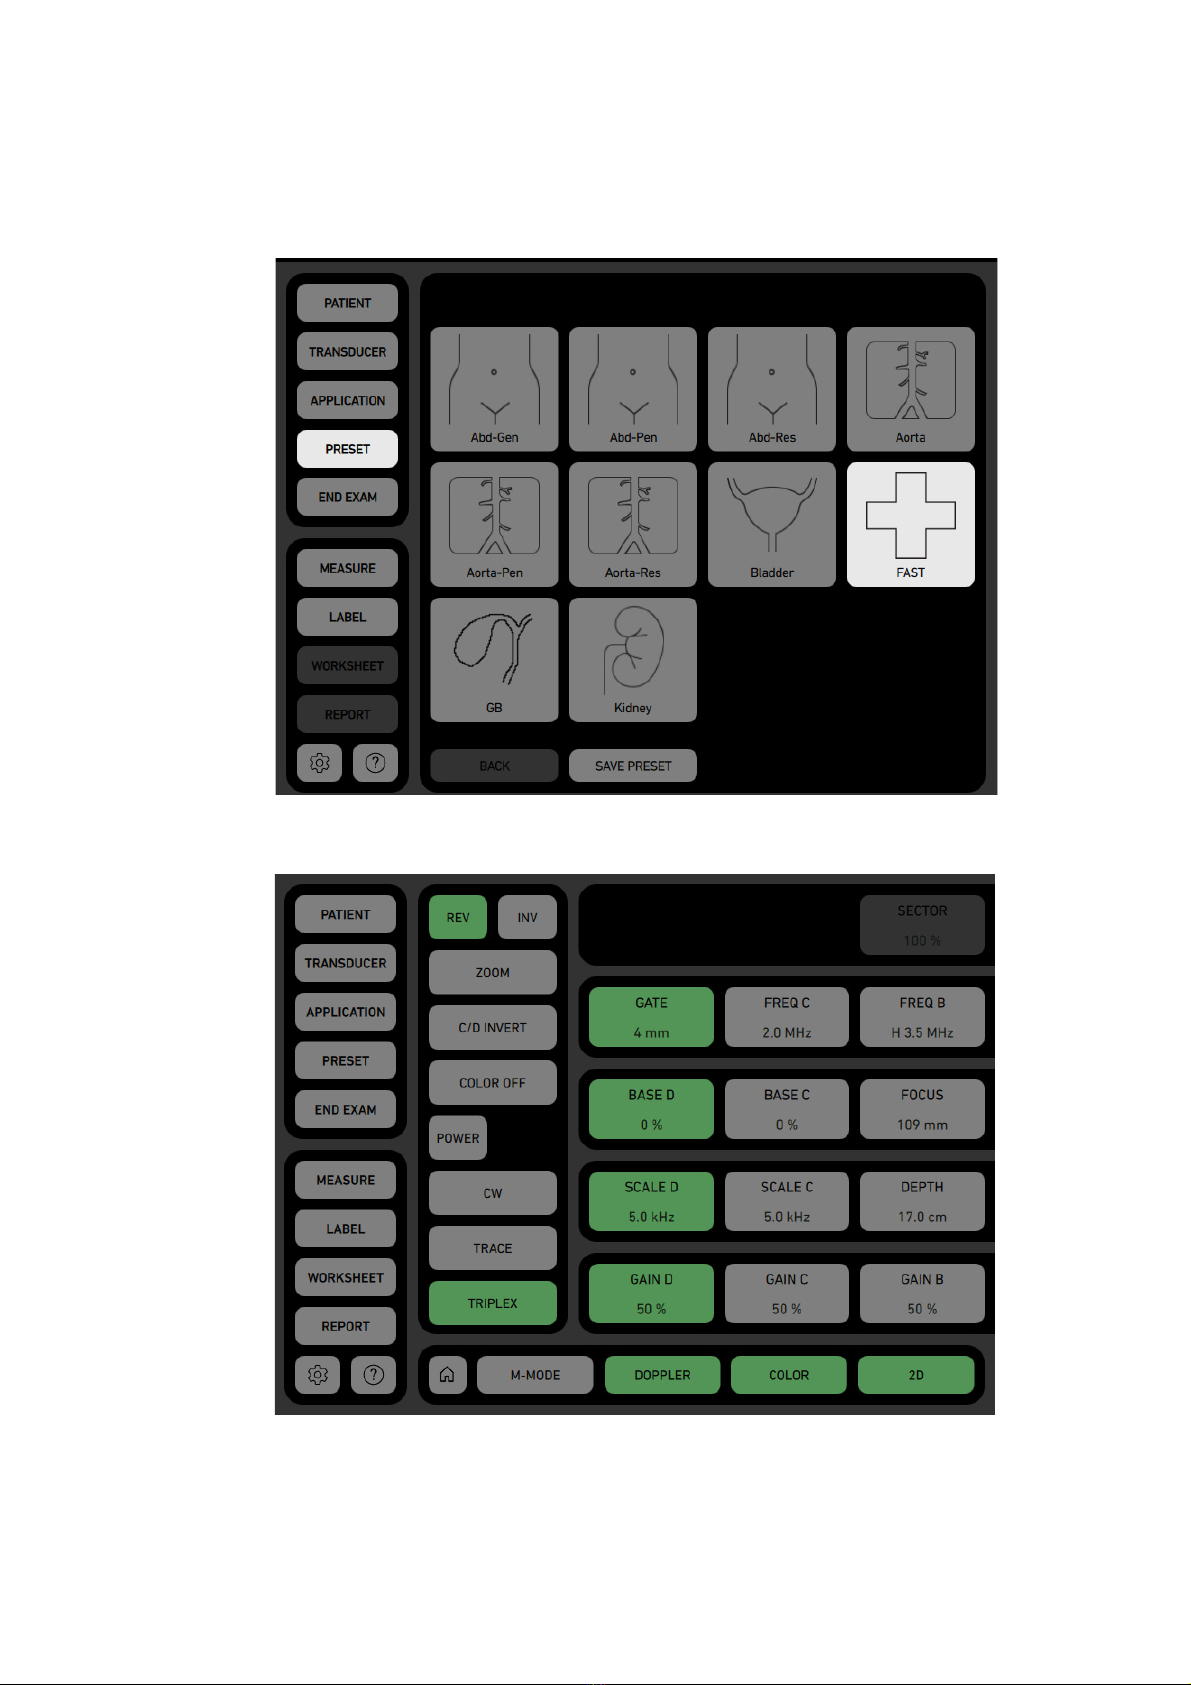
7
Select imaging
Preset
:
The imaging presets available are dependent on the transducer and the
application (exam type) selected.
Figure 2-10. Available presets.
bk3500 User Guide
(16-01410-EN-04) GettingStarted
17
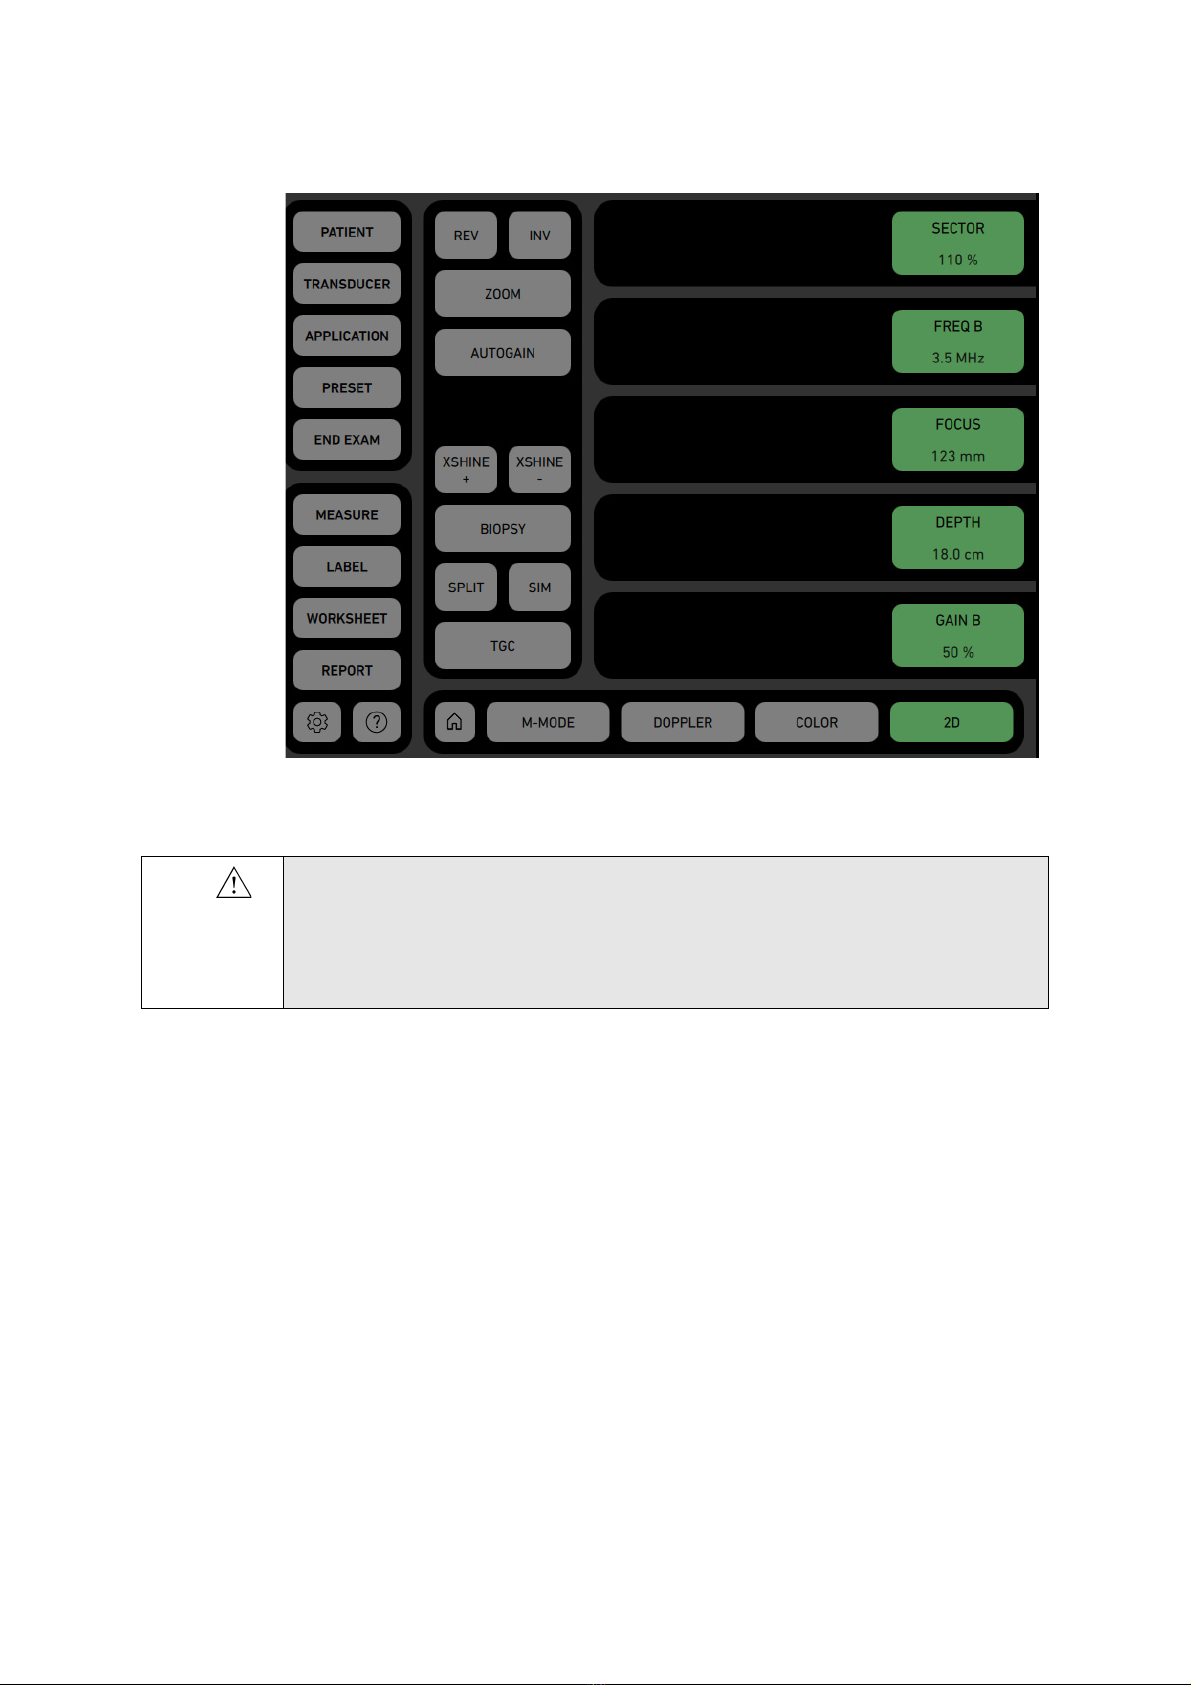
8
Begin the exam.
Figure 2-11. The Touch screen in Basic layout during an exam.
When you are finished, select
End Exam
.
WARNING
Exam-w2b
If, after beginning an exam without entering any Patient information, you want to save an
image, you must verify that the system auto-created a properly configured Patient ID
before exiting the exam. Whenever possible, BK recommends that you also enter a
complete Patient Name.
18
Chapter 2 April 2017
bk3500 User Guide
(16-01410-EN-04)
Starting an Exam Using the Touch Screen Buttons
If you have several patients who need the same transducer/application/preset, you
can choose not to use the Q workflow and use the touch screen buttons to go directly
into the windows you need to update. You can also update details in the patient
window and change transducer, application or preset during an exam.
Do as follows:
•TapthePatient button on the touch screen.
• Enter patient information.
The
Patient ID
is filled in automatically with a
timestamp, but you can change this to a relevant ID or use a barcode reader. See
“Barcode Reader” on page 11.
Figure 2-12. Patient window when using the touch screen buttons.
• Swipe the screen from right to left if you need to add more information. Add
exam info by tapping the Exam Info button. See steps 3 and 4 above.
• To use the transducer, application and preset already selected on the system,
tap Start Exam. Otherwise, continue your selection by tapping the relevant
main button (see Fig 2-18).
bk3500 User Guide
(16-01410-EN-04) GettingStarted
19
• To select Transducer, tap the transducer you want. Alternatively, you can
press the Smart button on the connected transducer to select it.
Figure 2-13. Transducer window when using the touch screen buttons.
• To use the application and preset already selected on the system, continue
the exam. Otherwise, continue your selection.
• To select Application, tap the application you want.
.
Figure 2-14. Application window when using the touch screen buttons.
20
Chapter 2 April 2017
bk3500 User Guide
(16-01410-EN-04)
To use the preset already selected on the system, continue the exam. Otherwise,
continue your selection.
•
To select
Preset
, tap the preset you want.
Figure 2-15. The preset window when using the touch screen buttons.
Figure 2-16. The touch screen in Basic layout during an exam.
•
The exam ends when you tap
End Exam
.
Table of contents
Other bk ultrasound Medical Equipment manuals


Popular Medical Equipment manuals by other brands


MBTelehealth
MBTelehealth Littman 3200 user guide

Inerventions
Inerventions Mollii user manual

Sharper Image
Sharper Image HEATED INSOLES user guide

Maquet
Maquet 111801 Maintenance and Repair Instructions

Sanofi
Sanofi Lantus SoloStar Package leaflet/Information for the user

Otto Bock
Otto Bock 3C96-1 Instructions for use

Hopkins
Hopkins 594810 Instructions for use

Stryker Medical
Stryker Medical 919 Operation and maintenance manual

Guardian
Guardian LINGO user guide

Siemens
Siemens Immulite Homocysteine 2000 user guide

E-Pill
E-Pill MedGlider HOME PLUS operating instructions

Pain Management Technologies
Pain Management Technologies Jstim user manual