Black & Decker BDV012I User manual

UK
Ireland
Australia
New Zealand

2

3
Intended use
Your Black & Decker jump starter with inflator is designed to
provide additional power to lead-acid batteries when starting
car engines, inflate car tyres and sports equipment and to
provide a portable 12 Vdc power source. This product is
intended for household, consumer use only.
Safety instructions
Warning!When using battery-powered appliances, basic safety
precautions, including the following, should always be followed
to reduce the risk of fire, leaking batteries, personal injury and
material damage.
XRead all of this manual carefully before using the
appliance.
XThe intended use is described in this manual. The use of
any accessory or attachment or the performance of any
operation with this appliance other than those
recommended in this instruction manual may present a risk
of personal injury.
XRetain this manual for future reference.
Using your appliance
Always take care when using the appliance.
XThis appliance is not intended for use by young or infirm
persons without supervision.
XThe appliance is not to be used as a toy.
XUse in a dry location only. Do not allow the unit to become
wet.
XDo not immerse the appliance in water.
XDo not open body casing. There are no user-serviceable
parts inside.
XDo not operate the appliance in explosive atmospheres,
such as in the presence of flammable liquids, gases or
dust.
XTo reduce the risk of damage to plugs and cords never pull
the cable to remove the plug from a socket outlet.
After use
XWhen not in use, the appliance should be stored in a dry,
well ventilated place out of the reach of children.
XChildren should not have access to stored appliances.
XWhen the appliance is stored or transported in a vehicle it
should be placed in the boot or restrained to prevent
movement following sudden changes in speed or direction.
XThe appliance should be protected from direct sunlight,
heat and moisture.
Inspection and repairs
XBefore use, check the appliance for damaged or defective
parts. Check for breakage of parts, damage to switches
and any other conditions that may affect its operation.
XDo not use the appliance if any part is damaged or
defective.
XHave any damaged or defective parts repaired or replaced
by an authorised repair agent.
XNever attempt to remove or replace any parts other than
those specified in this manual.
Specific safety instructions for jump starters
The following symbols are marked on the appliance:
XVehicles may have electrical and electronic systems (e.g.
engine management system, mobile phone) that may be
damaged if subjected to high starting voltages and voltage
peaks. Before connecting the appliance to the vehicle read
the vehicle's owner's manual to confirm that external-
starting assistance is allowed.
XFollow these instructions and those published by the
battery manufacturer, vehicle manufacturer and
manufacturer of any equipment you intend to use with this
unit. Review warning labels on these products and on the
vehicle.
XThis appliance is not designed to be used as a replacement
for a vehicular battery. Do not attempt to operate a vehicle
that does not have a battery installed.
XThe appliance must only be connected to a 12V lead-acid
battery. Do not use the appliance for charging dry-cell
batteries that are commonly used with home appliances.
These batteries may burst and cause injury to persons and
damage property.
XCheck the polarity of the vehicle battery terminals before
connecting the appliance. Always disconnect the negative
(black) jumper cable first: followed by the positive (red)
jumper cable.
XThe ON/OFF switch should be in the OFF position before
connection to a power source or load, when the unit is
charging and when not in use.
XNever allow the red and black clamps to touch each other
or another common metal conductor. This could cause
damage to the appliance and/or create a sparking/
explosion hazard. Always store the battery clamps in the
built-in holsters when not in use.
ON/OFF switch (7), ON position.
ON/OFF switch (7), OFF position.
12 Vdc accessory outlet.
Reverse polarity indicator.

4
XWhen using this unit in proximity to the vehicle's battery and
engine, stand the unit on a flat, stable surface, and be sure
to keep all clamps, cords, clothing and body parts away
from moving parts of the vehicle.
XThis appliance contains a sealed lead-acid battery. It is
recommended that the appliance is positioned upright
during storage, use, and recharging.
XExplosive gas may be vented from the lead acid batteries
when charging and under extreme conditions battery
leakage may occur. Ensure the area is well ventilated when
conducting jump starting and charging procedures.
XDo not charge the appliance using the 12V connector when
the vehicle is occupied. Ensure the area is well ventilated.
XTo reduce the risk of electric shock, disconnect the
appliance from any power source before attempting
maintenance or cleaning. Turning off controls without
disconnecting the appliance will not reduce this risk.
XThe 12 Vdc outlet is strictly for use as an accessory outlet,
the maximum output is 5A. Never insert a vehicle cigarette
lighter into the unit's 12 Vdc accessory outlet.
XMake sure the appliance is disconnected from all charging
power sources before beginning the jump start procedure.
XNever attempt to use the ac charger and dc charging
connection simultaneously.
Additional safety instructions for batteries and chargers
Batteries
XNever attempt to open for any reason.
XDo not expose the battery to water.
XDo not store in locations where the temperature may
exceed 40 °C.
XCharge only at ambient temperatures between 10 °C and
40 °C.
XCharge only using the chargers provided with the
appliance.
XWhen disposing of batteries, follow the instructions given in
the section "Protecting the environment".
XUnder extreme conditions, battery leakage may occur.
When you notice liquid on the batteries, carefully wipe the
liquid off using a cloth. Avoid skin contact.
XIn case of skin or eye contact, follow the instructions below.
Warning! The battery fluid is a diluted sulphuric acid and may
cause personal injury or damage to property. In case of skin
contact, immediately rinse with water. If redness, pain or
irritation occurs seek medical attention. In case of eye contact,
rinse immediately with clean water and seek immediate medical
attention.
Chargers
Your charger has been designed for a specific voltage.
Always check that the mains voltage corresponds to the
voltage on the rating plate.
Warning! Never attempt to replace the charger unit with a
regular mains plug.
Use your Black & Decker charger only to charge the battery
in the tool with which it was supplied. Other batteries could
burst, causing personal injury and damage.
XNever attempt to charge non-rechargeable batteries.
XHave defective cords replaced immediately.
XDo not expose the charger to water.
XDo not open the charger.
XDo not probe the charger.
The battery must be placed in a well ventilated area when
charging.
The following symbols are found on your charger:
Electrical safety
This tool is double insulated; therefore no earth
wire is required. Always check that the power
supply corresponds to the voltage on the rating
plate.
XIf the supply cord is damaged, it must be replaced by the
manufacturer or an authorised Black & Decker Service
Centre in order to avoid a hazard.
Fail-safe isolating transformer. The mains supply
is electrically separated from the transformer
output.
The charger automatically shuts off if the ambient
temperature becomes too high. As a
consequence the charger will be inoperable. The
charging base must be disconnected from the
mains supply and taken to an authorised service
centre for repair.
The charging base is intended for indoor use
only.
Read the instruction manual before use.
130oC

5
Features
This appliance includes some or all of the following features:
1. Jumper cables
2. 12 Vdc charging socket
3. 12 Vdc accessory outlet
4. Battery status pushbutton
5. Carry handle
6. Battery status LEDs
7. ON/OFF switch
8. LED area light on/off switch
9. Reverse polarity indicator
10. LED area light
11. Mains charging adaptor
12. 12 Vdc vehicle adaptor
13. Heavy-duty copper clamps
14. Clamp holders
15. Inflator nozzle
Use
Charging the unit (fig. A)
This unit is shipped in a partially charged state.
XCharge the unit before first use using the mains charging
adaptor (11) for 48 hours.
Lead-acid batteries require routine maintenance to ensure a
full charge and a long battery life. All batteries lose energy
from self-discharge over time and more rapidly at higher
temperatures. When the unit is not in use, Black & Decker
recommend that the battery is charged at least every 60
days.
XCheck the battery charge level by pressing the battery
status pushbutton (4). The LED charge status display (6)
will indicate the level of battery charge. When only one red
LED lights, charge the unit.
Note: Charging the battery after each use will prolong the
battery life; frequent heavy discharges between charges
and/or overcharging will reduce battery life.
The battery can be charged using the mains charging
adaptor (11) or the 12 Vdc vehicle adaptor (12).
Charging the unit with the mains charger (fig. A)
Make sure that the ON/OFF switch (7) and the LED area light
(10) are turned off while the unit is being charged.
As charging progresses, the red LEDs will light one by one.
XCharge the unit until the green FULL LED lights.
XContinue to charge for one to two more hours.
Note: The mains charger should not be connected for more
than 60 hours.
XWhen charging is complete, disconnect the mains charging
adaptor (11) and store it in a safe place.
Charging the unit with the 12 Vdc vehicle adaptor (fig. A)
Make sure that the ON/OFF switch (7) and the LED area light
(10) are turned off while the unit is being charged.
The 12 Vdc vehicle adaptor (12) does not provide a taper
charge.
Warning! While charging with the 12 Vdc vehicle adaptor (12):
XDo not charge for more than 4 hours maximum.
XDo not leave unattended.
To charge the unit with the 12 Vdc vehicle adaptor (12):
XInsert one end of the 12 Vdc vehicle adaptor (12) into a 12
Vdc accessory outlet on the vehicle or boat.
XInsert the other end of the 12 Vdc vehicle adaptor (12) into
the 12 Vdc charging socket (3) on the front of the unit.
XTo check the charge status of the battery during dc
charging, disconnect the 12 Vdc vehicle adapter from the
accessory outlet and push the battery status pushbutton.
Observe the battery status LEDs. Do not charge for more
than 3 to 4 hours maximum.
XWhen charging is completed, remove the 12 Vdc vehicle
adaptor (12) and store it in a safe place.
Warning! You must remove the 12 Vdc vehicle adaptor from the
12 Vdc accessory outlet on the vehicle before attempting to drive
the vehicle. Failure to do so could result in some cases of the
engine continuing to run even when the ignition key is removed
which could result in personal injury or property damage.
Using the unit as a jump-starter (fig. A & B)
Warning! Make sure that the vehicle is in neutral with the
parking brake applied.
XTurn off the vehicles ignition and all accessories before
making any connections.
XMake sure that the units ON/OFF switch (7) is turned OFF.
XThe following procedure is for a negative earth system ie
the negative battery terminal is connected to the chassis.
XConnect the positive (+) red clamp to the vehicle's positive
battery terminal.
XConnect the negative (-) black clamp to the vehicle's
chassis or a solid, non-moving, metal vehicle component or
chassis part.
Note: If your connections are incorrectly made, the unit will
beep continuously and the red reverse polarity indicator (9)
will illuminate, even if the ON/OFF switch (7) is in the OFF
position. Rectify the connections immediately.
Warning! Make sure that the cables are not in the path of
moving belts or the fan.
XTurn the unit's ON/OFF switch (7) to the ON position.
XStart the vehicle and crank the engine in 3 to 6 second
bursts.
If the engine doesn't start within 6 seconds let the unit's
internal battery cool for 3 minutes before making another
attempt.

6
XWhen the vehicle starts, turn the unit's ON/OFF switch (7)
to the OFF position.
XLeave the vehicle's engine running.
XDisconnect the (-) black clamp connected to the engine or
chassis first, followed by the (+) red clamp that is connected
to the battery positive (+) terminal.
XCarefully press the negative (black) jumper cable wire into
the storage channel starting at the end furthest from the
clamp.
XClamp the negative (black) clamp onto the clamp holder
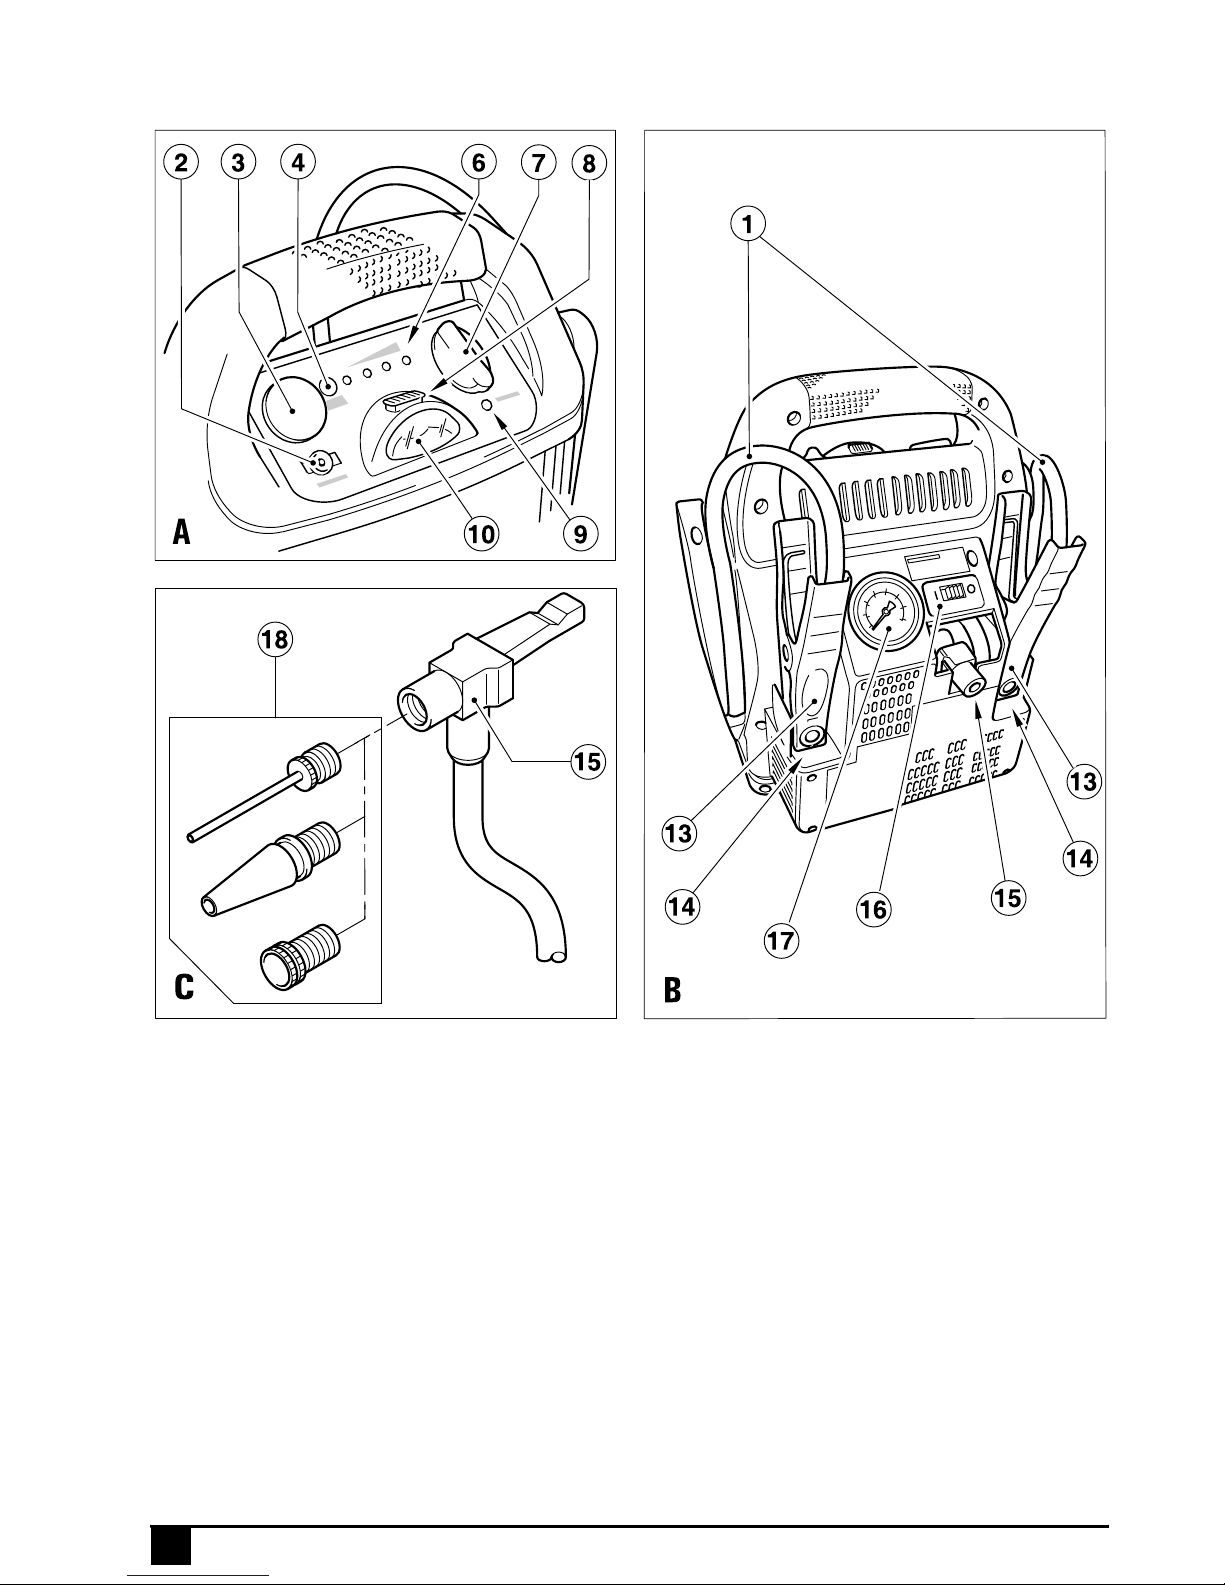
(14).
XCarefully press the positive (red) jumper cable wire into the
storage channel starting at the end furthest from the clamp.
XClamp the positive (red) clamp onto the clamp holder(14).
XCharge the unit as soon as possible.
Using the inflator (fig. C)
Warning! When using the inflator:
XDo not direct the nozzle at animals or bystanders.
XNever leave the compressor unattended when running.
XOnly use the adaptors supplied.
XShould the unit run over an extended period of time it may
overheat and cause the thermal trip to activate. When this
occurs switch the compressor off and allow to cool for
30 minutes.
XKeep the compressor stored out of reach of small children.
XThe gauge is intended as a guide only. Tyre pressures
should be regularly checked with a certified gauge.
XDo not over inflate any object as this may cause a risk of
injury.
This inflator can be used to inflate car tyres and sports
equipment.
XRemove the inflator hose from the storage compartment.
XIf an adaptor is required, choose the correct adaptor (18) for
the product you are inflating and fit it into the nozzle (15).
XFit the nozzle (15) of the inflator or the adaptor (18), if fitted,
to the valve of the item to be inflated. Make sure that the
nozzle (15) is locked in place.
XMove the inflator switch (16) to the on position (I).
XMonitor the pressure gauge (17) until the required pressure
is reached.
XMove the inflator switch (16) to the off position (0).
XRemove the adaptor (18), if fitted, or the nozzle (15) from
the inflated item.
XRemove the adaptor (18), if fitted, and store it in a safe
place and return the hose to the storage compartment.
Using the 12 Vdc portable power supply (fig. A)
This portable power supply can be used with all 12 Vdc
accessories equipped with a male accessory outlet plug
rated up to 5 amps.
Warning! Do not attempt to use or charge the unit while the 12
Vdc accessory outlet (3) is in use.
XLift the cover of the 12 Vdc accessory outlet (3).
XInsert the 12 Vdc plug from the appliance into the 12 Vdc
accessory outlet (3) on the top of the unit.
Warning! Do not exceed a 5A load.
XSwitch on the appliance and operate as usual.
XPeriodically press the battery status pushbutton (4) to
check the status of the internal battery.
Warning! Make sure that the unit's ON/OFF switch (7) is in the
OFF position when using the unit's 12 Vdc accessory outlet (3).
Warning! Do not operate appliances that draw more than 5
amps.
Warning! Never insert a cigarette lighter into the 12 Vdc
accessory outlet (3).
Using the LED area light (fig. A)
The LED area light (10) will operate up to 114 hours on a full
charge. The LED area light's operating life is 100,000 hours.
XSlide the LED area light on/off button (8) on the top panel of
the unit to turn the LED area light (10) on.
XSlide the LED area light on/off button (8) on the top panel of
the unit to turn the LED area light (10) off.
Make sure that the LED area light is turned off while the unit
is being charged or stored.
Maintenance
Your Black & Decker tool has been designed to operate over
a long period of time with a minimum of maintenance.
Continuous satisfactory operation depends upon proper tool
care and regular cleaning.
Warning! Before performing any maintenance or cleaning on
the appliance, unplug the appliance.
XFrom time to time wipe the appliance with a damp cloth. Do
not use any abrasive or solvent-based cleaner. Do not
immerse the appliance in water.
Replacing the fuse in the vehicle dc power cord
XRemove the gold cap by turning it counter clockwise.
XRemove the rubber washer, centre pin and the spring.
XRemove the fuse.
XFit a new fuse of the same type and size (8 A).
XInstall the centre pin, spring and rubber washer.
XInstall the gold cap by turning clockwise onto the plug.

7
Protecting the environment
Separate collection. This product must not be
disposed of with normal household waste.
Should you find one day that your appliance
needs replacement, or if it is of no further use to
you, think of the protection of the environment.
Black & Decker repair agents will accept old
Black & Decker tools and ensure that they are
disposed of in an environmentally safe way.
Separate collection of used products and
packaging allows materials to be recycled and
used again. Re-use of recycled materials helps
prevent environmental pollution and reduces the
demand for raw materials.
Local regulations may provide for separate collection of
electrical products from the household, at municipal waste
sites or by the retailer when you purchase a new product.
Black & Decker provides a facility for the collection and
recycling of Black & Decker products once they have
reached the end of their working life. To take advantage of
this service please return your product to any authorised
repair agent who will collect them on our behalf.
You can check the location of your nearest authorised repair
agent by contacting your local Black & Decker office at the
address indicated in this manual. Alternatively, a list of
authorised Black & Decker repair agents and full details of
our after-sales service and contacts are available on the
Internet at: www.2helpU.com.
Black & Decker batteries can be recharged many
times. At the end of their useful life, discard
batteries with due care for our environment:
XDo not dispose of the battery in fire, as this may result in an
explosion.
XLead Acid (Pb) batteries are recyclable. They must not be
disposed of with household waste. If you do not have
access to a product recycling scheme the battery must be
removed as described below and disposed of in
accordance with local regulations.
XDo not short-circuit the battery terminals.
XBe aware that the battery is heavy.
XIf possible, operate the appliance to run the battery down
completely.
Please refer to the exploded diagram at the back of this
manual to aid you in the removal of the batteries.
Place the battery in a suitable packaging to ensure that the
terminals cannot be short-circuited.
Take the battery to your service agent or a local recycling
station. Collected batteries will be recycled or disposed of
properly.
Technical data
EC declaration of conformity
BDV012I
Black & Decker declares that these products conform to:
Standards & Legislation.
95/54/EC, 2006/95/EC, EN60335, EN55014, EN61000
Kevin Hewitt
Director of Consumer
Engineering
Spennymoor, County Durham
DL16 6JG,
United Kingdom
04-07-2007
Guarantee
Black & Decker is confident of the quality of its products and
offers an outstanding guarantee. This guarantee statement
is in addition to and in no way prejudices your statutory
rights. The guarantee is valid within the territories of the
Member States of the European Union and the European
Free Trade Area.
If a Black & Decker product becomes defective due to faulty
materials, workmanship or lack of conformity, within 24
months from the date of purchase, Black & Decker
guarantees to replace defective parts, repair products
subjected to fair wear and tear or replace such products to
make sure of the minimum inconvenience to the customer
unless:
XThe product has been used for trade, professional or hire
purposes.
XThe product has been subjected to misuse or neglect.
XThe product has sustained damage through foreign
objects, substances or accidents.
BDV012I
Battery Type 12 V 17 Ah
sealed lead acid
Output (instant) A 450
Output (constant for 5 seconds) A 300
Inflator output psi 120
Weight kg 7.9
Battery Charger
Input Vac 230
Approx. charging time h 48
Weight kg 0.2

8
XRepairs have been attempted by persons other than
authorised repair agents or Black & Decker service staff.
To claim on the guarantee, you will need to submit proof of
purchase to the seller or an authorised repair agent. You can
check the location of your nearest authorised repair agent by
contacting your local Black & Decker office at the address
indicated in this manual. Alternatively, a list of authorised
Black & Decker repair agents and full details of our after-
sales service and contacts are available on the Internet at:
www.2helpU.com
Please visit our website www.blackanddecker.co.uk to
register your new Black & Decker product and to be kept up
to date on new products and special offers. Further
information on the Black & Decker brand and our range of
products is available at www.blackanddecker.co.uk.

9

10

11

$XVWUDOLD
%ODFN'HFNHU$XVWUDOLD3W\/WG 7HO
)OHWFKHU5RDG0RRURROEDUN )D[
9LFWRULD
1HZ=HDODQG
%ODFN'HFNHU 7HO
7H$SXQJD3ODFH )D[
0W:HOOLQJWRQ
$XFNODQG
8QLWHG.LQJGRP
%ODFN'HFNHU 7HO
%DWK5RDG )D[
6ORXJK%HUNVKLUH6/<' +HOSOLQH
90523906 07/07
Table of contents
Other Black & Decker Automobile Batteries Charger manuals

Black & Decker
Black & Decker BC25 User manual

Black & Decker
Black & Decker BC12 User manual

Black & Decker
Black & Decker VEC1086BBD User manual

Black & Decker
Black & Decker BBC10 User manual

Black & Decker
Black & Decker SIMPLE START BB7B User manual

Black & Decker
Black & Decker BC40 User manual

Black & Decker
Black & Decker SIMPLE START BBC2CB User manual

Black & Decker
Black & Decker ElectroMate 90556511 User manual

Black & Decker
Black & Decker BDV040 User manual