manuals.online logo
Brands
  1. Home
  2. •
  3. Brands
  4. •
  5. Black & Decker
  6. •
  7. Door Lock
  8. •
  9. Black & Decker Kwikset 663 Use and care manual

Black & Decker Kwikset 663 Use and care manual

UP
UP
SINGLESIDEDDEADBOLT— model663
PÊNEDORMANTÀUNCÔTÉ—modèle663
SERROJO DE UN LADO — modelo 663
663 SINGLE SIDED
DEADBOLT
06467 /05
R
FOR WOOD DOORS ONLY.
POUR PORTES DE BOIS UNIQUEMENT.
PARA PUERTAS DE MADERA SOLAMENTE.
✓✓
✓✓
✓Wood screws require pilot holes.
✓✓
✓✓
✓
Les vis à bois nécessitent des trous-pilotes.
✓✓
✓✓
✓
Lostornillosparamaderarequierenorificiosguía.
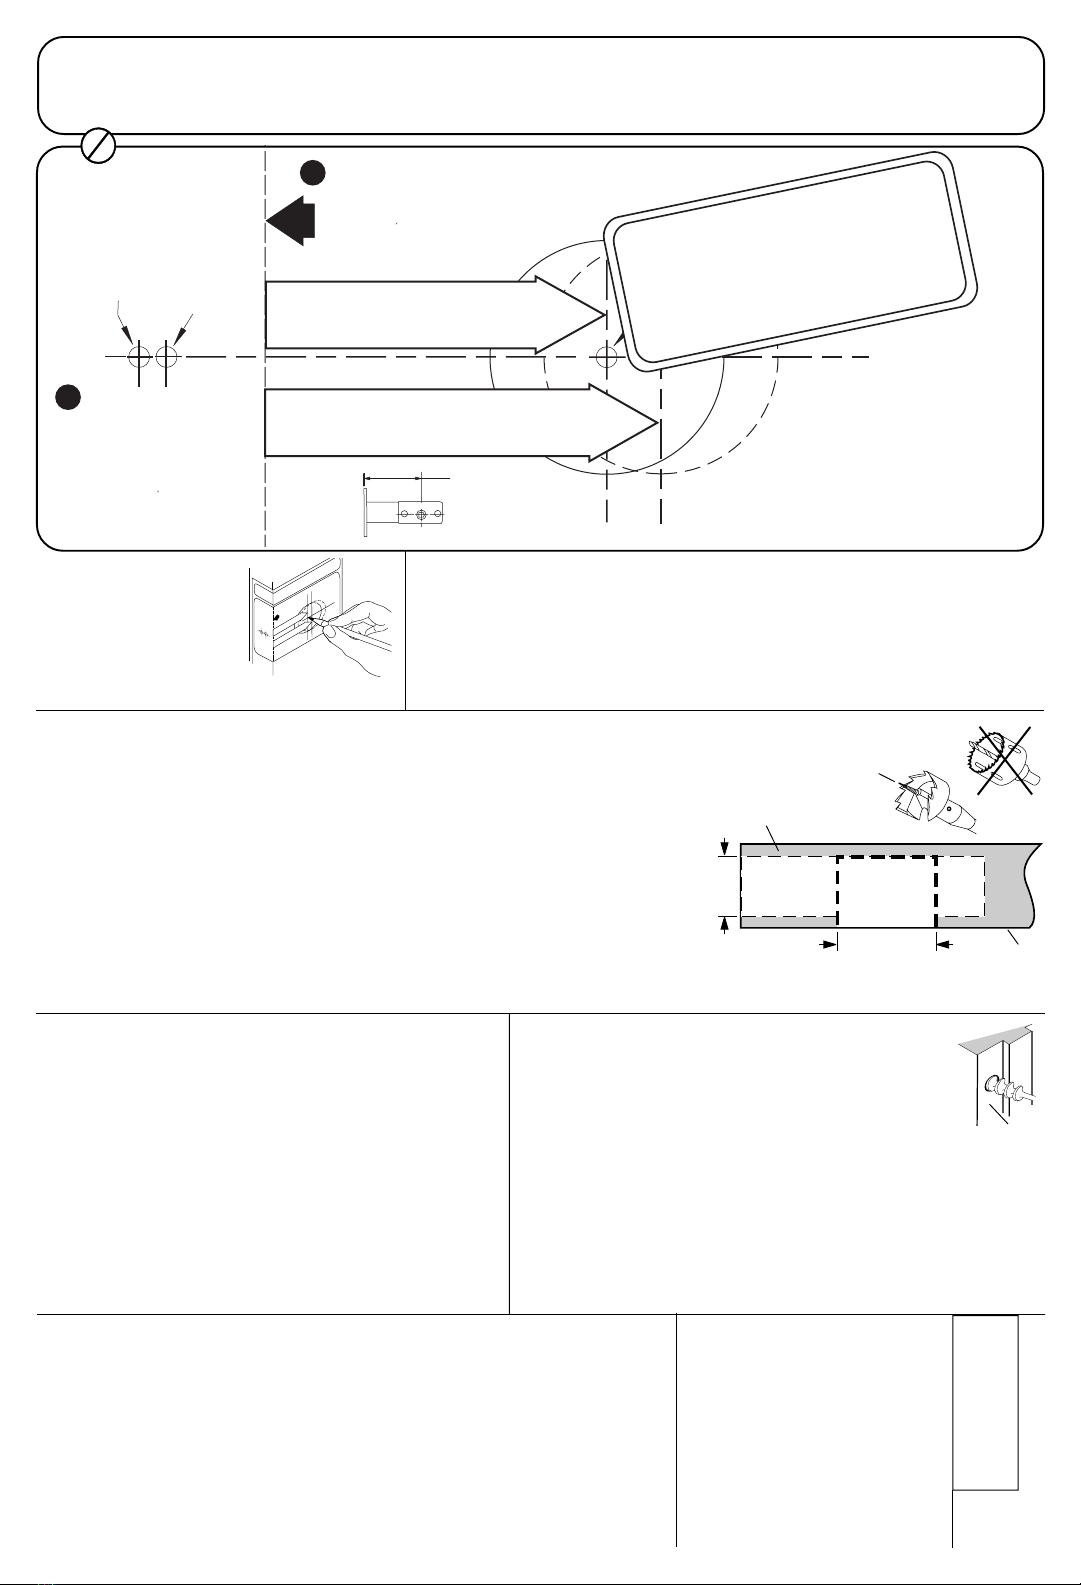
Note 1. With word "UP" at top, prepare latch for installation by positioning the
stud plate on the side of the latch that takes the turnpiece assembly.
Keep vertical.
Garder à la verticale.
Mantengalovertical.
Nota 2.
Para pasador de placa redonda,
introduzcalo en el orificio y presionelo hacia adentro
hasta que el pestillo este al rás de la orilla de la
puerta. No lo martille con el pestillo extendido.
Remarque 2. Si le loquet est rond à l'avant, le presser dans la trou jusqu'à ce que le pêne soit au
même niveau que le bord de la porte. Ne pas utiliser le marteau pour le faire entrer dans le trou lorsque
le pêne n'est pas rétracté.
Note 2. For roundface latch, press latch into hole until bolt is flush with door edge. Do not hammer into
hole with bolt extended.
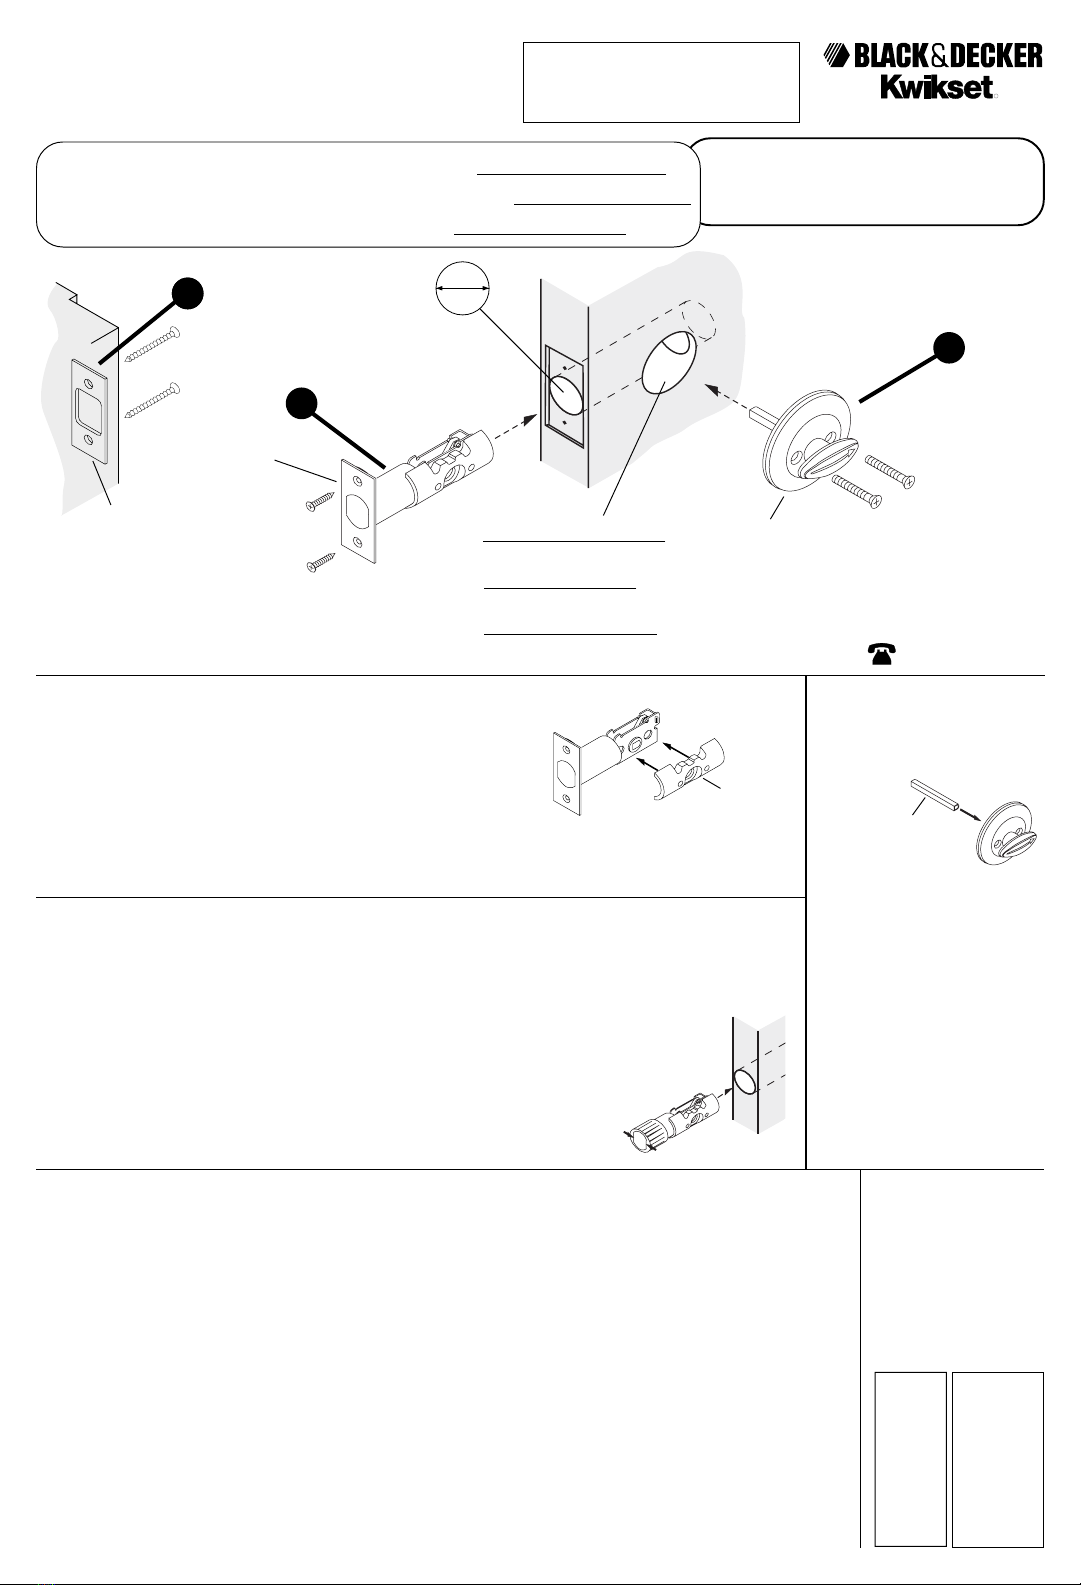
Note 3. Insert torque blade
beforeinstallingturnpiece
assembly.Rotateturnpieceto
lockedpositionto install
screws.
TORQUEBLADE.
LAMEDEROTATION
EJECENTRAL
Remarque 3. Insérer la
lame de rotation avant
d'installer le montage de la
pièce de rotation. Faire tourner
la pièce de rotation en position
verrouillée pour installer les
vis.
Nota 3.
Coloque el eje
centralantesde instalar el
ensambledelamariposa.
Gire el seguro a la posicion
cerradoparainstalarlos
tornillos.
STUDPLATE
PLAQUE ATENON
TRAVESAÑO
UP
Remarque 1. Le mot "UP" figurant au dessus, préparer le loquet à
l'installation en plaçant la plaque a tenon sur le côté du loquet où se
trouvera le montage de la pièce de rotation.
Nota 1.Con la palabra "UP" hacia arriba, prepare el pasador para su instalacion
poníendoeltravesañoenelpasadordelladodondeva el ensamble de la mariposa.
STRIKE
GÂCHE
RECIBIDOR
CC
A
1-5/8" (41mm) diameter hole.
Not a drilled through hole.
TURNPIECEASSEMBLY
MONTAGE DE LA PIÈCE DE ROTATION
ENSAMBLEDELAMARIPOSA
1"
(25mm)
T
rou de diametre 1-5/8" (41 mm).
Ce trou percé ne traverse pas.
Orificio de 1-5/8" de diámetro (41 mm).
Esteorificionoesde ladoalado.
1-800-327-LOCK
U.S.A.&CANADA
See Note #1& 2.
Voir Remarque #1 et 2.
Ver Nota #1 y 2
✓Do not over tighten screws.
✓Ne serrez pas trop fort les vis.
✓
No sobre apriete los tornillos.
See Note #3.
Voir Remarque #3.
Ver Nota #3.
B
LATCH
LOQUET
PASADOR
.°
?
Copyright©1998KwiksetCorporation
Copyright©2001KwiksetCorporation
REPLACEMENTINSTALLATIONINSTRUCTIONS—FollowsequenceA—C.
INSTRUCTIONS D'INSTALLATION EN CAS DE REMPLACEMANT— Suivre la séquence A à C.
INSTRUCCIONES DE INSTALACIÓN DE REEMPLAZO — Siga la secuencia A a C.
DRILLINGINFORMATIONONREVERSE.
INSTRUCTIONS DE PERÇAGE AU VERSO.
INSTRUCCIONES DE PERFORACIÓN AL REVERSO.
LifetimeMechanicalWarranty&5YearFinishWarranty
ThisproductcomeswithalifetimemechanicalwarrantyandafiveyearfinishwarrantytotheoriginalresidentialuserofKwiksetSecurityProductsagainstdefectsinmaterialandworkmanshipas
longastheoriginaluseroccupiestheresidentialpremisesuponwhichtheproductwasoriginallyinstalled.Thiswarranty
DOESNOTCOVER
scratches;abrasions;deteriorationduetotheuseofpaints,
solvents,orotherchemicals;abuse;misuse;orproduct(s)usedincommercialapplications. UponreturnofadefectiveproducttoKwiksetCorporation,Kwiksetmayrepairorreplacetheproductorrefund
thepurchaseprice. Kwiksetisnotliableforincidentalorconsequentialdamages. Somestatesdonotallow theexclusionorlimitationofincidentalorconsequentialdamages,sotheaboveexclusion
maynotapplytoyou. Thiswarrantygivesyouspecificlegalrightsandyoumayalsohaveotherrightsthatvaryfromstatetostate.Ifamechanicalorfinishdefectoccurs,pleasecall1-800-327-LOCK(5625)
intheU.S.andCanadaorreturnittoKwiksetCorporation,ConsumerServices,19701DaVinci,LakeForest,California92610.ForcustomersoutsideoftheU.S.andCanada,claimsunderthiswarranty
mustbemadeonlytoeithertheplaceofpurchaseortothelistedimporter.
Garantía deporVida sobreloscomponentes Mecánicosyde5 Añossobreel Acabado.
Esteproductovieneconunagarantíadeporvidasobreloscomponentesmecánicosyunagarantíadecincoañossobreelacabadootorgadaalusuariodelaprimeraresidenciaenlaquese
instalenlosProductosdeSeguridaddeKwikset ycubredefectosenmaterialesymanodeobra,poreltiempoenqueelusuariooriginalocupelaresidenciaenlaquesehayaninstaladolosproductospor
primeravez.EstagarantíaNOCUBRErayones,abrasiones,deteriorodebidoalusodepinturas,solventesuotrassustanciasquímicas;abuso,malusoousodel/delosproducto/senaplicaciones
comerciales. ConladevolucióndeunproductodefectuosoaKwiksetCorporation,Kwiksetpodrárepararoreemplazarelproductooreembolsarelpreciodecompra. Kwiksetnosehaceresponsable
pordañosconsecuentesóimprevistos.Algunosestadosnopermítenlaexclusiónólimitacióndedañosconsecuentesóimprevistos,demodoqueéstaexclusiónpuedenoaplicarseausted.Éstagarantía
leotorgaderechoslegalesyustedpuedetambientenerotrosderechosquevaríandeunestadoaotro.Siocurreundefectomecánicooenelacabado,llamea 1-800-327-LOCK(5625)enlosESTADOS
UNIDOSYCANADAódevuelbaloaKwiksetCorporation,consumerservices,19701DaVinci,LakeForest,California92610.ParaclientesfueradelosEstadosUnidosyCanadá,losreclamosbajoesta
garantíasedebenrealizarsolamenteatravésdellugarendondesecompróelproductoodelimportadorindicado.
GarantieMécanique àVieet GarantieduFini de5 Ans
Ceproduitbénéficie d’unegarantiemécaniqueà vieetd’unegarantie dufinidecinq anspourl’utilisateurd’originedans uneinstallationrésidentielledes produitsKwiksetSecuritycontretoutdéfaut
dematièrepremièreetdemain-d’œuvre aussilongtempsquel’acheteurd’origineoccupeleslocaux danslesquelsleproduit aétéinstallé.Laprésentegarantie NECOUVREPASlesrayures,abrasions,
détériorationsduesà l’utilisationde peintures,solvantsouautres produitschimiques,lesabus, lesmauvaisesutilisationsoulesproduits utilisésdansdesapplications commerciales. Encas deretourd’un
produitdéfectueuxchezKwiksetCorporation,Kwiksetpeutréparerouremplacerle produitourembourserleprixd’achat.Kwikset nepeut pasêtretenue responsablepour desdommagesconsécutifs
etindirects. Certainesjuridictionsinterdisent lesexclusionsou leslimitationsdes dommagesindirectsou consécutifs;ainsices exclusionspeuventnepass’appliqueràvotrecas. Cette garantievous
donnedesdroitslégauxspécifiqueset vouspouvezégalementdisposerd’autres droitsdont lateneurvaried’unejuridiction àl’autre.Encas dedéfautmécaniqueoudufini,veuillez appelerle1-800-327-
LOCK(5625)aux É.-U.etauCanadaou renvoyezleproduitàKwiksetCorporation,Consumer Services,19701DaVinci,LakeForest,California 92610.Lesclientsdel’extérieurduCanada etdesÉtats-
Unispeuventfaireleurs réclamationsenvertu delaprésente garantieens’adressant aupointd’achatouàl’importateurinscrit.
“This product is covered by one or more of the following patents
or patents pending:”
5335950 5123683 D400777 D347564 D349037 D348212
5317889 D348821 D373063 D378984 5084940 D373523
D344011 D348602 5364139 D352888 D363872 D361489
D361488 5335525 4215557 D348820 4698989 4372594
4427224 4338804 4438962 4472953 4516798 4672829
D348200 4664433 D319000 D300204 D300203 D300202
D300114 D300113 D300115 D302103 D303489 4844522
D321822 4631944 D391826 5513509 5611226 5797286
D424427 5816085 5730296 D413251 5662365 D406042
5810402 D394795 D393584 D414396 D400078 D396798
D415948 5761935 6048141 5857365 6058746 D395220
5611613 5482335 5460417 5490700 D361706 5496082
5570912 5441318 5513510 5761937 5611581 D429142
5535104 5712615 5597227 5611227 5996383 D391828
D391829 D391827 D407292 D391830 5540070
Importadopor:
Black&DeckerS.A.deC.V.
BosquesdeCidrosAccesoRadiatas#42
Col.BosquesdeLasLomas
CP05120Mexico,D.F.
Tel.326-7100
C
L
C
L
2-3/8" (60mm) BACKSET
ÉCARTEMENT 2-3/8" (60 mm)
DISTANCIA AL CENTRO DE 2-3/8" (60 mm)
FOLD HERE AND PLACE FOLD ON
LOW EDGE OF DOOR BEVEL.
PLIER ICI ET PLACER LE PLI SUR LE BORD
INFÉRIEUR DU BISEAU DE LA PORTE
2
1
MARK LOCATION FOR I" (25mm)
DIAMETER HOLE IN CENTER OF
DOOR EDGE.
É
MARQUE LA POSICION PARA EL
ORIFICIO DE I" (25 mm) EN EL CENTRO
DEL BORDE DE LA PUERTA
É
DOBLE AQUI Y COLOQUE EL DOBLEZ SOBRE
EL BORDE INFERIOR DEL BISEL
DE LA PUERTA
UP
`
MARQUER L'EMPLACEMENT DU
DIAMETRE DU TROU 1" (25 mm)
AU CENTRE DU BORD DE LA PORTE.
MARK APPROPRIATE CENTER FOR 1-5/8" (41mm) HOLE.
MARQUE LE CENTRE APPROPRIÉ DU TROU DE 1-5/8" (41 mm).
MARQUE EL CENTRO ADECUADO PARA EL ORIFICIO DE
1-5/8" (41 mm).
2-3/4" (70mm) BACKSET
ÉCARTEMENT 2-3/4" (70 mm)
DISTANCIA AL CENTRO DE 2-3/4" (70 mm)
3
1-3/8"
(35mm)
1-3/4"
(44mm)
DOOR THICKNESS
EPAISSEUR DE LA PORTE
GROSOR DE LA PUERTA
FOR NEW INSTALLATION — READ TEMPLATE AND INSTRUCTIONS BELOW CAREFULLY BEFORE BEGINNING.
POUR NOUVELLE INSTALLATION—LIRE ATTENTIVEMENT LE GABARIT ET LES INSTRUCTIONS CI-DESSOUS AVANT DE COMMENCER.
PARANUEVAINSTALACION—LEACUIDADOSAMENTELAPLANTILLAYLASSIGUIENTESINSTUCCIONESANTESDECOMENZAR.
TEMPLATE
GABARIT
PLANTILLAPLANTILLA
PLANTILLAPLANTILLA
PLANTILLA
Précaution: Ne pas percer le
trou de 1-5/8" (41mm) au
travers de toute la porte.
(Lire les instructions attentivement).
Precaucion: No perfore el orificio
de 1-5/8" (41mm) de diámetro
de lado a lado de la puerta.
(Lea las instrucciones cuiadadosamente).
Caution: Do not drill
1-5/8" (41mm) hole
through entire door.
(Read instructions carefully).
✄✄
A. Follow steps 1 through
3 of template above.
Siga los pasos 1 a 3 de la plantilla arriba.
Suivrelesétapes1à3dugabarit
ci-dessus.
B.Drill a 1" (25mm) diameter hole where marked in edge of door, drill 4" (102mm) deep.
Perceruntrouau diamètre de 1"(25mm)àl'indicationsurlebord de la porte,à4"(102mm)de
profondeur.
Pefore un orificio de 1" (25mm) de diámetro y 4" (102 mm) de profundidad en el lugar
marcado en el borde de la puerta.
F. Center strike over strike hole, trace outline and chisel out area 5/64" (2mm) deep. With
strike in place mark screw hole centers. Drill 1/8" (3mm) pilot screw holes a minimum of
1-1/2" (38mm) deep.
Perfore elorificiode 1-5/8" (41mm) dediámetro NO MÁS PROFUNDO delaorilla del orificio de
1" (25mm) de diámetro. NO PREFORE DE LADO A LADO DE LA PUERTA (vea la fig.1). Use una
broca con guia removible, empiece a perforar despacio con la guia puesta luego remuevala para evitar
traspasar la puerta. (En caso de traspasar la puerta el modelo 664 equipo de conversion puede comprarse para reparar el daño).
E.Locate strike hole by marking end of bolt with marking crayon
or lipstick. Close door and operate bolt back and forth several
timestomarkthe jamb. Locatecenterof spot anddrilla1"
(25mm)holea minimumof1" (25mm) deep.
C. Drill the 1-5/8" (41mm) diameter hole NO DEEPER than to the edge of the drilled 1" (25mm)
diameter hole. DO NOT DRILL THROUGH DOOR (see fig. 1). Use a drill with a removable pilot, start
hole briefly with pilot attached then remove to avoid breaking through door. (If a drilling through
should occur, the model 664 conversion kit can be purchased to remedy the situation).
Nepaspercerlatrouaudiamètrede1-5/8" (41 mm)PLUSPROFONDquejusqu'auborddelatroupereéau
diamètrede1"(25mm).NEPASPERCERÀTRAVERSLAPORTE(voirfig.1).Utiliseruneperceusedotée
d'unpiloteamovible,commencerlatroubrièvementaveelapiloteetenleverensuitecedernierafind'éviterde
traverserlaporteaucomplet.(Silatroutraversecomplètement,ilestpossibled'acheterlatroussede
conversion664afinderemédieràlasituation.)
1"
(25mm)
15/8" (41mm)
(fig.1) DOOR
PORTE
PUERTA
TOPVIEW
VUEENPLAN
VISTADEARRIVA
PILOT
PILOTE
GUIA
Traze el contorno de la placa del pasador en el borde de la
puerta y rebaje un área de 5/32" (4 mm) de profundidad (no es
necesario rebajar si el pasador no cuenta con una placa de
protección). Siga los pasos A y Bal reverso, despues continue
con el paso Een este lado.
Tracerletourdelaplaqueduloquetsurlebord delaporteetdécouperla
surfaceauciseauàboissuruneprofondeur de 5/32" (4 mm), (nepas
découperauciseauàboissivotrepênen'apasdeplaquette).Suivrelesétapes
AetBdel'autrecôtéetpoursuivreavecl'étapeEdececôté.
D. Trace face of latch in door edge and chisel out area 5/32"
(4mm) deep, (no chiseling is required if your latch has no face
plate). Follow steps A and Bof reverse side, then continue with
step Eof this side.
Centrerlagâchesurletroudelagâche,tracerlecontouretenleverlematériauauciseausur5/64"(2mm)
deprofondeur.Lagâcheenplace,marquerlecentredestrouspourlesvis.Percerdestrous-pilotesde1/8"
(3mm)d'au moins 1-1/2" (38mm)deprofondeur.
Centre el recibidor sobre el orificio en el marco de la puerta, trace el contorno del recibidor
sobre el marco y cincele un área de 5/64" (2 mm) de profundidad. Con el recibidor puesto
sobre el marco de la puerta, marque el centro de los orificios para los tornillos. Perfore
orificios guías de 1/8" (3 mm) de diámetro a una profundidad minima de 1-1/2" (38 mm).
JAMB
CHAMBRANLE
MARCO
Para marcar el orificio del recibidor use una crayola o un lapiz lavial en el
pestillo. Sierre la puerta y opere el pestillo varias veces para marcarlo en el
marco de la puerta. Marque el centro de la marca y perfore un orificio de 1"
(25mm) de diámetro a una profundidad minima de 1" (25mm).
Détermineroùsesitueralatroudelagâcheenmarquantl'extrémitédu
pêneaucrayonà marquerouaurougeàlèvre.Fermerlaporteetfaire
fonctionnerlepêneplusieursfoisafindemarquerlechambranle.
Localiserlecentredel'endroitetperceruntroude1"(25mm)d'une
profondeurd'aumoins1"(25mm).
G. Continue by following step C
of REPLACEMENT INSTALLATION
INSTRUCTIONS on reverse side.
ContinuerensuivantlesétapeCdes
INSTRUCTIONSD'INSTALLATION
DEREMPLACEMENTouverso.
Prosiga con el paso C de las
INSTRUCCIONES PARA LA
INSTALACIÓN DE
REEMPLAZO al reverso.
Importado por:
Black & Decker S.A. de C. V.
Bosques de Cidros Acceso Radiatas #42
Col. Bosques de Las Lomas
CP 05120 Mexico, D.F.
Tel. 326-7100
663
One
Sided
Deadbolt
06467/
05
BACKSET
ÉCARTEMENT
DISTANCIAALCENTRO
DIMENSIONS ON THIS PUBLICATION
ARE NOT TO SCALE
DO NOT USE THIS TEMPLATE TO
MARK DISTANCES.

Other Black & Decker Door Lock manuals

Black & Decker SmartCode 40490-01 User manual

Black & Decker

Black & Decker SmartCode 40490-01 User manual

Black & Decker 79-364 Manual

Black & Decker

Black & Decker 79-364 Manual

Black & Decker 79-362 User manual

Black & Decker

Black & Decker 79-362 User manual

Black & Decker 79-373 User manual

Black & Decker

Black & Decker 79-373 User manual

Black & Decker 28733/01 User manual

Black & Decker

Black & Decker 28733/01 User manual

Popular Door Lock manuals by other brands

Digi 6600-88 user manual

Digi

Digi 6600-88 user manual

Assa Abloy ES100 Series installation instructions

Assa Abloy

Assa Abloy ES100 Series installation instructions

Milre MI-7800 user manual

Milre

Milre MI-7800 user manual

LockState Remotelock 7i instructions

LockState

LockState Remotelock 7i instructions

RCI 4 Series Installation

RCI

RCI 4 Series Installation

Igloohome Smart Mortise 2 Installer/user guide

Igloohome

Igloohome Smart Mortise 2 Installer/user guide

IEC Trimec ES150 instructions

IEC

IEC Trimec ES150 instructions

Best 9K-YALRC Installation instruction

Best

Best 9K-YALRC Installation instruction

Beninca E.LOCK installation manual

Beninca

Beninca E.LOCK installation manual

Assa Abloy v.G1 Sargent installation instructions

Assa Abloy

Assa Abloy v.G1 Sargent installation instructions

Paxton Net2 PaxLock Instruction

Paxton

Paxton Net2 PaxLock Instruction

GEM WLP-150 Installation instruction

GEM

GEM WLP-150 Installation instruction

Lamp ET-48 installation manual

Lamp

Lamp ET-48 installation manual

Salto XS4 Mini installation guide

Salto

Salto XS4 Mini installation guide

CommScope FACT Installation instruction

CommScope

CommScope FACT Installation instruction

Lockly LUX COMPACT PGD688F-MB quick start guide

Lockly

Lockly LUX COMPACT PGD688F-MB quick start guide

Ezviz CSL2 quick start guide

Ezviz

Ezviz CSL2 quick start guide

SDC E75 Series Programming guide

SDC

SDC E75 Series Programming guide

manuals.online logo
manuals.online logoBrands
  • About & Mission
  • Contact us
  • Privacy Policy
  • Terms and Conditions

Copyright 2025 Manuals.Online. All Rights Reserved.