Black & Decker LEDUC9-1CCT-ACK User manual

USER GUIDE
Smart LED Under Cabinet Lighting

Safety Guidelines
What’s in the Box
Plan Your Layout
Routing Wires
How to Install
Connecting to Alexa™
How to Use
Alexa
™
Functionality
Specifications
Contents
Contact/Warranty Information
1-2
3-4
5-6
7-8
9-10
11-12
13-14
15-16
17
18
19-20
Table of Contents
Thank You for Choosing Black+Decker!
Save this user guide for future reference.
Please read this user guide before returning this product for any reason.

If you have a question or experience a problem with your Black+Decker purchase, go to PureOpticsLED.com/Support.If you can’t
find the answer or do not have access to the internet, call 1-855-784-4322 from 8 a.m. to 5 p.m. Monday – Friday to speak with an
agent. Please have the catalog number available when you call. To find the catalog number, please refer to product packaging.
WARNING: To reduce the risks associated with excessive heat and fire which, if not avoided, could result in death or serious injury
and/or property damage:
• Avoid usage in high temperature areas (104°F/40°C).
• Avoid putting light next to heater.
• Lights should not be covered with flammable objects (cloth, paper, etc.).
CAUTION: To reduce the risks associated with environmental contamination which, if not avoided, could result in minor or
moderate injury:
• Dispose of task lights in accordance with applicable local government regulations.
WARNING:
• This device may not cause harmful interference.
• This device must accept any interference received, including interference that may cause undesired operation.
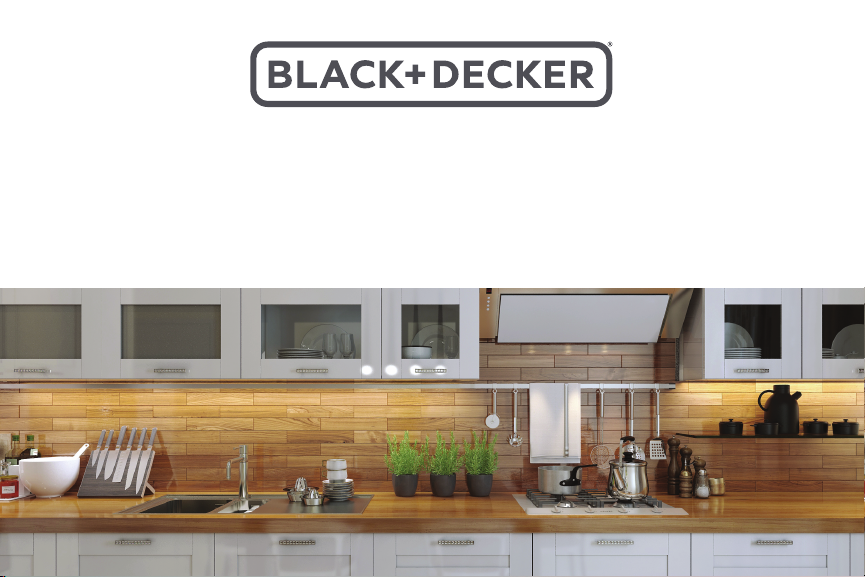
INTENDED USE: BLACK+DECKER® LED Under Cabinet Lights are intended to provide task lighting indoors. Use in any other
application has not been evaluated and may lead to an unsafe condition.
POLARIZED PLUGS: Polarized plugs (one blade is wider than the other) are used on equipment to reduce the risk of electric shock.
When provided, this plug will fit a polarized outlet in only one way.
WARNING: If the plug does not fit fully into the outlet, reverse the plug. If it still does not fit, contact a qualified electrician to
install the proper outlet. Do not change the plug in any way.
POWER ADAPTER STANDARDS: Input — AC 100-120V 60Hz 32W; Output — DC 24V 1A
2
NOTICE: Used without the safety alert symbol indicates potentially hazardous situation which, if not avoided, may result
in property damage.
WARNING: To reduce the risks associated with impact and hazardous voltage which, if not avoided, could result in death or
serious injury and/or property damage:
• Use indoors and in dry locations only; keep all liquids away from the light
• Avoid putting the light on an uneven surface to prevent toppling or damage
• Do not alter or modify the light, ground plug, or polarized plug blades
• Do not use light with other adapters or voltage supplies
• Plug the light into grounded, polarized electrical outlet; contact a qualified electrician if a polarized outlet is not available
• Do not use the light if the power cord or the enclosure is damaged
• If an extension cord is used, ensure that it is properly rated for your application
• Do not attempt to disassemble light; product is to be serviced by qualified service personnel only—there are no user
serviceable parts inside
• Always power o and unplug light before cleaning
• Clean exterior only with a dry, clean cloth; do not immerse light in water to clean
• Do not use force when adjusting light
• Do not insert objects into light
• If any irregularities are detected during use, turn o the switch and unplug the light
It is important for you to read and understand this manual. The information it contains relates to protecting YOUR SAFETY and
PREVENTING PROBLEMS. The symbols below are used to help you recognize this information.
DANGER: Indicates an imminently hazardous situation which, if not avoided, will result in death or serious injury and/or
property damage.
WARNING: Indicates a potentially hazardous situation which, if not avoided, could result in death or serious injury and/or
property damage.
CAUTION: Indicates a potentially hazardous situation which, if not avoided, may result in minor or moderate injury and/or
property damage.
1
Safety Guidelines

Indicator
Light
4
C
A
Jumper
Wire Inputs
Power
Cord Input
Motion
Sensor
Jumper Wire Inputs
Power/
Brightness
Button
Color Tuning
Button
3
A.
B.
C.
D.
E.
F.
G.
A A
EF
G
BB
C
D
What’s in the Box
Light Bar
Jumper Wire
Smart Control Box
AC Adapter
Wire Clips
Bar Mounting Clips
Jumper Wire Extender
For a full list of contents for your kit, please refer to PG. 18.

To find the ideal way to configure your lighting, we recommend planning your layout prior to installation.
Use the steps below to get started.
1. Choose your outlet and control box location
• The control box should be located in the front corner of an easily accessible cabinet and must be within 6’ of a
power source.
• If using a power source located inside of a cabinet, you will need to route the wires through the cabinet walls
(See Routing Wires - PG. 7).
2. Based on your plug location, you will either use a split or continuous configuration
• For layouts where preferred power source is centrally located within cabinets or mounting surfaces (See FIG 1),
link light bars and jumper wires using the left and right sides of the control box. (See FIG. 2.1)
• For layouts where preferred power source is on either side of cabinets or mounting surfaces (See FIG 1),
3. Lay a light bar on the counter under each cabinet you wish to install a light bar
4. Lay your jumper wires on the counter in between the light bars you will be connecting
If you need to jump a sink or stove, use a jumper wire extender to create additional length. If you need
additional length, a 108” Stove & Sink Jumper Wire (LEDJUMP108) is available for purchase.
FIG. 1
FIG. 2.1 FIG. 2.2
65
This under cabinet lighting was designed for an entirely tool-free application. However, for certain installation
options, tools may be required. These will be indicated by the drill symbol.
This symbol indicates a tip to help during installation.
Plan Your Layout
Split configuration
Continuous configuration
Continuous:
link light bars and jumper wires using the left or right side of the control box. (See FIG. 2.2)
Split:
Each 9” light bar illuminates up to 36” and is linkable up to 6 bars
Each 18” light bar illuminates up to 42” and is linkable up to 4 bars
Each 24” light bar illuminates up to 48” and is linkable up to 3 bars
Note: If you mix and match bar lengths, check the wattage on each bar and never exceed 24 total watts
of power consumption

8
Jumper Wires: To feed any size jumper wire through a cabinet, use a 1/2” drill bit
AC Adapter Wire: To feed the AC adapter wire through a cabinet, use a 3/8” drill bit
Routing Wires
For the cleanest installation for your cabinet type, we recommend routing wires using the tips below.
Be sure to use the provided wire clips and zip ties as needed.
7
Frameless Cabinets Framed Cabinets
Run connector wires towards the back of cabinet
frames to hide the wires and secure with wire clips.
Loop any excess wire at the back of the cabinet
joint. If there is space between two side-by-side
cabinets, hide excess wire in the opening.
You can run wires through a cabinet’s walls using
a power drill and the bits noted below.
You can run wires through a cabinet’s frame using
a power drill and the bits noted below.
Running Wires Through Cabinets

5. Connect the AC adapter cord to the control box
For troubleshooting and support, scan
code or visit PureOpticsLED.com/Support.
7. Plug in your AC adapter to the power source
10
6. Route and hide wires as desired using wire clips and/or
zip ties (See Routing Wires Section PG. 7)
1. Mount control box in desired location 4. Using jumper wires, connect the control box to the first
light bar(s) and light bars to each other.
2. Slide two bar mounting clips onto each light bar
See Routing Jumpers Wires section for tips (PG. 7)
3. Using the provided mounting spacer, mount bar lights
and hold in place for 10 seconds
9
How to Install

STEP 3: Select “Light” > “Black+Decker” STEP 4: Scan QR code on the
control box
STEP 5: Your device is now paired.
The red light should be o.
12
STEP 1: Plug the power cord into the control box. Once connected, the
red Wi-Fi light will begin to blink which indicates the device is now in
PAIRING MODE. The red light will blink for approximately five minutes.
After the light stops blinking, the device will no longer be in pairing mode.
STEP 2: Open your Alexa™ App, select
Devices, and select the “+” button to
“Add Device”
Red Wi-Fi Light
11
Connecting to Alexa™
To enable voice and app control, pair the control box to Alexa™ using the following steps. Note: If you are already an Alexa™
user, you may be prompted to connect automatically.
Note: If you are already an Alexa™ user, you may be prompted to connect automatically.
To restart PAIRING MODE, unplug the power cord then
reconnect your power cord to your control box.

13
VOICE
COMMANDS
POWER CONTROL
COLOR TUNING
Soft White (3000K)
White (4000K)
Daylight (5000K)
DIMMING
10% - 100%
ALEXA™
APP CONTROL
PRODUCT
OPERATION
“...turn my cabinet lights on.”
“...turn my cabinet lights o.” Yes Push power button or
wave hand within 2” of
motion sensor
Yes Press the color tuning
button to toggle between
temperature settings
Press and hold power button to
switch between 10 presets
Yes
Yes No
“...turn my cabinet lights to soft white.”
“...turn my cabinet lights to white.”
“...turn my cabinet lights to daylight.”
“...dim my cabinet lights.”
“...dim my cabinet lights to X%”
(10%-90%)
“...turn cabinet lights to 100%.”
“.…enable night mode on cabinet lights.”
“…disable night mode on cabinet lights.”
13
How to Use
1414
NIGHTLIGHT MODE
30% Brightness,
5-Hour Timer

Streamline devices and simplify your daily routines by incorporating your under cabinet lighting into Alexa’s native functionality.
Groups
Pair with other smart devices in the room for easy control.
16
Under cabinet lights power on
Overhead light turns on
Alexa™Functionality
Routines
Tie multiple actions into a simple voice command or automate tasks without speaking at all based on schedules, locations, and more.
15
Under cabinet lights power on;
natural daylight temperature;
full temperature
Echo Dot™ plays,
“Italian Cooking Music”
Under cabinet lights power on;
warm light temperature;
20% brightness
Coee maker turns on

18
Contents
LEDUC9-1CCT-ACK LEDUC9-3CCT-ACK LEDUC9-6CCT-ACK LEDUC18-1CCT-ACK LEDUC24-1CCT-ACK
24 in. Smart LED
Lighting Kit
18 in. Smart LED
Lighting Kit
6-Cabinet Smart
LED Lighting Kit
3-Cabinet Smart
LED Lighting Kit
1-Cabinet Smart
LED Lighting Kit
Light Bar 1 3 6 1 1
4” Jumper Wire 1 3 3 1 1
30” Jumper Wire 1 2 5 1 1
Control Box 1 1 1 1 1
12” Jumper Wire 1 1 1 1 1
0 0 1 0 072” Jumper Wire
6 12 22 6 6Wire Clip
1 1 1 1 1AC Adapter
1 1 2 1 1Jumper Extender
4 10 18 4 4Bar Clip
8 18 30 8 8Mounting Screw
17
Specifications
LEDUC9-1CCT-ACK
327.5 327.5 327.5 429.5 626
Color Tuning Range 3000K
4000K
5000K
335 335 335 505 672
Lumen Output
3000K 320 320 320 480 580
Watts Per Bar 4 4 4 5.8 7.6
CRI 84 84 84 84 84
84 84 84 87 88Ecacy
LEDUC9-3CCT-ACK LEDUC9-6CCT-ACK LEDUC18-1CCT-ACK LEDUC24-1CCT-ACK
3000K
4000K
5000K
3000K
4000K
5000K
3000K
4000K
5000K
3000K
4000K
5000K
24 in. Smart LED
Lighting Kit
18 in. Smart LED
Lighting Kit
6-Cabinet Smart
LED Lighting Kit
3-Cabinet Smart
LED Lighting Kit
1-Cabinet Smart
LED Lighting Kit
Lumen Output
4000K
Lumen Output
5000K

Manufactured by:
Goods iQ, North Kingstown RI 02852
Under license from The Black and Decker Corporation USA and Canada Only
Black+Decker and the Black+Decker logo are trademarks of The Black+Decker Corporation and are used under
license. All rights reserved. Product in this box may dier slightly from that pictured. Not all accessories shown in
photography are included in this package.
Amazon, Alexa and all related logos are trademarks of Amazon.com, Inc. or its aliates.
Copyright © 2021 Goods iQ
To register your new product visit: PureOpticsLED.com/New-Product
For product support visit: PureOpticsLED.com/Support
Support contact number: 1-855-784-4322
This device contains FCC ID: 2AC7Z-ESP32PICOZERO
This device complies with FCC Part 15B. Operation is subject to the following two conditions:
1. This device may not cause harmful interference, and
2. This device must accept any interference received, including interference that may cause undesired operation.
This device complies with the FCC radiation exposure limits set forth in an uncontrolled environment.
This device should be installed and operated with a minimum distance of 20cm between the equipment and the user’s body.
2019
Goods iQ warrants to the original retail purchaser that the product purchased is free from defects in material and workmanship,
and agrees to repair or replace, at Goods iQ’s option, any defective BLACK+DECKER™ branded under cabinet lighting product (3)
years from the date of purchase. Warranty is not transferable. Proof of purchase date required. This warranty covers only damage
resulting from defects in material or workmanship; it does not cover conditions or malfunctions resulting from normal wear, neglect,
abuse, accident, or repairs attempted or made by other than our national repair center or authorized warranty service centers. You
are responsible for the costs of shipping the defective product to Goods iQ.
THIS WARRANTY IS THE EXCLUSIVE WARRANTY OF GOODS IQ, AND IS IN LIEU OF ALL OTHER EXPRESS WARRANTIES IN-
CLUDING, BUT NOT LIMITED TO, IMPLIED WARRANTIES OF MERCHANTABILITY OR FITNESS FOR A PARTICULAR PURCHASE.
GOODS IQ SHALL NOT BE LIABLE FOR ANY DIRECT, INDIRECT, INCIDENTAL, OR CONSEQUENTIAL DAMAGES.
Some states and countries do not allow the exclusion or limitation of incidental or consequential damages, so the above limitations
or exclusions may not apply to you. This warranty gives you specific legal rights, and you may also have other rights which vary
from state to state and country to country. For information on our warranty claim procedure, please contact us at 855-784-4322.
Latin America: This warranty does not apply to products sold in Latin America. For products sold in Latin America, check country
specific warranty information contained in the packaging, call the local company, or see the website for warranty information.
Three-Year Limited Warranty
4006255
This manual suits for next models
4
Table of contents
Other Black & Decker Lighting Equipment manuals