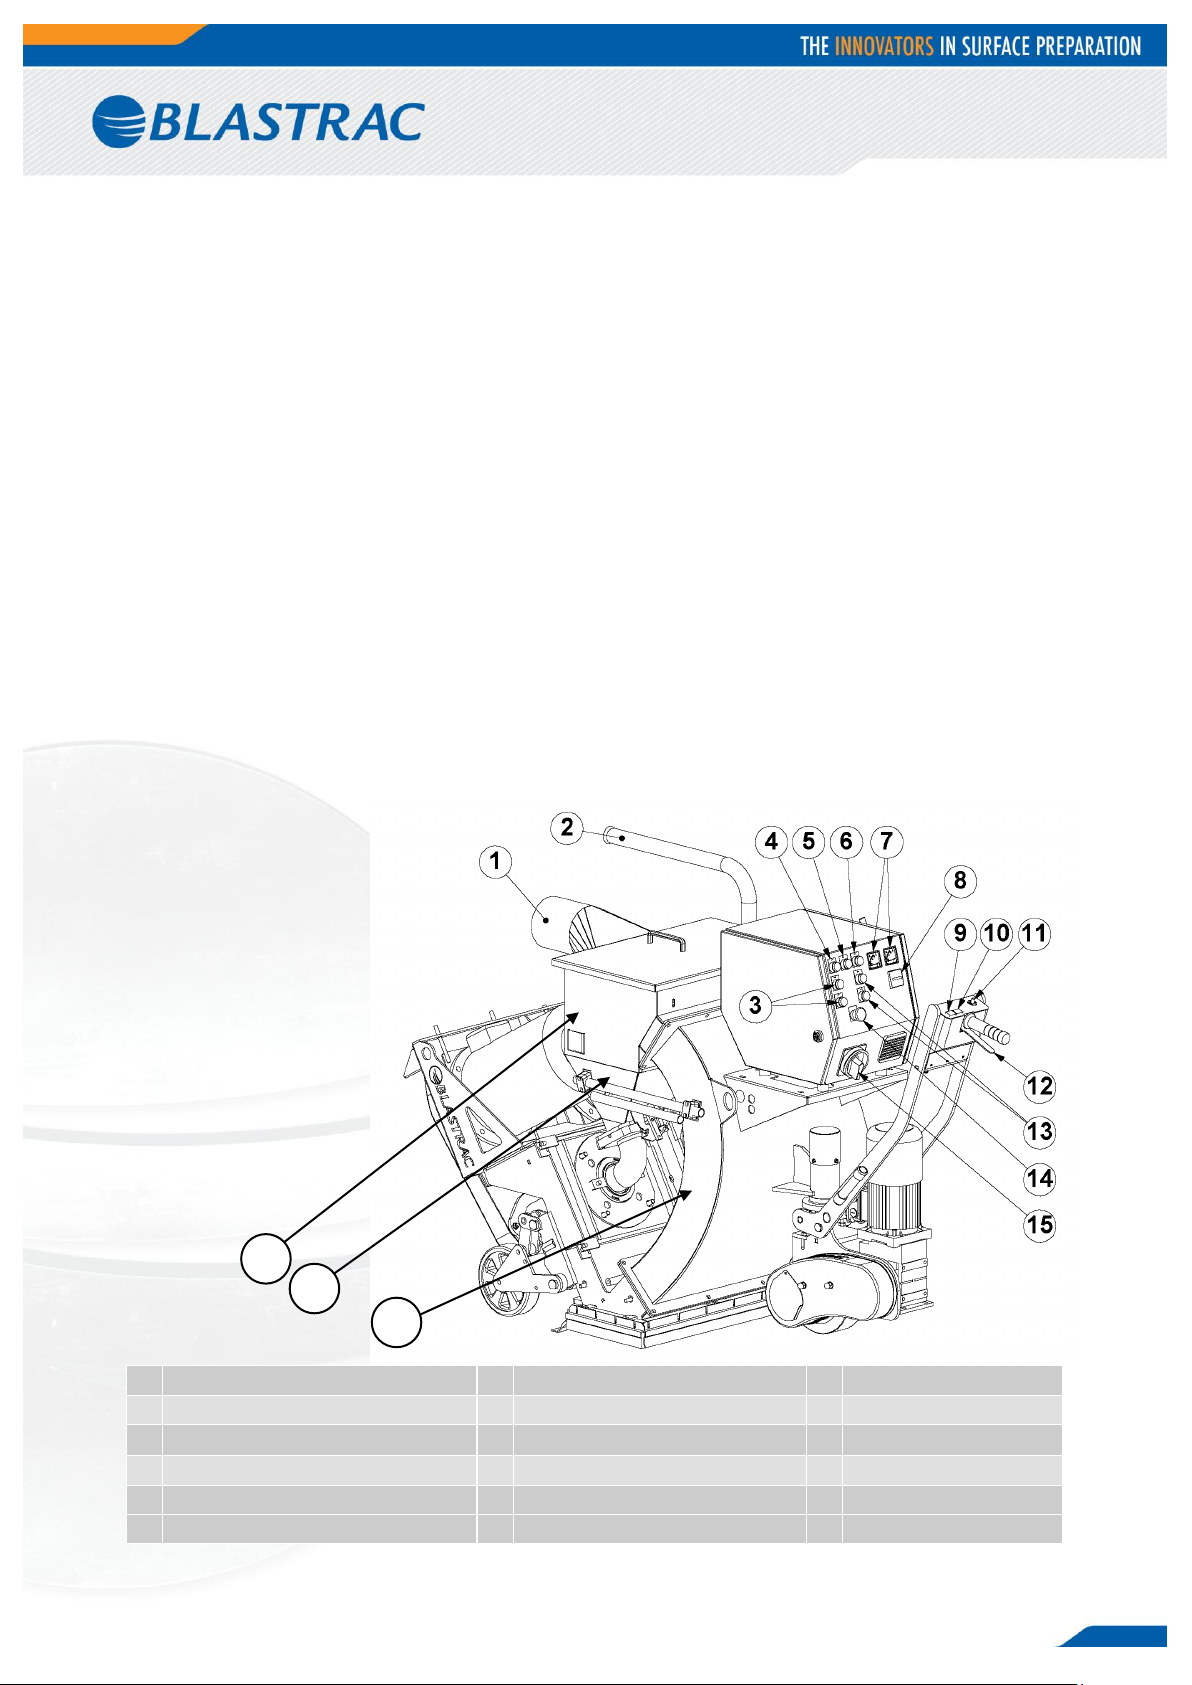
Blastrac 2-30DS Global User manual

Original instructions in English language.
OPERATING INSTRUCTIONS 2-30DS Global
VERSION 2.1

2
Inspection comments
Recurring inspections / maintenance log
*Competent person
Date / Hour counter
Findings
Repairs / Cleaning
Test
on
By*
Inspection before initial operation on: __________________________________________
By: __________________________________________
Date of initial operation: __________________________________________
Serial number & Year of manufacture: __________________________ _____________

3
Table of contents
Maintenance log 2
1. Introduction 4
2. Machine description 4
2.1 Blast machine 4
2.2 Separator, Deflector and Hopper 5
2.3 Blast wheels 5
2.4 Abrasive sealing 5
3. Safety 6
3.1 Work area safety 6
3.2 Electrical safety 6
3.3 Personal safety 7
3.4 Machine safety 7
3.5 Shot / steel blasting safety 8
3.6 Dust collector safety 8
3.7 Maintenance safety 8
3.8 Transport safety 8
3.9 Signs on the machine 10
4. Before operation 11
4.1 Checkpoints of power supply 11
4.2 Checkpoints of the machine 11
4.3 Checkpoints of Work area 11
4.4 Drive control 11
4.5 Connecting the drive motor 12
4.6 Driving with connected drive 12
5. Operating 13
5.1 Before switch on 13
5.2 Switching the machine on 13
5.3 Switching the machine off 13
5.4 Adjusting the blast pattern 14
5.5 Setting the control cages 14
5.6 Operation 16
6. Maintenance 17
6.1 Changing the liners 19
6.2 Changing the tune up kit 20
6.3 Deflector maintenance 21
6.4 Belts 22
6.5 The chain drive 23
7. Troubleshooting 24
8. Selection of abrasive 26
9. Technical data 27
Contact

4
1. Introduction
Before use, operators must be provided with information, instruction and training for the use of the machine
and the substances for which it is to be used, including the safe method of removal and disposal of the
material collected. All persons who are working with or maintaining this machine must read the manual
carefully and understand it fully. In case you sell the unit, hand it on to the next owner.
Keep this manual always with the machine, to enable it to be referred to at any time.
Any other work not covered by this operating manual must not be carried out.
This machine is designed for industrial use by professionals. Only authorized and trained personnel may
operate this machine. This machine is not intended for use by persons (including children) with reduced
physical, sensory or mental capabilities, or lack of experience and knowledge. Blastrac BV offers a course on
the use of the machine in order to make the operating and maintenance personnel familiar with all elements of
the machine. Always use common sense when working with machines.
2. Machine description
The Blastrac blast cleaning machine 2-30DS Global is a downward blasting machine with a closed abrasive
circuit designed for the pre-treatment of horizontal surfaces. The bouncing impact of metallic abrasive onto the
surface to be treated thoroughly removes surface contaminants, coats of paint, sealants and thin coatings.
The intended use of this machine is blast cleaning of the following surfaces: Steel, concrete, stone and asphalt.
The machine may not be used for other purposes. The manufacturer will not be liable for damage resulting
from incorrect usage, in these cases the user assumes all risks.
A suitable filter unit must be connected to the machine in order to separate the dust from the abrasive. A
specially designed Blastrac dust collection system ensures dust-free operation of the machine and clean air at
the workspace.
2.1 Blast
machine
1
Connection pipe for dusthose
7
Ammeters left & right blast motor
13
Blast motors ON and OFF
2
Cable guide
8
Hour counter
14
Emergency shutdown
3
Drive control ON and OFF
9
Overdrive
15
Main switch
4
Control lamp CONTROL VOLTAGE ON
10
Move forwards
16
Rebound
5
Control lamp FAULT
11
Speed control
17
Hopper
6
Control lamp BLASTMOTORS ON
12
Travel switch
18
Separator
16
17
18

5
2.2 Separator, deflector and hopper
The abrasive separator is mounted to the end of the rebound.
The deflector (19) separates the abrasive from contaminants
and feeds the cleaned abrasive onto the separator tray (21)
and back into the hopper. The separator tray (21) has a wire
mesh and prevents any coarse contaminants from getting into
the blast wheel. In order to clean the separator tray, the tray
can be removed from the side.
2.3 Blast wheels
The heart of the blast cleaning machine are two blast
wheels (1) which throw the abrasive onto the surface to
be cleaned by using centrifugal force. The blast wheels
are placed in a protective housing lined with replaceable
wear parts. The blast wheels are driven by two electric
motors.
The control cage (2) is placed over the middle of the blast
wheel. Once the control cage is carefully set, it regulates
the throwing angle of abrasive.
2.4 Abrasive sealing
Magnetic seals (29+30) are fitted to the front and the sides of
the blast housing outlet and are surrounded by brush seals
(27+28). At the rear there are 2 skid seals (26) sliding over the
floor.
The seals are employed to seal the blasting area in a way to
avoid leakage of any abrasive.
The correct height adjustment of the magnetic seals (10-12 mm)
is very important for optimum functionality of the machine.
The brush seals may be 1 mm maximum above the surface.

6
3. General Safety Rules
Warning!
Read all safety warnings and all instructions. Failure to follow the warnings and
instructions may result in electric shock, fire, explosions and / or serious injuries.
Only authorized and trained personnel may operate this machine. This machine is not intended for use by
persons (including children) with reduced physical, sensory or mental capabilities, or lack of experience and
knowledge.
It is the responsibility of the user to analyse the surface to be treated. The surface may not contain any
substances which could pose a fire-, explosion- or health risk when treated. The user should make a risk
assessment on the basis of the information obtained about the surface to be treated and take proper
precautions for the work to be performed.
In case of any inappropriate usage, improper operation or repair, the producer shall be exempt from liability.
3.1 Work area safety
a) Do not use the machine in rain, damp or wet locations.
b) Avoid dangerous environments: do not work in the presence of explosive atmospheres, in the presence of
flammable liquids, gases or dust. Remove materials or debris that may be ignited by sparks.
c) In some cases sparks could be created by the blast cleaning process.
d) The surface to be treated must be clean, make sure to remove all stones, screws etc..
Any stones, screws, bolts, pieces of wire etc. could cause serious damage to the machine if it gets inside
the machine!
e) Make sure there is enough ambient light on the work area. Cluttered or dark areas invite accidents.
f) Keep children and bystanders away while operating the machine. They are likely not to foresee the
potential dangers of the machine. Distractions could cause you to lose control of the machine.
g) Persons who are not operating the machine must not be permitted to stay in the surrounding area of at
least 5 meter from the machine.
h) Never use the machine when the surface is not clear and if there is a risk of stumbling or tripping.
i) Remove electrical cables and dust hose(s) from the surface to be treated.
j) Make sure that there are no cables or hoses in the driving direction of the machine.
k) Make sure that there is nothing standing or situated on the surface to be treated.
l) Make sure the machine can travel over all inequalities on the surface, small inequalities like weld seams or
(floor) joints are no barriers for the machine.
m) Never operate the machine when workplace is wet. Never stay in the rain with the machine.
n) Check if there are any obstacles that can snag the cables when the machine is moving.
o) Remove all objects from the surface that can damage the machine. Remove reinforcing steel or other
objects protruding from the surface in order to prevent damage to the machine.
p) Warning! Make sure that the surface to be treated does not contain dangerous materials such
as: - combustible or explosive dusts or substances.
- carcinogenic or pathogenic substances.
q) It is necessary to provide for an adequate air change rate L in the room if the exhaust air is returned to
the room. Comply with the National regulations.
r) Secure the work area around the machine in public areas providing an adequate safety distance from the
machine. Use a red and white safety chain and danger sign to enclose the work area.
3.2 Electrical safety
a) Use only extension cables for extending the main cable that are sized and marked in accordance with the
overall power consumption of the machine. Do not use damaged extension cables.
b) Electrical cables must be rolled entirely off of the reels.
c) Any damage to the electric cables and/or electrical components is not permitted.
d) If the power supply cable is damaged, it must be replaced immediately. Only use original Blastrac parts.
e) The voltage on the identification plate must comply with the power supply.
f) Use an electrical power supply connection with earth connection and earth leakage circuit breaker.
g) The circuit breaker of the power supply must have a ‘’D’’ characteristic. Circuit breakers with a “C” or “B”
characteristic can give problems when switching the machine on.

7
h) Keep the machine original; The machine is always equipped with an earthed connection, do not
change this and always use earthed cables with an earthed plug.
i) Inspect and test the electrical components regularly. The electrical components have to satisfy with the
requirements set out in the harmonised norm EN60204-1.
j) Always call a skilled electrician or your distributor when you have questions about the safety of the
electrical components.
k) Work on electrical equipment or operating materials may only be undertaken by a skilled electrician or by
trained persons under the guidance and supervision of a skilled electrician as well as in accordance with
the electrical engineering regulations.
l) Always use tools that are insulated against voltages.
m) Do not abuse the cables. Never use the cables for carrying, pulling or unplugging the machine. Keep
cables away from heat, oil, sharp edges or moving parts. Damaged or entangled cables increase the risk
of electric shock. Do not fold the cable or clamp it.
n) Don’t pull out the power supply cable out by the wire, but by the connector.
o) Be careful with water on the treated surface. Electrical cables must not come into contact with water.
p) The main power switch on the machine must be in the “Off” position before connecting to the power
supply.
q) During a long standstill of the machine, pull out the main plug.
r) If the machine is to be operated using power from a generator, the generator must be operated in
accordance with the current legal regulations and directives in force. (this applies to the protective earth
conductor in particular) in order to ensure that all safety devices are functioning and to eliminate possible
damage to electrical components.
3.3 Personal safety
a) Always wear Personal Protective Equipment while working with the machine.
-Dust mask class FFP3 or higher
-Ear protection
-Safety glasses with lateral protection
-Protecting gloves
-Safety shoes
b) Dress properly. Do not wear loose clothing or jewellery. Keep your hair, clothing and gloves away from
moving parts.
c) Personnel must tie back long hair and not wear loose clothing or jewellery including rings.
d) Stay alert, watch what you are doing and use common sense when operating the machine.
e) Always seek professional medical attention immediately in case of injury.
f) All persons surrounding the machine should wear Personal Protective Equipment.
3.4 Machine safety general
a) Safety functions and operating functions must work correct.
b) No loose bolts and nuts permitted.
c) Never operate machine without the guards and/or safety devices in place.
d) Never change anything on the safety devices on the machine!
e) Do not use the machine when it is damaged.
f) Do not open or remove protective guards while driving gears are running.
g) The machine, specially the handle grips must be dry and free of fats/oils.
h) If the length of the brushes is, due to wear, less than 5mm or they are extremely deformed, the brushes
have to be replaced. Check the Service Manual for the order numbers.
i) All repair work has to be done by qualified Blastrac personnel, this guarantees a safe and reliable
machine.
j) Always use original Blastrac spare parts and abrasive. This will ensure the best performance.
Only original parts meet the factory specifications and quality. Otherwise Blastrac BV cannot guarantee
the safety of the machine. The part numbers can be found in the Service Manual.
k) Check the rotating direction of the motor before operation. The correct direction is given with an arrow on
the housing of the motor.
l) If safety-critical changes occur to the machine or its working method, the machine must be shut down
immediately! The cause of the fault must be established, and rectified.
m) In the event of operational malfunctions the machine must be shut down immediately and secured!
n) Never use the machine without a suitable (Blastrac) dust collector!

8
3.5 Shot/steelblasting safety
a) Never lift the blast head during blasting! This could cause serious injury to yourself and others around
you!
b) Abrasive can escape from the sides of the blast head at high speed! Wear safety glasses with
lateral protection and close-fitting protective clothing.
c) Be very careful when inserting the quick release pin into the traction wheel.
d) Check the following parts daily for damage and wear to avoid unnecessary long and costly standstill on
the workplace; blastwheel, feedspout, liners, magnet- and brush sealing;
Replace the parts when you can see obvious signs of wear and tear.
Wear grooves are acceptable until 75% of blade thickness has been worn away.
e) Check the parts of the separator on wear and defects. Remove foreign bodies and dust deposits to
prevent clogging of the separator.
f) The cover of the separator and separator tray must be closed to keep the vacuum in the machine.
g) The machine will heat up during blasting! Don’t risk getting burned, always wear gloves and only
touch the handle grip(s).
h) Check the level of abrasive in the storage hopper before work starts. Refill if necessary.
i) Remove the abrasive from the abrasive storage hopper before storage.
j) In some cases sparks could be created by shot / steelblasting.
3.6 Dustcollector safety
a) Always use a Blastrac dust collector to ensure a dust-free operation of the machine and clean air at the
workspace. Also the airflow helps to cool the machine and prevents overheating.
b) Read the operating instructions of the dust collector before using it.
c) The dust container/bag of the dustcollector must be emptied regularly. Comply with the local waste
treatment regulations considering the removed material.
d) The dust hose must be connected properly with a hose clamp and industrial tape.
e) The dust hose must be undamaged and free of obstructions.
f) Always switch on the dust collector first!
3.7 Maintenance safety
a) Pull out the main plug and place it in sight, before starting inspections and repairing on the machine. The
main switch can be locked in the “OFF” position by using a padlock and placing it through the main switch.
b) Wait for standstill of all drives before any inspections, adjustments and/or maintenance work is started.
c) Block machine in stable position before doing any maintenance work.
d) Failures due to inadequate or incorrect maintenance may generate very high repair costs and long
standstill periods of the machine. Regular maintenance therefore is imperative.
e) Operational safety and service life of the machine depends, among other things, on proper maintenance.
f) Prevent premature wear by keeping the machine as dust free as possible. Clean the machine for this
reason regularly with a dust collector and non-aggressive materials. Never use a high pressure water
cleaner to clean the machine.
g) Do not use any aggressive cleaning materials!
h) Use lint-free cleaning cloths!
i) It is advisable to stock all spare parts or wear parts that cannot be supplied quickly. As a rule, production
standstill periods are more expensive than the cost for the corresponding spare part.
j) The suitable precautions include decontamination before disassembling the machine, adequate filtered
ventilation of the exhaust air from the room in which it is disassembled, cleaning of the maintenance area
and suitable personal protection equipment.
3.8 Transport safety
a) Be aware of your surroundings and machine operating level. Do not side hill, do not run on steep incline,
this could cause machine to tip over.
b) The net weight of the 2-30DS Global is 750 kg. Use a crane or lift when transporting the machine, use the
lifting eyes / lugs of the machine.
c) Before every use check the lifting eyes/lugs and welds for:
deformation, damages, cracks, corrosion and wear.
d) Pay attention that the drive unit does not turn away during lifting of the machine.
Hold on to the steering handle until the machine is of the ground.

9
e) When lifting the machine from the ground, always use the lowest lifting speed. The cables must first be
tensioned at this speed; they must not be slack when the machine is lifted from the ground.
f) During hoisting make sure to be at a safe distance from the machine with the most optimal view on the
machine and working environment.
g) Never stand directly below the machine.
h) When transporting the machine do so in such a manner that damage due to the effects of the use of force
or incorrect loading and unloading is avoided.
i) The lifting eyes can also be used to fasten the machine on a pallet or during transport.
j) Always drive backwards when driving up to a ramp or grade, and forwards when driving of the ramp.
k) Chock wheels for transport and keep control handle in neutral position.
l) Don’t leave the machine unsecured on jobsites.
m) Park the machine always on a flat horizontal and levelled surface.
n) Remove the abrasive from the machine before transport.
o) Make sure the electrical cable and dust hose are disconnected before transport.
p) Store the cleaned and dry machine in a humid free room. Protect the electrical motor from moisture, heat
dust and shocks.
q) Never use the machine for lifting persons or items.
r) Only lift the machine as shown in the picture below.

10
3.9 Signs on the machine
The following stickers are placed on the machine. Meanings of these symbols are:
Type plate:
EU Declaration of Conformity:
! Danger Hazardous voltage in motor
even when solid state controller is OFF.
Disconnect main power before servicing
motor, controller or associated wiring.
Lifting point
Wear a dust mask class FFP3 or
higher.
Hearing protection is obliged.
Safety glasses with lateral protection
are obliged.
CE-mark on this machine.
Wear protecting gloves.
Safety shoes obliged.
Consult the manual before operating
the machine.
Name, address and CE mark.
The machine type.
The net weight of the machine in kilogram.
The year of manufacture.
The serial number of the machine.
Email address, Website, Telephone & fax number.
No lifting point.
DANGER Rotating parts inside.
Keep hands clear.
Lock-out / shut down before servicing.

11
4. Before operation
Before using the machine it is of great importance to inspect the machine.
It is not permitted to use the machine if the machine safety is not according the checkpoints below.
4.1 Checkpoints power supply
Use only extension cables for extending the main cable that are sized and marked in accordance with
the overall power consumption of the machine.
Electrical cables must be fully unwind of their reels.
No damage is permitted for electrical cables.
Use an electrical power supply connection with earth connecting.
The main switch of the machine should be put to ‘Off’ before connecting to the power supply.
Make sure the power supply is in accordance with the machine specifications.
The circuit breaker of the power supply must have a ‘’D’’ characteristic. Circuit breakers with a “C” or
“B” characteristic can give problems when switching the machine on.
If the machine is to be operated using power from a generator, the generator must be operated in
accordance with the current legal regulations and directives in force. (this applies to the protective
earth conductor in particular) in order to ensure that all safety devices are functioning and to eliminate
possible damage to electrical components.
4.2 Checkpoints of machine
Safety functions and operating functions must work correct.
Check all screws and other fasteners for tightness. No loose bolts and/or nuts are permitted.
Check the electrical components, cables and connections for wear and/or damages.
Dust hose connection must be reliable: use hose clamps and industrial tape.
Dust hoses must be undamaged and free of obstructions
Check the following parts for damage and wear: blastwheel, feedspout, liners, magnet- and brush
sealing. Replace the parts when you can see obvious signs of wear and tear.
Wear grooves are acceptable until 75% of blade thickness has been worn away.
Check de parts of the separator on wear and defects. Remove foreign bodies and dust deposits.
4.3 Checkpoints of Work area
Check the surface to be treated for loose parts (stones, screws, etc.) The surface must be swept if
necessary. Make sure the machine can travel over all inequalities on the surface. Small inequalities like
weld seams or floor joints are no barriers for the machine
Secure the work area around the machine providing an adequate safety distance from the machine.
Use a red and white safety chain and danger sign to enclose the work area.
Remove reinforcing steel or other objects protruding from the surface in order to prevent damage to
the machine.
Warning! Make sure that the surface to be treated does not contain dangerous materials
such as: - combustible or explosive dusts or substances.
- carcinogenic or pathogenic substances.
4.4 Drive control
Dial for setting the drive speed
Buttons for:
Forward driving (Hold to run)
Overdrive (Hold to run)
Drive handle (Hold to run) to activate
the drive motor. When the lever is
released the drive motor switches off.

12
4.5 Connecting the drive motor to the traction wheel
4.6 Driving with connected drive motor
Set the driving speed at the desired speed using the speed control knob.
Place 1 hand on the handle grip and squeeze the switch lever, this will
move the machine towards you, this is the normal working direction for
blasting. Release the switch lever to stop. The driving speed can be
adjusted while driving by turning the speed control knob.
The OVERDRIVE-button makes it possible to drive at maximum speed
without having to adjust the speed control knob. To do so, press and hold
the OVERDRIVE-button while driving. WARNING! Mind your surroundings
at maximum speed!
The FORWARD-button is used to drive forward, press and hold the button
to do so. WARNING! Do not drive forward while blasting! This function is
only used for maneuvering without blasting. Make sure the dust hose and
electrical cable are out the way when driving forward.
Set the drive speed
knob to the lowest
possible setting,
approximately 0,5.
Open the wheel guard.
Insert the quick release
pin inside the hole.
!WARNING!
Use only 1 finger to
press the button of the
quick release pin, and
keep applying
pressure.
Make sure the magnetic
valve is CLOSED.
Make sure the Blast
motor is OFF.
Danger of crushing!
Use common sense, do
not get distracted
during the activities.
Use your other hand to
operate the drive-
motor handle (10).
1
2
3
5
6
7
When the drive-motor
and wheel are aligned,
the quick release pin
will lock into place.
Close wheel guard.
4
8

13
5. Operating
During operating the 2-30DS Global, the following additional safety instructions must be followed closely.
5.1 Before switch on
Check if the distance from magnet to the floor is 10-12mm. Check this height with aluminium strips.
Check the distance from brush sealing to the floor. This may be max. 1 mm.
Fill the separator equally with the selected abrasive up to the bottom of the separator tray. The
magnetic valve must be closed whilst doing this.
Connect the blast machine and filter unit with the dust hose. This connection must be reliable.
Connect the power supply cable of the filter unit with the generator. Be sure that electrical power
supply is correct.
5.2 Switch on the machine
Before switch on the blast machine, switch on the filter unit.
Press the green push button “Blast wheels ON” (13) and check the rotating direction of the blast
motor. The correct direction is given with a arrow on the housing of the motor.
Select the speed using the speed control knob. (item 11 of machine description)
When the machine is traveling pull the abrasive control cable to open the magnetic valve. Observe the
ammeters (7). It may indicate the full load amperage. After having blasted aprox. 2 m, close the
abrasive valve, stop the machine and check the blasted surface.
If the ‘hotspot’ is too much on the right, turn clockwise the cage a little bit. Never adjust the cage
during blasting.
5.3 Switch off the machine
Close the abrasive valve
Press the red button “Blast wheels OFF” (13)
Switch the main switch to position “OFF” (15)
Pull out the connector of the main power supply of the machine.
Switch off the filter unit.
Wait for standstill of all drives before any inspection or maintenance works are started.

14
5.4 Adjusting the blast pattern
Correct adjustment of the control cages and thus of the blast
pattern is a very important factor for optimum working with the
2-30DS blast cleaning machine.
Incorrect adjustment of the control cages results in very high
wear and premature blasting-through of the liners in the blast
wheel housing, as well as reduced blasting performance, uneven
cleaning and a possible loss of the rebounce energy of the
abrasive.
The adjustment is effected by removing the feed spout (3),
loosening the cage clamps (1) and turning of the control cage
(2).
The control cages have lateral
windows indicated by the cast
grooves (1 + 3). The positions of
the windows determine where the
abrasive is fed onto the blast
wheels and where it hits the surface
to be treated.
The turning direction of the
blastwheels is indicated by 2 + 4.
Every time the control cage is
adjusted or replaced, the thread of
the blast wheel fastening screw
should be checked. Make sure that
this screw will be tightened
correctly. In addition, absolute care
must be taken to clean the thread
from dust and abrasive.
5.5 Setting the control cages:
The cast grooves on the control cage show the position of the control cage opening (1 + 3).
The following adjustment standard value is valid: the control cage opening is approximately opposite to
the throwing angle. The abrasive grain size plays an important role here. Different types of abrasive have
different throwing characteristics due to their different weights and frictional resistance.
This means that you must never use different types of abrasive at the same time.
The adjustment can be carried out as follows:
-Determine the upper and lower edges of the windows. (watch the cast grooves 1 + 3)
-Set the upper window edge of the left-hand control cage (1) to imaginary 11:50 of a dial.
Set the upper window of the right-hand control cage (3) in a laterally inversed way.
1
2
3

15
-Move the blast head onto a 5-8 mm thick steel plate and blast for 45 seconds at full power without
moving the machine from the spot.
-Stop the abrasive flow and move the machine until
the blasted area is accessible.
With both hands carefully
feel the temperature of the blasted area. The hot spot will
be where the machine has developed the highest blast
cleaning intensity. An even temperature from left to right
indicates that the control cages are correctly positioned.
-Each control cage has its own blast area.
They both have to be adjusted separately.
-Looking from the front of the machine onto the control cage: If
the left side of the blasted area is warmer, turn the lower edge
(cast groove) of the control cage anti-clockwise for 3-6 mm.
-If the ‘hotspot’ is too much on the right, turn the control cage 3-6 mm clockwise. Never adjust the
control cages during blasting!
-This process has to be repeated until an even temperature across the blast pattern is achieved.
Notes:
With increased wear of the blast wheels, liners and control cages, the blast pattern will change.
The size of the abrasive affects the blast pattern. With every exchange of abrasive, the blast pattern must be
re-adjusted. The same applies for blasting on another type of surface.
Different types of abrasive have different throwing characteristics due to their different weights and frictional
resistance. This means that you must never use different types of abrasive at the same time.
Left Hand
Control cage
blast area
Right Hand
Control cage
blast area
WARNING! Never loosen the cage clamps or try to adjust the control cage
when the machine is in operation.

16
5.6 Operation
Carry out blasting in parallel tracks in such way that the dust hose and electric cable do not become twisted.
The next figure shows the recommended blast cleaning paths leading away from the dust collector.
Make sure that no vehicles, such as forklift trucks and other equipment run over the electric cable and the dust
hose.
The selection of the correct advancing speed of the blast machine is important for a good blast cleaning result.
In the case that the surface has different characteristics (e.g. different hardness or different coating
thicknesses), a uniform blast result can be achieved by varying the advancing speed during blast cleaning.
The advancing speed depends on the material of the surface to be treated and the desired profiling.
The correct advancing speed can be found out by observing the blasted surface and varying the speed during
the blast cleaning process.
Slight profiling on concrete requires a higher speed than coarse profiling (6 - 10).
Blasting on steel requires a very low advancing speed (0 -2).
Check the separator tray every 3 hours for foreign matter and large contaminants.
1
Dust collector
2
Dust hose and
electric cable
3
Blast cleaning machine

17
6. Maintenance
Maintenance work that goes beyond the scope described in this manual must only be performed by qualified
Blastrac technicians.
Pay attention to Chapter 3 "Safety" during maintenance and repair works.
Failures due to inadequate or incorrect maintenance may generate very high repair costs and long standstill
periods of the dust collector. Regular maintenance therefore is imperative.
Operational safety and service life of the dust collector depend, among other things, on proper maintenance.
The following table shows recommendations about time, inspection and maintenance with normal use of the
machine.
Operating hours/
time period
Inspection points, maintenance instructions
After repairing
Check the efficiency of all safety devices.
Check whether all machine parts are assembled safely and correctly.
12 h after repairing
Check all accessible screw connections and other fasteners for tightness.
Daily and prior to
starting work
Check all safety devices working adequate.
Check the function of the residual current operated device.
Check the hoses for leaks, damages and wear.
Check the hose connections for tightness and fixed seat.
Check the electric connections and motors for sediments of dirt, foreign bodies
and other contaminants.
Check the blast wheels, blades, impellers, control cages, feed spouts, liners and
fasteners for damages and wear.
Check the magnetic, rubber and brush seals for wear.
Check the separator parts for wear and defects.
Check and empty the separator trays.
Check the grid valves on damages and test if they are functioning correctly.
During operation
Watch the level and mixture of abrasive in the blast cleaning machine every hour.
The mixture should be nearly clean.
Weekly
Check the belt tension of the blast motors.
Check the bearing seals for damage and wear.
Every 3 months
Check the chain tension of the drive wheel.
Check and clean the parts of the drive wheel.
Inspect all welding on the machine for cracks.
Annually
Full overhaul and cleaning of the complete machine.
The time indications are based on uninterrupted operation. When the indicated number of working hours is not
achieved during the corresponding period, the period can be extended. However a full overhaul and a technical
inspection must be carried out at least once a year, consisting of inspection of filters for damage, air tightness
of the machine and proper function of the control mechanism. This technical inspection shall be carried out by
the manufacturer or an instructed person.

18
Due to different working conditions it can’t be foreseen how frequently inspections for wear check’s,
inspection, maintenance and repair works ought to be carried out. Prepare a suitable inspection schedule
considering your own working conditions and experience.
We recommend to execute the first repair works on the machine having support of Blastrac personnel. With
this your maintenance personnel gets the opportunity to be trained intensely.
Screws, bolts etc. that have been removed must be replaced with those of the same quality, strength, material
and design.
Pay attention to unusual noises or strong vibrations. Check for the cause of every big change. Call a technician
if you have doubts about the cause or when a repair without a technician seems not possible without damages.
Only use genuine Blastrac spare parts.
Our specialists will be happy to assist you with more advice.
Prior to any repair works on the machine and all its drives, secure the machine against
unintentional switching on. Put the machine to its safety off position.
Follow additional operating and maintenance instructions of Original Equipment Manufacturers
during your service and maintenance work.
Further is advised:
Clean the machine every day with air and non-aggressive materials. Never use a high pressure water cleaner
to clean the machine. Protect the electrical parts and motors from moisture, heat, dust and shocks.
Store the cleaned and dry machine in a dry and humid free room. Remove the abrasive out of the abrasive
storage hopper.
Do not weld, flame cut or perform grinding works on or near the machine. Danger of fire or explosion exists!
Provide adequate ventilation when working in a confided space.
Secure the maintenance area if necessary.
Always use original Blastrac spare parts, wear parts and consumables, this will ensure the best performance.
Only original parts meet the factory specifications and quality. Otherwise Blastrac BV cannot guarantee the
safety of the machine. The part numbers can be found in the Service Manual.
All repair work must to be done by qualified Blastrac personnel, this to guarantee a safe and reliable machine.
Any guarantee on the machine is expired when:
Non original Blastrac parts have been used
Repair work is not done by qualified Blastrac personnel
Changes, add on’s or conversions are undertaken without written permission of Blastrac BV.

19
6.1 Changing the liners
Unscrew the housing front covers (5
+ 6) and remove them.
Loosen the press bolts (7) of the top
liners and take the top liners (20)
out.
Loosen the nuts of the side liners
(23 + 24 + 25) and plenum liners
(26 + 27). Take them out of the
housing.
To mount the liners, keep on the following
sequence:
First place the plenum liners (26 +
27) and fix them with the nuts.
Place the side liners (23 + 24 + 25)
inside the housing. The sideliners
may stick out the body for max.
1mm. Tighten the nuts.
Place the centre liner bottom part
(22).
Place the top liners (20) in the
housing and make sure that the top
liner sits close to the edges of the
side liners and center liner.
Place the center liner top part (21).
Place the housing front covers
(5+6) and tighten the nuts.
Tighten the pressure bolts of the top
liner slightly and press the top liner
against the side liners.

20
6.2 Changing the tune-up kit
The tune-up kit consists of the blastwheel, the cage and a bolt.
Tune-up kit order number: B20536K
Remove the feed spout (1) and loosen the cage clamps.
Remove the control cage (2) and control cage shim.
Unscrew the 4 nuts of the blastwheel cover plate (3) and take it off.
Block the blastwheel (4) and remove the central fixing bolt.
Take the blastwheel out of the housing.
Check the wheel hubs for wear and replace them if necessary.
Clean all threads and use a new central fixing bolt when mounting a new blastwheel.
Place the blastwheel (3) on the wheel hub and tighten the central fixing bolt.
Fix the blastwheel cover plate with the 4 nuts.
Insert the shim and control cage in the center and clamp the control cage with the cage clamps so that
the blastwheel can rotate freely
Turn the blastwheel manually. It must rotate freely.
Place the feed spout between the abrasive valve and the control cage.
Clean the machine every day with air and non-aggressive materials. Never use a high pressure water cleaner
to clean the machine.
Store the cleaned machine in a dry room. Protect the electrical motor from moisture, heat dust and shocks.
Remove the abrasive out of the abrasive storage hopper.
Table of contents
Other Blastrac Cleaning Equipment manuals