Blue Technix Sentis3D-M530 Instructions for use
Sentis3D-M530
Hardware User Manual
Version 2

Template No.: 900-306 / A
Contact
Bluetechnix
Waidhausenstraße 3/19
A-1140 Vienna
AUSTRIA
http://www.bluetechnix.com
Date: 2016-04-27

Template No.: 900-306 / A
Table of Contents
1General Information.......................................................................................................................... 6
1.1 Symbols Used ........................................................................................................................... 6
1.2 Certification ............................................................................................................................... 6
1.3 Safety instructions .................................................................................................................... 7
1.4 Electrical connection................................................................................................................. 7
2Introduction ...................................................................................................................................... 8
2.1 Overview ................................................................................................................................... 8
2.2 Key Features ............................................................................................................................. 8
3General Description.......................................................................................................................... 9
3.1 Functional Description .............................................................................................................. 9
3.2 PCB description ........................................................................................................................ 9
3.3 Interfaces................................................................................................................................... 9
3.3.1 Power connector................................................................................................................ 9
3.3.2 GBit-Ethernet ................................................................................................................... 10
3.3.3 Extension connector ........................................................................................................ 10
3.3.4 JTAG connector............................................................................................................... 10
3.3.5 Reset button .................................................................................................................... 10
3.3.6 RGB LED.......................................................................................................................... 10
3.3.7 Buzzer .............................................................................................................................. 10
4Hardware installation...................................................................................................................... 11
4.1 Mounting ................................................................................................................................. 11
4.2 Cooling areas .......................................................................................................................... 11
4.3 Lenses and objective .............................................................................................................. 12
4.4 Sensor sensitivity .................................................................................................................... 12
4.5 Optical Isolation ...................................................................................................................... 12
4.6 Sensor Orientation .................................................................................................................. 14
5Specifications ................................................................................................................................. 15
5.1 Electrical Specifications .......................................................................................................... 15
5.1.1 Operating Conditions....................................................................................................... 15
5.1.2 ESD Sensitivity................................................................................................................. 15
5.1.3 EMC ................................................................................................................................. 15
6Connector Description ................................................................................................................... 16
6.1 Power Connector (a) ............................................................................................................... 17
6.2 GBit Ethernet Connector (b).................................................................................................... 17
6.3 Extension Connector (c).......................................................................................................... 17
6.4 JTAG Connector (d) ................................................................................................................ 18

Template No.: 900-306 / A
7Mechanical Outline......................................................................................................................... 19
7.1 Top View ................................................................................................................................. 19
7.2 Bottom View............................................................................................................................ 20
7.3 Side View................................................................................................................................. 20
8Product History .............................................................................................................................. 21
8.1 Version Information ................................................................................................................. 21
8.1.1 Sentis3D-M530 ................................................................................................................ 21
8.2 Anomalies................................................................................................................................ 21
9Document Revision History............................................................................................................ 22
AList of Figures and Tables .............................................................................................................. 23

Template No.: 900-306 / A
© Bluetechnix GmbH 2016
All Rights Reserved.
The information herein is given to describe certain components and shall not be considered as a guarantee
of characteristics.
Terms of delivery and rights of technical change reserved.
We hereby disclaim any warranties, including but not limited to warranties of non-infringement, regarding
circuits, descriptions and charts stated herein.
Bluetechnix makes and you receive no warranties or conditions, express, implied, statutory or in any
communication with you. Bluetechnix specifically disclaims any implied warranty of merchantability or fitness
for a particular purpose.
Bluetechnix takes no liability for any damages and errors causing of the usage of this board. The user of this
board is responsible by himself for the functionality of his application. He is allowed to use the board only if
he has the qualification. More information is found in the General Terms and Conditions (AGB).
Information
For further information on technology, delivery terms and conditions and prices please contact Bluetechnix
(http://www.bluetechnix.com).
Warning
Due to technical requirements components may contain dangerous substances.
Hardware User Manual - Sentis3D-M530 Last change: 27 April 2016
Version 2
Bluetechnix © Page 6 | 23
1General Information
This guide applies to the Sentis3D-M530 camera platform from Bluetechnix. Follow this guide chapter by
chapter to set up and understand your product. If a section of this document only applies to certain camera
parts, this is indicated at the beginning of the respective section.
The document applies to X-Grade product from V0.0.
1.1 Symbols Used
This guide makes use of a few symbols and conventions:
Warning
Indicates a situation which, if not avoided, could result in minor or moderate injury and/or
property damage or damage to the device.
Caution
Indicates a situation which, if not avoided, may result in minor damage to the device, in
malfunction of the device or in data loss.
Note
Notes provide information on special issues related to the device or provide information that
will make operation of the device easier.
Procedures
A procedure always starts with a headline
1. The number indicates the step number of a certain procedure you are expected to
follow. Steps are numbered sequentially.
This sign indicates an expected result of your action.
References
This symbol indicates a cross reference to a different chapter of this manual or to an
external document.
1.2 Certification
X-Grade Version
X-Grade version of the products are not intended for sale and have therefore no
certifications. The user is responsible for a correct usage in order with federal laws.

Hardware User Manual - Sentis3D-M530 Last change: 27 April 2016
Version 2
Bluetechnix © Page 7 | 23
1.3 Safety instructions
Important
This manual is part of the device and contains information and illustrations about the correct
handling of the device and must be read before installation or use. Observe the operating
instructions. Non-observance of the instructions, operation which is not in accordance with
use as prescribed below, wrong installation or handling can affect the safety of people and
machinery.
The installation and connection must comply with the applicable national and international
standards. Responsibility lies with the person installing the unit.
1.4 Electrical connection
Note
The unit must be connected by a qualified electrician.
Device of protection class III (PC III).
The electric supply must only be made via PELV circuits.
The device must only be powered by a limited energy source (≤ 30V; ≤ 8A; ≤ 100VA).
Disconnect power before connecting the unit.

Hardware User Manual - Sentis3D-M530 Last change: 27 April 2016
Version 2
Bluetechnix © Page 8 | 23
2Introduction
2.1 Overview
The Sentis3D-M530 is a depth sensor module, developed by Bluetechnix, operating on the Time-of-Flight
(ToF) principle. The Sentis3D-M530 is based on the ToF sensor IRS1020/1125 from Infineon and Freescale
i.MX6 processor. The camera consists of different modules from Bluetechnix like the TIM-U-IRS1020, LIM-u-
LED-850 and CM-i.MX6x.
2.2 Key Features
3D depth sensor module TIM-U-IRS1020 based on Infineon IRS1020/1125
2D sensor module based on Omnivision OV5640
2 x light modules LIM-u-LED-850
Processor module CM-i.MX6Q based on Freescale i.MX6Q
Up to 160fps, adjustable
Gigabit Ethernet
Support for 30°, 60° and 90° FOV (90° default)
Extension interface
Power supply connector
Matlab support
Software configuration interface
Ethernet data streaming server
3D Depth, amplitude data and 2D color image
Hardware User Manual - Sentis3D-M530 Last change: 27 April 2016
Version 2
Bluetechnix © Page 9 | 23
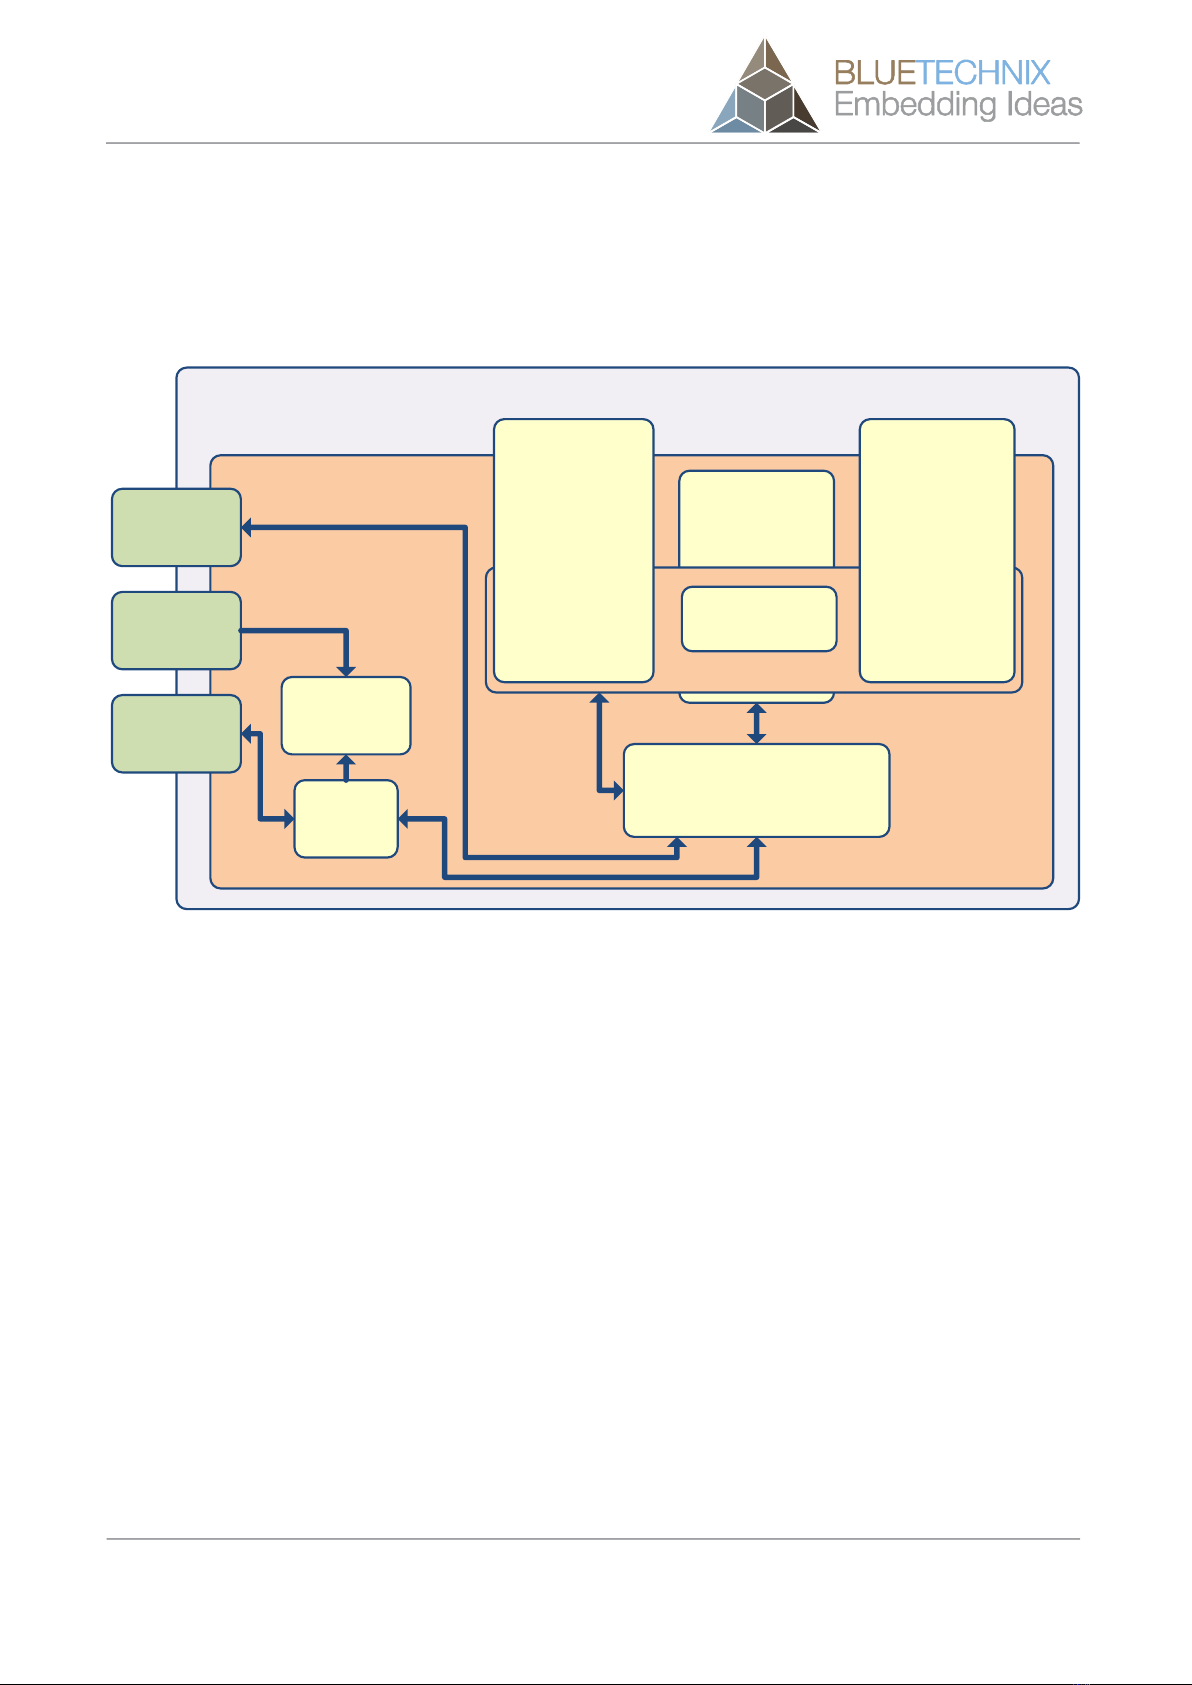
3General Description
3.1 Functional Description
The following image shows the block diagram of the Sentis3D-M530.
Sentis3D-M530
Base-Board
Power
Gbit-ETH
Extension TIM-U-IRS1020
Extension-Board
LIM-u-LED-850LIM-u-LED-850
PoE++
CM-i.MX6x
DC/DC
Converter
2D Sensor
OV5640
Figure 3-1 Sentis3D-M530 block diagram
3.2 PCB description
The hardware is based on 6 PCBs. The PCBs are stacked like a sandwich:
-The CM-i.MX6x is mounted on the bottom of the Baseboard
-The TIM-U-IRS1020 is mounted on the Baseboard
-The Extension-Board is mounted on the Baseboard
-The two LIM-u-LED-850 are mounted on the Extension-Board
3.3 Interfaces
The following chapters describes the interfaces on the Sentis3D-M530-Baseboard.
3.3.1 Power connector
The Sentis3D-M530 must be powered by an external 18V-30V power supply connected to the 2.5mm EH-
connector (see chapter 6.1).

Hardware User Manual - Sentis3D-M530 Last change: 27 April 2016
Version 2
Bluetechnix © Page 10 | 23
3.3.2 GBit-Ethernet
The Gbit-Ethernet interface from CM-i.MX6Q is available on a standard RJ45 connector (see chapter 6.2).
3.3.3 Extension connector
The extension connector provides multiple interfaces to control external units and to trigger the Sentis3D-
M530 (see chapter 6.3).
3.3.4 JTAG connector
A JTAG connector is available for debug purposes (see chapter 6.4).
3.3.5 Reset button
A reset button is available to perform a hardware reset (component (e) in Figure 6-1).
3.3.6 RGB LED
A RGB LED is available on the Extension-Board and can be used to show the state of the Sentis3D-M530
(component (f) in Figure 6-1).
The RGB LED is controlled by a Toshiba LED driver (TCA62724FMG(O,EL)) connected though the I2C2
interface with the CM-i.MX6x. The I2C slave address is set to 0x55.
3.3.7 Buzzer
A buzzer is available on the Extension-Board and can be used to provide an audible feedback to the user
(component (g) in Figure 6-1).
The buzzer is connected to the pin DISP0.DAT9 of the CM-i.MX6x.

Hardware User Manual - Sentis3D-M530 Last change: 27 April 2016
Version 2
Bluetechnix © Page 11 | 23
4Hardware installation
4.1 Mounting
The Sentis3D-M530-Baseboard provides 4 x M3 mounting holes to fix it on the enclosure. The positions of
the mounting holes is shown in figure 7.1 (3.2mm holes).
Note:
The mounting holes must be electrically connected to the enclosure using metallic screws!
The LIM modules mounted on the Sentis3D-M530-Baseboard must be fixed to a heatsink or to the
enclosure. For more information about the LIM modules see the Hardware User Manual of the LIM-U-LED-
850 available from Bluetechnix website. The mounting holes are also visible on the 3D STEP model of the
Sentis3D-M530 camera.
Note:
Gap pads must be used to electrically isolate the LIM module cooling area from the heatsink
or enclosure!
The TIM module can also be fixed on the enclosure using the top two M2 holes available on the module. The
mounting holes are also visible on the 3D STEP model of the Sentis3D-M530 camera.
4.2 Cooling areas
The Sentis3D-M530 must be cooled at several areas to ensure valid operation conditions. The most
important cooling areas are:
-LIM modules: each LIM module produces up to 20W of dissipation power that must be cooled
mounting a heatsink/enclosure and a gap pad on the bottom of the module (red areas in Figure 4-1).
The power is valid only during integration phase. Based on integration time and frame-rate the
average power may be less.
-CM-i.MX6Q: the processor module produces up to 5W of dissipation power. The main heat sources
are the i.MX6Q processor (left dark region in orange area in Figure 4-1) and the PMIC (right dark
region in orange area in Figure 4-1).

Hardware User Manual - Sentis3D-M530 Last change: 27 April 2016
Version 2
Bluetechnix © Page 12 | 23
2W
20W* 20W*
Figure 4-1 Hot Spots of the Sentis3D-M530 (Bottom View)
*) The value is valid only during integration (LEDs are on). The average power may be less depending on
integration time and frame-rate.
4.3 Lenses and objective
The Sentis3D-M530 is equipped with a 80° objective for the TIM module, 90° objective for the 2D sensor and
90° lenses for the LIM modules. Other objectives/lenses can be provided by Bluetechnix on request.
Note:
Be aware that using different objectives and lenses for other FOVs leads to different
objective/lenses height relative to the 3D and 2D sensor.
4.4 Sensor sensitivity
See Hardware User Manual of the TIM-uP-19k-S3-Spartan6 available from Bluetechnix website.
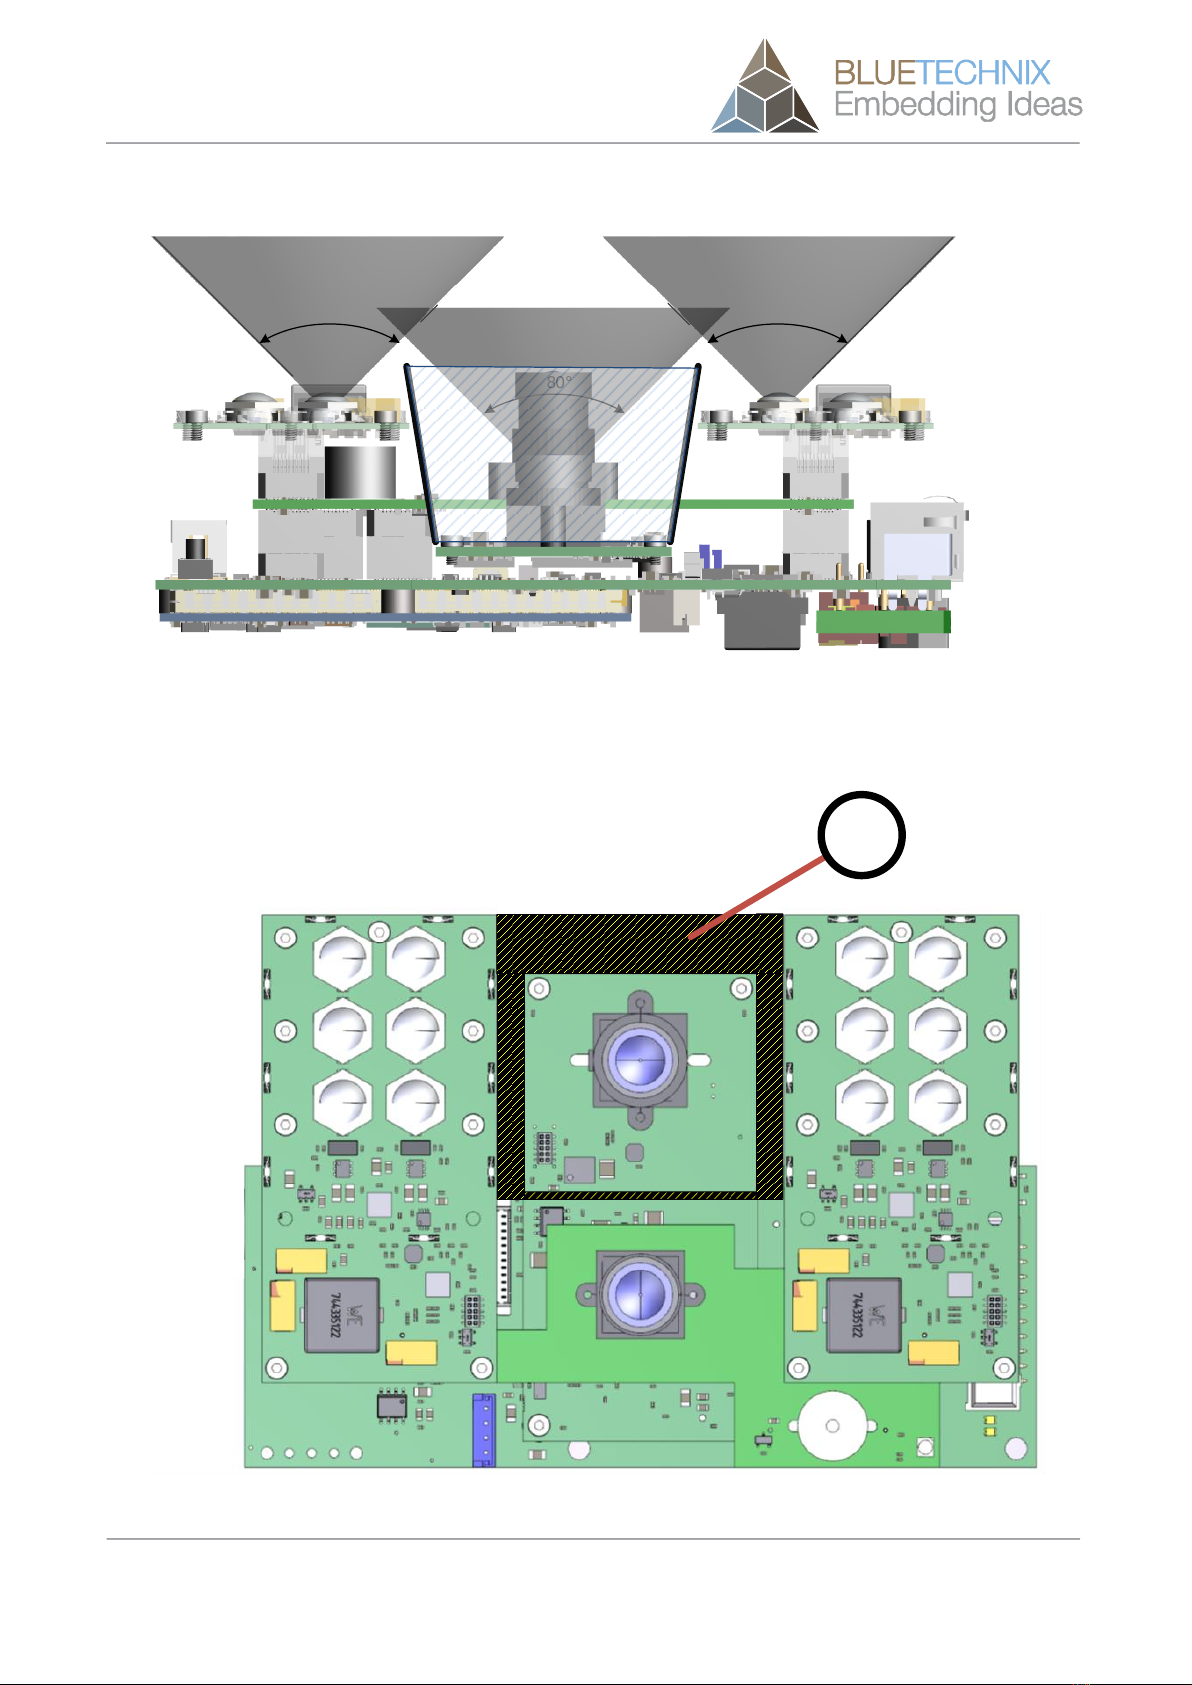
4.5 Optical Isolation
To prevent direct irradiation from the LIMs into the camera lens, an optical barrier has to be applied. There is
a component-free area on the TIM module to support an optical barrier down to the PCB (see Hardware User
Manual of TIM-U-IRS1020).
The height of the optical barrier and the distance to the 3D sensor depends from the used objective and
FOV. The following picture shows one possibility how to design an appropriate optical barrier (a) for a FOV of
80° with 60mm² objective area (default configuration of the Sentis3D-M530).
Hardware User Manual - Sentis3D-M530 Last change: 27 April 2016
Version 2
Bluetechnix © Page 13 | 23
80°
90°90°
Figure 4-2 Possible optical isolation (Side view)
a
Figure 4-3 Possible optical isolation (Top view)

Hardware User Manual - Sentis3D-M530 Last change: 27 April 2016
Version 2
Bluetechnix © Page 14 | 23
4.6 Sensor Orientation
See Hardware User Manual of the TIM-U-IRS1020.

Hardware User Manual - Sentis3D-M530 Last change: 27 April 2016
Version 2
Bluetechnix © Page 15 | 23
5Specifications
5.1 Electrical Specifications
5.1.1 Operating Conditions
Symbol
Parameter
Min
Typical
Max
Unit
VIN
Input supply voltage
18
24
30
V
IIN
Input current
-
2
3.5
A
TOP
Operating Temperature
0
-
601)
°C
TSTG
Storage Temperature
-65
-
150
°C
FITP
Frame-rate Integration Time Product
-
TBD
-
Table 5-1 Electrical characteristics
1) Depends on cooling mechanism.
5.1.2 ESD Sensitivity
ESD (electrostatic discharge) sensitive device. Charged devices and circuit
boards can discharge without detection. Although this product features patented
or proprietary protection circuitry, damage may occur on devices subjected to
high energy ESD. Therefore, proper ESD precautions should be taken to avoid
performance degradation or loss of functionality.
5.1.3 EMC
The system is intended for light industrial environments according to the following normative:
EN55022 class A, EN55024:2010
Only pre-compliance measurements according to the above stated normative will be performed on the
system. The customer responsible for the final product is also responsible to fulfill all regulations requested
by law.

Hardware User Manual - Sentis3D-M530 Last change: 27 April 2016
Version 2
Bluetechnix © Page 16 | 23
6Connector Description
c
Marks Pin #1
a
b
d
e
f
g
Figure 6-1 Connectors of the Sentis3D-M530 (top view with transparent LIM-u-LED-850)
c
a
Figure 6-2 Front panel vew
Hardware User Manual - Sentis3D-M530 Last change: 27 April 2016
Version 2
Bluetechnix © Page 17 | 23
6.1 Power Connector (a)
Pin assignment on the power connector:
Connector Type: 2.1mm ID / 5.5mm OD
Voltage: 18-30V
Polarity:
This pins are protected against wrong polarity.
Note
Use inherently limited power sources only!
6.2 GBit Ethernet Connector (b)
This standard RJ45 connector provides a 10/100/1000 Base-T interface to the Sentis3D-M530.
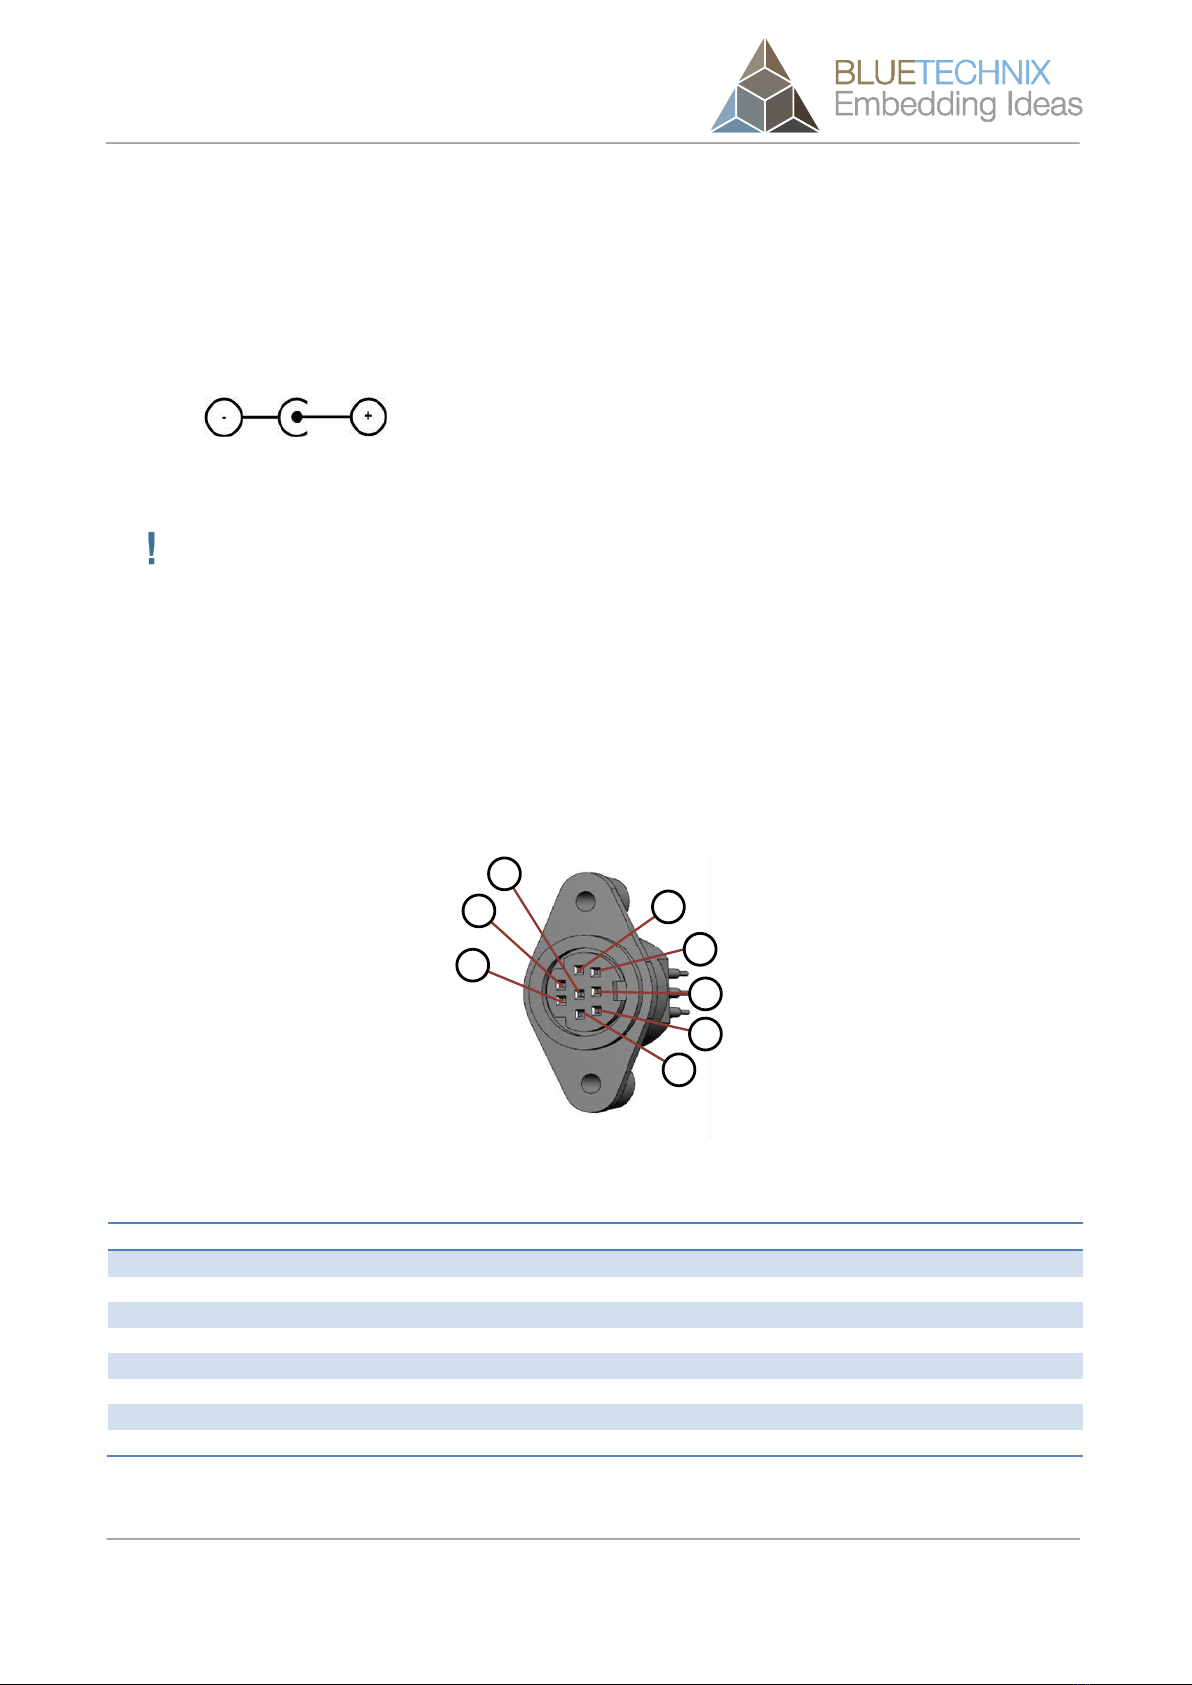
6.3 Extension Connector (c)
The Mini-DIN 8 connector provides several interfaces to connect the Sentis3D-M530 to external devices.
8
5
6
7
3
2
1
4
Figure 6-3 Mini-DIN8 pin out
No.
Signal
Type
Description
1
GND
Power
Ground
2
nRESET
Input (220 k pu)
Reset input (active low)
3
TRIGGER_IN
Input (100 k pd)
Trigger input, 4 V –30 V
4
OWIRE
Output
External OWIRE interface
5
MOD_P
Output
External Light modulation signal, differential, positive
6
MOD_N
Output
External Light modulation signal, differential, negative
7
GPIO
In-/Output
General purpose I/O (galvanic isolated) max. 50 V
8
GPIO_Ref_GND
Power
GPIO reference Ground (galvanic isolated)
Table 6-1: Power connector pinout

Hardware User Manual - Sentis3D-M530 Last change: 27 April 2016
Version 2
Bluetechnix © Page 18 | 23
Note:
To use the output functionality of the GPIO pin an external pullup resistor is necessary. This
pullup must be designed for a minimum current of 13mA. (e.g 1k5 pullup to 20V)
Description
Manufacturer
Part Number
Mini-DIN8 plug, male
CUI Inc
MD-80
Table 6-2: Mating connector
6.4 JTAG Connector (d)
The JTAG interface of the CM-i.MX6x is connected to the 20-pin 2.54mm header connector. The JTAG
connector is compliant with any ARM JTAG Emulator. (e.g ARM DSTREAM).
Hardware User Manual - Sentis3D-M530 Last change: 27 April 2016
Version 2
Bluetechnix © Page 19 | 23
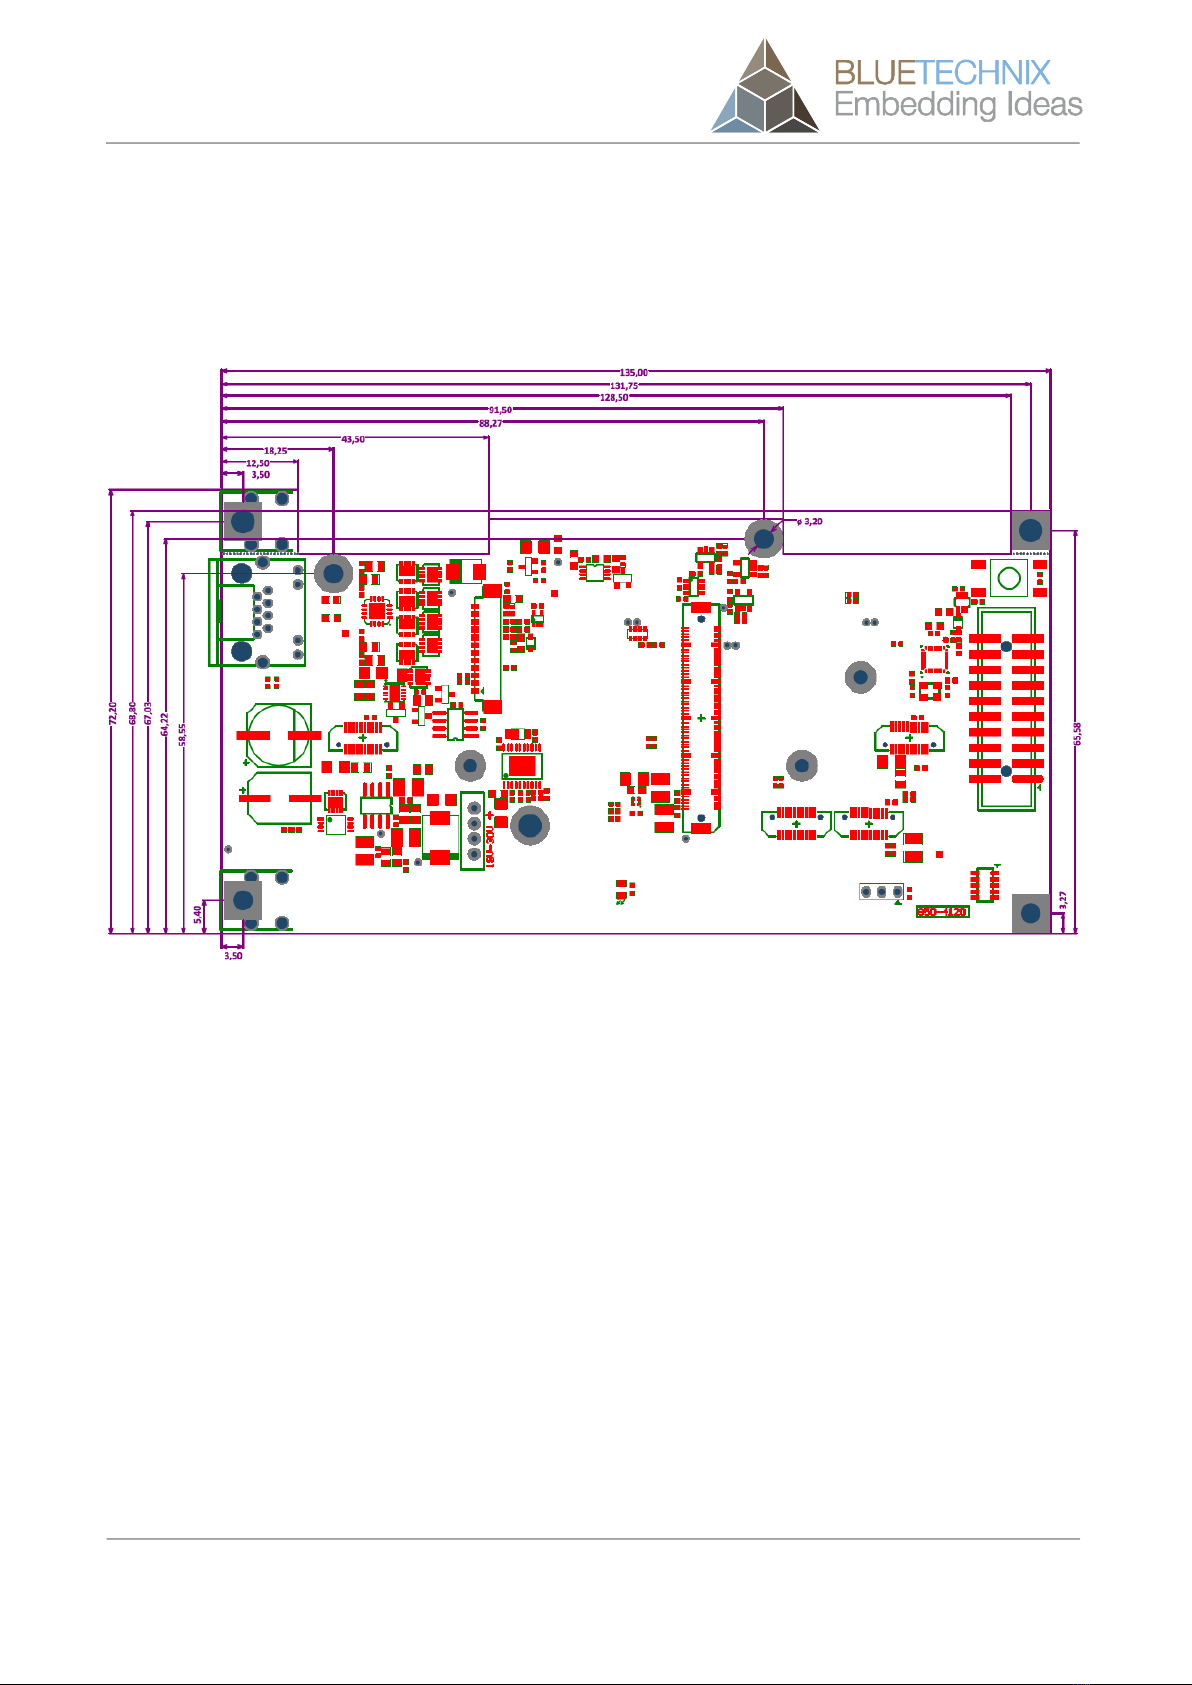
7Mechanical Outline
A 3D STEP model of the Sentis3D-M530 can be provided by Bluetechnix on request.
7.1 Top View
Figure 7-1 Top View of the Sentis3D-M530-Baseboard
Hardware User Manual - Sentis3D-M530 Last change: 27 April 2016
Version 2
Bluetechnix © Page 20 | 23
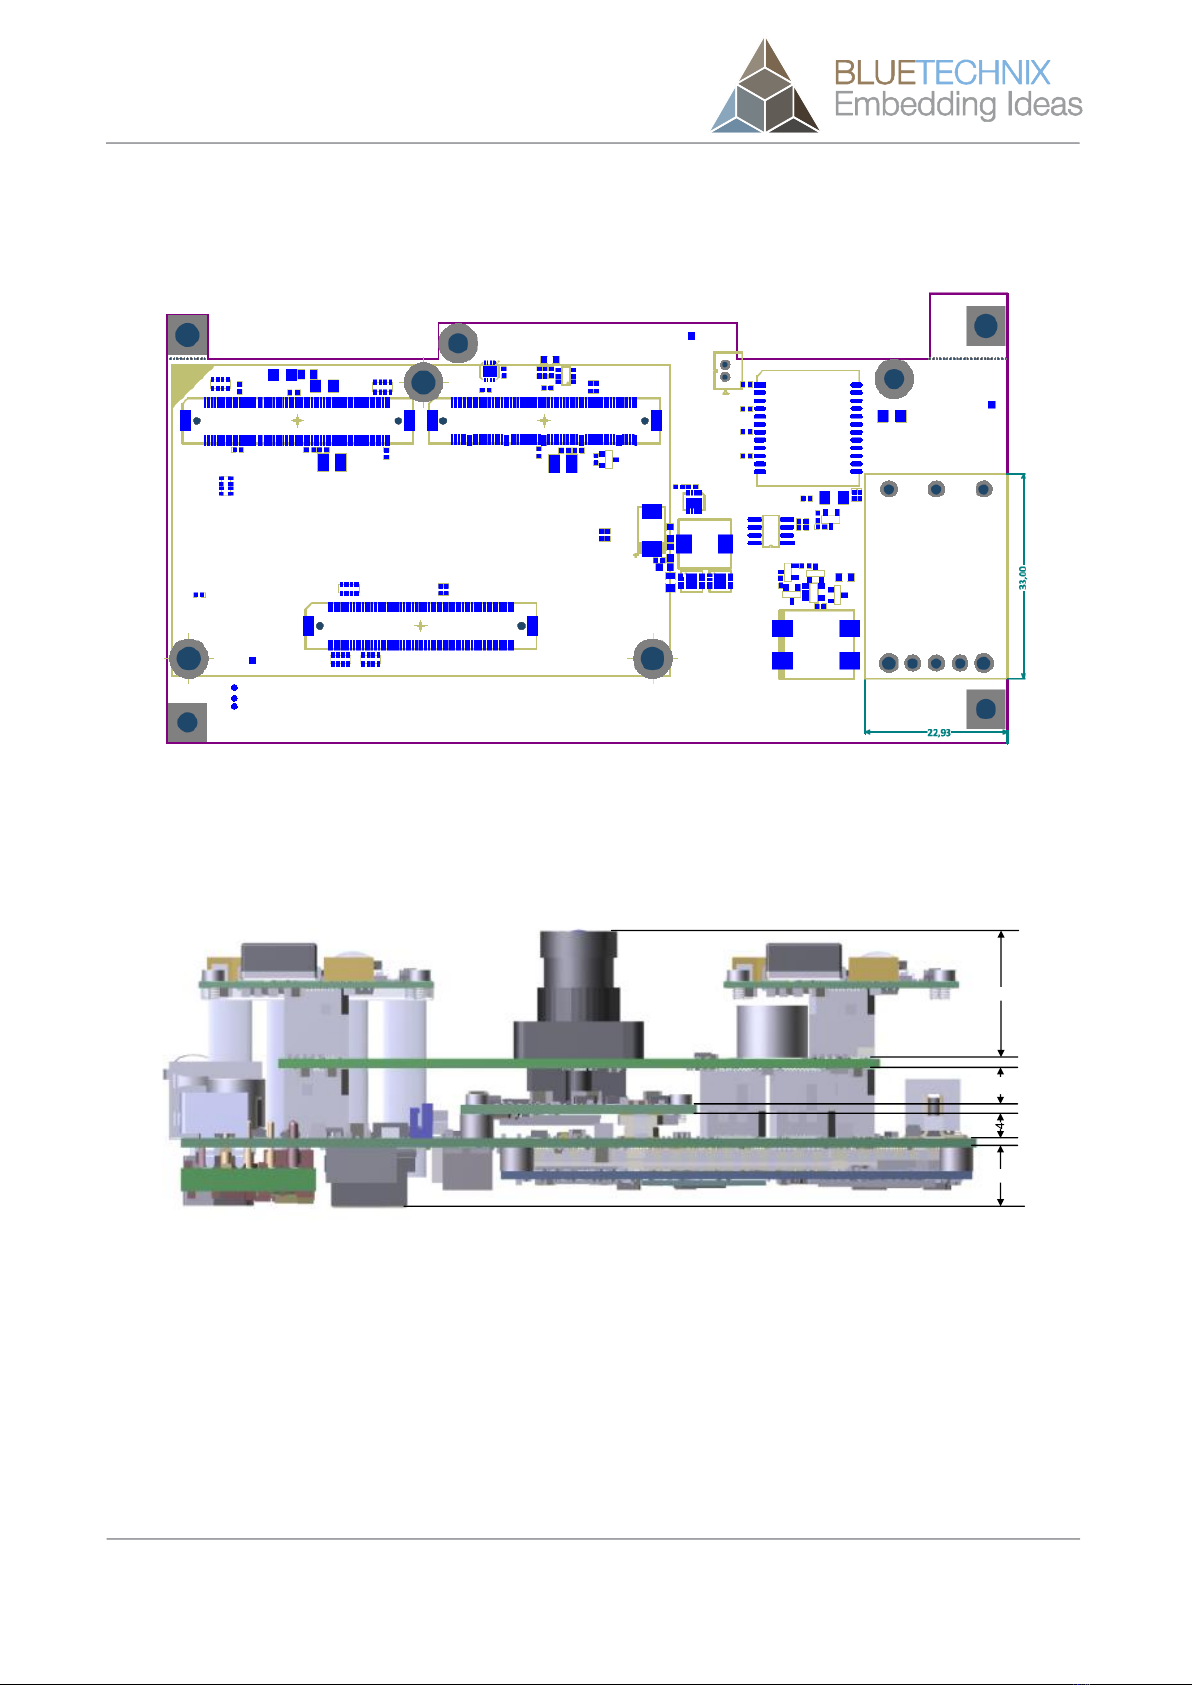
7.2 Bottom View
Figure 7-2 Bottom View of the Sentis3D-M530-Baseboard
7.3 Side View
6.4
11
1.6
1.6
1.6
20
Figure 7-3 Side view of the Sentis3D-M530-Baseboard
Table of contents
Other Blue Technix Control Unit manuals

Blue Technix
Blue Technix CM-BF537E Instructions for use

Blue Technix
Blue Technix TIM-UP-19k-S3-Spartan 6 User manual

Blue Technix
Blue Technix Sentis ToF-P510 Instructions for use

Blue Technix
Blue Technix CM-BF527 Instructions for use

Blue Technix
Blue Technix Argos3D-P320 Instructions for use

Blue Technix
Blue Technix ADEV-BF52xC V1.1 Instructions for use


