BM PRO BatteryCharge15 User manual

BATTERY MANAGEMENT TECHNOLOGY
THAT POWERS YOUR ADVENTURES.
BM PRO - 19 Henderson Road, Knoxeld 3180, Victoria, Australia
Phone +61 3 9763 0962 | Fax +61 3 9763 8789
OWNER’S MANUAL
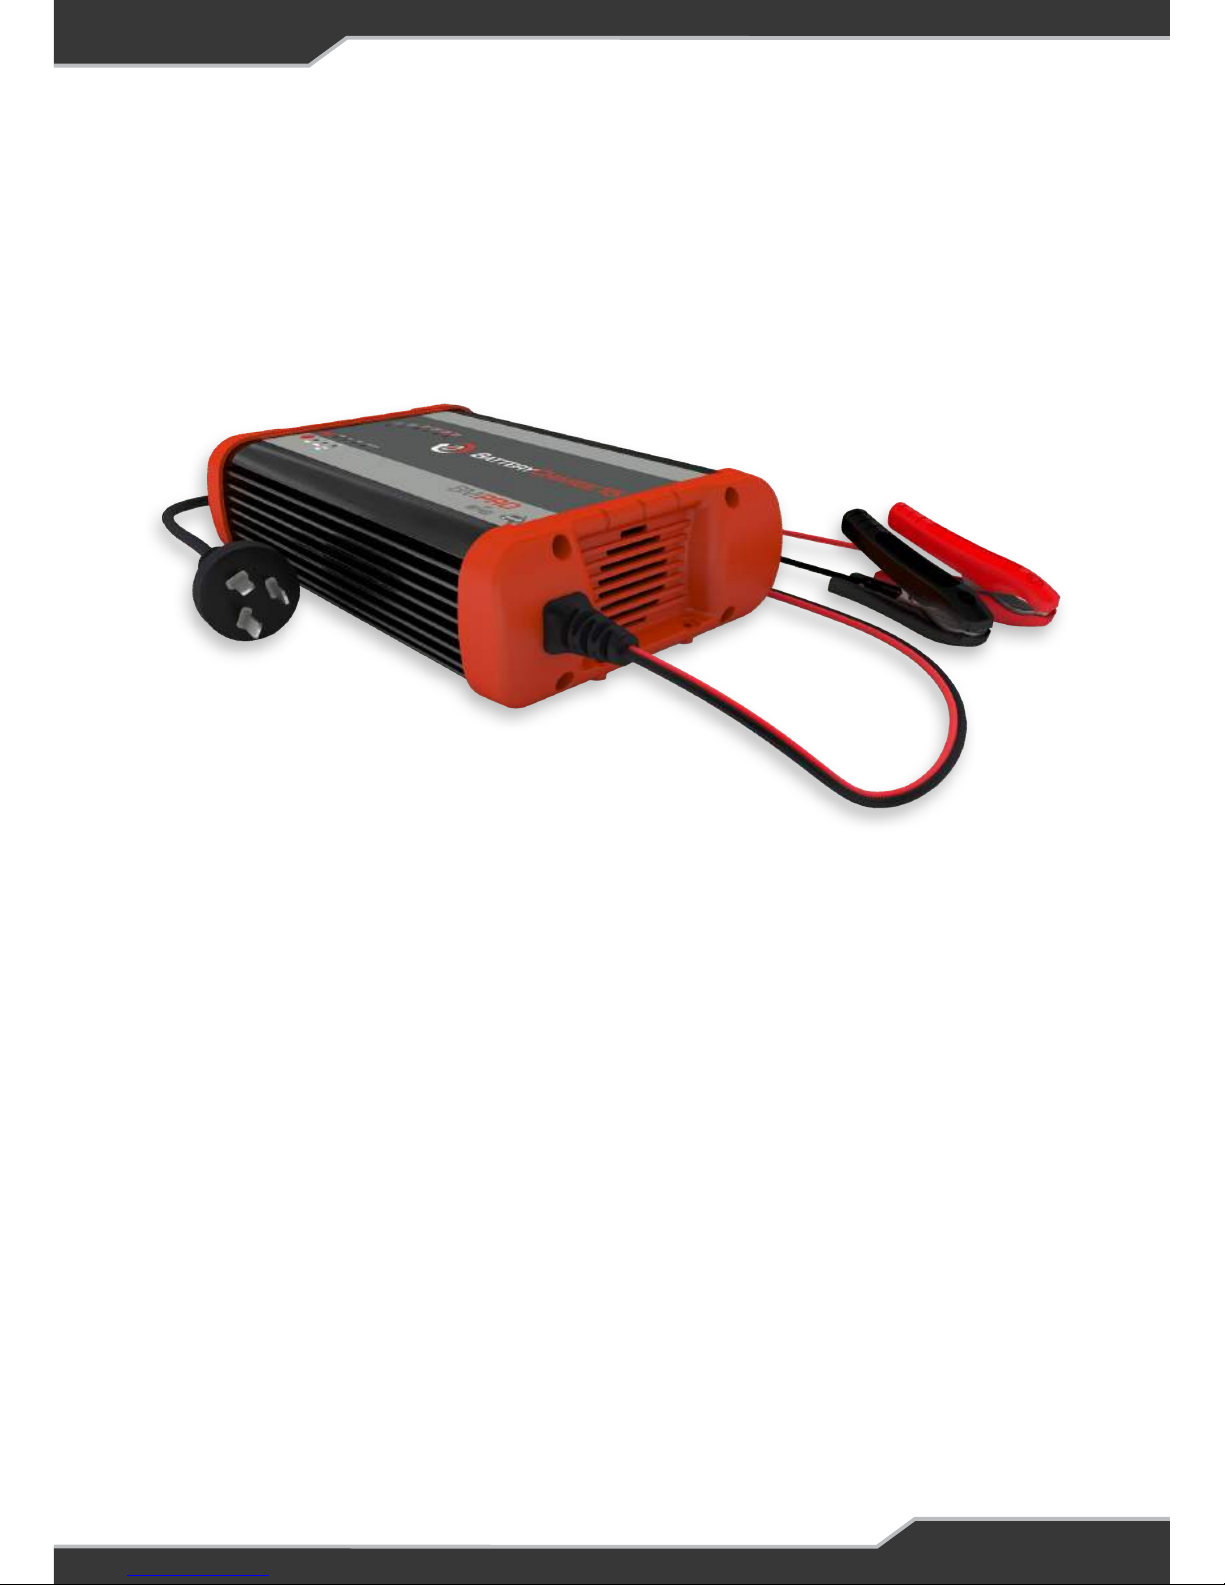
Ba
tteryCharge15

2
The BM PRO BatteryCharge15 (BC15) is a proudly Australian-made product manufactured in Melbourne, Australia. Designed by Setec, one of Australia’s
leading power solutions experts. The BatteryCharge15 represents a high quality product that will provide years of service.
Copyright © Setec 2016
Disclaimer
SETEC accepts no liability for any loss or damage, which may occur as a result of improper or unsafe use of its products. Warranty is only valid if the
unit has not been modied or misused by the customer.

3
Safety Precautions 4
What’s Included 5
Features 5
Multi Chemistry 5
Power Supply 6
Polarity Protection 6
Over Temperature Protection 6
Cooling Fan 6
Display 7
Battery Chemistry Selection 8
Gel (max voltage of 14.2V) 7
AGM (max voltage of 14.4V) 7
WET (bulk and absorption 14.4V, recondition up to 15.8V) 7
Calcium (bulk and absorption 14.9V, equalisation and recondition up to 15.8V) 7
Power Supply (constant voltage of 13.8V) 7
Adjustable Charge Rate 9
Charging Instructions 12
Step 1 Check the Electrolyte Level 12
Step 2 Connection 12
Step 3 Connect to 240V Mains Power 12
Step 4 Set Charge Rate 12
Step 5 Set Battery Chemistry Type 12
Step 6 Charging 13
Step 7 Disconnection 11
Power Supply Mode 14
Specications 14
Dimensions 15
Mounting Instructions 15
Fault Codes 16
Warranty Terms And Conditions 17
CONTENTS
4
SAFETY PRECAUTIONS
Please read the Safety Precautions carefully before installing the power
supply. Be sure to observe all precautions without fail.
Failure to follow these instructions properly may result in
personal injury or loss of life.
Ensure that there is good ventilation from the battery area.
This appliance can be used by children aged from 8 years and above and persons
with reduced physical, sensory or mental capabilities or lack of experience and
knowledge if they have been given supervision or instruction concerning the use
of appliance in a safe way and understand the hazards involved. Children shall not
play with the appliance. Cleaning and user maintenance should not be made by
children without supervision.
Batteries are electrically alive at all times and must be treated with extreme
caution. They can supply high short circuit currents, even if they appear damaged.
Take care that dropping or touching of metal objects onto the battery cell does not
cause short circuits.
Remove any personal metal adornment such as a chain, watch or ring, which
could cause short circuits and personal injury.
If the supply cord is damaged, it must not be replaced and the appliance should
be scrapped.
WARNING
Failure to observe these instructions properly may result in
property damage or personal injury, which may be serious
depending on the circumstances.
Refer to the installation section before operating. Correct installation is the most
critical factor in ensuring the safe use of the power supply. If every consideration
of these instructions has been satised the power supply will be safe to operate.
Ensure that cable connections to batteries have the correct polarity and are
protected against accidental short circuit.
Before servicing a battery, disconnect the power supply from all power sources.
Do not attempt to charge non-rechargeable batteries. Charging a non-
rechargeable battery may result in the battery catching re or possible explosion.
Do not allow water or other liquids to enter the installation area.
CAUTION
5
WHAT’S INCLUDED
Accessories provided with this product are:
Owner's Manual
Cables for Battery Connection
FEATURES
The BatteryCharge 15 (BC15) is an automatic battery charger with 7
charge stages.
The BC15 7-stage charger increases your battery’s life and performance
as it gives high-performance and intelligent charging. As well as being able
to use this charger on various types of batteries including: Calcium, AGM,
Wet and Gel, it can also help renew sulphated or drained batteries. With
the function of automatic charging, your battery is protected from being
overcharged which allows you to leave the charger connected indenitely to
the battery.
MULTI CHEMISTRY
This function allows for the various types of batteries (GEL, AGM, Calcium
& WET). Before charging, the type of battery is set to ensure maximise
charging performance.

6
POWER SUPPLY
When in power supply mode, an appliance etc. can be attached directly to
the charger via the terminals or the clamps.
Note - this mode is not to be used with a battery connected as it is
designed for a xed output and does not manage the battery and may result
in damage to the battery.
POLARITY PROTECTION
This allows the charger protection if there is a reverse connection or short
circuit and stops any sparking from the output leads.
Note: This feature is not available in Power Supply mode where a battery
should not be connected.
OVER TEMPERATURE PROTECTION
A three-phase temperature protection system has been installed for your
safety. These are A) if increased temperature is detected a fan will be
started; B) if this fails, power output is reduced; and C), if temperature is
detected as too high, the charger will be shut down.
COOLING FAN
A cooling fan ensures that your charging unit is maintained at optimum
performance temperature and is automatically engaged should the
temperature exceed the required limit. Ensure there is adequate clearance
and ventilation around the unit so that heated air can escape and cool air
can enter to ensure optimal performance of the unit or over temperature
protection will cut in reducing the units capability to charge or function as a
power supply particularly with higher loads.

7
DISPLAY
The BC15 has an informative LED interface.
The top row has 6 green LEDs indicating the stage of the charge cycle.
See “7 Stages of Charging” (page 9). The rst LED may also be red if a fault
condition is present. See Fault Codes.
The second row, 4 green LEDs indicates the Battery Chemistry selected.
See step 5 of “Charging Instructions” and “Battery Chemistry Selection”
sections.
The third row, 3 green LEDs indicates the Battery Charge Rate selected.
See Step 4 of “Charging Instructions” and “Adjustable Charge Rate”
sections. In Power Supply mode the 3rd LED is illuminated Orange. See
“Power Supply” section.

8
BATTERY CHEMISTRY SELECTION
Our Battery Chemistry option lets you set the charging prole of batteries
depending on their chemistry (Calcium, AGM, WET or GEL). This must
be done to ensure you maintain your battery effectively and maximise its
performance. To do this:
Press the mode button – the orange button left of the LEDs - and wait
until there are no
lights showing
Press the mode button until you have selected the correct battery type.
GEL (max voltage of 14.2V)
Designed specically for the GEL type batteries. But note that some GEL
batteries do require a higher voltage and for these the AGM option can be
used.
AGM (max voltage of 14.4)
Designed specically for the AGM type batteries but as mentioned above
can be used with GEL types that require a higher voltage.
WET (bulk and absorption 14.9 volts, recondition up to 15.8 volts)
Designed specically for WET type batteries. As such it has a maximum
charge voltage during bulk and absorption of 14.9 volts and then increases
to 15.8 volts during the recondition stage.
Calcium (bulk and absorption 14.9 volts, equalisation and recondition up to
15.8 volts)
Designed for calcium batteries that have been discharged deeply and need
an equalisation charge to ensure a full electrolyte reading. Note – if the
battery only needs a top up, do so and then use the WET charge mode.
Power Supply (constant voltage of 13.8 volts)
When the charger is in this Power Supply mode, the battery charger
gives a constant voltage of 13.8VDC at up to 10A. This is best used with
appliances or tools that are drawing power from the battery. See “Power
Supply” section (page 12).
To adjust between options, press and hold for 3 seconds to select desired
option.

9
ADJUSTABLE CHARGE RATE
The BC15 charge rate can be adjusted to accommodate batteries of
varying sizes. The BC15 is designed to charge 12V batteries only –
attempting to charge batteries of different voltage may result in damage to
the battery.
5 Amp - Motorcycle – ideal for charging batteries between 5 and 20
ampere-hours
10 Amp - Car – ideal for charging 12v batteries between 20 and 120
ampere-hours
15 Amp – 4WD / Light Truck - ideal for charging 12v batteries between 20
and 120 ampere-hours
Battery Chemistry Button
Charge Rate Button

10
7 STAGES OF CHARGE
The 7 Stages of Charge are:
DESULPHATION
When a battery is not charged for extended periods of time, the lead-
sulphate within the battery hardens. The desulphation stage is used to
break this down and start the process back to a full charge.
The 1st green LED in the top row ashes to indicate when in Desulphation
and is constant when complete.
SOFT CHARGE
A non-harsh, ‘soft’ introduction of power to the battery, to help preserve the
battery life.
The 2nd green LED in the top row ashes to indicate when in Soft Charge
and is constant when complete.
BULK CHARGE
The primary charging phase where approximately 80% of charging takes
place. The charger delivers maximum current until the terminal voltage has
risen to the battery’s preset level.
The 3rd green LED in the top row ashes to indicate when in Bulk Charge
and is constant when complete.

11
ABSORPTION
The battery’s voltage is kept at its pre-set level. During this phase, the
current is gradually reduced so that the battery can absorb more power.
The 4th green LED in the top row ashes to indicate when in Absorption
and is constant when complete.
ANALYSIS
The battery is tested to determine that it is fully charged. If this shows it is
not, then a recondition charge is applied to help bring the battery to a full,
healthy charge.
The 5th green LED in the top row ashes to indicate when in Analysis and is
constant when complete.
RECONDITION
If a battery fails to fully charge, the next step in the phase is for
reconditioning. If the BC15 determines that the battery is faulty, charging is
suspended and an error will be indicated.
The 6th green LED in the top row ashes when in Recondition mode.
FLOAT
This nal stage keeps the battery at optimum charge without overcharging
or damage to the battery. This allows the battery to be connected to the
charger at all times, if required.
The 6th green LED in the top row is constant when in Float mode.

12
CHARGING INSTRUCTIONS
STEP 1 – CHECK THE ELECTROLYTE LEVEL
Before charging your battery, the battery’s electrolyte level needs to be
checked. This does not apply to all batteries and is only necessary if
removable venting caps are present. Remove the vent caps and ensure
that the level is 6mm or ¼” above the battery plates. If not, then top up with
distilled water to bring it up to this level and replace caps.
STEP 2 – CONNECT TO 240V MAINS POWER
Plug the battery charger into the 240V mains power and turn on mains
power.
STEP 3 – SELECT BATTERY CHEMISTRY TYPE
Setting the battery chemistry on the charger depends upon the type of
battery that is being charged. Refer to battery manufacturer’s details to
conrm type. To select type:
Press the Battery Chemistry mode button for 3 seconds to change
options
Continue to press the mode button until the correct type is shown
STEP 4 – SET CHARGE RATE
Select the charge rate relevant to the size of the battery. A guideline is
shown in the section “Adjustable Charge Rate”. To set the rate:
Press the Charge Rate mode button for 3 seconds to select the mode
Press the Charge Rate button until the setting required is shown
Note: Ensure the 3rd LED is not illuminated Orange indicating the Power
Supply mode has been entered as this is not suitable for charging batteries.
STEP 5 – CONNECT TO BATTERY
Attach the RED clamp from the charger to the Positive (+) battery post.
Attach the BLACK lead clamp from the charger to the Negative (-) battery
post.

13
STEP 6 – CHARGING
During this process, the charging and ‘Fully Charged’ indicator lights will
ash in various patterns. This indicates the various stages of charge for your
battery.
When all of the top row LEDs remain steady, this indicates that the charger
is now in oat stage and can remain connected to the battery indenitely,
without over charging.
If at any point the Red LED begins to ash, this indicates that there is a
fault. Refer to “Fault Codes” Section of this document.
STEP 7 – DISCONNECTING
To disconnect from the battery once a full charge has been attained, remove
mains power to BC15, disconnect the negative battery terminal, disconnect
the positive battery terminal.
Note: This battery charger is not intended for charging a battery while
installed in a vehicle. Disconnect battery from vehicle before initiating the
above process.
BATTERIES
Note: This battery charger is rated to charge lead-acid battery types of
GEL, AGM, Calcium and/or WET, from 50-300Ah, (up to 500Ah oat/trickle),
single units or in parallel.
14
POWER SUPPLY MODE
Connect the BC15 to the mains supply and select Power Supply mode by
depressing and holding the Charge Rate selection button for 10+seconds
until the 3rd LED in the bottom row is illuminating constant orange.
Then connect your load being careful to connect the positive and negative
leads appropriately so that the load and BC15 are not damaged.
Power Supply mode is limited to 10Amp output.
Failure to observe these instructions properly may
result in property damage, which may be serious
depending on the circumstances.
CAUTION
Part No. BC15
Type 7 Stage
Input (nominal) 220-240VAC, 50Hz
Input Power 270W
Nominal Output Voltage 14.6V
Minimum Start Voltage 6V
Output Current (Battery Charge
Mode)
5/10/15A*
Over Current (Power Supply
Mode)
15A
Back Drain <4mA
Deep Cycle 200Ah
Automotive 40-800CCA
Marine 55-900MCA
Types of Batteries Most types of lead acid batteries
including GEL, WET, AGM, Calcium
SPECIFICATIONS
* Maximum output may progressively derate above 30° down to half of the rated output at 50°

15
DIMENSIONS
MOUNTING INSTRUCTIONS
For ease of mounting, the BC15 end plates include a mounting ange.
When mounting the charger, it is important to ensure at least a 10cm
clearance between the end plates and the surface it is being xed to. This
allows for adequate ventilation and cooling.
The BC15 is designed for indoor use only and is not suitable for outdoor
charging. Ensure that both the charger and the battery are in a well spaced
and ventilated environment during charging.

16
FAULT CODES
The top row rst stage LED will ash red when a fault is detected. The LED
will quickly blink the error code, pause for 2 seconds, then repeat for up
to 30 seconds. Touching one of the push buttons while the error LED is
ashing will make the unit re-attempt battery charge immediately.
After 30 seconds the unit will automatically re-attempt battery charge. After
3 consecutive attempts the unit will remain in the error condition until power
cycled, or the user touches one of the settings buttons.
Indicator Meaning
Solid RED Battery appears to not take a charge current, unknown
fault
1 Flash RED Reverse Polarity
2 Flash RED Over Temperature – BC15
3 Flash RED Short Circuit
4 Flash RED Over Voltage - Battery
5 Flash RED Under Voltage - Battery

17
WARRANTY TERMS AND CONDITIONS
Registering your BM PRO by Setec product is an important step to ensure that you receive all
of the benets you are entitled to. Please visit www.teambmpro.com to complete the online
registration form for your new product today.
1. BM PRO by Setec goods come with guarantees that cannot be excluded under Australian
Consumer Law. You are entitled to a replacement or refund for major failure and for
compensation for any reasonably foreseeable loss or damage. You are entitled to have the
goods repaired or replaced if the goods fail to be of acceptable quality and the failure does not
amount to a major failure. The benets under this Warranty are in addition to your other rights
and remedies under a law in relation to the goods to which this Warranty relates (the Australian
Consumer Law).
2. Setec, as the manufacturer of BM PRO by Setec goods warrants products against defects
for a period of two years, commencing from the original date of purchase. Proof of purchase is
required before you can make a claim under this warranty.
3. HOW TO PROTECT YOUR RIGHTS UNDER THIS WARRANTY: The BC15 is designed to
be installed by a suitably qualied installer. You or your installer should carefully inspect the
product before installation for any visible manufacturing defects. We accept no responsibility in
addition to our consumer guarantee obligations where a product has been installed incorrectly.
4. This warranty does not extend to product failures or defects caused by, or associated
with, but not limited to; failure to install or maintain correctly, unsuitable physical or operating
environment, accident, acts of God, hazard, misuse, unauthorised repair, modication or
alteration, natural disaster, corrosive environment, insect or vermin infestation and failure to
comply with any additional instructions supplied with the product.
5. Setec may seek reimbursement of any costs incurred by them when a product is found to
be in proper working order or damaged as a result of one or more of the warranty exclusions
mentioned in point 4 of this statement.
6. To enquire or make a claim under this warranty, please follow these steps:
to obtain a Return Material Authorisation (RMA) number
b. Package and send the product to: BM PRO by Setec Warranty Department,
19 Henderson Road, Knoxeld, VIC 3180.
Please mark RMA details on the outside of the packaging
c. Please ensure the package also includes: a copy of the proof of purchase, a detailed
description of the fault and your contact details including phone number and return
address
7. Setec will not be liable for any costs, charges or expenses incurred in the process of
returning a product in order to initiate a warranty claim
Manual Part #028843

18
NOTES:

19
NOTES:

BM PRO - 19 Henderson Road, Knoxfield 3180, Victoria, Australia
Phone +61 3 9763 0962 | Fax +61 3 9763 8789
Email sales@teambmpro.com | Web www.teambmpro.com
switch off. powerup
BY
the bm pro
batterycheck
The BatteryCheck is an easy to install device that sets a new
standard in battery management systems. This innovative product
connects to your deep cycle battery and communicates wirelessly
with smart phones. The BatteryCheck provides real time battery
management data that allows you to effectively manage remaining
battery energy via a simple to use app.
Key features
› Communicates via Bluetooth with smart phones
› Free downloadable app via Google Play and App Store
› Instant real time data - view information including volts and
amps, time remaining, temperature, battery status, state of
charge and battery health
› Easy installation – no mechanical expertise required
› Works with multiple batteries when in parallel (7Ah-800Ah
Battery Bank)
› Internal shunt capacity - 80 amps continuous
› Set automatic alarm warnings via app
› Compatible with any deep cycle 12 or 24V Lead Acid, AGM
and Gel 7Ah-800Ah battery
a world first, innovation
patented product showcasing
the latest technology in
wireless battery management
STATE OF CHARGE
BATTERY HEALTH
TIME REMAINING
24:00 hrs
TEMPERATURE
41ºC
BATTERY STATUSBATTERY STATUS
CHARGING...
CARAVAN TRAILER
12.0
+
–
50.0
2
Y
E
A
R
W
A
R
R
A
N
T
Y
2
Y
E
A
R
W
A
R
R
A
N
T
Y
2YR
WARRANTY
SWITCH OFF. POWER UP.
BM PRO - 19 Henderson Road, Knoxeld 3180, Victoria, Australia
Phone +61 3 9763 0962 | Fax +61 3 9763 8789
BY
Table of contents
Other BM PRO Batteries Charger manuals

BM PRO
BM PRO BatteryPlus35SR User guide

BM PRO
BM PRO MiniBoost User manual

BM PRO
BM PRO BatteryCharge7.5 User manual

BM PRO
BM PRO MiniBoost User manual

BM PRO
BM PRO MiniBoostPRO User manual

BM PRO
BM PRO MiniBoostPRO User manual

BM PRO
BM PRO ProBoost25 User manual

BM PRO
BM PRO BatteryCharge4 User manual

BM PRO
BM PRO MiniBoost User manual


