BMC G3 A20 User manual

User Manual
Sleep Apnea Therapy Device and Accessories
Auto CPAP / CPAP System
G3 A20 / G3 C20

Auto CPAP / CPAP System User Manual
Table of Contents
1. Symbols ························································································· 1
1.1 Control Buttons········································································ 1
1.2 Device Symbols········································································ 1
2. Warning, Caution and Important Tip ······················································· 3
3. Intended Use ··················································································· 3
4. Contraindications··············································································· 4
5. Specifications··················································································· 5
6. Available Therapies ············································································ 7
7. Glossary ························································································· 7
8. Model ···························································································· 9
9. Package Contents·············································································· 9
10. System Features············································································ 10
11. First Time Setup ············································································ 12
11.1 Placing the Device································································· 12
11.2 Installing the Air Filter and Filter Cap / PM2.5 Filter ························· 12
11.3 Connecting Power Supply ························································ 13
11.4 Assembling the Tubing / Heated Tubing and Mask··························· 14
11.5 Using Oxygen with the Device··················································· 16
11.6 Inserting the SD Card (Only for the device that equipped with SD card) 16
11.7 Starting Treatment ································································ 17
12. Routine Use ················································································· 17
12.1 Connecting the Tubing···························································· 17
12.2 Adjusting the Tubing ······························································ 17
12.3 Turning on the Airflow ···························································· 17
12.4 Heating the Water ································································· 18
12.5 Using the Ramp Feature·························································· 18
12.6 Accessing the iCode ······························································· 18
12.7 Turning the Device Off···························································· 19
13. Heated Humidifier·········································································· 19
13.1 Filling the Water Chamber ······················································· 19
13.1.1 Removing the Water Chamber········································· 19
13.1.2 Filling the Water Chamber·············································· 19
13.1.3 Putting the Water Chamber back······································ 20
13.2 Emptying the Water Chamber ··················································· 21
13.3 Setting the Humidity Level ······················································· 21

Auto CPAP / CPAP System User Manual
14. Using the SpO2Kit·········································································· 22
14.1 Connecting the SpO2Kit to the Device········································· 22
14.2 Removing the SpO2Kit from the Device ······································· 23
15. Connecting to GPRS or WiFi Network ··················································· 24
15.1 Connecting to GPRS Network···················································· 24
15.2 Connecting to WiFi Network ····················································· 26
16. Navigating the Patient Menu ····························································· 29
16.1 Steps to Navigating the Patient Menu·········································· 29
16.1.1 Accessing the Main Interface ·········································· 29
16.1.2 Bringing up the Initial Setup Interface ······························· 30
16.1.3 Selecting Options ························································ 31
16.1.4 Adjusting Options ························································ 31
16.1.5 Confirming Adjustments ················································ 31
16.1.6 Turning Pages ···························································· 32
16.1.7 Exiting the Patient Menu················································ 32
16.2 Options in the Patient Menu and Corresponding Descriptions ············· 33
17. Alert··························································································· 35
18. Cleaning and Disinfection ································································· 36
18.1 Cleaning the Mask and Headgear··············································· 36
18.2 Cleaning the SpO2Kit ····························································· 36
18.3 Cleaning the Water Chamber ···················································· 37
18.4 Cleaning the Transfer Box ······················································· 37
18.5 Cleaning the Enclosure ··························································· 38
18.6 Cleaning the Tubing ······························································· 38
18.7 Replacing the Air Filter / PM2.5 Filter ·········································· 38
18.8 Disinfection ········································································· 39
19. Traveling with the Device ································································· 40
20. Transferring the Device to Another Patient············································· 41
21. Reordering··················································································· 41
22. Technical Support ·········································································· 41
23. Disposal······················································································ 42
24. Troubleshooting············································································· 42
24.1 Common Problems in Patients and Corresponding Solutions··············· 42
24.2 Common Problems in the Device and Corresponding Solutions ··········· 44
25. EMC Requirements ········································································· 45
26. Limited Warranty ··········································································· 50

Auto CPAP / CPAP System User Manual
1 / 50
1. Symbols
1.1 Control Buttons
Home Button
Start / Stop Button
Knob
1.2 Device Symbols
Follow Instructions for Use
Operating Instructions
Type BF Applied Part (mask)
Class II (Double Insulated)
AC Power
DC Power
IP22
≥12.5 mm Diameter, Dripping (15º tilted)
Hot Surface
No SpO2Alert
Serial Number of the Product
Manufacturer
EC REP
Authorized Representative in the European Community
Disassembly is prohibited

Auto CPAP / CPAP System User Manual
2 / 50
Maximum water level
European CE Declaration of Conformity
Lot number
Non-Ionizing Radiation
SD Card
WEEE Marking
Logo of BMC Medical Co., Ltd.
Air Inlet
Air Outlet

Auto CPAP / CPAP System User Manual
3 / 50
2. Warning, Caution and Important Tip
WARNING!
Indicate the possibility of injury to the user or operator.
CAUTION!
Indicate the possibility of damage to the device.
IMPORTANT TIP!
Place emphasis on an operating characteristics.
Warnings, Cautions, and Important Tips appear throughout this manual as they apply.
3. Intended Use
The G3 A20 / G3 C20 system is a CPAP (Continuous Positive Airway Pressure) device
designed for the treatment of adults Obstructive Sleep Apnea (OSA) only, either in the
hospital or at home.
The device is to be used only on the instruction of a licensed health care professional. Your
home care provider will make the correct pressure settings according to your health care
professional’s prescription.
Several accessories are available to make your OSA treatment with the device as convenient
and comfortable as possible. To ensure that you receive the safe, effective therapy
prescribed for you, use only BMC accessories.
WARNINGS!
• The device is intended for adults use only.
• The device is not intended for life support.
• The instructions in this manual are not intended to supersede established medical
protocols.
• Do not bring the device or accessories into a Magnetic Resonance (MR) environment as it
may cause unacceptable risks to the patient or damage to the device or MR medical devices.
The device and accessories have not been evaluated for safety in an MR environment.
• Do not use the device or accessories in an environment with electromagnetic equipment
such as CT scanners, Diathermy, RFID and electromagnetic security systems (metal
detectors) as it may cause unacceptable risks to the patient or damage to the device. Some
electromagnetic sources may not be apparent, if you notice any unexplained changes in the
performance of the device, if it makes unusual or harsh sounds, disconnect the power cord
and stop using it. Contact your home care provider.
CAUTIONS!
• The device is restricted to sale by or on the order of a physician.
• The patient is an intended operator.

Auto CPAP / CPAP System User Manual
4 / 50
IMPORTANT TIP!
• Read and understand the entire user manual before operating this system. If you have any
questions concerning the use of this system, contact your home care provider or health care
professional.
4. Contraindications
Studies have shown that the following pre-existing conditions may contraindicate the use of
positive airway pressure therapy for some patients:
Absolute Contraindications: Pneumothorax, mediastinal emphysema; cerebrospinal fluid
leak, traumatic brain injury, or pneumocephalus; shock caused by a variety of conditions
before treatment; active epistaxis; upper gastrointestinal bleeding before treatment; coma
or impaired consciousness making the use of mask during therapy impossible; giant vocal
fold polyp, etc.
Relative Contraindications: Severe coronary heart disease complicated with left
ventricular failure, acute otitis media, excessive respiratory secretions and weak cough, weak
spontaneous breathing, nasal or oral tracheal intubation and tracheotomy, severe nasal
congestion caused by a variety of conditions, lung bullae, and allergies to breathing masks,
etc.
The following side effects may occur during treatment:
- Dryness of the mouth, nose and throat
- Abdominal bloating
- Ear or sinus discomfort
- Eye irritation
- Skin irritation due to the use of a mask
- Chest discomfort
IMPORTANT TIPS!
• An irregular sleep schedule, alcohol consumption, obesity, sleeping pills, or sedatives may
aggravate your symptoms.
• Please use a mask which meets ISO 17510: 2015.
CAUTION!
• Contact your health care professional if symptoms of sleep apnea recur. Contact your
health care professional if you have any questions concerning your therapy.

Auto CPAP / CPAP System User Manual
5 / 50
5. Specifications
Device Size
Dimensions (L x W x H): 265 mm × 145 mm × 114 mm
Weight: 1.7 kg
Water capacity:
To maximum fill line 360 mL
Product Use, Transport and Storage
Operation Transport and Storage
Temperature: 5°C to 35°C (41˚F to 95˚F) -25°C to 70°C (-13˚F to 158˚F)
Humidity: 15% to 93% Non-condensing 15% to 93% Non-condensing
Atmospheric Pressure: 760 ~1060 hPa 760 ~1060 hPa
Heated Humidifier
Humidifier Settings: Off, Auto, 1 to 5 (95˚F to 154.4˚F / 35°C to 68°C)
Humidifier Output: No less than 15 mg H2O/L
Environmental Conditions: Maximum airflow, 35°C, 15% relative humidity
Maximum Operating Pressure: 40 hPa
Pressure Drop with Humidifier: < 0.4 hPa at 60 LPM flow
Maximum Delivered Gas Temperature: ≤ 43°C
Cellular Module
Receiver Frequency Band: 850/900/1800/1900MHz
FCCID: XMR201202M35
Max RF power output: 33.0 dBm
WiFi Kit
FCCID: 2ACSVHF-LPT270
Mode of Operation
Continuous
Work Mode
CPAP, AutoCPAP
SD Card
The SD card can record patient data and fault information
AC Power Consumption
100 - 240 V ~, 50 / 60 Hz, 2.5 A Max
100 - 240 V ~, 50 / 60 Hz, 2A Max
Main device input
24 V, 3.33 A
Device offer to Heated Tubing Communications Port
24 V 18 W

Auto CPAP / CPAP System User Manual
6 / 50
Type of Protection Against Electric Shock
Class II Equipment
Degree of Protection Against Electric Shock
Type BF Applied Part
Degree of Protection Against Ingress of Water
IP22
Pressure Range
4 to 20 hPa (in 0.5 hPa increments), ≤ 30 hPa under single fault conditions.
Static Pressure Stability
± 0.5 hPa
Ramp
The ramp time ranges from 0 to 60 minutes.
Sound Pressure Level
< 28 dB (A), when the device is working at the pressure of 10 hPa, Uncertainty: 2 dB (A).
Sound Power Level
< 36 dB (A), when the device is working at the pressure of 10 hPa, Uncertainty: 2 dB (A).
Maximum Flow
Test Pressure
Pmin
Pmin + 1/4
(Pmax-Pmin)
Pmin + 1/2
(Pmax-Pmin)
Pmin + 3/4
(Pmax-Pmin)
Pmax
Test Pressures (hPa)
4
8
12
16
20
Measured Pressure at the
Patient Connection Port (hPa)
3
7
11
15
19
Average Flow at the Patient
Connection Port (L/min)
85
135
140
140
140
When the working pressure is set to the values listed in the table, the average flow rate at
the patient end should be greater than 80% of the corresponding flow value in the table.
Pressure
Range: 0 ~20 hPa
Margin of Error: ± (0.4 hPa + 4%)
SpO2
Range: 35% ~100%
The margin of error for SpO2between 70% and 100% is ± 3%. No strict accuracy
requirements for SpO2below 70%.
Pulse Rate
Range: 30 ~240 BPM
Margin of Error: ± 2%

Auto CPAP / CPAP System User Manual
7 / 50
Wavelengths
Red: 663 nanometers
Infrared: 890 nanometers
Maximal Optical Output Power
Less than 1.5 mw maximum average.
Air Tubing
Air tubing
Length
Inner diameter
Tubing
6 ft. (1.83 m)
19 mm
Heated Tubing
6 ft. (1.83 m)
19 mm
The Form and the Dimensions of the Patient Connection Port
The 22 mm conical air outlet complies with ISO 5356-1.
PM2.5 Filter
Efficiency: > 90% for 2.5 micron dust
6. Available Therapies
The device delivers the following therapies:
CPAP
–
Delivers Continuous Positive Airway Pressure; CPAP maintains a constant level of
pressure throughout the breathing cycle. If your health care professional has prescribed
ramp for you, you can turn the Knob to reduce the pressure and then gradually
increase the pressure to the therapeutic pressure setting so that you can fall asleep more
comfortably.
AutoCPAP
–
Delivers CPAP therapy and provides an air pressure no less than the prescribed
one based on the patient’s needs.
7. Glossary
Apnea
A condition marked by the cessation of spontaneous breathing.
AutoCPAP
Adjust CPAP pressure automatically to improve patient comfort based on monitoring of
apnea and snoring events.
Auto Off
When this feature is enabled, the device automatically discontinues therapy whenever the
mask is removed.
Auto On
With this feature, the device automatically initiates therapy when you breathe into the mask.
This feature is always enabled.

Auto CPAP / CPAP System User Manual
8 / 50
SmartC
In CPAP mode, if SmartC is set to on, the device can adjust Treat P based on the patient's
respiratory event during a certain time.
SmartA
In AutoCPAP mode, if SmartA is set to on, the device can adjust Initial P and Min APAP based
on the patient's respiratory event during a certain time.
CPAP
Continuous Positive Airway Pressure.
iCode
A feature designed to give access to compliance and therapy management information.
―iCode‖ consists of six separate codes displayed in the Patient Menu, each code being a
sequence of numbers. ―iCode QR‖ and ―iCode QR+‖ display two-dimensional codes.
LPM
Liters Per Minute.
OSA
Obstructive Sleep Apnea.
Patient Menu
The display mode in which you can change patient-adjustable device settings, such as the
starting pressure of the Ramp feature.
Ramp
A feature that increases patient comfort at the beginning of treatment. It reduces the
pressure and then gradually increases it the prescribed setting so that the patient can fall
asleep more comfortably.
Reslex
A therapy feature that is enabled by your home care provider to provide pressure relief
during exhalation.
Standby State
The state of the device when power is applied but the airflow is turned off.
min
Means the time unit ―minute‖.
h
Means the time unit ―hour‖.
yy mm dd / mm dd yy / dd mm yy
Denotes date.

Auto CPAP / CPAP System User Manual
9 / 50
8. Model
Model
Product Description
Work
Mode
Maximum
Work
Pressure
(hPa)
Product
Contents
Optional Accessory
G3 A20
Device
(3.5-inch LCD)
Tubing (optional), SpO2Kit
(optional), Mask( optional),
WiFi kit (optional), Cellular
Module (optional), Heated
Tubing (optional)
CPAP,
AutoCPAP
20
G3 C20
Device
(3.5-inch LCD)
CPAP
9. Package Contents
After unpacking the system, make sure you have everything shown here (Different models of
the product may contain different components):
No.
Articles
Qty.
Notes
1
Device
1
2
Air Filter
2
3
Power Adapter
1
4
Power Cord
1
5
WiFi kit
1
Optional
6
Cellular Module
1
Optional
7
Mask
1
Optional
8
SpO2Kit
1
Optional
9
Tubing
1
Optional
10
Heated Tubing
1
Optional
11
PM2.5 Filter
1
Optional
12
SD Card
1
Optional
13
Carrying Case
1
Optional
14
Accompanying Documents
1
All parts and accessories are not made of natural rubber latex.
The product’s service life is five years if it is used, maintained, cleaned and disinfected in
strict accordance with the User Manual.
The Heated Tubing service life is six month. The WiFi kit and Cellular Module service life is
one year.
SpO2Probe and mask are the application parts of the device.
WARNINGS!
• The device should only be used with the mask and accessories manufactured or
recommended by BMC. The use of inappropriate masks and accessories may affect the
Auto CPAP / CPAP System User Manual
10 / 50
performance of the device and impair the effectiveness of treatment.
• The use of accessories other than those specified, except for cables sold by the
manufacturer of the equipment or system as replacement parts for internal components,
may result in increased emissions or reduced immunity of the equipment or system.
• Do not stack the long tubing at the head of the bed, as it may wrap around the head or
neck of the patient during sleep.
• Do not attach any equipment to the device unless recommended by BMC or your health
care provider.
• Please contact BMC for an SD card if needed.
IMPORTANT TIPS!
• If any of the above parts are missing, contact your home care provider.
• Contact your home care provider for additional information on the available accessories of
the device. When using optional accessories, be sure to follow the instructions that come
with the accessories.
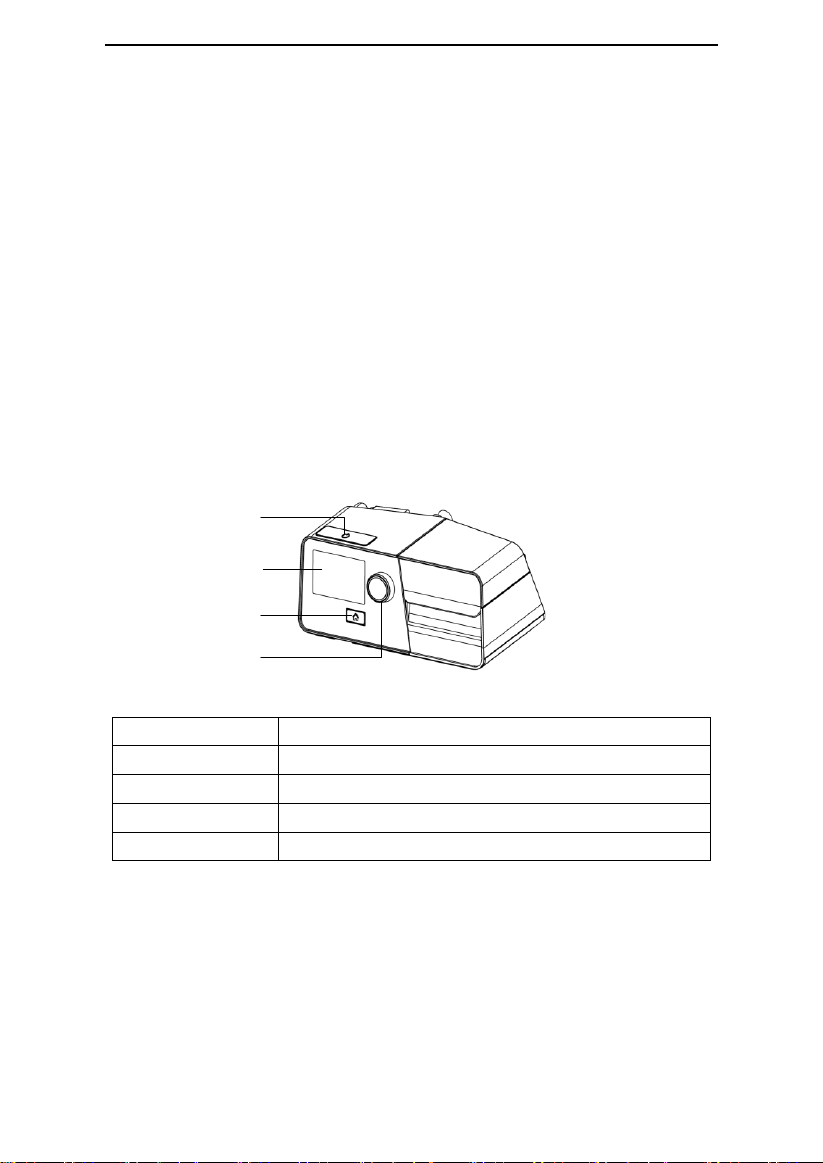
10. System Features
Knob
Display Screen
Home Button
Start / Stop Button
Fig. 10-1
Name
Function
Start / Stop Button
Start / Stop delivering air
Display Screen
Display operation menus, information, monitoring data, etc.
Home Button
Return to the previous menu or main interface
Knob
Adjust device settings

Auto CPAP / CPAP System User Manual
11 / 50
Air Outlet
DC Inlet
Filter Cap (Air Inlet)
Heated Tubing Port SpO2Kit Port
Fig. 10-2
Name
Function
Air Outlet
Deliver pressurized air; connects to the tubing
SpO2Kit Port
(optional)
Connected to SpO2Kit (Not for connection to un-recommended
devices)
Heated Tubing Port
Connected to the plug of the heated tubing
DC Inlet
An inlet for the DC power supply
Filter Cap (Air Inlet)
Place the cap on the air filter, which is used to filter dust and
pollen in the air entering the device
Transfer Box
SD Card Slot
Fig. 10-3
Name
Function
Transfer Box
For the connection of the water chamber to the device
SD Card Slot
Insert the SD card into this slot
CAUTION!
• The pictures in this manual are only for reference, if they are different from the material
objects, the latter shall prevail.

Auto CPAP / CPAP System User Manual
12 / 50
11. First Time Setup
11.1 Placing the Device
Place the device on a firm, flat surface.
WARNINGS!
• If the device has been dropped or mishandled, if the enclosure is broken, or if water enters
the enclosure, disconnect the power cord and discontinue use. Contact your home care
provider immediately.
• If the room temperature is above 95°F (35°C), the airflow generated by the device may
exceed 109.4°F (43°C). The room temperature must be kept below 95°F (35°C) while the
patient is using the device.
CAUTIONS!
• If the device has been exposed to very hot or very cold temperatures, allow it to acclimate
to room temperature (approximately 2 hours) before beginning setup.
• Make sure the device is away from any heating or cooling equipment (e.g., forced air vents,
radiators, air conditioners).
• The device is not suitable for use in high humidity environments. Make sure that no water
enters the device.
• Make sure that bedding, curtains, or other items are not blocking the filter or vents of the
device.
• Keep pets, pests or children away from the device and avoid small objects being inhaled or
swallowed.
• To avoid explosion, the device must not be used in the presence of flammable gases (e.g.
anesthetics).
•Tobacco smoke may cause tar to build-up in the device, which could lead to the
malfunctioning of the device.
• Air must flow freely around the device to allow it to function properly.
11.2 Installing the Air Filter and Filter Cap / PM2.5 Filter
(1) Attach the air filter to the filter cap, as shown in Fig. 11-1.
Filter Cap
Air Filter
Fig. 11-1
(2) Install the filter cap containing the air filter to the device, as shown in Fig. 11-2.

Auto CPAP / CPAP System User Manual
13 / 50
Fig. 11-2
(3) Change the air filter and filter cap to the PM2.5 filter, as shown in Fig. 11-3.
PM2.5 Filter
Fig. 11-3
CAUTION!
• The air filter or the PM2.5 filter must be in place when the device is operating.
11.3 Connecting Power Supply
(1) Insert the plug of the power adapter into the DC Inlet on the back of the device;
(2) Connect the power cord to the power adapter;
(3) Plug the other end of the power cord into the power outlet.
Power Adapter
Power Cord
DC Inlet
Fig. 11-4
Note: The length of the power cord and power adapter is 1.5 m and 1.8 m respectively
without the function of preventing electromagnetic interference.

Auto CPAP / CPAP System User Manual
14 / 50
WARNINGS!
• The device is powered on for use when the power cord and power adapter are connected.
Use the Knob to turn the blower On / Off.
• Using the device at an AC voltage outside the specified range (see Section 5 ―AC Power
Consumption‖) may damage the device or cause device failure.
• Connect to the proper power source for proper operation of the device.
• Check the power cord frequently for signs of damage. Replace a damaged cord
immediately.
IMPORTANT TIPS!
• After interruption and restoration of the power supply, the device will restore its
pre-interruption working status automatically.
• To remove AC power, disconnect the power cord from the power outlet.
11.4 Assembling the Tubing / Heated Tubing and Mask
(1) Connect one end of the tubing to the air outlet of the device, as shown in Fig. 11-5.
Air Outlet
Tubing
Fig. 11-5
(2) Connect the heated tubing joint to the air outlet of the device, and then insert the power
plug into the heated tubing port on the back of the device, as shown in Fig. 11-6.
Power Plug
Heated Tubing
Air Outlet Heated Tubing Port
Heated Tubing Joint
Fig. 11-6
Auto CPAP / CPAP System User Manual
15 / 50
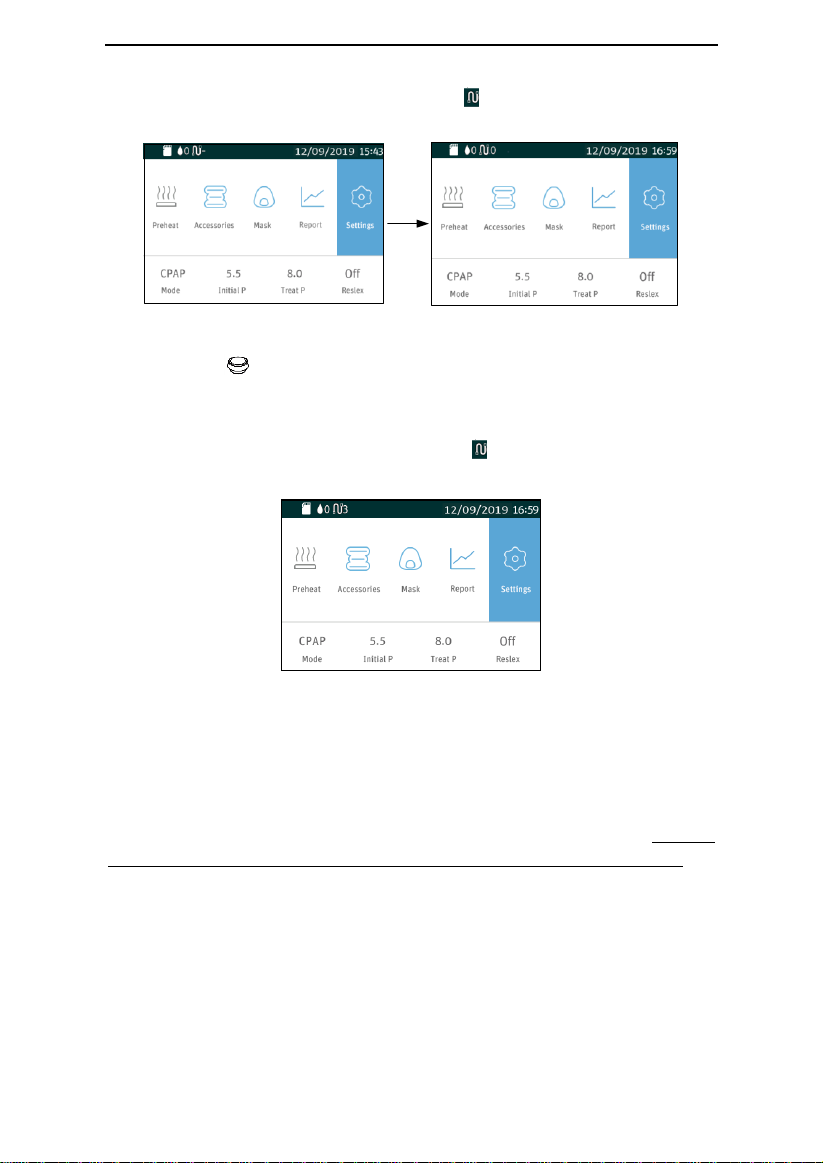
If the heated tubing is connected correctly, the icon will become a number in the Main
Interface on the screen of the device, as shown in Fig. 11-7.
Fig. 11-7
Turn the Knob to turn the heated tubing on or off and to adjust the heat level
according to the instructions in the Patient Menu of the device.
There are five heat levels available, and the number of heat levels will appear on the main
screen of the device. The number 3 next to the icon indicates the heat is adjusted to
Level 3, as shown in Fig. 11-8.
Fig. 11-8
(3) Connect the other end of the tubing to the mask according to the user manual of the
mask. Wear the mask.
WARNINGS!
• If multiple persons are going to use the device (e.g., rental devices), a low-resistance, main
flow bacteria filter should be installed in-line between the device and the tubing. Pressures
must be verified by your home care provider when using spare or optional accessories.
• If you are using a mask with a built-in exhalation port, connect the mask’s connector to the
tubing.
• If you are using a mask with a separate exhalation port, connect the tubing to the
exhalation port. Position the exhalation port so that the released air blows away from your
face. Connect the mask’s connector to the exhalation port.
• If you are using a full-face mask (a mask covering both your mouth and nose), the mask
must be equipped with a safety (entrainment) valve.
• To minimize the risk of CO2rebreathing, the patient should observe the following

Auto CPAP / CPAP System User Manual
16 / 50
instructions:
- Use the accompanying tubing and mask provided by BMC.
- Do not wear the mask for more than a few minutes while the device is not operating.
- Use only masks with vent holes. Do not block or try to seal the vent holes in the exhalation
port.
11.5 Using Oxygen with the Device
Oxygen may be added at the mask connection. Please observe the instructions listed below
when using oxygen with the device.
WARNINGS!
• Connect the oxygen tube to the oxygen inlet of the mask.
• The oxygen supply must comply with the local regulations for medical oxygen.
• Turn on the device before turning on the oxygen. Turn off the oxygen supply before turning
off the device. Explanation of Warning: When the device is turned off, but the oxygen flow
still remains, oxygen can accumulate inside the device's enclosure and pose a fire hazard.
Turning off the oxygen supply before turning off the device will prevent oxygen accumulation
in the device and reduce the risk of fire. This warning applies to CPAP devices.
• Oxygen supports combustion. Keep the device and the oxygen container away from heat,
open flames, any oily substances, or other sources of ignition. DO NOT smoke in the area
near G3 A20 / G3 C20 or the oxygen container.
• Sources of oxygen should be more than 1 m away from the device.
• When using oxygen with this system, a Pressure Valve must be placed in-line with the
patient circuit between the device and the oxygen source. The pressure valve helps prevent
the backflow of oxygen from the patient circuit into the device when the unit is off. Failure to
use the pressure valve could result in a fire hazard.
• Do not connect the device to an unregulated or high-pressure oxygen source. The pressure
of oxygen source does not exceed the working pressure of the device.
11.6 Inserting the SD Card (Only for the device that
equipped with SD card)
Insert the SD card into the SD Card Slot, as shown in Fig. 11-9.
SD Card Slot
Fig. 11-9

Auto CPAP / CPAP System User Manual
17 / 50
If the SD card is inserted correctly, a symbol indicating correct insertion will appear on
the screen of the device.
If the SD card is inserted incorrectly, a symbol indicating incorrect insertion will appear
on the screen of the device.
CAUTIONS!
• If no SD card is inserted, neither of the symbols will appear on the screen of the device.
• To avoid data loss or any damage to the SD card, the SD card can only be removed after the
device stops delivering air.
11.7 Starting Treatment
Connect the device to a power outlet, press the Start / Stop , and the device will
start delivering air.
WARNINGS!
• Be sure to follow your physician’s instructions on adjusting the settings! To order any
accessories not included with the device, contact your equipment supplier.
• DO NOT connect any ancillary equipment to the device unless recommended by BMC or
your physician. If you suffer from chest discomfort, shortness of breath, stomach bloating, or
severe headache when using the device, contact your physician or qualified medical
personnel immediately.
12. Routine Use
12.1 Connecting the Tubing
Connect the power cord, power adapter, and tubing properly in accordance with the
instructions in the First Time Setup (Chapter 11). Connect the mask and headgear according
to the user manual of the mask.
CAUTION!
• Before each use, examine the tubing for any damage or foreign object. If necessary, clean
the tubing to remove the foreign object. Replace any damaged tubing. Make sure that the
mask does not leak.
12.2 Adjusting the Tubing
Lie down on your bed, and adjust the tubing so it is free to move if you turn over during sleep.
Adjust the mask and headgear until you have a comfortable fit and until there is no airflow
leakage around the mask.
12.3 Turning on the Airflow
Press the Start / Stop Button to turn on the airflow. The screen will display
treatment pressure and other information.
Other manuals for G3 A20
3
This manual suits for next models
1
Table of contents
Other BMC Medical Equipment manuals


Popular Medical Equipment manuals by other brands


Nonin
Nonin WristOx2 3150 Operator's manual

Guilin Woodpecker Medical Instrument
Guilin Woodpecker Medical Instrument DTE Dpex I instruction manual

Animas
Animas OneTouch Ping quick start guide

Otto Bock
Otto Bock 50K30 Xeleton Instructions for use

biodex
biodex 058-820 Instructions for use

Novis
Novis ProCair user guide