BMI Bobcat User manual

# 12788 Bobcat
BMI NV/SA B-2550 Kontich BELGIUM
Modications, errors and printing errors reserved Sous réserve de modications
Änderungen, Irrtümmer und Druckfehler vorbehalten Wijzigingen, fouten en drukfouten voorbehouden
Warning
An RC model airplane
is not a toy and is not
suitable for model-
lers under 14 years.
Carefully read the
instructions before any
use. If you are a begin-
ner, it is necessary to let
you assist by an experi-
enced airplane pilot.
Attention
Cet avion n’est pas un
jouet et ne convient
pas aux personnes en
dessous de 14 ans. Avant
tout utilisation, veuillez
lire les instructions et
laissez vous assister par
un pilote expérimenté.
Achtung
Dieser Modellugzeug
ist kein Spielzeug. Er ist
nicht für Personen un-
ter 14 Jahren geeignet.
Lesen Sie die Anleitung
Aufmerksam und suchen
Sie als Ensteiger die Hilfe
eines erfahrenen Piloten.
Bei Fragen hilft Ihnen Ihr
Fachhändler weiter!
Aandacht
Een RC vliegtuig is
geen speelgoed en
niet geschikt voor perso-
nen jonger dan 14 jaar.
Lees aandachtig de hand-
leiding. Indien u een
beginner bent, laat u
zich best begeleiden
door een ervaren piloot.
Bobcat
GB Manual
F Manuel d’instructions D Bedienungsanleitung
NL Handleiding
1

1. Specications / Spécications / Technische Daten / Specicaties
Construction Construction Aufbau Constructie ARF
Fuselage Fuselage Rumpf Romp F/G
Wings Ailes Tragächen Vleugels Balsa
Span Envergure Spannweite Spanwijdte 1300 mm
Length Longueur Länge Lengte 1525 mm
Wing area Surface alaire Flächeninhalt Vleugeloppervlakte 43 dm³
Take off weight gewicht Poids de la machine Gewicht Fliegfertig Vliegklaar gewicht 2600 g
Recommended servos Servos recommandés Empfohlene Servos Benodigde servo’s 8x
Recommended Motor Moteur recommandé Empfohlener Motor Aanbevolen motor 2T: .46
4T: .60
Electro: #85576
# 12788 Bobcat 2
CAUTION
Caution measures
Use your radio controlled equipment only for
the operations it has been made for.
Avoid ying near to high-tension lines and
during rainy and/or at windy days. Avoid y-
ing in crowded areas
While reading your manual, you will see the
following symbols. Always pay special atten-
tion to the paragraphs where these symbols
are depicted and always respect their signi-
cance.
Strictly prohibited
Test and verify
Precautions during ight
Never use the same frequency as some-
one else in your running area. Using the
same frequency at the same time (either
if it is AM, FM or PCM) can cause serious
accidents, whether it’s ying, driving or
sailing.
Do not y outdoors by rainy or windy days
or at night. When ying in the rain, water
wil penetrate into the transmitter and will
cause either faulty operation, lack of con-
troll and cause a crash.
Always extend the antenna to its full length
to get the best possible transmission.
Always extend the receiver antenna and
hang it next to the fuselage if you want
to obtain a transmission that is better
then the 5-10 meters with the rolled up
antenna.
Always test the R/C set before
use. Any malfunction in the R/C
set or model may cause a crash.
Before starting the engine, check that
the direction of operation of each servo
matches the operation of its control stick.
If a servo does not move in the proper
direction, or operation is abnormal, do not
y the model.
Instructions for safe use and proper
charging
R/C operating procedures:
1. Make sure the throttle control is in the low-
est position, and switch on the transmitter.
2. Switch on the receiver.
3. Inspect the correct operation of your
transmitter before use.
4. Reverse sequences to shut down after ying.
- Switch off the receiver
- switch off the transmitter
PRECAUTIONS
Précautions d’usage
Utilisez votre ensemble radio uniquement
pour l’usage pour auquel il est destiné.
Ne volez pas prés des lignes à haute tension,
pendant les orages, à proximité du public.
Lors de la lecture de votre manuel vous ren-
contrerez ces deux symboles
Respectez leur signication.
Fortement déconseillé
Tester et vérier
Sécurité en vol
Ne volez jamais simultanément avec un
autre modèle ayant la même fréquence.
Ceci causera un crash. Utiliser deux ou
plusieurs ensembles sur la même fré-
quence génère des interférences tant en
FM ou PCM.
Ne volez jamais la nuit, sous la pluie ou par
grand vent. L’eau peut pénétrer dans l’émet-
teur et provoquer des courts-circuits, une
panne ou le mal fonction de l’émetteur et
la perte de votre modèle.
Déployez toujours l’antenne de votre
émetteur au maximum pour obtenir une
portée maximale. Déployez l’antenne de
votre récepteur et mettez le le long du
fuselage si vous voulez obtenir une portée
plus grande que 5-10 mètres.
Testez toujours le bon fonctionnement de
votre radio ainsi qu’un test de portée avant
chaque séance de vol moteur en marche.
Vériez toujours le sens de déplacement
des servos. Si ceux-ci ne fonctionnent pas
correctement, bruit bizarre ou ultra lents,
frétillement intempestif ne faites pas voler
votre modèle et vériez l’anomalie.
Instructions pour une bonne utilisation
et charger en sécurité
Mise en service de votre radio:
1. Mettez la manette des gaz en position plein
ralenti et allumer l’émetteur.
2. Allumer le récepteur.
3. Vériez la bonne marche de votre radio-
commande avant de voler.
4. Faites les opérations inverses après utilisa-
tion de votre rensemble R/C
- Arrêter le récepteur
- arrêter l’émetteur
VORSICHT
Vorsichtmassnahme
Benutzen Sie Ihre R/C Radioausrüstung nur
für die Betriebe, wo sie für gebildet worden
ist.
Vermeiden Sie zu iegen, nah am Hochspan-
nungslinien und während regnerischen und/
oder windigen Tage.
Vermeiden Sie, in gedrängte Bereiche zu
iegen.
Beim Lesen Ihres Handbuches, sehen Sie die
folgenden Symbole. Achten Sie immer beson-
deres auf die Punkte, in denen diese Symbole
bildlich dargestellt werden und respektieren
Sie immer ihre Bedeutung.
Ausschliesslich verboten
Testen und Überprüfen
Vorsichtmassnahme während
des Fluges
Prüfen Sie, dass niemand in der Umge-
bung dieselbe Frequenz benutzt, den
dadurch können Unfälle entstehen, auch
bei einer unterschiedlichen Modulierung
(PCHM/FM).
Vermeiden Sie das Outdoor Fliegen bei
Wind, Regenfall, Gewitter oder Dunkelheit.
Wenn Nässe im Gehäuse sickernt, kann es
die Wirkung des Senders ernsthaft stören
und einen Absturz verursachen.
Antenne des Senders volständig heraus-
ziehen. Falls nicht völlig entfaltet hat der
Sender nür eine beschränkte Reichweite.
Antenne des Senders volsändig abwicke-
len wenn Sie eine grossere Reichweite wie
5-10 Meter haben wollen.
Beobachten Sie immer Empfänger, Sender
und Servo’s auf unregelmässigkeiten vór
dem Fliegen. Ein Reichweitetest ist immer
empfohlen. Falls verdächtige Erschütte-
rungen oder unregelmässigkeiten auftre-
ten, Fliegen Sie dann nicht mit das Model.
Gebrauch vom Sender und Ladeakkus
Inbetriebnahme Ihres Radios:
1. Motorschalter in neutral-Position bringen
und Fernsteuersender einschalten.
2. Empfänger anschalten
3. Die Funktion vor abiegen mit dem Sender
überprüfen.
4. Nach dem Betrieb in umgekehrter Reihen-
folge vorgehen.
- Empfänger ausschalten
- Fernsteuersender ausschalten.
OPGEPAST
Voorzichtmaatregelen
Gebruik uw radiobesturing enkel voor de toe-
passingen waaroor het ontwikkeld werd.
Vlieg nooit in de buurt van hoogspannings-
kabels, tijdens storm of in de nabijheid van
publiek.
Bij het doornemen van deze handleiding zal u
de volgende symbolen opmerken. Respecteer
steeds hun betekenis.
Uitdrukkelijk verboden
Testen en controleren
Voorzichtmaatregelen tijdens de vlucht
Vlieg nooit wanneer een ander telegeleid
voertuig zich op uw frequentie bevindt,
ongeacht of het een AM, FM of PCM fre-
quentie is. Dit zal immers tot een ongeval
leiden.
Vlieg nooit ‘s nachts, bij regenweer of har-
de wind. Water dringt immers in uw ont-
vanger en kan tot een kortsluiting leiden.
Dit leidt dan tot een storing en het verlies
van controle van het model.
Trek steeds uw antenna volledig uit voor
een optimale reikwijdte. De opgerolde an-
tenne van de ontvanger heeft een maxi-
male reikwijdte van 5-10 meter. Indien u
een grotere reikwijdte wenst dient u de
antenne langs de romp af te wikkelen.
Vooraleer het model te gebruiken, dient u
eerst de goede werking van uw zender en
de reikwijdte ervan te testen. Controleer
steeds de servo-uitslag. Vlieg nooit indien
de servo’s niet correct functioneren, geluid
maken of traag zijn.
Veilig gebruik van de zender
en de accu’s
Ingebruikname van de zender:
1. Plaats de gasstick in de laagste positie en
schakel vervolgens eerst de zender aan.
2. Zet de ontvanger aan.
3. Controleer de functies van de zender voor
het vliegen.
4. Na het vliegen in omgekeerde volgorde te
werk gaan:
- Schakel eerst de ontvanger uit
- schakel vervolgens de zender uit.

To assemble this model some
tools are needed:
• Sharp hobby knife
• Needle nose pliers
• Phlips screwdriver
(large and small)
• Triangle
• Scissors
• Wire cutter
• Epoxy
Following items are needed
for operation:
• Servo: 4x # 801532, 1x
#801690, 3x # 801692
• Motor: 2T: # 5316, 4T:# 5352)
• Brushless motor:
# 85576
• Brushless ESC: # 85508 ESC
• Battery: # 18174
• Propeller: # 2706/08 APC 11x7
Pusher
• RX: # 81538 (35 Mhz)
# 81548 (41 Mhz)
An d’assembler ce modèle,
veuillez tiliser
les outils suivant:
• Couteau de modélisme
• Pince à becs
• Tournevis Philips
(grand et petit)
• Equerre à dessin
• Ciseaux
• Pinces coupantes
• Epoxy
Les articles suivants sont nec-
essaries pour l’utilisation:
• Servo: 4x # 801532, 1x
#801690, 3x # 801692
• Moteur: 2T: # 5316, 4T:# 5352)
• Moteur B/L: # 85576
• ESC B/L: # 85508 ESC
• Accu: # 18174
• Hélice: # 2706/08 APC 11x7
Pusher
• RX: # 81538 (35 Mhz)
# 81548 (41 Mhz)
Folgende Werkzeuge
sind erforderlich zum Bauen
dieses Modell:
• Modellbaumesser
• Flachzange
• Schraubendreher
(gross und klein)
• Winkelstreben
• Schere
• Seitenschneider
• Epoxy
Folgende Teile sind erforder-
lich für der Gebrauch:
• Servo: 4x # 801532, 1x
#801690, 3x # 801692
• Motor: 2T: # 5316, 4T:# 5352)
• Brushless Motor: # 85576
• Brushless ESC: # 85508 ESC
• Akku: # 18174
• Luftschraube: # 2706/08 APC
11x7 Pusher
• RX: # 81538 (35 Mhz)
# 81548 (41 Mhz)
Voor het bouwen van dit
model dient u volgend gereed-
schap te gebruiken:
• Modelbouwmes
• Bektang
• Kruisschroevendraaier
(groot en klein)
• Geodriehoek
• Schaar
• Kniptang
• Epoxy
Volgende onderdelen zijn
noodzakelijk voor het gebruik
van uw toestel:
• Servo: 4x # 801532, 1x
#801690, 3x # 801692
• Motor:2T: # 5316, 4T:# 5352)
• Brushless motor: # 85576
• Brushless ESC: # 85508 ESC
• Batterij: # 18174
• Propeller: # 2706/08 APC 11x7
Pusher
• RX: # 81538 (35 Mhz)
# 81548 (41 Mhz)
3. Kit content / Contenu de kit / Baukasteninhalt / Verpakkingsinhoud
2. Warranty / Garantie
We guarantee this product to be free of
defects in materials and workmanship at the
moment of purchase. This guarantee doesn’t
cover any component or piece demolished
into use, modications or deteriorations
following from the application of adhesives
or other products not mentioned in the
instructions. In no case our compensation
will exceed the purchase value of the product.
We reserve the right to change or modify
this guarantee without previous notice. As
we have no control on the nal assembly
and on the components used when assem-
bling the kit, no responsibility will be assured
or assumed for any damage resulting from
the bad use of the model kit. By using this
preassembled model the user assumes the
total responsibility.
Cette machine est garantie contre tout vice
de construction d’usine au moment de l’achat.
Cette garantie ne couvre as les composants
détruits lors de l’usage de la machine ou, les
modications de l’ensemble ainsi que de la
détérioration due à l’utilisation de colles ou
autres produits non spéciés dans la notice.
Nous nous réservons le droit de changer ou
modier les clauses de cette garantie sans
préavis.
BMI garantiert, dass dieser Modellugzeug beim
Kauf frei von Fabrikations- und Materialfehlern
ist. Schäden durch falschen Gebrauch oder Mon-
tagefehler werden durch diese Garantie nicht
gedeckt. Sobald der Modellugzeug in Betrieb
genommen wird, übernimmt der Benutzer aller
daraus erwachsende Verantwortlichkeit. Reklama-
tionen aufgrund von unsachgemäßer Behandlung
oder Schadensersatzforderungen aufgrund miss-
bräuchlicher Anwendung dieses Modells müssen
zurückgewiesen werden, da der praktische Betrieb
außerhalb unseres Einussbereiches liegt.
Gefeliciteerd met uw aankoop. Dit model
werd ontwikkeld door modelbouwers en ge-
bouwd door onze ingenieurs met het doel een
toestel met uitzonderlijke vliegeigenschappen
te verwezenlijken. Het is belangrijk dat u de
tijd neemt om aandachtig deze montagehan-
dleiding tot het einde te lezen.
Als u vragen heeft of als een uitleg u niet
duidelijk is, kan u altijd contact opnemen met
uw plaatselijke dealer.
Dit is een hoog technisch product, waarin
de nieuwste technologische ontwikkelingen
toegepast werden.
# 12788 Bobcat 3
# 12788 Bobcat 4
4. Assembly / Assemblage / Zusammenbau / Montage
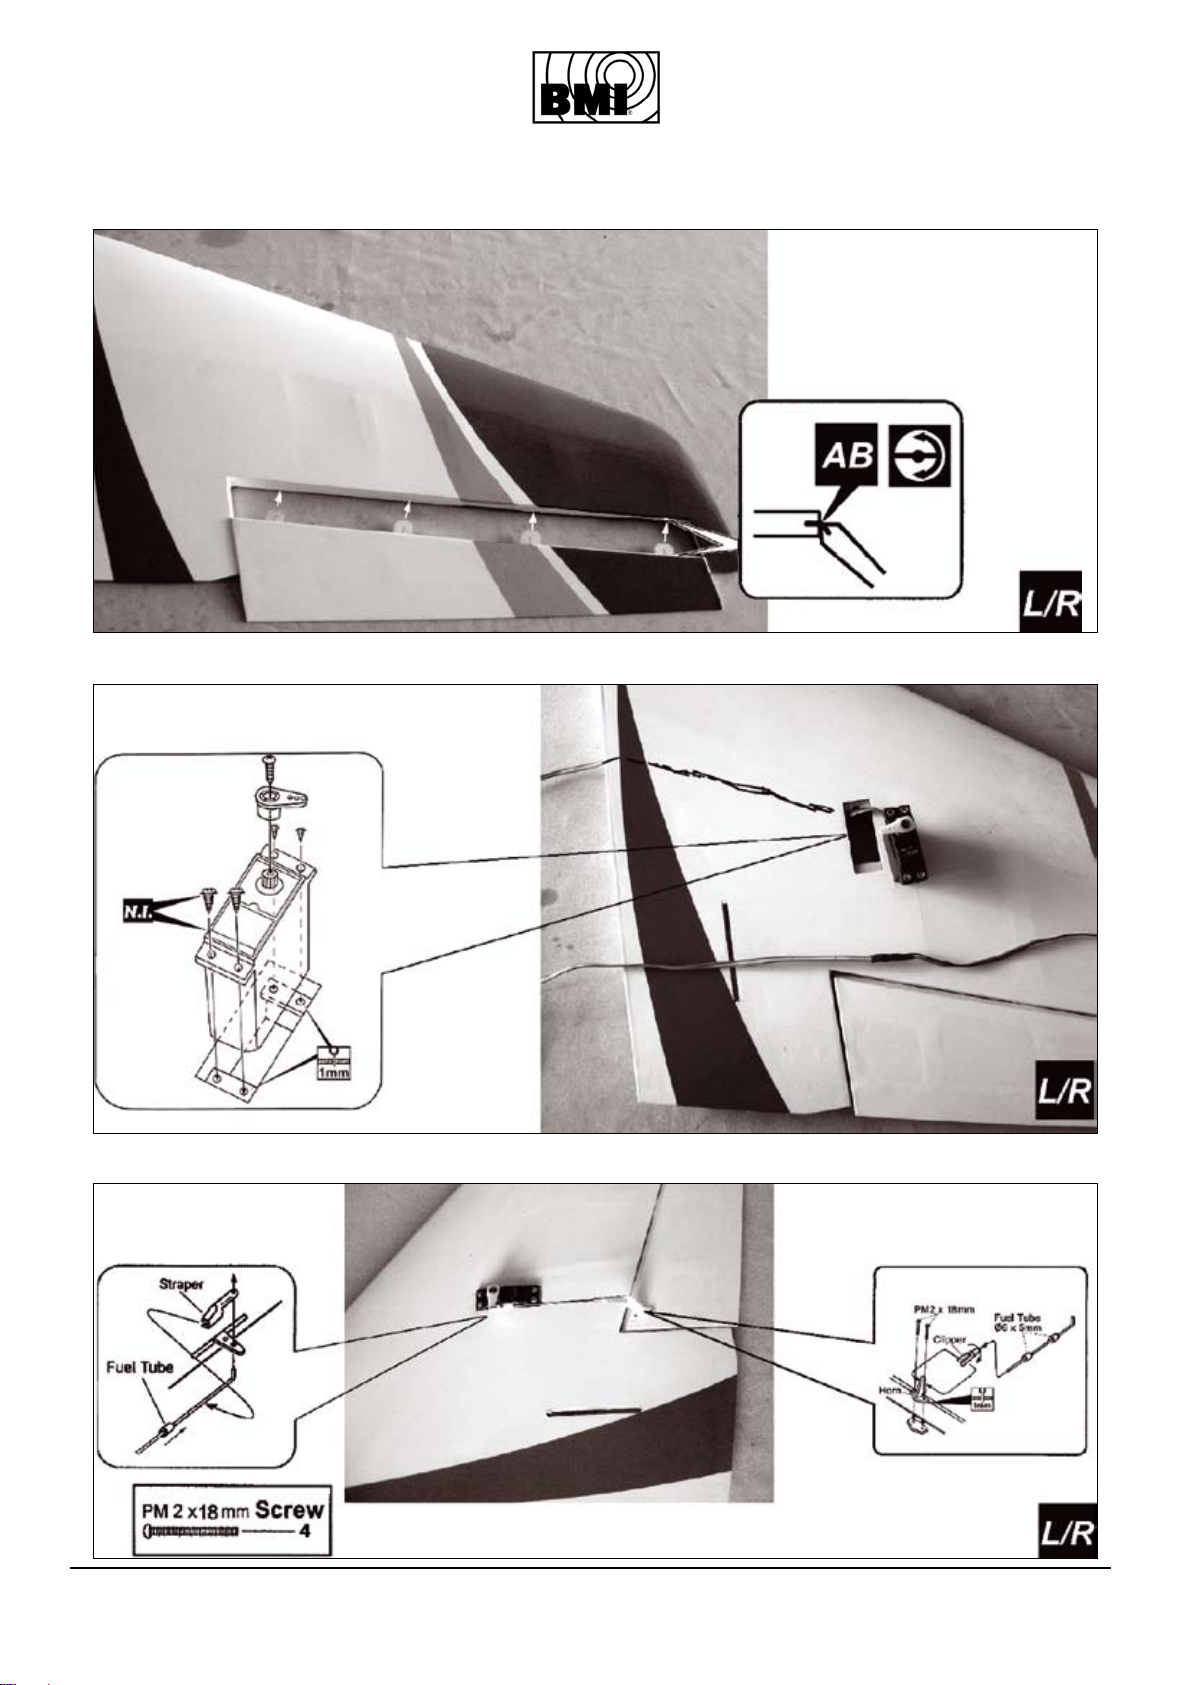
Aileron / Querruder / Rolroer
Main wing / Aile principale / Tragächen / Hoofdvleugel
Main wing / Aile principale / Tragächen / Hoofdvleugel
# 12788 Bobcat 5
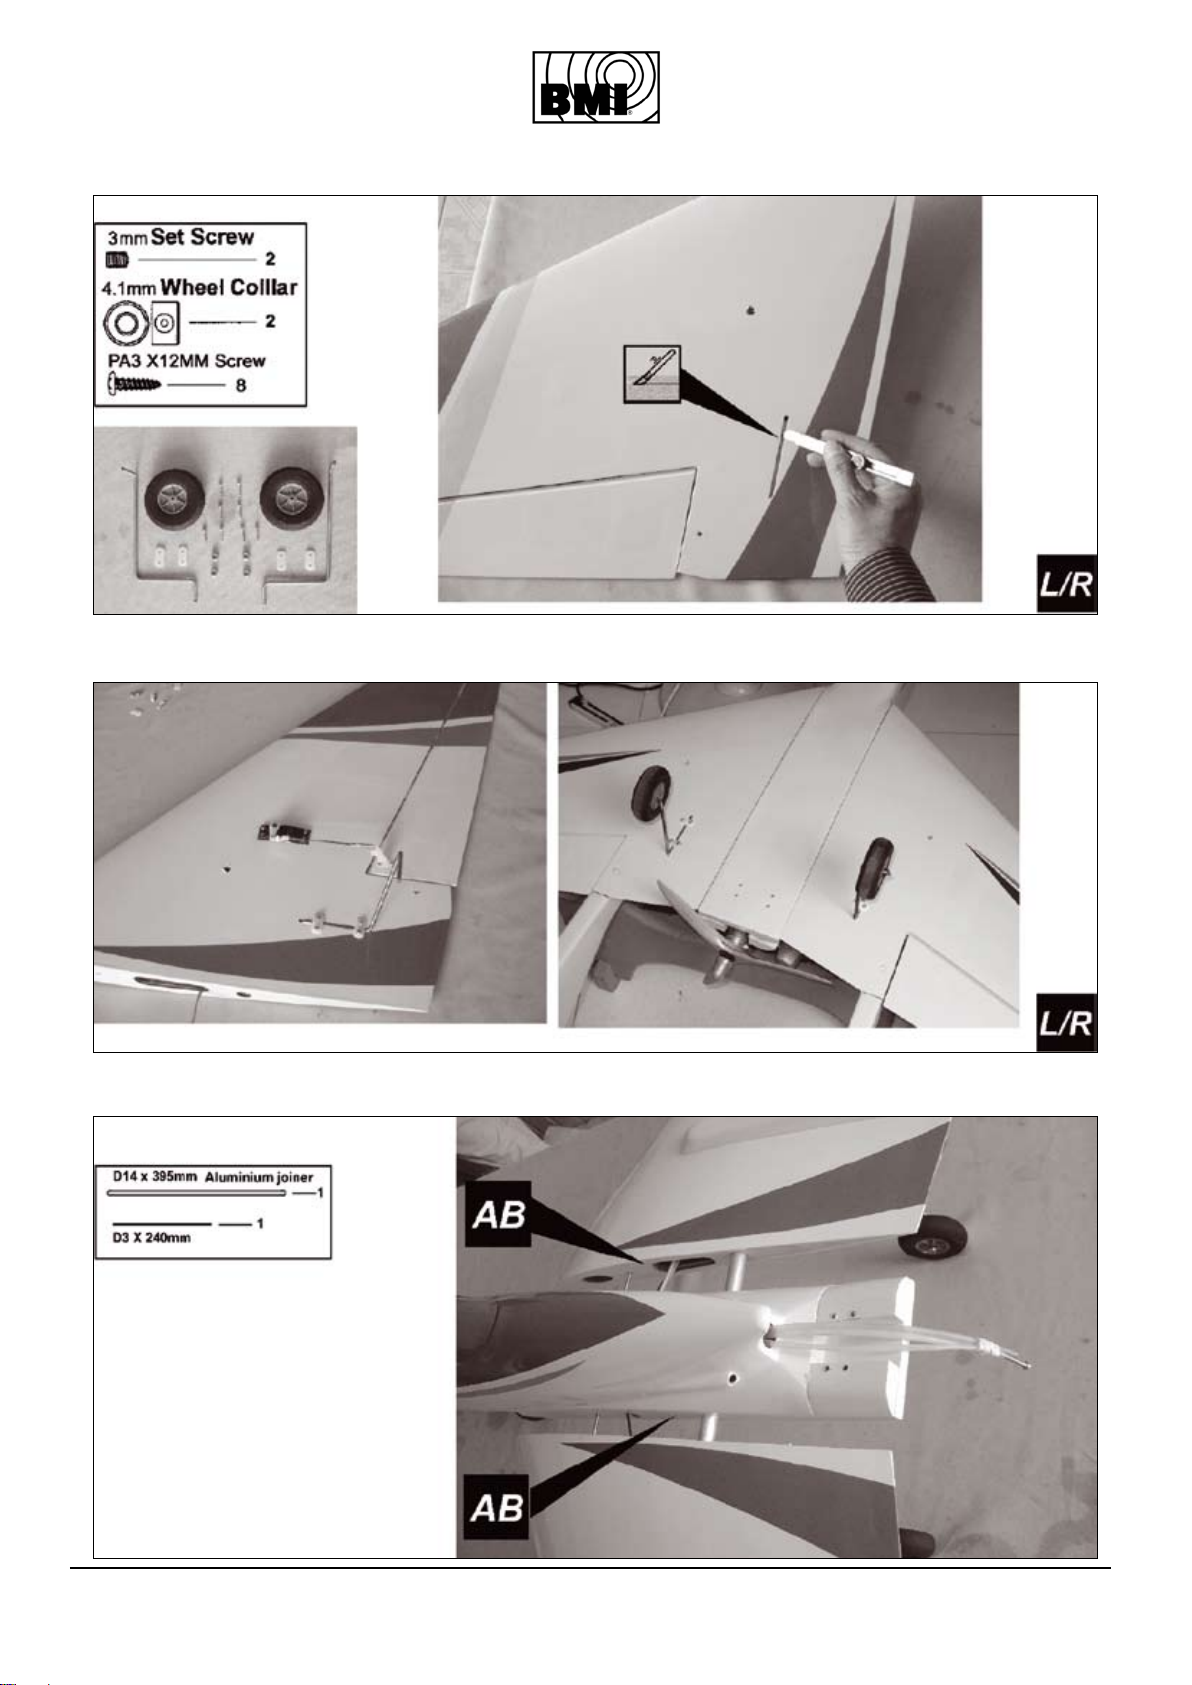
Main landing gear / Train d’atterrissage / Hauptfahrwerk / Landingsgestel
Main landing gear / Train d’atterrissage / Hauptfahrwerk / Landingsgestel
Main wing / Aile principale / Tragächen / Hoofdvleugel
# 12788 Bobcat 6
Main wing / Aile principale / Tragächen / Hoofdvleugel
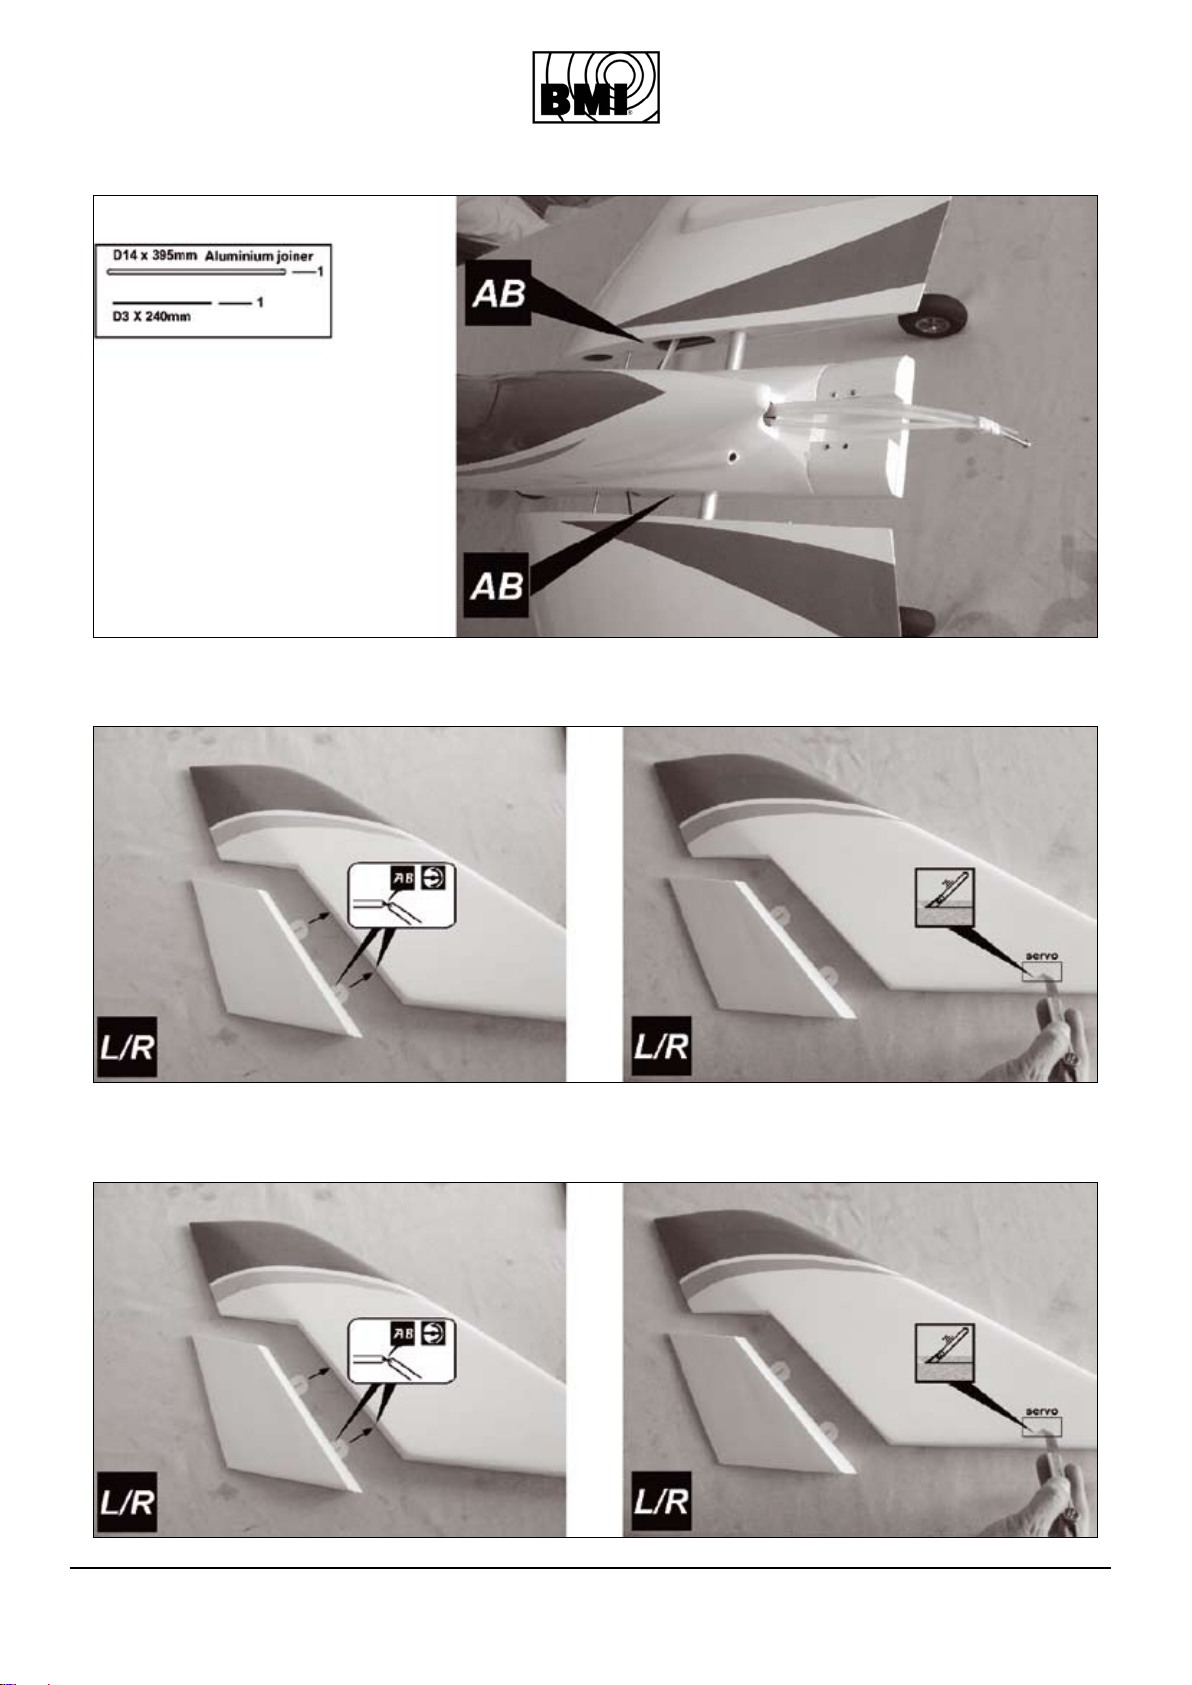
Rudder / Gouverne de direction / Seitenruder / Richtingsroer
Rudder / Gouverne de direction / Seitenruder / Richtingsroer

# 12788 Bobcat 7
Servo installation / Installation des servos / Servomontage / Servo montage
Servo installation / Installation des servos / Servomontage / Servo montage
Linkage rudder / tringles de dérives / Servoanlenkungen /Servo aansturing
# 12788 Bobcat 8
Stabilizer elevator / gouverne de profondeur / Höhenruder / Hoogteroer
Linkage elevator / tringles élévateurs / Servoanlenkungen Höhenruder/Servo aansturingen hoogteroer
Engine installation / Installation moteur / Motorbefestigung / Motor montage

# 12788 Bobcat 9
Fuel Tank install. / Installation réservoir / Kraftstofftankmontage / Montage benzinetank
Engine connection / Connection moteur / Motoreinstellung / Motorverbindingen
Front Wheel / Roue avant / Vorderne Fahrwerk / Voorste wiel

# 12788 Bobcat 10
Servo linkages / Tringle de commande / Servoanlenkungen / Servo aansturingen
Canopy install. / montage de la verrière / Kabinehaubemontage / Canopymontage
Install. of RC equipment / Installation et repères des éléments de la radio
Montieren vom Elektronik /Montage servo’s & ontvanger

# 12788 Bobcat 11
Adjust the wing & fuselage conguration as in the diagrams / Vérication de la
symétrie de l’assemblage / Überprüfung von Symmetrie vom Flugmodell / Controle
van de vleugelsymmetrie
Center of gravity / Centre de gravité / Schwerpunkt / Zwaartepunt

# 12788 Bobcat 12
Control surface travels / Débattements des gouvernes / Ruderausschläge / Roeruitslag
Control surface travels / Débattements des gouvernes / Ruderausschläge / Roeruitslag
Controle surface travels:
Ailerons: +25 - 25mm
Elevator: +15mm - 15mm
Rudder: 10mm
CG: 260mm from leading edge.
Débattements des gouvernes :
Ailerons : +25 - 25mm
Profondeur : +15mm - 15mm
Dérive : 10mm
Centrage 260 mm du bord d’attaque
contre le fuselage.
Ruderausschlag
Querruder: +25 - 25mm
Höhenruder: +15mm - 15mm
Seitenruder: 10mm
Schwerpunkt 260 mm vom Prolvorderkante
(Rumpfseite)
Roeruitslagen:
Rolroeren: +25 - 25mm
Hoogteroer: +15mm - 15mm
Richtingsroer: 10mm
Zwaartepunt: 260 mm van de aanvalsboord.
Other BMI Toy manuals

BMI
BMI Sports 182 EP User manual

BMI
BMI Fokker DR-1 User manual

BMI
BMI Carbooon 450-S User manual

BMI
BMI CarbOOOn 500 User manual

BMI
BMI Take Off 1400 Kit User manual

BMI
BMI Focke Wulf 190 User manual

BMI
BMI Carbooon 450-SC 0461-000 User manual

BMI
BMI Carat User manual

BMI
BMI Albatros User manual

BMI
BMI De Havilland DH-1 User manual


Popular Toy manuals by other brands


V-tech
V-tech Singing Bird House Parents' guide

V-tech
V-tech Myla The Magical Make-Up Unicorn Parents' guide

V-tech
V-tech Dancing Doggie Music Player Parents' guide

KNEX
KNEX K'NEXosaurus Rex manual

V-tech
V-tech Touch & Learn Activity Desk user manual

Pro's Kit
Pro's Kit WindBots GE-636 Assembly & instruction manual


