BN Products BNR6169 User manual

Mixer Manual 2017.indd • May 31, 2017
Page 1
BN Products - USA
BN Professional
Material Mixers
~ Product Manual ~
BNR6169
BNR6400 BNR6402K
BNR7000

Mixer Manual 2017.indd • May 31, 2017
Page 2
BN Products - USA
PRODUCT DESCRIPTION
From low-viscosity paints to high-viscosity mortars these
electric mixers will get your job done quicker, safer and eas-
ier than a conventional ½” drill motor. e ergonomically
designed handles and the variable 2-speed motor with soft-
start make the job quicker, safer and easier. e heavy-duty
gearbox and high-torque motor will outlast a standard ½”
drill motor by 3-4 times.
e machines have been designed to mix liquid and powder
building materials such as paint, mortar, adhesive, plaster,
epoxy and similar substances.
e relevant mixing action depends on the consistency of
the materials and the quantity that has to be mixed. is
must be set up for the appropriate mixing paddles.
You must abide by certain safety precautions when us-
ing the equipment, in order to prevent injuries and
damages from occurring. erefore you must always
read through this operating manual carefully.
PLEASE NOTE - is manual must be kept in a safe
place so that the information that it contains is always
available. is operating manual must accompany the
equipment if it is transferred to someone else.
We do not accept any liability for accidents or damage aris-
ing from ignoring this manual and the safety
instructions.
SAFETY INSTRUCTIONS
Read through these operating instructions carefully before
using these tools. Become familiar with the functions and
method of operation. To ensure proper operation, always
maintain the tools according to the instructions. e oper-
ating instructions and associated documents should always
be kept close to the appliance.
When using power tools, you· must observe the following
basic safety precautions in order to ensure protection from
electric shocks, injury and fire. Read and follow all the in-
structions before using these power tools. Follow the notes
on safety.
Always check ito see if voltage corresponds with the manu-
facturer’s requirements
Our mixers are double-insulated.in accordance with
EN60745; therefore, an ground wire is not required.
USE CORRECT SUPPLY VOLTAGE
e power supply voltage must match the information
quoted on the tools identification plate.
USE PROPER EXTENSION CORD: Only use an approved
extension cable that is suitable..for the machine’s power.
SWITCH OFF THE MACHINE
IMMEDIATELY IN CASE OF:
1. Malfunction in the plug or power cable.
2. Broken switch.
3. Smoke or smell of scorched insulation.
GENERAL SAFETY RULES
WARNING! Read all safety warnings and all Instructions.
Failure to follow the warnings and instructions may result
in electric shock, fire and/or serious injury.
Save all warnings and instructions for future reference.
e term “power tool” in the warnings refers to your elec-
tric power tool or battery-operated (cordless) power tool.
WORK AREA SAFETY
• Keep work area clean and well lit. Cluttered or dark ar-
eas invite accidents.
• Do not operate power tools in explosive atmospheres,
such as in the presence of flammable liquids, gases or
dust. Power tools create sparks which may ignite the
dust or fumes.
• Keep children and bystanders away while operating a
power tool. Distractions can cause you to lose control.
ELECTRIC SAFETY
• Power tool plugs must match the outlet: Never modify
the plug in any way. Do not use any adapter plugs for
grounded power tools. Unmodified plugs and match-
ing outlets will reduce risk of electric shock.

Mixer Manual 2017.indd • May 31, 2017
Page 3
BN Products - USA
SPECIFICATIONS
TECHNICAL DATA BNR6169 BNR6400 BNR7000 BNR6402K
Power 1050W / 9 Apms
1.4Hp
1800W / 15
Amps / 2.4Hp
1400W/11.7
Amps/1.9 Hp
1800W / 15 Amps
/ 2.4 Hp
Voltage 120V / 60 Hz 120V / 60 Hz 120V /60 Hz 120V / 60 Hz
Number of Gears 1 2 1 2
No-Load-Speed 1-600 rpm 150 - 300 rpm 270-460 rpm 18-460 / 300-700
rpm
Protection/ Class of
Protection
Double Insulated Class II
Certication ETL / GS / CE ETL / GS / CE ETL / GS / CE GS / CE
Thread for Fixing the
Paddle
M14 & 1/2” Chuck M14 & 1/2” Drill
Chuck
Specially de-
signed paddle
1/2” Hex Quick
Change Chuck
Mixing Paddle (CD max.) 4-3/4” (120mm) 6-1/2” (160mm) 5-1/2” (140mm) 4-3/4” (120mm)
• Avoid body contact with grounded surfaces, such as
pipes, radiators, ranges and refrigerators. ere is an
increased risk of electric shock if your body is ground-
ed.
• Do not expose power tools to rain or wet conditions.
Water entering a power tool will increase the risk of
electric shock.
• Do not abuse the cord. Never use the cord for carrying,
pulling or unplugging the power tool. Keep cord away
from heat, oil, sharp edges or moving parts. Damaged
or entangled cords increase the risk of electric shock.
• When operating a power tool outdoors, use an exten-
sion cord suitable for outdoor use. Use of a cord suit-
able for outdoor use reduces the risk of electric shock.
PERSONAL SAFETY
• Stay alert, watch what you are doing and use com-
mon sense when operating a power tool. Do not, use
a power tool while you are tired or under the influence
of drugs, alcohol or medication. A moment of inatten-
tion while operating power tools may result in serious
personal injury.
• Use personal protective equipment. Always wear eye
protection. Protective equipment such as dust mask,
non-skid safety shoes, hard hat. and/or hearing protec-
tion used for appropriate conditions will reduce per-
sonal injuries. .
• Prevent unintentional starting. Make sure the switch is
in the off-position before connecting to power source.
• Carrying power tools with your finger on the switch or
energizing power tools that have the switch on invites
accidents.
• Remove any adjusting key or wrench before starting
the power tool. A wrench or a key left attached to a
rotating part of the power tool may result in personal
injury.
• Do not overreach. Keep proper footing and balance at
all times. is enables better control of the power tool
in unexpected situations.
• Dress properly. Do not wear loose clothing or jewellery.
Keep your hair, clothing and gloves away from mov-
ing parts. Loose clothes, jewellery or long hair can be
caught in moving parts.
POWER TOOL USE AND CARE
• Use the correct power tool for your application. e
correct power tool will do the job better and safer at the
rate for which it was designed.
• Do not use the power tool if the switch does not tum
it on and off properly. Any power tool that cannot be
controlled with the switch is dangerous and must be
repaired.
• Disconnect the plug from the power source and/or the
battery pack before making any adjustments, changing
accessories, or storing power tools. Such preventive
safety measures reduce the risk of starting the power
tool accidentally.
• Store idle power tools out of the reach of children and
do not allow persons unfamiliar with the power tool
or these instructions to operate the power tool. Power
tools are dangerous in the hands of untrained users.

Mixer Manual 2017.indd • May 31, 2017
Page 4
BN Products - USA
• Maintain power tools. Check for misalignment or
binding of moving parts, breakage of parts and any
other condition that may affect the power tool’s opera-
tion. If damaged, have the power tool repaired before
use. Many accidents are caused by poorly maintained
power tools.
• Use the power tool, accessories and tool bits in accor-
dance with these instructions, taking into account the
working conditions and the work to be performed. Use
of the power tool for operations different from those
intended could result in a hazardous situation.
SERVICE
Have your power tool serviced by a qualified repair person
using only Identical replacement parts. is will ensure that
the safety of the power tool is maintained.
PRECAUTION ON USING MIXERS
Attention! - You must abide by the following basic safety
measures to prevent electrical shocks, injuries and the dan-
ger of fire when using electric tools. Read and abide by these
instructions before you start to use any tools.
ese Instructions must be kept in a safe place.
• e equipment must never be used in areas where an
explosive atmosphere exists.
• Never mix in solvents or substances containing solvent
that have flash points below 21°C.
• Do not let the electrical cord touch any parts of your
body.
• Only use the extension cord approved for use in the
working area.
• e unit must only be started and stopped when it is
inside a mixing vessel. Ensure that the mixing vessel is
placed on a solid, secure base.
• Never reach into the mixing vessel with your hands
or any other object during the mixing process.
• We recommend that you always wear industrial safety
gloves and safety goggles when working with the mix-
er.
• Wearing close-fitting clothes is mandatory.
• Always allow for twisting due to torque
• Always wear a dust mask
Before Initial Operation
Check to see that the rated voltage on the tool nameplate
corresponds to the tool requirement. Before using the tool,
read the instruction book carefully.
Mixer Assembly (Fig. 2):
e BNR6169 comes with a two part mixing paddle. First
screw mixer shaft (6a) together with mixer paddle (6b).
Screw the mixer (6) into the mixer (5). Use the two wrench-
es to tighten. Use one of the wrenches (a) to hold the mixer
(5) in place and then use the second wrench (b) to tighten
up the mixer (6). Proceed in the reverse sequence to undo
the paddle from the mixer.
STARTING THE MIXER
Ensure that the data listed on the nameplate matches the
voltage before connecting the unit up to power.
On / Off switch
• Switching on: Press the switch (1)
• Continuous running: Press the locking knob on the
switch (1) (2) to lock it in place.
• Switching off: Press the switch (1) briefly
• Speed control: Use the speed control (3) to select the
speed.
• Switching between 1st· 2nd gear (4)

Mixer Manual 2017.indd • May 31, 2017
Page 5
BN Products - USA
e switch position enables you to work at high or low
speeds. e gear switch position should only be changed
when the unit is stopped in order to prevent the gearing
from being damaged.
1st gear - Upper position
2nd gear- Lower position
CARE AND MAINTENANCE
• Remove the plug from the socket before making any
adjustment, servicing or maintenance.
• Your power tool requires no additional lubrication or
maintenance. Always store your power tool in a dry-
place.
• If the electric cord is damaged, it must be replaced by
the manufacturer, service agent or similarly qualified
persons in order to avoid a hazard.
CLEANING
• Always clead the mixing paddles by running the tool in
a bucket of clean water.
• Keep the safety devices, ventilation slots and motor
housing as free of dirt and dust as possible.
• Clean the unit by rubbing it with a clean cloth or blow
it clean using low-pressure compressed air.
• We recommend that you always clean the unit imme-
diately after using it.
• Clean the unit regularly by rubbing it with a damp cloth
and a little soft soap. Do not use cleaners or solvents
--these will attack the plastic parts in the unit. You must
also ensure that water does not get inside of the unit.
CARBON BRUSHES
If excessive sparking occurs you must have the carbon
brushes checked by a qualified electrician.
Attention! Changing the brushes should be done by a quali-
fied electrician.
MAINTENANCE
ere are no parts fitted inside the unit that require main-
tenance.
CORRECTIVE ACTION IN CASE OF FAILURE
e operating switch is switched on, but the motor is
not working.
• Wires in the electric plug or in the socket are loose.
Have socket and plug checked or repaired or replaced.
• e switch is faulty. Have the switch replaced.
e operating switch is switched on, but unusual nois-
es can be heard, the motor is not working or only very
slowly.
• Switch contact has failed. Have the switch replaced.
• Component jammed. Have the electric tool checked or
repaired.
• Too much thrust, as a result the motor is dragging. Use
less thrust during the task.
• Gear switch not completely engaged
Motor gets hot.
• Foreign substances have got inside the motor. Have the
foreign substances removed.
• Lack of or contaminated lubrication grease. Have lu-
bricating grease applied or replaced.
• Pressure too high. Use less thrust during the task
Frequent or strong sparks on the commutator.
• Short circuit on the armature. Have the armature re-
placed.
• Carbon brushes worn out or jammed. Have the carbon
brushes checked.
• Rough running of the commutator. Have the surface of
the commutator cleaned or ground.
For your own safety, never remove parts or accessories of
the electric tool during operation, In case of fault or
damage have the electric tool repaired only by a qualified
workshop or by the manufacturer.
Mixer Manual 2017.indd • May 31, 2017
Page 6
BN Products - USA
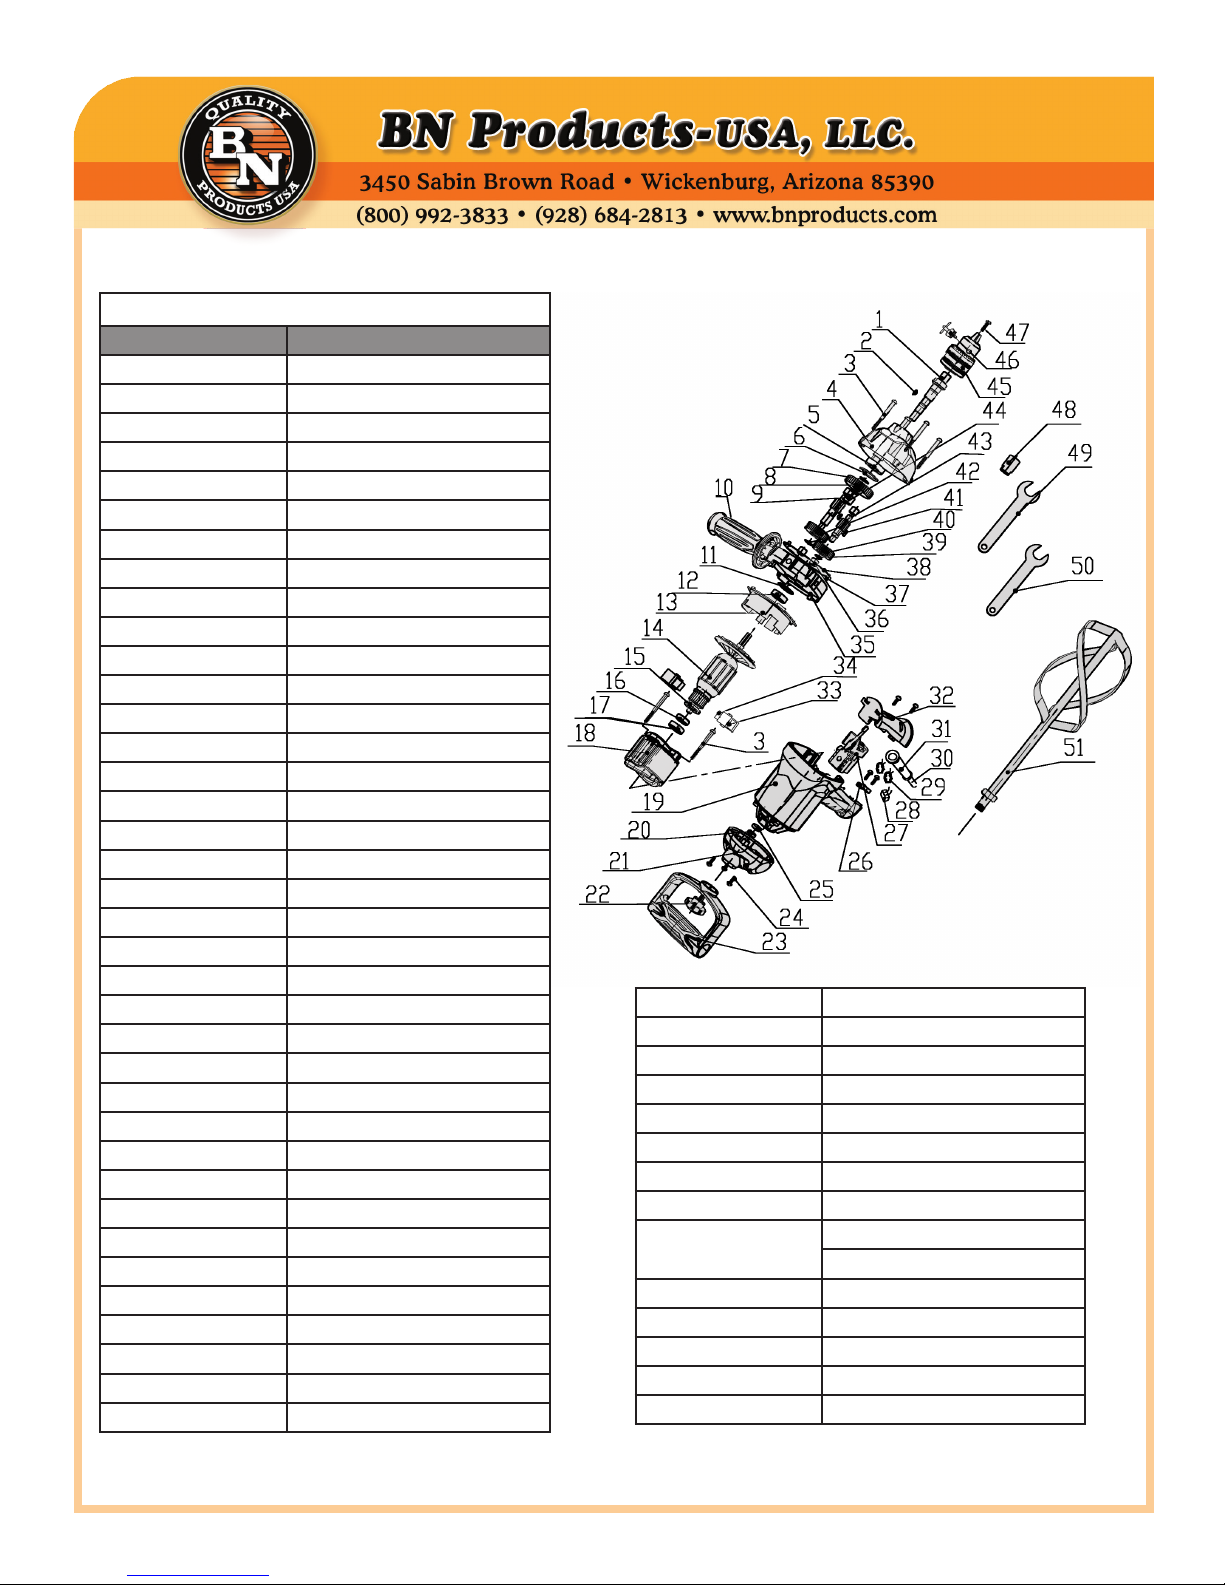
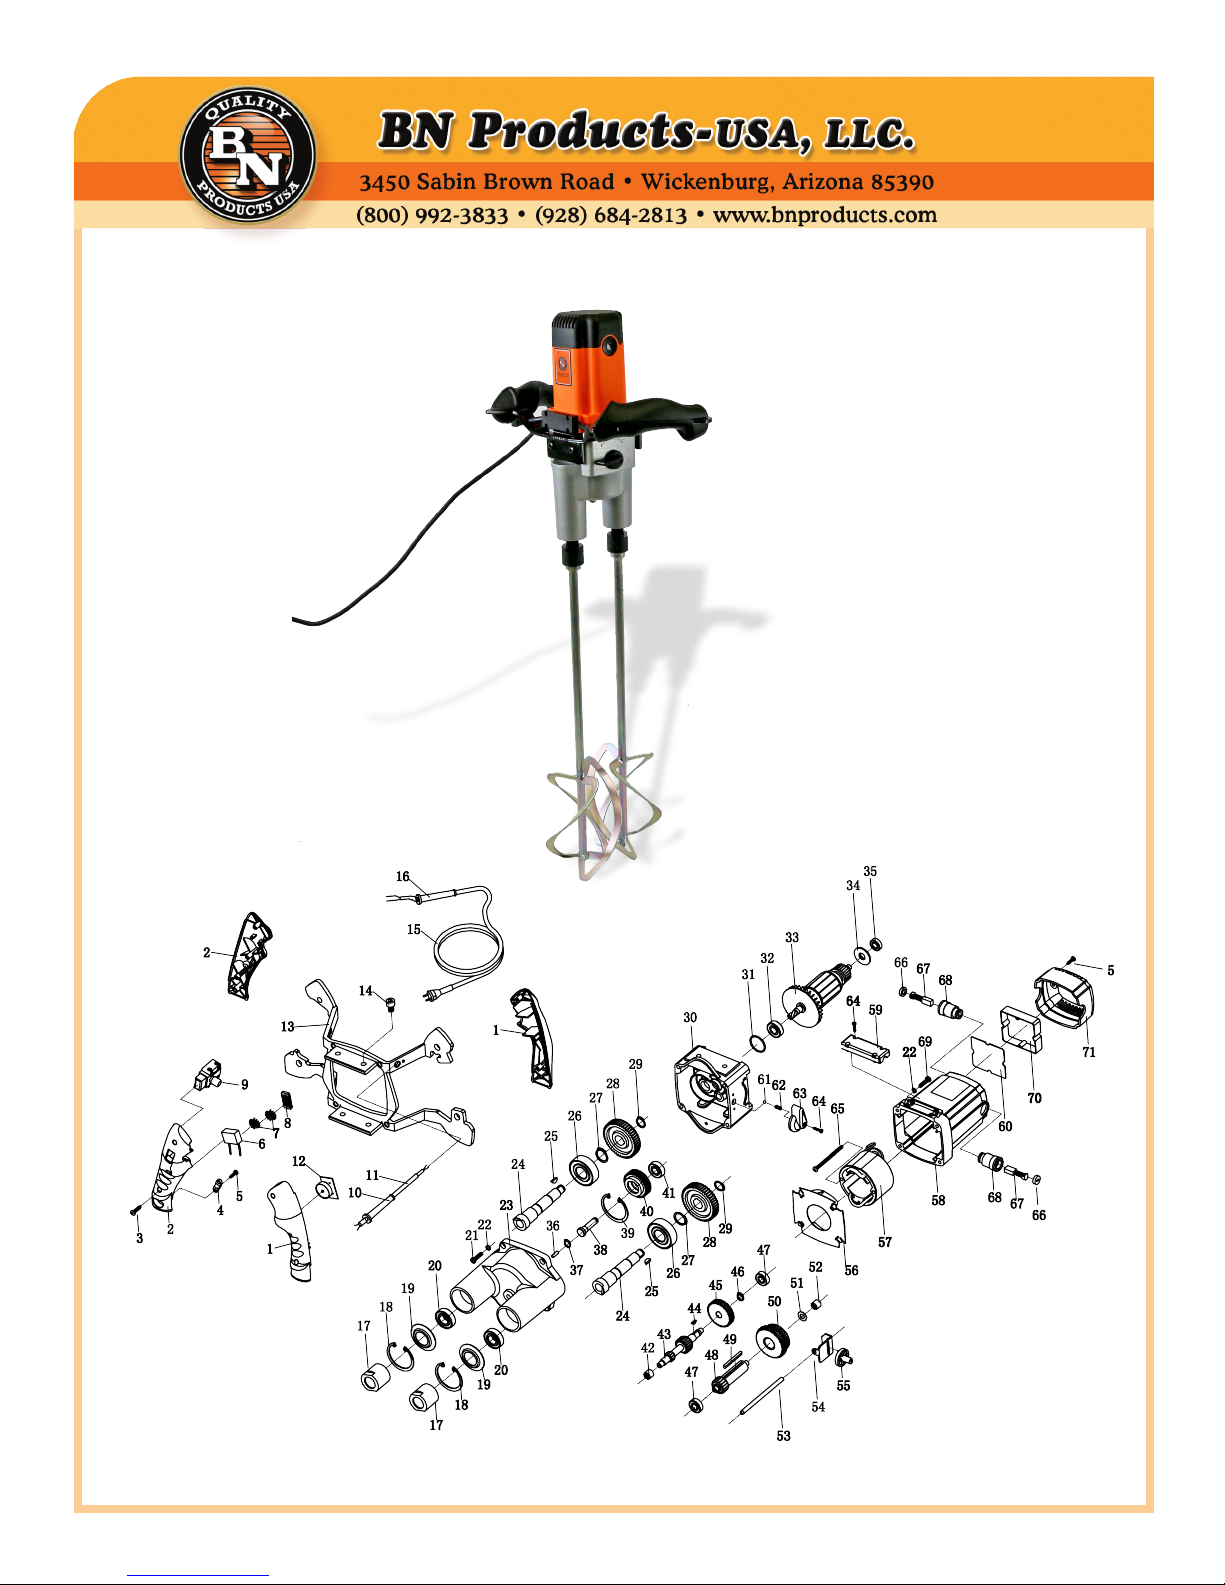
BNR6169 Material Mixer
PARTS LIST (BNR6169)
Part DESCRIPTION
BNR6169-01 Output shaft
BNR6169-02 Semi-circular key 3×3.7×10
BNR6169-03 Screw ST 4.8×48
BNR6169-04 Gear housing
BNR6169-05 Bearing 6002
BNR6169-06 Collar 32
BNR6169-07 Collar 15
BNR6169-08 Gear for output shaft
BNR6169-09 Bearing hk1010
BNR6169-10 Handle
BNR6169-11 O Ring
BNR6169-12 Bearing 6000
BNR6169-13 Fan guide
BNR6169-14 Rotor
BNR6169-15B Inslation ring
BNR6169-16 Bearing 608
BNR6169-17 Rubber cover 608
BNR6169-18 Stator
BNR6169-19 Motor housing
BNR6169-20 Screw M8
BNR6169-21 Back cover for motor housing
BNR6169-22 Back handle knob
BNR6169-23 Back handle
BNR6169-24 Screw st 3.8×14
BNR6169-25 Handle nut
BNR6169-26 Cable holder
BNR6169-27 Switch
BNR6169-28 Capacitor
BNR6169-29 Connector
BNR6169-30 Cable
BNR6169-31 Cable sleeve
BNR6169-32 Handle cover
BNR6169-33 Brush holder sets
BNR6169-34 Carbon brush
BNR6169-35 Middle cover
BNR6169-36 Bearing hk0810
BNR6169-37 Pin 4×6
BNR6169-38 Sealed washer
BNR6169-39 Collar 10
BNR6169-40 Big gear for main driving shaft
BNR6169-41 Collar 12
BNR6169-42 Big gear for sud- driving shaft
BNR6169-43 Main driving shaft
BNR6169-44 Sub-driving shaft
BNR6169-15 Drill chuck
Chuck key
BNR6169-47 Chuck screw
BNR6169-48 Connection adapter
BNR6169-49 Wrench 17#
BNR6169-50 Wrench 19#
BNR003-120-51 Mixing paddle
Mixer Manual 2017.indd • May 31, 2017
Page 7
BN Products - USA
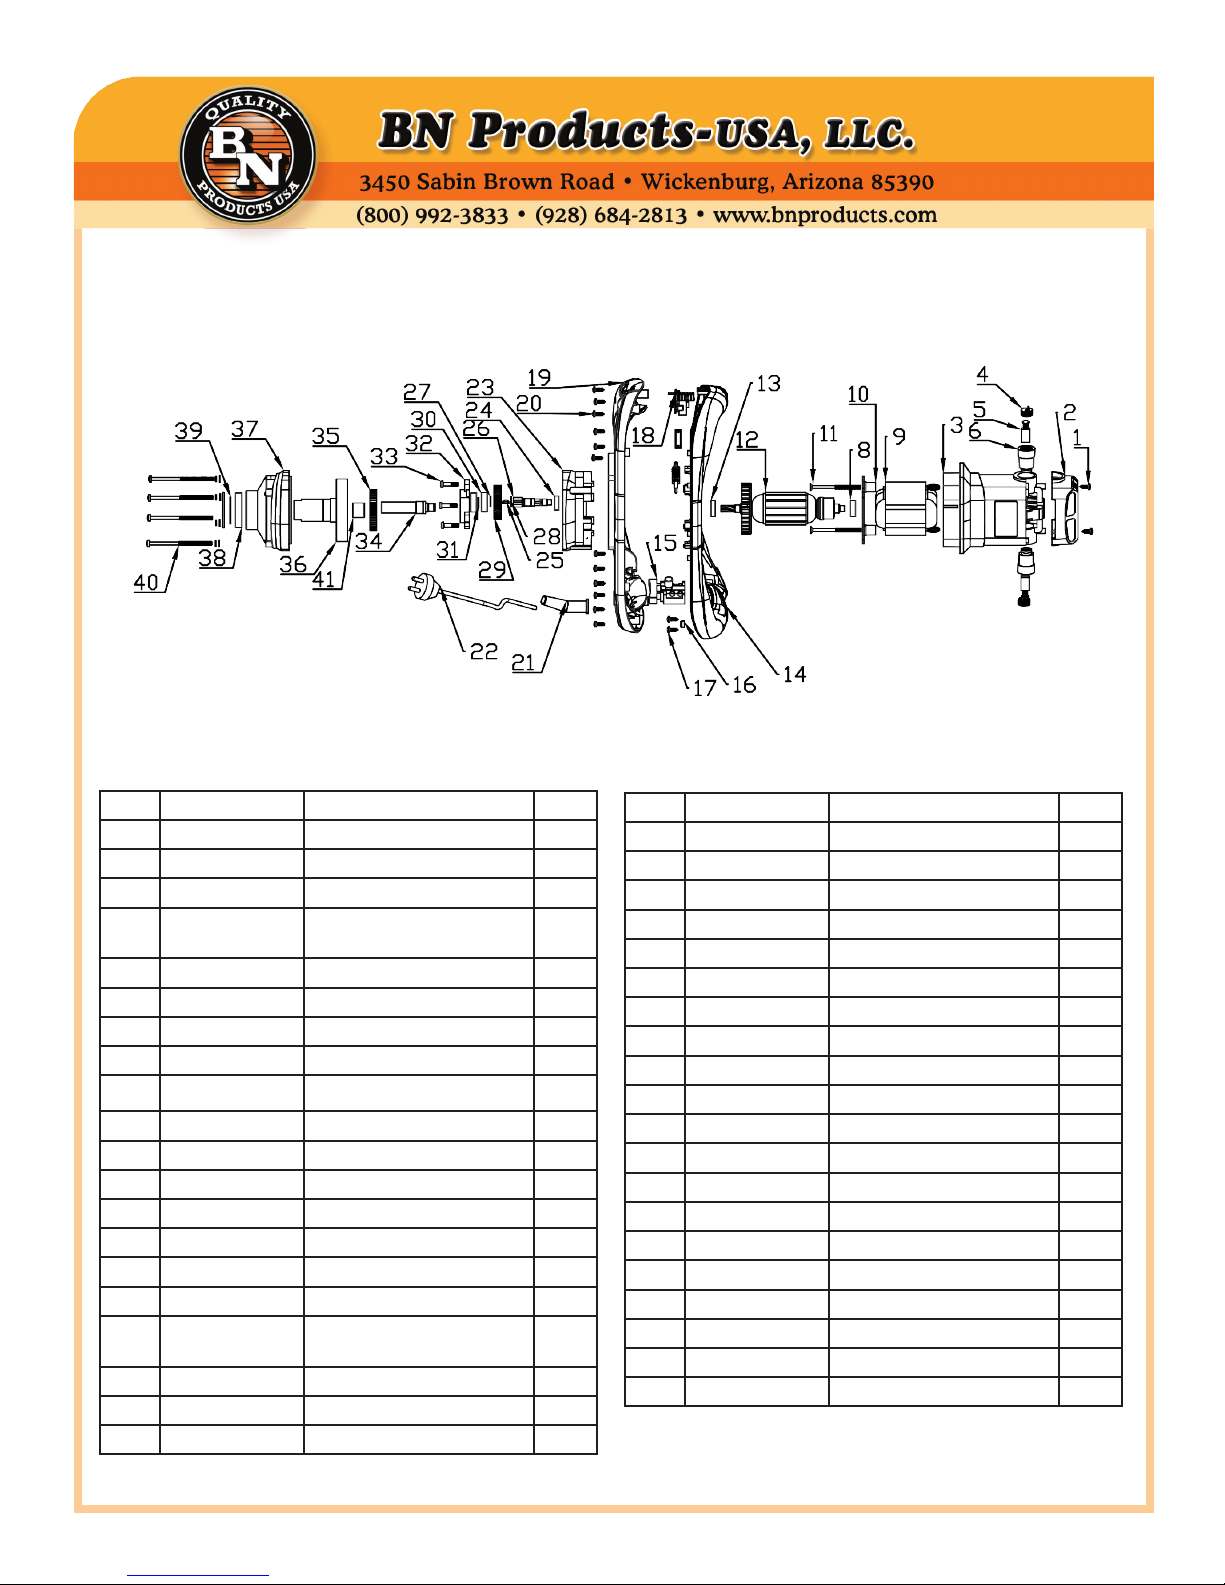
NO. ITEM NO. DESCRIPTION QTY.
1 BNR7000P-01 SCREW 2
2 BNR7000P-02 HOUSING COVER 1
3 BNR7000P-03 MOTOR HOUSING 1
4 BNR7000P-04 BRUSH COVER &
HOLDER
2
5 BNR7000P-05 CARBON BRUSH 2
6 BNR7000P-04 BRUSH HOLDER 2
8 BNR7000P-08 BEARING 1
9 BNR7000P-09 STATOR 1
10 BNR7000P-10 AIR DEFLECTOR 1
11 BNR7000P-11 SCREW 2
12 BNR7000P-12 ROTOR 1
13 BNR7000P-13 BEARING 1
14 BNR7000P-14 HANDLE A 1
15 BNR7000P-15 SWITCH 1
16 BNR7000P-16 CLAMP 1
17 BNR7000P-17 SCREW 2
18 BNR7000P-18 SPEED REGULATION
BOARD
1
19 BNR7000P-19 HANDLE B 1
20 BNR7000P-20 SCREW 12
21 BNR7000P-21 CABLE STRAIN 1
NO. ITEM NO. DESCRIPTION QTY.
22 BNR7000P-22 PLUG 1
23 BNR7000P-23 GEAR BOX 1
24 BNR7000P-24 BEARING 1
25 BNR7000P-25 KEY 2
26 BNR7000P-26 GEAR SHAFT 1
27 BNR7000P-27 RETAINING RING 1
28 BNR7000P-28 RETAINING RING 1
29 BNR7000P-29 GEAR 1
30 BNR7000P-30 BEARING 1
31 BNR7000P-31 RETAINING RING 1
32 BNR7000P-32 BRACKET 1
33 BNR7000P-33 SCREW 3
34 BNR7000P-34 OUTPUT SHAFT 1
35 BNR7000P-35 CYLINDRICAL GEAR 1
36 BNR7000P-36 GEAR RING 1
37 BNR7000P-37 BEARING COVER 1
38 BNR7000P-38 BEARING 1
39 BNR7000P-39 BEARING BUSHING 1
40 BNR7000P-40 SCREW 4
41 BNR7000P-41 NEEDLE BEARING 1
BNR7000 Material Mixer
Mixer Manual 2017.indd • May 31, 2017
Page 8
BN Products - USA
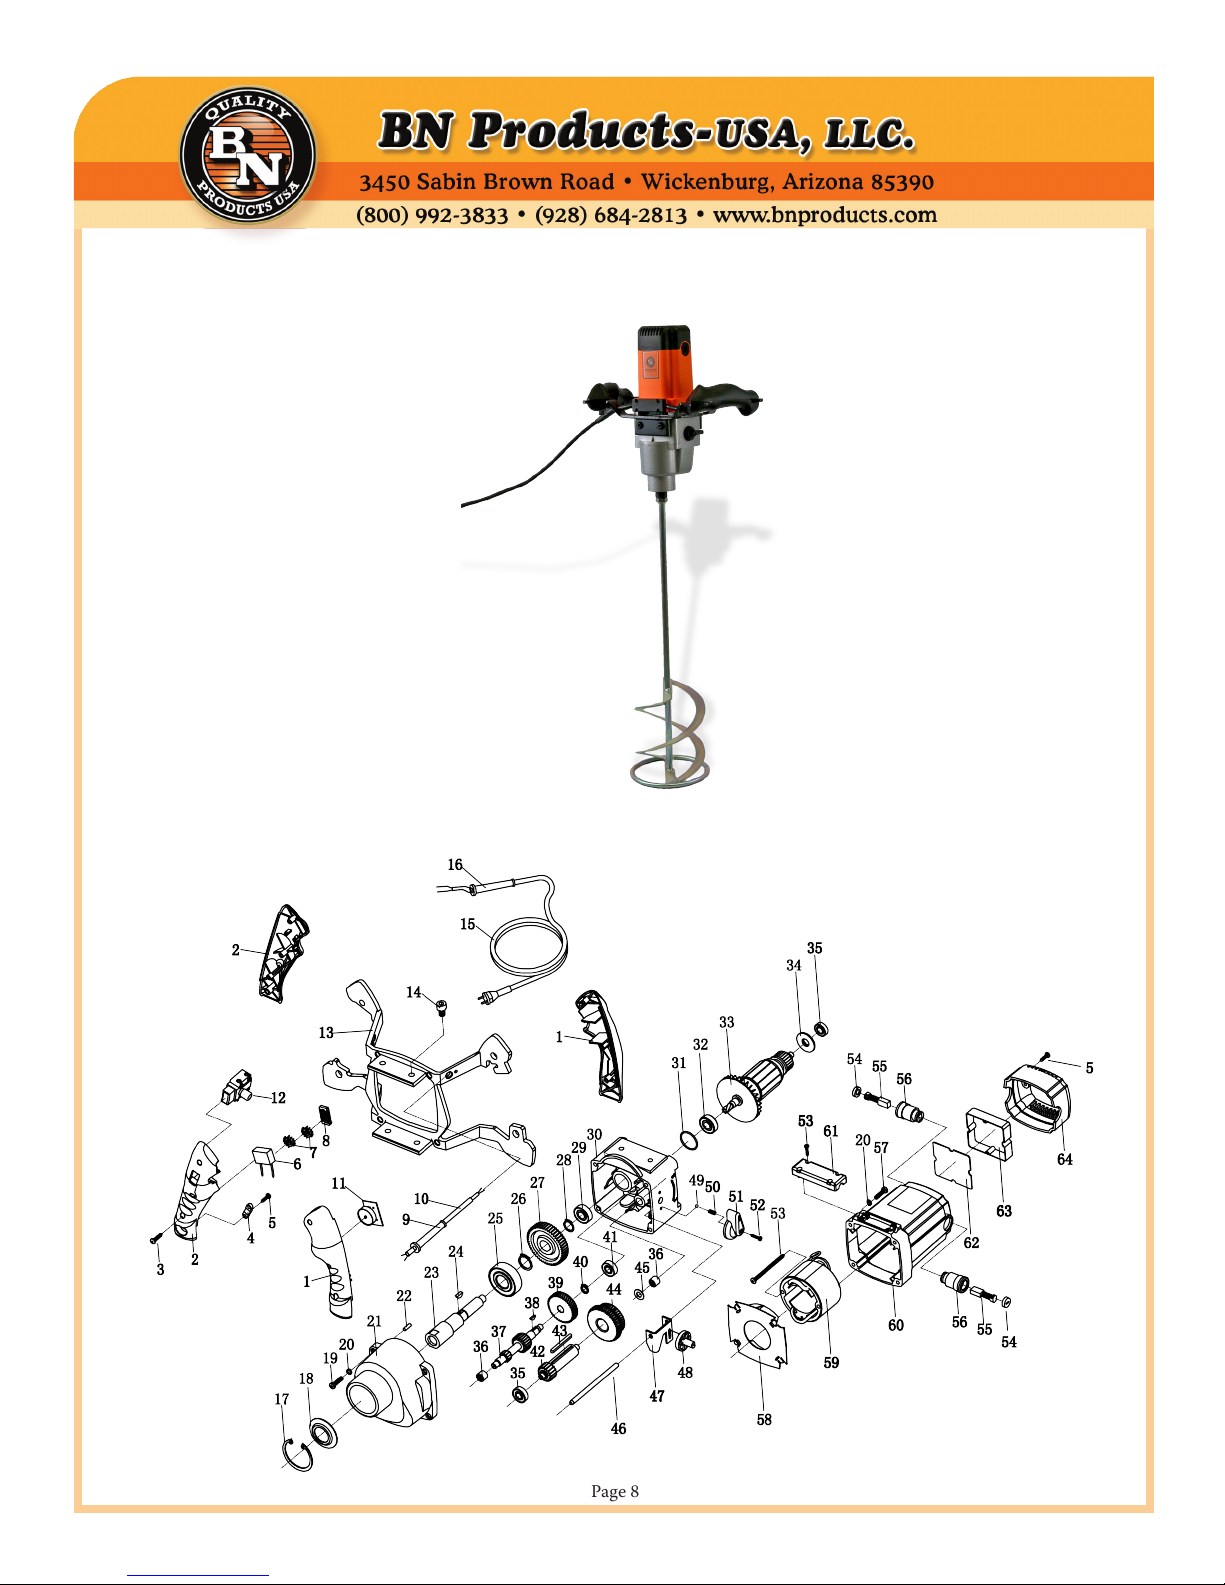
BNR6400 Material MixerBNR6400 Material Mixer
Mixer Manual 2017.indd • May 31, 2017
Page 9
BN Products - USA
NO. ITEM NO. DESCRIPTION QT Y.
1 BNR6402KP-01 RIGHT HANDLE 1
2 LEFT HANDLE 1
3 BNR6400-03 SCREW ST3.9X20 6
4 BNR6400-06 CLAMP 1
5 BNR6400-07 SCREW ST3.5X16 4
6 BNR6402K-06 CAPACITANCE 1
7 BNR6402K-08 ROUND INDUC-
TANCE
2
8 BNR6402K-07 THE INDUCTANCE 1
9 BNR6402K-08 SPEED CONTROL 1
10 BNR6402K-10 SLEEVE (MG) 2
11 BNR6402K-11 CABLE 2
12 BNR6400-02 SWITCH 1
13 BNR6402KP-13 STEEL FRAME 1
14 BNR6400-10 SCREW M8X12 4
15 BNR6400-65 CORD 1
16 BNR6402K-17 SLEEVE (BIG) 1
17 BNR6400-19 SAFETY RING Ø47 1
18 BNR6400-20 DUST COVER 1
19 BNR6400-15 SCREW M5X20 4
20 BNR6402K-21 SPRING WASHER Ø5 8
21 BNR6400-16 BEARING COVER 1
22 BNR6400-32 PIN 4*14 2
23 BNR6400-17 SPINDLE 1
24 BNR6400-18 HEMICYCLE KEY
3X3X10
1
25 BNR6400-22 BEARING 6204 Z 1
26 BNR6400-23 SAFETY RING Ø20 1
27 BNR6400-24 SPINDLE GEAR 1
28 BNR6400-25 SAFETY RING Ø15 1
29 BNR6400-26 BEARING 6000 ZZ 1
30 BNR6400-27 GEAR BOX 1
31 BNR6400-28 SEALRING Ø28*1.9 1
32 BNR6400-29 BEARING 6001 2RS 1
33 BNR6400-30 ARMATURE ASSEM-
BLY
1
34 BNR6402K-35 M INSULATION GAS-
KET
1
35 BNR6400-31 BEARING 608 Z 2
36 BNR6400-33 NEEDLE BEARING
HK0810
2
37 BNR6400-34 COUNTERSHAFT 1
38 BNR6400-35 HEMICYCLE KEY
2.5X3.7X10
1
39 BNR6400-36 MOTOR GEAR 1
40 BNR6400-37 SAFETY RING Ø10 1
41 BNR6400-38 BEARING 698 Z 1
42 BNR6400-40 THE THIRD ACTIVE
GEAR SHAFT
1
43 BNR6400-41 PARALLEL KEY
4X4X45
1
44 BNR6400-42 SPINDLE DOUBLE
GEAR
1
45 BNR6402K-52 FLAT WASHER
16*8*0.8
1
46 BNR6400-44 PIVOT Ø6*106 1
47 BNR6400-45 GUIDE 1
48 BNR6400-46 PARTIAL CORE +
ECCENTRIC WHEEL
CORE
1
49 BNR6400-48 BALL Ø4 1
50 BNR6400-49 SPRING Ø0.5*Ø3.9*L12 1
51 BNR6400-50 LEVER 1
52 BNR6400-51 SCREW ST3X16 1
53 BNR6400-53 SCREW ST5X65 2
54 BNR6400-60 BRUSH CAP 2
55 BNR6400-CB CARBON BRUSH
6.5*15*18
2
56 BNR6400-58 BRUSH HOLDER 2
57 BNR6400-55 SCREW M5X25 4
58 BNR6400-52 AIRGUIDE SHIM 1
59 BNR6400-55 THE STATOR (IN-
CLUDING THE BRUSH
RING)
1
60 BNR6400-56 MOTOR HOUSING 1
61 BNR6402K-60 CLAMP 1
62 BNR6400-61 CONSTANT POWER
BOARD
1
63 BNR6400-62 CIRCUIT BOARD
SEATS
1
64 BNR6400-63 REAR COVER 1
BNR6400 Material Mixer
Mixer Manual 2017.indd • May 31, 2017
Page 10
BN Products - USA
BNR6402K Material Mixer
Mixer Manual 2017.indd • May 31, 2017
Page 11
BN Products - USA
BNR6402K Material Mixer
NO. ITEM NO. DESCRIPTION QT Y.
1
BNR6402KP-01
RIGHT HANDLE 1
2 LEFT HANDLE 1
3 BNR6402K-03 SCREW ST3.9X20 6
4 BNR6400-02 CLAMP 1
5 BNR6402K-05 SCREW ST3.5X16 4
6 BNR6402K-06 CAPACITANCE 1
7 BNR6402K-08 ROUND INDUCTANCE 2
8 BNR6402K-07 THE INDUCTANCE 1
9 BNR6402K-08 SPEED CONTROL 1
10 BNR6402K-10 SLEEVE (MG) 2
11 BNR6402K-11 CABLE 2
12 BNR6402K-12 SWITCH 1
13 BNR6402KP-13 STEEL FRAME 1
14 BNR6402K-15 SCREW M8X12 4
15 BNR6400-16 CORD 1
16 BNR6402K-17 SLEEVE (BIG) 1
17 BNR6402K-18 PADDLE LOCKING COLLAR
SET (LEFT AND RIGHT)
1
18 BNR6402K-19 SAFETY RING Ø40 2
19 BNR6402K-20 DUST COVER 2
20 BNR6402K-21 BEARING 6203 Z 2
21 BNR6402K-22 SCREW M5X20 4
22 BNR6402K-23 SPRING WASHER Ø5 8
23 BNR6402K-24 BEARING COVER 1
24 BNR6402K-25 SPINDLE 2
25 BNR6402K-26 HEMICYCLE KEY 3X3X10 2
26 BNR6402K-27 BEARING 6002 Z 2
27 BNR6402K-28 SAFETY RING Ø17 2
28 BNR6402K-29 SPINDLE GEAR 2
29 BNR6402K-30 SAFETY RING Ø12 2
30 BNR6402K-31 GEAR BOX 1
31 BNR6402K-32 SEALRING Ø28*1.9 1
32 BNR6402K-33 BEARING 6001 2RS 1
33 BNR6400-30 ROTOR ASSEMBLY 1
34 BNR6402K-35 M INSULATION GASKET 1
35 BNR6402K-36 BEARING 608 Z 1
36 BNR6402K-37 PIN 4*14 2
37 BNR6402K-38 SAFETY RING Ø9 1
38 BNR6402K-39 REVERSE SHAFT 1
39 BNR6402K-40 SAFETY RING Ø26 1
40 BNR6402K-41 REVERSING SLIDING GEAR 1
41 BNR6402K-42 BEARING 6000 ZZ 1
42 BNR6402K-43 NEEDLE BEARING HK0810 1
43 BNR6402K-44 THE SECOND ACTIVE
GEAR SHAFT
1
44 BNR6402K-45 HEMICYCLE KEY
2.5X3.7X10
1
45 BNR6402K-46 MOTOR GEAR 1
46 BNR6402K-47 SAFETY RING Ø10 1
47 BNR6402K-48 BEARING 698 Z 2
48 BNR6402K-49 THE THIRD ACTIVE GEAR
SHAFT
1
49 BNR6402K-50 PARALLEL KEY 4X4X45 1
50 BNR6402K-51 SPINDLE DOUBLE GEAR 1
51 BNR6402K-52 FLAT WASHER 16*8*0.8 1
52 BNR6402K-53 NEEDLE BEARING HK0808 1
53 BNR6402K-54 PIVOT Ø6*89 1
54 BNR6402K-55 GUIDE 1
55 BNR6402K-56 PARTIAL CORE + ECCEN-
TRIC WHEEL CORE
1
56 BNR6400-52 AIRGUIDE SHIM 1
57 BNR6400-55 THE STATOR (INCLUDING
THE BRUSH RING)
1
58 BNR6400-56 MOTOR HOUSING 1
59 BNR6402K-60 CLAMP 1
60 BNR6402K-61 CONSTANT POWER
BOARD
1
61 BNR6402K-62 BALL Ø4 1
62 BNR6402K-63 SPRING Ø0.5*Ø3.9*L12 1
63 BNR6402K-64 LEVER 1
64 BNR6402K-65 SCREW ST3X16 5
65 BNR6402K-66 SCREW ST5X65 2
66 BNR6402K-67 BRUSH CAP 2
67 BNR6400-59 CARBON BRUSH 6.5*15*18 2
68 BNR6402K-69 BRUSH HOLDER 2
69 BNR6402K-70 SCREW M5X25 4
70 BNR6400-62 CIRCUIT BOARD SEATS 1
71 BNR6400-63 REAR COVER 1
Mixer Manual 2017.indd • May 31, 2017
Page 12
BN Products - USA
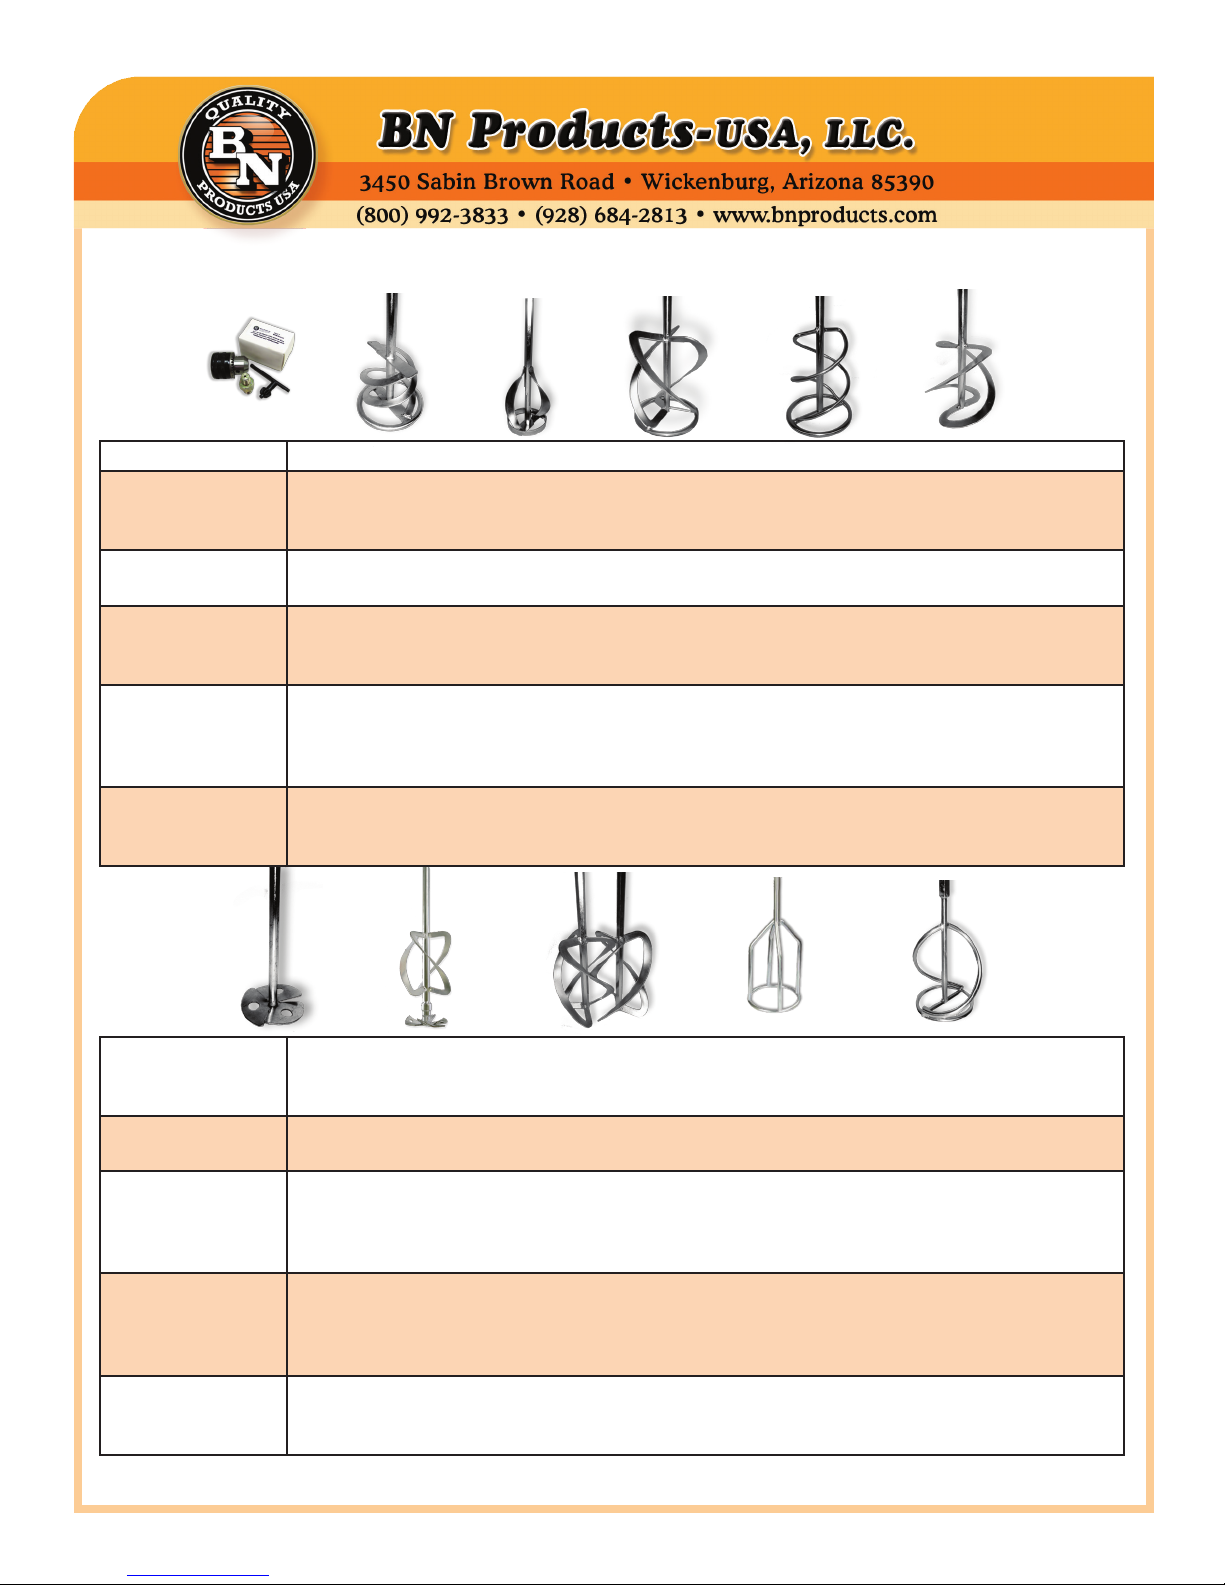
Paddles for the BN Power Mixers
BNRA0315 1/2” Drill Chuck
BNR001 -
Specify Diameter
120 mm (4.75”) or 140 mm (5.50”) or 160 mm (6.30”) • Overall length: 60 cm (24”) • Designed for
plasters, adhesive mortars, mortars, tile adhesives and fillers, best for sticky and viscous materials.
• Material Flow: Bottom to Top • Connection: M14 x 2 male threads
BNR002-57 Diameter: 57 mm (2.25”) • Overall length: 13.5” • Designed for paints, lacquers, thin coatings, and
ready-mix plaster. • Material Flow: Top to Bottom • Connection: 5/16” hex shank
BNR003-
Specify Diameter
120 mm (4.75”) or 140 mm (5.50”) or 160 mm (6.30”) • Overall length: 60 cm (24”) • Designed for
concrete, mortars, plasters, heat-insulating plasters, and epoxy resin with sand, best for heavy and
high viscosity materials. • Material Flow: Top to Bottom • Connection: M14 x 2 male threads
BNR004-
Specify Diameter
120 mm (4.75”) or 140 mm (5.50”) • Overall length: 60 cm (24”) • Designed for thinset, tile ad-
hesive, grout, adhesive mortars, ready-mix mortars, and pointing mortars, and fillers, best for
small volumes on high speed mixers. • Material Flow: Bottom to Top • Connection: M14 x 2 male
threads
BNR005-120 Diameter: 120 mm (4.75”) • Overall length: 60 cm (24”) • Designed for plasters, adhesive mortars,
tile adhesive and fillers, best for sticky and viscous materials. • Material Flow: Bottom to Top •
Connection: M14 x 2 male threads
BNR006-100 Diameter: 100 mm (3.875”) • Overall length: 60 cm (24”) • Designed for paints, lacquers, glazings,
primers, and paste, best for small volumes of low viscosity materials • Recommended to use on
BNR6169. • Material Flow: Top to Bottom • Connection: M14 x 2 male threads
BNR007-140 Diameter: 140mm (5-1/2”) • is is a special paddle that fits the BNR7000 TwinMaster Mixer™. It
turns in two directions at the same time.
BNR008-120K
Paddles sold in
pairs
left & right
Diameter: 120 mm (4.75”) Overall length: 60 cm (24”) • Designed for concrete, cement, mortars,
and grouts with aggregate less than 3/8” diameter. Also for gypsum lime plaster, fibrated aluminum
roof coatings and paints. Not for highly viscous materials. • Material Flow: Top to Bottom • Con-
nection: 13 mm or ½” Hex Shank, for BNR6402K mixer.
BNR009-Specify
Diameter
120 mm (4.75”) or 140 mm (5.50”) • Overall length: 60 cm (24”) • Designed for fillers, bitumen
coatings, joint cement, epoxy-resin compounds, and grouting compounds, best for prevention of
lump formation and lessens adding air into the mixture. Mixture flow is parallel. • Connection:
M14 x 2 male threads
BNR010-
Specify Diameter
120 mm (4.75”) or 140 mm (5.50”) • Overall length: 60 cm (24”) • Designed for gypsum-lime plas-
ter, fibrated aluminum roof coatings, and paints. is paddle can be disassembled in two pieces
and fit into a carrying case. • Material Flow: Top to Bottom • Connection: M14 x 2 male thread
This manual suits for next models
3
Table of contents
Other BN Products Power Tools manuals


